

In this chapter, we’ll examine how we can implement and make the best use of catalog software. Once again, we’ll start by outlining some general principles for setup and use of catalog software, followed by some practical descriptions of workflow. As with much of this book, the specific software offerings are more numerous than we can fully describe, and are changing pretty fast. We’ll mostly look at Expression Media as we discuss catalog capabilities, but I’ll mention Lightroom when appropriate.
This chapter presents a discussion of the tools that are in catalog software and some strategies on how to use those tools. It is difficult to provide a comprehensive workflow description because there are several different applications to choose from, and because the needs of users will be particular to the collections they manage. My main goal here is for you to see how a transparent management tool can help you prepare your image collection for a long and fruitful life.
Choosing Your Software
Managing Your Catalogs
Expression Media Basics
Expression Media Workflow
Archive Restoration and Validation
As we approach the decision to choose a software package, there are a number of things to keep in mind. I’ll lay out the criteria as I see them, discussing the various issues you should consider as you make your choice. While the options for desktop cataloging software are not huge at the moment, there are several to choose from. You’ll notice that I am only considering catalog software here, and I don’t mention browsers. While you can use the browser to perform certain tasks, I believe that it’s unsuitable for getting the maximum security and value out of an image collection.
Reference
For more information on what catalog software offerings are currently available, check out http://www.thedambook.com/.
The choice of software for the institutional collection manager is a more complicated issue. For many institutions, management of the photo archive may be best accomplished with desktop-level tools controlled by a single archivist. Approved images can be distributed company-wide with web-based tools as described in this chapter. Other institutions will require much more sophisticated enterprise-level systems like MediaBeacon, which can serve many simultaneous users. While these systems are beyond the scope of this book, it’s important that any solution can integrate with the tools described here, since the enterprise system will still need to integrate with the tools used by image creators on their desktops.
One of the most basic considerations when choosing software is the OS it runs on. I’ve tried to keep my discussions in this book limited only to cross-platform applications, which has narrowed down the number of choices. However, a user who is committed to a particular platform for the medium or long term can feel free to choose an application that only runs on his OS, as long as there is a “prenup,” as described below.
Some users may find that they need to share catalogs with users on different platforms (this is pretty common in a business environment). While there are a number of ways to run PC software on Mac hardware, it does not go both ways. Make sure that platform limitations don’t adversely impact your ability to get your work done.
One of the biggest issues I have with Apple’s Aperture as a catalog solution is that it does not offer a reasonable way to interact with anyone on the Windows or Linux platforms, nor does it offer a reasonable exit strategy if you plan to move to a different catalog application.
One of the most fundamental criterion for choosing software is user compatibility. How easily can you grok—understand and relate to—the software? There are two parts to this question.
The first part may have less to do with the software itself than with a new way of thinking. Parametric image editing is very different from pixel pushing, and using catalog software is very different from using a browser. With both PIEware and catalog software, you are not directly looking at the image, but, rather, a representation of the image. The PIEware shows you an image after it has been run through a rendering pipeline, and the catalog software can show you images that aren’t even there. Once you get what you are looking at, it’s pretty simple. Until then, it can be really confusing.
It’s hard to make a decision about the best tool to accomplish a process until you understand how that process works. Good software design can help you understand the abstract representational nature of modern imaging and how all the parts fit together. And this book should certainly help.
The second part of “getting it” will often come down to how in sync you are with the people who wrote the software; that is, how well you understand the controls they offer. How does the software feel? Do you understand the terminology? Can you find a function when you are looking for it? It will be hard to harness the full power of an application if you can’t understand the interface. The only real way to figure this out is to actually use the software for a while.
I’ve heard more than one photographer express wariness about using catalog software because they don’t want to be left hanging if the program is discontinued by the manufacturer. Nor do they want to be obliged to own that particular application forever in order to have access to the organizational work they’ve done.
My friend John Beardsworth describes a photographer’s relationship with a catalog program as “serial monogamy,” meaning that you need to be married to the application when you’re using it, even though you may divorce later and take up with some other program. If that happens, you will want to bring all your hard-won metadata with you, and not have to leave it behind. This means that the software must have a way to export the information in some usable form.
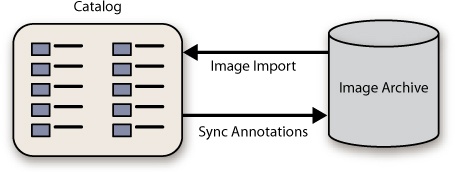
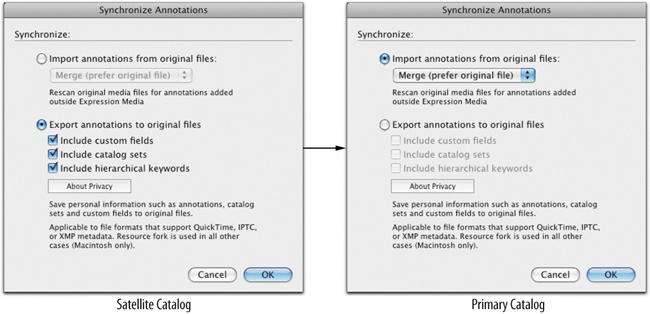
Figure 11-1. The ability to export your annotations back to the files is your assurance that you can move on to new catalog software at some point in the future.
For photographs, the best way to make your data portable is probably going to be an XMP export back into the original file (Figure 11-1). If the organizational work you do to your images can be written back to the metadata of the file, that work is portable and can be made universally accessible. Once the data is pushed into the file, moving to a new cataloging application is really easy: simply catalog the files with the new software, and all your information should be available in the new software. This might require that you copy the data from one field to another to be visible to the new program. We’ll take a closer look at that in Chapter 12.
One of the reasons I like the DNG format is that it’s very safe to use the XMP space inside the DNG file to carry the metadata. It’s a very elastic space, able to hold as much information as you like. And because there is only one place to embed any field in the file, it’s much less likely to lead to any data collisions.
There are other ways to export metadata so that you can use it in new cataloging applications, such as exporting XML data from the catalog (a big list of all the metadata for each file) or even exporting it as a tab-delimited file. Both of these bulk exports, however, require some experience working with database import/export, and can be difficult to accomplish.
There’s an extra dimension to the prenup issue if you are using cataloging software with its own rendering engine, like Lightroom or Aperture. In addition to being able to export informational metadata back to the file, I think it’s also essential to be able to export a rendering. You might have hundreds or thousands of hours invested in making your images look right, and you don’t want to leave those carefully crafted renderings behind if you want to change catalog programs.
Of course it’s possible to output all the edited files to TIFF or JPEG. This will let you bring the renderings along, but it does so at a high cost. Instead of having just one file to manage, you’ll now have multiple ones. This doesn’t just create a storage cost, but also creates a management issue. I’m unaware of any software that does a good job of keeping the files together and letting you choose between the various versions in an intelligent manner.
Once again, the DNG format can be of great use here. Since you can embed a rendering inside the DNG, it’s possible to take the renderings with you without creating additional files. You can, for instance, go from a Lightroom-based catalog to one handled by Expression Media and still see all the renderings you’ve created for the images.
Note
It gets more complicated if you move from one cataloging PIEware application to another. At the moment, only straight cataloging applications will make use of the embedded preview. No PIEware applications I’m aware of will let you use an embedded rendering for output if that rendering was made by another application. I think this is likely to change as more people create collections that have been adjusted by multiple applications. Forcing users to leave their renderings behind will eventually be seen as a bad design.
Since an increasing amount of what we do with images will be done parametrically, the ideal solution for a cataloging application is unquestionably one that includes a PIEware component, at least in the form of being able to save and restore parametric settings. PIEware depends on metadata, which is what catalogs are designed to manage and make use of. If one of the cataloging PIEware solutions can work for your collection, that’s the way to go.
At the moment, there are some pretty significant trade-offs. Cataloging PIEware developers have generally focused development more on the rendering than on the catalog, and that shows up as missing or crippled management functionality. Lightroom 2, for instance, can’t open more than one catalog at a time, which significantly limits its capability to help many users manage large collections, multiple drives, or restoration from backups.
Cataloging PIEware will inherently have a larger overhead for storage and other computing resources. The work it does to create image previews will require processor time to generate, and will then require more space to store. Catalogs grow large and are slow to transfer or back up. If you are unlikely to readjust the bulk of your archive with any frequency, it may be significantly easier to use regular cataloging software to manage the collection. Some people will find that cataloging PIEware simply falls short of what they need to manage their archives, due to issues with supported formats or other functionality. At the time of this writing, I find myself among this group.
Note
The functionality of catalog programs is always changing as products are developed and refined. I’ll outline some ways you can think about evaluating features. For more information about the current software landscape, check out www.theDAMbook.com.
Format support is a critical issue for many people managing archives. While the dedicated photo managers (Lightroom, Aperture, Bibble 5) generally do a good job of letting you work with digital camera files, most of them limit support to in-camera still images, and plain vanilla JPEG, DNG, TIFF, and PSD. Many other common file types, such as in-camera movies, some layered files, and CMYK files are often not supported. File types beyond that (PDF, Flash, Quicktime movies, text files, design documents, audio) are entirely unsupported. This will increasingly become a problem for anyone managing a photo archive, as more and more still cameras produce movies, and as you use still images to create other important documents that you must manage.
Once again, at least for the time being, we are faced with a decision between imperfect solutions. PIEware offers wonderful functionality for working with photos, but leaves out the other file types entirely. As you weigh your options, it’s important to consider how valuable these unsupported file types are to how you work with photos and other media. One feature of Expression Media that I find essential is its broad support of many file types (Figure 11-3). While Expression Media is generally thought of as a photo manager, it’s actually quite good at managing many different media file types, including audio, video, text, and more.
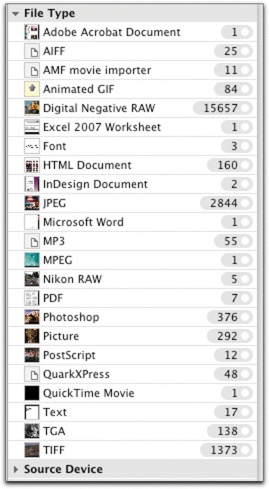
Figure 11-3. These are just a fraction of the supported file types in Expression Media. While photographs may be the principal file type most readers are concerned with, these other ones may also be important to your media collection, and need to be organized and preserved, too.
You Might Be Wondering ...
Can I Treat Other Files the Same as My Photographs?
The short answer is, yes, you can use many of the ideas in this book to manage your audio or video files. I have organized my audio files in the same way as my image file buckets (Figure 11-4), and I use Expression Media to let me know what I have and to be certain that it’s backed up. This was an important safeguard after an iTunes upgrade nuked my entire iTunes library and I wanted to make sure I had restored everything.
In fact, more and more of our lives are going to be represented as digital files on the computer, and having a catalog of that stuff is an essential part of protecting it.
Ideally, you would only need one catalog to manage your entire photo collection. You would have only one place to look to find any image, and you could group images with any other images in the entire collection. If your entire collection is fewer than 20,000 total image files, you can achieve that today. Once your collection stretches to 50,000 or more image files, however, things start to get more complicated. Some programs are limited to a certain number of records. Some programs don’t have a hard limit, but become slow and unwieldy as the catalog grows too large.
Expression Media 2 has a hard limit of 128,000 images per catalog, but also has a size limit of 1.8 GB for the catalog document itself. I have found that I can get about 60,000 files in the catalog before the catalog document gets too large, if the previews are built at low quality. Lightroom 2 has no hard limit, but you may find that the catalog gets slow and unresponsive somewhere between 20,000 and 60,000 images.
Bibble 5 (in beta as of this writing) has an interesting catalog configuration that attempts to get around the problems of limited capacity. The program runs like a shell that you can use to open the catalogs. When catalogs are open, even several at a time, they appear to the user as a single catalog. You can conduct searches across all open catalogs, and you can save results that include images from any open catalog. This ingenious solution not only addresses the problems of limited capacity of any one catalog, but it also helps with the handling needs of giant catalogs, since images can be divided into smaller groups for easier transfer and backup while still acting as a large catalog when loaded into the viewer.
Even if you’re using cataloging PIEware, you still probably need the program to play nicely with some other programs—in the photo world, that almost certainly includes Photoshop. This means your catalog software should be capable of exchanging metadata with Photoshop so that work done in the catalog can travel with derivative files throughout an image’s life. Additionally, it should be easy to send images off to Photoshop for derivative file creation. Figure 11-5 shows how you can send images to Photoshop with a right-click in Expression Media.
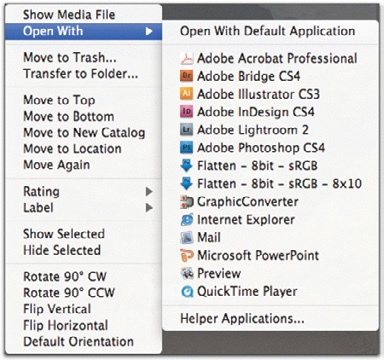
Figure 11-5. Expression Media lets you send images to Photoshop with a right-click. Just below Photoshop in the menu are two droplets—little Photoshop applets.
If you’re a power user of Photoshop and have made droplets (Figure 11-6), both Expression Media and Lightroom can send images directly there for automated processing.

Any catalog program you consider should have the capability to create useful output from your image files. This includes converting and resizing images as well as creating collections of images in web galleries, contact sheets, slideshows, movies, and more (Figure 11-7). In fact, making use of your image files is one of the most important capabilities that catalog software brings to the table.
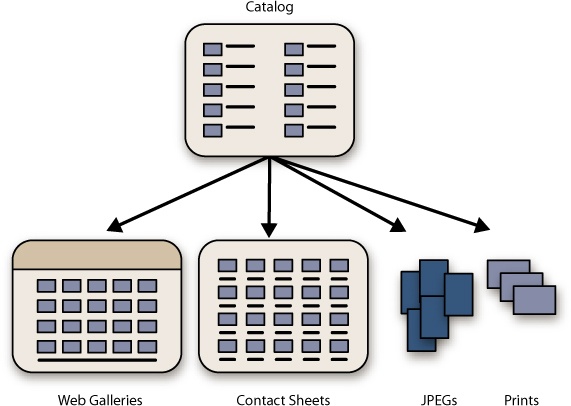
Figure 11-7. Catalog software can output lots of different types of files—web galleries, contact sheets, image files, prints, and more.
In order for output from a catalog to be valuable, it needs to be reasonably accurate, according to the intentions of the user. PIEware reproduces accurate renderings of images created in the software. With freestanding catalog programs, it can be tougher to get an accurate rendering, especially with proprietary raw files. If you edit a CR2 in ACR or Lightroom and look at it in non-Adobe catalog software, the catalog simply won’t see the edits. If you save that same file as a DNG with a full-size preview; however, the catalog can use that preview to render the file.
Note
There are several new methods that catalog software could use to check the integrity of your files, but none currently does, other than simply showing you the image. Check www.theDAMbook.com for developments.
Your catalog software should have a good feature set for managing images. This includes the capabilities to rename files, move them into folders, check for the presence of files, and, at some time in the future, check the integrity of your files.
A basic part of image management is putting the files where you want them. Your catalog program should be capable of doing this for you easily. One of my biggest issues with Aperture is that it does not expose the directory to the user for easy control of file location. You should also be able to rename folders and files if necessary.
Users need to be able to ask the program if everything is where it’s supposed to be. A catalog can provide a false sense of security because it can show you images that have been accidentally moved, renamed, or deleted. To get peace of mind, and to preserve the value of the archive, you should be able to ask the software to confirm the presence of all files in the collection.
No matter which software you’re using, there are some important strategies to employ as you set up your catalogs. The most important is to be comprehensive. The more unified your workflow, the easier things will be. Once again, if all your photos can fit in a single catalog, workflow is much more straightforward. However, if you have more images than can fit in one catalog, or multiple versions of catalogs on different machines, things get more complicated (Figure 11-8). Let’s take a look at some strategies for dealing with these issues.
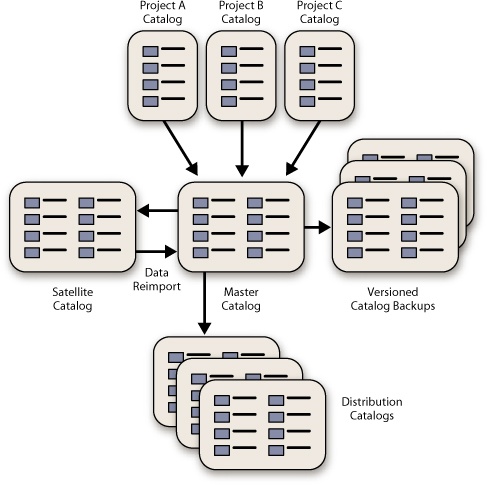
Figure 11-8. The whole flow of catalogs. This figure shows a number of different catalog types that you might find useful. We will discuss each of these in the coming section.
Note
I know I’m repeating myself, but it’s important. The fewer catalogs you use, the easier it will be to both find and manage your images. I’ve run into many people since the publication of the first edition of The DAM Book who divide their catalogs as I do, even though they have collections that would fit into one single catalog. This just makes more work for you, without adding convenience or security.
If—and only if—you have too many images for one catalog, I strongly suggest that you split your collection along some kind of bright lines (a bright line is a definitive distinction that is easy to find). You need to know with certainty which images are represented by which catalogs. This may be a division by date (all images from this year), or it might be a division by image type (all original images vs. all derivative images), or it might be some other division that works for your collection (such as all personal images vs. commissioned work). A division like this lets you more effectively find images you’re looking for, because you will know where to look.
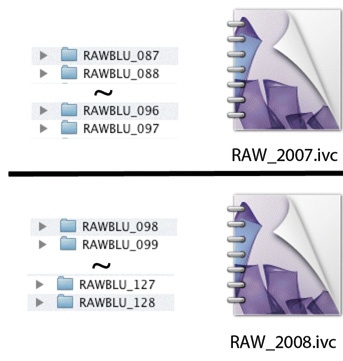
Figure 11-9. If you need to split catalogs up, make sure there is a corresponding way to split the directory as well. It will make things easier if you ever need to restore from backups.
In addition to helping you find your images more easily, tidy divisions of the collection can help you manage images more easily, as long as you make sure that there is a matching division in your directory structure. If you’re using size-limited buckets and you split catalogs by year, you should make sure you never have images from two different years in any bucket. This makes for a much more orderly restoration and revalidation of the archive should you lose a primary drive.
There are two kinds of problems we’re trying to prevent: omission and duplication. The bright line lets us know that all images of a certain type (say, photos from 2008) are included in this catalog, and that none has been omitted. If, for example, I need to restore my archive, I can say that all 2008 images are in the buckets RAWBLU-092 through RAWBLU-128 (Figure 11-9), and I can use the catalog to double-check that the archive has been fully restored.
Likewise, the bright line can help to ensure no images appear in master catalogs twice, creating unwanted branching of the work (branching occurs when multiple sets of annotations are created in different places and can’t be easily reconciled).
Tip
When deciding on a catalog structure, think about the kind of work you do, how much of it you have, and how you want to store it. Some people, for instance, can make an easy bright line distinction between images that are commissioned work and images that are personal. You might want to split these into two catalogs and keep the derivative files cataloged with each group. If you would find yourself having to pick through assignments looking for individual personal images you shot along the way, a division between client work and personal work is probably more trouble than it’s worth.
Figure 11-10 shows my master catalog folder. Each image file is in only one master catalog, so I can keep information about that file straight and avoid unnecessary duplication. Of course, this use of multiple catalogs is only a temporary workaround until I can find a program that lets me store all of this in one large catalog:
The Raw_(date) catalogs include all camera originals from that particular year (including DNG, JPEG, and in-camera movie files).
The Derivative catalog includes all derivative files in my collection—master files, delivery files, scans, and so on. It also includes the derivatives that are still in the working files folder, since they may take some time to complete.
The Camera Scans catalog includes the DNG files that are scans of my film (discussed more in the next chapter).
One technique for catalog management that helps to streamline the handling of large collections is to use project catalogs for the early part of an image’s lifecycle. I find this particularly useful for large projects, where I need to do some thorough organizing, and I want the catalog to be small, responsive, and easy to transfer (this is a particularly good technique for Lightroom users). At some point in the project’s life, you can merge a project catalog into the master catalog and manage it from there. For long-term projects, it’s possible you would manage images with the project catalog, even long after archiving the raw files. Most catalog programs offer the capability to import data from one catalog into another.

Once again the concept of the primary becomes important, at least for people who use multiple computers to work with catalog files. If you have more than one copy of a catalog, it’s pretty easy to do some work in Copy A and do different work on other images in Copy B. Neither will represent all the work you want to save with the images, so you’ll have to sort it out or end up losing something.
To ensure you don’t lose work, you should have a designated place to keep the primary copies of your catalog files, preferably in a working files folder that gets an automated backup. The primary copies of all my catalogs live on the main imaging workstation in my studio. If I want to work on the catalog with another computer, I’ll copy the catalog to the other computer. I don’t consider the work on the other machine to be actually done until it has been safely copied back to the workstation.
If I’m working in the studio with an assistant, we make it a habit to have only one copy of the catalog open at any time. It’s common to hear, “Do you have 2008 open? Can I use it?” Of course, this gets tricky if we both need to work on same catalog simultaneously. Use of project catalogs can be helpful in multiuser environments, since they allow one person to work with a shoot without locking up the Master catalog. Remember, it’s okay to have a second copy open to find stuff; the problem comes in when you both want to save your changes.
Almost any time I travel, I bring my Expression Media catalogs with me. Since the catalogs are small and easy to transfer, I can copy the Master Catalogs folder onto my laptop’s internal drive and hit the road. Let’s call this copy of the catalog a satellite copy (Figure 11-8). If I do any work to the satellite catalog while I’m out of the studio, I’ll replace the primary copy with the one from the laptop once I return.
To make sure that there were no changes in the primary catalog while I was on the road, I generally do a quick check of the catalog modification dates before replacing the catalog. If there’s any question, I’ll find out what was done in my absence.
Sometimes it’s unavoidable that work will be conducted on both the primary and satellite copies of a catalog simultaneously. Maybe I’m on the road and I need to do picture selection for a project, while Darren is back in the studio making web galleries. There are a couple of strategies you can use to unify all this work in the primary catalog at the end of the process.
If you are using a program like Expression Media that can push all the information it creates back into the image files, you can update the image files from the satellite catalog and then use the image files to update the primary catalog.
Let’s say I worked on the “Foo Camp” images in my Raw_2008_U catalog while I was on the road. When I return to the studio, I first connect the laptop to the network and export the metadata from the catalog back into the original files using the menu item Action > Sync Annotations, as shown in Figure 11-11. Once that’s finished, I go to the primary copy of Raw_2008 and import all the new annotations into the catalog using Action > Sync Annotations (in Chapter 9, we saw how you can do this in Lightroom).
Note
Proprietary raw formats are not well suited to carrying updates between catalogs, because they don’t necessarily support all XMP metadata. JPEG, TIFF, PSD, and DNG files can contain as much XMP data as you want, so they work well for this method. If you need to do this with proprietary raw, test first to make sure the data comes through.
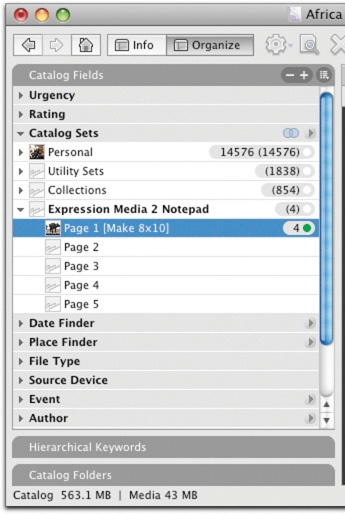
Expression Media offers a tool to export a limited set of data from a satellite catalog back to the primary version. The Notepad feature lets you create up to five groupings of images, using the menu item Window > Show Expression Media 2 Notepad. You can include these groupings in a small text file that you can export from one catalog into another. With a few clicks, the importing catalog can create catalog sets named for the comments in the notepad (see Figure 11-12 and Figure 11-13). This feature can be useful if you deliver catalogs to clients or if you want to transfer a limited set of groupings from a satellite catalog back to the primary. Note that it won’t let you move changes made to any other metadata fields from the satellite to the primary.
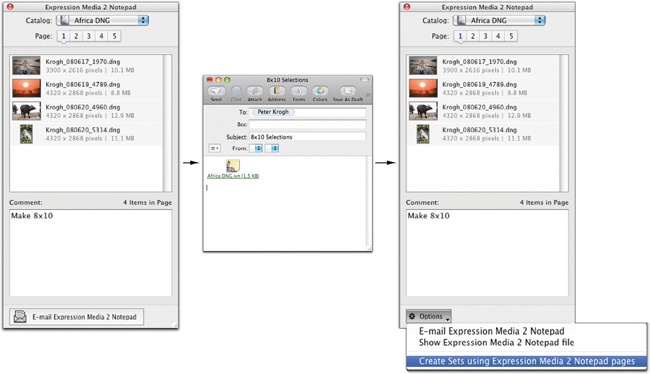
Figure 11-12. Expression Media’s Notepad feature allows you to send annotations to another person with the same catalog. You can use the comments to create catalog sets automatically, as shown in Figure 11-13.
Although desktop-class catalog software like Expression Media and Lightroom don’t offer real multiuser access (where more than one user could work on the same catalog simultaneously), many people find that they can create an acceptable workaround by using distribution catalogs, even for large multiuser groups.
In the distribution catalogs scenario, one person, computer, or department is the “keeper of the catalogs” with access to the master versions of the catalogs. On some regular timeframe (often this is an overnight operation), copies of the catalogs are distributed to people who need to have access to the image files. The people getting the distributed catalogs can search the collection by any metadata in the catalog.
Expression Media users can take advantage of the free Catalog Reader for the distributed users. The Reader lets you open but not alter the catalog. There is a Notepad feature in Expression Media (described in the previous section) that will even let users of the free Catalog Reader make groupings that an administrator can later import into the primary version of the catalog. Mark Rochkind offers a free viewer for Lightroom catalogs called LRViewer, which is available at http://www.basepath.com/.
You will have a lot work contained in the catalog documents, and you’ll want to take pains to protect it. While I strongly suggest that you create a double backup for any working files (see Chapter 6), including all your catalogs, that may not give you all the protection you need. It’s possible that a database could be corrupted or inadvertently altered in some way, and that you won’t catch the error until both of the backups have been updated with the unwanted changes.
I suggest that it’s prudent to make occasional versioned backups of your catalog data as true disaster recovery protection. You might want to do this monthly, bimonthly, yearly, or maybe after doing significant amounts of important work. You definitely want to do this before you upgrade your catalog software—even a minor upgrade release. It’s a quick and simple process. Refer to Figure 11-10; you can see that I keep a recent copy of my catalogs near the master catalogs.
I also suggest that you burn copies to DVD every so often as well. If you are using Lightroom as your cataloging program, you can get this protection for the catalog by burning the LRCAT file, even without the previews.
Digging Deeper
Extending Your Catalog Software with the Web
Most catalog software offers some way to create web galleries for image distribution. Most of these are static or “dumb” galleries (Figure 11-14). The images are created, along with some HTML, Flash, or Silverlight code, and the whole thing is uploaded to the Web. Users can browse these galleries, but most galleries don’t offer much more than that. Your friends or clients generally can’t search by metadata, nor can they make selections and save “lightboxes” (a saved group of images). While lightboxes aren’t available with galleries that are created by most catalog software, it’s possible to achieve this and more by using a web-based photo service in conjunction with your catalog software.
Digging Deeper
Web-based photo services are not well suited to managing large image collections, but are good at distributing portions of a collection. Secure, password-protected lightboxes are pretty common, even on inexpensive services. And the capability to search metadata, at least to some degree, is also common. By pushing images out of a catalog and up to a web-based photo site, you can implement distribution quickly, cheaply, and easily.
Most photo sites will have some variation of the following features, listed in rough order of importance. PhotoShelter (Figure 11-15) has all these features.
Ease of Use. Nobody wants to beat their heads against inscrutable software or web interfaces. Not me, not you, not your photo viewers.
Read metadata from files. You’ll want any work you’ve done tagging files to be available for searching. Of course, this means that you’ll want to make sure no metadata is included that you want to keep private. Usually, some portion of the IPTC is understood. Check to make sure that ratings are supported.
Resize and properly color-manage images. You’ll want the website to be capable of outputting images at desired sizes, without requiring you to upload multiple copies. The files that viewers download should also have their color profiles embedded.

Let’s take a look at how we can use a specific piece of catalog software, Expression Media 2, to manage the archive. We’ll start with some setup and program basics. Then, in the next section, we’ll see how Expression Media fits into our workflow.
You can find Expression Media’s preferences in the Edit menu on PC and the Expression Media 2 menu on Mac. There are five different panels.
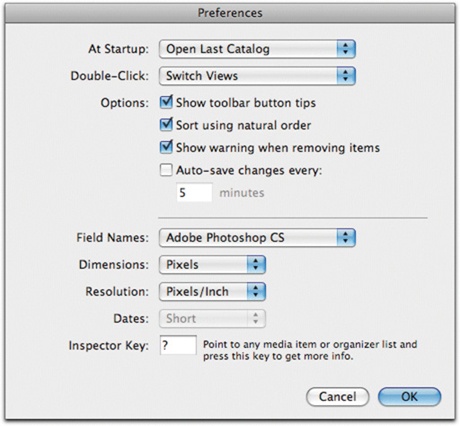
In the general preferences panel (Figure 11-16), I suggest the following settings:
Set At Startup to Open Last Catalog.
Set Double-Click to Switch Views. This is a nice way to move between thumbnails and media view.
I don’t enable Auto-save, since I often open catalogs just to look at photos and don’t actually want to save anything back to the database.
Set Field Names to Photoshop, so that the metadata field names agree with what you see in Adobe software.
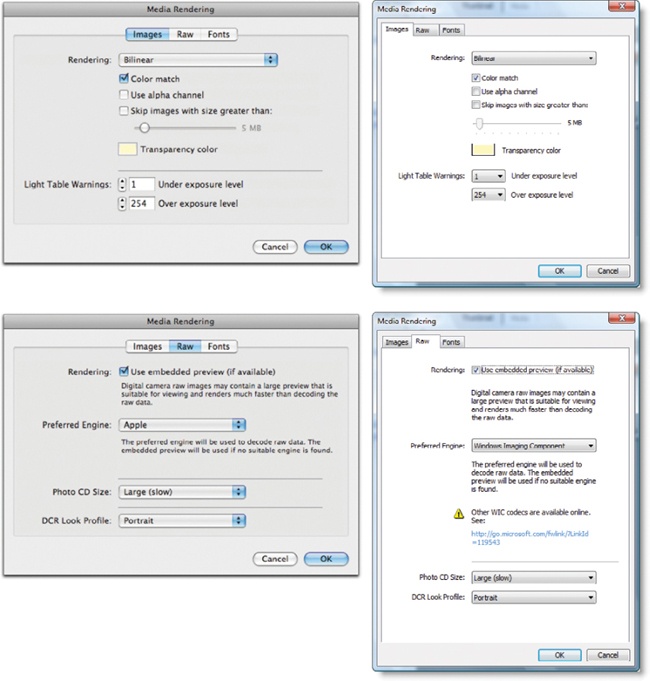
The Media Rendering preferences panel (Figure 11-17) controls how Expression Media decodes images for you. There are a number of different options here, and they are slight differences between Mac and PC. The most important are these:
Note
Expression Media uses QuickTime to render files on the Mac. It can use either QuickTime or Windows Imaging Component (WIC) on PC. Consult www.theDAMbook.com for the differences between the two and for instructions on installation.
In the Images section, make sure Color Match is enabled, so that color profiles are honored. You also might want to change the light table clipping warnings to be closer to pure black and pure white.
In the Raw section, enable the Use the embedded preview option. This tells Expression Media to use an embedded preview in the DNG rather than trying to decode the raw data.
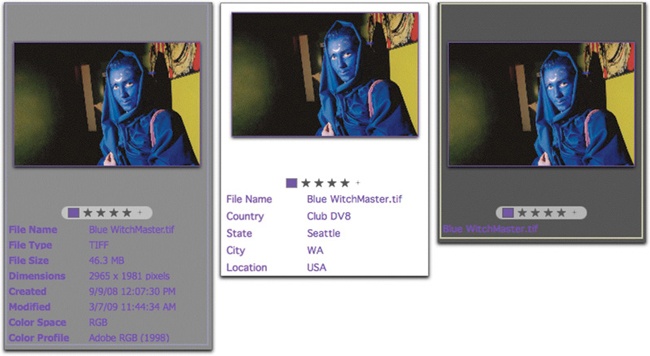
The Labels and Colors preferences panel (Figure 11-18) controls label colors and names. You’ll notice that I’ve named the first five labels for the rating stars, and that the next three correlate to my Bridge labels and even use the same colors. I like to use the labels for ratings for a couple reasons.
You’ll see that it’s much easier to pick out colors from a crowd than it is to pick out the number of stars. And for some view sizes, the stars disappear entirely. I like being able to have a quick visual indication of the highest rated images in a group. Additionally, I like duplicating my rating information in a second place. It’s surprisingly easy to select a bunch of images and accidentally change their ratings. Having the information in a second place makes it easier to get back in that event. I’ll show you a bit later how I get that information in both places.
There is a drop-down list at the bottom of the window with Import and Export options. You can save the label settings as a small XML file so that you can get the same settings easily on more than one computer, or so that you can have multiple configurations for your labels if you use them differently.

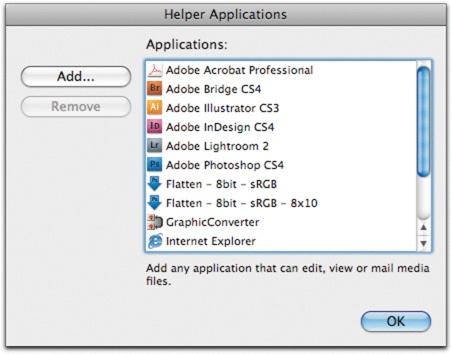
In the Helper Applications preferences panel, you can set any program on your computer to be a helper application (Figure 11-19), and you can send files to that program right-clicking and selecting Open With (or by selecting the Action > Open With menu item). Put any programs you want to send images to in here. You’ll notice that I have some Photoshop droplets in here.
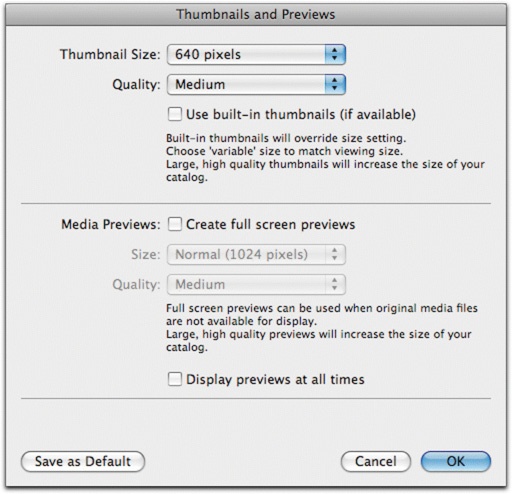
There’s one more preference to set, but it has its own heading in the Edit menu on both Mac and PC. The Thumbnails and Previews preferences let you control how thumbnails are built in the catalog—what size and level of JPEG compression is applied (Figure 11-20). I suggest you start out by building 640-pixel medium-quality thumbnails. If your catalog gets to be more than 25,000 or so images, I suggest that you change this to low quality, select all images in the catalog, and rebuild the thumbnails (Action > Rebuild).
You can also create full-screen previews, which are only really full screen if your monitor is no larger than 1280 × 800 resolution. These previews let you see a larger copy of the image when the real files are offline. They also make the catalog grow large very fast, and will significantly reduce the number of images that a catalog can contain. I generally only use these when I know I’ll need to do a slideshow from these photos and I won’t have the original files with me.
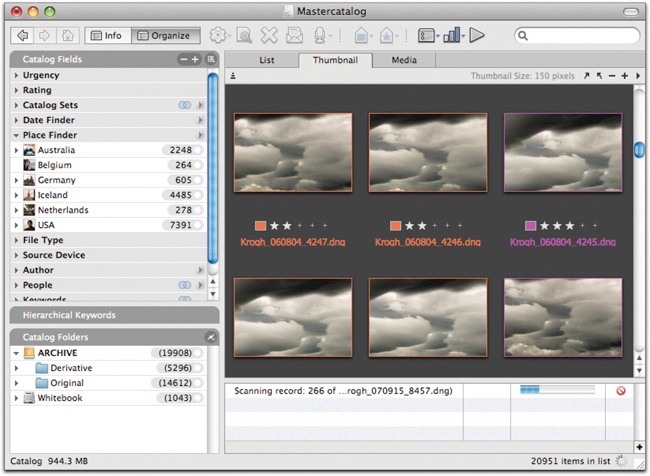
The Expression Media interface gives you an incredibly rich readout of information about your individual images and your collection as a whole. Figure 11-21 shows one configuration. Starting from the top left and moving down we see:
Navigation tools
Info/Organize panel (toggle between Info and Organize by clicking the respective buttons; in the figure, it’s shown in the Organize view)
Hierarchical Keywords that interchange with Lightroom and Bridge
Catalog Folders shows the directory structure
Size readout that shows the size of the catalog itself, as well as the shown media
Moving down the right-hand area we see:
The toolbar
View selector
File information readout of selected item—directory path, pixel dimension, file size, and format, plus thumbnail rotation and size tools
Content area, in this case, set to Thumbnail view
Image count—number of hidden files, shown files, and selected files
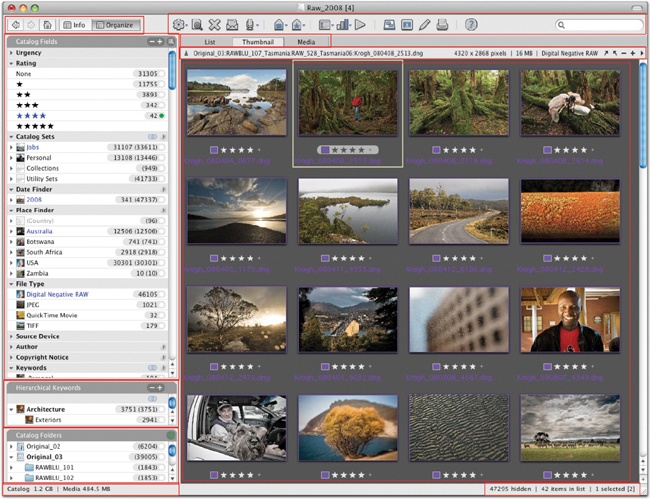
Figure 11-21. Here is one configuration of the Expression Media interface, with the Organize panel and Thumbnail view showing.
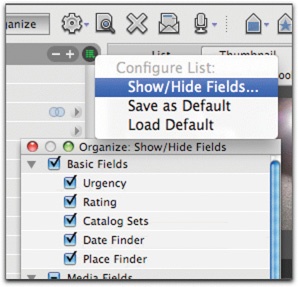
The Organize panel gives you information about your collection as a whole, including how many images share a particular annotation or trait. You can also assign metadata by dragging images to tags in the panel. Here are some tips for using the panel:
You can control which fields appear in the panel using the fly-out menu (Figure 11-21).
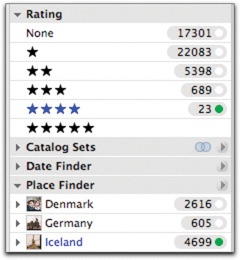
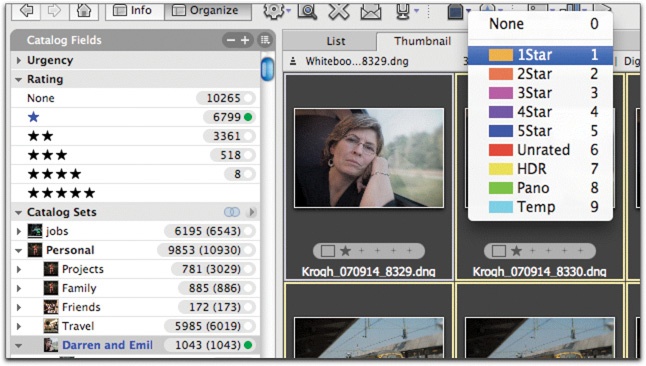
Clicking the dot at the right of the line shows those items (in Figure 11-23, all four-star images).
If a selected image is part of a group, the group name lights up in blue (Figure 11-21).
You can hold down the Ctrl key (command on Mac) and click to select multiple groups from the same field (such as all three- and four-star images).
You can hold down the Ctrl key (command on Mac) and click to select images that belong to multiple groups (such as all four-star images from Iceland, Figure 11-23).
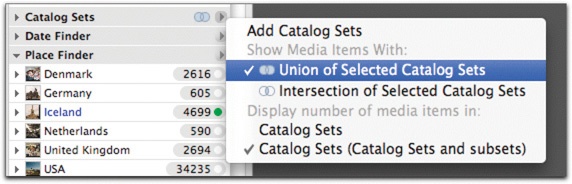
For catalog sets and keywords, where images can have multiple tags, you can choose whether multiple selections functions as “and” or “or” (Figure 11-24). Union lets you find all images with keywords Josie or Maddy. Intersection lets you find images with both Josie and Maddy as keywords.
To create new tags in a field, click on the + at the top of the Organize panel.
At the bottom of the Organize panel, the Catalog Folders panel lets you browse and control the directory (Figure 11-25):
The red question mark indicates that a folder or drive is missing. In this case, I have mounted network drive Original_03, but not Original_02.
You can click the dot on the right of the panel to show images from a folder.
In the fly-out, you can set folders to autoupdate, which will add images to the catalog as they are added to a folder. Choosing Union of Folder Hierarchies shows you all cataloged images directly in this folder and in all subfolders. The Trim Folder Hierarchy setting lets you show or hide the entire folder tree as you wish (Figure 11-26).
If an item count is in parentheses, that means items are in subfolders. If it is not in parentheses, then items are directly inside the folder.
Expression Media displays some size information at the bottom of the window (Figure 11-27). The left-hand number shows how large the catalog is; the absolute largest size it can get to in iView or Expression Media 1 or 2 is 1.8 GB. I try to never let my catalogs get above 1.5 GB. The right-hand number, Media, tells you the total size of the files that are showing. If you click on a folder, this number will indicate the size of the folder. This information can come in very handy, particularly if you are trying to make buckets of a certain size.
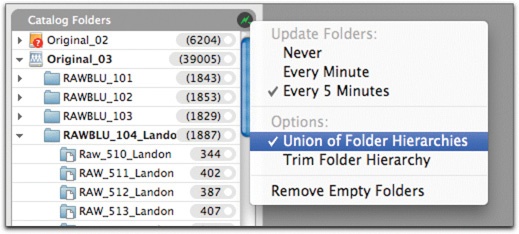
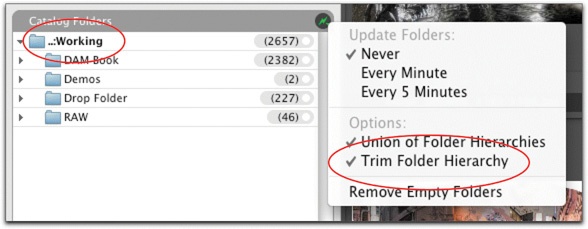
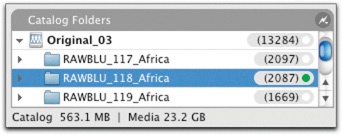
Figure 11-27. The size readouts from Expression Media. You can see the size of the catalog document (563MB) as well as the size of shown images (in this case, RAWBLU_118_Africa is 23.2 GB).
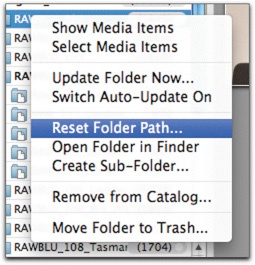
In the Catalog Folders panel, you can move images (Figure 11-28), rename folders, create and delete folders, and more. In most cases, it works just like the Mac Finder or Windows Explorer. In addition, right-clicking brings up a context menu (Figure 11-29). Two functions I use frequently here are Update Folder Now, which will add any images in the folder to the catalog, and Reset Folder Path, which I can use to tell Expression Media to look for the files elsewhere.

You can show the Info panel instead of the Organize panel by clicking the Info button at the top left of the Expression Media window. The Info panel will display lots of information about one or more selected images (Figure 11-30). Like the Organize panel, you can use the fly-out menu here to control what is displayed. You can change editable fields, like IPTC annotations, by simply typing into the fields and pressing Enter when done.
You can use Expression Media’s Info panel to apply templates (Figure 11-31). You can also create your own templates here and save them, or find any templates you’ve created in Bridge and apply those.
There are three ways to view files in Expression Media’s content area: List, Thumbnail and Media (Figure 11-32). While I do most of my work in the Thumbnail view, the others are valuable for different tasks. The List view is handy for sorting and organizing lots of images, particularly when you want to check for completeness of a particular field or need to see names of a lot of files at once. The Media view shows the images one at a time, letting you examine photos at full size.
Note
Expression Media 2 currently does not support the Mark as Copyrighted field, even if it is in a template.


Figure 11-31. Click the pencil icon at the top of the Info panel to create or apply metadata templates.
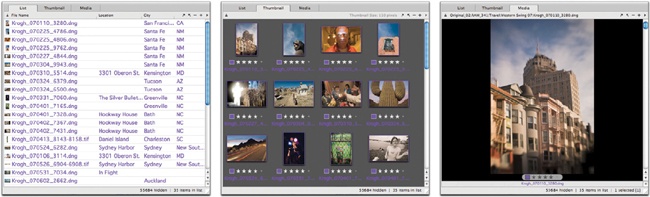
Figure 11-32. The three view options in Expression Media: List, Thumbnail, and Media. You can customize each in a number of ways.
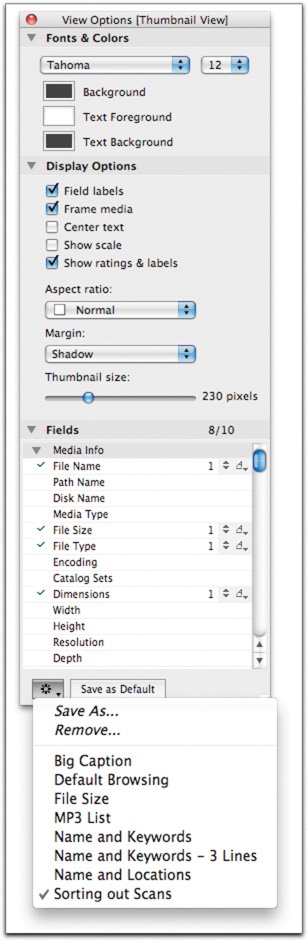
You can use the View Options dialog box to customize each of the views, choosing metadata fields to display and controlling various aspects of the appearance (Figure 11-34). Select Window > Show View Options to get the dialog box to appear. Once you get a configuration you like, you can save it as an option set that you can easily recall from the drop-down list at the bottom of the dialog box. I have several saved option sets, including one for my normal browsing, one that shows location information, and one that shows lots of information about scanned images (Figure11-34).
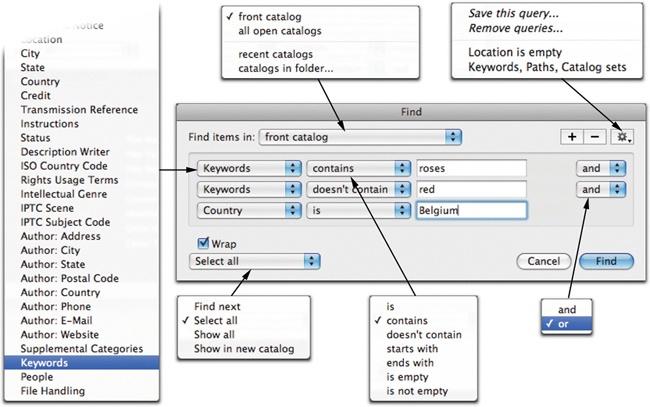
Most of the time I can find the images I’m looking for by clicking on the tags in the Organize panel, but sometimes I need to do a more robust search. The Find command in the Find menu offers a really powerful set of options for searching your collection (Figure 11-35). You can search through a single catalog or a folder full of catalogs. You can search on 80 different fields for many different criteria. You can return results one at a time, or in a large group, and you can save searches that you might want to return to.
Expression Media also lets you search through the entire catalog looking for images that are not where the catalog thinks they should be (select Find > Find Missing Items). I run this command periodically.
While new files should come in with a permanent name attached, legacy files may be named using all kinds of methods, and may need fixing. Expression Media includes lots of options for renaming, including using dates, numbers, and free text, as well as pulling strings from the original file names. One of the features I like most is that the software shows you an entire before and after list in the Batch Rename dialog box (Figure 11-36). You can inspect the new names before you do the work to change them all.
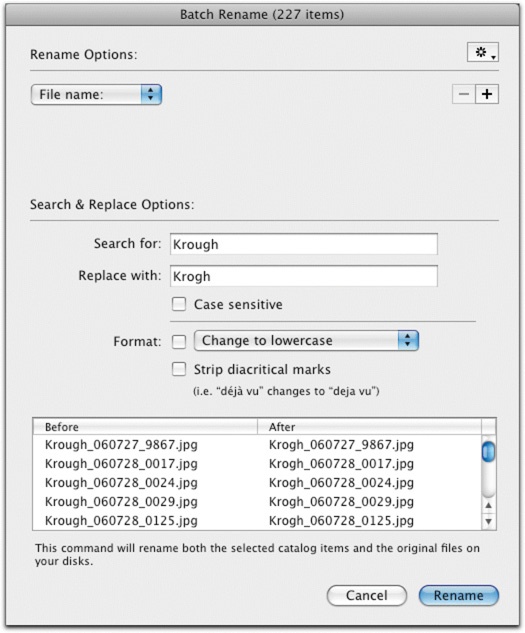
Figure 11-36. Using the Batch Rename command in Expression Media. In this case, it is correcting for a misspelling of my name but keeping the rest of the name intact. Notice the before and after list in the dialog box. One of Expression’s strengths is its ability to help you recover from your own mistakes.
We’re going to finish the workflow we started in the last chapter. When we left the images, they had been converted to DNG files, effectively closing out the working phase. We can now import into Expression Media, and do most of our work in that environment. In the following workflow, we’ll organize and proof first, and then send to the archive. You could just as easily send to the archive first, and then make your proofing output. Once we’re done with that, we’ll look at the creation of derivative files and then the restoration of the archive from backup.
If you don’t already have a catalog, you need to create one to begin. When Expression media opens, it automatically makes a new one. Save it immediately as a master catalog into the folder WorkingExpression Catalogs. Remember to save the catalog periodically. In this example, I’ll show the images coming into a catalog that has already been created.
Add images by dragging a folder to the Expression Media window, or by selecting File > Import Items > From Files/Folder. Select the folder and bring them in. If you open a metadata panel, you’ll see that tags will start to appear as Expression Media finds files with those tags (Figure 11-37). If you’ve added Location tags in ImageIngester or Bridge, you’ll see them start to appear. Once the Gear on the bottom right of the Expression Media window has stopped spinning, all the images have been indexed. Click the + at the bottom right of the window to show the progress bar.
I suggest doing most of your organization in catalog sets, since this is the most flexible kind of grouping Expression Media offers. Let’s create a set for the entire shoot right away, so we’ll be able to find it easily. You can find recently imported photos several ways. You can use Find > Show Last Import, or you can navigate to the folder in the Catalog Folders panel.
If you use ImageIngester Pro to download your images (Chapter 7), they can show up in Expression Media in catalog sets already named for the project and the client. In this example, I’ll show you how to do this manually. Let’s make a new set called Darren and Emilie Wedding inside Personal by clicking the + at the top of the Organize panel, and dragging all images to it. Next, subdivide the images as necessary, using keywords to find and select images from the subgroups of the shoot (Figure 11-38).

I said earlier that I like to use color labels to represent ratings so that I can scan for high-rated images easily. Getting this information in the labels is simple. Open Rating in the Organize panel and click on the one-star rating. Select all images and use the drop-down list in the toolbar (Figure 11-39) to apply the label 1Star to all these images. Repeat for two-star and above, if they exist. If you’ve got images tagged as HDR or panoramas, you can use the same method with the keywords.
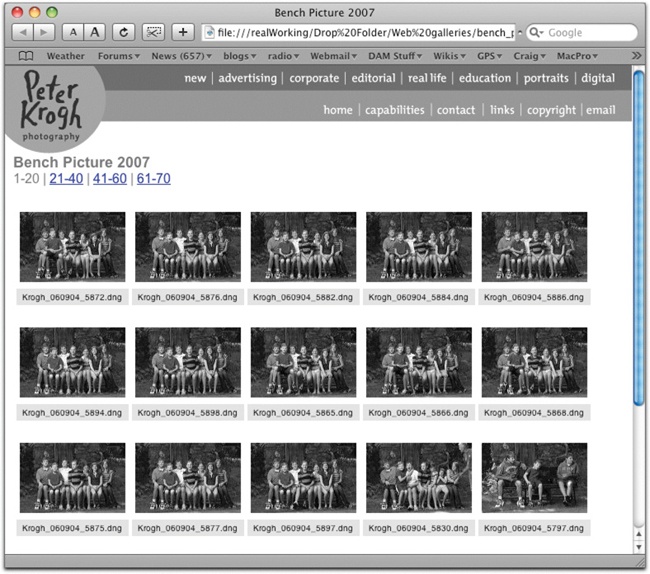
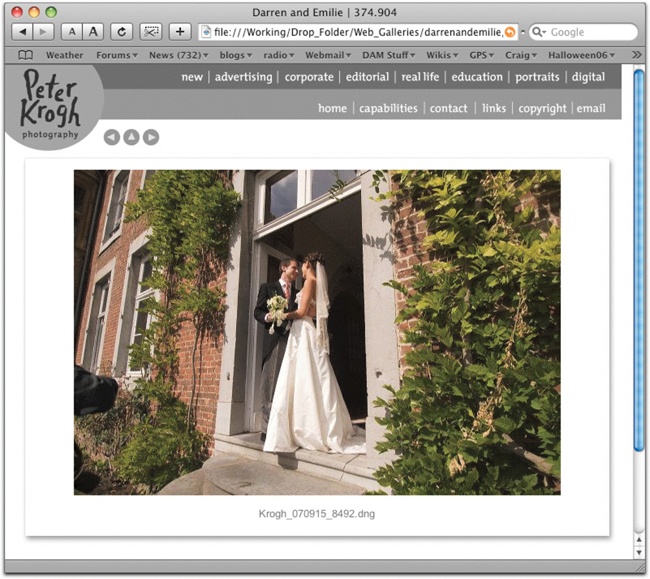
We want to make some proofs right away, so let’s make a web gallery. The web gallery will be made from one- and two-star images, so command-click (Ctrl+click on PC) to select all one-star and better images, and drop them into a catalog set you’ve created called Web Gallery. The catalog set will remember the order of the images, and that will be the order of the web gallery. For an event, it’s probably better to keep the images in chronological order. For a commercial shoot, I often choose to put the highest-rated images at the start of the web gallery. To change the sort order, select View > Sort > Rating or View > Sort > Capture Date or select images and drag them around for a custom sequence.
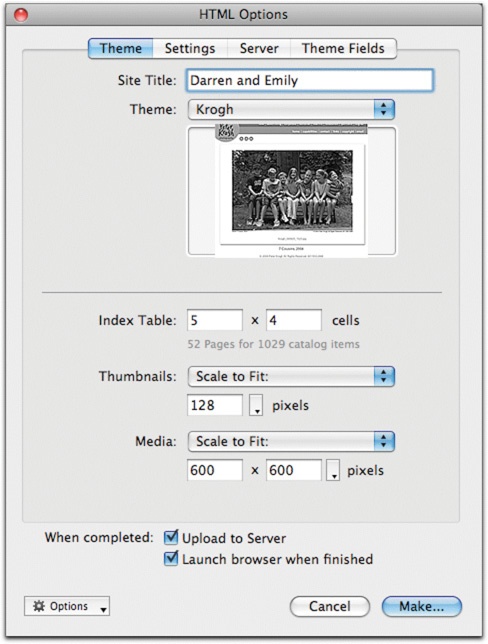
Once you are happy with the order, make a web gallery by selecting Make > HTML Gallery (Figure 11-40). You can choose how many thumbnails to put on the main page, and how large the images will be on the media page that the thumbnail links to. You can watermark the image if you like, using a TIFF you create, and you can use Expression Media’s built-in ftp uploader to send it to your web host.
I’ve created a custom web gallery template that matches the rest of my website using Dreamweaver (Figure 11-41). There are detailed instructions in the Expression Media user guide for creating custom web gallery templates. You can even include movies in your web galleries if you like.
Before you make proof JPEGs (or any other output), I suggest making a catalog set named for the output. This tells you which images have been sent out, without requiring you to go back and dig up the actual image files. You’ll see the full group of catalog sets at the end of the workflow demonstration.
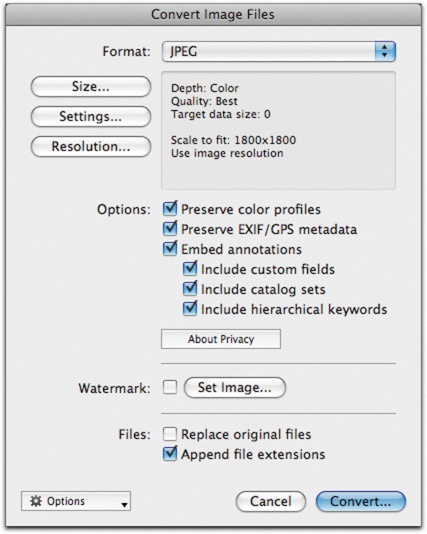
To make proof JPEGs, select Action > Convert Image Files (Figure 11-42). You can specify size, format, and compression. If you are working from DNG files, these will look nearly identical to JPEGs output from Lightroom or Bridge, but will be done in a fraction of the time. Send these images to your drop folder, and then burn to disk or upload to a lab. You can also upload the images directly to a web sharing site like Flickr, SmugMug, or PhotoShelter for online sharing.
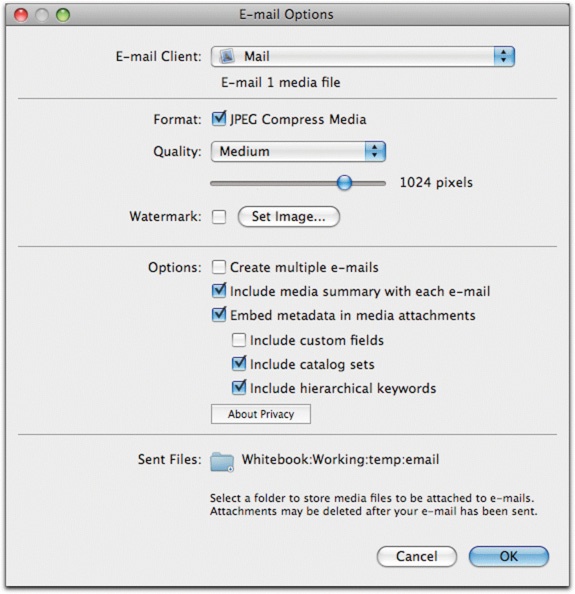
You might also want to email images. Once again, I’d suggest making a catalog set called something like “Emailed (Date)” so that you will know which images have been sent off. Select the images you want to send, and select Action > Send Email. This will create JPEG files, launch your email client, create a new email message, and attach the JPEGs. You will get some familiar-looking options in the dialog box, including resizing, metadata inclusion, and watermarking (Figure 11-43). You can also choose Include Media Summary, which extracts much of the metadata from the image and drops it into the body text of the email message.
We could have sent the image to the archive before proofing, but I wanted to show you the fun stuff before doing the housekeeping. There are a handful of things we want to do to archive the photos—collect them into buckets, do a validated transfer to the archive drive, and reset the folder paths for the catalog. Let’s take a look.
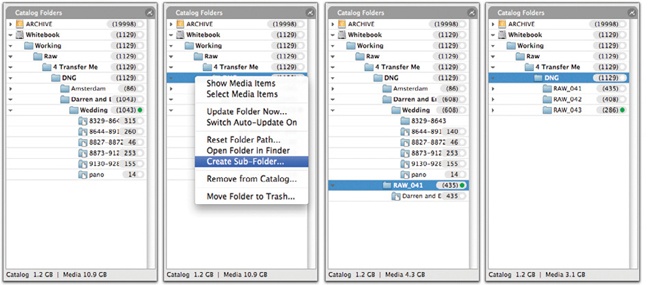
We’ll use the tools in the Catalog Folders area to create buckets. We need to make the bucket folders and then transfer the images in so that no folder is larger than the DVD bucket size (Figure 11-44). Of course, Blu-ray would simplify this considerably—all images would go in one bucket. When you click a folder (or any other grouping in the Organize panel) the program calculates the size of the shown items. This is displayed directly below the Catalog Folders area, to the right of the Catalog size.
Once the images are put into buckets, you can transfer them to their permanent home on the archive drive. I set up a staging ground for the DNGs that are outgoing (the DNG folder in the Transfer Me folder) and a staging ground for the incoming files (the Incoming folder on the Archive drive), as shown in Figure 11-45. This makes the process easier to set up and validate. If you are saving your proprietary raw files, you can do the same kind of validated transfer with them (Figure 11-46).
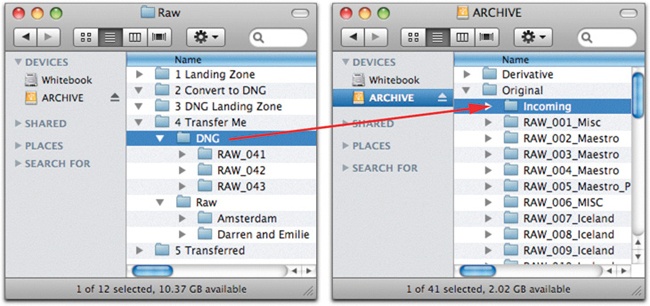
Figure 11-45. By using staging folders for both outgoing and incoming folders, you have a more repeatable, easy-to-validate process.

Figure 11-46. If you’re gong to save your proprietary raw files, you can do the same kind of validated transfer with them.
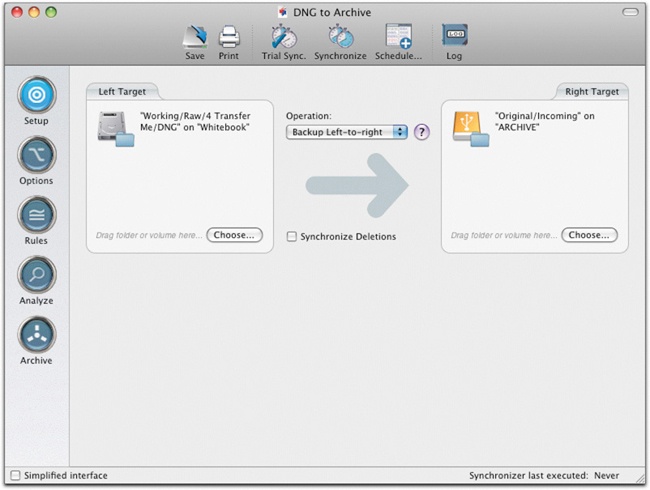
I use a backup program, Chronosync, to manage the process of copying the images to the archive on Mac, (Syncback on PC), including performing a bit-for-bit compare of the source and destination files (Figure 11-47). This gives me total confidence that the files have transferred properly.
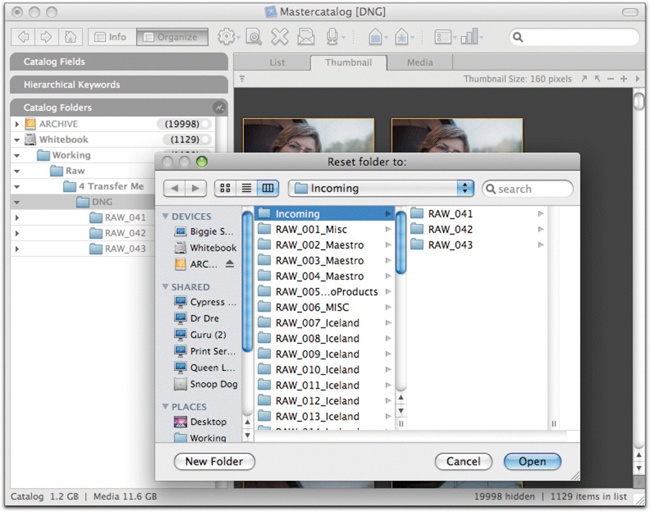
Once the images are in the archive, we can reset the folder path to point the catalog to the permanent home. Right-click the folder of outgoing images on the working drive, and select Reset Paths. Find and select your Incoming folder on the Archive drive (Figure 11-48). This tells Expression Media to pay attention to the files on the archive drive, rather than the ones in the working folders, which are going to be erased shortly.
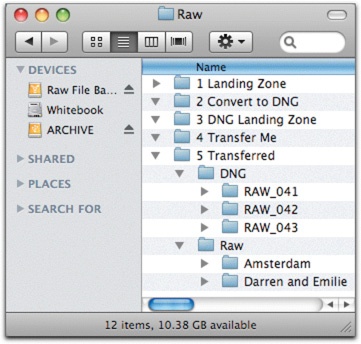
You can move the images in the Transfer Me folder to the Transferred folder (Figure 11-49) until they have gotten their 3-2-1 backups in their permanent homes. By using this holding folder, you continue to protect the images as working files until you are certain that the archive copy have been fully backed up. Once that’s happened, you can erase the images from the working folder.
Note
Synchronize metadata to the DNG file before opening into Photoshop, and the new master file will inherit all the metadata created in Expression Media, including the catalog sets.
After sending web galleries out for proofing, I generally get a master file print order. This request means that I need to open the images into Photoshop and make the best possible version of the images I can. I’ll first make a catalog set that indicates which ones are to be made into master files, and then right-click and open the files in Photoshop, going through ACR once again to tweak settings on these important files (Figure 11-50).
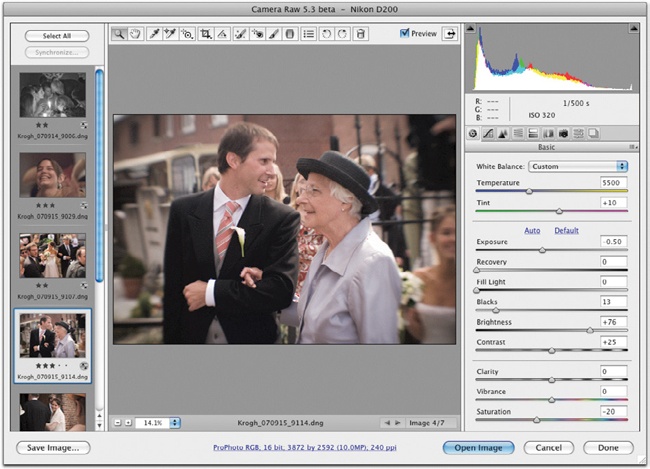
Figure 11-50. Right-clicking and sending the images to Photoshop will send the DNG files back through ACR for final tweaking on the way to Photoshop.
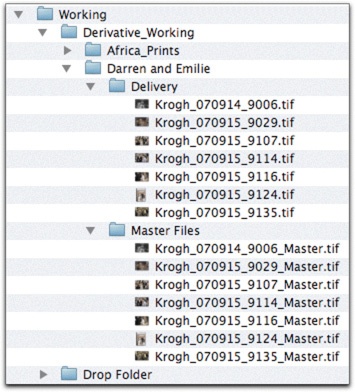
Figure 11-51. As I make master files, I keep them in the working folder until they are finished. I then make flattened delivery files to print or send out. All these get archived and added to the catalog.
I’ll save the master files in a folder in the working files folder until I feel like they’re finalized. Once they are ready for delivery, I make flattened versions of the files to send off (Figure 11-51). This entire group of images will be transferred to a bucket structure for derivatives, and the images are cataloged. If you have one master catalog, the images are cataloged with that. Since I use a different catalog for my derivatives, the images are cataloged separately from the DNGs.
The method I use to transfer derivatives is similar to the one I use for originals.
I collect them in a bucket until it’s full.
I then do a validated transfer to the derivative bucket archive.
I keep them in a Transferred folder inside the working folder until the archive has gotten its 3-2-1 backups; I then erase them from the Transferred folder.
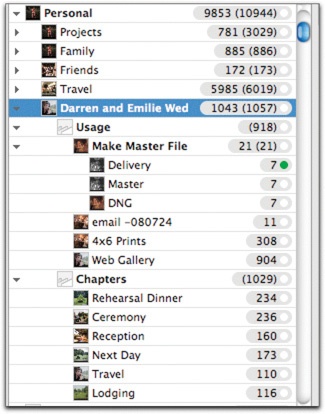
Figure 11-52. Here’s what a shoot might look like at the end of the process, when viewed in catalog sets.
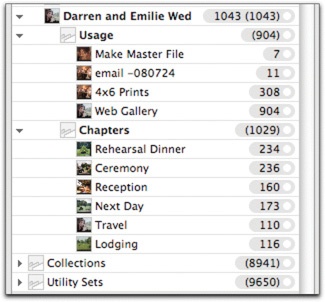
At the end of my work with a particular shoot, I have a record of which images I sent out, and which ones I made into master files inside my catalog sets. If originals and derivatives are cataloged together, you can end up with something that looks like Figure 11-52. If you catalog the derivatives and originals separately, you get something that looks like Figure 11-53. The Make Master File set tells you that there is a master file over in the derivative files catalog. Because the master files have inherited the metadata from the DNGs, they show up in my derivative files catalog with catalog sets that are identical to the ones they have in the Raw catalog (Figure 11-54).
Sometimes I’ll want to rework my DNG files. This can be because I archived them with a proofing adjustment I’m not happy with, or because new software now lets me make a better version of older files, or maybe because my tastes in image adjustment have changed. In any case, this presents a special problem for someone using a catalog program that is not the PIEware you to use to adjust the images.
While it’s no big deal to send the images back through ACR and make changes, those changes won’t be part of your backup of the images. Eventually, you’ll have lots of changed files, and you won’t want to lose the changes in the event that your primary hard drive crashes. You have a couple of choices to back up this work.
You could sync the primary to the backup drive, propagating all changes to the backup files. As I’ve said before, this has the undesired effect of making your backups less secure for those files most in need of security—those files that are valuable enough to warrant the new work, and that are most subject to some kind of corruption being transferred from primary to backup.
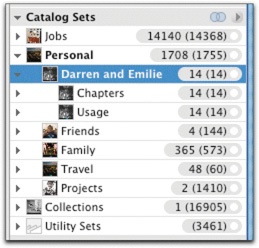
Figure 11-54. The images show up in the derivative catalog with the same catalog sets structure they have in the catalog of original files.
My own preferred solution is to send the files through a special Lightroom catalog whenever I rework an image. This keeps all the rendering updates confined to a single catalog, so I can back up all my changes, simply by backing up this one Lightroom catalog. Here’s how it works:
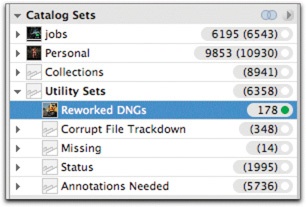
Figure 11-55. When you rework the develop settings in the DNG files, make a note of it in the catalog sets so you’ll know which ones to update and can restore the settings if your archive drive fails.
Select the images to work on and add them to a catalog set called Reworked DNGs, (inside my Utility Sets group, as shown in Figure 11-55).
Sync annotations to the image files.
Launch the Reworked Images Lightroom catalog.
Choose Action > Open With > Lightroom 2 and import the images into Lightroom.
Adjust the images as desired.
In Lightroom, export metadata and previews back to images (Metadata > Update Metadata and DNG Previews). Close the Lightroom catalog.
In Expression Media, select the images and choose Action > Rebuild Item.
If one of your hard drives dies, you will want to restore the information to a new drive from the backup. What does the recovery process look like, and how can cataloging software help you get back up to speed quickly?
You will need to figure out which files should be on this reconstructed drive, then put them there and validate that all files are present. After that, you’ll want to restore any parametric image edits that you made since backing up the archive. You can then use catalog software to restore any organizational metadata to the primary archive. Cataloging software will help us do all of this quickly and with confidence.
Here’s how to restore using Expression Media:
Find your most recent catalog(s) and make duplicates immediately (you are backing these up, right?). These documents will represent your collection at the time that the catalog was last saved (hopefully this is recent). It will include a lot of information you will want to use to help reconstruct the failed drive. By saving a separate copy of the catalog at the start of the process, you can double-check the archive at the very end.
Expand the directory listing in the catalog. You can see how your drive was structured, which bucket it started on, and which bucket it ended on. This will help you figure out which files to load onto the new drive.
Get a new hard drive and load the buckets back onto the drive.
Open the catalog in Expression Media and make sure the buckets correspond to the list in the Catalog Folders area. If you need to reset paths in the catalog to point at the new drive, do that as well.
Run Find Missing Items and make sure everything is there. Reconcile any missing items by checking other backups.
Open your Reworked Images Lightroom catalog, if you use one. Check that all folders are present. Right-click each folder to make sure all images have been found. Select all images that are part of the restoration, and export metadata and previews to the files.
Go back to the Expression Media catalog and export metadata to the files.
Open your precrash catalog and make sure that the numbers of images in folders correspond between the old and new catalogs.
Check the integrity of the image files. You can create a new Expression Media catalog, run the files through ImageVerifier or the DNG Converter, or catalog with Lightroom. Check for any errors that are flagged by the program. If you are using Lightroom or Expression Media to help confirm, do a quick visual inspection of all images, looking for obvious errors.
Check the status of the backup files. This would be a good time to check the integrity of other backups.