Appendix A. Installing QuickBooks
QuickBooks’ installation procedure seems to gain or lose a few steps—and clicks of the Next button—with each new version. Still, you only have two basic options: install the program from scratch or upgrade from a previous version. When you upgrade, you can run both versions on your computer at the same time, which is essential if you’re an accountant or bookkeeper who works with company files from several different clients. But if you use QuickBooks to run your own business, there’s not much point keeping two versions around. Once you open your company file in a new version of QuickBooks, it won’t run in the earlier version (see the box below). Either way, this appendix walks you through the installation process.
This appendix also tells you how to install QuickBooks 2010 on a company network (Before You Install). If, like most businesses, you have several people who can access a company file at the same time, everyone has to run the same version of QuickBooks, so prepare to spend the time installing the program on all those machines. You’ll also learn where on a network you can store your company file—and which location to choose for best performance.
Note
You don’t have to pay list price for QuickBooks ($199.95 for a single license of QuickBooks Pro; $399.95 for a single license of QuickBooks Premier). Your local office supply store, www.Amazon.com, and any number of other retail outlets usually offer the program at a discount. (If you buy QuickBooks from Intuit, you pay full price, but have 60 days to return the program for a full refund.) In addition, accountants can resell QuickBooks to clients, so it’s worth asking yours about purchase and upgrade pricing. QuickBooks ProAdvisors can get you up to a 20 percent discount on QuickBooks Pro or Premier, and you’ll still have 60 days to return the program for a refund.
Before You Install
Intuit recommends a 1.8 GHz processor and 256 MB of RAM for a single user of QuickBooks Pro. For a single user of Pro or Premier on Windows Vista, Intuit recommends a 2.0 GHz processor and at least 512 MB of RAM. Add another 512 MB of RAM for more than one concurrent user—but doubling the recommended RAM (2 GB at a minimum as a rule of thumb) will probably bring you closer to acceptable number-crunching speeds. You also need about 2 GB of free disk space and a 4X CD/DVD drive to install the program. (If you plan to use Google Desktop Search to search within your company file, make sure your computer is generously equipped with processing speed, RAM, and at least another gigabyte of disk space for the search index.) QuickBooks 2010 can run on Windows XP (Service Pack 2 if you want Intuit’s technical support to help you), Windows 2003 Server, and Windows Vista.
If you’re planning to use QuickBooks’ integration features, the versions of your other programs matter, too. For example, writing letters and exporting reports requires Microsoft Word and Excel 2000 or later; synchronizing contacts requires Outlook 2000 or later.
If you have several QuickBooks users, plan on upgrading everyone’s copy of QuickBooks at the same time. Once you’ve upgraded everyone, you can update the company file to the new software version. Then, have everyone make sure that they can open the company file with the new version of QuickBooks. (If you update the company file first, your colleagues won’t be able to work in it until they have the newest version of the program.)
Note
If your QuickBooks installation and registration behave differently than described in this appendix, go to the Missing CD page at www.missingmanuals.com/cds for updated instructions. Or, simply follow the onscreen instructions and don’t worry.
Installing QuickBooks
If you have a single-user license for QuickBooks, installing or upgrading the program is incredibly simple. Even on a network with a multiuser license, installing QuickBooks is mostly common sense. If you’re installing on a computer running Windows Vista, search the QuickBooks Knowledge Base (Other Kinds of Help) for instructions.
Note
In previous versions of QuickBooks, the installation wizard informed you that it was installing Microsoft .Net Framework. In QuickBooks 2010, the installation goes ahead and installs this program without a word. QuickBooks 2010 uses Google Desktop for its Search feature, but doesn’t install that program until the first time you use Search (Editing a Memorized Transaction). Then, if Google Desktop isn’t already installed on your computer, the program asks if you want to install it.
Here are the steps for installing QuickBooks:
Log into Windows as a user with administrator rights.
Windows XP, Windows 2003 Server, and Windows Vista require administrator rights to install QuickBooks. If you’re running Windows Vista, disable the firewall.
Shut down any running programs, including your virus protection programs (a good idea for any installation). Then put the QuickBooks CD in your CD drive.
Most of the time, the installation process starts on its own, and the QuickBooks installation dialog box appears on your screen.
Tip
If the installation window doesn’t appear, try using the Windows installation feature. Choose Start → Settings → Control Panel, and then double-click “Add or Remove Programs”. In the navigation bar on the left, click Add New Programs. Click “CD or Floppy”, select the QuickBooks CD, and then follow the onscreen instructions.
In the QuickBooks installation dialog box, click Next.
The installation wizard extracts the files it needs to install QuickBooks. You’ll see progress bars that give you an idea about you how long you have to wait. You’ll have time to reply to a few emails and make a few calls.
If the QuickBooks installation dialog box asks if you want to check for and download the latest installation update, leave the Yes option selected, and then click Next.
When the program finishes looking for updates, the screen tells you whether any are available. It installs any updates that it finds along with QuickBooks. On the screen that tells you whether any updates are available, click Next.
When you see Welcome to QuickBooks! screen, click Next.
The QuickBooks Software License Agreement screen appears.
After you read the software agreement carefully, select the “I accept the terms in the license agreement” option and then click Next.
You can proceed with the installation without reading the software agreement, but it’s a really good idea to make sure the agreement doesn’t ask for something you aren’t willing to provide.
On the Choose Installation Type screen, select either the Express or “Custom or Network options” option. Click Next.
The Express option sets up QuickBooks for single-user access (Switching Between Multi-User and Single-User Mode) and installs QuickBooks in C:Program FilesIntuitQuickBooks 2010. If you choose this option, the installation jumps to the screen asking for the license and product numbers—and you can continue with step 9. You can change the preference to allow multiple users after QuickBooks is up and running (Switching Between Multi-User and Single-User Mode).
The “Custom or Network options” option lets you install QuickBooks where you want on your computer, install QuickBooks and share a company file with others, or set up the computer only to share the company file (Setting Up QuickBooks on a Network).
If you’re the only person who uses QuickBooks, on the “Custom and Network Options” screen, select the “I’ll be using QuickBooks on this computer” option.
This option installs QuickBooks on your computer and sets it up for single-user access to your company file. You can change the preference to allow multiple users after QuickBooks is up and running (Switching Between Multi-User and Single-User Mode).
If you’re going to run QuickBooks and also want to store the company file on this computer to share with other QuickBooks jockeys, select the “I’ll be using QuickBooks on this computer, AND I’ll be storing our company file here so it can be shared over our network” option and then click Next.
The third and most long-winded option which begins with “I will NOT be using QuickBooks on this computer” is the one you select when you’re installing the program on a computer that acts as a file server; in other words, the computer stores your company files but won’t run QuickBooks (Setting Up QuickBooks on a Network).
Fill in the License Number and Product Number boxes with your QuickBooks license number and product number, and then click Next.
The license number and product number are hard to miss—they’re printed on the bright yellow sticker on your QuickBooks CD sleeve.
As you finish typing the digits in one box, QuickBooks automatically jumps to the next box. If you’re confident on the keyboard, you can keep your eyes on the yellow sticker and type all the digits for the license and product numbers without a break.
If you have a version of QuickBooks installed and want to upgrade that version, in the Upgrade or Change Installation location screen, select the “Replace the version selected below with the version I’m installing” option. In the drop-down list, choose the version that you want to upgrade.
The path for your current version of QuickBooks appears below the drop-down list.
If you don’t have a version of QuickBooks installed, the Installation Location Options screen appears. The only thing you can do is change the installation location.
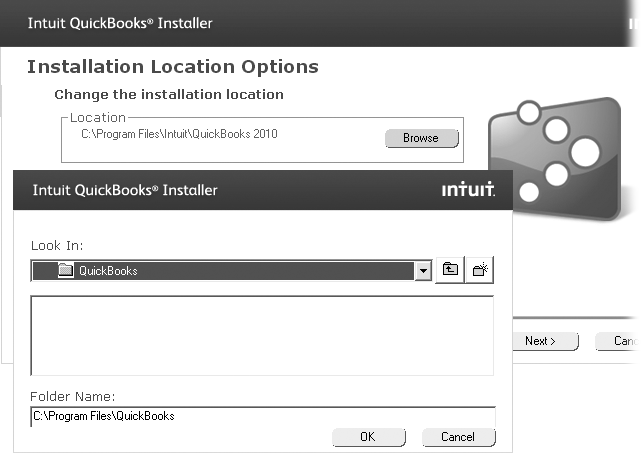
If you want to install QuickBooks 2010 without upgrading an existing version, select the “Change the install location” option. To choose a different location, click Browse (see Figure A-1 background). Select the new folder and click OK.
If QuickBooks isn’t installed on your computer, simply click Browse to change the installation location
Figure A-1. If the folder you want to use doesn’t exist, click the New Folder icon, which looks like a stylized folder with an asterisk (foreground). To view the folders one level up, click the icon that looks like a folder containing an arrow pointing up. To select a folder within the box, double-click it.When the installation location is set the way you want, click Next.
The “Ready to Install” screen appears with a summary of the program version, the license and product numbers, and the installation folder you chose. It also warns you that the installation could take 15 to 20 minutes.
If you want to change, say, the folder you’re installing to, click Back until you get to the appropriate screen and make the changes. Then click Next until you’re back at this screen.
Unless you like your desktop covered with shortcuts, turn off the “Add service and support icons to your desktop” checkbox. You can reach the same services from the Help menu with commands for contacting QuickBooks technical support (Other Kinds of Help) and ordering checks.
If the settings are correct, on the “Ready to Install” screen, click Install.
When you click Install, the CD starts whirring again and your hard drive makes busy sounds. The wizard shows the installation task it’s performing and progress bars indicate how far it’s gotten. When marketing information about new features pops up in the dialog box, you know that the installation might take some time and you can take a walk or return phone calls. (The process continues for a few minutes even after the progress bars reach the right side of the window.) But eventually, the “Congratulations!” screen appears.
If you’re ready to get to work, click Finish.
If you want some help with QuickBooks, turn on the “Help me get started” checkbox and then click Finish.
A message box tells you that you must restart your computer. Click Yes to complete the installation. To restart later, click No.
If you asked for help, a browser window opens with links that tell you how to create or update company files, set up QuickBooks for more than one user, or point you to helpful information about the program.
Running QuickBooks for the First Time
The first time you run the new version of QuickBooks, you need to take a few extra steps after you launch the program and before you open a company file. Chapter 1 takes through launching QuickBooks and opening files for day-to-day work, but the following steps walk you through the first pass:
To launch QuickBooks, double-click the desktop shortcut, or choose Start → All Programs → QuickBooks → QuickBooks <edition> 2010.
If you’re upgrading your version of QuickBooks, the program displays a dialog box asking if you want to convert your company file (Opening a Portable Company File). In the text box, type Yes and then click OK.
The program displays a message that Automatic Update is turned on automatically, which means that QuickBooks uses your Internet connection to go online and download updates.
Click OK to install updates made since the CD came out.
When Intuit releases software patches for QuickBooks (small, free upgrades to the program), the Automatic Update option downloads and installs those patches for you. But many people prefer to do these updates themselves, so they don’t get taken by surprise when the software changes. To learn about QuickBooks Automatic Update feature (and how to turn it off), choose Help → Update QuickBooks.
In the main QuickBooks window, click “Create a new company file” to create a brand-new company file.
If you’ve upgraded from a previous version, your accountant built your company file for you, or you’re restoring from a backup, click “Open an existing company file”. The first time you open any file in the new version, the Register QuickBooks dialog box asks you to register your software, which is the topic in the next section.
Registering QuickBooks
The Register QuickBooks dialog box doesn’t appear until the first time you open a company file with the new version of the program. If you’re new to QuickBooks and create a brand-new company file, the EasyStep Interview (Company Information) walks you through the entire process without mentioning registration. But when you open the file you’ve just created or converted from an earlier version, you’ll see the Register QuickBooks Now dialog box. You don’t have to register QuickBooks immediately, but you’ll have to eventually—the program runs for only 30 days unless you register your copy. In other words, Intuit doesn’t really give you a choice in the matter.
In addition to letting you run the program you’ve already paid for, registration is worthwhile for a couple other reasons: You get 30 days of free callback support from the day you first register, and you’ll receive any updates that Intuit releases. The price you pay is having to sit through online sales pitches for Intuit’s other products.
To register, make sure that you’re connected to the Internet, and then click Begin Registration.
The Register QuickBooks <edition> 2010 page appears with a phone number to call to obtain your Validation Code. When you call the number, you have to provide your license number, product number, and your telephone number to the agent.
A browser window opens to QuickBooks Registration. The first step is either creating an Intuit Account (Opening an Existing Company File) or signing in with your Intuit account User ID and password. If you haven’t provided information about you and your company before, you need to fill in a few screens of information. The fields that are required have an asterisk to the right of the field label.
In the Validation Code box, type the number that the agent gives you. Click Next and then click Finish.
Keep a copy of the license number, product number, and the telephone number you used for registration. You’ll need them if you have to reinstall QuickBooks or install it on a new hard drive.
Setting Up QuickBooks on a Network
For several people to work on the same company file from different computers, the computers running QuickBooks have to be networked together. Making this arrangement work requires a few extra—but simple—setup steps. Each user in a multiuser environment has to:
Run the same version of QuickBooks (QuickBooks 2010, for example).
Have permission to read, write, create, and delete in the folder in which the company file resides. A network administrator typically sets up each user for these permissions. If you’re responsible for getting users set up, but you never wanted network administrator as your job title, choose Start → “Help and Support” and then, in the Search box, type “Share folder” to find the instructions for sharing a folder using your operating system.
Have a valid license number and product number. You need a separate QuickBooks license for each computer on which you install the program.
QuickBooks Pro and Premier can handle up to five people accessing a company file at the same time. Intuit is happy to sell you more than five licenses for QuickBooks to install on other people’s computers, but only five of the licensed users can work on the company file simultaneously. QuickBooks Enterprise comes with 5-, 10-, or 15-user license packs and expands the number of simultaneous users to 30.
Where to Store Your Company Files
QuickBooks 2010 has its favorite spot for company files, but you can save your files where it makes the most sense for your company. For example, if several people work on your company files simultaneously, choose your storage location to get the quickest performance (and you can read how to do that on Storing company files on a network). This section explains how to choose where to store your company files.
In Windows Vista, the program automatically sets the company file folder to C:UsersPublicPublic DocumentsIntuitQuickBooksCompany Files. The folder for Windows XP is C:Documents and SettingsAll Users(Shared)DocumentsIntuitQuickBooksCompany Files. If you’re browsing through folders, the Windows XP path shows up simply as “Shared Documents”.
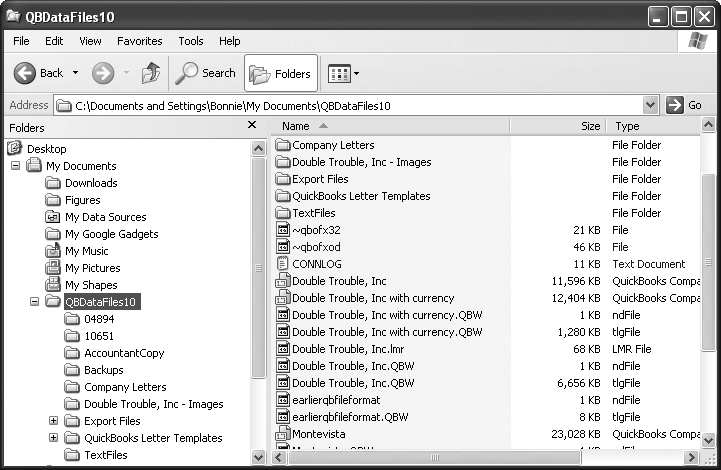
But you’re free to choose a different folder. QuickBooks lets you store your company files anywhere you like, so you may as well keep them with the rest of your documents. It also makes sense to create a folder dedicated to just your QuickBooks files. In addition to company files, you’ll probably create backup files, message templates, files that you export from QuickBooks, and files for importing into your company file. With a QuickBooks folder as a container, you can create subfolders for each type of file, as shown in Figure A-2.
Tip
If you aren’t totally at ease working with files in your computer operating system, Windows XP Pro: The Missing Manual or Windows Vista: The Missing Manual will make you an expert in no time.
Storing company files on a network
If several people work on your company files, where you store the files can determine whether the people who work on them get blisteringly fast responses or nod off waiting for commands to complete. For the best performance, store company files on the network computer with the most memory, the fastest processor, the most available disk space, and—ideally—the least amount of activity. The location of your company file depends on the type of network you use:
Peer-to-peer networks don’t use dedicated file servers, so you can store your company file on any computer on the network. The computers running QuickBooks need to use Windows XP, Windows 2003 Server, or Windows Vista.
Figure A-2. A subfolder for each type of QuickBooks-related file makes it easy to find what you want. If you save a copy of your company file at the end of each year, you can create subfolders for each year. To create a new folder, in a Windows Explorer window, first select the folder in which to create the new folder. Choose File → New → Folder, and then type a name for the new folder.On a client-server network, the company file typically resides on a file server, a dedicated computer for sharing files. Every computer on the network that has QuickBooks installed can access the company files, but one of the computers has to host multiuser access (Installing QuickBooks). Intuit recommends installing QuickBooks and the company files on the server, which has to run Windows XP, Windows 2003 Server, or Windows Vista.
However, in some cases, you can’t install QuickBooks on the computer that holds the company files (if you use a Novell file server, for instance). You have to log into the computer that you want to use as the host and open company files in multiuser mode (Switching Between Multi-User and Single-User Mode). When QuickBooks asks if you want this computer to host multiuser access, click Yes. This computer then plays traffic cop for several people working on the company files at the same time.
Tip
When you perform resource-gobbling tasks, like running massive reports or reconciling accounts, performance is paramount. On a peer-to-peer network, log into QuickBooks on the computer that holds the company files to perform these tough tasks. On a client-server network, use the fastest computer on the network.