
Hour 18. Adding Interactivity with Behaviors
What You’ll Learn in This Hour:
• What a Dreamweaver behavior is
• How to apply a behavior to an object in a web page
• How to use behaviors to add interactivity to a web page
• How to select events to trigger behaviors
Dreamweaver behaviors add interactivity to web pages. Interactivity usually requires coding in JavaScript, but Dreamweaver adds all the JavaScript for you, so you don’t have to understand scripting to use behaviors. Behaviors enable you to make something happen when the user clicks the mouse, loads a web page, or moves the cursor.
What Is a Dreamweaver Behavior?
When you add a behavior to a web page, Dreamweaver inserts JavaScript functions and function calls, enabling users to interact with the web page or make something happen. I like to think of a function as a little code machine—you send it some information, it processes that information, and it sends you a result or makes something happen. A function call is the code added to an object that triggers the function and sends it any information it needs to do its job. For instance, a popular Dreamweaver behavior is the Swap Image behavior. You actually used this behavior in Hour 16, “Adding Navigation: Navigation and Menu Bars,” because Dreamweaver adds the Swap Image behavior to your web page automatically when you use the Rollover Image object (Insert, Image Objects, Rollover Image).
When you insert a behavior, Dreamweaver writes a function in the head of the web page. The function that controls the Swap Image behavior is MM_swapImage(). Dreamweaver doesn’t call the code in that function until some event on the page triggers it; until the even triggers the function code, it just sits waiting in the head. For instance, the MM_swapImage() function is usually triggered by the onMouseOver event—the event fired when the cursor is placed over whatever object the function is attached to. When the user rolls the mouse over an image with a behavior attached, the event triggers the function, which swaps the image source with another image.
A behavior is an action triggered by an event. Or you could look at it this way:
Event + Action = Behavior
Actions are the JavaScript code, the function, which Dreamweaver inserts into a web page. Browser events are user actions that the browser captures; for example, clicking a button on a web page triggers the onClick event.
Did you Know?: Dreamweaver Terms: Behavior and Action
The terms behavior and action are specific to Dreamweaver and are not standard HTML terminology. These terms both describe prewritten JavaScript code that Dreamweaver makes available to anyone creating web pages with Dreamweaver. It works just like any other JavaScript code.
Using the Reference Books
To learn more about individual events, use the Dreamweaver Reference panel (by selecting Window, Reference). There are several reference books built into Dreamweaver. To find information about an event, do the following:
1. Open the References panel: Window, References.
2. Select JavaScript Reference from the Book drop-down list.
3. Select an event name, such as onClick, onBlur, or onMouseUp, from the Object menu.
The Reference panel displays a description of the event, as shown in Figure 18.1, including which browsers support the event (in the upper-right corner) and typical targets for the event.
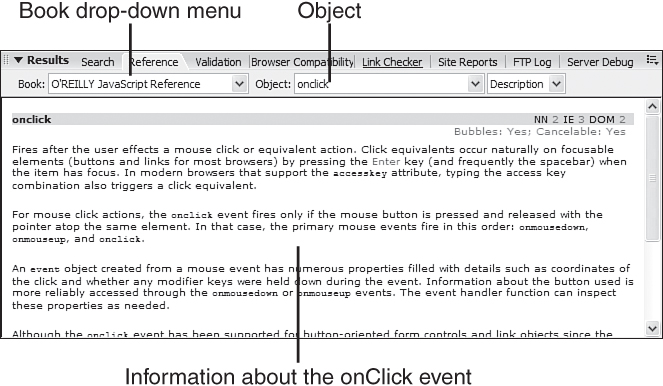
Figure 18.1. The Reference panel displays the JavaScript reference that includes descriptions of events.
To close the Results panel group that opens when you open the Reference panel, select the Close Panel Group command from the panel group menu on the far right of the panel group.
Exploring Dreamweaver Behaviors
Dreamweaver comes with many powerful behaviors that enable you to do some advanced web development without having to write JavaScript yourself. You access behaviors in the Behaviors panel (Window, Behaviors), shown in Figure 18.2. You’ll explore attaching a behavior to an object on a web page by using the Add Behavior button in a few minutes.
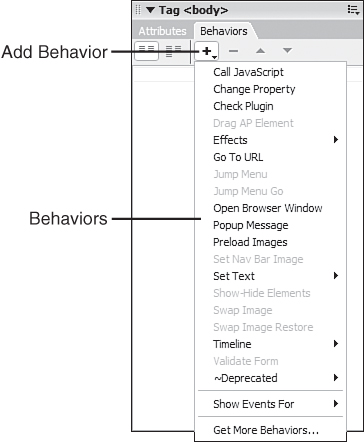
Figure 18.2. The Behaviors panel displays a list of the behaviors you can attach to the object currently selected in the web page.
A variety of behaviors comes preinstalled in Dreamweaver. Table 18.1 lists these behaviors along with a brief description of each one.
Table 18.1. Dreamweaver Behaviors
Some behaviors from previous versions of Dreamweaver use out-of-date methods or code, so Adobe deprecated them in Dreamweaver CS3. This means that you should not use the behaviors to create new objects. They have been included, however, so that you can edit existing pages created in previous versions of Dreamweaver that use these behaviors. Table 18.2 lists each deprecated behavior and a brief description of its use.
Table 18.2. Deprecated Dreamweaver Behaviors

Did you Know?: Want More Behaviors?
You can also download third-party behaviors, called extensions. You will learn more about extensions in Hour 24, “Customizing Dreamweaver.”
Exploring Events
The biggest difference among the various browsers is the events they support. When you use behaviors, you have to be aware of which browsers you are going to support. If it’s crucial that you support every browser available—on a government website, for instance—you might be slightly limited in the events available to you. Dreamweaver enables you to select various versions of Netscape and Internet Explorer because these browsers capture different events. To be compatible with the most users, choose the HTML 4.01 setting.
Dreamweaver enables you to set the browser events that it presents in the Behaviors panel based on browser versions. The Show Events For drop-down menu, shown in Figure 18.3, enables you to target specific browsers and browser versions. Depending on the selection in this menu, different events will be available. You access the Show Events For drop-down menu by clicking the Add Behaviors (+) button in the Behaviors panel.
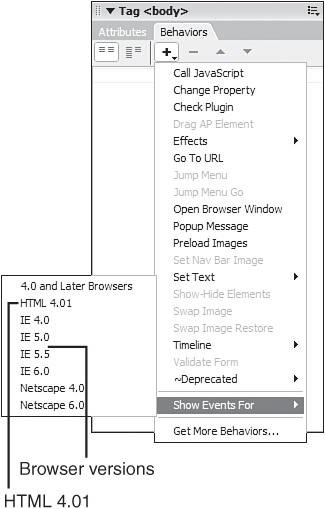
Figure 18.3. The Show Events For list enables you to choose browsers and browser versions. Only the actions and events that work with the browser and version you choose are available.
Table 18.3 lists examples of common browser events available with the HTML 4.01 setting. Although browsers capture different events, various objects also capture events. This is just a small sampling of the available events, but luckily most of the events’ names make their functionality obvious. The onDblClick event, for instance, is similar to the onClick event, except that the user clicks twice instead of once.
Table 18.3. Common Browser Events
Did you Know?: Which Event Setting Is Best?
You will have access to the largest number of events by choosing IE 6.0. However, the HTML 4.01 events offer a good standards-based compromise between a useful number of events and compatibility with almost all browsers, so you’ll generally want to choose the HTML 4.01 setting.
Watch Out!: What Happens When an Event Isn’t Supported?
If you select an event that does not work in a certain browser, users with that browser will either have nothing happen or will receive a JavaScript error.
Attaching a Behavior to an Object
You attach behaviors to objects in a web page. When you attach a behavior, Dreamweaver opens the appropriate behavior dialog box. After you’ve set up the behavior characteristics in the dialog box, select the event to trigger the behavior.
Dreamweaver inserts the necessary JavaScript into the head of the web page. It also adds code to the object’s tag to capture the event and call the JavaScript. Every time you attach a behavior, regardless of which behavior it is, follow these general steps:
1. Create a web page and save it (File, Save).
2. Select the object on the web page that will trigger the behavior; the object that the user clicks, for instance.
3. Select the appropriate behavior by clicking the Add Behavior button in the Behaviors panel and selecting a behavior from the drop-down menu.
4. Set the behavior’s properties in its specific dialog box and click OK.
5. Select the appropriate event in the Events column of the Behaviors panel.
You must attach behaviors to appropriate objects. Dreamweaver won’t let you attach inappropriate behaviors; it grays out inappropriate behaviors so that you cannot select them. You can tell which object you have selected in the Document window because the title bar of the Tag panel group displays the tag’s name, as shown in Figure 18.4. This is the panel group where you find the Behaviors panel.
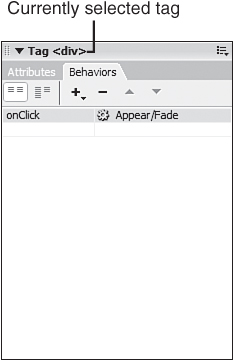
Figure 18.4. The title bar of the Tag panel group displays the tag of the currently selected object.
Watch Out!: Different Behaviors
The Behaviors panel is not the same as the Server Behaviors panel. The Server Behaviors panel works with sites that use server-side scripting, such as ASP (Active Server Pages), ASP.NET (Active Server Pages .NET), JSP (JavaServer Pages), PHP (a recursive abbreviation for PHP: Hypertext Preprocessor), and ColdFusion. The Behaviors panel uses JavaScript, which is client-side scripting and does not rely on a server.
When you add a behavior to an object, Dreamweaver adds an attribute to the HTML tag, enabling the tag to respond to the event. The attribute includes a function call to the appropriate function inserted by the behavior. For instance, the code for an image tag with the Show-Hide Elements behavior attached looks like this:
<img src="button_up.gif" width="80" height="35"
onClick="MM_showHideAP Divs('apDiv1','','hide')" />
When a user clicks the image, the AP div named apDiv1 hides.
In the rest of the hour, you’ll explore in detail how to attach a sampling of the behaviors available in Dreamweaver. We don’t have time to cover every behavior, but you’ll look at enough different behaviors to get the idea of how they all work. In this hour, you’ll explore the following behaviors:
• Show-Hide Elements
• Open Browser Window
• Popup Message
• Set Text of Container
• Go to URL
• Drag AP Element
Showing and Hiding Elements
Now you’re ready to add your first behavior. The Show-Hide Elements behavior has a name that pretty much says it all: You can use it to show or hide an element on the web page, using a div or AP div. You don’t usually apply a behavior to the object that it affects, so you’ll need to have another object on the page that triggers the behavior. For instance, you might create a hyperlink that triggers showing or hiding an AP div.
To begin, add an image or a hyperlink that captures the user’s click and hides the AP div. Dreamweaver is smart enough not to display the Show-Hide Elements behavior in the Add Behavior drop-down menu if you don’t actually have an AP div in the web page, so you’ll have to add an AP div to the page before you add the behavior. It’s important to name your AP divs when using the Show-Hide Elements behavior because the Show-Hide Elements dialog box displays all the AP divs on the page by name, so it helps for the AP divs to have meaningful names.
Creating a Null Link to Trigger the Behavior
Make sure that you’ve already defined a site in Dreamweaver and created a new web page. First you’ll create a link to trigger the Show-Hide Elements behavior. Follow these steps to create a null link:
1. Add text for a hyperlink somewhere on the web page. You could enter something such as Show the AP Div.
2. Instead of creating an active link, you’ll add what’s called a null link, which is a link to nowhere. This is just so that you create a clickable object that can trigger the behavior.
Select the text you created in step 1 and enter javascript:; in the Link box of the Property inspector, as shown in Figure 18.5.
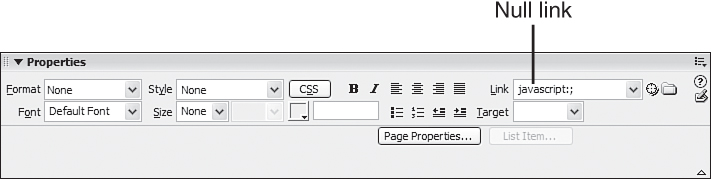
Figure 18.5. Create a null link that triggers the behavior but does not load another web page.
Watch Out!: Don’t Use # for Null Links
Some people create a null link by entering # instead of javascript:; in the Link box of the Property inspector. This isn’t a good idea because # is the named anchor for the top of the page. When visitors click a link like this, they not only trigger the behavior but they also jump to the top of the page, which may be surprising and undesirable if they’ve scrolled down to a lower part of the page.
Creating a Hidden AP Div
Next you’ll create the AP div to hide when the visitor clicks the null link you created earlier. After you’ve created the AP div, type some text into it or give it a background color so that you can actually see it in the browser. Check out Hour 17 if you need a refresher on how to insert an AP div and set its properties. To create a hidden AP div, do the following:
1. Insert an AP div (Insert, Layout Objects, AP Div).
2. Enter some text in the AP div or give it a background color in the Property inspector.
3. Select the AP div and set its Visibility attribute value to Hidden by selecting Hidden from the Vis drop-down menu in the Property inspector.
Attaching the Show-Hide Elements Behavior
Now that you have both the object that you will show and the object that the visitor will click to trigger the behavior, you are ready to attach the behavior. To attach the Show-Hide Elements behavior, do the following:
1. Click anywhere within the null link you created.
2. Open the Behaviors panel (Window, Behaviors).
3. Make sure that <a> (the anchor tag that creates a link) is visible in the title bar of the Tag panel group. This means that you have the correct object selected on the page. Always double-check the title bar to make sure that you are applying the behavior to the correct object.
4. Click the Add Behavior (+) button in the Behaviors panel, as shown in Figure 18.6. Select the Show-Hide Elements behavior. The Show-Hide Elements dialog box appears.
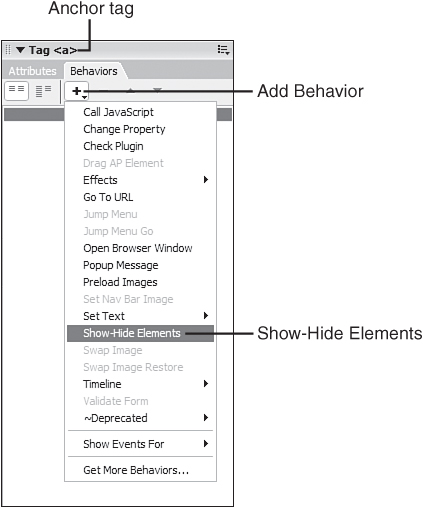
Figure 18.6. The Add Behavior (+) button drops down the Add Behavior dropdown menu, with all the available actions for the selected object.
5. The Show-Hide Elements dialog box, shown in Figure 18.7, lists all the AP divs in the page. There are three buttons: Show, Hide, and Default. Highlight the correct AP div and click the Show button. The word show then appears in parentheses next to the AP div’s name.
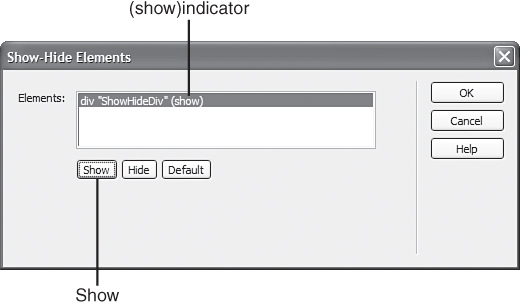
Figure 18.7. The Show-Hide Elements dialog box lists all the AP divs and enables you to change their visibility attributes.
You click the Show button to make an AP div visible, and you click the Hide button to make an AP div hidden. When an AP div is set to show, clicking the Show button again toggles show off (the same is true for the other buttons). The Default button restores an AP div to its default visibility (visible).
6. Click the OK button to save your changes.
Selecting the Event That Triggers the Behavior
At this point, you have selected half the behavior, but you also have to select the other half of the behavior: the event. When you selected the link, the Behaviors panel listed the Show-Hide Elements behavior under the Action column, and the Event column probably defaulted to the onClick event. You could use the onClick event to trigger showing the AP div, but that’s too easy! Try using the onMouseUp event instead:
1. In the Behaviors panel, drop down the Events list by clicking the arrow button, as shown in Figure 18.8. You have to click within the event for this button to be available.
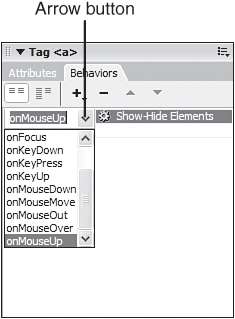
Figure 18.8. The arrow button beside the event drops down a menu containing the available events.
2. Select onMouseUp in the Events drop-down menu.
Now when users let up the mouse button, they trigger the Show-Hide Elements behavior.
Because you have set up the behavior (Show-Hide Elements) and the event (onMouseUp), you can test your work in the browser. First make sure that the AP div you set to show with the behavior is hiding (if you didn’t do this earlier). Preview the web page in the browser. Click the hyperlink and your AP div should appear!
Editing the Behavior
If you made a mistake while setting up the Show-Hide Elements behavior, you can edit the behavior in the following way:
1. Select the object that has the behavior attached to it.
2. Double-click Show-Hide Elements in the Action column of the Behaviors panel.
3. This reopens the Show-Hide Elements dialog box where you can make changes. Make changes and click OK.
Opening a New Browser Window
Use the Open Browser Window behavior to open a new browser window and display a URL. This time you will capture the user clicking an image to trigger the action. The onClick event fires when the user clicks the image. This then triggers the Open Browser Window behavior that opens a new browser window.
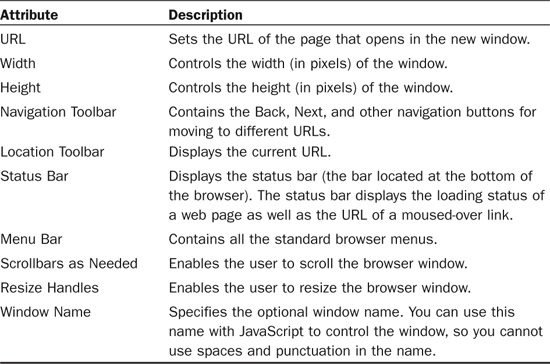
You can open a browser window at a specific size and with specific browser attributes. Browser attributes, listed in Table 18.4, control whether the browser window has controls that enable the user to navigate out of the window. You set up the browser attributes in the Open Browser Window dialog box.
Table 18.4. Browser Properties for the Open Browser Window Behavior
To have a new browser window open when the user clicks an image, follow these steps:
1. Save the web page. The Open Browser Window behavior needs the web page saved so that it knows how to build the URL that it will load in the new browser window.
2. Insert an image into this web page. Select the image, and make sure that the correct tag (the <img> tag) shows in the title bar of the Tag panel group.
3. Click the + button in the Behaviors panel. Select the Open Browser Window behavior, and the Open Browser Window dialog box appears.
4. Fill in the URL that will load in the new window. You can use a web page that you created previously or load an external web page from any website.
5. Set the width and height of the window. Check the browser attributes (listed in Table 18.4) that you want the new browser window to have. Optionally, give the window a name.
6. The Open Browser Window dialog box should look something like the one shown in Figure 18.9. Click the OK button.
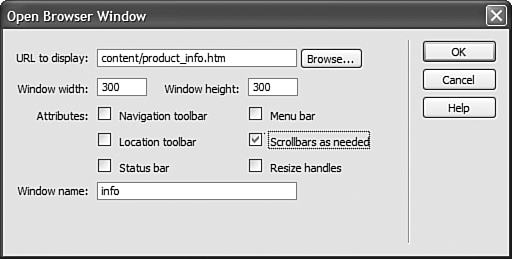
Figure 18.9. The Open Browser Window dialog box enables you to turn on or off various attributes of browser windows.
7. In the Behaviors panel, select the onClick event from the Events drop-down menu if it isn’t selected by default.
Preview the web page you created in a browser. When you click the image, your new window should appear.
Watch Out!: Pop-up Blockers Might Block Opening a New Window
Be aware that many browsers and browser add-in programs (such as the Google and Yahoo! toolbars) add pop-up blocker functionality. Although that’s great for getting rid of unwanted pop-up ads, it’s not good news for opening new browser windows. The better pop-up blockers stop only windows that open when triggered by the onLoad event of the <body> tag (you’ll learn more about that later this hour). But some block all pop-up windows, even those triggered by the user.
You might want to warn viewers that they could have to disable their pop-up blocker in order to see the information on your web page.
Popping Up a Message
Next, you’ll add an additional behavior—a pop-up message—to the same object you used to open a browser window. You can add as many behaviors as necessary to a single object. The Popup Message behavior displays a JavaScript alert box with a message. To add the Popup Message behavior, follow these steps:
1. Select the object you applied the behavior to in the preceding section. You should see the Open Browser Window behavior listed in the Behaviors panel. Make sure that the appropriate tag appears in the title bar of the Tag panel group.
2. Click the + button and select the Popup Message behavior.
3. The Popup Message dialog box includes a text box where you type your message, as shown in Figure 18.10. Click OK after typing the message.
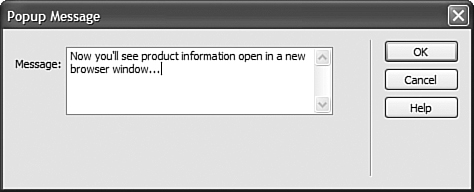
Figure 18.10. The Popup Message dialog box has a text box where you type the message that will pop up for the user.
4. Select the onClick event as you did in the Open Browser Window dialog box earlier.
Watch Out!: Don’t Use onMouseOver with a Popup Message
Make sure that you select the onClick event and not the onMouseOver event. If the onMouseOver event triggers the Popup Message action, the browser never receives an onClick event to trigger the other actions you attached to the object.
Attaching Multiple Behaviors to the Same Object
You can attach multiple behaviors to an object. One event can trigger several actions. In Figure 18.11, you can see that the onClick event triggers a number of actions. The actions happen in the order listed. You can change the order in which the actions occur by moving them with the up and down arrow buttons on the Behaviors panel.
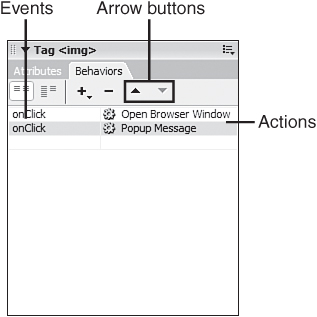
Figure 18.11. One event—for example, the onClick event shown here—can trigger multiple actions, and you can have multiple behaviors attached to a single object in a web page. You can change the execution order of the behaviors by using the arrow buttons.
Preview your web page with the two behaviors, Open Browser Window and Popup Message, in the browser. Does it work perfectly? It would probably be better if the message popped up and then the user went to the new window after clicking the OK button in the message box. You can change the order of behaviors triggered by the same event. To change the order of the behaviors, follow these steps:
1. Select the object to which the behaviors are applied. You should see both behaviors listed in the Behaviors panel.
2. Select the Popup Message behavior. Click the up arrow button to move the Popup Message behavior above the Open Browser Window behavior.
Preview your web page in the browser again. Now the pop-up message appears first. After you click the OK button on the pop-up message, the new browser window should appear.
Sending Text to a Container
You can insert behaviors that write to various objects: frames, divs (containers, links, paragraphs, or other containers), text entry fields, and the browser status bar. To use the Set Text of Container behavior, follow these steps:
1. Add an AP div, div, or other container to the web page and name it feedback.
2. Select an object on the web page to trigger the behavior. You can add this behavior to the same object you used earlier this hour or you can add a null link to an object on any web page.
3. Click the + button in the Behaviors panel. Choose the Set Text of Container behavior from the Set Text submenu—the menu that appears when you place your mouse over Set Text in the Add Behavior drop-down menu. The Set Text of Container dialog box appears.
4. Select the container named feedback from the drop-down menu.
5. Enter some text in the New HTML text box, as shown in Figure 18.12. Click OK.
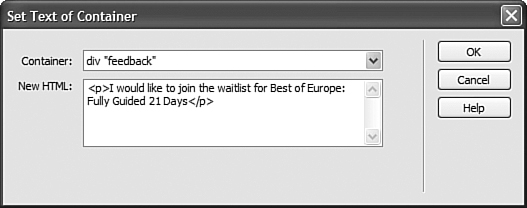
Figure 18.12. The Set Text of Container dialog box enables you to enter text (and HTML) to display in the specified container.
6. Select the onClick event from the Events drop-down menu in the Behaviors panel.
Preview the web page in your browser. When you trigger the action, the text you entered appears in the container.
Using the Go to URL Behavior
The Go to URL behavior enables to you load a URL into the existing browser window. You might choose to use this behavior instead of simply using a link if you want to trigger other behaviors prior to the visitor going to the link. For instance, you could first trigger a pop-up message telling users that they are leaving your website prior to linking them to another web page using the Go to URL behavior. To use the Go to URL behavior, follow these steps:
1. Select that object that will trigger the behavior. Make sure that the correct tag appears in the Tag panel group title bar.
2. Type javascript:; in the Link box in the Property inspector to create a null link.
3. In the Behaviors drop-down menu, select Go to URL.
4. The Go To URL dialog box opens, as shown in Figure 18.13. Enter a URL in the URL box.
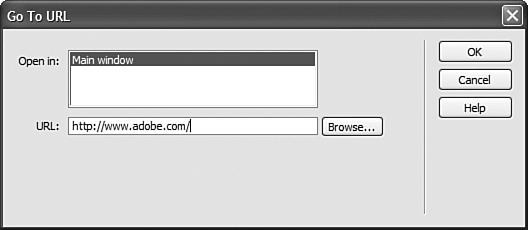
Figure 18.13. The Go To URL dialog box enables you to load a new web page in the existing browser window.
5. Click OK to save the behavior settings.
6. Preview the page in a browser.
Adding a Draggable AP Div to a Web Page
The Drag AP Element behavior enables you to create AP divs that the user can drag around the browser window. You can even constrain the area within which the user can drag the AP div. This capability is useful for creating sliders, puzzles, dialog boxes, and other interactions.
You can use the Drag AP Element behavior to let users interact with objects on your web page. For instance, you might have an AP div that contains a map legend. You could make that AP div draggable so that the user could move it out of the way if it blocks part of the map. Or you could create a blank face and let people drag different noses, ears, eyes, and so on, onto the face.
Did you Know?: Check Out CourseBuilder
If you need to create complicated drag-and-drop interactions, you should investigate the CourseBuilder extension to Dreamweaver, which is available at the Adobe Exchange (see Hour 24 for information about extensions to Dreamweaver). The drag-and-drop interactions created by CourseBuilder have the capability to make an object return to its original position if dropped incorrectly.
The Drag AP Element behavior enables users to drag an AP div. You have to turn on this behavior before a user can drag the AP div. This behavior can trigger when the web page loads by capturing the body tag’s onLoad event. You select the body tag in Dreamweaver’s tag selector. You should see <body> in the title bar of the Tag panel group.
By the Way: The <body> Tag Holds Everything Visible
You might notice that when you select the <body> tag, you also select everything in your web page. That’s because the <body> tag is the container within which all the objects on your web page reside.
After you’ve created your Drag AP Element and given it a name, you’re ready to apply the Drag AP Element behavior. To use the Drag AP Element behavior, follow these steps:
1. Add an AP div to a web page (Insert, Layout Objects, AP Div) and give it a name.
2. Select the body tag from the tag selector in the Dreamweaver status bar, as shown in Figure 18.14.

Figure 18.14. Select the body tag from the tag selector to trigger a behavior when the web page loads.
3. Click the Add Behavior (+) button in the Behaviors panel and select Drag AP Element. The Drag AP Element dialog box appears, as shown in Figure 18.15.
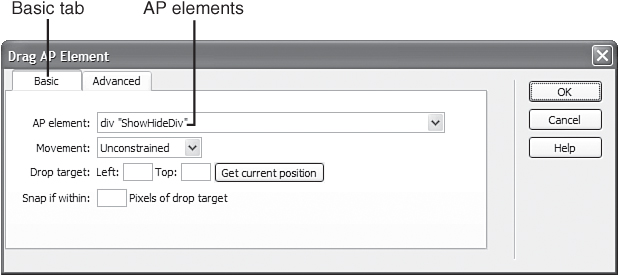
Figure 18.15. The Drag AP Element dialog box enables you to select the AP Div you want to be draggable.
4. From the AP Element drop-down menu, select the name of the AP div to drag.
5. Click OK to save your changes.
6. Make sure that the onLoad event is listed in the Behaviors panel next to the Drag AP Element action. This means the Drag AP Element behavior triggers when the web page loads.
Check to see that the Drag AP Element behavior is working the way you want it to by previewing the web page in a browser. The correct AP div should be draggable.
Did you Know?: Can’t Find the Behavior?
If you do not see the behavior attached to the <body> tag when you select it, you’ve applied the behavior to the wrong tag. You have to hunt down the object to which you applied the behavior and delete that behavior in the Behaviors panel. As you click objects in the Document window, look at the Behaviors panel to see which object has the behavior attached to it.
Summary
In this hour, you learned that a Dreamweaver behavior consists of an event that triggers an action. You used the Show-Hide Elements, Open Browser Window, Popup Message, Set Text in Container, Go to URL, and Drag AP Element behaviors. You captured events from a hyperlink and an image. And you used the onMouseUp, onClick, and onLoad events as triggers for Dreamweaver actions.
Q&A
Q. How can I apply a behavior to a hidden AP div?
A. You can select a hidden AP div in the AP Elements panel. Switch to the Behaviors panel, without selecting anything else, and apply the behavior. Or you can temporarily make the AP div visible, apply the behavior, and then hide the AP div again.
Q. How can I create a button that triggers a behavior?
A. We’ll cover forms and buttons in Hour 20. Basically, you place a button into the web page to trigger a behavior. You insert a button from the Forms tab of the Insert bar. If Dreamweaver asks whether you’d like to add a <form> tag, you can click Yes. The trick is to make sure that the button is not a Submit or Reset button. Select the None radio button in the Property inspector and then apply a behavior to the button.
Q. Where can I learn more about JavaScript?
A. You can learn some JavaScript from some excellent resources and tutorials on the Web. You don’t have to understand everything about JavaScript to use it. The short statements that you used during this hour should be easy to find in any JavaScript book or reference. Check out Appendix A, “Resources,” for links to helpful sites. You might want to start out with Sams Teach Yourself JavaScript in 24 Hours, Fourth Edition by Michael Moncur; ISBN: 0672328798.
Workshop
Quiz
1. What is the equation that connects an event, an action, and a behavior?
2. You have the most behaviors and events available when you choose HTML 4.01 from the Show Events For submenu in the Behaviors panel. True or false?
3. What two events add up to an onClick event?
Quiz Answers
1. The equation that connects an event, an action, and a behavior is
Event + Action = Behavior.
2. False. You have the most events available when you select IE 6.0 as the target browser.
3. An onClick event consists of the onMouseDown and onMouseUp events.
Exercises
1. Create a second hyperlink for the Show-Hide Elements example that you created earlier in the hour. Type Hide the AP Div, make it a hyperlink, and make clicking this hyperlink hide the AP div you created.
2. Try using some behaviors that are similar to the behaviors you used in this hour (for example, the Set Text of Status Bar behavior). What events are available for these behaviors? What objects must you have on the web page for these behaviors to work?
3. Create an AP div and make it draggable by attaching the Drag AP Element behavior to the body tag. Figure out how to constrain the AP div’s movement to only horizontal (select Constrained from the Drag AP Element dialog box). Check the web page by previewing it in a browser. Then try constraining the movement to only vertical. Finally, constrain the movement to an area.