
The free thinking of one age is the common sense of the next.
Gone are the days when a Web application could be architected and implemented as a collection of static and dynamic pages served from the server for each and every request. In today’s Web, a lot of work is done on the client using JavaScript libraries or richer engines such as Adobe Flash or Microsoft Silverlight.
Having rich client-side functionality is no longer a brilliant exception as it was only a few years ago; this is now going to be the rule. On the other hand, what’s your knee-jerk reaction when you run across a Web site that requires you to pick up an item from a drop-down list and refreshes the entire page afterward? More or less, you hate it and wish they could update the site as soon as possible. In the end, using server-side programming to generate the page markup is more and more becoming a thing of the past.
Server-side programming is still an important piece of the Web, but these days it’s different. For a Web site (a plain collection of mostly read-only pages), you leverage server-side programming to generate markup and serve it to the browser over an out-of-band, script-led request. For a Web application (a more sophisticated composition of functions exposed through pages), you tend to expose a URL-based API from the server that JavaScript code calls back to build and refresh the view dynamically.
The history of Web is full of cycles in which the focus shifts from the client to the server and then back. We had Dynamic HTML (DHTML) in 1997, but only for a subset of browsers—well, mostly Internet Explorer 4. There was no immediate and general consensus around that innovation, which remained confined to a small percentage of browsers for years. Then the hype returned to server programming with ASP.NET Web Forms. It’s odd, when you think of it, how shielding developers from JavaScript and HTML was one of the best-selling points of ASP.NET. Around 2005, people started moving back toward client-side programming with Ajax.
Ajax is an acronym that stands for Asynchronous JavaScript and XML. It’s a blanket term used to describe applications that extensively use the client-side capabilities of the Web browser. The browser is not simply a dummy HTML-based terminal; it gains the power of a real tier that hosts a part of the application’s presentation logic. So how do you do Ajax in ASP.NET?
Pattern-wise, there are two main approaches to Ajax. One consists of serving markup to the browser over a script-led request. Known as HTML Message (HM), this pattern is akin to the classic browser-to-server model except that the request is placed via user-defined script rather than the hard-coded browser’s machinery. As a developer, you make yourself responsible for deciding how to run the request and how to process the returned markup. On the server side, however, any URL you invoke always returns plain HTML markup.
The other pattern is Browser-Side Templating (BST) and is based on the idea that the browser places script-led requests for raw data to be incorporated in the user interface by some script-based presentation logic.
In this chapter, I’ll dig out these two patterns and explore technologies related to ASP.NET Web Forms that make it work.
Typically, Web applications work by submitting user-filled forms to the Web server and displaying the markup returned by the Web server. The client-to-server communication employs the HTTP protocol and is usually conducted by the browser. The new model heralded by Ajax is based on an alternate engine that can be driven by some script code embedded in the page.
There are many benefits to writing Ajax applications. First and foremost, the page that triggers the call remains up and running and refreshes its Document Object Model (DOM) with the freshly downloaded data. No page replacement occurs, and the overall user experience is smooth and continual. In addition, you can fire and control asynchronous and potentially lengthy operations without freezing the current UI. An Ajax application minimizes user frustration, provides timely feedback about what’s going on, and can deliver great mashed-up content.
The Hidden Engine of Ajax
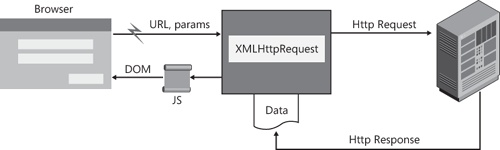
Let’s find out more about the internal HTTP engine that makes it possible to create and execute script-led HTTP requests. The key to the success of Ajax is that at some point around 2005, perhaps because of a rare astral conjunction, nearly all browsers on the marketplace happened to support the same component with a common API—the XMLHttpRequest object. This is the real hidden engine of Ajax applications, whatever browser you pick up and whatever the underlying platform might be.
Using the local Domain Name System (DNS) resolver in the operating system, the browser resolves the requested URL to an IP address and opens a socket. An HTTP packet travels over the wire to the given destination. The packet includes the form and all its fields. The request is captured by the Web server and typically forwarded to an internal module for further processing. At the end of the process, an HTTP response packet is prepared and the return value for the browser is inserted in the body. If the response contains an HTML page, the browser replaces the current contents entirely with the new chunk of markup.
While the request is being processed on the server, the “old” page is frozen but still displayed to the client user. As soon as the “new” page is downloaded, the browser clears the display and renders the page.
This model was just fine in the beginning of the Web age when pages contained little more than formatted text, hyperlinks, and some images. The success of the Web has prompted users to ask for increasingly more powerful features, and it has led developers and designers to create more sophisticated services and graphics. The net effect is that pages are heavy and cumbersome—even though we still insist on calling them “rich” pages. Regardless of whether they’re rich or just cumbersome, these are the Web pages of today’s applications. And nobody really believes that we’re going to return to the scanty and spartan HTML pages of a decade ago.
Given the current architecture of Web applications, each user action requires a complete redraw of the page. Subsequently, richer and heavier pages render slowly and, as a result, produce a good deal of flickering. Projected to the whole set of pages in a large, portal-like application, this mechanism is perfect for unleashing the frustrations of the poor end user.
The chief factor that enables Ajax functionality in a Web page is the ability to issue out-of-band HTTP requests. In this context, an out-of-band call indicates an HTTP request placed using a component different from the browser. This component is the XMLHttpRequest object.
Historically speaking, the first version of this object saw the light of day in 1998 as part of the Microsoft Outlook Web Access subsystem within Microsoft Exchange. Later on, the component was embedded as an ActiveX component in Internet Explorer 5 and then was integrated in other browsers.
Note
In the mid-1990s, there was a team at Microsoft working on a technology called Remote Scripting (RS). RS never reached the stage of a version 1.0, but it had a lot in common with today’s AJAX hidden engine. In RS, the proxy component was a Java applet managing the browser-to-server communication.
XMLHttpRequest is a browser object that is scriptable through JavaScript. It sends a regular HTTP request to the specified URL and waits, either synchronously or asynchronously, for it to be fully served. When the response data is ready, the proxy invokes a user-defined JavaScript callback to refresh any portion of the page that needs updating. Figure 20-1 provides a graphical overview of the model.
All browsers know how to replace an old page with a new page; until a few years ago, though, not all of them provided an object model to represent the current contents of the page. (Today, I can hardly mention a single modern, commercially available browser that doesn’t expose a read/write page DOM.) For browsers that supply an updatable object model for HTML pages, the JavaScript callback function can refresh specific portions of the old page, thus making them look updated, without a full reload.
There’s a World Wide Web Consortium (W3C) ratified standard for the updatable DOM you can find at http://www.w3.org/TR/DOM-Level-3-Core. A W3C document for the proxy component is currently being developed. It takes the form of the existing XMLHttpRequest object and is devised as an interface exposed by the browser to allow script code to perform HTTP client functionality, such as submitting form data or loading data from a remote Web site. The latest candidate recommendation is at http://www.w3.org/TR/XMLHttpRequest.
About ten years ago, with Internet Explorer 4.0, Microsoft introduced a proprietary object model named Dynamic HTML (DHTML) to enable page authors to update the current page dynamically using JavaScript. The success of DHTML led to the definition of a standard document object model—the W3C’s DOM. Quite obviously, the DOM evolved from DHTML and became much more generalized than DHTML.
Today most browsers support a mix of DOM and DHTML. Which one should you use? In particular, to update certain content, should you obtain a reference to the textual child node of the node that matches the intended HTML tag (the DOM way), or just grab a reference to a node and use the innerHTML property as you would do in the DHTML way? Likewise, to add a new element, should you create a new element or just stuff in a chunk of updated HTML via innerHTML? Admittedly, one of the most interesting debates in the community is whether to use DHTML to manipulate pages or opt for the cleaner approach propounded by the DOM API.
The key fact is that the DOM API is significantly slower than using innerHTML. If you go through the DOM to generate some user interface dynamically, you have to create every element, append each into the proper container, and then set properties. The alternative entails only that you define the HTML you want and render it into the page using innerHTML. The browser then does the rest by rendering your markup into direct graphics.
Overall, DHTML and DOM manipulation are both useful depending on the context. There are many Web sites that discuss performance tests, and DHTML is always the winner. Anyway, DOM is still perfectly fast as long as you use it the right way—that is, create HTML fragments and append them to the proper container only as the final step.
Created by Microsoft and adopted soon thereafter by Mozilla, the XMLHttpRequest object is fully supported these days by the majority of Web browsers. The implementation can vary from one browser to the next, even though the top-level interface is nearly identical. For this reason, a W3C committee is at work with the goal of precisely documenting a minimum set of interoperable features based on existing implementations. An excellent presentation on the component can be found here: http://developer.mozilla.org/en/docs/XMLHttpRequest.
Note
When the XMLHttpRequest object was first released, the Component Object Model (COM) was ruling the world at Microsoft. The extensibility model of products and applications was based on COM and implemented through COM components. In the late 1990s, the right and natural choice was to implement this new component as a reusable automation COM object, named Microsoft.XmlHttp.
COM objects are external components that require explicit permission—safe for scripting—to run inside of a Web browser. The XMLHttpRequest object is certainly a safe component, but to enable it users need to decrease their security settings and accept any other component “ declared” safe for scripting that is hanging around the Web sites they visit. The XMLHttpRequest object has finally become a browser object with Internet Explorer 7.0. All potential security concerns are therefore removed at the root.
Today, the XMLHttpRequest object is part of the browser object model and is exposed out of the window object. As a result, it can be instantiated through the classic new operator:
// The object name requires XML in capital letters
var proxy = new XMLHttpRequest();
When the browser is Internet Explorer (up to version 6.0), the XMLHttpRequest object must be instantiated using the ActiveXObject wrapper, as shown here:
var proxy = new ActiveXObject("Microsoft.XmlHttp");Generally, Ajax frameworks (and JavaScript libraries with Ajax support, such as jQuery) check the current browser and then decide which route to take.
The XMLHttpRequest object is designed to perform one key operation: send an HTTP request. The request can be sent either synchronously or asynchronously. The following bit of code shows the programming interface of the object as it results from the W3C working draft at the time of this writing:
interface XMLHttpRequest
{
  function onreadystatechange;
  readonly unsigned short readyState;
  void open(string method, string url);
  void open(string method, string url, bool async);
  void open(string method, string url, bool async, string user);
  void open(string method, string url, bool async,
            string user, string pswd);
  void setRequestHeader(string header, string value);
  void send(string data);
  void send(Document data);
  void abort();
  string getAllResponseHeaders();
  string getResponseHeader(string header);
  string responseText;
  Document responseXML;
  unsigned short status;
  string statusText;
};
Using the component is a two-step operation. First, you open a channel to the URL and specify the method (GET, POST, or other) to use and specify whether you want the request to execute asynchronously. Next, you set any required header and send the request. If the request is a POST, you pass to the send method the body of the request.
The send method returns immediately in the case of an asynchronous operation. You write an onreadystatechange function to check the status of the current operation and, using that function, figure out when it is done. The following code shows how to carry on a POST request using the XMLHttpRequest object:
var xmlRequest, e;
try
{
    xmlRequest = new XMLHttpRequest();
}
catch(e)
{
    try
    {
        xmlRequest = new ActiveXObject("Microsoft.XMLHTTP");
    }
    catch(e)
    {
    }
}

// Prepare for a synchronous POST request
var body = null;  // An empty request body this time...
xmlRequest.open("POST", pageUrl, false);
xmlRequest.setRequestHeader("Content-Type",
                            "application/x-www-form-urlencoded");
xmlRequest.send(body);
In a synchronous call, the send method returns when the response has been fully downloaded and parsed by the object. You can access it as a plain string using the responseText property. If the response is an XML stream, you can have it exposed as an XML DOM object using the responseXml property.
Important
If you’re going to use any Ajax-enabled framework for building Web applications, you’ll hardly hear anything about the XMLHttpRequest object, much less use it directly in your own code. An Ajax framework completely encapsulates this object and shields page authors and application designers from it. You don’t need to know about XMLHttpRequest to write great Ajax applications, no matter how complex and sophisticated they are. However, knowing the fundamentals of XMLHttpRequest can lead you to a better and more thorough understanding of the platform and to more effective diagnoses of problems.
Ajax applications require you to write a lot of JavaScript code. Most of the time, you are called upon to write simple UI-driven code that refreshes the user interface following the state of the application and maps pieces of downloaded data to UI elements. If all you need to write is a few event handlers, any approach does work. When the quantity of code grows beyond a certain threshold, however, you need to lay out your client code using abstractions not unlike those you might use in a classic programming language—functions and objects.
I won’t stray too far from the truth if I state that JavaScript is such a flexible language that it can be used to write code that follows two radically different programming paradigms—functional programming and object-oriented programming (OOP). Which one should you choose and when?
In functional programming, the building block of code is the “function,” as opposed to the “class” in object-oriented programming and the “subroutine” in procedural programming. A function is a unit of code that describes only the operations to be performed on the input. A function gets some input and returns some output; everything else is hidden from view.
As a functional programmer, you build your applications by pipelining function calls to create a super function that just gets the program’s input and returns the program’s output. There’s typically no layer where you process the input, store state, arrange a sequence of statements, update the state, and decide about the next step. A function is a like a value, and it can be used as an argument and be passed to other functions as well as used in any other context where values can be used.
In JavaScript, anonymous functions are the pillar of functional programming. An anonymous function is a direct offshoot of lambda calculus or, if you prefer, a language adaptation of old-fashioned function pointers. Here’s an example:
function(x, y) {
   return x + y;
}
The only difference between a regular function and an anonymous function is in the name. In a functional context, you don’t strictly need to name a function, especially if you’re using it as a value that you pass around.
The jQuery library, which we’ll cover in the next chapter, more than ever called people’s attention to functional programming. In a Web environment, all you do is manipulate DOM elements. The jQuery library is effective because it allows you to manipulate DOM elements while enjoying the power (and to some extent the cleanness) of functional programming.
There’s a significant difference between objects in a qualified OOP language and JavaScript. In OOP languages, the class is a blueprint for actual objects you use. In JavaScript, you just have objects whose blueprint is that of a dictionary of data and functions. When you create a new object in JavaScript, you have an empty dictionary you can fill with anything you like.
Having said that, with a bit of work you can create (and reuse) custom objects and manage for them to inherit from existing objects and also behave polymorphically. This work is just what JavaScript object-oriented libraries do.
When it comes to adding layers to JavaScript to make it closer to a qualified OOP language and gain some more programming power and code reusability, you have to choose from two main approaches for extending the capabilities of the native JavaScript objects: closures and prototypes.
Before we get to that, however, a few words about the native Object type in JavaScript and its usage. You can use the new keyword to create a new dictionary-like object in JavaScript.
Next, you stuff data into it, and you can add methods by wiring functions to property names. Here’s an example:
var person = new Object();
person.Name = "Dino";
person.LastName = "Esposito";
person.BirthDate = new Date(1992,10,17)
person.getAge = function() {
  var today = new Date();
  var thisDay = today.getDate();
  var thisMonth = today.getMonth();
  var thisYear = today.getFullYear();
  var age = thisYear-this.BirthDate.getFullYear()-1;
  if (thisMonth > this.BirthDate.getMonth())
      age = age +1;
  else
  if (thisMonth == this.BirthDate.getMonth() &&
      thisDay >= this.BirthDate.getDate())
      age = age +1;
  return age;
}
What we have is an object modeled after a person; we don’t have a Person object. A possible way to define the layout of a type is to create a new, all-encompassing function that exposes just the members we like. In addition, in JavaScript all intrinsic objects have a read-only property named prototype. You can use the prototype property to provide a base set of functionality shared by any new instance of an object of that type. These two are the mechanisms to leverage for using OOP in JavaScript.
A closure is a general concept of programming languages. Applied to JavaScript, a closure is a function that can have variables and methods defined together within the same context. In this way, the outermost (anonymous or named) function “closes” the expression. Here’s an example of the closure model for a function that represents a Person type:
var Person = function(name, lastname, birthdate)
{
   this.Name = name;
   this.LastName = lastname;
   this.BirthDate = birthdate;

   this.getAge = function() {
      var today = new Date();
      var thisDay = today.getDate();
      var thisMonth = today.getMonth();
      var thisYear = today.getFullYear();
      var age = thisYear-this.BirthDate.getFullYear()-1;
      if (thisMonth > this.BirthDate.getMonth())
          age = age +1;
      else
         if (thisMonth == this.BirthDate.getMonth() &&
             thisDay >= this.BirthDate.getDate())
             age = age +1;
      return age;
   }
}
As you can see, the closure is nothing more than the constructor of the pseudo-class. In a closure model, the constructor contains the member declarations and members are truly encapsulated and private to the class. In addition, members are instance based, which increases the memory used by the class. Here’s how you use the object:
var p = new Person("Dino", "Esposito", new Date( ... );
alert(p.Name + " is " + p.getAge());
The closure model gives full encapsulation, but nothing more. To compose objects, you can only resort to aggregation.
The prototype model entails that you define the public structure of the class through the JavaScript prototype object. The following code sample shows how to rewrite the preceding Person class to avoid a closure:
// Pseudo constructor
var Person = function(name, lastname, birthdate)
{
    this.initialize(name, lastname, birthdate);
}

// Members
Person.prototype.initialize(name, lastname, birthdate)
{
    this.Name = name;
    this.LastName = lastname;
    this.BirthDate = birthdate;
}

Person.prototype.getAge = function()
{
    var today = new Date();
    var thisDay = today.getDate();
    var thisMonth = today.getMonth();
    var thisYear = today.getFullYear();
    var age = thisYear-this.BirthDate.getFullYear()-1;
    if (thisMonth > this.BirthDate.getMonth())
        age = age +1;
    else
       if (thisMonth == this.BirthDate.getMonth() &&
           thisDay >= this.BirthDate.getDate())
           age = age +1;
    return age;
}
In the prototype model, the constructor and members are clearly separated and a constructor is always required. As for private members, you just don’t have them. The var keyword that would keep them local in a closure doesn’t apply in the prototype model. So you can define getter/setter for what you intend to be properties, but the backing field will remain accessible from the outside, anyway. You can resort to some internal (and documented) convention, such as prefixing with an underscore the name of members you intend as private. That’s just a convention, however.
By using the prototype feature, you can achieve inheritance by simply setting the prototype of a derived object to an instance of the “parent” object:
Developer = function Developer(name, lastname, birthdate)
{
   this.initialize(name, lastname, birthdate);
}
Developer.prototype = new Person();
Note that you always need to use this to refer to members of the prototype from within any related member function.
In the prototype model, members are shared by all instances as they are invoked on the shared prototype object. In this way, the amount of memory used by each instance is reduced, which also provides for faster object instantiation. Aside from syntax peculiarities, the prototype model makes defining classes much more similar to the classic OOP model than the closure model.
The choice between closure and prototype should also be guided by performance considerations and browser capabilities. Prototypes have a good load time in all browsers; indeed, they have excellent performance in Firefox. (In contrast, closures have a better load time than prototypes in Internet Explorer.) Prototypes provide better support for IntelliSense, and they allow for tool-based statement completion when used in tools that support this feature, such as Microsoft Visual Studio. Prototypes can also help you obtain type information by simply using reflection. You won’t have to create an instance of the type to query for type information, which is unavoidable if closures are used. Finally, prototypes allow you to easily view private class members when debugging. Debugging objects derived using the closure model requires a number of additional steps.
Note
Whether you opt for closure or prototype, writing complex JavaScript code requires a lot of discipline. An interesting pattern to explore is the Module Pattern, which essentially introduces the concepts of namespaces and dependencies in JavaScript code where no such elements exist natively. A good introduction to the pattern can be found here: http://www.adequatelygood.com/2010/3/JavaScript-Module-Pattern-In-Depth.
For security reasons, all XMLHttpRequest calls within all browsers are restricted to the Same Origin Policy (SOP). In other words, all browsers proceed with an XMLHttpRequest call only if the destination URL is within the same origin as the calling page. Because XMLHttpRequest uploads cookies, a user authenticated on a site (say, contoso.com) might end up on another site (say, thebadguy.com) and leave there her authentication cookie. At this point, from the thebadguy.com site an attacker could make an XMLHttpRequest request to contoso.com and behave as if it were the original user. In a nutshell, script-led cross-domain calls are forbidden.
The problem is that sometimes cross-domain calls are useful and entirely legitimate. How to work around the limitation? Generally speaking, there are four possible approaches:
Using a server-side proxy
Using Silverlight or Flash applets and their native workarounds to bypass SOP
Leveraging cross-domain-enabled HTML tags such as <script> and <iframe>
Using ad hoc browser extensions specifically created to enable cross-domain XMLHttpRequest calls
These are the various options you might want to consider first as a software architect. These are the options that would work without requiring each user to tweak security settings on her browser.
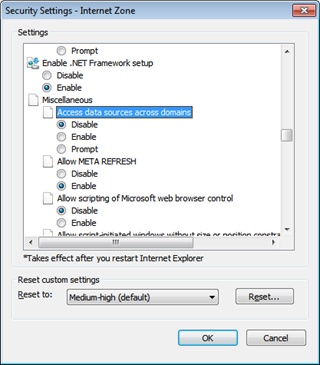
Note, however, that most browsers let you disable the SOP policy through the dialog box for the security settings. If you, as a user, proceed with and enable cross-domain calls, all XMLHttpRequest calls magically work, regardless of their final destination. From a design perspective, however, this solution has a strong prerequisite: it requires you to exercise strict control over all possible machines that will be using the site. For Internet Explorer, you select the Security tab from the Internet Options dialog box and then scroll down to the Miscellaneous section, as shown in Figure 20-2.
Be aware that a similar option might not exist for other browsers.
I’ll return to cross-domain calls in the next chapter with a few concrete examples. For now, suffice it to say that two approaches are the most commonly used today: server-side proxies and JSON with Padding (JSONP) over the <script> tag.
You do much of your ASP.NET Web Forms programming using server controls. A server control normally emits HTML markup. In an Ajax scenario, a server control emits markup plus some script code to support Ajax requests. This is not exactly a change of paradigm in the name of Ajax, but it is a good compromise between the classic Web and requested Ajax capabilities.
ASP.NET partial rendering works according to this idea. It provides a new container control—the UpdatePanel control—that you use to surround portions of existing pages, or portions of new pages developed with the usual programming model of ASP.NET. A postback that originates within any of these updatable regions is intercepted by some JavaScript code that the UpdatePanel control has injected in the page. As a result, only the controls in a given region are updated.
The UpdatePanel control, however, requires the use of another server control—the ScriptManager control—which is responsible, among other things, for injecting in the page any required script code.
The main control in the server infrastructure of ASP.NET for Ajax is the ScriptManager control and its twin, the ScriptManagerProxy control. You will find just one instance of the ScriptManager control in each ASP.NET Ajax page. The ScriptManagerProxy control is used only in master pages scenarios to reference the original script manager from content pages.
The ScriptManager control manages and delivers script resources, thus enabling client scripts to make use of the JavaScript type system extensions and other JavaScript features that we covered earlier in this chapter. The ScriptManager control also enables features such as partial-page rendering and service and page method calls. The following code shows the simplest and most common way to insert the script manager in an ASP.NET page:
<asp:ScriptManager runat="server" ID="ScriptManager1" />
The control produces no user interface, works exclusively on the server, and doesn’t add any extra bytes to the page download.
The ScriptManager control features a number of properties for you to configure its expected behavior. Table 20-1 details the supported properties.
Table 20-1. Properties of ScriptManager
The script manager is the nerve center of any ASP.NET AJAX pages and does all the work that is necessary to make AJAX features function as expected. Enabling AJAX features mostly means injecting the right piece of script in the right place. The script manager saves ASP.NET developers from dirtying their hands with JavaScript.
Table 20-2 lists the methods defined on the ScriptManager control.
Table 20-2. Methods of ScriptManager
All static methods emit some form of script and markup in the client page. These static methods are the AJAX counterpart of similar methods defined on the page’s ClientScript object that you should know from earlier versions of ASP.NET. The static RegisterXXX methods on the ScriptManager class ensure that the given piece of script and markup is properly emitted only once in each partial update of the ASP.NET AJAX page. Similarly, other nonstatic RegisterXXX methods should be seen as tools to emit proper script code in ASP.NET AJAX pages—especially script code that is associated with custom controls.
Note
What’s the difference between RegisterXXX methods in the ScriptManager control and the page’s ClientScript object, which is an instance of the ClientScriptManager class? The registration methods of ClientScriptManager and ScriptManager serve the same purpose but in radically different scenarios.
You need to use the ScriptManager’s methods only if you need to emit script code during an AJAX partial rendering postback operation. An AJAX partial-rendering postback operation is processed by the run time as usual, except for the rendering stage. At this time, the markup is generated and any registered script is emitted. Because during AJAX postbacks the ScriptManager is responsible for the markup rendering, it’s the ScriptManager that needs to know about registered scripts to emit.
If you stick to using ClientScriptMananager’s methods in an AJAX page, you risk the possibility that no script will be emitted during the refresh of an updatable panel. As a result, a portion of your page might display strange behaviors.
Table 20-3 details the events fired by the ScriptManager control.
Table 20-3. Events of ScriptManager
Description | |
|---|---|
AsyncPostBackError | Occurs when an exception goes unhandled on the server during an asynchronous postback. |
Navigate | Occurs when the user clicks the browser’s Back or Forward button. |
ResolveCompositeScriptReference | Occurs when the ScriptManager control is going to resolve a composite script reference. |
ResolveScriptReference | Occurs when the ScriptManager control is going to resolve a script reference. |
These events are much more than mere notifications of something that has happened on the server. Both give you good chances to intervene effectively in the course of the application. For example, by handling the ResolveScriptReference event, you can change the location from where the script is going to be downloaded on the client:
protected void ResolveScript(object sender, ScriptReferenceEventArgs e)
{
    // Check Path or Name on the e.Script object based on what you've put in Scripts.
    // Next, you specify the real file to load
    if (String.Equals(e.Script.Path, "personal.js", StringComparison.OrdinalIgnoreCase))
         e.Script.Path = "person.js";
}
By handling the AsyncPostBackError event, you can edit the error message being returned to the client during a partial rendering operation. Here’s an example:
protected void AsyncPostBackError(object sender, AsyncPostBackErrorEventArgs e)
{
        ScriptManager sm = sender as ScriptManager;
        if (Request.UserHostAddress == "127.0.0.1")
        {
            sm.AsyncPostBackErrorMessage = String.Format(
                "<b>An error occurred. <br/>{0}<b>",
                e.Exception.Message);
        }
        else
        {
            sm.AsyncPostBackErrorMessage = String.Format(
                "<b>An error occurred. <br/>{0}<b>",
                "Please contact your Web master.");
        }
}
What if you want to redirect the user to an error page instead?
In this case, you configure the page to use the traditional error-handling mechanism for ASP.NET pages. You configure the <customErrors> section in the web.config file and indicate HTML error pages to reach in case of specific errors. This behavior can be disabled by setting to false the value of the AllowCustomErrorRedirects property of the ScriptManager object.
Note
When an exception is thrown during a partial rendering operation, the HTTP request returns a regular HTTP 200 status code, but instead of including the updated markup, it includes a message in which a flag indicates the success or failure of the operation. In addition, the message includes the full description of the error or the updated markup. In case of error, the client-side default error handler throws a JavaScript exception passing the error message as an argument.
Only one instance of the ScriptManager control can be added to an ASP.NET AJAX page. However, there are two ways in which you can do this. You can add it directly on the page using the <asp:ScriptManager> tag or indirectly by importing a component that already contains a script manager. Typically, you can accomplish the second alternative by importing a user control, creating a content page for a master page, or authoring a nested master page.
What if a content page needs to add a new script reference to the manager? In this case, you need a reference to the script manager. Although it’s defined in the master page (or in a user control), the script manager might not be publicly exposed to the content page. You can use the static method GetCurrent on the class ScriptManager to get the right instance:
// Retrieve the instance of the ScriptManager active on the page
var manager = ScriptManager.GetCurrent(this.Page);
The ScriptManagerProxy class saves you from this sort of coding. In general, in cases where you need features of the ScriptManager control but lack a direct reference to it, you can instead include a ScriptManagerProxy control in the content page.
You can’t have two script managers in the context of the same page; however, you can have a script manager and a proxy to retrieve it. The ScriptManagerProxy control enables you to add scripts and services to nested components, and it enables partial page updates in user controls and nested master pages. When you use the proxy, the Scripts and Services collections on the ScriptManager and ScriptManagerProxy controls are merged at run time.
Note
The ScriptManagerProxy class is a simple wrapper around the GetCurrent method of the ScriptManager class, and its programming interface is not an exact clone of the ScriptManager. From within the proxy, you have access only to a limited number of properties, including Scripts, Services, AuthenticationService, RoleService, and ProfileService. If you need to modify anything else, refer to the GetCurrent static method of the ScriptManager class.
By extensively relying on client capabilities, an Ajax page requires a lot of script code. The framework itself links a lot of code, as do custom controls and actual user pages. The only HTML-supported way of linking script files is the <script> tag and its src attribute. The ScriptManager control can be used to save you from having to directly manipulate quite a few <script> tags and also to obtain richer features, such as built-in management of localized scripts.
You use the Scripts collection to tell the ScriptManager about the scripts you want to add to the page. The collection can be accessed either declaratively or programmatically. In addition to the user-requested scripts, the ScriptManager control automatically emits in the client page any ASP.NET AJAX required script. The following example illustrates the script loading model you can use to load optional and custom scripts, even when the script is embedded in an assembly:
<asp:ScriptManager runat="server" ID="ScriptManager1">
  <Scripts>
    <asp:ScriptReference
         Name="YourCompany.ScriptLibrary.CoolUI.js"
         Assembly="YourCompany.ScriptLib" />
    <asp:ScriptReference
         Path="~/Scripts/MyLib.js" />
  </Scripts>
</asp:ScriptManager>
Table 20-4 lists the properties of the ScriptReference class by means of which you can control the loading of scripts.
Table 20-4. Properties to Control Script Loading
Description | |
|---|---|
Assembly | Indicates the assembly that contains in its resources the script to download on the client. |
IgnoreScriptPath | Boolean value, indicates whether the ScriptPath value optionally set at the top ScriptManager level has to be ignored. This property is set to false by default. |
Name | Name of the script to download on the client. |
You can reference script files from an assembly or from a disk file. There’s a benefit in using disk files. You gain something in performance because less work is required to load the script in memory directly from a file.
Script references obtained from embedded Web resources are served by the ScriptResource.axd HTTP handler. In ASP.NET, this handler replaces an old acquaintance, the WebResource.axd handler—a native component of ASP.NET. What’s the difference? In addition to serving script references, the ScriptResource.axd handler also appends any localized JavaScript resource types for the file and supports composite scripts.
ScriptManager allows you to combine in a single download multiple JavaScript files that you register through the <compositescript> section of the control’s markup:
<asp:ScriptManager ID="ScriptManager1" runat="server">
     <CompositeScript>
        <Scripts>
           <asp:ScriptReference Path="~/Scripts/Script1.js" />
           <asp:ScriptReference Path="~/Scripts/Script2.js" />
           <asp:ScriptReference Path="~/Scripts/Script3.js" />
        </Scripts>
    </CompositeScript>
</asp:ScriptManager>
Composite scripts reduce the number of browser requests and result in faster download time and less workload on the Web server.
One of the additional free services offered by ScriptManager that isn’t offered by the classic <script> tag is the ability to automatically link debug or release script files, as appropriate. ASP.NET uses a special naming convention to distinguish between debug and release script files. Given a release script file named script1.js, its debug version is expected to be filed as script1.debug.js.
In general, the main difference between debug and release scripts is that the release scripts remove unnecessary blank characters, comments, trace statements, and assertions. Normally, the burden of switching the links to debug and release scripts is left to the developer.
The ScriptManager control takes on this burden and, based on the aforementioned naming convention, distinguishes between debug and release scripts. The ScriptManager control picks debug scripts when the debug attribute of the <compilation> section in the web.config file is true.
Globalization is a programming feature that refers to the code’s ability to support multiple cultures. A request processed on the server has a number of ways to get and set the current culture settings. For example, you can use the Culture attribute on the @Page directive, the Culture property on the Page class, or perhaps the <globalization> section in the web.config file. How can you access the same information on the client from JavaScript?
When the EnableScriptGlobalization property is true, the ScriptManager emits proper script code that sets up a client-side global Sys.CultureInfo object that JavaScript classes can consume to display their contents in a culture-based way. Only a few methods and a few JavaScript objects support globalization. In particular, it will work for the localeFormat method of Date, String, and Number types. Custom JavaScript classes, though, can be made global by simply calling into these methods or accepting a Sys.CultureInfo object in their signatures.
Partial rendering is the programming technique centered on the UpdatePanel control. In ASP.NET, the UpdatePanel control represents the shortest path to Ajax. It allows you to add effective Ajax capabilities to sites written according to the classic programming model of ASP.NET Web Forms. As a developer, you have no new skills to learn, except the syntax and semantics of the UpdatePanel control. The impact on existing pages is very limited, and the exposure to JavaScript is very limited—even null in most common situations.
You might wonder how partial rendering differs from classic postbacks. The difference is in how the postback is implemented—instead of letting the browser perform a full-page refresh, the UpdatePanel control intercepts any postback requests and sends an out-of-band request for fresh markup to the same page URL. Next, it updates the DOM tree when the response is ready. Let’s investigate the programming interface of the control.
The UpdatePanel control is a container control defined in the System.Web.Extensions assembly. It belongs specifically to the System.Web.UI namespace. Although it’s logically similar to the classic ASP.NET Panel control, the UpdatePanel control differs from the classic panel control in a number of respects. In particular, it doesn’t derive from Panel and, subsequently, it doesn’t feature the same set of capabilities as ASP.NET panels, such as scrolling, styling, wrapping, and content management.
The UpdatePanel control derives directly from Control, meaning that it acts as a mere Ajax-aware container of child controls. It provides no user-interface-related facilities. Any required styling and formatting should be provided through the child controls. In contrast, the control sports a number of properties to control page updates and also exposes a client-side object model. Consider the following classic ASP.NET code:
<asp:GridView ID="GridView1" runat="server"
     DataSourceID="ObjectDataSource1"
     AllowPaging="True"
     AutoGenerateColumns="False">
    <Columns>
        <asp:BoundField DataField="ID" HeaderText="ID" />
        <asp:BoundField DataField="CompanyName" HeaderText="Company" />
        <asp:BoundField DataField="Country" HeaderText="Country" />
    </Columns>
</asp:GridView>
<asp:ObjectDataSource ID="ObjectDataSource1" runat="server"
     TypeName="YourApp.DAL.Customers"
     SelectMethod="LoadAll" />
This code causes a postback each time you click to view a new page, edit a record, or sort by a column. As a result, the entire page is redrawn even though the grid is only a small fragment of it. With partial rendering, you take the preceding markup and just wrap it with an UpdatePanel control, as shown here:
<asp:UpdatePanel ID="UpdatePanel1" runat="server">
    <ContentTemplate>
       ...
    </ContentTemplate>
</asp:UpdatePanel>
In addition, you need to add a ScriptManager control to the page. That’s the essence of partial rendering. And it magically just works. Well, not just magically, but it works.
Note
From this simple but effective example, you might be led to think that you surround the whole body of the page with an UpdatePanel control and you’re done. If you do it this way, it certainly works. It might not be particularly efficient though. In the worst case, you need the same bandwidth as you do with classic ASP.NET; however, you still give your users an infinitely better experience because only a portion of the page actually refreshes. As we’ll learn in the rest of the chapter, partial rendering offers a number of attributes to optimize the overall behavior and performance. However, the majority of users are more than happy with the sole effect of a partial page rendering.
Table 20-5 details the properties defined on the UpdatePanel control that constitute the aspects of the control’s behavior that developers can govern.
Table 20-5. Properties of the UpdatePanel Control
Description | |
|---|---|
ChildrenAsTriggers | Indicates whether postbacks coming from child controls will cause the UpdatePanel to refresh. This property is set to true by default. When this property is false, postbacks from child controls are ignored. You can’t set this property to false when the UpdateMode property is set to Always. |
ContentTemplate | A template property, defines what appears in the UpdatePanel when it is rendered. |
ContentTemplateContainer | Retrieves the dynamically created template container object. You can use this object to programmatically add child controls to the UpdatePanel. |
Indicates whether the panel is being updated as part of an asynchronous postback. Note that this property is designed for control developers. Page authors should just ignore it. | |
RenderMode | Indicates whether the contents of the panel will be rendered as a block <div> tag or as an inline <span> tag. The feasible values for the property—Block and Inline—are defined in the UpdatePanelRenderMode enumeration. The default is Block. |
UpdateMode | Gets or sets the rendering mode of the control by determining under which conditions the panel gets updated. The feasible values—Always and Conditional—come from the UpdatePanelUpdateMode enumeration. The default is Always. |
Triggers | Defines a collection of trigger objects, each representing an event that causes the panel to refresh automatically. |
A bit more explanation is needed for the IsInPartialRendering read-only Boolean property. It indicates whether the contents of an UpdatePanel control are being updated. From this description, it seems to be a fairly useful property. Nonetheless, if you read its value from within any of the handlers defined in a code-behind class, you’ll find out that the value is always false.
As mentioned, IsInPartialRendering is a property designed for control developers only. So it is assigned its proper value only at rendering time—that is, well past the PreRender event you can capture from a code-behind class. Developers creating a custom version of the UpdatePanel control will likely override the Render method. From within this context, they can leverage the property to find out whether the control is being rendered in a full-page refresh or in a partial rendering operation.
As a page author, if you just need to know whether a portion of a page is being updated as a result of an AJAX postback, you use the IsInAsyncPostBack Boolean property on the ScriptManager control.
Note
Like any other ASP.NET AJAX feature, partial rendering requires a ScriptManager control in the page. It is essential, though, that the EnablePartialRendering property on the manager be set to true—which is the default case. If this property is set to false, the UpdatePanel control works like a regular panel.
The content of an updatable panel is defined through a template property—the ContentTemplate property. Just like any other template property in ASP.NET controls, ContentTemplate can be set programmatically. Consider the following page fragment:
<asp:ScriptManager ID="ScriptManager1" runat="server" />
<asp:UpdatePanel ID="UpdatePanel1" runat="server">
    <%-- Left empty deliberately. Will be filled out programmatically --%>
</asp:UpdatePanel>
In the PreInit event of the code-behind page, you can set the ContentTemplate programmatically, as shown here:
protected void Page_PreInit(object sender, EventArgs e)
{
    // You could also read the URL of the user control from a configuration file
    string ascx = "customerview.ascx";
    UpdatePanel1.ContentTemplate = this.LoadTemplate(ascx);
}
You are not allowed to set the content template past the PreInit event. However, at any time before the rendering stage, you can add child controls programmatically. In ASP.NET, to add or remove a child control, you typically use the Controls property of the parent control, as shown here:
UpdatePanel1.Controls.Add(new LiteralControl("Test"));If you try to add a child control programmatically to the Controls collection of an UpdatePanel—as in the preceding code snippet—all that you get is a run-time exception. You should use the ContentTemplateContainer property instead. The reason is that what you really want to do is add or remove controls to the content template, not to the UpdatePanel directly. That’s why Controls doesn’t work and you have to opt for the actual container of the template. The following code shows how to populate the content template programmatically:
public partial class _Default : System.Web.UI.Page
{
    private Label Label1;

    protected void Page_Load(object sender, EventArgs e)
    {
        var updatePanel = new UpdatePanel();
        updatePanel.ID = "UpdatePanel1";

        // Define the button
        var button1 = new Button();
        button1.ID = "Button1";
        button1.Text = "What time is it?";
        button1.Click += new EventHandler(Button1_Click);

        // Define the literals
        var lit = new LiteralControl("<br>");

        // Define the label
        var label1 = new Label();
        label1.ID = "Label1";
        label1.Text = "[time]";

        // Link controls to the UpdatePanel
        updatePanel.ContentTemplateContainer.Controls.Add(button1);
        updatePanel.ContentTemplateContainer.Controls.Add(lit);
        updatePanel.ContentTemplateContainer.Controls.Add(label1);

        // Add the UpdatePanel to the list of form controls
        this.Form.Controls.Add(updatePanel);
    }

    protected void Button1_Click(object sender, EventArgs e)
    {
        Label1.Text = DateTime.Now.ToShortTimeString();
    }
}
You can add an UpdatePanel control to the page at any time in the life cycle. Likewise, you can add controls to an existing panel at any time. However, you can’t set the content template programmatically past the page’s PreInit event.
You can safely use UpdatePanel controls from within master pages. Most of the time, the use of updatable panels is easy and seamless. There are a few situations, though, that deserve a bit of further explanation.
If you add a ScriptManager control to a master page, partial rendering is enabled by default for all content pages. In addition, initial settings on the script manager are inherited by all content pages. What if you need to change some of the settings (for example, add a new script file or switch on script localization) for a particular content page? You can’t have a new script manager, but you need to retrieve the original one defined on the master page.
In the content page, you can declaratively reference a ScriptManagerProxy and change some of its settings. The proxy retrieves the script manager currently in use and applies changes to it.
The ScriptManagerProxy control, though, is mostly designed to let you edit the list of scripts and services registered with the manager in a declarative manner, and it doesn’t let you customize, say, error handling or script localization. You can do the same (and indeed much more) by programmatically referencing the script manager in the master page. Here’s how:
protected void Page_Init(object sender, EventArgs e)
{
    // Work around the limitations in the API of the ScriptManagerProxy control
    ScriptManager.GetCurrent(this).EnableScriptLocalization = true;
}
In the content page, you create a handler for the page’s Init event, retrieve the script manager instance using the static GetCurrent method on the ScriptManager class, and apply any required change.
Partial rendering divides the page into independent regions, each of which controls its own postbacks and refreshes without causing, or requiring, a full-page update. This behavior is highly desirable when only a portion—and perhaps only a small portion—of the page needs to change during a postback. An ASP.NET page can contain any number of UpdatePanel controls. This is a key point to understand to make effective use of the UpdatePanel control.
The first practical step for successfully migrating page behavior to partial rendering entails that you, given the expected behavior of the page, identify the portions of the page subject to refresh. If you have, say, a complex table layout but only a small fragment of only one cell changes in the page lifetime, there’s no reason to keep the whole table in an UpdatePanel control. Only the server-side control that displays the modifiable text should be wrapped by the panel.
The portions of the page that you should consider to be candidates to be wrapped by an UpdatePanel control should be as small as possible. They also should include the minimum amount of markup and ASP.NET controls.
The second step consists of associating each candidate region with a list of refresh conditions. You basically answer the question, “When does this region get updated?” After you have compiled a list of candidate regions, and for each you have a list of refresh events, you’re pretty much done.
The final step is mapping this information to UpdatePanel controls and triggers. If all the regions you have identified are disjointed, you’re fine. If not, you use properties and triggers on the UpdatePanel control to obtain the expected page behavior, thereby minimizing the impact of postbacks and page flickering.
If needed, updatable panels can be nested. There’s no syntax limitation to the levels of nesting allowed. Just consider that any nested panel refreshes when its parent is refreshed, regardless of the settings.
Let’s be honest. It might not be a trivial task, and getting a disjoint set of regions is not always possible. However, given the number of properties supported by the UpdatePanel control, there’s always room for a good compromise between user experience and performance.
An UpdatePanel control refreshes its content under the following conditions:
When another UpdatePanel control in the same page refreshes
When any of the child controls originates a postback (for example, a button click or a change of selection in a drop-down list with AutoPostBack=true)
When handling a postback event the page invokes the Update method on the UpdatePanel control
When the UpdatePanel control is nested inside another UpdatePanel control and the parent update panel is updated
When any of the trigger events for the UpdatePanel occur
You can control these conditions through a number of properties such as UpdateMode and ChildrenAsTriggers, as well as the collection Triggers. To minimize the total number of post-backs and the amount of data being roundtripped, you should pay a lot of attention to the values you assign to these properties. Let’s delve deeper into this topic.
By default, all updatable panels in a page are synchronized and refresh at the same time. To make each panel refresh independently from the others, you change the value of the UpdateMode property. The default value is Always, meaning that the panel’s content is updated on every postback that originates from anywhere in the page, from inside and outside the updatable region.
By changing the value of the UpdateMode property to Conditional, you instruct the updatable panel to update its content only if it is explicitly ordered to refresh. This includes calling the Update method, intercepting a postback from a child control, or handling any of the events declared as triggers.
Normally, any control defined inside of an UpdatePanel control acts as an implicit trigger for the panel. You can stop all child controls from being triggers by setting the value of ChildrenAsTriggers to false. In this case, a button inside an updatable panel, if clicked, originates a regular full postback.
What if you want only a few controls within an UpdatePanel to act as triggers? You can define them as triggers of a particular UpdatePanel, or you can use the RegisterAsyncPostBackControl method on the ScriptManager class.
The RegisterAsyncPostBackControl method enables you to register controls to perform an asynchronous postback instead of a synchronous postback, which would update the entire page. Here is an example of the RegisterAsyncPostBackControl method:
protected void Page_Load(Object sender, EventArgs e)
{
    ScriptManager1.RegisterAsyncPostBackControl(Button1);
}
The control object you pass as an argument will be a control not included in any updatable panels and not listed as a trigger. The effects of the postback that originates from the control differ with regard to the number of UpdatePanel controls in the page. If there’s only one UpdatePanel in the page, the script manager can easily figure out which one to update. The following code shows a page whose overall behavior might change if one or two UpdatePanel controls are used:
protected void Button1_Click(Object sender, EventArgs e)
{
    // If there's only one UpdatePanel in the page, and it includes this Label control,
    // the panel is refreshed automatically.
    Label1.Text = "Last update at:  " + DateTime.Now.ToLongTimeString();

    // This Label control, not included in any UpdatePanel, doesn't have its UI
    // refreshed. Its state, though, is correctly updated.
    Label2.Text = "Last update at:  " + DateTime.Now.ToLongTimeString();
}
When multiple panels exist, to trigger the update you have to explicitly invoke the Update method on the panel you want to refresh:
protected void Button1_Click(object sender, EventArgs e)
{
    Label1.Text = "Last update at:  " + DateTime.Now.ToLongTimeString();
    UpdatePanel1.Update();
}
All controls located inside of an UpdatePanel control are automatically passed as an argument to the RegisterAsyncPostBackControl method when ChildrenAsTriggers is true.
I’ve already mentioned the Update method quite a few times. It’s time to learn more about it, starting with its signature:
public void Update()
The method doesn’t take any special action itself, but is limited to requiring that the child controls defined in the content template of the UpdatePanel control be refreshed. By using the Update method, you can programmatically control when the page region is updated in response to a standard postback event or perhaps during the initialization of the page.
An invalid operation exception can be thrown from within the Update method in a couple of well-known situations. One situation is if you call the method when the UpdateMode property is set to Always. The exception is thrown in this case because a method invocation prefigures a conditional update—you do it when you need it—which is just the opposite of what the Always value of the UpdateMode property indicates. The other situation in which the exception is thrown is when the Update method is called during or after the page’s rendering stage.
So when should you use the Update method in your pages?
You resort to the method if you have some server logic to determine whether an UpdatePanel control should be updated as the side effect of an asynchronous postback—whether it is one that originated from another UpdatePanel in the page or a control registered as an asynchronous postback control.
As mentioned, you can associate an UpdatePanel control with a list of server-side events. Whenever a registered event is triggered over a postback, the panel is updated. Triggers can be defined either declaratively or programmatically. You add an event trigger declaratively using the <Triggers> section of the UpdatePanel control:
<asp:UpdatePanel runat="server" ID="UpdatePanel1">
   <ContentTemplate>
      ...
   </ContentTemplate>
   <Triggers>
      <asp:AsyncPostBackTrigger
           ControlID="DropDownList1"
           EventName="SelectedIndexChanged" />
   </Triggers>
</asp:UpdatePanel>
You need to specify two pieces of information for each trigger: the ID of the control to monitor, and the name of the event to catch. Note that the AsyncPostBackTrigger component can catch only server-side events. Both ControlID and EventName are string properties. For example, the panel described in the previous code snippet is refreshed when any of the controls in the page posts back (that is, its UpdateMode property defaults to Always) or when the selection changes on a drop-down list control named DropDownList1. (Obviously, the DropDownList1 control must have the AutoPostBack property set to true.)
By default, all child controls of an UpdatePanel that post back operate as implicit asynchronous postback triggers. You can prevent all of them from triggering a panel update by setting ChildrenAsTriggers to false. Note that when ChildrenAsTriggers is false, postbacks coming from child controls are processed as asynchronous postbacks and they modify the state of involved server controls, but they don’t update the user interface of the panel.
There might be situations in which you need to perform full, regular postbacks from inside an UpdatePanel control in response to a control event. In this case, you use the PostBackTrigger component, as shown here:
<asp:UpdatePanel runat="server" ID="UpdatePanel1">
   <ContentTemplate>
      ...
   </ContentTemplate>
   <Triggers>
      <asp:AsyncPostBackTrigger ControlID="DropDownList1"
           EventName="SelectedIndexChanged" />
      <asp:PostBackTrigger ControlID="Button1" />
   </Triggers>
</asp:UpdatePanel>
The preceding panel features both synchronous and asynchronous postback triggers. The panel is updated when the user changes the selection on the drop-down list; the whole host page is refreshed when the user clicks the button.
A PostBackTrigger component causes referenced controls inside an UpdatePanel control to perform regular postbacks. These triggers must be child elements of the affected UpdatePanel.
The PostBackTrigger object doesn’t support the EventName property. If a control with that name is causing the form submission, the ASP.NET AJAX client script simply lets the request go as usual. The ASP.NET runtime then figures out which server postback event has to be raised for the postback control by looking at its implementation of IPostBackEventHandler.
Note
When should you use a PostBackTrigger component to fire a full postback from inside an updatable panel? If you need, say, a button to refresh a given panel, why not list the Click event of the button as an asynchronous trigger and leave the button outside the panel?
Especially when complex and templated controls are involved, it might not be easy to separate blocks of user interface in distinct panels and single controls. So the easiest, and often the only, solution is wrapping a whole block of user interface in an updatable panel. If a single control in this panel needs to fire a full postback, you need to use the PostBackTrigger component.
The mechanics of the asynchronous postback keeps the displayed page up and running. So having the computer engaged in a potentially long task might be problematic. Will the user resist the temptation of clicking that button over and over again? Will the user patiently wait for the results to show up? Finally, will the user be frustrated and annoyed by waiting without any clue of what’s going on? After all, if the page is sustaining a full postback, the browser itself normally provides some user feedback that this is happening. Using ASP.NET AJAX, the callback doesn’t force a browser-led postback and the browser’s visual feedback system is not called upon to inform the user things are happening.
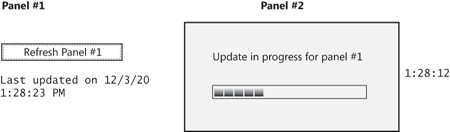
The continuous experience raises new issues. Feedback should be given to users to let them know that an operation is taking place. In addition, user-interface elements should be disabled if the user starts new operations by clicking on the element. ASP.NET AJAX supplies the UpdateProgress control to display a templated content while any of the panels in the page are being refreshed.
The UpdateProgress control is designed to provide any sort of feedback on the browser while one or more UpdatePanel controls are being updated. If you have multiple panels in the page, you might want to find a convenient location in the page for the progress control or, if possible, move it programmatically to the right place with respect to the panel being updated. You can use cascading style sheets (CSSs) to style and position the control at your leisure.
The user interface associated with an UpdateProgress control is displayed and hidden by the ASP.NET AJAX framework and doesn’t require you to do any work on your own. The UpdateProgress control features the properties listed in Table 20-6.
Table 20-6. Properties of the UpdateProgress Control
An UpdateProgress control can be bound to a particular UpdatePanel control. You set the binding through the AssociatedUpdatePanelID string property. If no updatable panel is specified, the progress control is displayed for any panels in the page. The user interface of the progress bar is inserted in the host page when the page is rendered. However, it is initially hidden from view using the CSS display attribute.
When set to none, the CSS display attribute doesn’t display a given HTML element and reuses its space in the page so that other elements can be shifted up properly. When the value of the display attribute is toggled on, existing elements are moved to make room for the new element.
If you want to reserve the space for the progress control and leave it blank when no update operation is taking place, you just set the DynamicLayout property to false.
The control displays the contents of the ProgressTemplate property while waiting for a panel to update. You can specify the template either declaratively or programmatically. In the latter case, you assign the property any object that implements the ITemplate interface. For the former situation, you can easily specify the progress control’s markup declaratively, as shown in the following code:
<asp:UpdateProgress runat="server" ID="UpdateProgress1">
    <ProgressTemplate>
        ...
    </ProgressTemplate>
</asp:UpdateProgress>
You can place any combination of controls in the progress template. However, most of the time, you’ll probably just put some text there and an animated GIF. (See Figure 20-3.)
Note that the UpdateProgress control is not designed to be a gauge component, but rather a user-defined panel that the ScriptManager control shows before the panel refresh begins and that it hides immediately after its completion.
Important
If you’re looking for a real gauge bar to monitor the progress of a server-side task, partial rendering and the UpdateProgress control are not the right tools. As you’ll see later in the chapter, polling is one of the main drawbacks of partial rendering and polling is unavoidable for monitoring server tasks from the client.
Each asynchronous postback is triggered on the client via script. The entire operation is conducted by the PageRequestManager client object, which invokes, under the hood, the XMLHttpRequest object. What kind of control do developers have on the underlying operation? If you manage XMLHttpRequest directly, you have full control over the request and response. But when these key steps are managed for you, there’s not much you can do unless the request manager supports an eventing model.
The Sys.WebForms.PageRequestManager object provides a few events so that you can customize the handling of the request and response. Table 20-7 lists the supported events that signal the main steps around an Ajax postback that partially update a page. The events are listed in the order in which they fire to the client page.
Table 20-7. Properties of the UpdateProgress Control
To register an event handler, you use the following JavaScript code:
var manager = Sys.WebForms.PageRequestManager.getInstance();
manager.add_beginRequest(OnBeginRequest);
The prototype of the event handler method—OnBeginRequest in this case—is shown here:
function beginRequest(sender, args)
The real type of the args object, though, depends on the event data structure. By using any of these events, you can control in more detail the steps of an asynchronous request. Let’s dig out more.
The initializeRequest event is the first in the client life cycle of an asynchronous request. The life cycle begins at the moment a postback is made that is captured by the UpdatePanel’s client-side infrastructure. You can use the initializeRequest event to evaluate the postback source and do any additional required work. The event data structure is the InitializeRequestEventArgs class. The class features three properties: postBackElement, request, and cancel.
The postBackElement property is read-only and evaluates to a DomElement object. It indicates the DOM element that is responsible for the postback. The request property (read-only) is an object of type Sys.Net.WebRequest and represents the ongoing request. Finally, cancel is a read-write Boolean property that can be used to abort the request before it is sent.
Immediately after calling the initializeRequest handler, if any, the PageRequestManager object aborts any pending async requests. Next, it proceeds with the beginRequest event and then sends the packet.
When the response arrives, the PageRequestManager object first processes any returned data and separates hidden fields, updatable panels, and whatever pieces of information are returned from the server. Once the response data is ready for processing, the PageRequestManager object fires the pageLoading client event. The event is raised after the server response is received but before any content on the page is updated. You can use this event to provide a custom transition effect for updated content or to run any clean-up code that prepares the panels for the next update. The event data is packed in an instance of the class PageLoadingEventArgs. The class has three properties: panelsUpdating, panelsDeleting, and dataItems. The first two are arrays and list the updatable panels to be updated and deleted, respectively.
The pageLoaded event is raised after all content on the page is refreshed. You can use this event to provide a custom transition effect for updated content, such as flashing or highlighting updated contents. The event data is packed in the class PageLoadedEventArgs, which has three properties: panelsUpdated, panelsDeleted, and dataItems. The first two are arrays and list the updatable panels that were just updated and deleted, respectively.
The endRequest event signals the termination of the asynchronous request. You receive this event regardless of the success or failure of the asynchronous postback.
If you want to prevent users from generating more input while a partial page update is being processed, you can also consider disabling the user interface—all or in part. To do so, you write handlers for beginRequest and endRequest events:
<script type="text/javascript">
function pageLoad()
{
   var manager = Sys.WebForms.PageRequestManager.getInstance();
   manager.add_beginRequest(OnBeginRequest);
   manager.add_beginRequest(OnEndRequest);
}
</script>
You typically use the beginRequest event to modify the user interface as appropriate and notify the user that the postback is being processed:
// Globals
var currentPostBackElem;

function OnBeginRequest(sender, args)
{
    // Get the reference to the button click (i.e., btnStartTask)
    currentPostBackElem = args.get_postBackElement();
    if (typeof(currentPostBackElem) === "undefined")
        return;
    if (currentPostBackElem.id.toLowerCase() === "btnStartTask")
    {
        // Disable the button
        $get("btnStartTask").disabled = true;
    }
}
The beginRequest handler receives event data through the BeginRequestEventArgs data structure—the args formal parameter. The class features only two properties: request and postBackElement. The properties have the same characteristics of analogous properties on the aforementioned InitializeRequestEventArgs class.
In the preceding code snippet, I disable the clicked button to prevent users from repeatedly clicking the same button.
At the end of the request, any temporary modification to the user interface must be removed. So animations must be stopped, altered styles must be restored, and disabled controls must be re-enabled. The ideal place for all these operations is the endRequest event. The event passes an EndRequestEventArgs object to handlers. The class has a few properties, as described in Table 20-8.
Table 20-8. Properties of the EndRequestEventArgs Control
As you can see, when the endRequest event occurs there’s no information available about the client element that fired the postback. If you need to restore some user interface settings from inside the endRequest event handler, you might need a global variable to track which element caused the postback:
function OnEndRequest(sender, args)
{
    if (typeof(currentPostBackElem) === "undefined")
        return;
    if (currentPostBackElem.id.toLowerCase() === "btnStartTask")
    {
        $get("btnStartTask").disabled = false;
    }
}
Wouldn’t it be nice if you could visually notify users that a certain region of the screen has been updated? As you’ve seen, partial rendering improves the user experience with pages by eliminating a good number of full refreshes. If you look at it from the perspective of the average user, though, a partial page update doesn’t have a clear start and finish like a regular Web roundtrip. The user doesn’t see the page redrawn and might not notice changes in the user interface. A good pattern to employ is to use a little animation to show the user what has really changed with the latest operation. You can code this by yourself using the pair of beginRequest and endRequest events, or you can resort to a specialized component—an UpdatePanel extender control—as you’ll see in a moment.
Important
The disabled HTML attribute works only on INPUT elements. It has no effect on hyperlinks and <a> tags. If you plan to use LinkButton controls, you have to resort to other JavaScript tricks to disable the user interface. One possible trick is temporarily replacing the onclick handler of the hyperlink with a return value of false. Another effective trick might be to cover the area to be disabled with a partially opaque DIV.
A really user-friendly system always lets its users cancel a pending operation. How can you obtain this functionality with an UpdateProgress control? The progress template is allowed to contain an abort button. The script code injected in the page will monitor the button and stop the ongoing asynchronous call if it’s clicked. To specify an abort button, you add the following to the progress template:
<input type="button" onclick="abortTask()" value="Cancel" />
In the first place, the button has to be a client-side button. So you can express it either through the <input> element or the <button> element for the browsers that support this element. If you opt for the <input> element, the type attribute must be set to button. The script code you wire up to the onclick event is up to you, but it will contain at least the following instructions:
<script type="text/JavaScript">
function abortTask()
{
    var manager = Sys.WebForms.PageRequestManager.getInstance();
    if (manager.get_isInAsyncPostBack())
        manager.abortPostBack();
}
</script>
You retrieve the instance of the client PageRequestManager object active in the client page and check whether an asynchronous postback is going on. If so, you call the abortPostBack method to stop it.
Important
Canceling an ongoing update in this way is equivalent to closing the connection with the server. No results will ever be received, and no updates will ever occur on the page. However, canceling the update is a pure client operation and has no effect over what’s happening on the server. If the user started a destructive operation, the client-side Cancel button can do nothing to stop that operation on the server.
Overall, partial rendering is only one possible way to approach Ajax. It preserves most of your current investments and is relatively cheap to implement. Partial rendering just adds Ajax capabilities to your pages. There’s no architectural new point in partial rendering. It’s a great technique to quickly update legacy applications, and it is an excellent choice when you lack the time, skills, or budget to move on and redesign the application. But in a good number of cases, an improved user interface and optimized rendering is all that your users demand. So partial rendering would fit in perfectly.
On the other hand, building true Ajax applications where some of the presentation logic lives on the client written in JavaScript is not trivial either, and it requires a well-done and powerful client framework, as well as a server-side API that can be easily invoked via a URL and that can return easy-to-parse data.
These days, the winning library for client-side programming is jQuery. (I’ll cover the library in the next chapter.) An important extension to the library is jQuery UI, which solves at the root most of the issues I mentioned earlier regarding update progress and client-side widgets.
You should be aware of the structural limitations that partial rendering has. Let’s review the most important. If any of them are likely to affect you, you better look elsewhere and re-architect your application.
Partial rendering doesn’t support concurrent asynchronous postbacks. This means that you are not allowed to have two asynchronous postbacks going on at the same time. Partial rendering ultimately works by bypassing the standard browser mechanism that handles an HTTP request. It hooks up the submit event of the form, cuts out the standard browser handler, and places the HTTP request using XMLHttpRequest.
The request that reaches the Web server differs from a regular ASP.NET request only because it has an extra HTTP header. The request sends in the contents of the posting form, including the view-state hidden field. The response is not pure HTML but represents a text record where each field describes the new status of a page element—update panels, hidden fields, and scripts to run on loading.
As you can see, the underlying model of partial rendering is still the model of classic ASP.NET pages. It is a sort of stop-and-go model where the user posts back, waits for a while, and then receives a new page. While waiting for the next page, there’s not much the user can do. Only one server operation per session occurs at a time. Partial rendering is only a smarter way of implementing the old model.
From a technical standpoint, the major factor that prevents multiple asynchronous postbacks is the persistence of the view-state information. When two requests go, both send out the same copy of the view state, but each reasonably returns a different view state. Which one is good for the page, then? Partial rendering takes a defensive approach, and it silently kills the ongoing request whenever a new request is placed—a last-win discipline.
By writing some JavaScript code around the BeginRequest client event, you can turn the discipline into a first-win approach, at the cost of losing the new request. It is your responsibility to queue the stopped request and run it later. This is just what some commercial Ajax frameworks do.
This fact has a clear impact on developers. In fact, you should always modify the user interface to ensure that users can’t start a second operation before the first is terminated. Otherwise, the first operation is aborted in favor of the second. This happens in any case, even when the two operations are logically unrelated.
Note
When concurrent calls are necessary, you should consider moving that page (if not the whole application) to a more AJAX-oriented design. Alternatively, you can consider implementing that feature within the page using direct script-led calls to URL-based endpoints. I’ll cover this approach in a moment.
Among other things, Ajax pages are popular because they can retrieve the client information in a timely manner. A page starts polling a remote URL, grabs fresh information, and returns it to the client for the actual display. Implemented via partial rendering, polling is subject to being interrupted when the user starts a new partial rendering operation to restart automatically at the end.
If this is not a problem for you, you can use the new Timer server control, as shown here:
<asp:Timer ID="Timer1" runat="server" Enabled="true" Interval="1000" ontick="Timer1_Tick" />
<asp:Button ID="Button1" runat="server" Text="Start task" onclick="Button1_Click" />
<asp:UpdateProgress ID="UpdateProgress1" runat="server" DynamicLayout="false">
    <ProgressTemplate>
        <img src="loading.gif" />
    </ProgressTemplate>
</asp:UpdateProgress>

<asp:UpdatePanel ID="UpdatePanel1" runat="server">
    <ContentTemplate>
        <asp:Label ID="Label1" runat="server" />
    </ContentTemplate>
    <Triggers>
        <asp:AsyncPostBackTrigger ControlID="Button1" EventName="Click" />
    </Triggers>
</asp:UpdatePanel>

<hr />

<asp:UpdatePanel ID="UpdatePanel2" runat="server">
    <ContentTemplate>
        <asp:Label ID="lblClock" runat="server" />
    </ContentTemplate>
    <Triggers>
        <asp:AsyncPostBackTrigger ControlID="Timer1" EventName="Tick" />
    </Triggers>
</asp:UpdatePanel>
The Timer control is the server counterpart of a client timer created using the window.setTimeout method. In the preceding code, the Timer control causes a postback every second as specified by the Interval property. The postback fires the Tick event. By using the timer as the trigger of an updatable panel, you can refresh the content of the panel periodically. In the code, the second UpdatePanel control just renders out a digital clock:
protected void Timer1_Tick(Object sender, EventArgs e)
{
    // Update the client UI to reflect server changes
    ...
}
The downside is that a timer-based polling system implemented over the partial rendering engine is still subject to concurrent calls and can be stopped at any time.
When the client requires that a specific operation be executed on the server with no frills and in a purely stateless manner, you should consider options other than partial rendering. Enter remote server method calls and REST, or Representational State Transfer.
REST refers to the idea of having data and resources exposed to Web clients as public HTTP endpoints. Clients interact with these endpoints using HTTP verbs such as GET, POST, PUT, and DELETE. In REST, the URL is a representation of a resource, and the HTTP verb describes the action you want to take regarding the resource’s representation. Data exchanged in those interactions is represented in simple formats such as JSON and plain XML, or even in syndication formats such RSS and ATOM.
From a programming perspective, REST is all about making a call to a Web-exposed service from the client browser. This requires that a public, well-known API be exposed and made accessible from JavaScript or whatever other programming technology you have available in the browser (for example, Silverlight).
At the highest level of abstraction, Web applications are client/server applications that require an Internet connection between the two layers. Before Ajax, this connection was incorporated in the special client application—the browser—which opens the connection, clears the user interface, and then updates the screen with the results of a server operation.
With Ajax, the client code has the ability to bypass the browser and can handle connections itself. This enables the client to enter user interface updates without fully refreshing the displayed page—a great step forward toward usability and rich user experiences.
Any Ajax solution is made of two main layers that are neatly separated but communicating: the JavaScript and HTML presentation layer, and a service layer that acts as a façade for HTTP endpoints. Figure 20-4 gives an overview of the architecture.
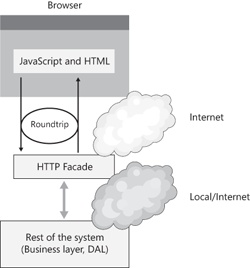
The HTTP façade works out a convenient API for the presentation layer to call. The API is built on top of the existing application services and workflows. The HTTP façade scripts these middle-tier components from the client. The architectural relevance of the HTTP façade is that it decouples the middle tier from a special presentation layer, such as an Ajax presentation layer. An Ajax presentation layer is special essentially because it’s a partial-trust Web client.
For security reasons, service technologies hosted on the Web server require special adjustments to enable JavaScript callers. In addition, it’s likely that some of the application services you have in the middle tier run critical procedures. Any piece of code bound to a URL in the HTTP façade, instead, is publicly exposed over the Internet—not an ideal situation for a business-critical service. So decoupling application services from the Ajax presentation layer is a measure of design but also a matter of security.
How would you build the HTTP façade?
The HTTP façade is the list of public URLs known to, and managed by, the Ajax presentation layer. In an Ajax scenario, the presentation layer is made of only JavaScript code. All the logic you can’t or don’t want to code in JavaScript must be referenced on the server.
Public HTTP endpoints are the only point of contact between Ajax clients and server applications. You can write endpoints callable by Ajax clients using a number of technologies.
Note
In the context of Ajax, Web-hosted services are instrumental to the definition of a public, contract-based API that JavaScript code can invoke. It doesn’t mean that you can call just any public Web services from an Ajax client. More precisely, you can call only services that live in the same domain as the calling page in full respect of the Same Origin Policy (SOP) implemented by most browsers. This is a security measure, not a technical limitation. You should think of Web services as a sort of application-specific façade to expose some server-side logic to a JavaScript (or Silverlight) client.
To start off, an AJAX-callable endpoint can be an .asmx ASP.NET Web service. If this is your choice, you need to configure the server ASP.NET application so that its hosted Web services can accept JSON calls in addition to, or instead of, SOAP calls.
You can also use a Windows Communication Foundation (WCF) service to contain all the logic you want to expose to Ajax clients. As you’ll see later in the chapter, though, you get only the Web WCF programming interface and, as such, only a subset of the typical WCF features. In particular, the area of security is thinned down. A common solution for ASP.NET Web Forms Ajax-enabled applications is hosting WCF services and interacting with them via JSON payloads.
If you don’t want to add WCF to your application but still need a service, you can then opt for a custom, handmade HTTP handler. An HTTP handler is just a public URL exposed by a Web application, so it can reliably serve any purpose the presentation needs to address. Compared to WCF services, plain HTTP handlers lack a lot of facilities, including the automatic JSON serialization of input and output data. (You can use the same tools that WCF uses, but that’s just not…automatic.)
A WCF services is exposed as an .svc endpoint. To be invoked from within an ASP.NET Ajax page, a service must meet a number of requirements, the strictest of which relate to the location of the endpoint and underlying platform. Ajax-enabled services must be hosted in the same domain from which the call is made. If we consider using WCF services to back an Ajax front end, the service must be hosted in an Internet Information Services (IIS) application on the same Web server as the ASP.NET application.
Important
By default, AJAX-enabled WCF services run side by side with the ASP.NET application in the same AppDomain. Requests for an .svc resource are first dispatched to the ASP.NET runtime, but then the WCF hosting infrastructure intercepts these requests and routes them out of the HTTP pipeline. ASP.NET doesn’t participate in the processing of WCF requests past the PostAuthenticateRequest event in the request life cycle. At that point, in fact, the WCF infrastructure intercepts the request and starts processing that in total autonomy. In the default configuration, the WCF service method has no access to ASP.NET intrinsics, ASP.NET impersonation and URL authorization settings are ignored, and HTTP modules interested in filtering the WCF request past the PostAuthenticateRequest event never get a chance to do their work.
To support Ajax calls, you also need to expose service methods through HTTP requests and subsequently map methods to URLs. This is just what the WCF Web programming model has to offer. The WCF Web programming model enables services to support plain-old XML (POX) style messaging instead of SOAP, which is the key step to enabling the JSON calls that are typical of ASP.NET AJAX clients.
The following code snippet shows how to use the new WebGet attribute in the definition of a service contract:
[ServiceContract]
public interface ICalculator {
  [OperationContract]
  [WebGet]
  long Add(long x, long y);

  [OperationContract]
  [WebGet(UriTemplate="Sub?p1={x}&p2={y}")]
  long Subtract(long x, long y);
}
The WebGet attribute qualifies a method as a retrieval operation and enables callers to use the HTTP GET verb to invoke it. The WebGet attribute also features the UriTemplate property. You use this property to specify which URL format is accepted to invoke the method. If not otherwise specified via an explicit UriTemplate property, the URI template for a WebGet method like the aforementioned Add is the following:
theService.svc/Add?x=1&y=2
The service name is followed by the method name, and formal parameters follow in order, each with its own actual value. You can change this standard URI template by changing the method name and formal parameter names.
The WebInvoke attribute indicates that a given method has to be considered as a logical invoke operation that can be invoked using any HTTP verb, but typically the POST verb is called upon:
[ServiceContract]
public interface ICalculator {
  [OperationContract]
  [WebInvoke(Method="Post",
    RequestFormat=WebMessageFormat.Xml,
    ResponseFormat=WebMessageFormat.Json)]
  long Add(long x, long y);
}
Through the WebInvoke attribute, you can set the URI template, the method to be used to invoke the method, as well as the format for the request and response text.
Note
If you choose to add to your Visual Studio project a new item known as an AJAX-enabled service, the wizard gets you a skeleton of code that’s ready to help you build an AJAX-enabled WCF service.
To be invoked from an AJAX client, a WCF service can be configured with a specific binding model—the webHttpBinding model. The webHttpBinding model is a basic HTTP binding except that it doesn’t use SOAP. The webHttpBinding binding model is specifically created for REST scenarios. Here’s an excerpt from a sample configuration script for an AJAX-enabled WCF service:
<system.serviceModel>
  <behaviors>
    <endpointBehaviors>
      <behavior name="ajaxBehavior">
        <enableWebScript />
      </behavior>
    </endpointBehaviors>

    <serviceBehaviors>
      <behavior name="metadataBehavior">
        <serviceMetadata httpGetEnabled="true" />
      </behavior>
    </serviceBehaviors>
  </behaviors>
  ...
</system.serviceModel>
When webHttpBinding is turned on, you can also use the optional enableWebScript element, which enables the run time to generate the JavaScript proxy for the service. The proxy is a JavaScript class that makes it particularly easy to invoke the service endpoints. To invoke a service, a proxy is not strictly required, as you’ll see in the next chapter about jQuery. In addition, you might also want to publish service metadata for retrieval using an HTTP GET request.
The services hosted by the Web application must be specially configured to use the Web HTTP-specific binding model, as shown here:
<system.serviceModel>
  ...
  <services>
    <service name="Samples.TimeService"
             behaviorConfiguration="metadataBehavior">
      <endpoint contract="Samples.ITimeService"
                binding="webHttpBinding"
                behaviorConfiguration="ajaxBehavior" />
    </service>
  </services>
</system.serviceModel>
The configuration of a WCF service specifies key pieces of information—the binding model (mandatory), contract, and behavior. The binding indicates how the call is going to happen—essentially whether it will use a REST approach, a SOAP approach, or both. The contract attribute indicates which contract the endpoint is exposing. If the service class implements a single contract type, the contract attribute can be omitted in the endpoint section. Finally, the behaviorConfiguration attribute contains the name of the behavior to be used in the endpoint.
Note
In some particular scenarios, you can also resort to a simplified configuration scheme for AJAX-enabled WCF services. In the service endpoint file—the .svc file—you use the Factory attribute in the @ServiceHost directive and make it point to a system-provided class that supplies default settings for binding and endpoint behaviors. Here’s the code for the .svc endpoint file:
<%@ ServiceHost
    Factory="System.ServiceModel.Activation.WebScriptServiceHostFactory"
    Service="Samples.Services.TimeService" %>
Note that you can use simplified configuration only for service classes that implement one contract only.
The definition of the service contract for an AJAX-enabled WCF service is not different from that of any other WCF services. You use the OperationContract attribute to qualify a method as a public service method, and you use the optional WebGet and WebInvoke attributes to configure the URL template. Here’s an example:
[ServiceContract(Namespace="Samples.Services", Name="TimeService")]
public interface ITimeService
{
    [OperationContract]
    DateTime GetTime();
    [OperationContract]
    string GetTimeFormat(string format);
}

public class TimeService : ITimeService
{
    public DateTime GetTime()
    {
       return DateTime.Now;
    }
    ...
}
You should be sure to give meaningful values to the Namespace and Name properties of the ServiceContract attribute. The reason is that the concatenation of those values determines the name of the JavaScript proxy class used to access the WCF service. If you leave them blank, the JavaScript proxy for the preceding service will be named tempuri.org.ITimeService. Not really a nice or helpful name!
For AJAX-enabled WCF services, the data contract—namely, the agreement between the service and client that describes the data to be exchanged—is defined in the canonical way. You use an implicit contract for serialization, and deserialization is used for collections, primitive types, dates, enumerations, and the GUID; an explicit contract is required for custom complex types. In this case, you use the DataContract and DataMember attributes on class members to determine which members go into the serialization stream.
The primary reason for choosing ASP.NET Web services instead of WCF as the technology for building your HTTP façade is backward compatibility. You can call ASP.NET Web services from AJAX clients as long as your Web server runs the Microsoft .NET Framework 2.0 plus AJAX Extensions 1.0. For WCF services, ASP.NET 3.5 or a newer version is required.
A Web service made to measure for an ASP.NET AJAX application is similar to any other ASP.NET Web service you might write for whatever purposes. Just one peripheral aspect, though, marks a key difference. You must use a new attribute to decorate the class of the Web service that is not allowed on regular ASP.NET Web services—the ScriptService attribute. Here’s how to use it:
namespace Samples.WebServices
{
    [ScriptService]
    [WebService(Namespace = "urn:aspnet4.book/")]
    public class TimeService : System.Web.Services.WebService, ITimeService
    {
        [WebMethod]
        public DateTime GetTime()
        {
            return DateTime.Now;
        }
        ...
    }
}
Note that the ScriptService attribute simply enables AJAX callers to connect to the service; it doesn’t prevent SOAP callers from sending their packets. As a result, an ASP.NET AJAX Web service might have a double public interface: the JSON-based interface consumed by the hosting ASP.NET AJAX application, and the classic SOAP-based interface exposed to any clients, from any platforms, that can reach the service URL.
When you write an AJAX-enabled ASP.NET Web service, you have no need for a contracted interface as with WCF services. However, extracting an interface from the service class is rarely a bad idea.
public class TimeService : System.Web.Services.WebService, ITimeService
{
    [WebMethod]
    public DateTime GetTime()
    {
        return DateTime.Now;
    }
    ...
}
Public methods of the Web service class decorated with the WebMethod attribute can be invoked from the AJAX page. Any method is invoked using the HTTP POST verb and returns any value as a JSON object. You can change these default settings on a per-method basis by using an optional attribute—ScriptMethod. In particular, through the ScriptMethod attribute you can enable HTTP GET calls and use XML instead of JSON as the serialization format.
Enabling the use of the HTTP GET verb opens security holes: the service method can be invoked through a cross-site scripting attack that attaches an external script to the <script> or <img> HTML tags. These HTML elements are the sole elements allowed to access resources from outside the current domain. However, they always operate through a GET verb. This means that by keeping the HTTP GET verb disabled on your Web service method you prevent at the root any possible cross-site scripting attacks. More in general, my opinion is that you should have very good reasons to use the ScriptMethod attribute, anyway.
Finally, deriving the Web service class from System.Web.Services.WebService is not mandatory either. If you use that class as a parent, all that you gain is that you enable the service to access ASP.NET intrinsics directly without using the HttpContext.Current object as an intermediary.
Important
By default, AJAX-enabled WCF services process requests for method execution outside the ASP.NET pipeline. Requests for ASP.NET Web services methods, conversely, are treated as standard ASP.NET requests. In other words, .asmx requests flow through the classic request life cycle whereas .svc requests are routed out of the pipeline at some point.
By switching WCF services to ASP.NET compatibility mode, you ensure that .svc requests are treated identically to .asmx requests with respect to ASP.NET intrinsics, URL authorization, and impersonation. However, the ASP.NET compatibility mode for WCF services breaks the WCF ability to behave consistently across hosting environments and transports. Compatibility mode is an option only for WCF services that will always operate over HTTP and be hosted by IIS, which is just what the majority of AJAX-enabled WCF services do.
Any security barrier you place around the HTTP façade at the network level (for example, a firewall) to filter outsiders would likely stop legitimate calls too. When all calls come from a plain Web browser and from the Internet, you need a reliable way to welcome legitimate users and reject outsiders.
To do so, you have to identify a piece of information that only legitimate users can easily provide. The simplest and most effective piece of information is an authentication cookie generated by the ASP.NET Forms authentication.
To protect critical services in the HTTP façade, you isolate in a reserved area of the site any ASP.NET pages that invoke a sensitive service method and any services to protect. After pages and services are placed in a protected area of the site, access to them requires that users go through a login page.
The login page gets credentials from the user and verifies whether the user is authorized to visit the page. If all is fine, the request is authorized and an authentication cookie is generated and attached to the response. From now on, any requests the user makes to the application, including requests directed at services in the HTTP façade, will bring the cookie. (See Figure 20-5.)
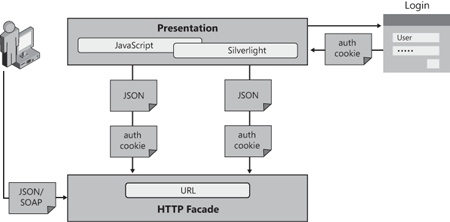
In ASP.NET, login pages require that Forms authentication be turned on. Furthermore, anonymous users should be denied access to any resources within the protected area. Here’s a sample configuration script you can use:
<location path="ProtectedAreaOfTheSite">
    <system.web>
        <authorization>
            <deny users="?" />
        </authorization>
    </system.web>
</location>
If necessary, login pages can be placed on a different server and work over HTTPS. This solution, however, has no impact on the security of the HTTP façade.
Outsiders can still try to access the services via the public URL. In this case, though, because the service IIS endpoint is also placed behind an authorization section, they will receive an HTTP 401 error code (unauthorized access). The outsider call will pass only if the outsider can show a valid authentication cookie. But this can happen only if a cookie theft has occurred previously. However, this is all another problem that relates to the security of the Web site rather than to the security of the services in the HTTP façade.
The only viable alternative to using cookies and ASP.NET Forms authentication is to install client certificates on all client machines.
Should WCF and Web services do something on their own to keep outsiders off the site? If you place service endpoints behind a protected area of the site, you’re as safe as with any other ASP.NET pages based on Forms authentication. To give you an idea, if you combine Forms authentication with HTTPS you have the same security level currently used by online banking applications and payment sites.
It’s therefore safe for the middle tier to trust the upper HTTP façade and accept any calls coming down the way. However, nothing prevents you from implementing an extra check for authorization within the body of service methods. In this case, though, you need to access credentials information from within the service.
AJAX-enabled services can carry this information only via the authentication cookie or client certificates. Programmatically, a service gets user credentials via intrinsic objects of the run-time platform. ASP.NET XML Web services live within the ASP.NET runtime and have full access to the ASP.NET intrinsics, including the User object.
By default, instead, WCF service calls are processed by the WCF runtime, which lives side by side with ASP.NET, but it’s not a part of it. As a result, a WCF service method can’t access the HTTP request context and put its hands on the User object. The only possible workaround is running all the WCF services hosted by the site in ASP.NET compatibility mode.
You turn compatibility mode on in the configuration file, as shown here:
<system.serviceModel>
    <serviceHostingEnvironment aspNetCompatibilityEnabled="true" />
    ...
</system.serviceModel>
In addition, each service is required to express its explicit approval of the model. A service does this by decorating the service class—not the service contract—with the AspNetCompatibilityRequirements attribute, as shown here:
[AspNetCompatibilityRequirements(
        RequirementsMode = AspNetCompatibilityRequirementsMode.Allowed)]
public class TimeService : ITimeService
{
    ...
}
Note that, by default, a WCF service has the RequirementsMode property set to NotAllowed. If this value is not changed to either Allowed or Required, you get a run-time exception as you attempt to make a call to the service.
Note
WCF services have been designed to be independent from binding and transportation. By turning on ASP.NET compatibility mode, you break this rule because you make the service dependent on IIS as the host and HTTP as the transportation protocol. On the other hand, services in the HTTP façade are just Ajax-specific services so, in this regard, enabling ASP.NET compatibility is actually a natural choice.
When you call server-based code you likely need to pass input data and wait to receive some other data back. Clearly, a serialization format is required to transform platform-specific data (for example, a .NET object) into an HTTP network packet. For years, this field has been the reign of XML. To a large extent, this is still the reign of XML, but not when a Web browser is used as the client.
Shorthand for JavaScript Object Notation, JSON is the de facto standard format for browsers and Web servers to exchange data over HTTP when a script-led request is made. The main reasons for preferring JSON over XML can be summarized by saying that, overall, JSON is simpler than full-blown XML and gets a free deserialization engine in virtually any browser that supports JavaScript. You can learn more about the syntax and purposes of JSON at http://www.json.org.
JSON is a text-based format specifically designed to move the state of an object across tiers. It’s natively supported by JavaScript in the sense that a JSON-compatible string can be evaluated to a JavaScript object through the JavaScript eval function. However, if the JSON string represents the state of a custom object, it’s your responsibility to ensure that the definition of the corresponding class is available on the client.
The JSON format describes the state of the object, an example of which is shown here:
{"ID"="ALFKI", "Company":"Alfred Futterkiste"}The string indicates an object with two properties—ID and Company—and their respective, text-serialized values. If a property is assigned a nonprimitive value—say, a custom object—the value is recursively serialized to JSON, as in the code snippet shown here:
{"ID"="ALFKI",
  "Company":"Alfred Futterkiste",
  "Address":{"Street="543 Oberstr", "City"="Berlin", "Country":"Germany"} }
Services in the HTTP façade preferably receive and return HTTP packets with JSON content.
On the client, creating a JSON representation of data is your responsibility. You can either manually build the string or use some facilities to serialize a JavaScript object to JSON. Some browsers support native JSON parsing through a JSON object exposed out of the window object. Specifically, these browsers are Internet Explorer 8, Firefox 3.5, Safari 4, Chrome, Opera 10, and their newer versions. Alternatively, you can download the file json2.js, which provides analogous capabilities, from http://www.json.org.
On the server, you typically rely on the serialization capabilities of some classes in the .NET Framework to get a JSON string. You can use the JavaScriptSerializer class or the newer DataContractJsonSerializer class. Although they do it through different APIs, both classes take a .NET object and convert it to a JSON string. This step, however, is transparently performed by the WCF infrastructure after you have defined the data contracts for the service interface.
Any nonprimitive data to be sent or received via WCF methods must be marked with the DataContract attribute. Imagine you have the following service:
[ServiceContract(Namespace = "Services.Wcf")]
[AspNetCompatibilityRequirements(
        RequirementsMode = AspNetCompatibilityRequirementsMode.Allowed)]
public class CustomerService
{
    [OperationContract]
    public CustomerDTO LookupCustomer(String id)
    {
        var context = new NorthwindDataContext();
        var data = (from c in context.Customers
                    where c.CustomerID == id
                    select c).SingleOrDefault();
        if (data != null)
        {
             var dto = new CustomerDTO((Customer)data);
             return dto;
        }
        return new MissingCustomerDTO();
    }
}
The method LookupCustomer is expected to return a custom object. This object must be decorated with ad hoc DataContract attribute:
namespace Services.Wcf
{
    [DataContract]
    public class CustomerDTO
    {
        private Customer _customer;
        public CustomerDTO(Customer customer)
        {
            _customer = customer;
        }

        [DataMember]
        public string CustomerID
        {
            get { return _customer.CustomerID; }
            set { _customer.CustomerID = value; }
        }
        ...
    }
}
In this particular case, the class being used over WCF is a data-transfer object (DTO)—that is, a helper class that moves the content of domain model objects across tiers.
For years, XML has been touted as the lingua franca of the Web. Now that Ajax has become a key milestone for the entire Web, XML has been pushed to the side in favor of JSON as far as data representation over the Web is concerned.
Why is JSON preferable to XML in Ajax scenarios?
The main reason for dropping XML and SOAP in favor of JSON is that JSON is much easier to handle from within a JavaScript-powered client than any XML-based format. JSON is slightly simpler and more appropriate for the JavaScript language to process than XML. Although JSON might not be easier for humans to understand than XML—this is just my thought, by the way—it’s certainly easier for a machine to process than XML. Nothing like an XML parser is required for JSON. Everything you need to parse the text is built into the JavaScript language. JSON is also less verbose than XML, and less ambitious too. JSON, in fact, is not as good as XML for interoperability purposes.
The JSON syntax is not perfect either. The industrial quantity of commas and quotes it requires makes it a rather quirky format. But can you honestly say that XML is more forgiving?
With JSON, you also gain a key architectural benefit at a relatively low cost. You always reason in terms of objects instead of dealing with untyped Document Object Model (DOM) trees. On the server, you define your entities and implement them as classes in your favorite managed language. When a service method needs to return an instance of any class, the state of the object is serialized to JSON and travels over the wire. On the client, the JSON string is received and processed, and its contents are loaded into an array, or a kind of mirror JavaScript object, with the same interface as the server class. The interface of the class is inferred from the JSON stream. In this way, both the service and the client page code use the same logical definition of an entity.
Obviously, from a purely technical standpoint, the preservation of the data contract doesn’t strictly require JSON to be implemented. You could get to the same point using XML as well. In that case, though, you need to get yourself an XML parser that can be used from JavaScript.
Parsing some simple XML text in JavaScript might not be an issue, but getting a full-blown parser is another story completely. Performance and functionality issues will likely lead to a proliferation of similar components with little in common. And then you must decide whether such a JavaScript XML parser should support things such as namespaces, schemas, white spaces, comments, and processing instructions.
As I see it, for the sake of compatibility you will end up with a subset of XML limited to nodes and attributes. At that point, it’s merely a matter of choosing between the angle brackets of XML and the curly brackets of JSON. Additionally, JSON has a free parser already built into the JavaScript engine—the aforementioned function eval.
Also labeled as the fat-free alternative to XML, JSON has ultimately been a very convenient choice for architects of Web frameworks and is today the real currency exchanged by browsers and Ajax-enabled services.
You can consume a REST service by simply invoking its URL and processing its response. We’ll get into this example in the next chapter via the jQuery library. A referenced Ajax-enabled WCF or Web service, however, can automatically generate a JavaScript proxy class, which might make invoking the service easier.
When you add a Web or WCF service to a classic Web application project or to a Windows Forms project, you go through a Visual Studio wizard, indicate the URL of the service, specify the desired namespace, and finally have the wizard generate a proxy class and add it in the folds of the project solution.
When you add a reference to Web or WCF services to an ASP.NET AJAX page, no Visual Studio wizard will be there to silently invoke an SDK tool that automagically creates the proxy class. In the first place, you don’t add a service reference through the Web project. Instead, you programmatically add the service reference to the ASP.NET page, as shown here:
<asp:ScriptManager ID="ScriptManager1" runat="server">
    <Services>
        <asp:ServiceReference Path="appAjaxLayer.svc" />
        ...
    </Services>
</asp:ScriptManager>
The script manager emits the following markup:
<script src="appAjaxLayer.svc/js" type="text/javascript"></script>
If you’re testing your page and have debug mode set in the web.config file, the suffix to the service URL will be /jsdebug instead of /js.
The /js suffix is the magic word that instructs the service infrastructure to generate a JavaScript proxy class for the client code to call the service. In particular, for WCF services the enableWebScript attribute of the endpoint behavior enables the generation of the proxy; subsequently, it enables the service to be scripted from an Ajax client.
The JavaScript proxy class is named according to different rules for Web and WCF services. For Web services, the proxy gets the exact fully qualified name of the class behind the .asmx endpoint. For WCF services, the name of the proxy class is determined by the concatenation of the Namespace and Name properties specified in the ServiceContract attribute you’re targeting. Note, therefore, that when you call a WCF service method you’re actually calling a method defined on a contract. To invoke a WCF service, it’s the contract that matters, not the class that implements it. In fact, the same service class can implement multiple contracts.
After you have the JavaScript proxy, invoking the Web or WCF service is nearly the same thing. The proxy object comes as a singleton and exposes the same set of contracted methods you have on the original service. The communication model is asynchronous and requires you to specify at least a callback function to use in case of successful execution. Here’s an example:
// Async call of method GetQuotes with a callback
Samples.Services.FinanceInfoService.GetQuotes(symbols, onDataAvailable);
The code can refer to a Web service as well as a WCF service. If it refers to a Web service, the Web service class is named Samples.Services.FinanceInfoService; if it refers to a WCF service, the namespace of the service contract might be Samples.Services and the name of the contract might be FinanceInfoService. The preceding code snippet invokes the method GetQuotes.
In addition to the regular list of parameters for the service method, each proxy method can take up to three extra parameters. The first extra parameter is mandatory and represents the callback to invoke if the method execution is successful. The second and third optional parameters indicate, respectively, the callback to use in case of failure and a state object to pass to both callbacks. In the code snippet just shown, the onDataAvailable parameter refers to a JavaScript callback to call only if the method executes successfully.
The signature of the success and failure callbacks is similar, but the internal format of the results parameter can change quite a bit. Here’s the callback signature:
function method(results, context, methodName)
Table 20-9 provides more details about the various arguments.
Table 20-9. Arguments for a JavaScript Proxy Callback Function
Argument | Description |
|---|---|
results | Indicates the return value from the method in the case of success. In the case of failure, a JavaScript Error object mimics the exception that occurred on the server during the execution of the method. |
context | The state object passed to the callback. |
methodName |
The JavaScript proxy exposes a number of properties and methods for you to configure. The list is presented in Table 20-10.
Table 20-10. Static Properties on a JavaScript Proxy Class
If you set a “default succeeded” callback, you don’t have to specify a “succeeded” callback in any successive call as long as the desired callback function is the same. The same holds true for the failed callback and the user context object. The user context object is any JavaScript object, filled with any information that makes sense to you, that gets passed automatically to any callback that handles the success or failure of the call.
If you don’t feel like using Web or WCF services, a quick solution to expose Ajax-callable endpoints is based on page methods. Page methods are simply public, static methods exposed by the code-behind class of a given ASP.NET page. The run-time engine for page methods and Ajax-enabled Web services is nearly the same. Using page methods saves you from the burden of creating and publishing a service; at the same time, though, it binds you to having page-scoped methods that can’t be called from within a page different from the one where they are defined.
Public and static methods defined on a page’s code-behind class and flagged with the WebMethod attribute transform an ASP.NET page into a Web service. Here’s a sample page method:
public class TimeServicePage : System.Web.UI.Page
{
    [WebMethod]
    public static DateTime GetTime()
    {
        return DateTime.Now;
    }
}
You can use any data type in the definition of page methods, including .NET Framework types as well as user-defined types. All types will be transparently JSON-serialized during each call.
Note
The page class where you define methods might be the direct code-behind class or, better yet, a parent class. In this way, in the parent class you can implement the contract of the public server API and keep it somewhat separated from the rest of the event handlers and methods that are specific to the page life cycle and behavior. Because page methods are required to be static (shared in Microsoft Visual Basic .NET), you can’t use the syntax of interfaces to define the contract. You have to resort to abstract base classes.
Alternatively, you can define Web methods as inline code in the .aspx source file as follows (and if you use Visual Basic, just change the type attribute to text/VB):
<script type="text/C#" runat="server">
    [WebMethod]
    public static DateTime GetTime()
    {
        return DateTime.Now;
    }
</script>
Page methods are specific to a given ASP.NET page. Only the host page can call its methods. Cross-page method calls are not supported. If they are critical for your scenario, I suggest that you move to using Web or WCF services.
When the code-behind class of an ASP.NET AJAX page contains WebMethod-decorated static methods, the run-time engine emits a JavaScript proxy class nearly identical to the class generated for a Web or WCF service. You use a global instance of this class to call server methods. The name of the class is hard-coded to PageMethods. Its usage is nearly identical to the proxy for Web or WCF services.
function getTime()
{
    PageMethods.GetTime(methodCompleted);
}
function methodCompleted(results, context, methodName)
{
    // Format the date-time object to a more readable string
    var displayString = results.format("ddd, dd MMMM yyyy");
    document.getElementById("Label1").innerHTML = displayString;
}
Note, however, that page methods are not enabled by default. In other words, the PageMethods proxy class that you use to place remote calls is not generated unless you set the EnablePageMethods property to true in the page’s script manager:
<asp:ScriptManager runat="server" ID="ScriptManager1" EnablePageMethods="true" />
For the successful execution of a page method, the ASP.NET AJAX application must have the ScriptModule HTTP module enabled in the web.config file:
<httpModules>
  <add name="ScriptModule"
     type="System.Web.Handlers.ScriptModule, System.Web.Extensions" />
</httpModules>
For page method calls, therefore, there’s no page life cycle and child controls are not initialized and processed.
Note
From page methods, you can access session state, the ASP.NET Cache, and User objects, as well as any other intrinsic objects. You can do that using the Current property on HttpContext. The HTTP context is not specific to the page life cycle and is, instead, a piece of information that accompanies the request from the start.
ASP.NET offers two approaches to AJAX: partial rendering and scriptable services. Of the two, partial rendering is the one with some hidden costs. Partial rendering is easy to understand and doesn’t require that you learn new things. It makes an existing page work the Ajax way without changing anything. Although it can still achieve better performance than classic postbacks, partial rendering moves a lot of data around. In the worst cases, the savings in terms of markup are negligible compared to the quantity of bytes moved.
On the other hand, the best selling point of the Ajax paradigm is the idea of making stateless server-side calls from the client and updating the page via the DOM. Here’s where scriptable services fit in. No hidden costs are buried in this model. You send in only input data required by the method being invoked and receive only the return value. Traffic is minimal, and no view state or other hidden fields (for example, event validation) are roundtripped. On the down side, remote method calls require JavaScript skills. You control the execution of the method via JavaScript and use a JavaScript callback to incorporate the results in the page.
Using scriptable services leads you to making some architectural changes to the application. You need a server API designed to respond to script-led requests, and you need this API to live on top of your existing middle tier. How do you expose this API? There are various options for implementing this layer. You can use a Web service or, better yet, a WCF service hosted in the same domain. Once you have a back end based on services, you orchestrate calls to endpoints from the client browser using whatever programming language the browser provides. If plain JavaScript is not optimal, you can use a wrapper library such as jQuery (see next chapter) or switch to a rich Internet framework such a Silverlight.