
As a general rule, the most successful man in life is the man who has the best information.
Any Web application is hosted within a Web server; for ASP.NET applications, the Web server uses typically Microsoft Internet Information Services (IIS). A Web server is primarily a server application that can be contacted using a bunch of Internet protocols, such as HTTP, File Transfer Protocol (FTP), and Simple Mail Transfer Protocol (SMTP). IIS—the Web server included with the Microsoft Windows operating system—is no exception.
A Web server such as IIS spends most of its time listening to a variety of ports, including port 80, which is where HTTP packets are usually forwarded. The Web server captures incoming requests and processes them in some way. The details of how that happens depend on both the programming interface of the Web server and the functionalities of the additional components installed on the server.
These components altogether form the runtime environment of ASP.NET and are collectively responsible for processing an incoming HTTP request to produce some response for the client browser. Note that this ASP.NET runtime machinery is the same for both ASP.NET Web Forms and ASP.NET MVC. Among other things, this means that classic ASP.NET pages and ASP.NET MVC resources can be hosted side by side in the same application.
In this chapter, I’ll first review the architecture and application model of the ASP.NET runtime environment and then explain the work it does to serve a request. In the second part of the chapter, I’ll discuss tools and techniques to publish and administer ASP.NET applications hosted on an IIS Web server.
Note
Any Web framework needs a Web server for applications to stay online, and ASP.NET is no exception. ASP.NET works very well with IIS—the Microsoft Web server—and very few attempts have been made to run ASP.NET applications outside the Microsoft stack of server products. Furthermore, many of these attempts are just experiments, if not just toy projects. Overall, because IIS is so tightly integrated with ASP.NET, it does not make much sense to look around for an alternate Web server.
With this said, however, note that with the proper set of add-on modules you can also make ASP.NET run on other Web servers, such as Apache. In particular, for Apache the mod_mono module is used to run ASP.NET applications. The mod_mono module runs within an Apache process and forwards all ASP.NET requests to an external Mono process that actually hosts your ASP.NET application. For more information, pay a visit to http://www.mono-project.com/Mod_mono.
At the dawn of ASP.NET planning, IIS and the ASP.NET framework were supposed to be a tightly integrated environment sharing the same logic for processing incoming requests. In this regard, ASP.NET was expected to be the specialist capable of handling page requests through port 80, whereas IIS was envisioned as the general-purpose Web server capable of serving any other type of requests on a number of predefined ports.
This is more or less what we have today with the latest IIS 7.5 and Microsoft Windows Server 2008 R2; it took a while to get there though.
Back in 2002, ASP.NET 1.0 was a self-contained, brand new runtime environment bolted onto IIS 5.0. With the simultaneous release of ASP.NET 1.1 and IIS 6.0, the Web development and server platforms have gotten closer and started sharing some services, such as process recycling and output caching. The advent of ASP.NET 2.0 and newer versions hasn’t changed anything, but the release of IIS 7.0 with Windows Server 2008 signaled the definitive fusion of the ASP.NET and IIS programming models.
Let’s step back and review the key changes in the IIS architecture and the architecture’s interaction with ASP.NET applications.
Originally, the ASP.NET and IIS teams started together, but at some point the respective deadlines and needs created a fork in the road. So ASP.NET 1.0 couldn’t rely on the planned support from IIS and had to ship its own worker process. Figure 2-1 shows the runtime architecture as of Windows 2000 and IIS 5.0.
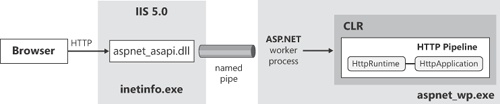
Captured by the IIS executable listening on port 80, an HTTP request was mapped to an IIS extension (named aspnet_isapi.dll) and then forwarded by this component to the ASP.NET worker process via a named pipe. As a result, the request had to go through a double-stage pipeline: the IIS pipeline first and the ASP.NET runtime pipeline next. The ASP.NET developer had little control over preliminary steps (including authentication) performed at the IIS gate and could gain control over the request only after the request had been assigned to the ASP.NET worker process. The ASP.NET worker process was responsible for loading an instance of the Common Language Runtime (CLR) in process and triggering the familiar request life cycle, including application startup, forms authentication, state management, output caching, page compilation, and so forth.
With Windows Server 2003 and IIS 6.0, Microsoft redesigned the architecture of the Web server to achieve more isolation between applications. IIS 6.0 comes with a predefined executable that serves as the worker process for a bunch of installed applications sharing the same application pool. Application pools are an abstraction you use to group multiple Web applications under the same instance of an IIS native worker process, named w3wp.exe.
IIS 6.0 incorporates a new HTTP protocol stack (http.sys) running in kernel mode that captures HTTP requests and forwards them to the worker process. The worker processes use the protocol stack to receive requests and send responses. (See Figure 2-2.)
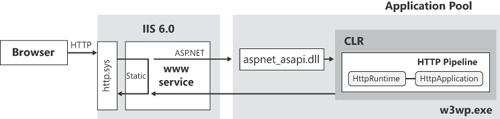
An ad hoc service—the WWW publishing service—connects client requests with hosted sites and applications. The WWW service knows how to deal with static requests (for example, images and HTML pages), as well as ASP and ASP.NET requests. For ASP.NET requests, the WWW service forwards the request to the worker process handling the application pool where the target application is hosted.
The IIS worker process loads the aspnet_isapi.dll—a classic IIS extension module—and lets it deal with the CLR and the default ASP.NET request life cycle.
Before IIS 7, you had essentially two distinct runtime environments: one within the IIS process and one within the application pool of any hosted ASP.NET application. The two runtime environments had different capabilities and programming models. Only resources mapped to the ASP.NET ISAPI extension were subjected to the ASP.NET runtime environment; all the others were processed within the simpler IIS machinery.
With IIS 7, instead, you get a new IIS runtime environment nearly identical to that of ASP.NET. When this runtime environment is enabled, ASP.NET requests are authenticated and preprocessed at the IIS level and use the classic managed ASP.NET runtime environment (the environment centered on the managed HttpRuntime object) only to produce the response. Figure 2-3 shows the model that basically takes the ASP.NET pipeline out of the CLR closed environment and expands it at the IIS level.
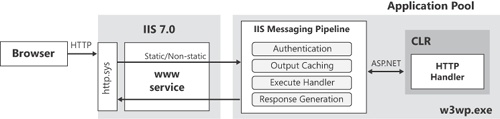
Figure 2-3. The unified architecture of IIS 7 that offers an integrated pipeline for processing HTTP requests.
An incoming request is still captured by the kernel-level HTTP stack and queued to the target application pool via the WWW service. The difference now is that whatever request hits IIS is forwarded run through the unified pipeline within the application pool. Application services such as authentication, output caching, state management, and logging are centralized and no longer limited to requests mapped to ASP.NET. In this way, you can, for example, also subject HTML pages or JPEG images to forms authentication without having to first map them to an ASP.NET-specific extension.
Note that in IIS 7, the unified architecture is optional and can be disabled through the IIS Manager tool, as shown in Figure 2-4. The Integrated Pipeline mode, however, is the default working mode for new application pools. In the rest of the chapter, I’ll assume application pools are configured in Integrated Pipeline mode unless otherwise specified.

To make sense of the IIS architecture, let’s go through the steps of the typical journey of HTTP requests that hit an ASP.NET application.
Any HTTP request that knocks at the IIS door is queued to the application pool that the target application belongs to. The worker process picks up the request and forwards it to the application. The details of what happens next depend on the IIS 7 pipeline mode—Classic or Integrated Pipeline. (IIS 7 configured to work in Classic mode behaves according to the model of its predecessor, IIS 6.)
In IIS 7.0 running in Integrated Pipeline mode, no explicit handoff of the request from IIS to ASP.NET ever occurs. The runtime environment is unified and each request goes through only one chain of events.
The following list of events is fired within the IIS messaging pipeline. Handlers for these events can be written through managed code both in the form of HTTP modules (as discussed in Chapter 4,) and code snippets in global.asax. Events are fired in the following sequence:
BeginRequest The ASP.NET HTTP pipeline begins to work on the request. For the first request ever in the lifetime of the application instance, this event reaches the application after Application_Start.
AuthenticateRequest The request is being authenticated. ASP.NET and IIS integrated authentication modules subscribe to this event and attempt to produce an identity. If no authentication module produced an authenticated user, an internal default authentication module is invoked to produce an identity for the unauthenticated user. This is done for the sake of consistency so that code doesn’t need to worry about null identities.
PostAuthenticateRequest The request has been authenticated. All the information available is stored in the HttpContext’s User property at this time.
AuthorizeRequest The request authorization is about to occur. This event is commonly handled by application code to perform custom authorization based on business logic or other application requirements.
ResolveRequestCache The runtime environment verifies whether returning a previously cached page can resolve the request. If a valid cached representation is found, the request is served from the cache and the request is short-circuited, calling only any registered EndRequest handlers. ASP.NET Output Cache and the new IIS 7.0 Output Cache both feature “execute now” capabilities.
PostResolveRequestCache The request can’t be served from the cache, and the procedure continues. An HTTP handler corresponding to the requested URL is created at this point. If the requested resource is an .aspx page, an instance of a page class is created.
MapRequestHandler The event is fired to determine the request handler.
PostMapRequestHandler The event fires when the HTTP handler corresponding to the requested URL has been successfully created.
AcquireRequestState The module that hooks up this event is willing to retrieve any state information for the request. A number of factors are relevant here: the handler must support session state in some form, and there must be a valid session ID.
PostAcquireRequestState The state information (such as Application or Session) has been acquired. The state information is stored in the HttpContext’s related properties at this time.
PreRequestHandlerExecute This event is fired immediately prior to executing the handler for a given request.
ExecuteRequestHandler At this point, the handler does its job and generates the output for the client.
PostRequestHandlerExecute When this event fires, the selected HTTP handler has completed and generated the response text.
ReleaseRequestState This event is raised when the handler releases its state information and prepares to shut down. This event is used by the session state module to update the dirty session state if necessary.
PostReleaseRequestState The state, as modified by the page execution, has been persisted.
UpdateRequestCache The runtime environment determines whether the generated output, now also properly filtered by registered modules, should be cached to be reused with upcoming identical requests.
PostUpdateRequestCache The page has been saved to the output cache if it was configured to do so.
LogRequest The event indicates that the runtime is ready to log the results of the request. Logging is guaranteed to execute even if errors occur.
EndRequest This event fires as the final step of the pipeline. At this point, the response is known and made available to other modules that might add compression or encryption, or perform any other manipulation.
Another pair of events can occur during the request, but in a nondeterministic order. They are PreSendRequestHeaders and PreSendRequestContent. The PreSendRequestHeaders event informs the HttpApplication object in charge of the request that HTTP headers are about to be sent. The PreSendRequestContent event tells the HttpApplication object in charge of the request that the response body is about to be sent. Both these events normally fire after EndRequest, but not always. For example, if buffering is turned off, the event gets fired as soon as some content is going to be sent to the client.
Speaking of nondeterministic application events, it must be said that a third nondeterministic event is, of course, Error.
Let’s delve deeper into the mechanics of ASP.NET request processing.
Note
Technically, most of the IIS pipeline events are exposed as events of the ASP.NET HttpApplication class. A significant exception is ExecuteRequestHandler. You find this event in the IIS messaging pipeline, but you won’t find an easy way to subscribe to it from within ASP.NET code. Internally, the ASP.NET runtime subscribes to this event to receive notification of when an ASP.NET request needs to produce its output. This happens when using unmanaged code that is not publicly available to developers. If you want to control how an incoming request is executed by IIS, you have to resort to Win32 ISAPI filters. If you want to control how an ASP.NET request is executed, you don’t need the IIS ExecuteRequestHandler event, because a simpler HTTP handler will do the job.
In an integrated pipeline, an ASP.NET request is like any other request except that, at some point, it yields to a sort of simplified ASP.NET runtime environment that now just prepares the HTTP context, maps the HTTP handler, and generates the response.
When the application pool that contains an ASP.NET application running in Integrated Pipeline mode is initialized, it hosts ASP.NET in the worker process and gives ASP.NET a chance to register a set of built-in HTTP modules and handlers for the IIS pipeline events. This guarantees, for example, that Forms authentication, session state, and output caching work as expected in ASP.NET. At the same time, the ASP.NET runtime also subscribes to receive notification of when an ASP.NET request needs processing.
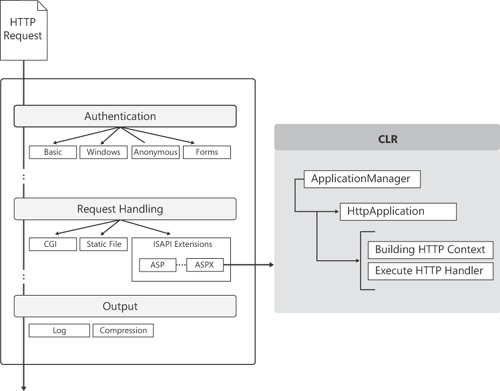
In between the PreRequestHandlerExecute and PostRequestHandlerExecute events, IIS hands an ASP.NET request to some code in the ASP.NET runtime environment for actual processing. Hosted in the IIS worker process, the ASP.NET environment is governed by a new class—the ApplicationManager class. This class is responsible for creating and managing any needed AppDomains to run the various ASP.NET applications located in the same pool. During the initialization, the ApplicationManager class invokes a specific PipelineRuntime object, which ultimately registers a handler for the ExecuteRequestHandler.
This ASP.NET internal handler is called back by IIS whenever an ASP.NET request needs to be processed. The handler invokes a new static method on the HttpRuntime object that kicks in to take care of the request notification. The method retrieves the HTTP handler in charge of the request, prepares the HTTP context for the request, and invokes the HTTP handler’s public interface. Figure 2-5 offers a graphical view of the steps involved.
Each ASP.NET request is mapped to a special component known as the HTTP handler. The ASP.NET runtime uses a built-in algorithm to figure out the HTTP handler in charge of a given ASP.NET request.
In Web Forms, this algorithm is based on the URL of the requested page. You have a different HTTP handler for each page requested. If you requested, say, page.aspx, the HTTP handler is a class named ASP.page_aspx that inherits from the code-behind class you specified in your source code. The first time the request is made this class doesn’t exist in the AppDomain. If the class does not exist, the source code for the class is obtained by parsing the ASPX markup and then it’s compiled in memory and loaded directly into the AppDomain. Successive requests then can be served by the existing instance.
An HTTP handler is a managed class that implements the IHttpHandler interface, as shown in the following code snippet. The body of the ProcessRequest method ultimately determines the response for the request.
public interface IHttpHandler
{
    void ProcessRequest(HttpContext context);
    bool IsReusable { get; }
}
The base class for Web Forms pages—the System.Web.UI.Page class—is simply a class that provides an extremely sophisticated implementation of the IHttpHandler interface, which basically turns out to be a full implementation of the Page Controller pattern. The ProcessRequest method of the System.Web.UI.Page class consumes posted data, view state, and server controls to produce the resulting HTML for the client. Needless to say, the Page class assumes that your request is for an HTML page as described by the content available in a server ASPX file.
For individual requests, or for a logically defined group of requests, within an application you can define an alternate handler class that employs different logic to generate the response. This alternate HTTP handler can be mapped to a particular URL, and it doesn’t have to point necessarily to an existing server resource. Ultimately, this is just what ASP.NET MVC does.
Note
As you’ll see in Chapter 4, ASP.NET Web Forms supports URL routing, which essentially allows you to map an incoming URL to a specific ASPX page. The standard algorithm for mapping URLs to HTTP handler classes as described here only works if you’re not using Web Forms URL routing.
As mentioned, you can write your own handlers for many of the request life-cycle events listed earlier in the chapter. You can do that by writing a managed HTTP module or by adding code to the global.asax file of your ASP.NET application. Let’s briefly consider what it takes to extend the global.asax file. Here’s a piece of code that shows what you end up with:
protected void Application_PostAuthenticateRequest()
{
    // Your code here
}
You use the Application_Xxx notation to define a handler for the Xxx event fired at the application level. For example, the code snippet gives you a chance to run some custom code after the request has been authenticated. These handlers affect your application only.
As you’ll see in much more detail in Chapter 4, a managed HTTP module is a class that implements a specific interface—the IHttpModule interface. In its startup code, the HTTP module programmatically registers as the handler for one or more of the request events. Next, you register the module with the application and just wait for it to kick in for each and every application request.
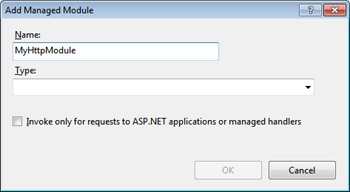
Note that the HTTP module can be registered in two ways: via the configuration file of the application (web.config) or administratively through the IIS Manager tool. Mappings set directly within IIS Manager are stored in the applicationHost.config file.
In IIS Manager, you select the Modules applet and then bring up the dialog box shown in Figure 2-6 to add a new module by specifying its unique name and, of course, the type.
An HTTP module can operate on both ASP.NET managed and native requests. A native request is intended as a request that doesn’t strictly require the ASP.NET runtime machinery to be served successfully. The canonical example of a native request is a JPEG image or a static HTML page.
Recently, IIS 7 has been further refined to better serve the needs of Web developers and site administrators. Here’s a quick list of new features you might want to take advantage of to improve the performance and effectiveness of ASP.NET applications.
Note that the list is not exhaustive and is mostly meant to serve the needs of members of an ASP.NET development team rather than site administrators. For example, IIS 7.5 incorporates a number of administrator-level extensions that have been released along the way as add-ons to IIS 7, such as the Application Request Routing and the URL Rewrite Module. The former is a routing module that forwards HTTP requests to content servers based on predefined settings to ensure proper balancing of traffic. The latter is a highly configurable module to block, redirect, and rewrite incoming requests.
For developers, features like application warm-up and hardened security are perhaps more attractive.
It comes as no surprise that some Web applications might take a while to get up and running and ready to serve the first request. Application restarts happen for a number of reasons, and sometimes they’re beyond the explicit control of the site administrators. (I’ll get back to application restarts in a moment.)
If the application needs to perform expensive initialization tasks before serving the first request, every restart is a performance hit. The user all of a sudden experiences significant delays and can’t easily figure out why. There are no fancy ways to solve the issue; in the end, all you need to do is keep your application awake and “distribute” the time it takes to initialize your application across its entire uptime. This might mean, for example, that if your application requires lengthy database processing, you ensure that data is cached in a location that’s faster to access than the database itself. Some effective solutions in this regard have been arranged using an always running Windows service. All the service does is periodically refresh a cache of data for the Web application to access from within the Application_Start event handler in global.asax.
ASP.NET 4 and IIS 7.5 on Windows Server 2008 R2 offer an integrated solution to this relatively frequent issue. A new feature named autostart provides a controlled approach for starting up an application pool and initializing the ASP.NET application before the application can accept HTTP requests.
You edit the configuration file of IIS to inform IIS of your intentions and then provide your own component that performs the warm up and accomplishes whatever tasks are required for your application to be as responsive as expected. The feature is a joint venture between IIS 7.5 and ASP.NET 4. ASP.NET ensures the preloader component is invoked in a timely manner; IIS 7.5, on the other hand, prevents the ASP.NET application from receiving any HTTP traffic until it is ready. As you can see, the warm-up is not really magic and does not squeeze extra computing power out of nowhere; it stems from the fact that users perceive the application is down until it is ready to accept and promptly serve requests.
I’ll demonstrate concretely how to set up the IIS 7.5 autostart feature later in the chapter in the section about the configuration of IIS.
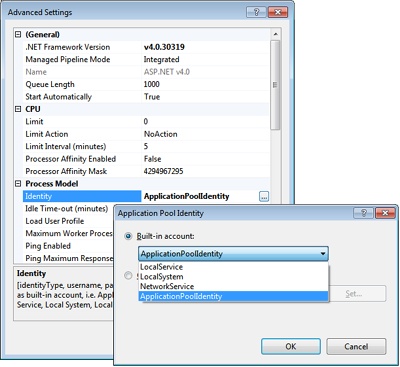
For years, worker processes under both IIS 6.0 and IIS 7.0 have run under the aegis of the NETWORKSERVICE account—a relatively low-privileged, built-in identity in Windows. Originally welcomed as an excellent security measure, in the end the use of a single account for a potentially high number of concurrently running services created more problems than it helped to solve. In a nutshell, services running under the same account could tamper with each other.
In IIS 7.5, worker processes by default run under unique identities automatically and transparently created for each newly created application pool. (The underlying technology is known as Virtual Accounts and is currently supported by Windows Server 2008 R2 and Windows 7. For more information, have a look at http://technet.microsoft.com/en-us/library/dd548356(WS.10).aspx.)
You can still change the identity of the application pool using the IIS Manager dialog box shown in Figure 2-7.
An ASP.NET application must be installed on an IIS machine for it to be usable by its end users. Installing a Web application means moving files and configuration from the development server to a staging server first or directly to the production environment. In general, deployment of a Web application entails a number of steps that relate to moving settings and data around a few server machines. This process can obviously be accomplished manually but does offer a high degree of automation. Automation is always useful and welcome; it becomes a necessity, though, when you need to install on a hosted server instead of an enterprise server that you might have direct access to.
In the beginning of the Web development era, deployment was not an exact science and everybody developed their own set of practices and tools to simplify and speed up necessary tasks. Today, Web deployment is part of the job, and effective tools are integrated into the development environment and are taken care of as part of the development cycle.
Not all scenarios are the same for the deployment of Web applications. You still can recognize simple and less simple scenarios and pick appropriate tools for each. Let’s start with plain XCopy deployment for Web site projects and then move on to consider more enterprise-level tools, such as the IIS 7 integrated Web Deployment Tool, that are better suited for Web application projects.
Note
In Microsoft Visual Studio, you can choose between two main types of Web projects—Web Site Project (WSP) and Web Application Project (WAP). The biggest difference between the two is the deployment of the source code. In a WSP, you deploy markup and source code; in a WAP, you deploy markup and compiled code. There are, of course, pros and cons in both situations. Having source code deployed to the Web server enables you to apply quick fixes and updates even via FTP. If you need to control the rollup of updates, or you are subject to strict rules for deployment, a WAP is preferable as you build a single package and run it through the server.
A comprehensive comparison of WSP and WAP can be found in the whitepaper available at http://msdn.microsoft.com/en-us/library/aa730880(VS.80).aspx#wapp_topic5. An interesting post that helps you make the choice through a series of questions is found at http://vishaljoshi.blogspot.com/2009/08/web-application-project-vs-web-site.html.
In simple scenarios, installing an ASP.NET application is simply a matter of performing a recursive copy of all the files (assemblies, scripts, pages, style sheets, images) to the target folder on the target server machine. This process is often referred to as performing an XCopy. Performing an XCopy doesn’t preclude applying additional configuration settings to the IIS machine, but you keep XCopy and configuration on two distinct levels and run them as distinct operations.
Visual Studio 2010 offers XCopy capabilities only for Web site projects through the Copy Web Site function on the Website menu. The typical user interface is shown in Figure 2-8.
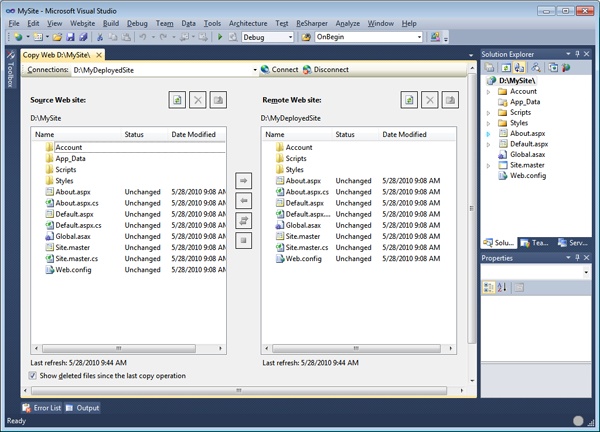
Visual Studio offers you two list boxes representing the source and remote Web sites. All you do is copy files from the source to the target and synchronize content if needed.
This approach works very well if you just want to have the source on the server machine in a native format that can be edited live to apply updates and fixes. In a WSP, Visual Studio does not really compile your source code and doesn’t deploy assemblies. It is limited to validating the correctness of the code by running the ASP.NET compiler in the background and spotting possible failures.
The actual compilation occurs only when the page is requested by some end users. This ensures that any applied change is promptly detected without the need of an extra step of compilation and deployment.
Note
As mentioned, the Copy Web Site function is enabled only for Web site projects. There are no technical reasons, however, that prevent the feature from also being implemented for Web application projects. It was merely a matter of opportunity and a design choice. The assumption is that if you opt for a WAP, you primarily intend to deploy compiled assemblies and markup files. This means that editing a code-behind class on the fly and live on the production server (for example, to apply a sensitive update) is not a priority of yours. Therefore, you are probably more interested in an automated deployment experience.
The Copy Web Site function allows you to sync up your project files directly with the target directory on the IIS machine (as illustrated in Figure 2-8) or in other ways. For example, you can connect to the IIS Web site via FTP or via FrontPage extensions.
Beyond the Copy Web Site facility of Visual Studio, to copy files to a target site you can use any of the following: FTP transfer, any server management tools providing forms of smart replication on a remote site, or an MSI installer application.
Each option has pros and cons, and the best fit can be found only after you know exactly the runtime host scenario and if the purpose of the application is clearly delineated. Be aware that if you’re going to deploy the application on an ISP host, you might be forced to play by the rules (read, “use the tools”) that your host has set. If you’re going to deliver a front end for an existing system to a variety of servers, you might find it easier to create a setup project. On the other hand, FTP is great for general maintenance and for applying quick fixes. Ad hoc tools, on the other hand, can give you automatic sync-up features. Guess what? Choosing the right technique is strictly application-specific and is ultimately left to you.
FTP gives you a lot of freedom, and it lets you modify and replace individual files. It doesn’t represent a solution that is automatic, however—whatever you need to do must be accomplished manually. Assuming that you have gained full access to the remote site, using FTP is not much different than using Windows Explorer in the local network. I believe that with the Copy Web Site functionality the need for raw FTP access is going to lessen. If nothing else, the new Copy Web Site function operates as an integrated FTP-like tool to access remote locations.
The new copy function also provides synchronization capabilities too. It is not like the set of features that a specifically designed server management tool would supply, but it can certainly work well in a number of realistic situations. At the end of the day, a site replication tool doesn’t do much more than merely transfer files from end to end. Its plusses are the user interface and the intelligence that are built around and atop this basic capability. So a replication tool maintains a database of files with timestamps, attributes, and properties, and it can sync up versions of the site in a rather automated way, minimizing the work on your end.
Another common scenario involves using an out-of-the-box installer file. Deploying in this way is a two-step operation. First, create and configure the virtual directory; next, copy the needed files. Visual Studio makes creating a Web setup application a snap. You just create a new type of project—a Web Setup Project—select the files to copy, and build the project.
Ideally, you proceed by adding a Web Setup Project to the solution that contains the Web application. In this way, you can automatically instruct the tool to copy the project output in the Bin folder and copy the content files directly in the root of the Web application folder. The benefit is that you don’t have to deal with specific file names but can work at a higher level of abstraction.
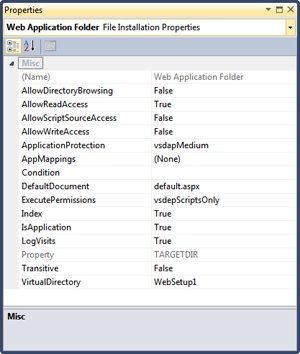
You create a Web application folder to represent the virtual directory of the new application on the target machine. The Properties dialog box lets you configure the settings of the new virtual directory. For example, the AllowDirectoryBrowsing property lets you assign browsing permission to the IIS virtual folder you will create. You can also control the virtual directory name, application execute permissions, the level of isolation, and the default page. The Bin subfolder is automatically created, but you can have the setup process create and populate as many subfolders as you need. (See Figure 2-9.)
When you build the project, you obtain a Windows Installer .msi file that constitutes the setup to ship to your clients. The default installer supports repairing and uninstalling the application. The setup you obtain in this way—which is the simplest you can get—does not contain the Microsoft .NET Framework, which must be installed on the target machine or explicitly included in the setup project itself.
The XCopy strategy is well suited for relatively simple scenarios where you don’t need to do much more than copy files. All in all, the Web setup project is a solution that works well for implementing an XCopy strategy in a context (for example, hosted servers) where you don’t have direct access to the IIS machine.
In general, installing an ASP.NET Web application is not simply a matter of copying a bunch of files and assemblies. It is likely that you will have to perform additional tasks, including adapting configuration settings to the destination environment, creating databases, configuring the Web server environment, and installing security certificates. In the first place, you must be able to express the detailed deployment logic you need (that is, what has to be done, and where and how it must be done). Second, you need tools that allow you to push content to one server (or more) in an automated way so that manual steps are eliminated, which decreases the possibility of making mistakes.
For WAP projects only, Visual Studio 2010 offers a powerful set of tools centered on the Web Deployment Tool.
The Web Deployment Tool (WDT, or Web Deploy) is an IIS tool that recognizes ad hoc deploy packages and runs them in the server environment. A deploy package contains setup instructions for a Web application, including the list of files to copy, assemblies to install, database scripts to run, certificates, and IIS and registry configuration.
You don’t even need administrative privileges to deploy these packages to IIS—delegated access to IIS is enough to run Web Deploy packages. You can get Web Deploy for IIS 6 and IIS 7 from http://www.iis.net/download/webdeploy. As shown in Figure 2-10, you can install the tool on an IIS machine via the latest version of Web Platform Installer.
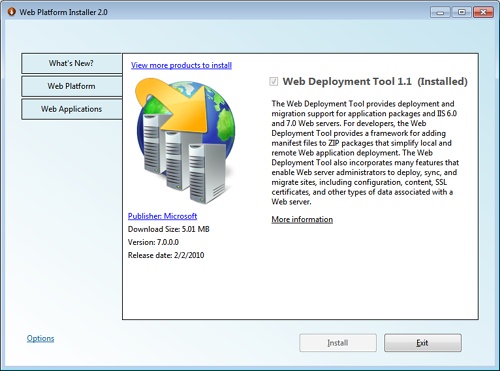
After you have WDT on board, all you need to do is prepare a deployment script and push it to the tool installed on the IIS machine.
Notice that you can use WDT for clean installations as well as for updating existing applications. In other words, the tool gives you an API to synchronize files over HTTP, the ability to execute setup and configuration commands remotely; more importantly, it works in both enterprise and hosted environments.
The strict requirement, of course, is that WDT must be installed on the server machine.
Note
To successfully operate with WDT, you need compatible versions of WDT installed on the server and the client machine. However, note that WDT is automatically installed if you have Visual Studio 2010. In addition, you must have appropriate permissions on the target computer to perform the tasks you require.
A deployment package is a zipped file with a manifest. The package includes all the information required to set up the IIS application and the files to copy. In a package, in addition to the application’s source files and binaries, you find IIS and application pool settings, changes required to the web.config file in the production environment, database scripts, security certificates, registry settings, and assemblies to place in the global assembly cache (GAC).
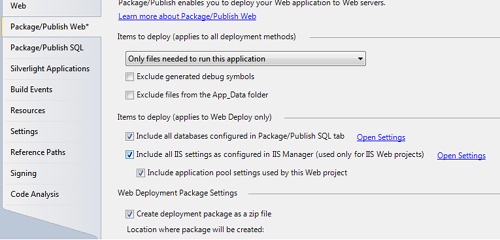
You can create a WDT package either from Visual Studio 2010 or using Windows PowerShell or the command-line version of the tool. From Visual Studio 2010, you have a highly automated user interface you control through the Package/Publish Web tab. (See Figure 2-11.)
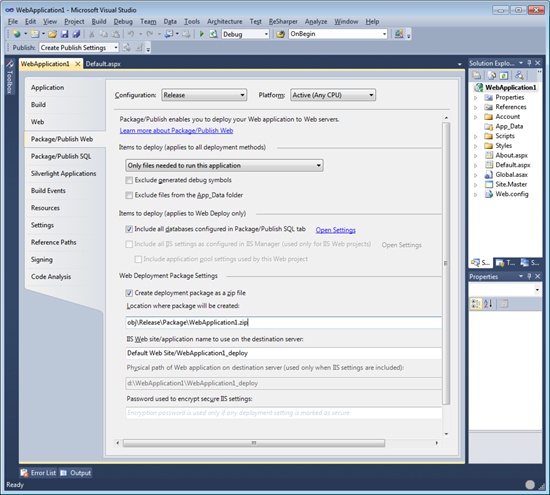
You access the tab from the Project menu and use it to set your default settings for the projects. Interestingly, the tab goes hand in hand with the Package/Publish SQL tab, where you can list the databases you intend to configure and script on the server. The tool also offers to load some database information from your web.config file.
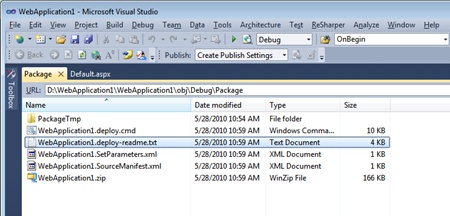
In Visual Studio 2010, you can choose to publish the application directly or you can build a WDT package and deploy it later. To build a package, you select the Build Deployment Package item from the Project menu. You obtain a ZIP file in the specified location that, among other things, contains a Windows PowerShell script to be used on a server machine. Figure 2-12 shows the content of such a package.
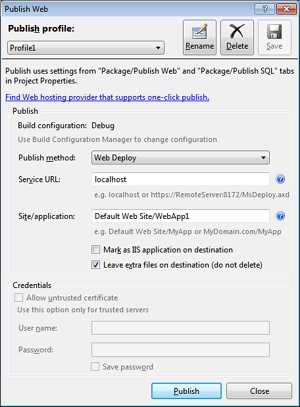
You can also publish the application in single step by choosing the Publish item on the Build menu. You are then shown the dialog box seen in Figure 2-13 where you indicate the full name of the target site or application and whether you want it to be a new application or simply a virtual directory. To turn the newly installed package into a new application, you select the Mark As IIS Application On Destination check box. For the entire operation to work, you need to run Visual Studio 2010 in administrative mode.
If you choose to deploy a new IIS application, it will be placed in the default application pool. Obviously, if the application pool is configured for, say, the .NET Framework 2.0, it can’t be used to host an ASP.NET 4 application.
How would you specify IIS settings for the application? The first option is importing a package that will be installed in the application pool of choice, configured as appropriate. Another option is creating the desired IIS environment in the development machine and then just propagating those settings up to the destination environment via WDT. There are some snags, though.
The Visual Studio Publish Wizard doesn’t let you determine the target application pool unless the source Web project is an IIS Web project. So what’s an IIS Web project, exactly?
An IIS Web project is a project that relies on the local IIS Web server instead of the ASP.NET Development Server that comes with Visual Studio. (Note that this internal Web server is also referred to as the Visual Studio Development Server or, more familiarly, Cassini.) For a WAP, you switch to the local IIS Web server by selecting the Web tab in the application properties dialog box, as shown in Figure 2-14.

At this point, when you open the Publish Settings tab you find a couple of check boxes selected that allow you to propagate current IIS settings down to the destination. (See Figure 2-15.) To configure the local IIS for the current project, you just click the Open Settings link. Any application pool or configuration scenario you define will be reported in the deployment script.
During the development of a Web site, you rely on a bunch of settings stored in the web.config file that refer to the current environment. So, for example, the data access layer targets a development database and the security settings are different from those required by the production environment. When it comes to deploying the site to the real host, you need to tweak the web.config appropriately. This is usually a manual process. You open the development version of the web.config in Visual Studio and then proceed with any required changes.
To make the whole matter even more complicated, sometimes you need to go through a battery of integration tests. An integration test is typically a situation in which you test the behavior of your site (or part of it) in an environment that simulates the production environment and in which multiple elements are being tested together. You might need yet another web.config file for this scenario. In the end, you likely need about three different versions of the web.config file: debug, release, and test. How do you deal with that?
The simplest, but not necessarily most effective, solution is managing distinct files and keeping them in sync by manual intervention. However, if you made the switch to Visual Studio 2010, you can rely on a new IDE feature that automatically maintains a single copy of the web.config file—the skeleton—and then transforms it into as many versions as you need when you publish the solution using WDT. This feature is supported by Web application projects and is not available for simple Web site projects.
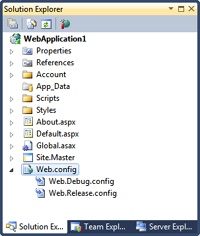
The web.config file of a Visual Studio 2010 WAP looks like the one shown in Figure 2-16. It shows up as a subtree in Solution Explorer. If you expand the node, you see two child files—web.debug.config and web.release.config. The debug version of web.config looks like a regular configuration file except for a little detail.
Here’s how the root <configuration> element appears for transformation files:
<configuration xmlns:xdt="http://schemas.microsoft.com/XML-Document-Transform">
The element includes the definition of a new namespace whose suffix is xdt. The namespace refers to a specific XML schema used to express transformations required on the content of the file. You use xdt elements to insert commands in the configuration file to be processed during the publish process to apply transformations to the actual web.config file being deployed for a given configuration (debug, release, or any other one you want to support).
Suppose, for example, that the web.config file you use for development purposes contains a <connectionString> node that needs be updated for a production install to target a real database. You edit the web.release.config file to contain the following:
<connectionStrings>
    <add name="YourDatabase"
         xdt:Locator="Match(name)"
         xdt:Transform="Replace"
         connectionString="..." />
</connectionStrings>
The Transform attribute indicates the operation to perform on the current element. In this case, you intend to perform a Replace. The Locator attribute, on the other hand, refers to the attribute to process. In the example, the target of the replacement is any attribute that matches the value of the name attribute. In other words, when processing the development web.config file, the Publish Wizard will try to locate any connection string entry there that matches the YourDatabase name. If any is found, the entire <add> subtree is replaced with the one provided in the transformation file.
If you open up the Release transformation file that comes with the default Visual Studio ASP.NET template, you find the following:
<configuration xmlns:xdt="http://schemas.microsoft.com/XML-Document-Transform">
  <system.web>
    <compilation xdt:Transform="RemoveAttributes(debug)" />
  </system.web>
</configuration>
The <compilation> element is definitely one that needs to be updated when you move to a production environment. The Transform element indicates that a given attribute—the debug attribute—must be removed. As a result, when the web.release.config file is transformed, the debug attribute is removed from the <compilation> element.
The overall idea is that you write a base web.config file for the development environment and then express the delta between it and any other one you might need through transformations. At a minimum, you need a transformation for the release version for the configuration file. The delta results from the transformation applied via the XDT transform. The XDT processor is incorporated in the Web Deployment Tool.
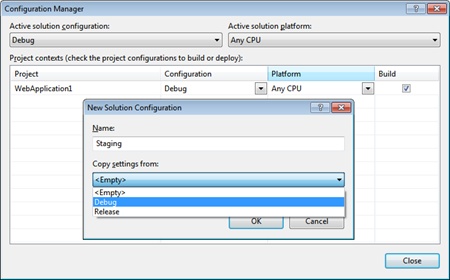
You can have a distinct transformation of the web.config for each build configuration you handle in your solution. Figure 2-17 shows how to define a custom build configuration. After you successfully add a new custom build configuration, you right-click the web.config file and select the Add Config Transform menu item. This will add a new web.Xxx.config file, where Xxx is the name of the new configuration. At this point, you can edit the file at will and add as many XDT tags as needed. The file transformation occurs only when you generate a deployment package from the Project menu.
Another aspect related to deploying an ASP.NET application is the site precompilation. Every ASP.NET page needs an extra step of runtime compilation to serve its markup. As you’ll see in the upcoming chapters, when you author an ASP.NET page you write a markup file (ASPX) plus a code-behind class using C#, Visual Basic, or any other supported .NET language.
In a WSP scenario, you deploy markup and code-behind classes as is and wait for the users to make requests to have them compiled. In a WAP scenario, you deploy markup files and one or more assemblies containing the compiled code-behind classes. In both cases, the dynamic compilation step for each available page is still required at least the first time a given page is served. The WAP project type simply saves you from deploying the source code of your classes.
In Visual Studio, when you attempt to publish a WSP project you are shown a different user interface than for a WAP project where a new term is introduced: site precompilation. In spite of this, site precompilation is a general ASP.NET feature and is not limited to WSP projects. It’s the Visual Studio 2010 user interface that seems to limit it to Web site projects.
Is site precompilation really useful?
Site precompilation consists of programmatically invoking all pages so that the ASP.NET runtime can process them as if a user had already invoked each. The benefit is that users won’t experience any extra delay after the first request. In addition, you catch any compile-time errors that slipped into pages after the previous tests.
Precompilation doesn’t necessarily deliver a huge performance improvement; most of the time, it is a small-scale optimization instead. However, if you have pages that cache a lot of data and take a while to initialize, this little bit of speed can improve the user’s perception of your application.
Precompilation can take two forms: in-place precompilation and deployment precompilation.
Note
Site precompilation is sometimes sold as a feature that saves you from having to deploy your source code to the production environment. This is definitely the wrong way to approach things. ASP.NET allows you to deploy pages with their source code-behind classes, but it doesn’t mandate it. It’s ultimately your choice, and the option has both pros and cons. If you don’t want to deploy source code, just opt for a Web application project instead of a Web site project. Site precompilation can be applied to any ASP.NET project regardless of the type and in spite of the Visual Studio tooling support that for some reason is only offered if you opt for a WSP.
In-place precompilation consists of running a tool over the entire set of project files to request each page as if it were being used by end users. As a result, each page is compiled as if it’s for ordinary use. The site is fully compiled before entering production, and no user will experience a first-hit compilation delay.
In-place precompilation usually takes place after the site is deployed but before it goes public. To precompile a site in-place, you use the following command, where /yourApp indicates the virtual folder of the application:
aspnet_compiler -v /yourApp
Note that with the previous syntax, YourApp is assumed to be deployed within the default Web site. If that is not your case, you might want to indicate the site explicitly, as shown here:
aspnet_compiler -v /W3SVC/2/Root/YourApp
In this case, you are addressing YourApp within the Web site characterized by an ID of 2.
If you precompile the site again, the compiler skips pages that are up to date and only new or changed files are processed and those with dependencies on new or changed files. Because of this compiler optimization, it is practical to compile the site after even minor updates.
Precompilation is essentially a batch compilation that generates all needed assemblies in the fixed ASP.NET directory on the server machine. If any file fails compilation, precompilation will fail on the application. The ASP.NET compiler tool also supports a target directory. If you choose this option, the tool will generate all of its output in a distinct directory. Next, you can zip all of the content and deploy it manually to the IIS machine. I’ll discuss the command line of the ASP.NET compiler tool in a moment.
Precompilation for deployment generates a representation of the site made of assemblies, static files, and configuration files—a sort of manifest. This representation is generated on a target machine and also can be packaged as MSI and then copied to and installed on a production machine. This form of precompilation doesn’t require source code to be left on the target machine.
Precompilation for deployment is also achieved through the aspnet_compiler command-line tool. Here’s a common way to use the tool:
aspnet_compiler -m metabasePath
                -c virtualPath
                -p physicalPath
                targetPath
The role of each supported parameter is explained in Table 2-1.
Table 2-1. Parameters of the aspnet_compiler Tool
If no target path is specified, the precompilation takes place in the virtual path of the application, and source files are therefore preserved. If a different target is specified, only assemblies are copied, and the new application runs with no source file in the production environment. The following command line precompiles YourApp to the specified disk path:
aspnet_compiler -v /YourApp c:DeployedSite
Static files such as images, web.config, and HTML pages are not compiled—they are just copied to the target destination.
Precompilation for deployment comes in two slightly different forms—with or without support for updates. Sites packaged for deployment only are not sensitive to file changes. When a change is required, you modify the original files, recompile the whole site, and redeploy the new layout. The only exception is the site configuration; you can update web.config on the production server without having to recompile the site.
Sites precompiled for deployment and update are made of assemblies obtained from all files that normally produce assemblies, such as class and resource files. The compiler, though, doesn’t touch .aspx page files and simply copies them as part of the final layout. In this way, you are allowed to make limited changes to the ASP.NET pages after compiling them. For example, you can change the position of controls or settings regarding colors, fonts, and other visual parameters. You can also add new controls to existing pages, as long as they do not require event handlers or other code.
In no case can new pages be added to a precompiled site without recompiling it from scratch.
The fixednames parameter in Table 2-1 plays an important role in update scenarios for sites that need to release updates to specific portions without redeploying the entire set of assemblies. In this case, you must be able to just replace some of the dynamically created assemblies and subsequently require that their names be fixed.
Note
In Visual Studio 2010, you have a graphical user interface for site precompilation only if you create a Web site project. If this is the case, and you get to publish the site, you are offered a nice dialog box with options to select to make the precompiled site updatable and to enable strong naming on precompiled assemblies.
Because an ASP.NET application lives within the context of the IIS Web server, the settings you apply to IIS might have an impact on the application itself. Let’s review some of the aspects of IIS you want to consider for achieving good performance and stability.
The application pool that hosts your ASP.NET application is subject to process recycling. Process recycling is a configurable setting by means of which you determine when the application pool (and subsequently all of its contained applications) is to be restarted. Recycling is not necessarily a bad thing and doesn’t necessarily indicate a problem. However, if it happens too often and without a clear reason, well, it’s not really a good sign.
Process recycling is an IIS feature introduced as a sort of insurance against programming errors that can cause the application to leak memory, hang, or just slow down. By recycling the worker process behind the application pool regularly, the Web server tries to ensure an acceptable average quality of service.
In light of this, process recycling is expected to happen naturally but occasionally, and in a way that doesn’t affect the perceived performance. What if, instead, you detect that the application is restarted too often?
There are many reasons for a recycle of the worker process to be triggered. Natural reasons are those configured through the wizard shown in Figure 2-18.
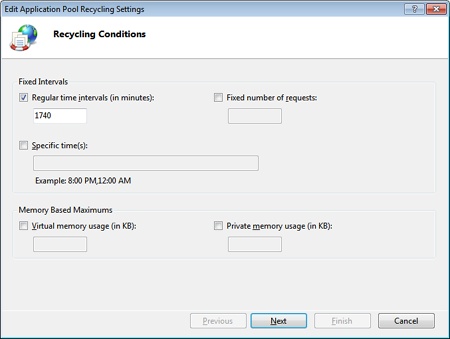
The application pool can be recycled at regular intervals (which is the default choice, as shown in Figure 2-18), after serving a fixed number of requests, at specific times, or when enough memory is consumed. Beyond this, the pool is recycled when you apply changes to the deployed site and modify configuration files or the Bin folder. If you frequently update bits and pieces of the site (for example, you published it as a Web site), an application restart also happens when a given number of assemblies is loaded in memory.
In the .NET Framework, you can’t unload a given assembly. Therefore, when an ASP.NET page is modified, it is recompiled upon the next access, resulting in a new assembly being loaded in the AppDomain. The number of recompiles allowed is not unlimited and is controlled by the numRecompilesBeforeAppRestart attribute in the <compilation> section of the configuration file. When the maximum number of recompiles is exceeded, the application just restarts.
Aside from all these reasons, an application pool can recycle because of unhandled exceptions, timeouts, low memory, or threads or connection pool issues. In general, the worker process recycling is a defensive measure aimed at keeping the application in shape and preventing any worse troubles. An application restart is not free of issues because it causes the user’s session to disappear, for example; however, that is probably the lesser evil compared to having a site that hangs or crashes.
An application restart is not something you can spot easily. It manifests through diminished and periodical responsiveness of the site. Diagnosing the cause is usually hard. When you suspect undue process recycling, the first place to look is in the event viewer to see whether some interesting information is being tracked. Memory usage is another good successive area to investigate.
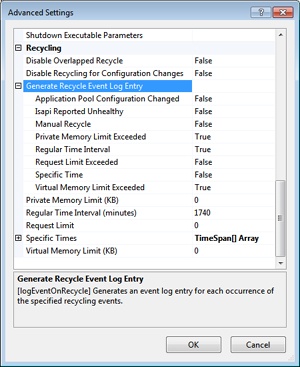
In IIS 7.x, you can use the settings shown in Figure 2-19 to determine which event log entries you want to be generated in the case of process recycling events.
To make sure you track effective termination of the application, or to handle that in a customized way, you can resort to using the following code, adapted from an old but very nice post by Scott Guthrie:
public static class HttpApplicationExtensions
{
   public static void TrackAppShutdown(this HttpApplication theApp)
   {
      // Use reflection to grab the current instance of the HttpRuntime object
      var runtime = typeof(HttpRuntime).InvokeMember("_theRuntime",
            BindingFlags.NonPublic | BindingFlags.Static | BindingFlags.GetField,
            null, null, null);
      if (runtime == null) return;

      // Use reflection to grab the current value of an internal property explaining the
      // reason for the application shutdown
      var messageShutdown = runtime.GetType().InvokeMember("_shutDownMessage",
            BindingFlags.NonPublic | BindingFlags.Instance | BindingFlags.GetField,
            null, runtime, null);

      // Log an entry in the event viewer (or elsewhere ...)
      if (!EventLog.SourceExists("YourApp"))
          EventLog.CreateEventSource("YourApp", "Application");
      var log = new EventLog { Source = "YourApp" };
      log.WriteEntry(messageShutdown, EventLogEntryType.Error);
   }
}
Written as an extension method for the HttpApplication object, the method can be invoked easily from the Application_End handler in global.asax, as shown here:
void Application_End(object sender, EventArgs e)
{
   this.TrackAppShutdown();
}
The result is an entry written in the application log for each restart. It’s not a magic wand, but it’s a nice extension you can incorporate into all applications or just in case of problems.
Devised in the context of earlier versions of ASP.NET, output caching in IIS 7 is a fully fledged feature of the Web server. Output caching refers to caching for performance reasons some of the semi-dynamic content served by the Web server. Semi-dynamic content is any content that partially changes from request to request. It is the opposite of static content, such as JPEG images or HTML pages, and also different from classic ASP.NET pages that need to be entirely regenerated for every request.
The whole point of output caching is skipping the processing of a given ASP.NET page for a number of seconds. For each interval, the first request is served as usual; however, its response is cached at the IIS level so that successive requests for the same resource that could be placed in the interval are served as if they were for some static content. When the interval expires, the first incoming request will be served by processing the page as usual but caching the response, and so forth. I’ll say a lot more about output caching in Chapter 17.
When it comes to configuring output caching in IIS, you proceed by first defining the extensions (for example, aspx) you intend to cache, and then you have to choose between user-mode and kernel-mode caching. What’s the difference?
It all depends on where IIS ends up storing your cached data. If you opt for user-mode caching, any content will be stored in the memory of the IIS worker process. If you go for kernel-mode caching, it is then the http.sys driver that holds the cache.
Using the kernel cache gives you a throughput of over ten times the throughput you would get with a user-mode cache. Additionally, the latency of responses is dramatically better. There are some drawbacks too.
Kernel caching is available only for pages requested through a GET verb. This means that no kernel caching is possible on ASP.NET postbacks. Furthermore, pages with semi-dynamic content that needs to be cached based on form values or query string parameters are not stored in the kernel cache. Kernel caching only supports multiple copies of responses based on HTTP headers. Finally, note that ASP.NET Request/Cache performance counters will not be updated for pages served by the kernel cache.
As mentioned, an ASP.NET application is hosted in an IIS application pool and run by an instance of the IIS worker process. An application pool is started on demand when the first request for the first of the hosted applications arrives. The first request, therefore, sums up different types of delay. There’s the delay for the application pool startup; there’s the delay for the ASP.NET first-hit dynamic compilation; and finally, the request might experience the time costs of its own initialization. This delay sums up any time the application pool is recycled, or perhaps the entire IIS machine is rebooted.
In IIS 7.5, with the IIS Application Warm-up module (also available as an extension to IIS 7), any initialization of the application pool is performed behind the scenes so that it doesn’t add delays for the user. The net effect of the warm-up module is simply to improve the user experience; the same number of system operations is performed with and without warm-up.
You apply the warm-up feature to an application pool. An application pool configured in this way has a slightly different behavior when the whole IIS publishing service is restarted and in the case of process recycling.
In the case of an IIS service restart, any application pools configured for warm-up are started immediately without waiting for the first request to come in, as would the case without warm-up.
When warm-up is enabled, IIS also handles the recycling of the worker process differently. Normally, recycling consists of killing the current instance of the worker process and starting a new one. For the time the whole process takes, however, IIS keeps getting requests; of course, these requests experience some delay. With warm-up enabled, instead, the two operations occur in the reverse order. First a new worker process is started up, and next the old one is killed.
When the new process is up and running, it notifies IIS that it is ready to receive requests. At this point, IIS shuts down the old worker process and completes the recycle in a way that doesn’t add hassle for the user.
To configure an application pool for warm-up, you need to edit the applicationHost.config file under the IIS directory. The folder is inetsrvconfig and is found under the Windows System32 folder. You need to change the value of the startMode attribute of the application pool entry from OnDemand to AlwaysRunning. Here’s the final snippet you need to have:
<applicationPools>
<add name="MyAppWorkerProcess"
managedRuntimeVersion="v4.0"
startMode="AlwaysRunning" />
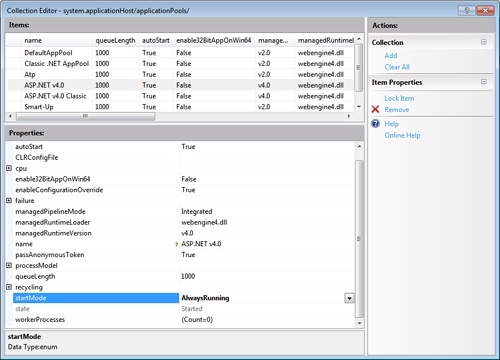
</applicationPools>You can achieve the same effect in a much more comfortable way via the IIS Manager user interface, as shown in Figure 2-20.
Because an application pool can host multiple ASP.NET applications, you also need to specify which applications the warm-up applies to. You can do that either by entering the following script into the applicationHost.config file or by using the IIS Manager interface:
<sites>
    <site name="YourApp" serverAutoStart="true" ...>
    ...
</sites>
From within IIS Manager, you just navigate to the application and select the Warm-up applet for it.
Note
Warm-up is configured at the host level, not the application level. As mentioned, changes are saved to the applicationHost.config file, not the web.config file. This means that the hoster (including a hosting company) or the administrator decides about the policy and whether or not warm-up is allowed. (In a hosting scenario, that could cause a lot of extra data to be hanging around and, subsequently, a loss of performance.)
So far, we’ve configured the application pool for warming up, but we haven’t discussed yet the actions to take to actually warm up an application. At the IIS level, all you need to indicate is a URL to your application that runs the warm-up code.
The Warm-up applet in IIS Manager gives you a dialog box where you enter the URL to the page on your site that will execute the preloading code. You also indicate a range of acceptable HTTP status codes that indicate the success of the operation.
This approach works with both IIS 7 and IIS 7.5.
With IIS 7.5, however, you can define an autostart service provider—namely, a managed component that runs any required preloading code for a given application. Such providers are registered in the IIS configuration using the following new section:
<serviceAutoStartProviders>
     <add name="MyPreloader" type="Samples.MyPreloader, MyWebApp" />
      ...
</serviceAutoStartProviders>
There’s no visual interface to configure this aspect. You either edit the configuration file manually or resort to the generic configuration editor of IIS Manager. After you have registered a bunch of autostart providers, you can pick up one for a particular application, as shown here:
<sites>
    <site name="YourApp" serverAutoStart="true">
         <application serviceAutoStartProvider ="MyPreloader" ... />
    ...
</sites>
An autostart provider is a class designed to execute any initialization or cache-loading logic you want to run before requests are received and processed. Here’s an example:
using System.Web.Hosting;

public class MyPreloader : IProcessHostPreloadClient
{
    public void Preload(String[] parameters)
    {
        // Perform initialization here...
    }
}
When the Preload method on the autostart provider returns, IIS sets up the application to receive incoming requests. If the Preload method throws an unhandled exception, the worker process is shut down and the whole warm-up feature fails. The result is that the worker process will be activated on demand by the next Web request as in the default scenario.
However, if the preload continues to fail, at some point IIS will mark the application as broken and put it in a stopped state for awhile. (All these parameters are configurable. For more information, refer to http://www.iis.net/ConfigReference.)
Note
The warm-up feature is an IIS feature. Autostart providers are an ASP.NET 4 extension that works for any type of ASP.NET applications, including Web Forms applications and ASP.NET MVC applications. Furthermore, warm-up also works for Windows Communication Foundation (WCF) services running under IIS.
With the release of IIS 7 just a couple of years ago, the ASP.NET platform and the Microsoft Web server platform are finally aligned to the same vision of HTTP request processing. A request that hits the IIS Web server goes through a number of steps—nearly the same set of steps that for years have characterized the ASP.NET runtime environment.
Today, you need to understand the internal mechanics of IIS to optimize deployment and configuration of ASP.NET applications. The great news is that if you know ASP.NET and its runtime machinery, you’re more than halfway to understanding and leveraging IIS capabilities.
Put another way, the integration between ASP.NET 4 and IIS 7.x couldn’t be tighter and more rewarding for Web application developers. In this chapter, I reviewed the key facts of the internal workings of IIS and ASP.NET when they process a request and discussed some of the features you want to dig out to deploy an application and optimize its behavior in a production environment.
In the next chapter, I’ll take a look at some details of the configuration of ASP.NET applications and discuss the schema of configuration files.