Chapter 5. Manage SharePoint solutions, BI, and systems integration
This chapter covers a diverse set of objectives that didn’t fit into the any of the previous chapters but represent important topics relevant to advanced solutions in SharePoint. This chapter covers how to manage customizations that programmers and developers have created as well as how to upgrade these solutions from SharePoint 2010. Another important topic covered is the business intelligence (BI) framework that SharePoint provides to give users and developers a powerful set of tools to analyze and present data. The final part of the chapter covers how to configure SharePoint to work with other systems, such as Exchange Server and Project Server. These systems greatly extend SharePoint but require planning and configuration to be able to use them productively and securely.
Objectives in this chapter:
Objective 5.1: Manage SharePoint solutions and applications
This objective covers issues with configuring, deploying, and upgrading customizations, including sandboxed solutions, farm solutions, and SharePoint apps. Sandboxed solutions and farm solutions were available in SharePoint 2010 and are still available in SharePoint 2013. Whereas farm solutions don’t seem to be going anywhere, sandboxed solutions are being deprecated—at least, as of this writing. Best practices dictate that any future development be done within the apps framework or in the context of a Farm Solution.
The main difference between farm solutions and SharePoint apps is that server-side code isn’t allowed to run inside SharePoint-hosted apps. SharePoint apps can run on a non-SharePoint server and even in the cloud, but in some cases you will still need to run code within a SharePoint worker process. In these cases, you need to develop a farm solution, but otherwise you should be developing apps because this is the direction SharePoint is headed. This exam doesn’t cover creating any of these customizations but rather what to do after the solution or app is handed over from the developers.
Managing sandboxed solution quotas
Sandboxed solutions run as a very restricted set of code. The whole purpose of the sandboxed solutions was to allow deployment of solutions that wouldn’t affect the rest of SharePoint. For example, an errant web part couldn’t take all the resources of the SharePoint farm. SharePoint accomplishes this by making all the sandboxed solutions run within the User Code Service and by setting quotas on how much of the system resources the sandboxed solutions could consume.
Quotas are set at the site collections level both for the amount of space they can use and how many points can be allocated to sandboxed solutions. When a sandboxed solution or set of solutions uses up the resource points within a single day, all sandboxed solutions in the site collection are stopped until the Solution Daily Resource Update timer job runs (typically late at night or early morning) or the quota is removed or increased.
More Info: Sandboxed solutions overview
See http://technet.microsoft.com/en-us/library/ee721992(v=office.14).aspx for an overview of sandboxed solutions.
Determining the resource quota for sandboxed solutions is accomplished by modifying an individual quota for a site collection or by modifying or creating a quota template and then applying it to a site collection. When modifying a quota, you set the maximum number of points that can be used by all sandboxed solutions that run in the site collection before sandboxed solutions are disabled. You can also set a warning level that sends out an email as soon as it has been reached. You can set the quotas for an individual site collection in Central Administration by following these steps:
Navigate to Central Administration as a farm administrator.
Click Application Management to open the Application Management page.
Choose the site collection that you want to set quotas on in the Site Collection section.
In the Site Quota Information section, select the quota template that you want from the Current Quota Template drop-down list, or select Individual Quota if you want to configure the values yourself. If you don’t choose Individual Quota, you can review the values and click OK to finish.
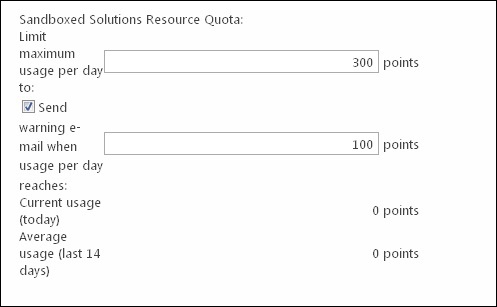
In the Sandboxed Solutions Resource Quota section, enter the maximum allowed points that sandboxed solutions can use in the Limit Maximum Usage Per Day To box, as shown in Figure 5-1 (the default is 300 points).
Choose whether to send an email warning and at what value to send the warning in the Send Warning E-mail When Usage Per Day Reaches text box.
View the current usage and the average of the last 14 days before clicking OK to save.
In these steps, you could have chosen a template rather than sett directly for an Individual Quota. You can also set a quota template by running the following PowerShell command in the SharePoint 2013 Management Shell, where <site collection> is the URL or GUID of the site collection and <template name> is the name or the GUID of the template:
Set-SPSite -Identity "<site collection" -QuotaTemplate "<template name>"
In the quotas, you were setting the number of points that could be accumulated in a day before the sandboxed solutions were disabled. A point is determined by a collection of up to 15 resource counters. For example, after the sandboxed solutions in a site collection use up a certain number of CPU cycles, that counts as a point and is added to the total for the day. As a farm administrator, you can change what these values are by using PowerShell commands. You can see the current resource point allocations by using the following PowerShell commands as a farm administrator in the SharePoint 2013 Management Shell:
$rpa=[Microsoft.SharePoint.Administration.SPUserCodeService]::Local
$rpa.ResourceMeasures | Select-Object Name,ResourcesPerPoint,AbsoluteLimit
Running the commands lists the names of the resource measures, the amount of resources per point, and the absolute limit of points per resource:
Name                                ResourcesPerPoint             AbsoluteLimit
--------------------------------------------------------------------------------
AbnormalProcessTerminationCount                     1                         1
CPUExecutionTime                                  200                        60
CriticalExceptionCount                             10                         3
IdlePercentProcessorTime                          100                        10
InvocationCount                                   100                       100
PercentProcessorTime                               85                       100
ProcessCPUCycles                         100000000000              100000000000
ProcessHandleCount                              10000                      5000
ProcessIOBytes                               10000000                 100000000
ProcessThreadCount                              10000                       200
ProcessVirtualBytes                        1000000000                4000000000
SharePointDatabaseQueryCount                      400                       100
SharePointDatabaseQueryTime                        20                        60
UnhandledExceptionCount                            50                         3
UnresponsiveprocessCount                            2                         1
You can use the names in the preceding list to modify the values if you want to change the respective weights of the resources. For example, you might want to make CPU execution time more important than Process IO Bytes. You would do this by lowering the CPUExcecutionTime property from 200 down to something less, like 100, so that the points would accumulate twice as fast as they did before you changed it. You can change the values of the resource measures in the same Management Shell by using the following PowerShell commands, where <resource name> is the name of the resource measure to be changed, <limit value> is the absolute limit value, and <point value> is the resource per point value:
$rpa=[Microsoft.SharePoint.Administration.SPUserCodeService]::Local
$rpa.ResourceMeasures["<resource name>"].AbsoluteLimit = <limit value>
$rpa.ResourceMeasures["<resource name>"].ResourcesPerPoint = <point value>
$rpa.ResourceMeasures["<resource name>"].Update()
$rpa.Update()
Exam Tip
That you will need to know this level of detail about resource point allocations for the exam is doubtful, especially because sandboxed solutions are being deprecated. However, this information might help you with planning and controlling the resources consumed by sandbox solutions on your SharePoint 2013 farm.
Whatever values you use, you might want to keep track of the points by referring back to the Configure Quotas And Locks page to see how many points are being consumed. Any sandboxed solutions that you are using and deem as valuable in the long term for your business should be marked for migration to an app solution or a farm solution if an app solution isn’t feasible.
Configuring Sandboxed Solution Management
Sandboxed solutions (or user solutions, as they are sometimes called) can be managed at the farm level. Since SharePoint 2010 introduced sandboxed solutions, they have been the preferred development solution. Thousands and thousands of sandboxed solutions are available.
Even though SharePoint 2013 recommends that you now use SharePoint apps instead of sandboxed solutions, most organizations won’t have enough time and/or money to convert these applications before upgrading to SharePoint 2013. This means that you need to test and manage these solutions as they are migrated to the new farm(s).
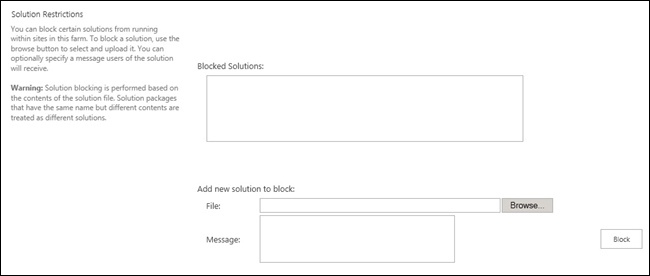
The preceding section covered setting quotas, which can limit how many resources are used by sandboxed solutions per site collection. Sandbox Solution Management allows for blocking of certain sandboxed solutions as well as determining how servers are used to provide resources. This way, you can remove certain solutions that might be consuming more resources than they should be without affecting the other solutions. It also allows you to determine which servers are used to provide solution services. To delete sandboxed solutions, follow these steps:
Navigate to Central Administration as a farm administrator and click System Settings.
Click Manage User Solutions in the Farm Management section. (Remember that sandboxed solutions are also referred to as user solutions.)
Click the Browse button in the Solution Restrictions section (see Figure 5-2). You need to browse to and select the solution package that was used to install the sandboxed solution. Solutions are blocked based on the contents of the solution and not the name of the solution file.
Enter a message that will appear when a user tries to use the solution.
Click Block to add the solution to the list of blocked solutions.
Click OK to save changes.
In the Load Balancing section, the option to run the sandboxed code on the same server as requests can help improve performance and requires that all WFEs run the Sandboxed Code Service. If you want to specify servers to run the Sandboxed Code Service, you need to use the Requests To Run Sandboxed Code Are Routed By Solution Affinity option. This can also help you isolate the sandboxed solutions so that they don’t potentially use many resources on the WFEs, but doing so also can cause something of a performance hit because the WFEs have to communicate across servers.
Deploying farm solutions
Farm solutions are also known as full trust solutions because they have full trust on the servers on which they are installed. When you deploy a farm solution, it can place the dynamic link libraries (DLLs) that it uses in the global assembly cache (GAC). This gives farm solutions a high degree of access to the server.
Only fully tested and trusted farm solutions should be deployed into a production environment. Despite the push for SharePoint apps, server-side code is still needed for many solutions, which means that you will continue to need to deploy farm solutions.
Deploying farm solutions is much more different in SharePoint 2013 from what it is in SharePoint 2010, because of the ability of SharePoint 2013 to run SharePoint 2010 mode alongside SharePoint 2013 mode. SharePoint 2013 accomplishes this by having different areas in the root folder. It has a folder that starts with 14 for SharePoint 2010 files and a folder that starts with 15 for SharePoint 2013 files.
If you deploy a farm solution in the same way that you did in SharePoint 2010—by using the PowerShell commands Add-SPSolution and Install-SPSolution—the farm solution files that are part of the TEMPLATES directory are installed only under the 14 folder and therefore aren’t accessible to SharePoint 2013 mode. The files that aren’t part of the TEMPLATES directory are still installed in the same places they were in SharePoint 2010—that is, in binaries, DLLS, ISAPI files, and so on. If you want the farm solution files available to both the SharePoint 2010 mode and the SharePoint 2013 mode, you need to install the files into both folders.
SharePoint 2013 uses the CompatibilityLevel property that you can include as part of the Install-SPSolution command or define in the solution file (although values in the solution file will be overridden by those of the Install-SPSolution command). Following are the valid values for the CompatibilityFile property:
14 installs the solution into the 14 folder for SharePoint 2010 mode compatibility.
15 installs the solution into the 15 folder for SharePoint 2013 mode compatibility.
“14,15” or “All” installs the solution into both the 14 and 15 folders.
“Old” or “OldVersions” installs the solution to the old (14) folder.
“New” or “NewVersions” installs the solution to the new (15) folder.
More Info: Using Install-SPSolution
See http://technet.microsoft.com/en-us/library/ff607534(office.15).aspx#detail for more information on how to use the PowerShell command Install-SPSolution.
If a solution file doesn’t contain a Compatibility Level property, it defaults to 14. You can install a farm solution into both the 14 and 15 folders with a single command; if you try to install a solution by using two different commands, you will get an error. If you try to use the -Force option, you can cause the solution to malfunction. You should uninstall it by using the Uninstall-SPSolution and then reinstall by using the “14,15” or the “All” Compatibility Level, as shown in the following example where <solution name> is the name of the solution:
Install-SPSolution -Identity <solution name> -CompatibilityLevel "14,15"
Important
The CompatibilityLevel property is available for features as well. The values for the CompatibilityLevel property and concepts of which folders they deploy into are the same as for solutions.
To have functionally different solutions for the SharePoint 2010 and SharePoint 2013 modes, you should create two different solutions and make sure that their compatibility levels are different. If you want two different solutions but also want them to share a set of global files, you can create three solution files: one set for files that go in the 14 folder, one for files that go in the 15 folder, and one for files that are shared globally.
Important
When uninstalling a solution (using the Uninstall-SPSolution command), be sure to use the appropriate Compatibility Level. If you use the wrong one, the files in the TEMPLATE folder will be left behind, but the global files will be removed.
If you want to use Central Administration to deploy a farm solution and want to control what folder the solution is deployed into, you need to set the version in the solution itself. This is done by setting the SharePointProductVersion attribute of the Solution property in the solutions manifest file (manifest.xml). Now, the only valid values for SharePointProductVersion are 14.0 and 15.0. By default, if no version is set, SharePoint 2013 assumes that the solution will be installed into the 14 folder. You can add the SharePointProductVersion attribute to the manifest files if you want ensure that people installing it with Central Administration install it into the right folder. If you want to install (deploy) it into both the 14 and the 15 folders, you need to use the PowerShell command Install-SPSolution or create two solutions. If you still want to deploy your farm solution with Central Administration, add it first by using the PowerShell Add-SPSolution command and then follow these steps:
Navigate to Central Administration as a farm administrator.
Click System Settings to open the System Settings page.
Click the name of the .wsp (such as contososolution.wsp) file that was added under the Name column on the Solutions Management page.
On the Solutions Properties page, click Deploy Solution.
On the Deploy Solution page, choose whether you want to deploy the solution immediately or in the future. Either situation will create a timer job that will actually deploy the solution.
On the same page, choose which web application (or all Web applications) that the solution will be deployed to.
Click OK to create the timer job. You are returned to the Solution Management page, where you can see the deployment’s progress. When the status for the solution says Deployed, the solution is ready to use.
Exam Tip
The concept of side-by-side folders (the 14 folder and the 15 folder) to implement two different SharePoint modes is new to SharePoint 2013, and you can expect to see it on the exam. It was covered in Chapter 3, but knowing how it affects solutions is also important.
Upgrading farm solutions
This exam doesn’t cover programming, but you need to be aware of some aspects of upgrading farm solutions. The good thing about bringing farm solutions over to SharePoint 2013 is that most of them will run because of the separate 14 and 15 folders. The farm solution defaults into the 14 folder when it’s installed. That the solution might even be available in SharePoint 2013 mode is highly likely. You should still upgrade your farm solutions when you can, though. SharePoint 2013 uses .NET 4.0 and if you want your farm solutions to be natively compatible with SharePoint 2013, they need to be compiled with .NET 4.0. If you want the farm solution to be deployed to the 15 folder, follow these steps to modify your old solution:
Open the solution in Visual Studio 2012 (or higher).
Right-click Package.Package under Package in the Solution Explorer.
Change the SharePoint Product Version to 15.0.
Rebuild your solution.
After rebuilding a solution, you need to deploy it, upgrading the solution to the most current version. When upgrading a farm solution, you have two options: replace or update.
In the replacement method, the solution is retracted and optionally removed. The new solution is then added and deployed. If you uninstalled but didn’t remove the solution, you need to use a new (and unique) filename for the .wsp file and a new GUID. If you plan to install the solution into the same folder, you should use the replacement method if any of the following is true:
When updating a farm solution, SharePoint automatically detects that the GUID already exists and retracts the existing solution before deploying the new solution. It keeps a backup of the old solution in case the new one fails to deploy (only one copy of a backup is kept at a time). You use the Update-SPSolution PowerShell command to perform this type of upgrade. You can update a 14 solution in the 14 folder or a 15 solution in the 15 folder, but you can’t cross the folders because it must contain the same set of files and features as the existing solution.
More Info: Using Update-SPSolution
See http://technet.microsoft.com/en-us/library/ff607724 for more information on the PowerShell command Update-SPSolution.
Deploying apps
Chapter 4, covered the topic of creating an App Catalog. The App Catalog stores apps that SharePoint users can then install on their SharePoint sites. An App Catalog is scoped to the web application level, so any apps that you want to be available to a site must be in the App Catalog that’s for the web application that contains the site. Adding a SharePoint app to the App Catalog can be done by navigating to the App Catalog site and following these steps:
Verify that the user adding the SharePoint app is a member of the site Owners or Designers group.
Click the Apps For SharePoint link.
On the Apps For SharePoint page, click New Item.
Click the Browse button in the Choose A File dialog box and select the SharePoint app to be added.
Click OK to upload the SharePoint app.
Validate the values in the Item Details section.
Make sure that Enabled is selected so that users can see the SharePoint app on their sites.
Optionally, select Featured so that the SharePoint app will appear in the featured section when a user adds an app.
Click Save.
More Info: Managing the App Catalog
See http://technet.microsoft.com/en-us/library/fp161234.aspx for more information on how to manage the App Catalog in SharePoint 2013.
An App Catalog is scoped to the web application level, but that doesn’t mean that only one web application can use it. An App Catalog can be used by all or several of your web applications. This means that you can use a single App Catalog for all the web applications on the SharePoint farm. This has a drawback in that you might be showing users SharePoint apps that aren’t applicable to the web application, but it has the benefit of allowing for app management in a single location. If you have an App Catalog per web application and want a particular SharePoint app to be available to all web applications, you have to add it to each App Catalog. If you want to attach an App Catalog to a different web application, you can do so in Central Administration by following these steps:
Navigate to Central Administration as a member of the Farm Administrators group.
Click Manage App Catalog in the Apps section.
On the Manage App Catalog page, choose the web application to which you want to assign the App Catalog by clicking the down arrow next to the Web Application drop-down list and then selecting the web application’s name. The dialog box should close.
Back on the Manage App Catalog page, select Enter A URL For An Existing App Catalog Site and then enter the location of the App Catalog (for example, http://contoso.com/appcatalog).
Click OK to save changes.
Repeat for all the web applications to which you want to assign the App Catalog.
Upgrading apps
A SharePoint app package can contain various items, depending on where it’s located (that is, where the code runs). If an App runs in the cloud, the app package might consist of only an app manifest, which contains a product ID and a version number. For you to update an app the product ID must be the same as the existing app that you want to upgrade, and the version number must be higher. Migrating from an old app to a new one is also possible. In the migration scenario, the app would have a different product ID but could still have the same friendly name. In either case, you upgrade an app the same way that you deploy it for the first time.
After a SharePoint app is updated, end users will see an indication that an update is available on the Site Contents page of every web site on which the app is installed. Clicking the link to update the app starts the update process, and if it fails, it’s completely rolled back. The following series of events will occur in no particular order and, in some cases, will even occur in parallel:
If permissions are changed, the user is asked to approve the changes.
The SharePoint app becomes temporarily unavailable while it’s being updated.
If a schema change is made to a SQL Azure database, the database is backed up before the change is made so that it can be rolled back, if needed.
If an app is auto-hosted and a Windows Azure Web Site component is changed, a transaction occurs that allows a full rollback.
If the app contains a solution package (a .wsp file) and the contents are changed, SharePoint makes a backup of the app web, tests the update, and then either updates the app package or rolls it back, depending on the success of the test.
Assuming that the app is provider hosted, any update logic on non-SharePoint components can occur in the PostUpdate web service or in the first-run logic of the app itself.
The PostUpdate web service is executed.
Any updates that SharePoint 2013 can’t make need to go in the PostUpdate web service or in the first-run logic (code that runs the first time the app is run but not after that). This process of updating app code gives more power to end users (or to the site owner, at least) and away from farm administrators. This means that additional communication is needed for site owners to be aware of any app updates.
Migrating an app to a new one requires that the app use a new product ID in its manifest. Although the new app can have the same friendly name as the old app, they both will show up in the App Catalog as two distinct apps until the old app is removed. If data needs to be migrated, it needs to be handled by the app code via the PostInstall event, which runs after the app is installed. The new app can use any components (such as external data sources) that aren’t installed by the old app because when the old app is removed, it also removes any components that were installed with it.
More Info: Understanding the App for SharePoint update process
See http://msdn.microsoft.com/en-us/library/fp179904.aspx for more information on the App for SharePoint update process.
Objective summary
SharePoint 2013 supports sandboxed solutions, but development on them shouldn’t be continued because they are being deprecated.
The Compatibility Level determines which SharePoint modes can use a farm solution when it’s installed.
To target a farm solution to the 15 folder, you need to rebuild the solution in Visual Studio and set the SharePoint version to 15.0.
An updated farm solution must contain the same set of files and features as the deployed solution.
Apps added to the App Catalog are available to all web applications that use that particular App Catalog.
After an app is updated in the App Catalog, the sites that use that App Catalog can manually upgrade the app by updating it on the Site Contents page.
If an app doesn’t update successfully, it automatically rolls back.
Objective review
Answer the following questions to test your knowledge of the information in this objective. You can find the answers to these questions and explanations of why each answer choice is correct or incorrect in the “Answers” section at the end of this chapter.
SharePoint Server 2013 supports which of the following?
Sandboxed solutions
Farm solutions
SharePoint apps
All of the above
You are installing a farm solution on SharePoint 2013 and want it available only for SharePoint 2010 mode. Which of the following Compatibility Level options for the Install-SPSolution command can you use for this purpose?
14
“14,15”
“Old”
“All”
Which of the following can you change in a farm solution and still do an update rather than a replacement upgrade?
Add a feature
Modify a DLL
Update the elements.xml file
Change the scope of the solution
Which of the following is true about upgrading a SharePoint app by using the update method?
The product ID stays the same.
The app remains fully functional throughout the process.
The app is automatically updated on the sites that use it.
If the app fails to update, the previous version must be reinstalled.
Objective 5.2: Planning and configuring a BI infrastructure
SharePoint 2013 provides a wide range of powerful business intelligence (BI) tools to use. Chapter 4 has already discussed some of these tools, such as Excel Services, but several others haven’t been discussed, such as Performance Point, PowerPivot, and Power View. These tools can be used to do BI analysis of the data in SharePoint lists as well as data from external sources. As powerful as these tools are, they can also consume many resources; as a result, you must carefully plan implementation of these BI tools to ensure not only that users can access them, but also that the tools don’t overburden the SharePoint server so that other users can’t use it. This objective covers how to plan for and implement the SharePoint infrastructure that will enable users to perform BI analysis securely on a wide range of data sources.
Planning and configuring PerformancePoint
In SharePoint Server 2013, the PerformancePoint service application can be used to create BI dashboards. These dashboards can contain custom reports, key performance indicators (KPIs), filters, tabular data sources, and scorecards made up of SharePoint data as well as data from external sources.
You need to start the PerformancePoint service, create the PerformancePoint service application, and configure it before you can start using PerformancePoint services. Follow these steps:
Navigate to Central Administration as a farm administrator.
Click Manage Services On Server in the System Settings section.
Select the server on which you want to run the PerformancePoint service by clicking the down arrow and selecting Change Server (or leave the default server selected).
Scroll down until you find PerformancePoint Services and click Start in the Action column.
Repeat steps 3 and 4 for each server on which you want to run the PerformancePoint service.
Back on the Central Administration home page, click Manage Service Applications in the Application Management section.
Click the New icon and choose the PerformancePoint Service Application.
Enter a name for the PerformancePoint service application (such as PerformancePoint Service Application) in the Name text box.
Select the default proxy list check box if you want the service application to be in the default proxy list (leave it cleared if you want to specify manually which web applications can use this service application).
Enter the name of the database server in the Database Server text box; use the default database server for performance reasons.
Enter the name of the database in the Database Name text box. A non-GUID based name makes entering the name into scripts and identifying it in backups easier.
Leave the Database Authentication method set to Windows Authentication unless you have to use SQL Authentication (due to business requirements or governance).
If a failover server is available, enter its name in the Failover Database Server text box.
Choose to create a new application pool or use an existing application pool in the Application Pool section.
Click Create.
SharePoint lets you know when the creation process is completed by displaying the screen shown in Figure 5-3, indicating that the PerformancePoint service application has been created, the steps necessary to complete the configuration, and a warning about connecting to Microsoft SQL Server Analysis Services.
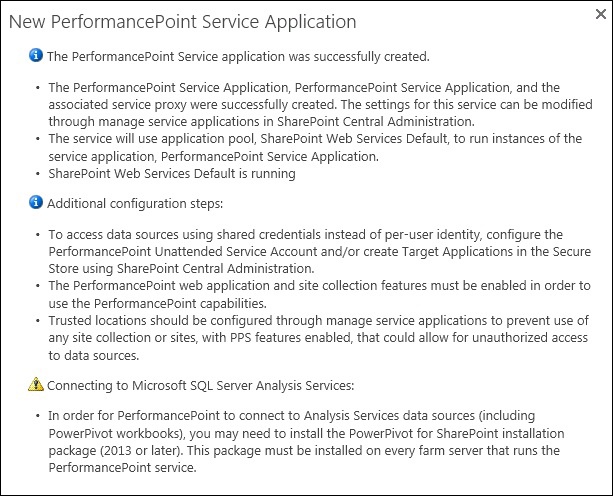
Exam Tip
Pay special attention to the additional configuration steps to be done after the PerformancePoint service application is created. This information could show up on the exam in the form of an “items required” or “steps to take” type of question.
You also can create the PerformancePoint service application by using PowerShell commands in the SharePoint 2013 Management Shell.
Configuring the unattended service account
As indicated in Figure 5-3, after the PerformancePoint service application is created, you need to perform additional configuration steps before users can start using the PerformancePoint services. First, configure the unattended service account, which is stored in the Secure Store service application. Before you can do so, you must create the Secure Store service application and generate a master key, as explained in Chapter 4. After the Secure Store is ready to be used, you can configure the unattended service account in Central Administration by following these steps:
Navigate to Central Administration as a farm administrator.
Click Manage Service Applications in the Application Management section.
Select PerformancePoint from the list of service applications.
Click the PerformancePoint Service Application Settings link on the Manage PerformancePoint Services page, as shown in Figure 5-4.
Enter the user name and password of the account that you want to be the unattended service account in the Secure Store And Unattended Service Account section and click OK.
Verify that the account used for the unattended service account has db_datareader permissions on any databases that it needs to access, read access to any SharePoint data that will be used (including Excel workbooks used by Excel Services), and read access to any cubes that might be used if you plan to use SQL Server Analysis Services.
More Info: Configuring the unattended service account
See http://technet.microsoft.com/en-us/library/ee836145 for more information on how to configure the unattended service account for PerformancePoint Services.
PerformancePoint dashboards can also use Secure Store target applications to access external data sources. You use the Dashboard Designer to connect to the external data sources, using the name of the target application after it’s created in the Secure Store. Creating a target application for PerformancePoint is similar to creating one for other service applications such as Excel Services or the Business Connectivity Services. The main difference is in the permissions required. PerformancePoint Services only reads data, so the Target Application account needs only the db_datareader role on the SQL Server databases it will access. If you are connecting to other data sources, the account still needs only read access to the data being reported on, but the actual permissions given depend on the data source. In general, the account has only these minimal permissions (and therefore is more secure). For security concerns, you should audit the account to make sure that it doesn’t receive more permissions than required to provide the necessary BI information required.
The Dashboard Designer tool gets installed on users’ local machines and helps them design dashboards that can contain a wide variety of BI-related information, such as analytic charts, strategy maps, key performance indicators (KPIs), and so forth. Although you don’t need to know how to use Dashboard Designer for the exam, it can bring a better understanding of how users are using the tool and help you determine the best way to configure it.
More Info: Using PerformancePoint Services to create dashboards
See http://technet.microsoft.com/en-us/library/jj571736.aspx for more information on how to create dashboards by using PerformancePoint Services.
Configuring trusted data sources
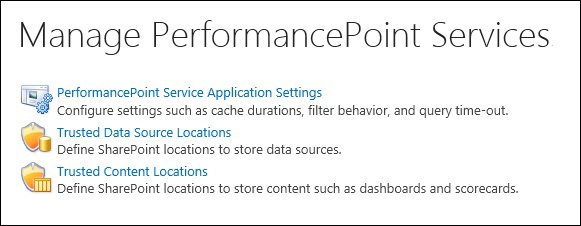
After you configure the unattended service account, you should consider configuring the trusted data source locations. By default, PerformancePoint trusts all SharePoint locations. If this is the configuration you want, you don’t have to do anything. If you don’t want to trust all SharePoint locations—for example, you don’t want users to be able to report on certain data in SharePoint—you need to specify each location that PerformancePoint Services trusts for SharePoint data. The locations can be site collections, sites, and/or document libraries. To change the trusted data source locations in Central Administration, follow these steps:
Navigate to the Manage PerformancePoint Services page as a farm administrator or with an account that has full control of the PerformancePoint service application.
Click the Trusted Data Source Locations link.
Select Only Specific Locations and click Apply.
Click the Add Trusted Data Source Location link that should have appeared below the Apply button.
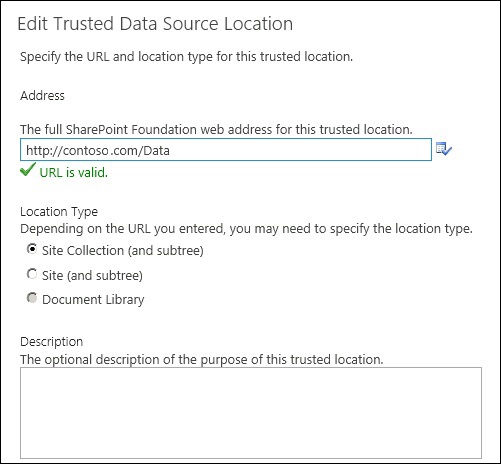
On the Edit Trusted Data Source Location page, enter the full URL of the SharePoint location to be trusted in the Address text box and then validate the URL by clicking the validate icon to the right of the text box, as shown in Figure 5-5.
Choose which type of location the SharePoint URL is (Site Collection, Site, or Document Library) in the Location Type section.
Enter an optional description in the Description field.
Click OK to save.
Repeat steps 4 through 8 for each additional SharePoint location that you want to trust.
You can also configure where PerformancePoint components (such as dashboards and scorecards) are allowed to be created. By default, PerformancePoint allows components to be stored in any SharePoint location (although the creator of the content would still need contribute rights to the location). If you want to limit where users can create PerformancePoint content, you need to add each location that’s allowed, similar to way the trusted data source locations were added. Although PerformancePoint Services are extremely useful for a wide range of BI-related tasks, you might want to limit the locations for performance and security reasons. You can limit the locations allowed in Central Administration by following these steps:
Navigate to the Manage PerformancePoint Services page as a farm administrator or with an account that has full control of the PerformancePoint service application.
Click Trusted Content Locations.
On the Trusted Content Locations page, select Only Specific Locations and click Apply.
Click the Add Trusted Content Location link.
On the Edit Trusted Content Location page, enter the full URL of the SharePoint location in the Address text box and click the verify icon.
In the Location Type section, choose the location type: site collection, site, or document library.
Enter an optional description in the Description text box and click OK to save.
Repeat steps 4 through 7 until all desired locations are added.
More Info: Enabling trusted locations for PerformancePoint Services
See http://technet.microsoft.com/en-us/library/ee836148.aspx for more information on how to enable trusted locations for PerformancePoint Services in SharePoint Server 2013.
Configuring site collections to use PerformancePoint
After configuring PerformancePoint services, you can turn on the PerformancePoint feature on existing site collections to allow PerformancePoint content to be created. SharePoint 2013 provides a site template designed to help guide users in the development of dashboards and scorecards, as well as the items contained within. If you users aren’t familiar with PerformancePoint, the site collection’s home page has some helpful directions as well as a link to install the Dashboard Designer.
As mentioned in the confirmation dialog box when you created the PerformancePoint service application, information from SQL Server Analysis Services can be displayed in PerformancePoint dashboards and scorecards. This powerful capability requires some additional setup and works with PowerPivot. Because PowerPivot is covered in this objective, the configuration of the connection between SharePoint and SQL Server Analysis Services is covered in the section covering PowerPivot. Note that the PowerPivot installation package needs to be installed on every server that runs the PerformancePoint service.
Planning and configuring Reporting Services
SQL Server Reporting Services can be used in SharePoint 2013, assuming that both SQL Server and SharePoint have been configured correctly. After Report Services is configured, SharePoint can display and interact with SQL Server reports. This provides end users access to these reports without giving them access to the underlying data used to generate the reports. It also allows the full power of SQL Server to be used to generate reports (such as those based on millions of lines of data and/or complex relationships) that might not otherwise be feasible if they were pulled from SharePoint lists. Some reports have to be generated periodically rather than on demand. Regardless of the type of report created, it can be exposed within SharePoint.
Before you start configuring Reporting Services in SharePoint, you need to install it on the SQL Server instance that will provide Reporting Services to SharePoint (SQL Server can provide reports without SharePoint using Reporting Services).
Important
An instance of a compatible SQL Server version (such as SQL Server 2012) with Reporting Services needs to exist on each SharePoint WFE as well as all SharePoint servers running the Reporting Services service application. This can be the Express edition, but neither Reporting Services nor SharePoint can store their databases in the Express versions.
Installing Reporting Services on SQL Server
Configuring Reporting Services for SharePoint on SQL Server 2012 requires that you go through the setup process and add features (if they aren’t already installed). This means that SQL Server won’t be available during part of the installation. Also, the account that installs the software needs to be a member of the local administrators group during the installation. The account should be removed from the group after installation if it’s also an account that has access to SQL Server or the SharePoint farm. Follow these steps to add the Reporting Services feature to SQL Server 2012:
Log onto the server where SQL Server 2012 is installed with an account that’s a member of the Local Administrators group.
Start the SQL Server Installation Wizard by navigating to All Programs | Microsoft SQL Server 2012 | Configuration Tools and clicking SQL Server Installation Center.
In the SQL Server Installation Center dialog box, click Installation and then click New SQL Server Stand-Alone Installation or Add Features To An Existing Installation.
If necessary, browse to the SQL Server 2012 Installation Media and click OK.
Wait for the Setup Support Rules check to finish and click OK.
The Product Updates page automatically checks for updates if that’s enabled. Wait for the check to finish and then click Next.
The process for installing setup files should take just a moment. Wait until it finishes and the SQL Server 2012 Setup dialog box appears.
Wait for the Setup Rules check to run and click Next.
On the Installation Type page, select Add Features To An Existing Instance Of SQL Server 2012 and choose the SQL Server instance on which to install Reporting Services. Click Next.
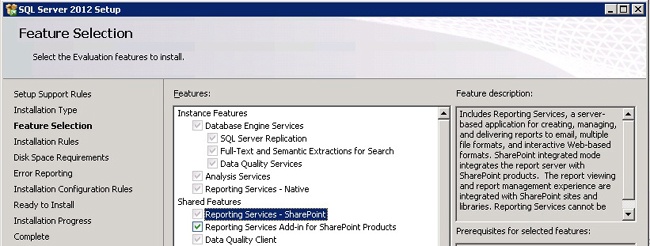
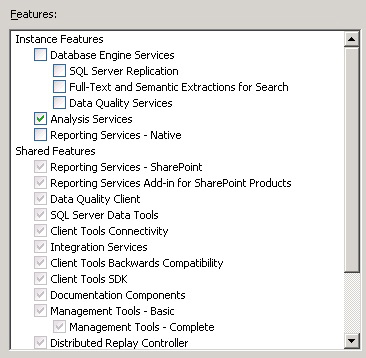
In the Features Selection, choose the Reporting Services - SharePoint feature under the Shared Features. If the server is also running SharePoint, choose Reporting Services Add-in For SharePoint Products (as shown in Figure 5-6) and click Next.
On the Disk Space Requirements page, make sure that enough space is available to install the feature, and then click Next.
On the Error Reporting page, select whether you want to send error reports to Microsoft (the default is cleared) and click Next.
On the Installation Configuration rules page, wait for the rules check to finish (a second or two) and then click Next.
On the Ready To Install page, verify the features and configuration and then click Install to begin the installation of the features.
On the Complete page, click Close to finish the installation and close the wizard.
Configuring SharePoint for Reporting Services
After Reporting Services is installed on SQL Server, you need to configure the SharePoint servers for Reporting Services by registering and starting the Reporting Services SharePoint Service. Unlike many of the other service applications, you need to use PowerShell commands rather than the Central Administration UI:
Open the SharePoint 2013 Management Shell as a farm administrator.
Run the PowerShell command Install-SPRSService to install the service and wait for the command prompt to return.
Run the PowerShell command Install-SPRSServiceProxy to install the service proxy.
Run the following PowerShell command to start the service:
Get-spserviceinstance -all | where ($_.TypeName -like "SQL Server
Reporting*")|Start-SPServiceInstance
Important
If the Install-SPRSService command isn’t found, it’s most likely caused by the version of SQL Server. You need at least Service Pack 1 installed for the command to be found.
After you install the service, you can also start it by going to the Manage Services On Server page in Central Administration. It should be listed as SQL Server Reporting Services Service. If the server that you want to start it on doesn’t show it in the list, it must be installed on that server before it can be started (and Reporting Services feature of SQL Server 2012 SP1 or greater must also be installed on the server).
More Info: Installing and starting the Reporting Services SharePoint service
See http://msdn.microsoft.com/en-us/library/gg492276.aspx#bkmk_install_SSRS_sharedservice for more information on how to install and start the Reporting Services SharePoint service.
Now that the SQL Server Reporting Services service is running, you can create the Reporting Services service application. Follow these steps:
Navigate to Central Administration as a farm administrator.
Click Manage Service Applications in the Application Management section.
On the Manage Service Applications page, click the New icon and select SQL Server Reporting Services Service Application.
Enter a name (such as SQL Server Reporting Services Service Application) in the Name text box.
Choose to use an existing application pool or create a new application pool in the Application Pool section.
In the SQL Server Reporting Services (SSRS) Service Database section, enter the name of the SQL Server to be used for Reporting Services (it can’t be an Express version) in the Database Server text box.
In the same section, give the Reporting Services database a name in the Database Name text box.
Choose whether to use Windows Authentication or Stored Credentials (if you are using SQL authentication). If you choose Stored Credentials, specify whether the credentials are Windows credentials.
Choose one or more web applications with which to associate the SQL Server Reporting Services service application. Disabled and cleared web applications have already been associated to a different SQL Server Reporting Services service application.
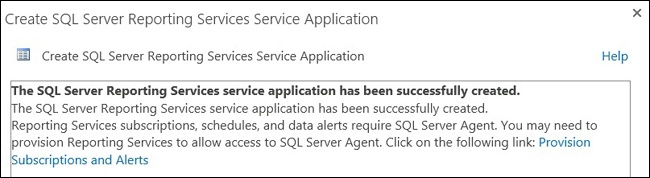
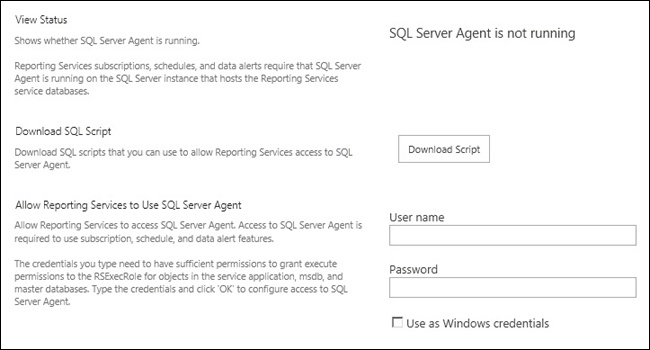
Click OK to finish. If you were successful, you should see a screen indicating that you might need to provision Reporting Services to allow access to the SQL Server agent (see Figure 5-7).
Provisioning subscriptions and alerts
After creating the SQL Server Reporting Services service application, you should go ahead and provision subscriptions and alerts. Doing so requires that the SQL Server Agent run on the SQL Server instance that will host the Reporting Services databases. You also need to download a script and enter credentials for the account used to access the SQL Server Agent. The account needs sufficient permissions to grant the RSExecRole execute permissions to the following databases:
The Provision Subscriptions and Alerts page should look similar to Figure 5-8. It shows you whether the SQL Server Agent is running, gives you a link to download the necessary script, and provides a place to enter the necessary credentials.
After the SQL Server Agent is started on the SQL Server instance that hosts the Reporting Services database(s) and an account is provided to allow Reporting Services to use the SQL Server Agent, you should execute the script that was downloaded. You can do this through SQL Server Management Studio:
Open an instance of SQL Server Management Studio with an account that has appropriate permissions (same or higher than those of the credentials that were entered on the Provision subscriptions and alerts page).
In the Connect To Server dialog box, enter the name of the server hosting the Reporting Services database(s) in the Server Name text box, select Database Engine from the Server Type list, and select an authentication mode (and enter credentials if necessary).
Click Connect.
From the toolbar of SQL Server Management Studio, choose File | Open | File.
Navigate to the downloaded script (for example, SQL Server Reporting Services Application-GrantRights.sql), select the file, and click Open.
Click the Execute icon and wait for the command to complete successfully.
At this point, the subscriptions and alerts for SQL Server Reporting Services (SSRS) service application provisioning should be done. You also can generate the script with PowerShell and to run the script with the command line.
More Info: Provisioning subscriptions and alerts for SSRS service applications
See http://msdn.microsoft.com/en-us/library/hh231725.aspx for more information on how to provision subscriptions and alerts for SSRS service applications.
Configuring Reporting Services
Reporting Services is up and running at this point (or should be) but still needs to be configured. Several options can be configured, as shown on the Manage Reporting Services Application page in Figure 5-9. You can get to the page via Central Administration by navigating to Manage Service Application in the Application Management section and clicking the name of the Reporting Services service application (for example, SQL Server Reporting Services Service Application).
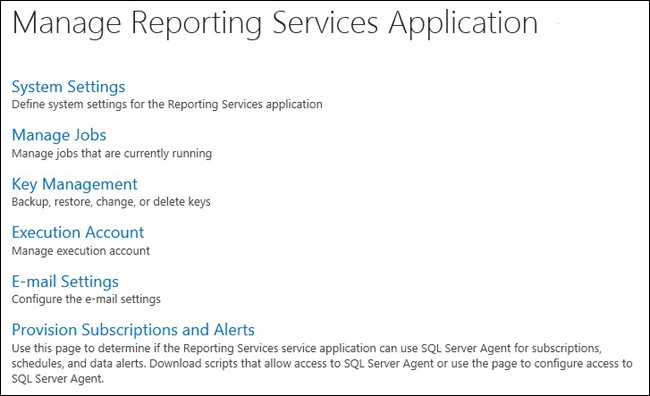
Configuring system settings
The first link you should visit is on the System Settings page, which offers the settings shown in Table 5-1.
Setting | Page section | Description |
External Images Timeout | Reporting | Determines the length of time, in seconds, before a timeout occurs when retrieving external images. The default value is 600 (10 minutes). The range is any positive value. |
Snapshot Compression | Reporting | Defines how snapshots are compressed: SQL, None, or All. |
System Report Timeout | Reporting | Determines the time, in seconds, before a report times out. It can be overridden at the report level. The default is 1800 (30 minutes). A value of –1 is for no limit, and the max is any positive integer. |
System Snapshot Limit | Reporting | Sets the maximum number of snapshots stored for a report. The default is –1 (no limit), and the range is any positive integer. |
Stored Parameters Lifetime | Reporting | Determines the number of days that stored parameters can be stored. The default is 180 days, and the range is any positive integer. |
Stored Parameters Threshold | Reporting | Determines the threshold, in days, for a parameter. The default is 1500 days. The range is any positive integer. |
Session Timeout | Session | Determines the length of time, in seconds, that a session remains active. The default is 600 (10 minutes), and the range is any positive integer. |
Use Session Cookies | Session | Indicates whether cookies can be used when communicating with client browsers. This option is selected by default. |
RDLX Report Timeout | Session | Determines the amount of time, in seconds, before an RDLX report times out. The default is 1800 (30 minutes), and the range is any positive integer. |
Enable Execution Logging | Logging | Lets you choose whether to enable report execution logging. |
Execution Log Days Kept | Logging | Determines how many days to keep report execution information. The default value is 60 days, and valid values are –1 to any positive integer. A value of 0 indicates that entries won’t be deleted. |
Enable Integrated Security | Security | Determines whether integrated security is enabled. |
Enable Load Report | Security Definition | Determines whether users can perform impromptu queries from a Report Builder report. |
Enable Remote Errors | Security | Determines whether remote information is included with the error messages returned from remote computers. This setting is disabled by default. |
Enable Test Connection Detailed Errors | Security | Determines whether detailed error messages are sent to the client computer when the data source connection is tested. |
Enable Report Builder Download | Client | Indicates whether users can download Report Builder from sites in the SharePoint farm. |
Client | Requires a URL if the Report Service doesn’t use the default Report Builder URL. | |
Enable Client Printing | Client | Specifies whether the RSClientPrint ActiveX control is available for download from the report server. Note that some browsers and/or browser settings can prohibit ActiveX controls. |
Edit Session Timeout | Client | Specifies the number of seconds before a report edit session times out. The default is 7200 (2 hours), and the range is any positive integer. |
ExecutionLogLevel | User-Defined | Defines the execution log level with a default of Normal. The other valid option is Verbose. |
Managing Jobs
Clicking the Manage Jobs link of the Manage Reporting Services Application page takes you to the Manage Jobs page, where you can view any running Reporting Services jobs. You can also select jobs to delete on this page (for example, if a particular job or set of jobs is taking too long). This page has nothing to configure, but if you set your timeout to be particularly high, you might need this page to end errant jobs.
Managing Keys
The next link on the Manage Reporting Services Application page is Key Management. SharePoint encrypts the data in the Reporting Services databases with an encryption key that you can back up, restore, and change.
If you have to restore a Reporting Services service application, you also need to restore the encryption key. When you back up the encryption key, you provide a password that must meet the complexity requirements set by the domain policy. This password is also needed to restore the encryption key, so keep it in a safe location separate from the backup of the encryption key. For security purposes, you should also store the encryption key in a physically separate location from the SharePoint farm as well as from the backups of the Reporting Services service application. You should change the encryption key occasionally, but the process can take several hours depending on the amount of content. Therefore, you should schedule this so that users are minimally affected, and you should back up the key immediately after changing it (as well as back up the service application itself, because the two backups work in tandem).
The final option on the Key Management page is to delete encrypted content. Deleted content (which can include stored connection strings, subscription information, and information necessary to connect to external data sources) can’t be recovered after it’s deleted. This action is non-reversible, so make sure that users aren’t caught unaware by it. All four actions—backup, restore, change, and delete—are available on the Key Management page, as shown in Figure 5-10.

Configuring the Execution Account
The fourth item on the Manage Reporting Services Application page is the Execution Account. This account is used when connecting to data sources that don’t use credentials or when connecting to another server to retrieve external image files or resources. The account is also used when a data source specifies None as the credential type. It shouldn’t be the same account used to run the Reporting Services service because of security concerns. Also, it should have minimal access, such as read-only, if any access at all is required (to external servers, for example).
You are recommended to use a domain user account that has network logon permissions, so that it can access other servers. You can set the account by clicking Execution Account to get to the Execution Account page. You need to select Specify An Execution Account, provide a user name and password, and then confirm the password before clicking OK (it doesn’t verify that the password is correct, so make sure that it’s valid and not just matching). If you are building out more than one Reporting Services application, you will need to make sure that all the Execution Accounts are the same on all the service applications.
Configuring Email Settings
The fifth link on the Manage Reporting Services Application page is E-mail Settings. This might seem confusing at first because you also set up email settings for the SharePoint farm. Email settings for Reporting Services are separate from the SharePoint farm. The Reporting Services email system can deliver reports and/or notifications through email subscriptions. Email in Reporting Services requires that you use a Simple Mail Transport Protocol (SMTP) server, so you must have access to one or set one up. You can configure the settings by following these steps:
Click E-mail Settings on the Manage Reporting Services Application page in Central Administration.
Select the Use SMTP Server check box—otherwise, you can’t enter the other values.
Enter the name of the SMTP server (such as smtp.contoso.com) in the Outbound SMTP Server text box (no inbound traffic is allowed).
In the From Address text box, enter an email address. This doesn’t have to be valid or monitored, but you might want to use a valid email address for replies.
Click OK to save settings.
Provisioning subscriptions and alerts
The Provision Subscriptions And Alerts link is the same one shown when the Reporting Services service application was created. If you want to make changes or didn’t go through the provisioning right after creating the service application, you can us this link to perform that task.
Monitoring Resources
Reporting Services should be ready to use at this point. When users start creating and deploying reports, you should monitor the resources consumed so that you can modify the settings and/or topology to meet your organization’s demands.
More Info: Managing a Reporting Services service application
See http://technet.microsoft.com/en-us/library/gg492284.aspx for more information on how to manage a Reporting Services service application.
Planning and configuring PowerPivot
You can use the powerful PowerPivot tool for data mash-ups and data exploration. PowerPivot can be used to explore millions or even billions of rows of data. SharePoint has taken this powerful tool and made it accessible through its service application infrastructure.
In general, the users of PowerPivot won’t be your typical end users but, depending on the types of operations they are performing, they can end up use many resources. As a result, you must plan out what servers will provide these resources, who will use them, and what the settings will be on the service application.
PowerPivot doesn’t come with SharePoint Server 2013—at least, not in the initial release. You must download and install it, or find the latest version of the software to install.
More Info: Downloading PowerPivot
See http://www.microsoft.com/en-us/download/details.aspx?id=35577 to download Microsoft SQL Server 2012 SP1 PowerPivot for Microsoft SharePoint.
After you download the PowerPivot installation file, you can install it on a SharePoint server on your farm. You need to be a local administrator as well as a member of the SharePoint Farm Administrators group to completely install PowerPivot. The following items are installed on the server when you install the installation package:
As soon as the PowerPivot service application is installed and configured, users can start using it. SharePoint shows that a new site template can be used for sites dedicated to PowerPivot functionality. Also, a feature is available on the site collection level that enables PowerPivot functionality on any site collection. Because PowerPivot is a specialized tool that’s typically used only by a small group of users, dedicating a site collection to those users is best so that PowerPivot is easier to manage.
Running the Configuration tool
After the PowerPivot for SharePoint package is installed, you can run the PowerPivot for SharePoint 2013 Configuration tool. You can use this tool to configure, repair, or remove PowerPivot on a SharePoint server. When you run the tool for the first time, the only option is to configure, which you can do by following these steps, using an account that is both local administrator and a SharePoint farm administrator:
On the server on which you installed Microsoft SQL Server 2012 SP1 PowerPivot for Microsoft SharePoint, navigate to All Programs | Microsoft SQL Server 2012 | Configuration Tools and select PowerPivot for SharePoint 2013 Configuration.
The tool examines your system, which can take a minute or so. Afterward, the first screen allows you to choose only to Configure Or Repair PowerPivot For SharePoint. Click OK to continue.
A PowerPivot Configuration Tool window should appear, as shown in Figure 5-11. You need to consider many values, and the screen might vary depending on your SharePoint installation. Make sure that everything is configured correctly before you click Run.
After you enter the necessary values, click Validate to test the values that you’ve entered. Make sure that the items that you don’t want to run at this time are excluded; for example, if you want to create the PowerPivot service application manually through Central Administration or PowerShell, you can clear the Create PowerPivot Service Application option.
If the validation comes back as a success, click Run to begin the batch job that will run all the tasks. An Activity Progress bar appears, showing the progress of the tasks being completed. On completion, click OK and then click Exit to close the configuration tool.
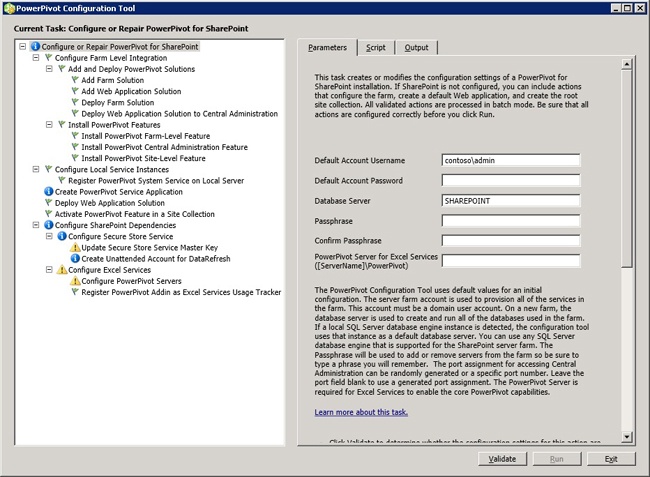
You don’t need to configure everything here; you can come back later or configure the PowerPivot Service Application in Central Administration and/or with PowerShell. However, although the PowerPivot Configuration Tool provides many options, you should be sure to have the correct values for at least the following:
Default Account. This account is used to provision the PowerPivot service application pool and create the service application (if that step is done here). It can’t be a built-in account.
Passphrase. If the SharePoint farm hasn’t been created, create a new passphrase that will become the SharePoint farm passphrase. If the SharePoint farm already exists, use the SharePoint farm passphrase, the one used when you add a new server to the farm.
Database Server. This is the name of a SQL Server 2012 SP1 PowerPivot Server running in SharePoint mode.
Port. If you are creating a SharePoint farm, you can specify the port number or let SharePoint create one randomly.
Creating the PowerPivot service application
In the list of tasks that exist in PowerPivot Configuration Tool, notice the task called Create PowerPivot Service Application. This task creates the PowerPivot Service Application as part of the configuration. (You can also choose to create the PowerPivot Service Application at a later time.) If you do want to create the service application with the tool, you should click the task so you can verify and/or change the values. Clicking the Create PowerPivot Service Application task should display a screen similar to Figure 5-12.
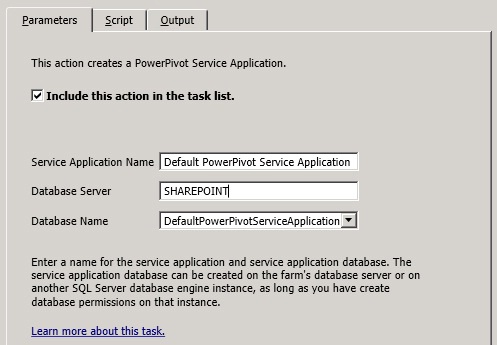
You should change the values in the Create PowerPivot Service Application task pane depending on your needs. The name in the Database Name field actually has a GUID in it, but that part is hidden because the name is so long. If you’re using scripting or multiple PowerPivot service applications, you should modify the name to make it easier to type and distinguish. The database server doesn’t have to be on the SharePoint farm; it can be any PowerPivot-capable database that the default account has access to.
Exam Tip
Because PowerPivot isn’t a widely used SharePoint feature, it’s an easy one to overlook when studying for the exam. This is especially true because it has to be downloaded, installed, and configured. You should at least be aware of what’s required to install it as well as what the configuration tool can do.
You later might want to do (or have already done) several other tasks rather than have the configuration tool do them for you, such as configuring the Secure Store and Excel Services. If you’re connecting to an existing farm, more than likely these already exist and you don’t need to have them created.
More Info: Configuring or repairing PowerPivot
See http://technet.microsoft.com/en-us/library/jj820150.aspx#bkmk_steps for more information on how to configure or repair PowerPivot for SharePoint 2013 using the PowerPivot Configuration Tool.
You also can create the SQL Server PowerPivot service application within Central Administration. The SQL Server PowerPivot System service should also be running on the server on which the configuration tool was run. If you want the service to run on other servers, you should run the configuration tool on those servers and choose only the task that installs the service (Configure Local Service Instance). Creating the service application can be done in Central Administration by following these steps:
Navigate to Central Administration as a farm administrator and click Manage Service Applications in the Application Management section.
Click the New icon and select SQL Server PowerPivot Service Application.
Enter a name for the PowerPivot service application (such as PowerPivot Service Application) in the Name text box.
Create a new application pool or select an existing one in the Application Pool section.
In the PowerPivot Service Application Database section, enter the name of the database server to be used in the Database Server text box and a database name in the Database Name text box. The database doesn’t have to be the same one used for the SharePoint farm.
In the same section, select the authentication method used to connect to the database server and credentials, if necessary.
If you want this service application to be added to the default proxy group, leave the check box selected in the Default section and click OK (if this is the first PowerPivot service application on the SharePoint farm, you need to add the PowerPivot service application to the default proxy for the PowerPivot Management Dashboard to work properly).
Working with additional PowerPivot settings
After the PowerPivot service application is created, it has a default set of configuration settings. You are recommended to leave these settings alone unless you’re experiencing performance problems or you to change them for a specific web application (such as a separate PowerPivot service application for a web application dedicated to PowerPivot functionality). You change the settings in the PowerPivot Management Dashboard, but note that an IISRESET might be needed after the service application is created before the dashboard can work.
You can get to PowerPivot Management by clicking the PowerPivot service application on the Manage Service Applications page in Central Administration. This opens the dashboard, where you can get to the settings page by clicking Configure Service Application Settings in the Actions Settings section. Table 5-2 lists the available settings and their descriptions.
Setting | Section | Description |
Data Load Timeout | Data Load Timeout | Determines the number of seconds before a data load attempt times out. The default is 1800 (30 minutes), and the range is from 1 to 3600. |
Connection Pool Timeout | Connection Pools | Determines the number of seconds before an idle connection is removed from the connection pool. The default is 1800, and the range is from 1 to 3600. |
Maximum User Connection Pool Size | Connection Pools | Determines the maximum number of connections in the user connection pool. The default is 1000, and the range is from –1 to 10000, with a value of –1 meaning unlimited and 0 meaning that user connection pooling is disabled (every connection is created new). |
Maximum Administrative Connection Pool Size | Connection Pools | Determines the maximum number of connections in the administrative connection pool. The default is 200, and the range is –1 to 10000, with –1 meaning unlimited and 0 meaning that administrative connection pooling is disabled. |
Business Hours | Data Refresh | Specifies the usual business hours so that data refreshes can be scheduled to occur after business hours and can include the data from the current day. |
PowerPivot Unattended Data Refresh Account | Data Refresh | Enables you to put a Secure Store target application in here for unattended data refreshes. The value should be the name of the target application, not the ID. |
Allow Users To Enter Windows Credentials | Data Refresh | Allows users to enter arbitrary Windows credentials for a data refresh. SharePoint will automatically create a target application for the set of credentials. |
Refresh Jobs To Run In Parallel | Data Refresh | Specifies the maximum number of data refresh jobs that can run in parallel. The default is 1 and the range is from 1 to 5. |
Maximum Processing | Data Refresh History Length | Specifies the maximum number of days to keep the processing history. The default is 365 and the range is 1 to 5000. |
Disable Data Refresh Due To Consecutive Failures | Data Refresh | Specifies the number of times a data refresh can consecutively fail before it’s disabled. |
Disable Data Refresh For Inactive workbooks | Data Refresh | Determines how many times a data refresh can occur for workbooks that aren’t used interactively before they are disabled. The default is 10, and the range is 0 to any positive value. A value of 0 means they are never disabled. |
Keep Inactive Database In Memory (In Hours) | Disk Cache | Specifies the number of hours to keep an inactive PowerPivot database in memory. The default is 48 hours and the range is any positive integer. |
Keep Inactive Database In Cache (In Hours) | Disk Cache | Determines the number of hours to keep an inactive database in cache. Must be greater than the Keep Inactive Database In Memory setting. The default is 120, and the range is any positive integer. |
Load To Connection Ratio | Health Rule Settings | Determines the value for the health rule for the number of workbooks being loaded relative to the number of user connections. High values indicate a high memory load. The default is 20, and the range is 1 to 99. |
Data Collection Interval (In Hours) | Health Rule Settings | Specifies the interval in hours to count load and connection events to determine the Load To Connection Ratio. The default is 4, and the range is 1 to 24. |
Check For Updates To PowerPivot Management Data.xlsx File | Health Rules Settings | Specifies the threshold in days before a warning is created to indicate that the data file used by reports in the PowerPivot Management Dashboard is not being updated. The default is 5, and the range is 1 to 30. |
Query Reporting Interval | Usage Data Collection | Indicates the number of seconds to gather response statistics before reporting it as a usage event. The default is 300 (5 minutes), and the range is any positive integer. |
Usage Data History | Usage Data Collection | Determines the number of days to retain usage data and server health statistics. The default is 365 (a year), and the value is from 0 to any positive integer, with 0 meaning indefinitely. |
Trivial Response Upper Limit | Usage Data Collection | Determines the maximum number of milliseconds allowed to complete a trivial request (trivial requests are excluded from report data). The range is from any positive integer to a number less than the Quick Response Upper Limit. The default is 500 (half a second). |
Quick Response Upper Limit | Usage Data Collection | Determines the upper limit in milliseconds for a completing a quick request. A quick request could be considered querying a small dataset. The default is 1000 (one second), and it must be greater than the Trivial Response Upper Limit and lower than the Expected Response Upper Limit. |
Expected Response Upper Limit | Usage Data Collection | Specifies another threshold in milliseconds for completing a query in an expected amount of time. Most PowerPivot data queries will fall into this category. The default is 3000 (3 seconds), and the value must be greater than the Quick Response Upper Limit and less than the Long Response Upper Limit. |
Long Response Upper Limit | Usage Data Collection | Sets the threshold, in milliseconds, for long-running requests. Very few requests should fall into this category; otherwise, performance will be affected. The default number is 10000 (10 seconds), and it must be greater than the Expected Response Upper Limit. |
As you can see from Table 5-2, many settings can be configured. However, you should use caution when modifying these settings because you can greatly curtail the performance of both SharePoint and PowerPivot if you misconfigure them.
More Info: Creating and configuring a PowerPivot service application
See http://technet.microsoft.com/en-us/library/ee210685.aspx for more information on how to create and configure a PowerPivot service application in Central Administration.
Planning and configuring Excel Services data modeling
Chapter 4 covers how to set up and configure Excel Services, but this section focuses on the data models created in Excel 2013. With Excel Services, you can specify one or more instances of Microsoft SQL Server 2012 SP1 to use for processing these data models. Excel Services can use Analysis Services to work with the data models; in fact, if you use Excel workbooks that store imported data in multiple tables, you need to have Analysis Services to be able to interact with the data in SharePoint. An Analysis Service instance doesn’t have to be on the same SQL Server instance as the SharePoint farm, but it does have to be on the same network and in the same domain. If the load on your Analysis Services instance becomes too great to meet the demands of your users, you can add more servers as needed.
You configure the data model settings inside the context of the Excel Services service application. The settings allow you to register one or more servers to be used for Analysis Services. Follow these steps to register a SQL Server instance to the data model settings:
Navigate to Central Administration as a farm administrator or as an administrator of the Excel Services service application.
Click Manage Service Applications in the Application Management section.
Click the Excel Services service application under the Name column to open the Manage Excel Services Application page.
Click Data Model Settings.
Click Add Server on the Excel Services Application Data Model Settings page.
In the Server Name text box, enter the name of the SQL Server instance (the server must be running SQL Server Analysis Services 2012 SP1 or higher in SharePoint deployment mode).
Enter an optional description in the Description text box and click OK.
After you add the Analysis Services server, you have only two options for further configuration of the item you just added. You can edit the server name and/or description, or you can unregister the Analysis Services server. These tasks can also be done from the Excel Services Application Data Model page.
More Info: Managing the Excel Services data model settings
See http://technet.microsoft.com/en-us/library/jj219780.aspx for more information on how to manage the Excel Services data model settings.
Planning and configuring Power View
The Power View tool can be used for interactive exploration of data. It provides a visual way to explore large sets of data, using various different charts and graphs. You even can connect Bing maps to data, giving users a way to map out their data by region (such as sales data per state).
Power View is installed as part of the Reporting Services add-on for SharePoint found in Microsoft SQL Server 2012 SP1 (or greater). So when you installed Reporting Services for SharePoint, you also installed the capability to use Power View. Power View reports can be created from PowerPivot workbooks or tabular data in SQL Server 2012 Analysis Services.
Power View requires that Analysis Services be installed in Tabular mode when you are installing an instance of SQL Server. If you’ve already installed Analysis Services in Multidimensional and Data Mining mode, you need to install another instance of SQL Server or change the mode to be unsupported. (You also could remove SQL Server and reinstall it, but that might not be feasible.) To install Analysis Services in Tabular mode, follow these steps when you are installing an instance of SQL Server:
When you get to the Feature Selection page during the installation of the SQL Server instance, be sure to choose Analysis Services, as shown in Figure 5-13. Also choose the other features that you want to install.
Continue with the installation until you get to the Analysis Services Configuration page, where you need to select Tabular Mode in the Server Mode section.
Finish the installation of the SQL Server instance.
More Info: Installing Analysis Services in Tabular mode
See http://msdn.microsoft.com/en-us/library/hh231722.aspx for more information on how to install Analysis Services in Tabular mode.
After you ensure that SharePoint has access to Analysis Services in Tabular mode, ensure that Power View is working with Analysis Services. To do this, Analysis Services needs to have a data model in it to report on. You can do this by following these steps:
Navigate to a PowerPivot site (or a site with the PowerPivot site collection feature enabled).
Go to the Library Settings of the Documents Library and click Advanced Settings.
Click Yes to Allow Management Of Content Types? in the Content Types section and click OK to save the settings.
Back on the Library Settings page, click Add From Existing Site in the Content Types section.
On the Add Content Types page, select BI Semantic Model Connection from the list of Available Site Content Types and click Add, as shown in Figure 5-14.
Click OK on the Add Content Types page to add a BI Semantic Model Connection document to the Document library.
Add a new BI Semantic Model Connection by returning to the Documents library, clicking the Files tab, and then selecting BI Semantic Model Connection from the New Icon drop-down list.
Enter a filename (the file to be created) in the File Name text box for the BI Semantic Model Connection and a description in the Description text box.
Enter the name of a workbook URL or server name (the Analysis Services in Tabular Mode server) in the Workbook URL Or Server Name text box.
If you entered a server name in step 9 (and you should have if using Analysis Services), enter the name of the database to connect to in the Database text box and click OK.
After the file is created, click the three dots next to the newly created document and then choose Create Power View Report.
Install Silverlight if necessary (if you have to install it, you need to return to this page to continue after restarting the browser). Return to the document, click the three dots again, and then click Create Power View Report.
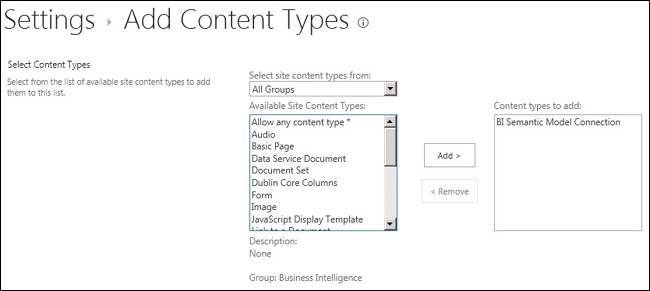
You and your users should be able to use Power View at this point. You might see the following error when you try to create the BI Semantic Model Connection:
Could not load type 'Microsoft.AnalysisServices.Sharepoint.Integration.ASLinkFilePage'
This error probably means that the PowerPivot farm solution hasn’t been deployed on the web application on which the PowerPivot site (or site collection that has the PowerPivot feature installed) resides. You can solve this issue by following these steps:
Navigate to Central Administration as a farm administrator and click System Settings.
Click Manage Farm Solutions.
Click the powerpivotwebapplicationsolution.wsp link under the Name column.
Click Deploy Solution on the Solution Properties page.
In the Deploy To? Section, choose the web application to deploy to and then click OK to deploy the solution.
If you still have issues, you need to do some troubleshooting. Getting to this point involves many steps and configurations. In some cases, redoing steps might be easier than trying to fix them. Installing Power View seems to involve many steps, but it will be worth it in the end and your power users will have a great set of tools to do some outstanding data analysis.
Objective summary
PerformancePoint is a powerful reporting tool for both SharePoint data and external data that needs to be configured to prevent the accidental reporting of secure data.
Reporting Services requires SQL Server 2012 SP1 Reporting Services installed on each SharePoint server required to run Reporting Services.
Reporting Services content is encrypted with a key along with a password to restore the service application in case of a disaster.
PowerPivot requires a separate download that comes with a configuration tool that works with SQL Server 2012 SP1 to install PowerPivot on SharePoint.
PowerPivot provides many configuration options, but you should rely on the defaults unless performance becomes an issue.
Power View works with SQL Server Analysis Services and PowerPivot workbooks to provide end users powerful interactive charts and graphs.
Objective review
Answer the following questions to test your knowledge of the information in this objective. You can find the answers to these questions and explanations of why each answer choice is correct or incorrect in the “Answers” section at the end of this chapter.
Which of the following isn’t a requirement to be able to use PerformancePoint services with shared credentials?
Provide credentials to the PerformancePoint service application for the Unattended Service Account
Create a target application for PerformancePoint
Ensure that the PerformancePoint service is running on at least one server
Create the PerformancePoint service application
Which of the following isn’t needed to restore a Reporting Services service application?
A backup of the Reporting Services service application
A copy of the encryption Key for Reporting Services
A farm password
An encryption key password
The PowerPivot for SharePoint 2013 Configuration tool can do which of the following tasks?
Create the SQL Server PowerPivot Service Application
Create a web application
Configure the Secure Store service application
All of the above
Power View can report on Analysis Services data models. What minimum version and mode of Analysis Services is required for Power View in SharePoint 2013?
Microsoft SQL Server 2012 Analysis Services in Tabular mode
Microsoft SQL Server 2012 Analysis Services in Multidimensional and Data Mining mode
Microsoft SQL Server 2012 SP1 Analysis Services in Tabular mode
Microsoft SQL Server 2012 SP1 Analysis Services in Multidimensional and Data Mining mode
Objective 5.3: Creating and configuring work management
This section covers interacting with other servers, such as Microsoft Project Server and Microsoft Exchange Server. Interactions between these systems require the applications to trust each other so they can have access to the information they need to perform certain functions. For example, if you’re performing eDiscovery with SharePoint and part of the eDiscovery process involves having access to a user’s mailbox, the SharePoint farm needs to trust the Exchange farm and the Exchange farm must trust the SharePoint farm. This level of security ensures that applications can’t have access, even if the user might actually have access. This is not only for security reasons but also for performance reasons because unfettered access to an application could slow it down or even bring it to a halt.
Configuring a connection to Microsoft Project Server
Microsoft Project Server 2013 is installed as part of SharePoint. Several versions ago, Project Server didn’t even know that SharePoint existed, but gradually it became more integrated with SharePoint until Project Server 2010, when it became a service application that ran on the SharePoint infrastructure. Although it’s not completely integrated—Project Server has its own security structure in addition to the one provided by SharePoint—Project Server can leverage the power of SharePoint for document management and project storage and allow for users to interact with projects through a browser interface.
You can use a client-side program called Project Professional to open and work with projects from a local computer or from a SharePoint server. Project files can be saved onto a SharePoint farm with or without Project Server being installed. Conceptually, this can be thought of in the same way as how other products with client-side programs (such as Word, Excel, and PowerPoint) work with SharePoint. You can use Project Server to deliver and receive project-related information without end users having to purchase a copy of Project Professional for their client machine, potentially saving your organization a considerable amount of money. Project Server doesn’t come with the SharePoint Server software, but it can be downloaded for evaluation (and eventual purchase, if desired) so that you can prepare for the exam.
More Info: Downloading Microsoft Project Server 2013
See http://technet.microsoft.com/en-us/evalcenter/hh973403.aspx to download Microsoft Project Server 2013.
Installing Project Server
Assuming that you’ve obtained the installation software for Project Server, you can begin to install it. Installing Microsoft Project Server 2013 on SharePoint is a multistep process that needs to be done correctly; otherwise, it could leave your SharePoint farm in an unstable state. Also, installation can take several hours, depending on how many servers are in your farm. The principal steps required are as follows:
Install Project Server 2013 on every SharePoint server in the farm.
Run the SharePoint Products Configuration Wizard for each sever in the farm.
Start the Project Server Application service.
Create a Project Server service application.
As with any software, you should install Project Server on a test farm before you install it in production. You also should back up the entire SharePoint farm (databases and farm configuration) before installing Project Server. After you have taken care of all the prerequisite tasks, you can begin to install Project Server by following these steps:
Log onto a SharePoint server with an account that can be used to install software. You should run the Project Server installation software with the same account that you used to install SharePoint (but you can do Run As to accomplish this).
Start the Project Server installation software to get to the splash screen, as shown in Figure 5-15.
Because you’re installing onto a server that already has SharePoint 2013 installed, you can skip Install software Prerequisites (they are covered by the SharePoint 2013 installation) and click Install Project Server.
After the setup process initializes, enter a valid product key (note that you can’t install an evaluation version of Project Server 2013 on a production version of SharePoint 2013) and click Continue.
On the End User License Agreement page, review the agreement, select I Accept The Terms Of This Agreement (if you agree to them), and then click Continue.
On the Choose A File Location page, click Install Now to begin the installation process (the actual browse buttons should be disabled).
When the installation process is complete, clear the Run The SharePoint Products And Technologies Configuration Wizard Now check box (unless you have only one server in your SharePoint farm).
Click Close.
Repeat steps 1 through 8 until you’ve installed Project Server on each SharePoint server in the SharePoint farm.
On one of the SharePoint servers in the SharePoint farm, start the SharePoint 2013 Products Configuration Wizard.
On the Welcome page, click Next.
A list of services appears, warning that the services might have to restart. Click Yes to continue.
Select Do Not Disconnect From This Server Farm on the Modify Server Farm Settings page and click Next.
If you are on a server that hosts the Central Administration website, select No, This Machine Will Continue To Host The Web Site on the Modify SharePoint Central Administration Web Application page. Click Next to continue.
Click Next on the Completing The SharePoint Products Configuration Wizard page.
Wait until the process completely finishes before moving on.
Click Finish on the Configuration Successful page.
Repeat steps 10 through 17 for each SharePoint server in the SharePoint farm.
Important: Running the SharePoint 2013 Products Configuration Wizard
Make sure that you wait until the SharePoint 2013 Products Configuration Wizard is completely finished on one SharePoint Server before moving to the next SharePoint server. Failing to do so could leave the SharePoint farm in an unstable state.
Starting the Project Server Application Service
After you install Project Server on all the SharePoint servers and run the SharePoint 2013 Products Configuration Wizard on each SharePoint server in turn, you are ready to start the Project Server Application service and then create the Project Server service application, either via Central Administration or with PowerShell commands. The first task is to start the Project Server Application Service, as follows:
Navigate to Central Administration with a farm administrator account.
Click Manage Services On Server in the System Settings section.
Select the server on which you want to start the service from the Server drop-down list and click the Start link on the line that says Project Server Application Service in the Service column.
Repeat steps 2 and 3 for every server that you want running the Project Server Application Service.
If possible, you should have the Project Service Application Service running on at least two servers for redundancy; except for very heavy Project Server loads, two should be sufficient.
Creating the Project Server service application
Now that the service is running, you are now ready to create the Project Server service application. You can do this in Central Administration by following these steps:
Navigate to Central Administration as a farm administrator and click Manage Service Applications in the Application Management section.
Click the New icon to open the drop-down menu and select Project Server Service Application.
Enter a name (such as Project Server Service Application) in the Project Server Application Name text box.
Choose whether to create a new application pool or use an existing one in the Application Pool Settings section.
In the Service Application Proxy section, leave the Create A Proxy For This Service Application? check box selected if you want the service application in the default proxy group.
Click OK to create the service application.
More Info: Installing and configuring Project Server 2013
See http://technet.microsoft.com/en-us/library/ee662109.aspx for more information on how to Install and configure Project Server 2013.
Creating a Project Server web app
You are almost ready to start using Project Server, but you still need to create a Project Server web app in a new site collection or within an existing site collection. Creating the web app within its own site collection (and its own content database) is probably a good idea for the purposes of management and disaster recovery. Project Server is a complex program with data that changes frequently. The odds of having to recover data are much higher with this type of data than your typical document management data. Isolating the Project Server to its own site collection and content database greatly speeds up the recovery process.
Users of the Project Server web app need read permissions to the site collection that contains the web app. To create a site collection to be used by the Project Server web app, follow these steps:
Create a site collection for the Project Server web app. Project Server doesn’t require a certain template because the team site template will work fine.
Navigate to the site collection that you created and click Share.
On the Share page, click Show Options and choose the Visitors group (<site> Visitors [Read]) from the Select A Group Or Permission Level drop-down list.
Type Everyone in the Enter Names Or Email Addresses text box (or the user group that you want to have access to the underlying Project Server data).
Click Share.
You are finally ready to create a Project Server web app. That you create a new content database for the Project Server web app site and the associated workspaces is highly recommended. For this to happen, you need to create the site collection during a time when other users aren’t trying to create sites within the web application. Then, you need to perform the following steps (if the web application houses only the Project Server web app and the top-level site collection, you can have both site collections in the same content database):
Lock down the existing content databases (set content database to Offline).
Create a new content database for the web application hosting the Project Server web app.
Create the Project Server web app.
Lock down the content database created for the Project Server web app.
Unlock the other content databases for the web application.
Creating the actual Project Server web app can be done in Central Administration by following these steps:
Navigate to Central Administration as a farm administrator.
Click Manage Service Applications in the Application Management section.
Select the Project Server Service Application from the list of service applications to open the Manage Project Web Apps page, as shown in Figure 5-16.
Click Create Project Web App Instance.
In the Web Application section, select the web application (the one where you created the site collection for this web app) where you want the web app instance to reside from the Web Application drop-down list.
Enter the path from the root site. (You can leave it as PWA if installing at the root.)
Select a language from the Select A Language drop-down list (pulled from the installed language packs) for the user interface.
Enter an administrator account in the Administrator Account text box. This user is who initially handles setting up permissions for the site.
Enter a database server and project web app database name in the Database Settings section. The database doesn’t have to be on the same SQL Server instance where the SharePoint farm is installed, but you can experience reduced performance if it’s not.
In the Site Quota section, enter the values (in megabytes) for the Quota For SharePoint Content and the Quota Warning.
Click OK. You are returned to the Manage Project Web Apps page, where the status displays Waiting For Resources. Wait until the status shown says Provisioned. It might take a while (a few minutes usually), depending on the resources available. If you don’t have enough resources (like low on memory), the process will fail, but it can be started again after you correct the resource issue.

More Info: Deploying a Project Web App with a new site collection
See http://technet.microsoft.com/en-us/library/ee662105.aspx for more information on how to deploy a Project web app with a new site collection.
You can also create a Project Server web app in an existing site collection for relatively small projects. In this case, the Project Server web app site would be part of the existing site collections content database, which should factor into any performance and disaster recovery considerations. The steps involved with this process are straightforward:
Enable the site collection feature Project Web App.
Create a site using the Project Web App site template.
After creation, the site is ready to use either through the browser or with the Project Professional 2013 client application, as long as users have access to it.
More Info: Deploying a Project web app in an existing site collection
See http://technet.microsoft.com/en-us/library/jj200304.aspx for more information about how to deploy a Project web app in an existing site collection.
After you create your project web app site, you can navigate to it and verify that it was created correctly. It should appear as it does in Figure 5-17. You should also verify that users who need to use the site can get to it; they have to have at least read permissions to the site.

From the Project web app, users can create or import projects and do all the work on the project right from the browser. This eliminates the need for having the Project Professional client application work on projects, but some licensing issues exist. Project Server 2013 is licensed separately from SharePoint Server 2013, and you need to determine how many licenses you need for your organization before allowing users access to the Project web apps. Typically, Project Server 2013 has one license for itself and then additional client-access licenses (CALs) for each user who accesses the Project Server data, either directly or indirectly.
Exam Tip
That you need to install Project Server on all SharePoint servers before you run the SharePoint 2013 Products Configuration Wizard is a prime example of a question that will lend itself to one of the “put-the-steps-in-order” questions. Note that some documentation mentions that Project Server is needed only on the app servers, but it actually needs to be installed on the WFEs also.
Configuring a connection to Exchange for eDiscovery and Resource Sharing
SharePoint 2013 can be used for eDiscovery both for SharePoint content as well as content in Microsoft Exchange. It can query emails, put holds on them, and export their content as part of the overall eDiscovery process. The process of enabling SharePoint to be able to perform these functions takes configuration on both the SharePoint farm and the Exchange farm. Chapter 2, covered how to configure an eDiscovery center in some detail, but only briefly covered the steps involved on the Exchange server. This objective covers the Exchange portion in more detail.
Communication between SharePoint and Exchange requires that the two systems trust each other. This trust needs to be established on each system separately. SharePoint trusts the Exchange server by making it a security token issuer and granting the Exchange service principal full control to SharePoint site subscription. You can make an Exchange farm a security token issuer by logging onto a SharePoint server and running the following PowerShell command in the SharePoint 2013 Management Shell as a farm administrator, where <exchange server> is the Exchange 2013 server name (or FQDN):
New-SPTrustedSecurityTokenIssuer -Name Exchange -MetadataEndPoint https://<exchange
server>/autodiscover/metadata/json/1
While you are still in the Management Shell, you can grant the Exchange service principal full control to SharePoint site subscription by running the following PowerShell commands, where <sharepoint server> is the server on which you are running the commands:
$exch=Get-SPTrustedSecurityTokenIssuer "Exchange"
$app=Get-SPAppPrincipal -Site http://<sharepoint server> -NameIdentifier $exch.NameId
$site=Get-SPSite http://<sharepoint server>
Set-SPAppPrincipalPermission -AppPrincipal $app -Site $site.RootWeb -Scope
sitesubscription -Right fullcontrol -EnableApplyOnlyPolicy
Important
SharePoint and Exchange must be in the same forest if SharePoint is going to perform eDiscovery on the Exchange mailboxes.
Configuration with regards to server trust is complete on the SharePoint server at this point; configuring the Exchange server is next. Typically, the administrator accounts on the SharePoint farm aren’t administrators on the Exchange farm—nor should they be. You need to make sure that the account configuring the trust on the Exchange server has the Organization Management permission to perform the necessary steps. You can use the following PowerShell command on the Exchange 2013 server to provide the necessary trust, where <sharepoint server> is a server on the SharePoint farm or the FQDN of the server:
cd c:'Program Files'Microsoft'Exchange Server'V15Scripts
.Configure-EnterprisePartnerApplication.ps1 -AuthMetadataUrl "http://<sharepoint
server>/15/_layouts/metadata/json/1" -ApplicationType SharePoint
This script works as long as Exchange is installed on the C drive; otherwise, point to the where it is installed. The preceding command is a script that relies on the PowerShell command New-AuthServer to specify a new trusted server.
More Info: Using New-AuthServer
See http://technet.microsoft.com/en-us/library/jj215704.aspx for more information on the PowerShell command New-AuthServer.
Any user who will perform eDiscovery on Exchange mailboxes needs the appropriate permissions on the Exchange server. The needed permissions are provided by adding the SharePoint users performing In-place eDiscovery to the Discovery Management role group on the Exchange 2013 server.
Important
Users who are part of the Discovery Management role group will have access to all the mailboxes on the Exchange server. This could potentially give users access to sensitive and confidential information.
By default, nobody is part of the Discovery Management role group. You can add users to the Discovery Management role group via the Exchange Administration Center by following these steps:
Open the Exchange Administration Center with an account that is a member of the Role Management group.
Navigate to Permissions and click Admin Roles.
Select Discovery Management from the list view and then click Edit.
Under Members, click Add+ in the Role Group.
Select one or more users in the Select Members list box.
Click Add and then click OK.
Click Save.
More Info: Adding a user to the Discovery Management role group
See more http://technet.microsoft.com/en-us/library/dd298059 for more information on how to add a user to the Discovery Management role group.
At this point, you have configured users for eDiscovery. As soon as the eDiscovery process is complete, you should remove all users from the Discovery Management role group. The elevated permissions represent a security risk that should be minimized as soon as possible.
Objective summary
Project Server 2013 is installed as a service application that runs on SharePoint Server 2013.
Project Server web apps are best installed on their own content database to improve backup and restore performance as well as to help troubleshoot any issues.
Users who are performing eDiscovery on Exchange mailboxes have access to all mailboxes on the Exchange server.
To use eDiscovery on Exchange via SharePoint, the SharePoint and Exchange farms must trust each other.
Objective review
Answer the following questions to test your knowledge of the information in this objective. You can find the answers to these questions and explanations of why each answer choice is correct or incorrect in the “Answers” section at the end of this chapter.
By default, which of the following users are members of the Discovery Management role group on the Exchange Server?
Exchange administrators
Members of the local Administrators group on the Exchange server
Nobody
Members of the Role Management group
You want to install and configure Project Server 2013 on your SharePoint 2013 farm. On which SharePoint servers do you need to install Project Server?
All the servers running SharePoint
Just the application servers
Just the web front ends
Just the servers running the Project Server service
For SharePoint 2013 to perform eDiscovery on Exchange mailboxes, which of the following must be true?
The SharePoint farm needs to trust the Exchange farm, but the Exchange farm doesn’t need to trust the SharePoint farm.
The Exchange farm needs to trust the SharePoint farm, but the SharePoint farm doesn’t need to trust the Exchange farm.
As long as the Exchange farm and SharePoint farm are in the same domain, establishing trust isn’t necessary.
The Exchange farm and the SharePoint farm must trust each other through the exchange of certificates.
A Project web app has a parent site or site collection. What rights do users need to the parent site collection to use the Project web app (which has its own set of permissions)?
Read
Read and Write
Full Control
Users only need permissions to the Project web app and not the parent.
Chapter summary
SharePoint 2013 allows for website collections to run in either SharePoint 2010 mode or SharePoint 2013 mode by having directories for each mode.
Sandboxed solutions and farm solutions can be deployed to both 2010 and 2013 mode, but SharePoint apps can be used only in 2013 mode.
Many of the business intelligence (BI) features of SharePoint Server 2013 require SQL Server 2012 SP1 or higher components to be installed on the SharePoint servers.
SharePoint provides many powerful BI tools, but care must be used in planning and usage because some of the BI features can put a heavy load on the backend databases.
Project Server 2013 allows users of SharePoint Server 2013 to get the functionality of Microsoft Project without needing the client application.
Exchange and SharePoint Server must trust each other before SharePoint can perform eDiscovery on Exchange mailboxes.
Answers
This section contains the solutions to the thought experiments and answers to the lesson review questions in this chapter.
Objective 5.1: Thought experiment
In this thought experiment, you are assigned to help facilitate the migration of a farm solution. Because you need to make it available to both the SharePoint 2010 mode and the SharePoint 2013 mode, you need to plan out how you will install and potentially upgrade it.
Because the SharePoint 2010 mode has no idea about the SharePoint 2013 features, you can just go ahead and install the farm solution as usual on the SharePoint 2013 farm. It defaults to the 14 folder and is available for use without any modification.
Because you want the SharePoint 2013 mode users to have access to SharePoint 2013 features, you need to modify the code for the farm solution or potentially convert it into a SharePoint app. The main issue with trying to convert the farm solution into a SharePoint app is that it’s using server-side code, and apps can’t use that. Unless the functionality of the solution can be done with server-side code, you are stuck with a farm solution and because they are still fully supported in SharePoint 2013, you will be fine for the next version of SharePoint.
Assuming that you are sticking with a farm solution, you should rebuild the solution and change the target SharePoint version to 15.0 so that when you deploy the solution, it will go into the 15 folder and not overwrite the SharePoint 2010 mode. You could force it into the 15 folder by using the CompatibiltyFolder property, but you should go ahead and change the target with Visual Studio. You then can add features specific to SharePoint 2013 to the farm solution without worry of overwriting the old SharePoint 2010 mode version. Even if the SharePoint 2013 features aren’t added right away, you should at least rebuild the solution with the updated target. Because you aren’t planning to keep the SharePoint 2010 mode version updated, this will mark the separation of the two farm solutions going forward.
Objective 5.1: Review
Correct answer: D
Incorrect: Sandboxed solutions are supported, even though SharePoint apps are the preferred code solution. However, this is just one of the right answers.
Incorrect: Farm solutions are supported and will probably continue to be supported because SharePoint apps can’t have server-side code. This is just one of the right answers, though.
Incorrect: SharePoint apps are the preferred method for developing code solutions for SharePoint 2013, but this too is just one of the right answers.
Correct: All the preceding answers are supported fully in SharePoint Server 2013.
Correct answers: A and C
Correct: The Compatibility Level value of 14 installs the solution into the 14 folder for the SharePoint 2010 mode.
Incorrect: The Compatibility Level of “14,15” installs the solution into both the 14 and 15 folders, which allows for the solution to be used for the SharePoint 2010 mode and the SharePoint 2013 mode.
Correct: The Compatibility Level of “Old” is equivalent to 14 in SharePoint 2013, although this might change in future versions of SharePoint.
Incorrect: “All” is the equivalent of “14,15” in SharePoint 2013. In future versions of SharePoint, “All” might include more modes.
Correct answer: B
Incorrect: Any changes to features require that you use the replacement method to update a farm solution.
Correct: Changes to DLLs are allowed with the Update method of upgrading a farm solution.
Incorrect: Any changes to the elements.xml file requires the replacement method of upgrading. Adding or removing an elements.xml file also requires the replacement method.
Incorrect: Changes in scope require that the replacement method be used to upgrade a farm solution.
Correct answer: A
Correct: To use the update method of upgrading a SharePoint app, the product ID must remain the same.
Incorrect: During the upgrade process, the SharePoint app becomes non-functional so that the app can be swapped out.
Incorrect: SharePoint apps are usually updated when the update link is clicked next to the app on the Site Contents page. In any event, the process isn’t automatic.
Incorrect: When a SharePoint app fails to update, it automatically rolls back and the old version is restored.
Objective 5.2: Thought experiment
In this thought objective, you have to provide PowerPivot for SharePoint to the data analyst team without spending any money on hardware or software. PowerPivot for SharePoint is a free download but requires SQL Server 2012 SP1; however, the SharePoint Server is running on SQL Server 2008 R2. Depending on the licensing, which was not specified, it can cost money to upgrade the database and in any case would cause a major disruption to services if SharePoint is heavily used.
Fortunately you could install the components necessary using the SQL Server 2012 SP1 Express edition on one of the servers in the SharePoint farm. This server would run the PowerPivot service as well as be the server where the PowerPivot configuration tool is run. You would still need a full version of SQL Server 2012 SP1 to host the PowerPivot databases, though. The PowerPivot service application can use a separate database than the one SharePoint is installed on, so this would solve your problem. Although performance won’t be quite as good from a connection standpoint, you will gain some benefit from balancing the overall SharePoint load across two database servers. After configuration, you should monitor the server running the PowerPivot service to make sure that it’s not being overtaxed. If it is, you might consider removing services from that server and/or configuring the PowerPivot settings.
Objective 5.2: Review
Correct answer: B
Incorrect: You need to configure the unattended service account before you can use shared credentials.
Correct: You don’t need to create a target application to use shared credentials. Target applications are used to impersonate specific accounts to connect to external data.
Incorrect: You need to make sure the PerformancePoint service is running on at least one of the SharePoint servers on the farm.
Incorrect: You need to have a PerformancePoint service application created before users can use PerformancePoint Services.
Correct answer: C
Incorrect: You need to restore the service application from a backup of the service application and not just the associated Reporting Services database.
Incorrect: You need to restore the Encryption Key as well as the Reporting Services service application.
Correct: The farm password, used to add servers to the SharePoint farm, isn’t needed.
Incorrect: A password is associated with the encryption key that will be needed when you restore it.
Correct answer: D
Incorrect: The PowerPivot for SharePoint 2013 Configuration tool can create the SQL Server PowerPivot service application for you, rather than you take care of it through Central Administration or PowerShell. However, this is just one of the correct answers.
Incorrect: The configuration tool can actually create a couple of different web applications. It can create a Central Administration web application and one specifically for PowerPivot. However, this is just one of the right answers.
Incorrect: The configuration tool can also be used to configure the Secure Store service application, but this is just one of the right answers.
Correct: Because A, B, and C are all true, “All of the above” is the best answer.
Correct answer: C
Incorrect: Tabular mode is the correct mode, but Microsoft SQL Server 2012 SP1 or greater is required.
Incorrect: Multidimensional and Data Mining mode is the wrong mode and the SQL Server version is wrong.
Correct: SQL Server 2012 SP1 is the right version of SQL Server and Tabular mode is the correct mode.
Incorrect: The SQL Server version is correct, but the Multidimensional and Data Mining mode is the wrong mode.
Objective 5.3: Thought experiment
In this thought experiment, you were asked to add Project Server 2013 functionality to the SharePoint 2013 farm and create a Project Server web app at http://www.contoso.com/pwa. Because you don’t have Project Server 2013 installed, that’s the first thing you need to take care of. You need to install Project Server on the two WFEs and the application server (but don’t run the SharePoint 2013 Products Configuration Wizard at the end of the setup). You don’t need to install Project Server on the database server because it’s not running SharePoint.
After you install Project Server on each SharePoint server, you need to go back and run the SharePoint 2013 Products Configuration Wizard on each of the SharePoint Servers one at a time, waiting until one server is completely done before starting on another. You should now start the Project Server Application Service and create a Project Server service application. You are restricted by the path you were instructed to use, so you could activate the Project Server site collection feature and then create a site using the Project Server site template at http://www.contoso.com/pwa. You could also go to the Project Server service application and create a Project Server web app from the Manage Project Web Apps page. This would create a site collection at http://www.contoso.com/pwa and allow for designating a database for the Project Server content as well as allowing you to set quotas specifically for the Project Server web app site. This has the additional benefit of being easier to back up and restore, greatly increasing the speed of recovery in case of a disaster. It also helps isolate issues for troubleshooting, should the need arise.
Objective 5.3: Review
Correct answer: C
Incorrect: Exchange administrators aren’t members of the Discovery Management role group because it has no members by default.
Incorrect: Local administrators aren’t members of the Discovery Management role group.
Correct: The Discovery Management role group is empty by default because it allows access to all mailboxes and therefore access to potentially confidential and sensitive information.
Incorrect: Members of the Role Management Group aren’t members of the Discovery Management role group, but they can add users, including themselves, to the group.
Correct answer: A
Correct: Project Server needs to be installed on all the servers in the SharePoint farm that are running SharePoint.
Incorrect: The application servers need Project Server installed on them, but so do all the other servers running SharePoint.
Incorrect: The WFEs also need Project Server installed on them, but so do all the other servers running SharePoint.
Incorrect: The Project Server service determines which servers process requests from the Project Server service application, but you still need to install Project Server on the other SharePoint servers.
Correct answer: D
Incorrect: The trust needs to be established in both directions through the exchange of certificates.
Incorrect: Like with answer A, the trust needs to be established in both directions.
Incorrect: Being in the same domain doesn’t do away with the trust requirement. The Exchange farm and the SharePoint farm don’t need to be in the same domain, but they do need to be in the same forest.
Correct: The Exchange and SharePoint farms must exchange certificates to establish trust before the SharePoint farm can perform eDiscovery on mailboxes located on the Exchange farm.
Correct answer: A
Correct: The users of the Project web app need at least Read access to the parent site or site collection. This is separate from the permissions on the Project web app site.
Incorrect: Write permissions can be given in addition to Read permissions, but they aren’t needed to use the Project web app.
Incorrect: Users don’t need Full Control, although that would give them the necessary Read permissions. Also, for security reasons, regular users shouldn’t have full control of the site or site collection that hosts the Project web app.
Incorrect: Giving users permissions to only the Project web app site and not the parent site or site collection will prohibit them from getting to the Project web app site.