
Chapter 4. Implementing hybrid identity
In Chapter 3, you learned about hybrid identity and how it enables users be productive on the devices they love while at the same time enabling IT to manage access to corporate resources and help keep company data secure in a cloud-first, mobile-first world.
In this chapter, you will take on the role of the senior enterprise administrator for the IT department at Blue Yonder Airlines and implement hybrid identity as the first phase of their EMS implementation plan as described at the end of Chapter 2. You will be responsible for ensuring Blue Yonder Airlines employees have a seamless Single Sign-On (SSO) experience and a consistent look and feel across all company websites and services both on the intranet and Internet.
Scenario description
As the senior enterprise administrator for Blue Yonder Airlines, you are responsible for planning, designing, and implementing the company’s EMS solution. You know that hybrid identity is the key enabler to allowing your users to work from anywhere on any device, so you will start there.
Because you are already heavily invested in on-premises Windows Server 2012 Active Directory, which currently authenticates hundreds of users every day, you need to find a way to easily integrate that existing infrastructure with Microsoft Azure AD to leverage your on-premises investment. You also know that you will need to implement EMS with as little administrative overhead as possible while still enabling centralized reporting to monitor organizational activity and services.
Implementation goals
In addition to integrating the on-premises Active Directory with Azure AD, you will need to meet the following goals during the first phase of the EMS implementation plan for Blue Yonder Airlines:
![]() Leverage on-premises investment in Windows Server Active Directory and Microsoft Azure to deliver a hybrid identity solution that enables users to be productive while leaving IT in control.
Leverage on-premises investment in Windows Server Active Directory and Microsoft Azure to deliver a hybrid identity solution that enables users to be productive while leaving IT in control.
![]() Implement SSO so that your users need only one name and one password to access both on-premises and cloud-based software and services.
Implement SSO so that your users need only one name and one password to access both on-premises and cloud-based software and services.
![]() Enable a seamless transition user experience from on-premises to the cloud by providing a consistent look and feel across all managed websites and services.
Enable a seamless transition user experience from on-premises to the cloud by providing a consistent look and feel across all managed websites and services.
Solution diagram
To meet the EMS implementation goals for the first phase of the project, you will need to implement the solution shown in Figure 4-1.
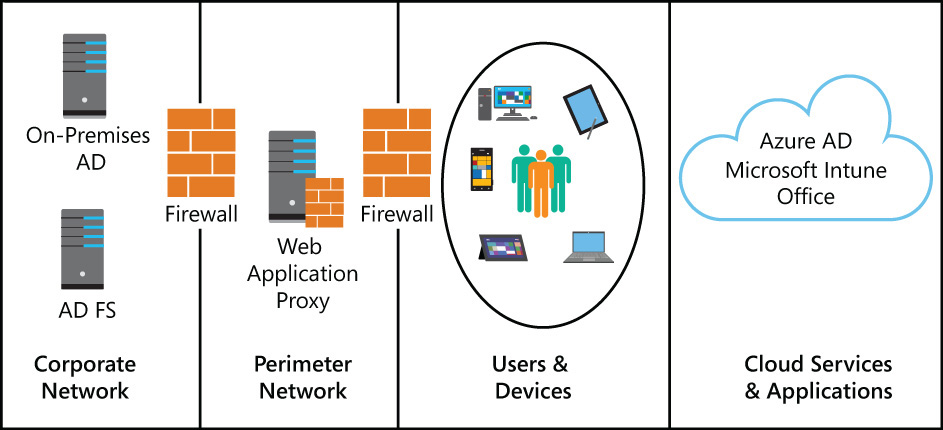
FIGURE 4-1 Hybrid identity enables users to access applications and cloud services from their devices while being authenticated by on-premises AD FS for SSO
Tip
This solution diagram is meant to provide a high-level overview and basic description of the intended solution architecture. Planning and design considerations for each element of the solution will be described in the next section.
The pieces of the solution diagram are:
![]() Corporate network The corporate network, corp.blueyonderairlines.com, is where the on-premises Windows Server 2012 R2 Active Directory resides and where you will need to implement AD FS 3.0 to perform on-premises authentication for your users.
Corporate network The corporate network, corp.blueyonderairlines.com, is where the on-premises Windows Server 2012 R2 Active Directory resides and where you will need to implement AD FS 3.0 to perform on-premises authentication for your users.
![]() Perimeter network The perimeter network, or demilitarized zone or DMZ as it is sometimes called, is where you will install the Web Application Proxy as part of your AD FS 3.0 implementation.
Perimeter network The perimeter network, or demilitarized zone or DMZ as it is sometimes called, is where you will install the Web Application Proxy as part of your AD FS 3.0 implementation.
![]() Users and devices This part of the solution diagram represents the Blue Yonder Airlines employees and the devices they use on a regular basis—both company-owned and employee-owned.
Users and devices This part of the solution diagram represents the Blue Yonder Airlines employees and the devices they use on a regular basis—both company-owned and employee-owned.
![]() Cloud services and applications This section represents the cloud services and Software-as-a-Service (SaaS) applications that Blue Yonder Airlines employee access from their devices.
Cloud services and applications This section represents the cloud services and Software-as-a-Service (SaaS) applications that Blue Yonder Airlines employee access from their devices.
Planning and designing the solution
Now that you have seen the completed solution picture from 10,000 feet, it is time to descend much lower into the individual technology and configuration requirements necessary to complete phase 1 of the EMS implementation plan. You will need to completely understand the information in this section to plan and prepare for the configuration steps necessary to successfully complete this phase of the project.
Tip
This planning and design section is meant to provide you with additional details about the components and considerations to consider while implementing the hybrid identity solution. The next section will guide you through the actual implementation steps and show you what each of the components looks like in more detail.
Microsoft Azure planning and design considerations
As already discussed in chapter 3, Azure AD is a cloud-based service that provides identity and access management capabilities for Microsoft Azure resources as well as all Microsoft cloud services such as Microsoft Intune and Office 365. Azure AD is the key to extending your on-premises AD to the cloud and you will not be able to utilize EMS to its fullest extent until you synchronize on-premises user objects with your Azure AD service.
Tip
A default Azure AD domain ends with .onmicrosoft.com. You will need to have global administrator credentials for your organization’s default Azure AD domain to integrate it with your on-premises AD.
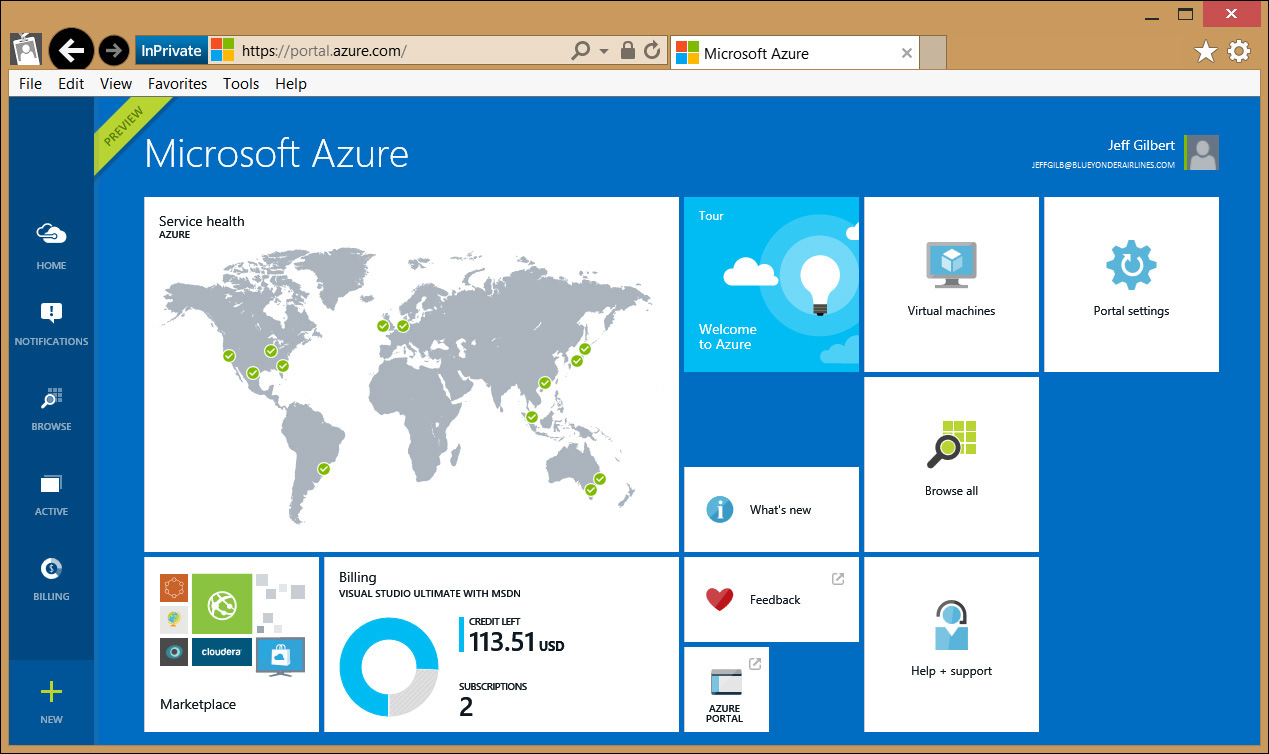
Microsoft Azure Management Portal
The Microsoft Azure Management Portal is used to manage your organization’s directory data and to grant end-user access to resources managed by your Azure AD repository. As an administrator, you will have access to the Blue Yonder Airlines Azure AD tenant service that is associated with your subscription from within the Microsoft Azure Management Portal at https://manage.windowsazure.com/ and as shown in Figure 4-2. From there, you can create and manage cloud-based users, groups, and SaaS applications, add custom domains, configure the Azure AD service itself, view reports, assign subscription licenses, and last, but not least, you can manage directory integration.
Tip
As you plan for your Azure AD instance, you might need to consider how you will delegate administrative tasks to other administrators using the pre-defined Azure Management Portal administrative roles: billing administrator, global administrator, password administrator, service administrator, and user administrator. You can learn more about assigning Microsoft Azure administrative roles at http://msdn.microsoft.com/en-us/library/azure/dn468213.aspx.
Microsoft Azure Access Panel
Just like most organizations, Blue Yonder Airlines relies on many SaaS applications like Office 365, Box, and Salesforce for end-user productivity. When SaaS applications are published to Azure AD, they are integrated into the service which provides identity management and ease of access via the Microsoft Azure Access Panel and SSO for applications that are managed within your Azure AD service instance. In addition to the many SaaS applications available from the Azure application gallery, you can also integrate your on-premises web applications to allow Internet-based uses to access web applications hosted on-premises.
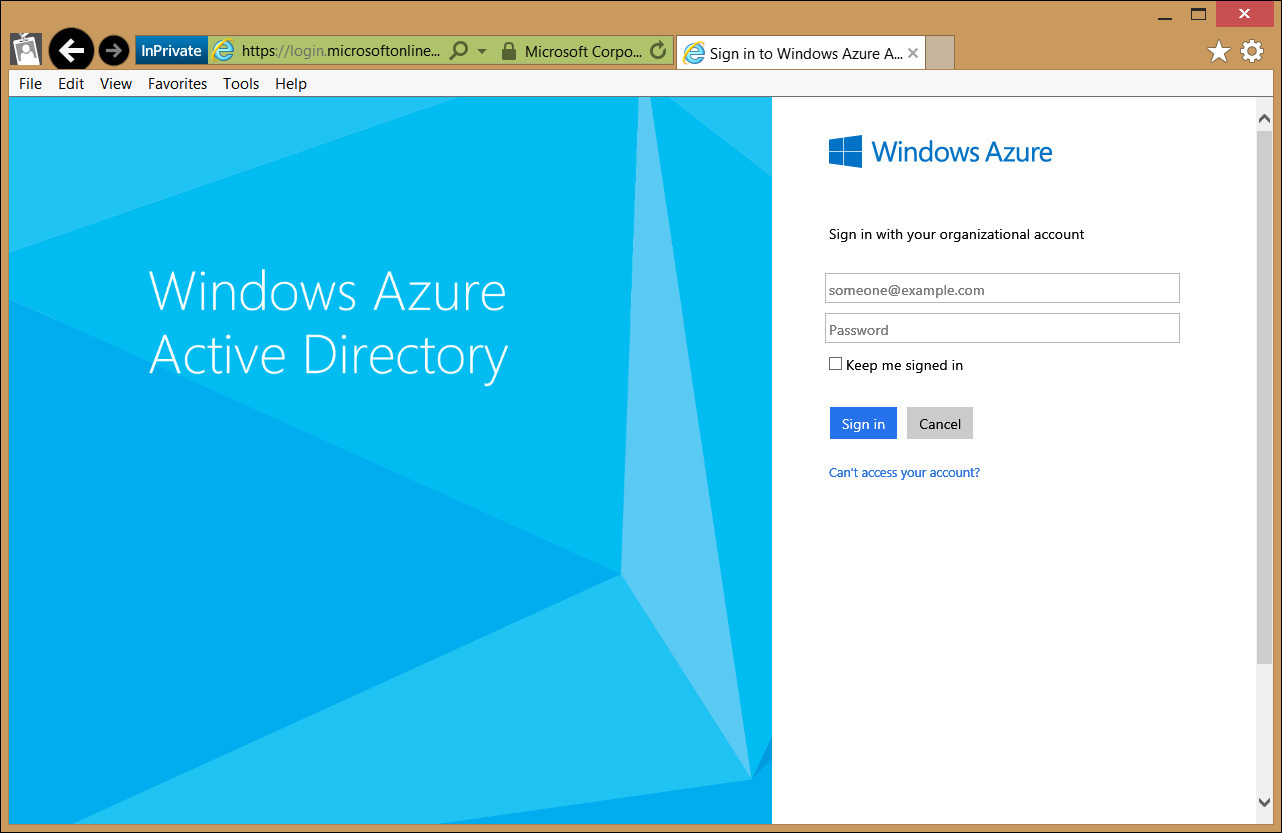
All of the configuration and integration is done in the Microsoft Azure Management Portal to make the entire process seamless to your users, who only need to go to https://myapps.microsoft.com and log on with their organizational account as shown in Figure 4-3.
After signing in to the Access Panel, users can also take advantage of the self-service functionality provided by Azure AD Premium features to perform password resets, update their profile information, perform password resets, or change their passwords without needing to call the helpdesk.
On-premises planning and design considerations
By definition, hybrid identity is all about getting your on-premises directory information into the cloud so that you can take advantage of Microsoft’s enterprise-level cloud service features and functionality through integration with Azure AD. However, before you can successfully enable that integration, there are a few things that you will need to understand and configure.
The information in this section is critical to understanding how you will administer your Azure AD directory as well as how your users will sign into Microsoft cloud services. Be sure that you have a plan to completely address these considerations before attempting to integrate your directories.
User Principal Names
A user principal name (UPN) is an AD object attribute that provides an Internet-style sign-in name for a user account based on the Internet standard RFC 822. It is composed of the user’s sign-in name and then the @ symbol followed by a UPN suffix. Shorter than a distinguished name, the UPN is easier to remember and usually maps to the user’s email address.
You can read more about RFC 822 on MSDN at http://msdn.microsoft.com/en-us/library/ms527253(v=EXCHG.10).aspx.
By default, your users will have a domain UPN suffix based on the domain the account was created in. If multiple UPN suffixes are available, administrators can choose the default or alternative UPN to assign the user account from a drop-down list on the account properties in the Active Directory Users And Computers Microsoft Management Console (MMC) console snap-in.
Important
The UPN suffix that you use for directory integration must be a public domain name that your organization owns. The public domain name must be added to your Azure AD instance and verifiable through a domain name registration service.
As you plan your directory integration from on-premises to Azure AD, you will need to decide on the UPN suffix that will be used for your users to log onto cloud services. You might also need to plan for coordinating with the Active Directory administrators to add the UPN suffix, to apply the UPN suffix to the user accounts that you want to synchronize, or both.
Scope of directory integration
By default, the domain synchronization tools we’ve discussed might synchronize more objects with Azure AD than you need or want them to. As stated in Chapter 3, you can always apply a synchronization filter to remove those objects from Azure AD the next time synchronization runs.
However, if you do not want all the default objects to be synchronized, you will need to consider how you will scope the objects to be synchronized with Azure AD and plan your filtering strategy accordingly.
Single Sign-On components and considerations
Another aspect of preparing your on-premises environment for integration with Azure AD and SSO is understanding the requirements to implement the on-premises server infrastructure to support AD FS in your environment.
Remember, the end goal of enabling SSO for your users is to simplify your cloud-based administrative work and provide a seamless sign-on experience for your users to get access to cloud-based applications and services. In the past, configuring SSO has been a very complicated and cumbersome process to implement, but as you will see, there have been vast improvements made recently in this area to greatly simplify the process of installing and configuring AD FS for SSO with Windows Server 2012 R2.
Active Directory Federation Services 3.0
Active Directory Federation Services (AD FS) is the key to providing identity federation and SSO capabilities for your end users to access applications with federation partner organizations or cloud-based services. AD FS 3.0 is included as a federation service role in Windows Server 2012 R2 that authenticates users and provides access to applications and resources. You do not even need to install IIS on the server computer now because AD FS 3.0 is built with all of the IIS component it needs to work. And, as you will see later in the “Customize branding” section at the end of this chapter, it is also easy to customize the AD FS logon page using Windows PowerShell.
You will need to install and configure one or more AD FS 3.0 servers on Windows Server 2012 R2 server computers in your on-premises environment to enable SSO. To run the service itself, you can either create a standard service account or, if you have at least one Windows Server 2012 or later domain controller in your environment, you can use a group managed service account.
Tip
You do not need to install or configure AD FS manually because the Azure AD Connect Wizard will do it for you as part of configuring directory integration.
Web Application Proxy
The Web Application Proxy is a new role for Windows Server 2012 R2. It replaces the AD FS Proxy in legacy versions of AD FS and includes additional features, such as allowing administrators to publish internal websites, pre-authenticate users with AD FS, or allow pass-through authentication. The Web Application Proxy also provides reverse proxy functionality to enable users on any device to access web applications inside your corporate network from the Internet. You will need to install and configure the AD FS Web Application Proxy server on a Windows Server 2012 R2 server computer in your on-premises environment as part of enabling SSO, but you cannot install it on the same server that is hosting the AD FS server role.
While you can install this role on a non-domain joined computer, if you want to use integrated Windows authentication for your web applications, you will need to install the Web Application Proxy on a domain-joined server computer. You will most likely want to do this in your perimeter network because Secure Sockets Layer (SSL) endpoint must be opened up to the Internet to enable SSO from outside the corporate network for sign-ins and web application authentication when you publish web applications originating from your internal network.
When an authentication request is received by the Web Application Proxy, it will direct the request to the AD FS server to complete the authorization process. You will need to create an A Host (not a CNAME) record in your on-premises DNS to enable devices connecting from the intranet to contact the Web Application Proxy at the federation service name as it is displayed on the SSL certificate. To enable devices connecting from the Internet to access the AD FS service, you will need to create a CNAME record in public DNS to direct Internet traffic to the Web Application Proxy.
Tip
You do not need to install or configure the AD FS Web Application Proxy manually because the Azure AD Connect Wizard will do it for you as part of configuring directory integration. Also remember that you cannot install the AD FS server role and the AD FS Web Application Proxy roles on the same computer.
AD FS sign-in page
When you try to sign in to cloud-based services with an organizational account that has been federated with Azure AD, you will be automatically redirected by the Web Application Proxy to the organizational AD FS server’s sign-in page with your sign-in name pre-populated on the sign-in screen for you. You can see the default sign-in page experience shown in Figure 4-4 and you will learn how to customize it using Windows PowerShell later in the chapter.
Certificate requirements
Security certificates are a vital component for safeguarding communication between AD FS and web-based devices and users and you will need to have a publicly trusted X509 v3 SSL certificate to secure your AD FS infrastructure. You can quickly and easily purchase the certificate from a public certificate authority company such as Verisign, DigiCert, or webhosting companies like GoDaddy, but be sure that the subject name of the certificate to be used matches the federation service name that you will create in AD FS (something like adfs.blueyonderairlines.com).
You can learn more about the X509 public key certificates on MSDN at http://msdn.microsoft.com/library/windows/desktop/bb540819(v=vs.85).aspx.
You should use the same SSL certificate for both the AD FS server and the AD FS Web Application Proxy server computer. All client devices should also automatically trust the certificate because it was provided by a public certificate authority.
Tip
You will need the certificate when you run the Azure AD Connect Wizard to configure AD FS and directory integration.
Azure AD Connect
The final on-premises planning consideration is the tool that will be used to enable domain integration from your Windows Server Active Directory to Azure AD. The wizard will handle all of the configuration and coordination necessary to get directory synchronization with Azure AD running as well as install AD FS and configure SSO for you. The Azure AD Connect Wizard provides a guided experience for:
![]() Downloading and installing integration component prerequisites for running the wizard, such as the .NET Framework, the Azure AD PowerShell Module, and the Microsoft Online Services Sign-In Assistant.
Downloading and installing integration component prerequisites for running the wizard, such as the .NET Framework, the Azure AD PowerShell Module, and the Microsoft Online Services Sign-In Assistant.
![]() Downloading, installing, and configuring Azure AD Sync and enabling directory sync in your Azure AD tenant service.
Downloading, installing, and configuring Azure AD Sync and enabling directory sync in your Azure AD tenant service.
![]() Configuring either password sync or AD FS with Azure AD for you, depending on what option you choose to use.
Configuring either password sync or AD FS with Azure AD for you, depending on what option you choose to use.
![]() Validating that everything is working at the completion of the wizard.
Validating that everything is working at the completion of the wizard.
![]() Even if you configure SSO, the Azure AD Connect Wizard will still give you the option to configure password hash sync to enable sign in using on-premises passwords as a fall back in case AD FS goes down.
Even if you configure SSO, the Azure AD Connect Wizard will still give you the option to configure password hash sync to enable sign in using on-premises passwords as a fall back in case AD FS goes down.
The server computer that you run Azure AD Connect on will be used for managing the synchronization service with Azure AD. The identity synchronization components will be installed on this computer, but you can also make it an AD FS server. If you do not want the wizard to install AD FS on the synchronization computer, or if you want to install AD FS on additional computers to create an AD FS server farm, you can have the wizard install the AD FS and Web Application Proxy server roles on any other accessible Windows Server 2012 R2 server computers.
Azure AD Connect is a very powerful wizard that makes it extremely easy to quickly configure directory synchronization with Azure AD and enable SSO via AD FS for users in your environment, but it does require several items that you should plan for before you start it. In addition to having at least two Windows Server 2012 R2 server computers and the federation services SSL certificate (and certificate password) available, you will also need to have the following information on hand before running the Azure AD Connect Wizard:
![]() Azure AD global tenant admin credentials.
Azure AD global tenant admin credentials.
![]() On-premises Windows Server Active Directory enterprise administrator credentials.
On-premises Windows Server Active Directory enterprise administrator credentials.
![]() The FQDN for the server names on which you want to install AD FS. It can be the same server you run the wizard to install the synchronization engine on or one or more remote servers if you want to create an AD FS server farm.
The FQDN for the server names on which you want to install AD FS. It can be the same server you run the wizard to install the synchronization engine on or one or more remote servers if you want to create an AD FS server farm.
![]() The FQDN for the server on which you want to install the Web Application Proxy.
The FQDN for the server on which you want to install the Web Application Proxy.
![]() Domain credentials that the Web Application Proxy will use when requesting certificates from the AD FS server. This domain user account must be an administrator on the AD FS server.
Domain credentials that the Web Application Proxy will use when requesting certificates from the AD FS server. This domain user account must be an administrator on the AD FS server.
![]() If you do not have a Windows Server 2012 domain controller in your environment you will need to create an AD FS service account. Otherwise, with a Windows Server 2012 domain controller in your environment, you can use a Group Managed Service account.
If you do not have a Windows Server 2012 domain controller in your environment you will need to create an AD FS service account. Otherwise, with a Windows Server 2012 domain controller in your environment, you can use a Group Managed Service account.
More Info
You can learn more about group managed service accounts on TechNet at http://technet.microsoft.com/en-us/library/hh831782.aspx.
![]() A public domain name that your company owns and that is already verified in Azure AD. If you have not previously verified the domain name in the Microsoft Azure Management Portal, you will be prompted to verify it by the wizard, but because it can take some time for that to happen you are better off pre-verifying the domain in Azure AD before running the wizard.
A public domain name that your company owns and that is already verified in Azure AD. If you have not previously verified the domain name in the Microsoft Azure Management Portal, you will be prompted to verify it by the wizard, but because it can take some time for that to happen you are better off pre-verifying the domain in Azure AD before running the wizard.
Implementing the hybrid identity solution
Now that you have an understanding of the components involved and you have completed the requisite pre-planning to ensure your success, the time has come for you to begin implementing the hybrid identity solution for Blue Yonder Airlines so that the company can begin utilizing EMS and fully enjoy the benefits it provides.
Prepare the Azure AD service for directory integration
To prepare the Azure AD service for directory integration with the Blue Yonder Airlines on-premises AD, you will first need to add and verify the blueyonderairlines.com public domain name and then activate domain synchronization from within the Microsoft Azure Management Portal.
Add and verify your public domain
The first step in preparing the Azure AD service for integration with the on-premises Blue Yonder Airlines AD is to add and verify ownership of the custom domain name. You know you can do this because your company owns the public domain name blueyonderairlines.com and you have the necessary credentials to ensure that the DNS records required to verify the domain can be modified with the domain name registrar.
Complete the following steps to successfully add and verify the custom domain:
1. Sign in to the Microsoft Azure Management Portal with global administrator credentials.
2. Open the Active Directory node of the Azure Management Portal.
3. Select the Azure AD instance to be modified.
4. On the Domains tab, select Add A Custom Domain and then click Add. You do not need to select the I Plan To Configure This Domain For Single Sign-On With My Local Active Directory check box because you will verify the domain next as part of this process rather than when configuring domain federation integration using Azure AD Connect.
5. After receiving the notification that the domain was successfully added, click the arrow to continue. Use the information displayed on the next page to go to your domain registrar and update the DNS settings for the custom domain to add the required TXT record to the applicable DNS zone. (You can learn more about verifying your domain name with a domain registrar on MSDN at http://msdn.microsoft.com/library/azure/jj151803.aspx.)
Tip
It can take anywhere from 15 minutes to 72 hours for the DNS zone changes to take effect before you can verify the domain, so it’s a good idea to get this out of the way as soon as possible.
6. Back in the Microsoft Azure Management Portal, select the custom domain name on the Domains tab and then click the Verify button at the bottom of the page to open the domain verification dialog box.
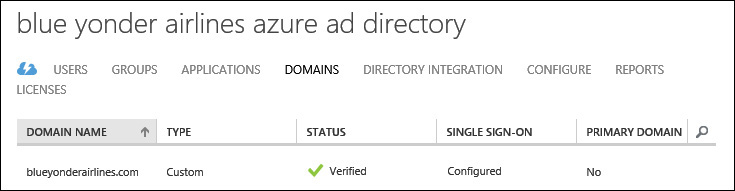
7. Click the Verify button to verify the domain and close the dialog box. You should now see Verified for the custom domain status on the Domains tab as shown in Figure 4-5.
Activate directory synchronization in Azure AD
Activating directory synchronization from the Microsoft Azure Management Portal is required to prepare the service to accept on-premises object attributes into your Azure AD service. The Azure AD Connect Wizard will do this for you if you forget, but it’s best to go ahead and get it out of the way while you’re still working in the portal.
Complete the following steps to activate directory integration for the Azure AD service:
1. Continuing in the Azure Management Portal, ensure your Azure AD service name is still selected and click the Directory Integration tab.
2. In the Integration With Local Activate Directory section, click Activated and then select Save at the bottom of the page.
3. Select Yes on the Activate Directory Sync dialog box.
4. Verify that you see the Changing Directory Integration Status message at the bottom of the portal. After a few minutes, the message should change to Successfully Changed The Directory Integration Status. Click OK and verify that the Directory Sync status is now Activated.
Prepare the on-premises environment for directory integration
After successfully preparing the Azure AD service for directory synchronization, you now need to focus on what needs to get done to prepare the on-premises environment.
As the enterprise admin for Blue Yonder Airlines you have permissions to make all of the necessary modifications, but don’t forget that you still need to coordinate with the other domain administrators to ensure that they are all aware of the changes you will be making to the on-premises AD and DNS settings as well as why you are making them. The server team will also need to provide you with at least two Windows Server 2012 R2, domain-joined server computers with one configured for perimeter network access.
Add an alternate UPN suffix to support the public domain
The first thing that you need to do is add the custom domain name that will be federated with Azure AD to the domain suffix list in the on-premises AD.
To do that, you will need to follow these steps while logged on with your administrator credentials on a Windows Server 2012 Active Directory server:
1. Open Administrative Tools from the Start menu and then click Active Directory Domains And Trusts.
2. In the console tree, right-click Active Directory Domains And Trusts and then click Properties.
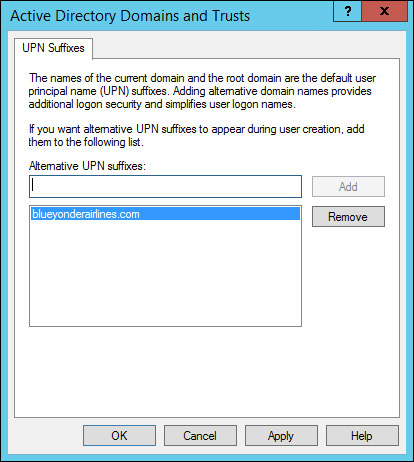
3. On the UPN Suffixes tab, add the alternative UPN suffix for the custom domain (in this case, blueyonderairlines.com) and then click Add, as shown in Figure 4-6.
4. Click OK to close the properties dialog box and exit the Active Directory Domains And Trusts console.
Configure users and groups for synchronization
Because you do not want to immediately synchronize all users and groups with Azure AD, the first step you take to configure on-premises AD objects for synchronization should be to create a new organization unit (OU) in the on-premises AD. You will use that as a container to organize the specific users and groups that you want to sync with Azure AD as part of the pilot phase of implementing EMS at Blue Yonder Airlines.
After creating the OU, you need to add the users and groups that you want to sync with Azure AD. You will also need to configure the alternate UPN suffix for each user so that each user can use that federated sign-in name for cloud services authentication.
To add users to the Cloud Service Users OU, you will need to follow these steps while still logged on with your administrator credentials on a Windows Server 2012 Active Directory server:
1. Open Active Directory Users And Computers from Administrative Tools. Right-click the domain name (in this case, corp.blueyonderairlines.com) and then click NewOrganizational Unit. Name the new OU Cloud Service Users and then click OK to close the New Object – Organizational Unit dialog box.
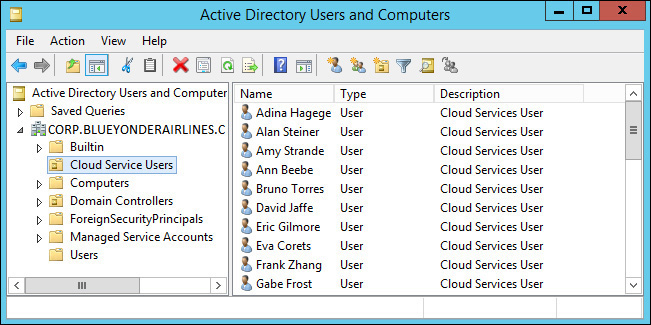
2. Next, you need to navigate through the existing OUs to move user accounts for those who will be part of the EMS pilot into the new Cloud Service Users OU. When you are finished, you should have an OU containing the users that will be synchronized, looking something like Figure 4-7.
3. Finally, you need to configure the UPN suffix for all of the pilot users in the Cloud Service Users OU so that they will be ready for SSO using the blueyonderairlines.com public domain name that you added to Azure AD. To do that, you simply select all of the user accounts in the Cloud Service Users OU, right-click one and select Properties. Next, select the Account tab and configure the appropriate UPN suffix from the drop-down list to bulk update all of the user accounts at once.
Configure name resolution
The final step in preparing the on-premises environment is to ensure that the necessary DNS settings have been configured properly. You need to enable the name resolution to support the AD FS functionality required for users connecting to published web applications from within the corporate network to authenticate into those apps as well as enable the Web Application Proxy server computer to resolve the AD FS server name to authenticate users signing in from outside the corporate network.
To allow intranet users to authenticate into web applications and resources using AD FS, you need to go into the on-premises DNS server and create an Host (A) record for the IP address of the AD FS server (or AD FS load-balancer if you are using an AD FS farm) that corresponds to the AD FS service you will create when you enable SSO. You know from your previous planning and from when you purchased the SSL certificate for Blue Yonder Airlines that you will name the service adfs.blueyonderairlines.com, so you add a Host record for that name in the DNS forward lookup zone for blueyonderairlines.com in the on-premises DNS.
Because the Web Application Proxy is actually the computer that users signing in from the Internet will need to contact to enable SSO authentication, you will need to ensure that port 443 is open to Internet communication on the Web Application Proxy and that the server can be contacted on an external network interface card configured with an Internet-accessible IP address. That IP address will need to be registered with your domain name registrar so that the host name matches the AD FS service name (in this case, adfs.blueyonderairlines.com). Finally, the Web Application Proxy must be able to resolve the internal AD FS server name by either using an alternate DNS server in the perimeter network or by modifying the local HOSTS file on the Web Application Server itself.
The end result of all of this is that name resolution is properly enabled both inside and outside the corporate network to fully support AD FS functionality. Authentication requests should now be routed to the AD FS server using either internal company DNS settings or from authentication requests being sent by proxy via the Web Application Proxy to the on-premises AD FS server for Internet-based devices.
Enable Single Sign-On
With all the hard work done to prepare both Azure AD and the on-premises AD out of the way, the only thing left to do is to enable SSO and verify that your pilot users appear in Azure AD. Luckily, the Azure AD Connect Wizard will do most of the work for you as long as you supply it with the public SSL certificate you purchased for the AD FS service name and have properly planned to provide the other information it needs to complete the job for you.
Tip
At the time of this writing, the Azure AD Connect Wizard was in Beta, so your experience might vary depending on any changes made to the Wizard at its final release.
Use the Azure AD Connect Wizard to configure domain synchronization, federate your domains, and configure AD FS to enable SSO by following these steps:
1. Download the latest version of Azure AD Connect from http://aka.ms/aadconnect on the Windows Server 2012 R2 computer that you will use for the synchronization computer.
2. Open MicrosoftAzureActiveDirectoryConnect.msi to start the Azure AD Connect Wizard. Once started, the wizard will check for installation prerequisites to determine if prerequisites like Microsoft .NET Framework 3.5, Microsoft Online Services Sign-In Assistant For IT Professionals, Azure AD Sync Engine, or the Windows Azure Active Directory Module For Windows PowerShell need to be automatically downloaded and installed.
3. After installing the necessary prerequisites, the Azure AD Connect Wizard will prompt you for your Azure AD global administrator credentials. After your credentials are verified with Microsoft Online the wizard will proceed to the next step.
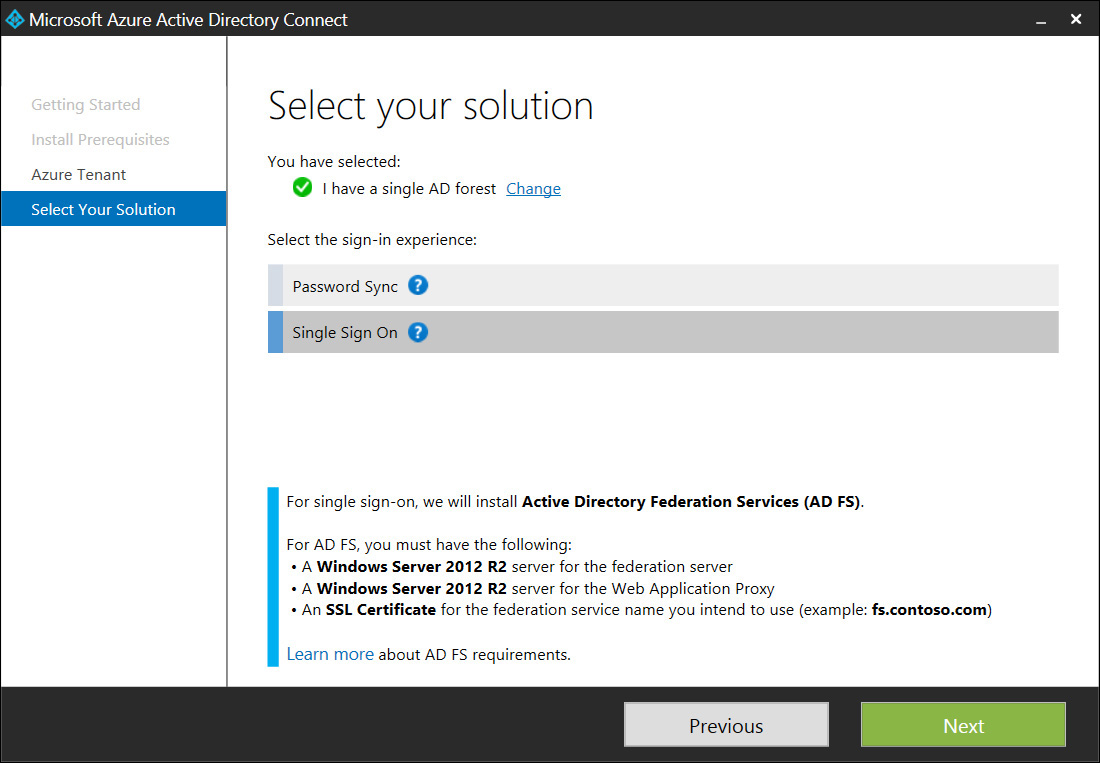
4. Next, you need to select the Active Directory forest that you want to synchronize with Azure AD. You only need to synchronize a single Active Directory forest, so you select that option and then select Single Sign On as the sign on experience you would like the wizard to configure for you, as shown in Figure 4-8.
5. After verifying your Azure AD credentials and getting an understanding of what you want to do, the wizard will start the on-premises information gathering process by asking you to provide the enterprise administrator credentials for the on-premises Windows Server Active Directory.
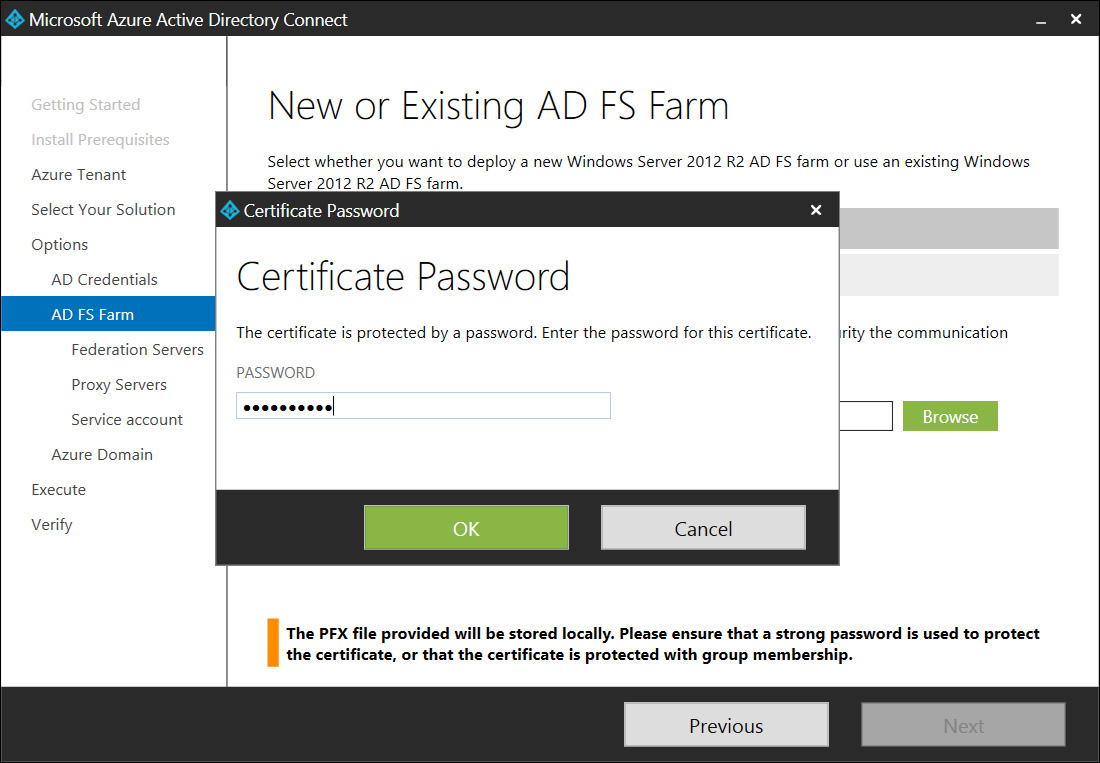
6. On the AD FS Farm page of the Azure AD Connect Wizard you will be prompted to either create a new Windows Server 2012 R2 AD FS farm or use an existing one. For this scenario, select the option to deploy a new AD FS farm and then click Browse to select the SSL certificate (PFX file) that you purchased to use for the AD FS service certificate. You will most likely need to enter the password for the exported certificate, as shown in Figure 4-9. After it is imported, select the AD FS service name (in this case, adfs.blueyonderairlines.com) and then verify the federation service name is correct.
7. Next, you need to provide the Windows Server 2012 R2 computer name that you want to install the AD FS service on. The wizard will verify network connectivity to the server and then add it as a selected server.
Tip
You can add multiple server names on this page to create an AD FS server farm, but for this scenario you will just add one server name and continue.
8. On the specify on-premises options page, enter the name of the Windows Server 2012 R2 computer that you want the wizard to install the Web Application Proxy server role on. The wizard will again validate network connectivity to the server before continuing.
Tip
The Web Application Proxy cannot be installed on the same server as the AD FS service computer and it does not need to be domain-joined as it is often a standalone server in the perimeter network. However, to enable integrated Windows authentication to published web apps, you will use a domain-joined server in the perimeter network with a firewall rule that allows 443 traffic between the Web Application Proxy server and the AD FS server only.
9. On the Specify Federation Server Credentials page, you need to enter a username and password for the credentials that will be used by the Web Application Proxy to request a certificate from the federation server. This service account only needs to be a regular domain user account, but it must also be an administrator on the AD FS servers.
10. On the Specify Federation Service Account page you should select the Create A Group Managed Service Account (gMSA) For Me option because you know that Blue Yonder Airlines on-premises AD has Windows Server 2012 domain controllers to support this type of account.
11. On the Specify Domain For Federation page, select the domain name that you want to federate from the drop-down list.
Tip
If you had not already previously verified the domain name, the wizard would have prompted you with information and directions for you to confirm you own the domain name before completing AD FS installation. If you continue without first verifying the domain name, the wizard will start the initial synchronization but will not create the AD FS trust with Azure AD. This is why you were proactive and have already verified the blueyonderairlines.com domain in Azure AD.
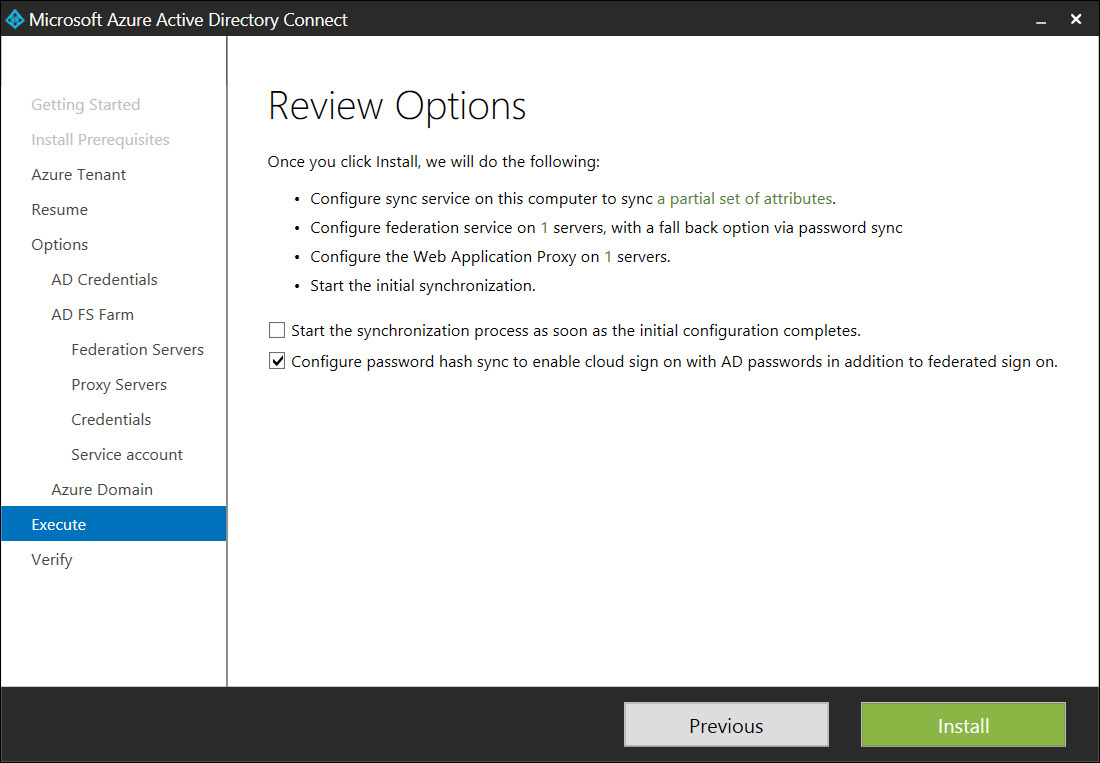
12. The Review Options page is displayed next and offers you the opportunity to review the settings that the wizard will execute when you click Install on this page. Because you do not want to synchronize all users and groups with Azure AD, you clear the Start Synchronization Process As Soon As The Initial Configuration Completes check box as shown in Figure 4-10, but you do leave the second check box selected to provide fallback authentication in case AD FS goes down for some reason in the future.
Tip
After you click Install on this page, the Wizard will begin installing and configuring identity synchronization components and AD FS in your environment. The process will take about half an hour as the wizard downloads and installs components necessary to enable directory sync and install and configure AD FS for you.
13. When the installation is complete, the wizard gives you the option to verify that the DNS name resolution that you configured earlier is functioning properly by clicking the Verify button or you can just exit the wizard. Because you want to be sure everything is working properly, click Verify to continue.
14. Finally, the Wizard will verify both the intranet and extranet configuration and the IP addresses that the federation service name responds to on both internal and external DNS Servers and you can exit the wizard.
Configure synchronization filtering
After successfully completing the Azure AD Connect Wizard, several identity synchronization components will be installed on the synchronization computer. These include a new synchronization service, a scheduled task to manage the service, and a new account to run the service for you called AAD_xxxxxxxxxxxx where the x characters represent a unique, 12-digit alphanumeric string specific to your organization. You will also have several new Forefront Identity Manager (FIM) security groups added to the local computer, including FIMSyncAdmins (which will contain the account used to install AAD Connect and the AAD_xxxxxxxxxxxx account), FIMSyncBrowse, FIMSyncJoiners, FIMSyncOperators, and FIMSyncPasswordSet.
Tip
To avoid causing synchronization failures, do not move, remove, or re-permission the AAD_xxxxxxxxxxxx account.
To configure synchronization filtering after Azure AD Connect finishes, but before your first synchronization, you will need to use the following steps to only synchronize the Cloud Service OU accounts from the on-premises AD to the Blue Yonder Airlines Azure AD service:
1. On the synchronization computer that you ran the Azure AD Connect Wizard on, launch the Synchronization Service Manager from the Start menu and then select Connectors.
2. With the on-premises AD name highlighted, select Properties from the Action menu.
3. In the connector Properties’ dialog box, select the Configure Directory Partitions option in the Connector Designer area and then click Containers to configure connection options.
4. After successfully authenticating using your on-premises credentials, you will see the Select Containers dialog box. From here you can clear all of the represented OUs except for the Cloud Service Users OU, as shown in Figure 4-11.
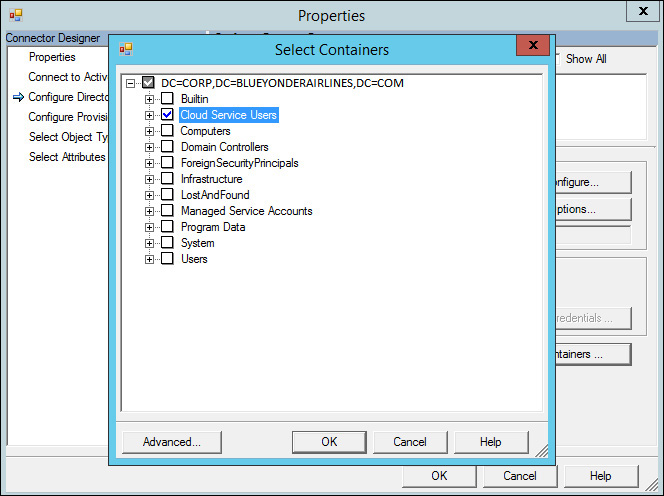
5. Click OK to close the properties dialog boxes and then use the Run options for the on-premises AD Connector to run the Full Import and Delta Synchronization actions.
More Info
You can learn more about synchronization filtering on MSDN at http://msdn.microsoft.com/en-us/library/azure/dn801051.aspx.
Force a directory synchronization and verify that it is successful
When you successfully complete the Azure AD Connect Wizard, it will create a scheduled task that will run every three hours to synchronize your on-premises AD with Azure AD. However, if you deselect the option to Synchronize Now on the Azure AD Connect Wizard’s summary page, it will disable that scheduled task to give you time to configure synchronization settings, such as the domain partitions (as you have just done).
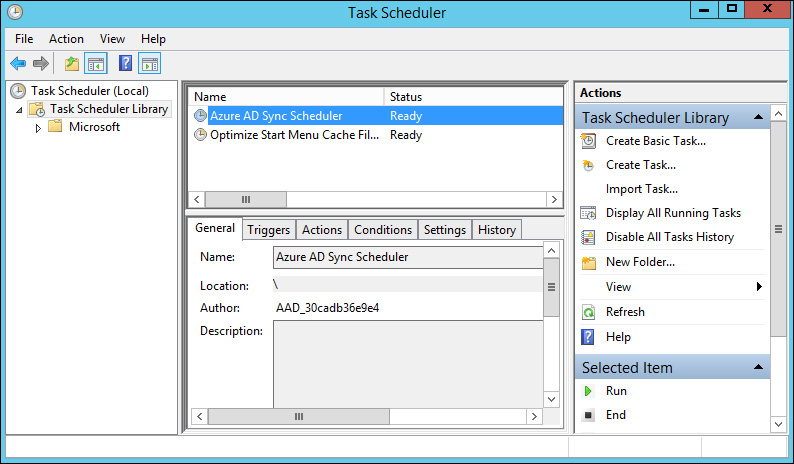
After customizing your synchronization filtering, and when you are finally ready to synchronize your domain for the first time, you will need to enable the scheduled task so that it will run every three hours thereafter as the AAD_xxxxxxxxxxxx account. After you enable the task in Task Scheduler, select Run from the Actions menu (as shown in Figure 4-12) to force an immediate synchronization.
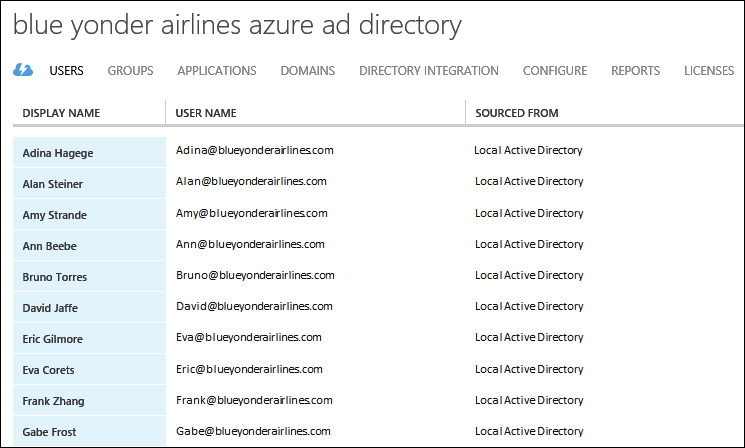
To verify that the synchronization was successful, simply log on to the Azure Management Portal and review the objects displayed on the Users tab of your Azure AD service instance. If all has gone well, the user account information from the OU that you wanted to synchronize will now be present, similar to what is shown in Figure 4-13.
Now that you have user objects in Azure AD, you will also need to verify that AD FS is functioning correctly and your users are being authenticated on-premises. You can verify this by simply signing in to the Azure Access Panel at https://myapps.microsoft.com using your synchronized organizational credentials. If AD FS is functioning correctly, you will be redirected to your company’s default AD FS sign in page as soon as you enter your username and tab into the password box.
Customize branding
Now you have completed configuring directory synchronization from on-premises to Azure AD to enable SSO for Blue Yonder Airlines employees, your next and last task to complete the objectives for this phase of the project will be to provide a consistent look and feel for users signing in across all company websites and services both on the intranet and cloud-based.
Rather than use the basic Microsoft Azure AD Sign-In page used by cloud services shown in Figure 4-3 or the organizational AD FS sign-in page shown in Figure 4-4, you will want to customize each page to add Blue Yonder Airlines branding and provide a familiar and seamless sign-in experience for your users.
Add company branding using the Microsoft Azure Management Portal
You can easily add company branding for Blue Yonder Airlines to the Microsoft Azure AD Sign-In page and the Access Panel from the Azure Management Portal on the Configure tab for the Azure AD directory that you want to customize. Simply select Customize Branding on the Configure tab and then modify the elements that you want to customize. The changes should take affect for all users within about thirty minutes.
More Info
The user interface for customizing branding is self-explanatory so it will not be covered in great detail here. You can learn more about the customization options available to you on MSDN at http://msdn.microsoft.com/library/azure/dn532270.aspx.
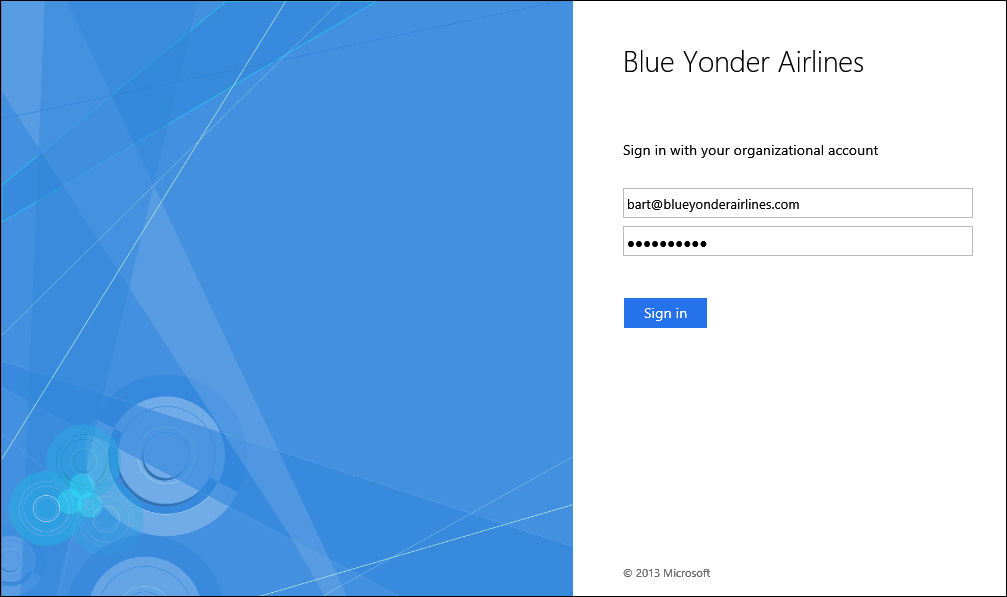
After you customize the sign-in page as shown in Figure 4-14, it now looks more like a standard company website at Blue Yonder Airlines and the Access Panel will also display the company logo rather than the default Microsoft Azure logo.
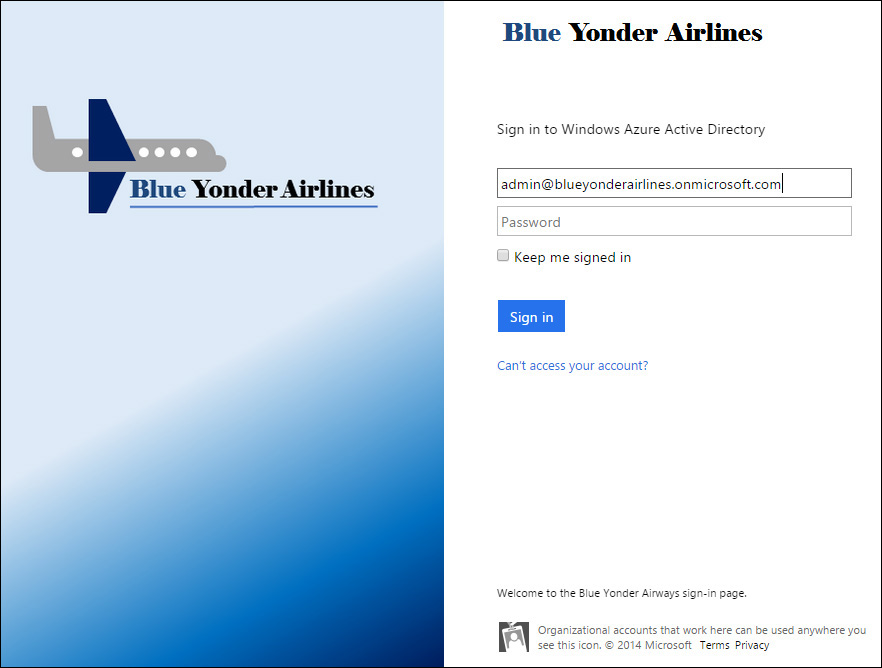
Tip
Notice how the sign-in text says to sign in to Windows Azure Active Directory instead of to sign in with your organizational account? This is the Azure AD sign in page that cloud-based users such as those from the default onmicrosoft.com domains will see. This is also the sign-in page shown if you do not configure AD FS for SSO.
Customize the AD FS sign-in page
Because you have configured AD FS and SSO for Blue Yonder Airlines employees, they will not usually be signing in to the default Azure AD sign-in page that was shown in Figure 4-3. Instead of being redirected to a customized Azure AD sign-in page, your users will now be redirected via the Web Application Proxy server computer to the AD FS server’s sign-in page for on-premises authentication, so you also need to modify the branding on that page.
It is easy to modify the AD FS sign-in page using Windows PowerShell and the same logo image files you used to customize the Azure AD sign-in page. You can also add company-specific descriptions and links for more information or support.
You can use the following Windows PowerShell commands to customize the on-premises AD FS sign-in page like the Azure AD sign-in page:
![]() To replace the company name with a company logo file:
To replace the company name with a company logo file:
Set-AdfsWebTheme –TargetName default –Logo @{path="<pathToLogo>.png"}
![]() To replace the default illustration with a custom picture:
To replace the default illustration with a custom picture:
Set-AdfsWebTheme -TargetName default -Illustration @{path="<pathToLogo>.png"}
![]() To add sign-in page description text:
To add sign-in page description text:
Set-AdfsGlobalWebContent -SignInPageDescriptionText
"<yourHTMLFormattedTextGoesHere>"
![]() To add a helpdesk link:
To add a helpdesk link:
Set-AdfsGlobalWebContent -HelpDeskLink <linkUrl> -HelpDeskLinkText Help
![]() To add a home page link:
To add a home page link:
Set-AdfsGlobalWebContent -HomeLink <linkUrl> -HomeLinkText Home
![]() To add a custom privacy page link:
To add a custom privacy page link:
Set-AdfsGlobalWebContent -PrivacyLink <linkUrl> -PrivacyLinkText Privacy
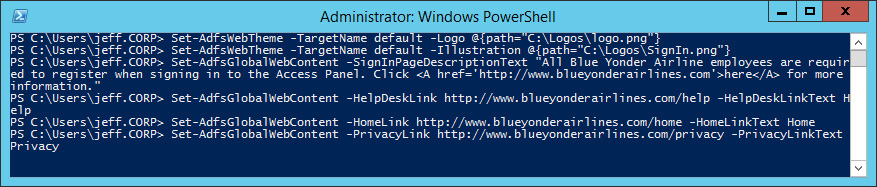
If you use all of the these commands, the Windows PowerShell command window will look something like what’s shown in Figure 4-15.
More Info
You can learn more about the other customizations available to you and image size recommendations on TechNet at http://technet.microsoft.com/en-us/library/dn280950.aspx.
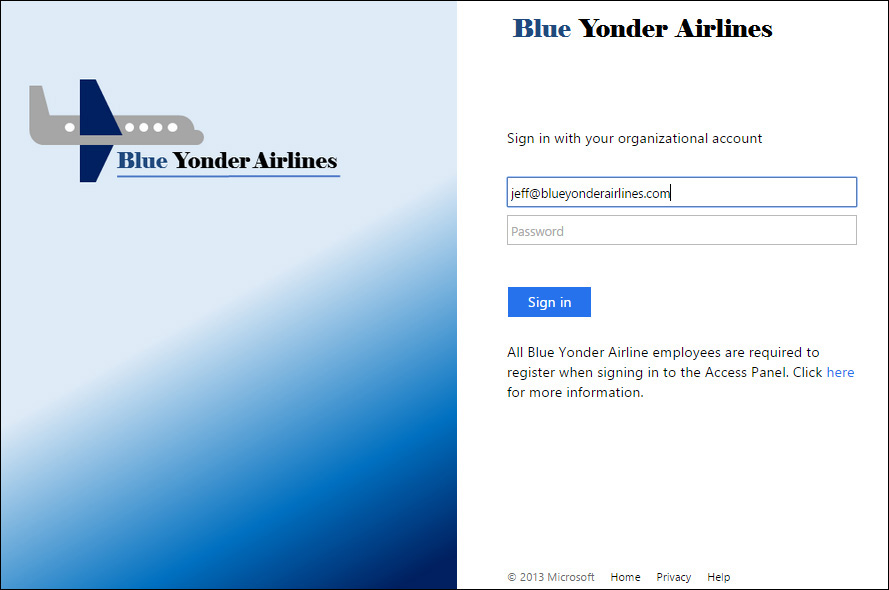
After you enter all of the Windows PowerShell commands successfully, you need to verify the changes have taken place by performing an SSO sign-in as a synchronized user. At this point, the AD FS sign-in page should now look something like Figure 4-16 instead of the default image.
Congratulations, you have completed the first implementation phase of the EMS project for Blue Yonder Airlines.