
The underlying architecture of Web applications has always posed a problem with usability. Whenever a user performs an action on a Web page that requires a post back to the Web server, data from all form fields is sent over the network, the page goes blank, and the browser sits in limbo waiting for the Web server to send the response. In a typical ASP.NET scenario where a post back reloads the same page after the server processes the data, the speed of the application can be sacrificed because the entire page must reload each time it’s posted back.
Ajax is well suited to providing a user experience that doesn’t suffer from such problems. When a Web page uses Ajax to post back to the server, only the applicable form data is sent to the server in a process known as a partial post back. After the server processes that data, it responds with data that the Web page uses to dynamically update the page as necessary. During this process, the Web page remains visible in the browser. The result is a user experience very much like a Windows application instead of a typical browser-based experience.
The technology that Ajax uses is called XMLHttp. XMLHttp is a standardized method of exchanging data between an application and a Web server. Almost all browsers support XMLHttp, and the latest Opera mobile browser allows for support of Ajax functionality from mobile devices and smart phones.
Microsoft’s implementation of Ajax is called ASP.NET AJAX. It includes the AJAX Library (client-side libraries), the ASP.NET AJAX Extensions (the server-side controls that are available in the Expression Web 2 toolbox), and the ASP.NET AJAX Control Toolkit, a collection of Ajax controls complete with source code that you can use in any way.
The Microsoft AJAX Library consists of client scripts and libraries that can be used to add Ajax functionality to any Web page. The AJAX Library is the perfect choice, for example, for PHP developers who want to add Ajax functionality to a PHP application using Microsoft’s implementation. In fact, one of Microsoft’s employees has developed PHP for Microsoft AJAX Library that does just that, and you can download it from codeplex.com/phpmsajax.
Note
We’ll use the AJAX Library in the “Lagniappe: Using the AJAX Library” section of this chapter, but I won’t go into great detail on it in this book. If you’re interested in reading more about it, read ASP.NET Ajax in Action from Manning. It’s an excellent book on Ajax.
The Microsoft AJAX Extensions consist of a series of .NET Framework assemblies (DLL files) that include not only server-side functionality, but also ASP.NET controls that make using Ajax in an ASP.NET page a drag-and-drop endeavor. The following Ajax controls are included with Expression Web 2:
ScriptManager—. TheScriptManagercontrol is required on any Web form that uses the AJAX Extensions. It provides the capability to dynamically include client-side scripts used in Ajax functionality.ScriptManagerProxy—. TheScriptManagerProxycontrol is used most often in content pages that use ASP.NET master pages. We’ll look at this control in more detail in the “Lagniappe: Using the AJAX Library” section later in this chapter.Timer—. TheTimercontrol enables you to easily perform post backs of a page (both synchronous and asynchronous) at a regular interval.UpdatePanel—. TheUpdatePanelcontrol is a container for any control on a Web form that takes part in an Ajax partial post back. We’ll use anUpdatePanellater in this chapter.UpdateProgress—. TheUpdateProgresscontrol is designed to display a message or some other indicator when anUpdatePanelis performing a partial post back.
The AJAX ASP.NET Control Toolkit (which can be viewed and downloaded from http://asp.net/ajax/ajaxcontroltoolkit/) is a set of Ajax controls Microsoft developed that include full source code. Microsoft released these controls to encourage developers to create their own Ajax controls using Microsoft’s AJAX Extensions, and some of the coolest Ajax controls are included in the Toolkit.
Note
Unfortunately, you cannot add controls from the AJAX ASP.NET Control Toolkit to the toolbox in Expression Web 2.
Developing new Ajax controls and extenders is an advanced programming topic, and Microsoft has provided plenty of excellent documentation on the AJAX ASP.NET Control Toolkit Web site.
Adding Ajax functionality to your ASP.NET page is much easier than you might think. Let’s create a simple ASP.NET page, and then we’ll modify the page to add Ajax functionality to it.
Note
If you’d prefer to see the final working page, you can find it in the ExamplesCh34Website folder on the CD that accompanies this book.
Let’s create a new Web site and page, and then add Ajax functionality to the page using the Microsoft AJAX Extensions:
Create a new one-page Web site at a file location on the local computer so that you can preview pages using the Microsoft Expression Development Server.
Select File, New, Page and choose ASPX from the list of page types.
Select C# as the language and click OK to create the page.
Make sure you are in Design View.
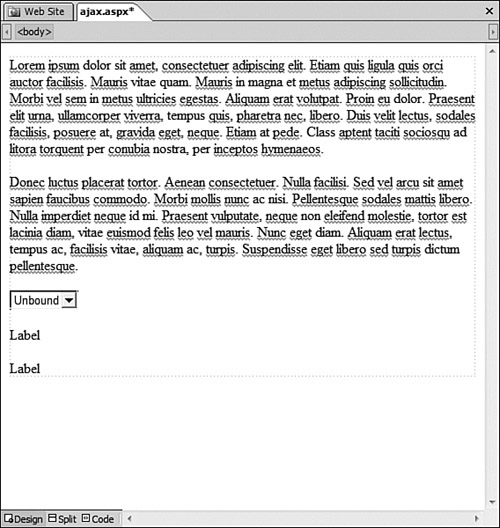
Add about 15 lines of text. Any text will suffice, such as text generated by the Lorem Ipsum generator at www.lipsum.com.
From the ASP.NET section of the toolbox, add a
DropDownListcontrol under the text you added previously. Change the ID property of theDropDownListcontrol todrpMusicGroup.Change the
AutoPostBackproperty of theDropDownListcontrol toTrue.Add a new line under the
DropDownListcontrol and add an ASP.NETLabelcontrol. Change the ID property of theLabelcontrol tolblDisplayGroup.Add a new line and add a new
Labelcontrol. Change the ID of the newLabelcontrol tolblTime.Add 20 or so new lines so that the text and controls scroll off the design surface.
Your page should now look like the one shown in Figure 34.1. Save the page as ajax.aspx.
Next, you need to add some items to the DropDownList control. Click the arrow button at the top of the DropDownList control to display the DropDownList Tasks dialog, and click the Edit Items link as shown in Figure 34.2.

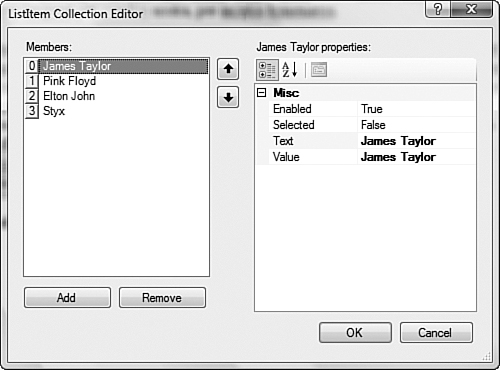
Click Add and add a few of your favorite music groups as shown in Figure 34.3, and then click OK to add the items.
Now that you’ve created a simple page, you need to add some server-side code to process the page when a new item is selected in the DropDownList control. Switch to Code View and enter the code in Listing 34.1 directly above the opening <html> tag.
Example 34.1. Server-Side Code for Ajax Page
<script runat="server">

    protected void Page_Load(object sender, System.EventArgs e)
    {
        lblTime.Text = "It is now " + System.DateTime.Now.ToString();
    }
    protected void drpMusicGroup_SelectedIndexChanged(object sender, System.EventArgs e)
    {
        string Group = drpMusicGroup.SelectedValue.ToString();
        lblDisplayGroup.Text = "You selected " + Group;
    }
</script>
This code is very simple. When the page loads, it displays the current date and time in the lblTime Label control. It also includes code that will run when a new value is selected in the drpMusicGroup DropDownList control. That code will change the lblDisplayGroup Label control so that it displays the group name you’ve selected.
Note
We haven’t begun adding Ajax capability to this page. The purpose of this exercise is to show you how easy it is to build a page and then add Ajax functionality to it.
To make this page work, you’ll need to change the code for the drpMusicGroup control to hook it up to the code that you added to the page. To do that, make sure you’re in Code View and add the following to the opening <asp:DropDownList> tag on the page:
OnSelectedIndexChanged="drpMusicGroup_SelectedIndexChanged"
After you’ve added that, the opening <asp:DropDownList> tag should look like this:
<asp:DropDownList id="drpMusicGroup" runat="server" AutoPostBack="True"OnSelectedIndexChanged="drpMusicGroup_SelectedIndexChanged">
You’re now ready to test the page without Ajax functionality. Save the page and preview it in your browser. When the page loads, scroll down so that the drop-down is at the top of the page, and select a new group. When you do, you’ll notice a couple of things happening. First, the page will scroll back to the top when you select a new group; then, the date and time change in the lblTime Label control. The reason for this is that the entire page is redrawn every time you select a different group.
Note

If you get an error that a control on your page must be added to a form with a runat attribute set to server, see “Error When Previewing Page” in the “Troubleshooting” section of this chapter.
Ajax is the perfect solution for a situation like this. By adding Ajax functionality to this page, you can update the lblDisplayGroup Label control when a new group is selected without changing anything else on the page.
Only two steps are involved in making this page Ajax-enabled:
As I mentioned earlier, any page that uses Microsoft’s AJAX Extensions must have exactly one ScriptManager control on the page. The ScriptManager control also must be added to the page above any control that uses the AJAX Extensions; otherwise, an error will occur.
The AJAX Extensions use the ScriptManager control to load the necessary client scripts to support partial post backs, the process of posting only certain data back to the Web server.
Tip
You can add your own scripts to the ScriptManager control as well. We’ll cover the concept of adding scripts to the ScriptManager in the “Lagniappe: Using the AJAX Library” section of this chapter.
Let’s add a ScriptManager control to the ajax.aspx page:
Open the
ajax.aspxpage if it’s not already open.Add a new
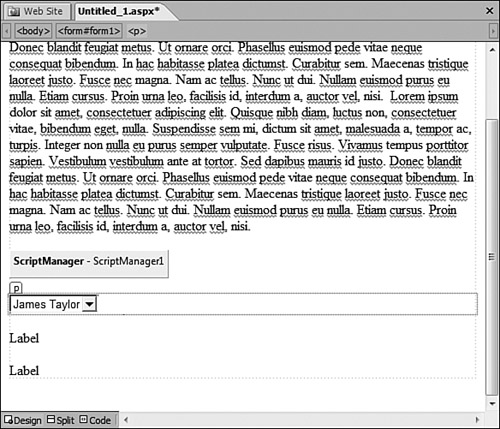
ScriptManagercontrol on the page directly above thedrpMusicGroupcontrol. TheScriptManagercontrol will likely show a warning icon as shown in Figure 34.4. If you don’t already have aweb.configfile that contains configuration information for the 3.5 .NET Framework, you’ll need to add one before you can use the AJAX Extensions.To add the necessary configuration information, click the
asp:scriptmanagerlink on theScriptManagercontrol shown previously in Figure 34.4. Expression Web 2 will display a message informing you that you need to update or add aweb.configfile to support the .NET Framework 3.5, as shown in Figure 34.5. Click Yes to add the necessary information to your Web site.Save the page.


Your page should now look similar to the one shown in Figure 34.6.
The UpdatePanel control is an extremely powerful control. Any control placed within an UpdatePanel control will automatically become an Ajax-enabled control. In the case of the ajax.aspx page, we want the drpMusicGroup and lblDisplayGroup controls to be Ajax enabled so that when an item is selected in the drop-down, the label is updated to reflect the selected item via Ajax. Accomplishing this is going to be a lot easier than you might think.
You need to add a new UpdatePanel control that contains both controls. To do that, add the UpdatePanel, and then cut and paste the controls into it.
Click to the right of the
ScriptManagercontrol and press Enter to insert a new line above thedrpMusicGroupcontrol.Add a new
UpdatePanelcontrol from the AJAX Extensions section of the ASP.NET Toolbox.Select the
drpMusicGroupand thelblDisplayGroupcontrols and select Edit, Cut to remove them and place them on the Windows Clipboard.Click inside the new
UpdatePanelcontrol and select Edit, Paste to paste the controls inside theUpdatePanelcontrol.
Believe it or not, you have just finished Ajax-enabling the page. If you preview the page in your browser and select an item in the drpMusicGroup drop-down, the lblDisplayGroup label will be populated with the appropriate group using ASP.NET AJAX. When that happens, you’ll notice that the page will no longer scroll to the top and the time that appears in the lblTime Label control will reflect the time that the page was first loaded and not when you selected the group in the drop-down.
When I preview my page, I get an error that tells me that my control must be placed in a form with a runat attribute set to server. How do I fix that?
Switch to Code view and make sure the closing </form> tag in your page appears after all ASP.NET controls on the page. To be safe, you can place the closing </form> tag right before the closing </body> tag on the page.
The AJAX Library enables you to write client-side scripts that interact with your ASP.NET application. Suppose the code that runs when a new group is selected in the drpMusicGroup drop-down might take several seconds to run and return a value. In such a scenario, displaying a message to the user is a good practice, and the AJAX Library makes it easy to do.
Note
You can use the UpdateProgress control to display a message, but it’s a good idea to know how to take advantage of the AJAX Library in case you want a more customized solution.
In this section, we’ll use the AJAX Library to display a status message while the Ajax request is executing.
You’ll need to add a <div> to the ajax.aspx page. The <div> will be used to display the status message.
Follow these steps to add the <div>:
Open the
ajax.aspxpage if it’s not already open.Click to the right of the
drpMusicGroup DropDownListcontrol and press Enter to add a new line.Add a new
<div>control to the new line from the Tags section in the HTML section of the Toolbox.In the Tag Properties task pane, change the
idproperty of the<div>toWaitIndicator.
The client library is a JavaScript file used to interact with the page during an Ajax partial post back. Follow these steps to create the client library:
Select File, New, Page to add a new file to the Web site.
Select JavaScript from the list of file types and click OK.
Select File, Save and save the JavaScript file as
ClientLibrary.js.
Now you must add the JavaScript that will update the <div> you added earlier with a status message. Add the following JavaScript code to the ClientLibrary.js file:
Sys.Net.WebRequestManager.add_invokingRequest(App_InvokeRequest);
Sys.Net.WebRequestManager.add_completedRequest(App_CompleteRequest);

function App_InvokeRequest(sender, eventArgs)
{

    var waitDiv = $get("WaitIndicator");
    waitDiv.innerHTML = "Please wait...";

}

function App_CompleteRequest(sender, eventArgs)
{
    var waitDiv = $get("WaitIndicator");
    waitDiv.innerHTML = "";

}
The first few lines of code add the event handlers that will fire when the Ajax request begins (the invokingRequest event) and ends (the completedRequest event). These lines use the Sys.Net.WebRequestManager object, which is provided by the AJAX Library.
Note
A detailed discussion of the AJAX Library is outside the scope of this book. For detailed information on using the objects provided by the AJAX Library, see asp.net/AJAX/Documentation/Live/ClientReference/default.aspx.
The App_InvokeRequest and App_CompletedRequest functions set the innerHTML property of the <div> that you added earlier using the $get method that the AJAX Library provides. The $get method will return a reference to the control whose ID is passed to it.
After you’ve added the code to the ClientLibrary.js file, save the file.
The final step is to add the ClientLibrary.js file to the ScriptManager’s Scripts collection. As I mentioned earlier in this chapter, you can add your own client scripts to the ScriptManager control. When you do, ASP.NET AJAX will load your scripts dynamically.
Follow these steps to add the ClientLibrary.js script to the ScriptManager’s Scripts collection:
Select the
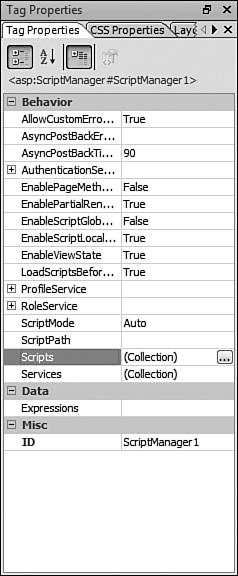
ScriptManagercontrol that you added to theajax.aspxpage earlier.Click the ellipse button for the
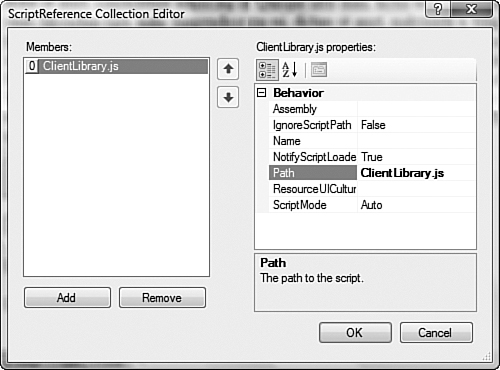
Scriptsproperty in the Tag Properties task pane as shown in Figure 34.7.Click the Add button in the ScriptReference Collection Editor.
Change the Path property of the new ScriptReference to
ClientLibrary.jsas shown in Figure 34.8.Click OK and save the page.
When the ajax.aspx page is browsed, the ScriptManager will load the ClientLibrary.js script.
If you browse to the page right now, the script we added will display a message that says “Please wait...” while the Ajax request is being processed. However, because the Ajax request is almost instantaneous in our test page, we need to build in a delay so we can see the effect.
Open the ajax.aspx page and add the following code to the Page_Load event you added earlier:
if (IsPostBack) System.Threading.Thread.Sleep(7000);
After you add that code, the Page_Load event will look like the following code:
protected void Page_Load(object sender, System.EventArgs e)
{
    if (IsPostBack) System.Threading.Thread.Sleep(7000);
    lblTime.Text = "It is now " + System.DateTime.Now.ToString();
}
This code will make the page wait seven seconds when the AJAX partial post back takes place, enabling you to see the “Please wait...” message. You can now save the page and preview it to see the status indicator displayed.