
Although ASP.NET is a popular standard when it comes to server-side application development, it’s certainly not the only one. Scripting technologies such as ColdFusion, Java Server Pages, and even the old stalwart Perl have all been used to perform similar work on the server to generate dynamic content. One of the most popular server-side scripting technologies, PHP, is so ubiquitous that Microsoft has decided to provide support for it in Expression Web 2.
PHP (a recursive acronym that stands for PHP: Hypertext Preprocessor) was designed as an alternative to Perl because it is better suited for generating dynamic Web content. Whereas Perl requires all content to be generated by the Perl script, PHP’s model is much more like that of classic ASP code. PHP code is embedded directly into Web pages, but only content that is embedded inside special characters called PHP delimiters is interpreted as PHP code. All other content on the page is sent as is. This allows for most of a Web page to be written as standard HTML, while only the portions of the page that need to be generated dynamically utilize the PHP code.
Whether you are actually coding in PHP or simply using other people’s PHP code in your pages, it is helpful to understand a bit about PHP syntax and how PHP programs are structured. Like ASP code, PHP is embedded directly into a Web page and requires special tags (called delimiters) to let PHP know what can be output directly and what needs to be handled by the PHP interpreter.
PHP code can be delimited in several different ways. The first is through the use of the <script> tag:
<script language="php">
echo "Welcome to PHP!
";
</script>
Tip
The echo statement seen here is used to output information to the browser window when the page is browsed.
This method can cause problems with some HTML authoring tools because the content between the script tags is not recognizable as HTML content. Therefore, this method has been deprecated, although it can be found in older PHP pages.
The recommended syntax for PHP is to use <?php ?> instead. This syntax is referred to as full tags. For example:
<?php
echo "Welcome to PHP!
";
?>
In some cases, you might find PHP documents using a shorter version of this syntax referred to as short tags. For example:
<? echo "Welcome to PHP!
"; ?>
You might even find them using ASP-style tags:
<% echo "Welcome to PHP!
"; %>
Use of short tags is optional and may be disabled on a particular Web host. Sticking with full tags is the best option for code portability.
Like JavaScript and other languages that share a C-like syntax, PHP code is case sensitive. Statement lines are followed with a semicolon, as you can see with the various echo statements listed previously.
PHP comments make code easier to understand for people not familiar with the language and for other PHP developers reading your code. Three styles of comments are supported in PHP: C-style, C++/Java-style, and Perl-style. Here is an example of each style of comment:
/* C style */

// C++/Java style

# Perl style
The C-style comments can occupy more than one line, and everything between the opening and closing identifier is treated as part of the comment. With C++ and Perl-style comments, text up to the next newline is treated as a comment.
PHP variables are declared with a preceding dollar sign ($) followed by the name. The name must consist of a leading letter (A–Z, a–z) or underscore, followed by any number of letters, underscores, or numbers. Variable names embedded in a string will be substituted by the value of the variable at runtime. Here is an example:
<?php
$first_name = 'John';
$last_name = 'Doe';
$age = 33;
echo "name: $last_name, $first_name  age: $age
";
?>
In this example, three variables are declared: $first_name, $last_name, and $age. When the page runs, the variable values are output to the page and the following text is displayed:
name: Doe, John age: 33
The type of a variable is not typically assigned by the programmer. Instead, the PHP interpreter sets the type based on the type of data that is first assigned to it.
Table 35.1 lists the variable types available in PHP.
Table 35.1. PHP Variable Types
Description | |
|---|---|
boolean | True or False |
integer | –2, 0, 100, 3500, 0xff (hex), and so on |
float | –6.0, 1.2, 0.0, 1.3e4, and so on |
string | “Sample string text” |
array | A collection of objects indexed by a key |
object | A reference to an instance of a class |
resource | A handle to an external resource such as a file or a database connection |
NULL | A variable with no value |
PHP supports language structures that are similar to those used by many other languages. It can use if/else/elseif, while, do-while, for, foreach, and more. Each of these structures can use either of two syntaxes. One will be more familiar to C++ or JavaScript programmers due to the use of braces to mark the beginning and end of a block. The alternative style will likely seem more familiar to Visual Basic programmers because it uses keywords to mark the end of a block instead of braces, as shown here:
<?php
// JavaScript-style 'if' statement
if ($user_role == "administrator") {
    echo "administrator login successful.
";
}
else {
    echo "user login successful.
";
}

// Alternative style 'if' statement
If (%user_role == "administrator") :
    echo "administrator login successful.
";
else :
    echo "user login successful.
";
endif;
?>
The alternative style can also make the code more readable if the beginning and ending of the block are in different PHP script blocks:
<php? if (%user_role == "administrator") : ?>
   <br />
   <span>administrator login successful</span>
   <br />
<php? else : ?>
   <br />
   <span>user login successful</span>
   <br />
<php? endif; ?>
Blocks of PHP code can be inserted into functions, allowing the code to be called from the main program flow or from another function. Functions should be used for code that needs to be called from multiple locations. They can also be used to pull out long sections of code from the main program flow, making it easier to read and follow. In this example, the code in the initialize function is not executed until it is called from the main program flow:
<?php
function initialize ()
{
    echo "initializing...
";
}

echo "calling initialize
";
initialize();
echo "initialization complete
";
?>
Note
It is outside the scope of this book to go into thorough detail about the use of PHP. If you are interested in learning more about PHP and how to write dynamic Web content with it, read PHP 5 Unleashed from Sams Publising (ISBN 067232511X).
You can also learn about PHP, follow tutorials, and browse documentation by visiting the PHP group’s Web site located at www.php.net.
Installing PHP is straightforward enough, but until the release of IIS 7, getting it to work correctly with IIS was a fairly involved process. The Common Gateway Interface (CGI) for IIS can call PHP executable reliably and safely, but prior to IIS 7, this method was inefficient because it required the creation of a new Windows process for each request.
A more efficient method of calling PHP utilizes the Internet Server Application Program Interface (ISAPI) extension. With ISAPI, IIS calls into the PHP ISAPI DLL with its own thread. This is very efficient because it bypasses the need to create a new process for each request, but there is still a potential problem with this method. The ISAPI interface demands that the code it calls be thread-safe, meaning multiple threads can safely access the same block of code in the same memory space. Although the core PHP is available in a thread-safe version, it doesn’t perform as well as the nonthread-safe (NTS) version. A fair number of popular PHP libraries aren’t thread-safe either, so if you intend to use them, you’d be forced into the standard CGI model.
The FastCGI protocol was created to address these problems. FastCGI provides a pool of processes to host CGI calls. When a call finishes, the process is returned to the pool instead of being terminated, so it can be reused. This greatly speeds up the process of calling CGI programs because it eliminates the process startup penalty. In addition, because CGI applications are running as their own process space with protected memory, thread safety issues don’t apply.
To show its commitment to supporting the use of PHP on IIS, Microsoft has created FastCGI components for both IIS 6 and IIS 7. In this section, I show you how to get PHP up and running with IIS 7 using FastCGI. But first, I briefly cover how to install IIS itself.
Tip
IIS 6 users can download the FastCGI extension for IIS 6 from www.iis.net/downloads/default.aspx?tabid=34&g=6&i=1521.
IIS 7 users will have FastCGI out of the box, including users of IIS 7 on Windows Vista SP1.
To use FastCGI, you must have IIS 7 for Windows Vista SP1 or later or Windows Server 2008. Because IIS is not part of the default installation for either operating system, you will have to add it yourself.
You install IIS 7 in Vista through the Control Panel. Follow these steps to do it:
Click Start, Control Panel.
Choose Classic View, double-click Programs and Features, and then choose Turn Windows Features On or Off.
Check the Internet Information Services box, as shown in Figure 35.1.

To use FastCGI, you must now enable the CGI feature in IIS. Continuing in the Windows Features dialog box, do the following:
Expand the Internet Information Services tree node.
Expand World Wide Web Services.
Expand Application Development Features.
Check the CGI box, as shown in Figure 35.2.
Click OK when you are finished.

Installing IIS 7 in Windows Server 2008 is a somewhat different process. You must use the Server Manager to enable the Web Server role for the server. Follow these steps to enable this role:
Click Start, Administrative Tools, Server Manager.
Choose Add Roles.
On the Select Server Roles page, select the Web Server (IIS) check box.
Click Next.
Select any role services that you want to install at the same time. For our purposes, make sure the CGI option is selected. This service is necessary for FastCGI to function.
Click Next.
Click Install.
At the time of this writing, PHP version 5.2.5 is the current release of PHP, and it can be downloaded from http://www.php.net/downloads.php. This download page is shown in Figure 35.3. The nonthread-safe binaries (NTS) are preferred for use with FastCGI and will perform better. Don’t download the installer version because it is not necessary when using FastCGI. Simply download the Windows binaries zip file.

If you need to use an older version of PHP for a particular application, you can use FastCGI with versions 4.4 and higher. Versions 5.2.3 and higher, however, include optimizations that will allow better performance when running on Windows with FastCGI.
Tip
Version 5.2.3 or version 5.2.5 will perform much better than other versions. Versions prior to 5.2.3 do not contain the optimizations contained in 5.2.3 and later.
Because of problems in version 5.2.4 that cause performance degradation, it’s recommended that you not use version 5.2.4. These problems have been fixed in version 5.2.5.
When the download is complete, extract the contents of the zip file to C:PHP. Then, in that folder, rename the file php.ini-recommended to php.ini.
After you have IIS 7 and PHP installed, you need to tell IIS where it can find the PHP installation and which file extensions to use for it. This is done in the IIS Manager, and this configuration process is the same for Vista SP1 and Windows Server 2008. Follow these steps to enable PHP using FastCGI:
Click Start, type
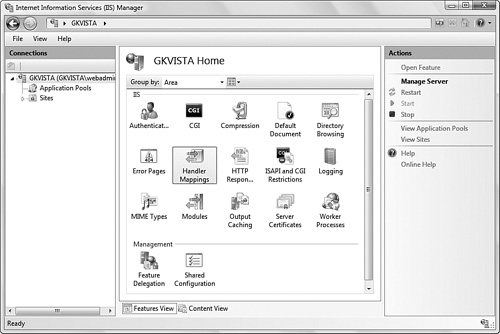
INETMGRin the search box, and press Enter.Select the server name in the pane on the left, and look for the Handler Mappings item in the Features View, as shown in Figure 35.4. Double-click this item.
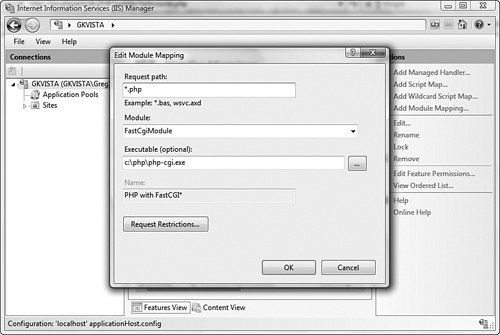
Click Add Module Mapping from the Action menu on the right. This opens the Edit Module Mapping dialog box, shown in Figure 35.5.
Type
*.phpin the Request Path.Choose FastCgiModule from the Module drop-down list.
Enter the path to your PHP CGI module under Executable. If you followed the instructions for installing PHP earlier, it will be
C:phpphp-cgi.exe.Type
PHP with FastCGIin the Name field.Click OK, and then click Yes when asked if you want to create a FastCGI application for this executable.
Close the IIS Manager.
With IIS configured and PHP enabled, you can now create a PHP page in Expression Web 2 to test the functionality of the FastCGI application. Follow these steps to create a sample PHP Web site for testing:
In Expression Web 2, choose File, New, Web Site.
Under the General tab, choose Empty Web Site.
Enter a name for the site, such as
PHPTestSite. Click OK.Now, create a PHP page. Choose File, New, Page to open the New dialog box again.
Select PHP as the file type in the General section as shown in Figure 35.6, and then click OK.
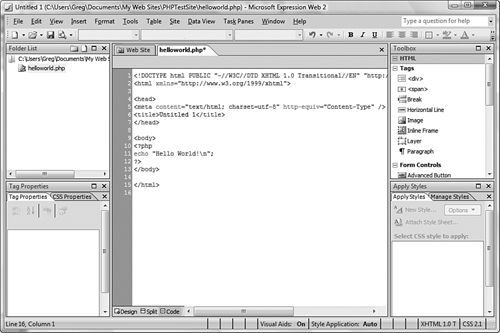
Select Code View. In the Body section, enter the following PHP code:
<?php
echo "Hello World!
";
?>
Save the page as
helloworld.php. Figure 35.7 shows the page in Code View.

Even if you have IIS7 installed and configured to use PHP, Expression Web 2 will not use it by default when you preview in the browser. Instead, it will use the Microsoft Expression Development Server. You either need to configure the Web site you just created to use IIS for the preview, or tell the Microsoft Expression Development Server where to find your PHP CGI executables. Fortunately, both of these configuration options are done in the same place in the Site Settings dialog. Follow these steps to configure the preview of PHP pages using the Microsoft Expression Development Server:
Tip
You can configure the location of the PHP executable in the Application Settings dialog as well. If you configure it in the Application Settings dialog, it will affect all Web sites you create with Expression Web 2.
Select Site, Site Settings to open the dialog.
Click the Preview tab.
Make sure the Preview Using Web Site URL button and the Use Microsoft Expression Development Server check box are selected.
If you have not configured the PHP CGI executable path in the Application Settings dialog, or if you want to use a different version for this Web site, select the Use a PHP Executable for Only this Web Site option.
If necessary, enter the path to your PHP CGI executable or browse to it. It will be
C:phpphp-info.exeif it was installed using the instructions in the previous section.Click the Preview in Browser button. The page should be parsed by the PHP program, as shown in Figure 35.8.

If you’d rather configure the preview feature to use IIS running locally instead, follow these steps:
Configure a virtual directory in the IIS Manager that points to your development Web site path. Right-click Default Web Site, and select Add Virtual Directory.
In the Add Virtual Directory dialog, type
PHPTestSiteas the alias, and enter or browse to the path where your Web site project files are located.Right-click the new PHPTestSite item in the tree, and choose Edit Permissions. This opens the properties window for the folder. Click the Security tab.
Click the Edit button, and then click Add in the Permissions dialog.
In the Select Users or Groups dialog, type
IIS_IUSRS. Then click OK.Click OK again.
In Expression Web 2, select Site, Site Settings to open the Settings dialog.
Click the Preview tab.
Select the Preview Using Custom URL for the Web Site radio button.
Type
http://localhost/PHPTestSite/for the custom URL.Click OK.
Click the Preview in Browser button to view the page in the browser.
Note

If you get an error when previewing your page, or if your PHP code doesn’t execute as you expect, see “PHP Code Doesn’t Seem to Execute When I Preview It in the Browser” in the “Troubleshooting” section of this chapter for possible solutions.
PHP script blocks cannot be processed in Design View in the same way they are in the browser. However, you can see where PHP code blocks are using the formatting marks available for script blocks.
Formatting marks are not enabled by default. Do the following to show them:
Select Design View.
Choose View, Formatting Marks from the menu.
Make sure the Show item is checked.
Choose View, Formatting Marks again.
Make sure Script Blocks is checked.
PHP blocks appear with the script block icon, as shown in Figure 35.9.

As with other types of scripts, you can view the code within the block by double-clicking the script block icon (see Figure 35.10).

While Design View is somewhat limited in its handling of PHP, Code View offers some additional features. You can customize the display of PHP code in the editor and use IntelliSense to help you write PHP code.
Syntax highlighting makes it easier to edit in Code View because it makes code blocks and the elements contained in them stand out from the surrounding code. With syntax highlighting, you can customize each PHP item with the color of your choice. You can customize foreground and background colors and even set font styles such as bold, italic, or underline specifically for each PHP item.
Expression Web 2 is configured with default values for each of the formatting options. (You can change them if you don’t like the defaults.) Follow these steps to configure syntax highlighting for PHP elements:
Switch to Code View.
Select Tools, Page Editor Options from the menu.
Select the Color Coding tab as shown in Figure 35.11.
Make sure the Code View Settings radio button is selected.
Scroll down the list of display items until you see the PHP items.
Select each PHP item in turn and choose the foreground color, background color, and any custom font styles that you like. Use the Automatic option for the foreground and background colors so that those items are determined automatically by the editor.

IntelliSense is a feature of Microsoft’s code editors that helps you speed up coding by giving you options to select code from a list as you type. IntelliSense will also provide you with tooltips to fill in parameters for function calls. IntelliSense works inside a PHP script block regardless of the type of PHP tags you use to identify the block (<?php ?>, <? ?>, or <script language="php"> </script>).
Press Ctrl+L inside a PHP script block to bring up a list of available PHP functions, as shown in Figure 35.12. You can quickly locate a function from the long list by typing one or more letters of the function name right before or after you activate the list. Alternatively, simply scroll down the list using the mouse or the arrow keys and choose a function manually.

When the function you want to add is highlighted in the list, you can enter it in the editor simply by pressing Tab.
If the selected code is a function, IntelliSense will show you a tooltip with the parameters required by the function when you enter the left parenthesis, as shown in Figure 35.13. As you enter parameters and type the comma separating them, the next parameter to enter will appear bolded in the tooltip.

Tip
You can also show this tooltip by positioning the cursor at any point in a parameter list and pressing Ctrl+Shift+Space.
Global variables in PHP are provided by the environment and include several collections, such as session variables, form elements, cookies, and environment variables. IntelliSense can simplify the addition of global variables in your code as well. In PHP, global variables are preceded by a $_. If you type those characters into the editor inside a PHP code block, IntelliSense will present you with a list of global variables, as shown in Figure 35.14. As with the function list, you can type a partial name and then press Tab to complete the entry.

If you prefer not to use IntelliSense, or want only some of the IntelliSense features, you can enable or disable them in the Page Editor Options dialog box.
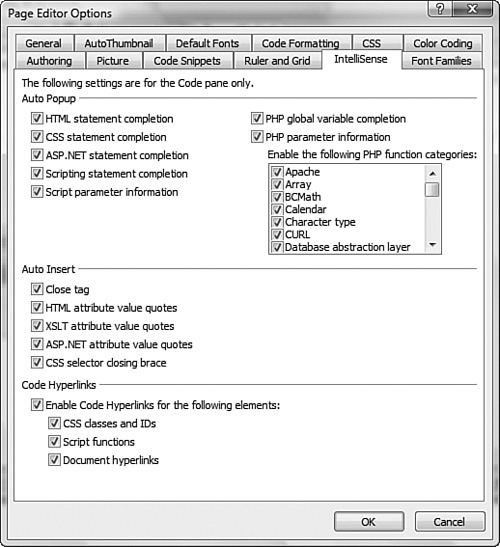
The following are some PHP IntelliSense options you can enable or disable:
PHP Global Variable Completion—. Controls whether to display a list of global variables when you type
$_.PHP Parameter Information—. Choose whether to display information about parameters when entering a function call.
PHP Function Categories—. You can reduce the size of the IntelliSense function list by deselecting categories of functions that you might never need.
Follow these steps to set IntelliSense options:
Choose Tools, Page Editor Options.
Select the IntelliSense tab.
In the Auto Popup section, select or deselect the IntelliSense items as you see fit, as shown in Figure 35.15.
Click OK when you are finished.
To further simplify and assist you with your PHP coding, Expression Web 2 lets you insert common PHP script blocks into your code from the Insert menu, as shown in Figure 35.16. This can be helpful if you aren’t familiar with the exact syntax of a particular PHP statement or global variable.
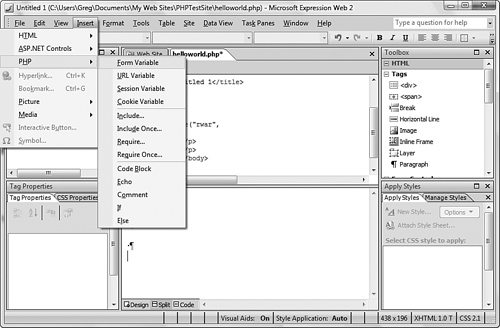
The following section describes the PHP script items you can insert using this method.
The Form variable holds information passed to the page from form elements on the requesting page. Form variables are passed using the HTTP POST method; therefore, the global variable name is $_POST.
The following code is inserted into a page when you choose this option:
<?php $_POST[]; ?>
To reference a specific form variable, you must use the name of the form element as a key, as shown in this example:
<?php $_POST["LAST_NAME"]; ?>
The URL Variable item inserts a script to pull items passed to the page via the HTTP GET method as parameters passed in the calling URL. The following script is inserted:
<?php $_GET[]; ?>
As with other global variables, you must use the name of a URL variable as a key to reference a specific variable value.
As a user visits pages on your Web site, the browser passes a session value that the Web server uses to identify the specific user session. Session variables can be used to maintain user state information on the server between page requests. Use the Session Variable script item to insert the following script:
<?php $_SESSION[]; ?>
Instead of having session values determined by the requesting page, you must store values in the session variable yourself. Store it using a key that you create:
<?php $_SESSION["role"] = "administrator"; ?>
Then, on a subsequent page request, retrieve it using the same key:
<?php
if ($_SESSION["role"] == "administrator") {
    echo "administrator is logged in.
";
}
?>
Session variables last only as long as the user’s session is active.
Cookie variables are similar to session variables in that they store information that persists from page to page. Cookies, however, are sent to the browser and stored on the client computer instead of the server. This item inserts the following script:
<?php $_COOKIE[]; ?>
PHP code that will be used in many pages can be separated out and put in its own file, which then can be included in a PHP page using the include statement.
When you choose the Include item from the Insert menu, you will be prompted to choose a PHP file to include, as shown in Figure 35.17. This item inserts the following script, with the chosen page as a parameter to the include statement:
<?php include('common.php'), ?>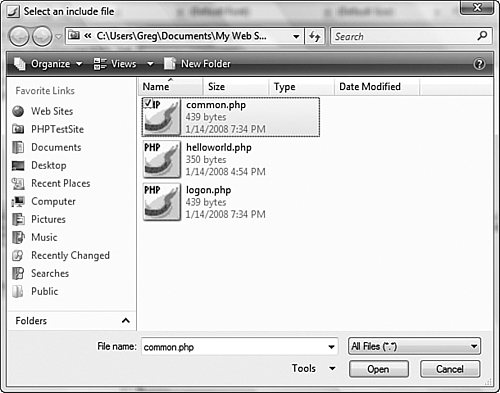
The Include Once script is similar to the Include script, except that the inserted script will be included in a page only once to avoid variable and function redefinitions, value reassignments, and other potential problems. When you choose this item, the following script is inserted:
<?php include_once('common.php'), ?>As with Include, you choose the file to add to the statement.
The PHP require statement is similar to the include statement, except in the way in which errors are handled when it is used. If the file referenced by an include statement doesn’t exist, an error message will be displayed but script execution will continue. When the require statement is used, PHP script execution will stop if there is an error with the included file.
The following script is inserted when this statement is used:
<?php require('common.php'), ?>The require_once statement is analogous to the include_once statement, but with the same difference in error handling as between include and require. This script segment is inserted:
<?php require_once('common.php'), ?>The Code Block item inserts a simple empty PHP script block tag, as follows:
<?php ?>
This can be useful as shorthand for entering the tag quickly, particularly if you memorize the keyboard shortcut used to enter it: Alt+I, H, B.
As mentioned at the beginning of this chapter, the echo statement is a very common way to have the PHP script insert dynamic text into a page. This item inserts the following script:
<?php echo ?>
The cursor is positioned after the echo statement to facilitate adding the string or variable values to be echoed.
The Comment item inserts a PHP C-style comment into the program flow, with the cursor positioned to type the comment text:
/* */
Note that this script doesn’t include the surrounding script block tags. PHP assumes that the comment will be inserted into an existing block.
The if statement is a commonly used conditional execution statement. This item inserts the following script:
<?php if ?>
An expression to evaluate is then inserted enclosed in parentheses. The following is an example:
<?php if ($user_role == "administrator") ?>
An if statement typically is followed by a block of code to be executed, contained in braces. The code between the braces is executed only if the expression evaluated by the if statement is true. Note that this script does not add the braces; they must be added by hand.
The if statement can also use the alternative style described earlier in this chapter, in which case you must manually enter a colon after the expression to be evaluated, as well as a corresponding endif; statement. This can be useful when you want to embed HTML code in the if block, as the example in the “PHP Program Flow” section of this chapter shows.
The else statement can be used to follow up an if statement as an alternative block of code to execute if the expression evaluated by the if statement is false. This item inserts the following script:
<?php else ?>
The else statement should be followed up with a block of code in curly braces. You can also use the alternative syntax, although you will need to remember to add a colon after the else statement. An example shown earlier in the chapter in the use of the if..else..endif syntax is repeated here to demonstrate this:
<php? if (%user_role == "administrator") : ?>
   <br />
   <span>administrator login successful</span>
   <br />
<php? else : ?>
   <br />
   <span>user login successful</span>
   <br />
<php? endif; ?>
My PHP code isn’t executing when I preview the page in the browser; instead, the PHP code appears in the page source just as it is in Expression Web 2.
If FastCGI or PHP isn’t configured correctly, IIS won’t know how or won’t be able to parse the PHP code in your page. PHP pages must be processed by the php-cgi engine to display correctly.
To resolve this problem, check the settings for the FastCgiModule configuration in the IIS Manager. Pay particular attention to the module, request path, and executable entered for the FastCgiModule mapping.
You also should verify that PHP itself is configured correctly. You can do this from the command line by executing the PHP command-line interpreter (CLI) directly, with the -info parameter. From the command line, type php -info and press Enter. You might have to change directories to the C:php folder first, if it isn’t in your path.
When I attempt to preview a PHP page in the browser, an HTTP Error 500 - Internal Server Error is displayed.
An Internal Server Error (HTTP Error 500) is a generic error pointing to a failure in the Web server or a CGI program. This problem usually is a configuration problem with PHP or with the FastCGI module. If the CGI executable doesn’t exist in the specified path, or if permissions on the PHP directory don’t allow IIS to call the executable, you could receive this error.
IIS uses the NETWORK SERVICE user account to run PHP. This account, or a group that contains it, must have read and execute permissions to the C:php folder. You can give these permissions to the IIS_IUSRS group because it contains the NETWORK SERVICE account. To view or change current permissions, right-click the php folder in Explorer and select Properties. Select the Security tab.
When I attempt to preview a PHP page in the browser, part of the code is displayed in the browser and code execution halts partway through.
This problem generally involves a syntax error with your PHP code. Look for mistyped statements, misnamed function calls, and other problems with your syntax. Improperly nested PHP blocks can also cause problems.
Syntax highlighting can help track down syntax errors. Look for code highlighted yellow to indicate a problem with parsing the code.
Although you might know your server intimately, your Web site’s PHP pages could end up deployed to some other server that might not be configured quite the same way as the server on which you developed it. This can often be frustrating to debug, as you end up putting in debugging echo statements that loop over global variables and other such techniques to try to glean some information about the server.
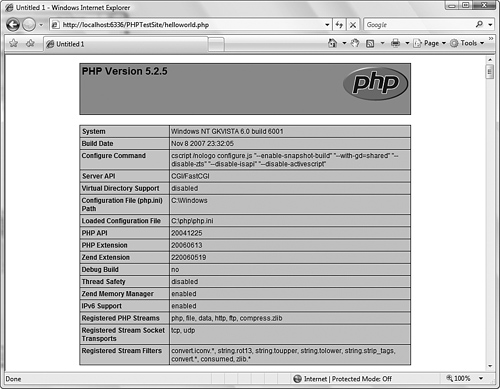
The need to display server information for development and debugging purposes is so common that the phpinfo() function was created just to facilitate the display of this type of information. If you are deploying a PHP application to many different server configurations, it is in your best interest to include a test page somewhere that calls phpinfo.
To use phpinfo, simply include it in a PHP page in a PHP script block:
<?php
phpinfo();
?>
Various bits of server configuration information are displayed in the resulting Web page, as shown in Figure 35.18.
If you call phpinfo with no parameters, as just shown, you will get all the information that can be displayed, which can be quite a lot. Give it a try and scroll down the list just to see what is available. If you want to restrict the output to only certain portions of the information, pass in a value as a parameter to restrict the output. The values that can be passed are defined as constants for convenience and appear in Table 35.2.
Table 35.2. Options for phpinfo
Option | Value | Description |
|---|---|---|
| 1 | General server and PHP information |
| 2 | Credits for the PHP developers |
| 4 | Current value of configuration options from |
| 8 | Loaded PHP modules |
| 16 | All environment variables ( |
| 32 | All |
| 64 | PHP license information |
| –1 | All information (default value) |
Because the arguments for phpinfo are bitwise values, they can be combined using the or operator | to display more than one item at a time. For example, you can display INFO_ENVIRONMENT and INFO_VARIABLES information by calling phpinfo as follows:
<?php
phpinfo(INFO_ENVIRONMENT | INFO_VARIABLES);
?>