
Chapter 4 Client-Side Scripting
The first three chapters of this book introduced you to JavaScript, exposed you to its semantics, and covered several programming techniques to help you get started. In Part II, “Programming in JavaScript,” we are going to cover the environments in which JavaScript is interpreted, including the client-side, server-side, and in the Windows Script Host environment.
In this chapter specifically, you will look at several aspects of the language. We’ll look at how the browsers interpret JavaScript, how to deal with some of the issues that surround browsers, and how they handle the scripts—issues such as bugs and differences in functionality.
Later, you will look at how JavaScript can extend a browser’s functionality. This is accomplished with some of its object arrays and through the use of LiveConnect—the Java to JavaScript bridge. We will also cover tasks that will allow you to process form data and without having to send pages back and forth to the server. Cookies, another key component, will also be covered in this chapter.
The next topic we will discuss is Window manipulation. Windows appear to be very basic on the outside, but the underlying JavaScript provides a lot of power for configuring and manipulating windows to meet your design needs.
This chapter will also include coverage of the dynamic positioning of HTML and XHTML elements and their manipulation using JavaScript. Finally, the chapter will take a look into XUL—the XML-Based User Interface Language, which is a new language created by our friends at Mozilla.org and used to build the user interface for the Netscape 6 and Mozilla browsers.
This chapter has a lot of material in it, so lets get started by talking about which browsers support JavaScript and some of their issues.
Supporting Browsers and Their Issues
Even though JavaScript seems to have been a foundation building block in today’s Internet technology, it wasn’t always there. It wasn’t until Netscape Navigator 2.0 and Internet Explorer 3.0, that its functionality was included. Currently, only four major browsers interpret JavaScript: Netscape Navigator, Internet Explorer, Opera, and HotJava. However, just because they interpret the language does not mean that they do so in the same manner, which is something you will be looking into shortly.
For those of you familiar with Java, you know that various JVMs, or Java Virtual Machines, can interpret the language differently. JavaScript is similar, except that the market can often be considered more fragmented. For the most part, browsers do interpret JavaScript the same—at least the core language semantics. The big distinction is that they all have different version support as well as diverse bugs.
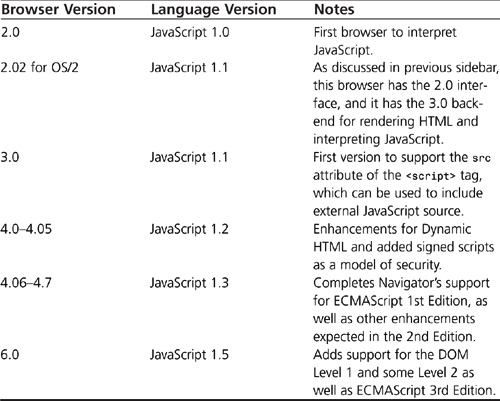
To give you an idea of the versions and support among these browsers, take a look at Table 4.1. It breaks down these runtime environments by browser version and language version.
Table 4.1 Language Support by Browser Version

New browsers are released a couple of times a year, which forces the market to become fragmented in terms of the JavaScript runtime environment with which users will be accessing a site. Extra care needs to be taken in writing scripts so browsers will interpret them correctly. As discussed in Chapter 2, “Details of the Language,” most of the version control can be accomplished using the language or type attribute of the <script> element, but not all browsers correctly implement this. As a programmer, you will have to write in code to accommodate these browsers.
The first browser you are going to look at is Netscape’s Navigator browser. It was the pioneering browser that first interpreted the language co-developed by Sun and Netscape. We will also look at Internet Explorer, Opera, and HotJava as well.
Netscape Navigator
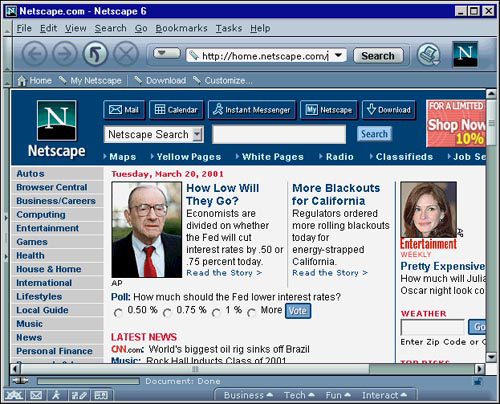
Netscape Navigator (see Netscape 6.0 in Figure 4.1) first included its support for JavaScript in its version 2 browsers. This was a major step for JavaScript because Navigator was by far the most widely used browser in the world. Web developers could add scripts to their pages and feel very confident that the majority of their visitors would be able to experience their enhancements. And things have not stopped there.
Recently, Netscape released version 6 of its browser, which was a complete rewrite and is shown in Figure 4.1, from the ground up. This time, its support for official standards has been relatively unmatched. It has even gone so far as to not support old elements and tags that were implemented in Navigator 4, which provides its own problems, but reflects Netscape’s dedication to standardization.
Figure 4.1 Netscape 6 browser.
Similar to anything else Netscape has implemented in its browsers, it has continued to expand the language and add to it. With each major release, new functionality through standards support have been added that keep it ahead of other browsers. Table 4.2 outlines the JavaScript support in these browsers and gives you some additional information.
Table 4.2 JavaScript Language Support by Browser
Internet Explorer
Even though Internet Explorer (see version 5.5 in Figure 4.2) was the second browser to follow suit in its support of JavaScript, it seems to have avoided the Navigator problems just discussed. However, JScript does have issues that inhibit its performance and functionality as well.
Because Microsoft did not want to purchase the licensing to JavaScript from Netscape to implement in its Internet Explorer browser, it had to reverse-engineer the scripting language and give it a new name. This led to the birth of JScript.
In the short run, this seemed like a bad thing for JavaScript programmers. Now that two versions of the language were on the market, how could programmers be assured that their scripts would work in both browsers? Luckily, this version incompatibility only lasted for version 3 of Internet Explorer. By the time version 4 of the browser came out, the first edition of the ECMAScript standard was well on its way to adoption, and Microsoft based its JScript 3.0 on the standard. This refocused and aligned both JavaScript and JScript and reduced the problems of incompatibility between them. There are, however, a few quick things to watch for in the older versions of the browser:
• Microsoft provides the ability for users to update their scripting engines without updating the browser. It also distributes different engines with minor updates to the browser.
• No support for the Image object on the Windows platform in version 3 of the browser.
• Support for the src attribute of the <script> tag was implemented in the 3.02 maintenance release of Internet Explorer and did not fully work.
Figure 4.2 Internet Explorer 5.5 browser.
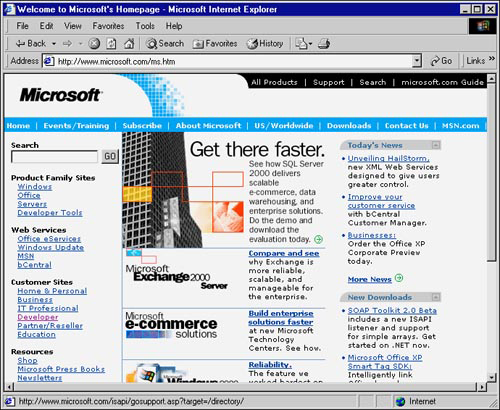
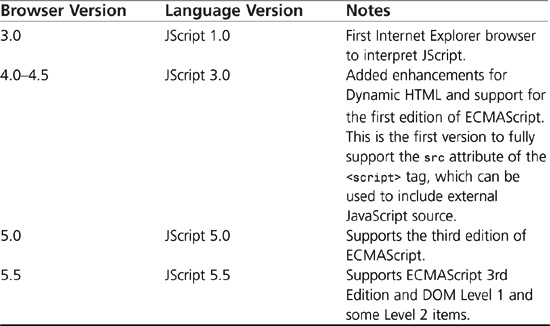
Table 4.3 breaks down the browsers that have been released by Microsoft and its JScript support by version. The table also includes some notes that give more information about what the release added to the language.
Table 4.3 JScript Language Support by Browser
There is another topic that we want to discuss here, which is the user’s ability to update his scripting engine without having to update his browser. This makes it very possible for a user to implement an Internet Explorer 5.0 browser that has the 5.5. JScript engine.
One good thing is that the more recent versions of the engines have functions to allow developers to determine what version of the engine users are running. Watch out because using some of these functions on version 3.0 engines causes errors. Luckily, version 3 is few and far between at this point, so it puts developers at less of an impossible situation.
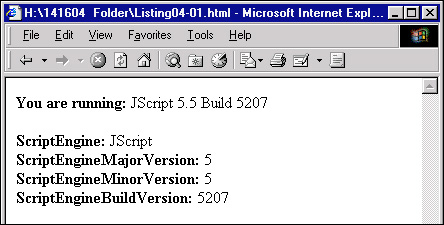
Listing 4.1 includes the Microsoft-specific elements that a developer can use to determine the version of the scripting engine the user has.
Listing 4.1 JScript’s Elements for Determining Scripting Engine Version Information
<script language=“JScript” type=“text/javascript”>
<!--
// Create a variable to hold all the engine information in a single string.
var jscriptVer = ScriptEngine() + “ ” + ScriptEngineMajorVersion() + “.” +
ScriptEngineMinorVersion() + “ Build ” +
ScriptEngineBuildVersion();
// Write the string to the user’s browser.
document.write('<b>You are running:</b> ' + jscriptVer);
// Write each of the individual elements of the engine’s version to the
// browser.
document.write('<br><br><b>ScriptEngine:</b> ' + ScriptEngine());
document.write('<br><b>ScriptEngineMajorVersion:</b> '),
document.write(ScriptEngineMajorVersion());
document.write('<br><b>ScriptEngineMinorVersion:</b> '),
document.write(ScriptEngineMinorVersion());
document.write('<br><b>ScriptEngineBuildVersion:</b> '),
document.write(ScriptEngineBuildVersion());
// -->
</script>
The result of opening Listing 4.1 in Internet Explorer 5.5 on Windows is shown in Figure 4.3. As you can see, this can be very helpful if developers need to know the specific build the user implements when executing his scripts. However, you should be careful to avoid versions that do not support these elements.
Figure 4.3 Internet Explorer 5.5 displaying its scripting engine information.
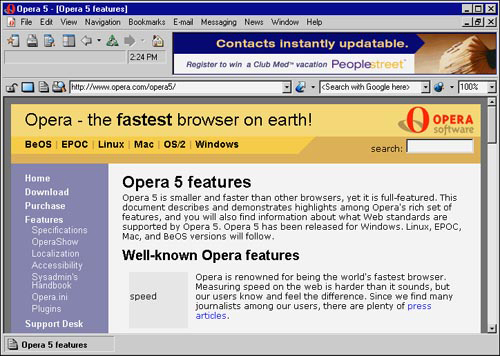
Opera
The Opera browser (see version 5.0 in Figure 4.4) has received a lot of press because of its support for standards, such as cascading style sheets (CSS). The developers at Opera Software have taken on the responsibility of providing a lot of functionality to their users without a lot of unneeded flash. Opera is mostly a pure rendering engine, but it does have support for Navigator plug-ins and Java. This allows its users to gain the needed support to position it as a real alternative.
Figure 4.4 The Opera 5.0 browser is available at http://www.opera.com.
The main thing you will want to watch out for in Opera browsers is the user agent string—it has the ability for users to select the string sent. This was included to allow the Opera browser to access pages built for Navigator 4, or perhaps Internet Explorer 5, which can make it tricky for JavaScript programmers to accurately detect the browser version.
HotJava
The final browser that we are going to mention is Sun’s HotJava browser, which included support for JavaScript in version 3.0. It uses the Rhino implementation (JavaScript engine written in Java) from Mozilla.org for its interpretation and is the only browser that was officially released that supported JavaScript 1.4. To be honest, this browser is rarely used and has not been updated in over a year, but we did want to mention it.
Extended Browser Functionality
In addition to the scripting functionality you can add to Web pages, JavaScript can also be used to extend your browser’s functionality. Today’s most functional browsers support plug-ins or ActiveX controls. These plug-ins are loaded by the browser when it starts and are accessed when called via HTML tags on a page. Because plug-in instances run as objects within the browser’s environment, some core JavaScript objects can be used to access, modify, and control their functionality.
JavaScript also supports interaction with Java applets embedded in a page. This type of interaction can occur in both directions—from the applet to scripts on a page, and from scripts to the applet. The technology behind this is referred to as LiveConnect and will be discussed in more detail later in the chapter.
Built-In Functions for Control
Not all browsers have the same methods for their extended functionality, but some common language elements allow developers to access these various items. These are considered built-in control elements in the JavaScript language itself, and access to this functionality is through two included arrays.
These two items are arrays containing references to all the applets the browser has loaded on a given page and all the plug-ins the browser has installed. Through these arrays, a developer is able to access and interact with these components.
Applet Array
The applet array stores references to all the Java applets loaded on a page. This allows a developer to retrieve the total number of applets on a page and to directly interact with them. If the developer is using LiveConnect to interact with the applet, the applet itself can be referenced by its indexed location. The second applet, for instance, could have its information accessed by the following JavaScript code:
var myAppletInfo = document.applets[1];
This allows developers to store information about this applet in a variable, where they can then parse it and process the information about the applet. The information stored in the myAppletInfo example would contain the applet’s name, dimensions, and the layout package used to create the applet.
With the increased use of Web-based, enterprise-level applications, it is not uncommon for a developer not to know how many applets are on a page. Pages are built dynamically depending on the type of request by the user, and the resulting page might depend completely on the number of items the user selected to view. Because this number can vary, a developer might have to include JavaScript code that analyzes the page to see how many applets are on it. Listing 4.2 shows an example of this.
Listing 4.2 Checking for Java Applets with the length Property of the Applet Array
<html>
<head>
<title>Checking for Java Applets</title>
<script language=“JavaScript1.1” type=“text/javascript”>
<!--
function checkApplets(){
// Store the number of applets on the page in a variable
var numApplets = document.applets.length;
// If there are no applets on the page, then go to the “noapplets”
// page.
if(numApplets == 0){
window.location.href = “http://www.purejavascript.com/noapplets.html”;
// If there is only one applet on the page, go to the
// “oneapplet” page.
} else if (numApplets == 1){
window.location.href = “http://www.purejavascript.com/oneapplet.html”;
// If there are more than two applets on the page, go to the
// “manyapplets” page.
} else if (numApplets > 2){
window.location.href = “http://www.purejavascript.com/manyapplets.html”;
}
}
// -->
</script>
</head>
<body onLoad='checkApplets()'>
<center>
<table border=“1”>
<tr>
<td>
<applet code=“TestApplet”
codebase=“.”
width=“200”
height=“35”
name=“AppletOne”
mayscript>
This browser is not able to run Java applets
<param name=“clickurl”
value=“http://www.purejavascript.com/cgi-bin/redirect.cgi”>
</applet>
</td>
</tr>
<tr>
<td>
<applet code=“TestApplet”
codebase=“.”
width=“200”
height=“35”
name=“AppletTwo”>
This browser is not able to run Java applets
<param name=“clickurl”
value=“http://www.purejavascript.com/cgi-bin/redirect2.cgi”>
</applet>
</td>
</tr>
</table>
</center>
</body>
</html>
As you can see in Listing 4.2, after the page has fully loaded, an onLoad event handler is called by the <body> tag. This event triggers a function that checks to see how many applets were loaded on the page. Depending on the number of applets loaded, the browser might be redirected to another location. If the number of applets on the page is two, the page does not redirect to another location.
As you can see, the applet array can be a very helpful resource in accessing the applets on your pages. You should use it with caution, however, because not all browsers that support JavaScript support the ability to run applets.
Plug-In Array
The plug-in array is the second array that can be used to control elements loaded by an HTML page. Developers commonly determine whether a particular plug-in is installed on the user’s machine by using this array. When this has been determined, the developer can then make the appropriate decisions about whether to try and load the plug-in.
The actual plug-in array has several properties that can be used to retrieve this information. These include items such as the name of the plug-in, the actual filename, and a description. Listing 4.3 demonstrates the use of the plug-in array by writing the information it can retrieve to the page. Figure 4.5 shows the result of running this in a browser with several plug-ins installed.
Listing 4.3 Checking the Plug-Ins Array
<html>
<head>
<title>Checking the plug-ins Array</title>
</head>
<body>
<script language=“JavaScript” type=“text/javascript”>
<!--
// Store the number of plug-ins in a variable.
var numPlugins = navigator.plugins.length;
// Write the title of the page.
if (numPlugins > 0){
document.write('<h3>The Plug-ins You Have Installed</h3><hr>'),
}else{
document.write('<h3>You have No Plug-ins Installed.</h3>'),
}
// Write the various installed plug-in information to the page.
for (i = 0; i < numPlugins; i++){
currPlugin = navigator.plugins[i];
document.write('<p><b>Name:</b> ' + currPlugin.name + '<br>'),
document.write('<b>Filename:</b> ' + currPlugin.filename + '<br>'),
document.write('<b>Description:</b> ' + currPlugin.description + '<br>'),
}
// -->
</script>
</body>
</html>
Figure 4.5 The result of running Listing 4.3 in a browser with several plug-ins installed.
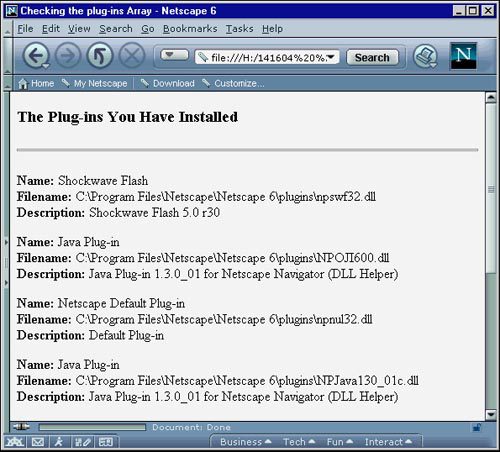
In the script, you access the total number of plug-ins installed by using the length property of the plug-ins array. After this has been done, determine the appropriate header to write to the page and run through a for loop writing the plug-ins information as well. This is a fairly simple example, but accessing these properties can be very useful when determining what elements you want your pages to use when loaded by a browser.
LiveConnect
LiveConnect is a Netscape-specific technology, starting with Netscape Navigator 3, that provides a communication link among JavaScript scripts, Java, and plug-ins. It allows JavaScript to access certain Java core functionality through the Packages object. It can also access specific Java applets through the Applet array and plug-ins through the Plugin array.
In this section, you’ll take a closer look at LiveConnect as it pertains to Java applets. You’ll also step through some examples of using LiveConnect to extend the browser’s interpretation of scripts and Java.
Why LiveConnect?
LiveConnect plays a very important role in linking JavaScript and Java together so that each can rely and expand on the functionality the other has to offer. The ability to dynamically change and interact with a Java applet on a page after it is loaded makes it easy for a Web developer to harness the power of Java. This can be done in modular fashion because it is completely possible that another developer wrote the applet.
On the flip side, LiveConnect enables an applet to access information contained in scripts. Because information can be passed to and from the applets, developers are able to maximize the functionality of their pages when using it. Using LiveConnect within an enterprise gives the developer the ability to exploit these features. Netscape has developed LiveConnect so that it fits nicely within its vision and adds to the mix of technologies that support the “write once, run anywhere” theories.
LiveConnect Examples
The following two examples will give you a better understanding of how LiveConnect works within Netscape’s browsers. The first example shows you how JavaScript can access some of the Java language functionality natively (through the Packages object). The second example shows how you can use JavaScript to interact with an applet.
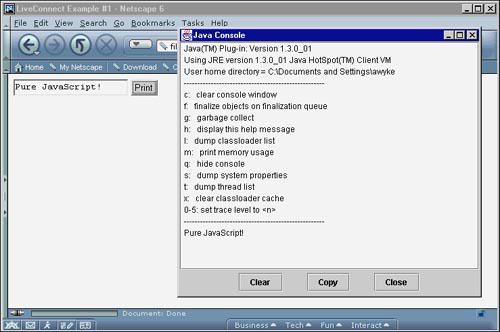
Listing 4.4 uses some of Java’s native methods available via the Packages object. In this example, a user can type some information in a form text box, and then click the Print button to print his text to the Java Console. The onClick event is used to pass the text information to a JavaScript function, where it then writes the information. The result of running this example in a browser is shown in Figure 4.6.
Figure 4.6 Using the Packages object to access the System.out.println() method in Java.
Listing 4.4 Accessing Java Methods Through JavaScript’s Packages Object
<html>
<head>
<title>LiveConnect Example #1</title>
<script language=“JavaScript1.2” type=“text/javascript”>
<!--
//This function takes the text entered in by the user and prints
//it to the Java Console.
function writeToConsole(inText){
Packages.java.lang.System.out.println(inText);
}
// -->
</script>
</head>
<body>
<form>
<input type=“text” name=“entered” width=“10”>
<input type=“button” value=“Print”
onClick='writeToConsole(form.entered.value)'>
</form>
</body>
</html>
The second example is a little more complex. It takes text entered by the user and passes it to a method within an applet to change the text the applet is displaying. To help you get a full understanding of this example, this listing includes both the applet code and the JavaScript code needed to perform this task. Listing 4.5 shows the Java code necessary, whereas Listing 4.6 shows the JavaScript.
Listing 4.5 Java Code Used in the Example
// Imported classes
import java.applet.*;
import java.awt.Graphics;
public class PSLiveConnectExample extends Applet {
// Initialize an instance of a public string variable
public String sText;
// Initial the string itself with a value
public void init() {
sText = new String(“Pure JavaScript”);
}
// Draw the string in the applet at this location
public void paint(Graphics gArea) {
gArea.drawString(sText, 20, 20);
}
// Method used to change the string when passed to the applet
// from JavaScript.
public void changeString(String aString) {
sText = aString;
repaint();
} }
Listing 4.6 HTML Used to Load the Applet and Change the Text Within It
<html>
<head>
<title>LiveConnect Example #2</title>
</head>
<body>
<center>
<table border=“1”>
<tr>
<td align=“center”>
<applet
code=“PSLiveConnectExample.class”
codebase=“.”
name=“TextChanger”
width=“150”
height=“25”
mayscript>
</applet>
<form name=“inputForm”>
<input type=“button” value=“Change Text”
onclick=“document.TextChanger.changeString(document.inputForm.
inputText.value)”>
<input type=“text” size=“20” name=“inputText”>
</form>
</td>
</tr>
</table>
</center>
</body>
</html>
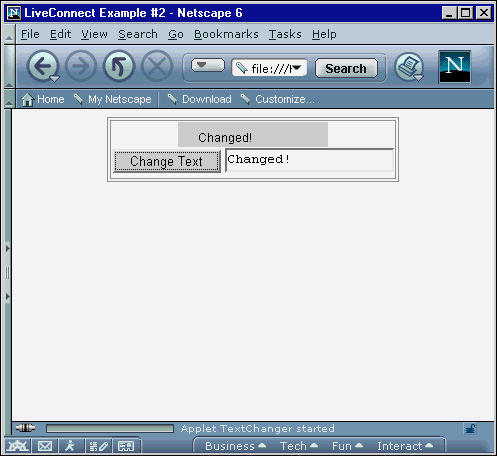
As you can see in Listing 4.6, the applet that displays the initial “Pure JavaScript” text is loaded. After the page has finished loading, the user can enter text into the text box and click the Change Text button to modify the text displayed by the applet. This button directly accesses the changeString() method in the applet to change the text from the default to that entered by the user. Figure 4.7 shows the result of changing this text.
Figure 4.7 Using JavaScript to change the text in a Java applet.
Form Processing
Before JavaScript was developed, most developers used server-side programs to send information from the Web server back to a user’s browser after a form was submitted. When using a form, the user would enter his information and submit the form to the server. This usually was slow, due to transmission delay back and forth to the server and the fact that the Web server did most of the work with the form, such as parsing information and validation.
JavaScript helps speed up this process by interacting with the form data, similar to these server-side programs, before it is sent to the server. This saves the Web server work and reduces the amount of time spent transmitting information. Using JavaScript for form processing can be very useful to the developer and time-saving to the user.
Many forms collect user information such as names, addresses, or interests. By collecting this information, developers open up a whole new level of possibility in their sites’ functionality. They are no longer placing static information out on their site for the world to see; rather, it is a means of communication—communication between users and their sites.
Communication between users and sites is mostly done through forms. When a user fills out an online form and submits it, the information needs to be validated and processed. Without client-side scripting languages, these actions can only be done on the server-side. The validation and processing work can be broken out by using JavaScript, which is where the language’s use of form processing really benefits developers.
Accurate processing of forms is dependent on the validity of the information given. It is very easy to input incorrect data into a form and then submit it. When this is done, you generally let the server handle any problems that might occur. These problems can be avoided if JavaScript is used on the client-side to validate the data before it is submitted. JavaScript can check the data content and format before transmitting the data, which, in turn, frees the server from encountering and dealing with these types of problems. The server’s only job now is to process the information being sent.
Keep in mind that JavaScript is not a complete substitute for server-side form processing programs. It should be used more as a complement to these programs. By combining the use of JavaScript and server-side programs, a developer can create a very effective and efficient means of processing forms.
Before programmers can use JavaScript with forms, they need to know how to get and parse forms for information. The next section takes a look at methods of extracting information from forms using JavaScript.
The Forms Array
Another JavaScript built-in object used to access components within a page is the Form array. The Form array, which is a property of the document object, is an array containing a list of the forms within a given document. Because it is an array, each form in the document can be referenced by the index number that represents its position in the document.
For instance, if you had a document containing three forms and you wanted to access a property in the second form, you would reference it with the following syntax:
document.forms[1].property
In this example, the document object refers to the document in which the form is located, and the property element refers to the property you are trying to access.
Listing 4.7 is an HTML page that contains two forms. In addition to the forms on this page, two JavaScript functions are included in the <head> portion of the page that show different methods of accessing forms and perform some input validation. Each of the forms contains a text area for the user to insert text, as well as a Submit button. When the user attempts to submit the form, an onClick event is fired and the contents of the form are passed to a JavaScript function for processing.
Listing 4.7 Using the Forms Array to Access Multiple Forms on a Page
<html>
<head>
<title>Forms Array Example</title>
<script language=“JavaScript” type=“text/javascript”>
<!--
// Function verifyZip checks for a valid ZIP Code. If user enters invalid
// ZIP Code, then an alert box is used to inform the user. Function
// takes the length as an input parameter.
function verifyZip(length){
// Create variable and store the form value for the ZIP input.
var zipEntry = document.forms[0].zip.value;
// Parse the input for an integer number using 10 as the radix.
var zipNum = parseInt(zipEntry, 10);
// Check to see that the length is 5.
if (document.forms[0].zip.value.length == length){
// Verify that the ZIP is a number.
if(zipNum != 0 && isNaN(zipNum) == false){
alert(zipEntry + “ is a valid zip code”);
} else {
// Inform the user if the ZIP is not valid.
alert(“Invalid Zip Code Entered. Please Re-enter”);
}
} else {
alert(“Invalid Zip Code Entered. Please Re-enter”);
}
}
// Function myName displays the name the user entered.
function myName(){
// Get the form value of the name entered.
var name = document.form2.name.value;
alert(“You Entered: ” + name);
}
// -->
</script>
</head>
<body>
<p>
<center><b>Forms Example</b></center>
<br><br><br>
<table>
<form name=“form1” method=“post”>
<tr>
<td align=“right”>Enter a 5 Digit Zip Code:</td>
<td align=“left”>
<input type= “text” name=“zip” size=“15”>
<input type=“button” name=“button1”
value=“Verify” onclick=“verifyZip(5)”>
</td>
</tr>
</form>
<form name=“form2” action=“" method=“post”>
<tr>
<td align=“right”>Enter Your Name:</td>
<td align=“left”>
<input type=“text” name=“name” size=”15“>
<input type=“button” name=”button2“ value=”Show Name“
onclick=”myName(this.form)">
</td>
</tr>
</form>
</table>
</body>
</html>
In the first form, validation is performed on the input. The user is asked to enter a five-digit ZIP Code. Once entered, the user can push the verify button, which calls the verifyZip function. This function uses the forms array index number to access the user input. Figure 4.8 shows this example of accessing the forms array.
Figure 4.8 The output result for processing the first form.
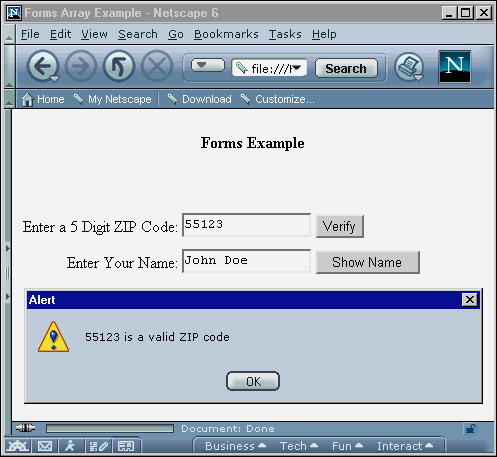
When a script has the input, it can perform checks to make sure that it is the correct length and that a numeric value was entered. If the correct information has been entered, a message is displayed informing the user the input was valid. If incorrect information was entered, an error message is displayed informing the user of an invalid entry.
The second form takes a name as input and passes it to the showName function, which displays the name in a window when the Show Name button is chosen. Notice that the function accesses the form information differently than the first function. Instead of using the forms array, it references the form by its name value.
In this example, the variable name is set using the name attribute of the <form> tag instead of the index number of the Forms array. Either method of accessing a form element is valid. However, if a document contains many forms, it might be easier to use the form name instead of counting the Forms array index numbers. Accessing a form through the name attribute also tends to make the script easier to understand.
This example demonstrates some uses of combining forms and JavaScript. Another useful function of JavaScript and forms is information manipulation. For instance, if the form processing program on the server-side only processes phone numbers without the hyphen, developers can program their scripts to strip all hyphens out of phone numbers before submission.
Accessing and Writing Information
Just as the document object contains a forms array, the form object contains an elements array. The elements array works similar to the forms array in that items are indexed in the order they appear, and you can access a specific element by its name instead of index number. Listing 4.8 demonstrates the two different ways of accessing form elements.
Listing 4.8 Using Different Methods of Accessing Form Elements
<html>
<head>
<title>Example of accessing form elements</title>
<script language=“JavaScript” type=“text/javascript”>
<!--
// Function displays the car information entered.
function showCar(){
// Access the car information by using the elements array.
var car = document.pref.elements[0].value;
alert(“Your favorite car is: ” + car);
}
// Function displays the color information entered.
function showColor(){
// Access the color value directly by form name.
var color = document.pref.color.value;
alert(“Your favorite color is: ” + color);
}
// -->
</script>
</head>
<body>
<form name=“pref” method=“post”>
Enter the name of your favorite car:
<input type=“text” name=“car” size=“25”>
<input type=“button” name=“carButton” value=“Show Car”
onclick=“showCar(this.form)”>
<br>
Enter your favorite color:
<input type=“text” name=“color” size=“15”>
<input type=“button” name=“colorButton” value=“Show Color”
onclick=“showColor(this.form)”>
</form>
</body>
</html>
The information entered into each text box becomes an element of the form. Using the elements array, a script can access each individual element of the array. As you can see in the showCar function, the car element is referred to by document.pref.elements[0].value. This is accessing the first element of the elements array in this specific form. The button would be the second element and would be referenced by document.pref.elements[1].value, and so on for other elements throughout the form.
The showColor function references the color object differently: by using the color object name with document.pref.color.value. If you were to use the elements array, this value would be referenced by document.pref.elements[2].value. Referencing by element name is much safer and easier to keep track of, and it can prevent future problems. For example, suppose that you have a Web page containing two frames, A and B, respectively. Frame A contains a JavaScript program that references elements within frame B using the elements array. If the Web page in frame B were to change but still contain form elements, your JavaScript program in frame A would be accessing incorrect form elements. Another reason for using element names is that if new form elements are inserted in the future, all the element numbering would not have to be changed.
In addition to accessing form elements, you can also write or modify form information. This can be a very useful technique for automatic form correction. Just about any object that carries information within a form can be modified.
Take a look at a simple example of writing information to forms. Listing 4.9 contains a form with one text box with a question and one Submit button. The user is asked to enter the answer to the question. If the answer is correct, an information box appears indicating so. If it is wrong, an alert box appears informing the user that he entered the wrong answer, and the correct answer is automatically written to the text box.
Listing 4.9 Writing Information to JavaScript Forms
<html>
<head>
<title>Example of Writing Form Elements</title>
<script language=“JavaScript” type=“text/javascript”>
<!--
// Function checks to see if the text submitted is the
// correct answer.
function checkText(){
// Perform an equality check to see if the input is correct.
if( document.FormExample3.textbox.value == “Bugs Bunny”){
alert(“You are correct!”);
} else {
// If the original input was incorrect, output the
// correct information and inform the user.
document.FormExample3.textbox.value = “Bugs Bunny”;
alert(“That is incorrect. The correct answer is now in the text box.”);
}
}
// -->
</script>
</head>
<body>
<form name=“FormExample3” method=“post”>
What Looney Tunes Character is gray and has long ears?
<input type=“text” name=“textbox” size=“25”>
<input type=“button” name=“Bugs” value=“Submit”
onclick=“checkText(this.form)”>
</form>
</body>
</html>
Building on the foundation of the code in Listing 4.9, it’s possible to create a JavaScript method that creates a customized pull-down menu based on specific user input.
Form Example
Listing 4.10 presents a sample Web page that allows a user to enter his personal information to submit. After all the information is entered and the user clicks the Submit button, all the form data is validated on the client-side before passing the data to the server for further processing.
Listing 4.10 Example Using a Form for Client-Side Validation
<html>
<head>
<title>Form Validation Example</title>
<script language=“JavaScript” type=“text/javascript”>
<!--
// Function checks to see that the personal
// information entered is valid.
function validatePersonalInfo(){
// Declare variables to hold input values.
var _first = document.info.fname.value;
var _last = document.info.lname.value;
var _street = document.info.street.value;
var _city = document.info.city.value;
var _zip = document.info.zip.value;
var _phone = document.info.phone.value;
var _email = document.info.email.value;
// Verify that the all input fields are filled in.
if(_first.toString() == “"){alert(”Please enter a first name.“);}
if(_last.toString() == ”“){alert(”Please enter a last name.“);}
if(_street.toString() == ”“){alert(”Please enter your street name.“);}
if(_city.toString() == ”“){alert(”Please enter your city.“);}
if(_zip.toString() == ”“){alert(”Please enter your ZIP.“);}
if(_phone.toString() == ”“){alert(”Please enter your phone number.“);}
if(_email.toString() == ”“){alert(”Please enter your email.“);}
else{
// Check that the ZIP and phone numbers are valid inputs.
var checkZip = checkNum(5);
var phoneInput = document.info.phone.value;
// Initialize variables.
var validPhone = false;
var validZip = false;
if(checkZip == true){
validZip = true;
}
else{
alert(”Invalid ZIP Code: “ + validZip);
}
// If the phone number is not valid, then inform user.
if(!checkPhone(phoneInput)){
alert(”Phone number is invalid.“ + validPhone);
}
else{
validPhone = true;
}
if(validZip && validPhone){
alert(”Your form has been verified");
}
}
}
// Strips hyphens out of phone number and verifies that
// phone number is valid. Any phone number in the format
// xxxxxxxxxx, xxx-xxx-xxxx, or (xxx)xxx-xxxx will be valid.
function checkPhone(str){
var regexp = /ˆ(d{10}|d{3}-d{3}-d{4}|(d{3})d{3}-d{4})$/;
return regexp.test(str);
}
// Function checks that the ZIP Code is valid.
function checkNum(length){
var zipEntry = document.info.zip.value;
var zipNum = parseInt(zipEntry, 10);
if (document.info.zip.value.length == length){
if(zipNum != 0&& isNaN(zipNum) == false){
// Valid ZIP Code
return true;
}
else {
// Invalid ZIP Code
return false;
}
}
else {
//Too Many digits- Invalid
return false;
}
}
// -->
</script>
</head>
<body>
<p>
<center><b>Form Validation Example</b></center>
<p>This page demonstrates how JavaScript can do form validation on a Web page.
Using JavaScript to do validation on the client-side can greatly reduce
processing time by reducing the chance of submitting incorrect forms.
<hr>
<br>
<b>Personal Information:</b>
<form name=“info” method=“post”>
<table>
<tr>
<td align=“left”>first name:</td>
<td align=“left”>
<input type=“text” name=“fname” size=“15”>
last name:
<input type=“text” name=“lname” size=“20”>
</td>
</tr>
<br>
<tr>
<td align=“left”>Street:</td>
<td align=“left”>
<input type=“text” name=“street” size=“30”>
</td>
</tr>
<br>
<tr>
<td align=“left”>City:</td>
<td align=“left”>
<input type=“text” name=“city” size=“15”>
State:
<select name=“state”>
<option value=“AL”>AL</option>
<option value=“AK”>AK</option>
<option value=“AZ”>AZ</option>
<option value=“AR”>AR</option>
<option value=“CA”>CA</option>
<option value=“CO”>CO</option>
<option value=“CT”>CT</option>
<option value=“DE”>DE</option>
<option value=“FL”>FL</option>
<option value=“GA”>GA</option>
<option value=“HI”>HI</option>
<option value=“ID”>ID</option>
<option value=“IL”>IL</option>
<option value=“IN”>IN</option>
<option value=“IA”>IA</option>
<option value=“KS”>KS</option>
<option value=“KY”>KY</option>
<option value=“LA”>LA</option>
<option value=“ME”>ME</option>
<option value=“MD”>MD</option>
<option value=“MA”>MA</option>
<option value=“MI”>MI</option>
<option value=“MN”>MN</option>
</select>
ZIP:
<input type=“text” name=“zip” size=“7”>
</td>
</tr>
<br>
<tr>
<td align=“left”>Phone (w/area code):</td>
<td align=“left”>
<input type=“text” name=“phone” size=20>
</td>
</tr>
<br>
<tr>
<td align=“left”>Email:</td>
<td align=“left”>
<input type=“text” name=“email” size=“20”>
</td>
</tr>
<br>
</table>
<center>
<input type=“button” value=“Submit” onclick="validatePersonalInfo()">
</center>
</form>
</body>
</html>
Figure 4.9 shows how the personal information form looks.
Figure 4.9 Form example using client-side validation.
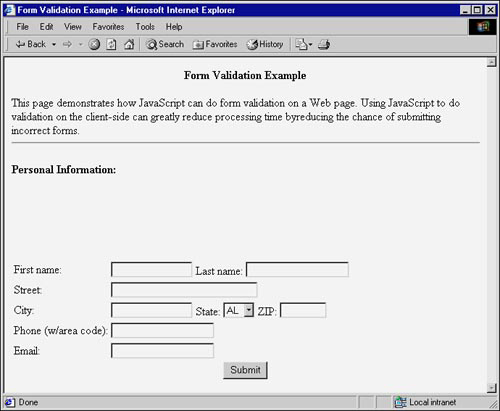
The form begins by validating that all the input fields have been filled. If any of the fields are left empty, an alert box will appear indicating that the field requires input. Two main inputs require special validation: the ZIP Code and the phone number.
The first function called is ValidatePersonalInfo. This main function checks to see that all the user entries are valid. If so, an alert box is returned indicating that the form has been validated. Before the form can be completely validated, the ZIP Code and phone number must be checked. The ZIP Code verification is performed by the sub-function called checkNum. This function takes one parameter—the string length. For the ZIP Code, we are restricting the string length to five digits. If this is found to be true, the ZIP Code is validated.
The second sub-function called is checkPhone. The checkPhone function takes the input for the phone number and checks it against three different standard phone number formats. If any are found to be valid, the function returns true. After both checks are performed, the form is determined to contain valid information.
Cookie Handling
A cookie is a small bit of organized information that is stored by a browser in a text file on the user’s computer. Cookies are typically used to store information pertinent to a specific site that is currently used and can be reused in the future.
The location of cookie text file differs according to the browser being used. In Navigator, all cookies are stored in a file named cookies.txt. In Internet Explorer, each cookie is stored as its own individual text file in the Cookies folder, which is located by default in the Windows or Winnt folder.
There are limitations to cookies. The size of a cookie is limited to 4KB. Also, Navigator browsers only allow for 300 total cookies to be stored on the user’s computer. This keeps the size of the cookies.txt file or Cookies folder to a 1200KB maximum. In addition, each Web server is only allowed to store a total of 20 cookies. If the 300 total cookies or 20 cookies per Web server limit is exceeded, the least recently used cookie is deleted to accommodate any additional cookies.
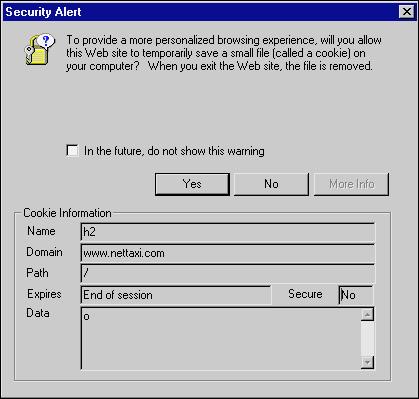
Browsers let the user control how cookies are used. In Navigator, under Edit, Preferences, there is an Advanced category. This category gives you the option to accept all cookies, accept cookies that get sent back to the server, or disable cookies. There is also an option to warn you before accepting a cookie. Enabling this option will force the browser to notify you when a cookie requests to be set and inform you of what the cookie contains. Figure 4.10 shows a picture of what a cookie warning would look like. Similarly, Internet Explorer controls the use of cookies through its Security tab on its Internet Options dialog box (available under the Tools menu for version 5.5 on Windows).
Figure 4.10 Cookie warning example.
The cookie object is part of the Document object. Cookies can be created, set, and modified by setting the appropriate values of the cookie property. A cookie has four name attributes: expires, path, domain, and secure.
By default, a cookie lasts only during the current browsing session. When the browsing session is over, the cookie is destroyed. For a cookie to last beyond the current browsing session, the expires attribute must be set. This attribute specifies the life of a cookie. The value of this attribute can be set to any valid date string. If the expires attribute is set, the cookie is written to the cookie text file after the current browsing session is over. If no expires attribute is set, the cookie will expire when the user’s browsing session ends.
The path attribute specifies the domain associated with the cookie. The level of association begins at the specified path and goes down into any subfolders. For example, suppose that http://www.purejavascript.com/examples/cookie.html was setting a cookie and wanted the cookie to be shared across Web pages on the purejavascript.com domain. To do this, the cookie path attribute needs to be set to "/". This allows the cookie to be accessed from any page on the www.purejavascript.com Web server. If the path was set to "/examples", the cookie would only be valid to pages in the examples folder and its subfolders.
Understanding the cookie attributes is the first step in being able to read and write cookies. Now that you do understand this, look at how to read cookies.
Reading Cookies
As stated before, cookies are part of the document object. The first thing you have to do is to read the cookie property. This can be done with the following statement:
var cookieName = document.cookie;
This statement creates the variable cookieName and assigns it the cookie property of the document object. When you have accessed this property, you must extract the various attributes of the cookie. The cookie property itself returns a string containing all the cookies pertaining to the current document.
Cookies are interpreted in name/value pairs. The string returned from the cookie property contains the list of cookie name/value pairs. To read an individual attribute, you must parse through its string. You can use built-in JavaScript string methods to accomplish this.
Look at the example in Listing 4.11 to see how to read a cookie. When calling this function in your code, you simply need to pass the name of the cookie you are looking for.
Listing 4.11 Getting a Cookie Value
<script language=“JavaScript” type=“text/javascript”>
<!--
// Declare variable to hold all the cookies contained
// in the document.
var cookies = document.cookie;
// Function that gets a cookie’s value by searching
// for the name of the cookie.
function readCookie(name) {
// Declare variable to set the "name=" value.
var start = cookies.indexOf(name + "=");
// Get the index if the cookie name is found.
if (start == -1){
alert("Cookie not found");
}
// Get the first character of the cookie.
start = cookies.indexOf("=", start) + 1;
// Read to the end of the cookie.
var end = cookies.indexOf(";", start);
if (end == -1){
end = cookies.length;
}
// Get the cookie value, reversing the escaped format by
// using the unescape method.
var value = unescape(cookies.substring(start, end));
if(value == null){
alert("No cookie found");
}
else{
alert("Cookie value is: " + value);
}
}
// -->
</script>
Writing Cookies
Cookie values can be created, modified, and set. Remember that cookies are read as name/value pairs. Therefore, when you write a cookie, its attributes must be written as a name/value pair.
To set a cookie value, you first create a cookie and assign it a name. Then you must set each individual attribute for the new cookie. Keep in mind that when you set the expires attribute, you must have a valid date string. It is best to use the JavaScript Date methods to create a date string, which can be assigned. Additional cookie attributes can be set similarly. The following is an example of how this is done:
document.cookie = "name=" + form.cookie.value + "; expires=" + month;
If you want to modify a specific value in the cookie, just set its attributes again. You can delete a cookie’s value by modifying that attribute.
Windows in Action
A window object is used in all your JavaScript programs, whether you specify it or not. The window object is one level higher than the document object in the JavaScript object hierarchy and provides a developer with the ability to manipulate the current window as well as create new window instances.
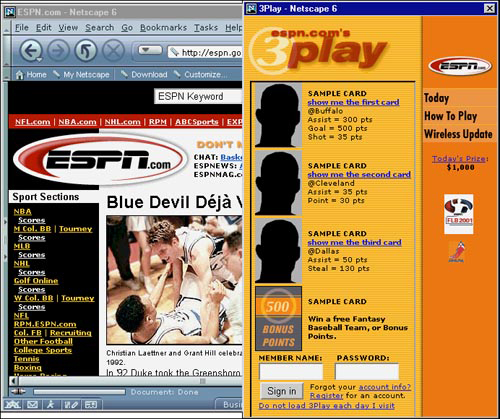
The ability to create new windows allows developers to add functionality to their sites. Some sites have advertisers create new windows to show their advertisement banners, whereas others, such as ESPN (shown in Figure 4.11), use this as a method to play games in windows while their users continue to browse.
Figure 4.11 Pop-up window for a game.
The Parent/Child Relationship
Windows use what is described as a parent/child relationship when they are initiated. This means that if window B is created from within window A, window B is considered a child of window A, which is its parent. Any actions performed on the child by its parent must be referenced through its parent. Look at the following code:
<html>
<head>
<script language=“JavaScript” type=“text/javascript”>
<!--
// Function creates a new window called myChild
// with the index.html file in it.
function create(){
open("index.html", “myChild”);
}
// -->
</script>
</head>
<body>
<form name=“form1”>
<input type=“button” value="Create Child" onclick='create()'>
</form>
</body>
</html>
The function create simply creates a new window that would be considered a child of the original window. The name of the child is specified in the second parameter of the window.open function, which is “myChild”. Any values in the child window are referenced using the name of the parent window. If the child window has a child of its own, this would be considered a grandchild of the parent. For a grandparent to perform actions on its grandchild, it must first reference its immediate parent and then its grandparent. Suppose that the grandchild is named Jane, its parent is named Bob, and the grandparent is named Joe. For Jane to be manipulated by Joe’s window, it must reference the value by the following:
joe.bob.jane.document.form1.textBox.value
The parent has total control of its immediate child window and any subsequent child (grandchild) windows. If the parent window is destroyed, all control for the remaining child windows is lost.
A child window can find out who its parent is by using the opener method. The opener method will tell the child from which window it was created. You use the opener method as shown in the following:
var name = window.opener.document.name;
This will return the name of the parent document to the name variable.
You can use multiple instances of opener if you have several levels of windows. If a grandchild wanted to reference its grandparent, it could do so by simply adding another level:
window.opener.opener.document.form1.textbox.value
For a window to refer to its own properties, you can use the window self property. Suppose that you wanted to set a textbox value within a form document in a window. You could refer to the value as shown in the following:
self.document.formName.textbox.value = "JavaScript is cool";
Creating Windows
JavaScript provides a built-in method to create new instances of windows. The open method can be used to create any primary or secondary window. The following is an example of how open can be used.
window.open("web.html", “newWin”, "resizeable,menubar,toolbar");
This creates a window that is resizable, contains a menu bar, and has a toolbar. The "web.html" is the file that will open in the newly created window. “newWin” represents the name of the window object. Many different features can be added to a window. This example only shows a few. Other features include, outerHeight, outerWidth, innerHeight, innerWidth, alwaysRaised, alwaysLowered, location, screenY, and screenX. The features are specified in the parameters of the open function.
After you create a new window, you can manipulate it. JavaScript also provides you with the ability to interact between multiple windows. As long as a window property is referenced correctly, you can modify objects in other windows. Remember the parent-child relationship when referencing window objects.
Limitations
In older versions of JavaScript, windows could only be referenced from the top down. This meant that a parent window would know the properties of its child windows, but not vice versa. In JavaScript version 1.2 and later, this problem is resolved. As mentioned earlier, using the opener property will resolve any child/parent referencing conflicts.
Window Example
The next example shows how you can send information between two windows. It begins with the parent window. Figure 4.12 shows both the parent and child windows open with the parent window on the top.
Figure 4.12 Window example showing how information can be sent between windows.
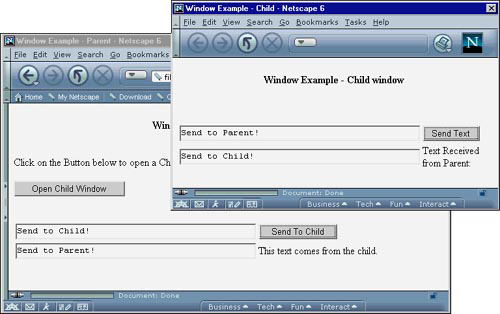
Look at the code for the parent window in Listing 4.12.
Listing 4.12 Parent Code for Window Example
<html>
<head>
<title>Window Example - Parent</title>
<script language=“JavaScript” type=“text/javascript”>
<!--
// Function creates and opens a new child window.
function openWin(){
// Open a new window named “ChildWin”.
childWin=open("child.html", “ChildWin”,"toolbar,scrollbars,menubar,status,
width=500,height=200");
}
// Function sends a value from the parent window to the
// child window.
function sendToChild(){
childWin.document.childForm.childText.value =
document.parentForm.parenttext.value;
}
// -->
</script>
</head>
<body>
<p>
<center>
<b>Window Example - Parent Window</b>
<br><br><br>
</center>
<form name=“parentForm”>
Click on the Button below to open a Child window:
<br><br>
<input type=“button” name=“submit” value="Open Child Window"
onclick="openWin()">
<br><br><br>
<table>
<tr>
<td align=“left”>
<input type=“text” name=“parenttext” size=“45”>
</td>
<td align=“left”>
<input type=“button” name=“submit” value="Send To Child"
onclick="sendToChild()">
</td>
</tr>
<tr>
<td align=“left”>
<input type=“text” name=“received” size=“45”>
</td>
<td align=“left”>
This text comes from the child.
</td>
</tr>
</table>
</form></body>
</html>
This parent window has a button, which, when clicked, opens a child window. It also has two text fields, one for sending text to the child and one for receiving text from the child. The user will first click the button to create a new window. This is the child window. When the user enters text into the first text box and clicks the Send Text button, the input is sent to the child and appears in its appropriate text box. Take a look now at what the child window looks like in Listing 4.13.
Listing 4.13 Child Window Code for Window Example
<html>
<head>
<title>Window Example - Child</title>
<script language=“JavaScript” type=“text/javascript”>
<!--
// Function sends a value from the child window to the parent window.
function sendToParent(){
window.opener.document.parentForm.received.value =
document.childForm.sendText.value;
}
// -->
</script>
</head>
<body>
<p>
<center>
<b>Window Example - Child window</b>
<br><br><br>
</center>
<form name=“childForm”>
<table>
<tr>
<td align=“left”>
<input type=“text” name=“sendText” size=“45”>
</td>
<td align=“left”>
<input type=“button” name=“submit” value="Send Text"
onclick="sendToParent()">
</td>
</tr>
<br>
<tr>
<td align=“left”>
<input type=“text” name=“childText” size=“45”>
</td>
<td align=“left”>
Text Received from Parent:
</td>
</tr>
</table>
</form>
</body>
</html>
The child window is similar to the parent except that there is no option to open another window. The child window has one text field for sending text to the parent window and one text field for receiving text from the parent. In the JavaScript code, you can see the use of the opener property to reference its parent. Remember, you cannot reference windows directly upward. The parent can call a child by name, but a child cannot call the parent by its name.
Manipulating windows provides you with the ability to greatly expand your site’s functionality. Many window properties can be specified or modified to your individual needs. Do be careful on how you implement these windows, however, because often times too many (or any for that matter) pop-up windows can be annoying. Be sure that you really need it.
Dynamic Documents
As Web sites became more advanced, the need for dynamic content grew. In the beginning, the only type of presentation technologies available was plain HTML. It allowed various type of formatting so content could be displayed in a pleasant manner, but soon more was needed—enter scripting languages. The combination of JavaScript and HTML was a big step, and that coupled with support for CSS meant that a developer could create static content with HTML and then have control over it with JavaScript and CSS.
The Web has come a long way in a very short period. The first generation was called Dynamic HTML or DHTML for short. As we just mentioned, DHTML wasn’t one specific technology, but a core set of three technologies working together to provide a toolset for developers to create dynamic content. But things have moved on even more since then.
In today’s newest browsers we have the Document Object Model (DOM) at our disposal. This is an attempt to standardize the method in which you access elements within a given document, such as an HTML or XHTML document. This is definitely the way of the future, but it does not remove the fact that some of the older browsers are still around.
Within this section of the chapter, we are going to take a look at both the old (DHTML) and new (scripting the DOM) ways of doing things. We will also show you how to build cross-browser scripts that will work in all version 4+ browsers. With the rate of adoption of the DOM, this will most likely be the last edition of this book that covers the old way, but for now it is definitely still needed.
The Old Way
Netscape initially tackled three-dimensional positioning with the <layer> and <ilayer> tags in Navigator 4. Internet Explorer 4, on the other hand, implemented three-dimensional positioning through their DHTML Object Model implementation by extending the functionality of the existing HTML tags, such as <div>.
With the release of these version 4 browsers, developers had two ways of creating layers within documents, but they were browser-specific. Cascading Style Sheets, which is also needed for creating dynamic documents, has been implemented in both browsers. CSS provides the base positioning. There are some differences in implementation, in both level and interpretation, so this area is still in a state of change, but things are getting much better.
Navigator 4 Layers
The concept of layers was introduced in Navigator 4, but not only in the HTML, but also through the new Layers object in JavaScript 1.2. Similar to many things at the time, these layers were only supported in Navigator 4—not Internet Explorer. They did have some usefulness, however, by providing the ability to control the stacking and movement of elements within a single window.
On the HTML side, one of the new tags created was the <layer> tag. This tag allowed you use JavaScript for layer manipulation. The following shows an example of using this tag.
<layer id=“myLayer” width=“220” height=“100” bgcolor=“red” top=“150”
left=“100” visibility=“show”>
This is a Navigator 4 tag
</layer>
The positioning of layers could be either absolute or relative, as with most elements. With absolute positioning, you can specify the position within its containing layer. Relative positioning is when the object appears in its natural location within the flow of the document.
The <layer> tag used absolute positioning, and contained properties that let a developer specify the exact position in the document. Now the second tag they introduced allowed for relative positioning. The <ilayer> tag was considered an inflow or inline layer.
The HTML tags were only half of what was added by Netscape for this functionality. In addition to this, they also added the Layer object and the document.layers array to JavaScript for accessing and manipulating these layers. This object contained its own methods and properties for performing these tasks.
Even though it is not defined in the HTML 4 Recommendation, Navigator 4 required that you have the name attribute set in the tags, be it <layer>, <ilayer>, or <div> (which was used to define groups of tags) for this to work. The syntax is rather simple for accessing layers in this manner. For instance, if you are wanting to access a layer called layer1, you could accomplish this through the following syntax:
document.layers['layer1']
Because these types of layers represent the old method of performing document dynamics, we are not going to go into any more detail here. We will, however, include a cross-browser example later in the chapter in the section called “Dynamic Documents” that will help show how dynamic documents in Navigator 4 works. But moving forward, you should pay close attention to the new method, which is what has been implemented in Netscape 6.
Internet Explorer 4’s DHTML Object Model
Internet Explorer 4 took a broader approach to DHTML by allowing developers the ability not only to access layers, which they defined primarily using <div> tags, but also to access almost all tags within a given document. On the layer front, the <div> approach was the way to go because it was a tag that was part of the HTML Recommendation. The tag is essentially used to define data blocks within a document—blocks that can later be scripted, styled, and manipulated.
In addition to this tag, there was also the <span> tag. Whereas the <div> tag provided a way to organize numerous tags together as a single group, <span> was used to group a set of characters inline, within the body of another tag.
Similar to Navigator, Internet Explorer needed a method to access these elements and manipulate them. Microsoft did not implement the Layer object, but rather the document.all collection. This collection provided the means by which you could access elements within your document. However, unlike the document.layers method, it did not rely on the non-standard name attribute of the <div> tag, but rather on the standardized id attribute instead. Using the same layer1 as our example, you would access this layer in Internet Explorer 4 or 5 using the following syntax:
document.all['datablock1']
Even though both the Netscape and Internet Explorer methods differ, both have been deprecated in favor of the DOM approach.
The New Way
The Document Object Model (DOM) is a very broad topic, and covers all aspects of representing documents within an object model designed for accessibility and flexibility. In this section, we will discuss the basics of the DOM, its structure, and how it can be used in relation to JavaScript. This is meant to be an overview of the DOM.
What Is the DOM?
The DOM refers to the Document Object Model, which provides access to all elements and their attributes within a document through a hierarchical structure. The DOM API can be used to create, delete, and modify elements and content. Although the DOM was designed to work with any programming language, it is most commonly associated with XML and HTML. The primary focus here will be within the scope of the JavaScript binding that it defines.
The DOM Level 1 is supported starting in Netscape 6, Internet Explorer 5 and Opera 5, whereas parts of Level 2 are also supported in these browsers. As usual, each browser will have its own quirks on how parts of the DOM work. Earlier versions of these browsers also support various aspects of the DOM, but not completely.
Manipulating the DOM
Before getting into discussions on how to use the DOM, we need to set up a little vocabulary. When talking about the DOM, three terms are often used. They are node, element, and attribute. Each document contains a bunch of nodes, which represents either a piece of text or a tag and its attributes. A tag (that is, <img>) is also referred to as an element in terms of the DOM. Each element might or might not have an attribute. For example in the following HTML code, we have the <img> element containing attributes of src and name:
<html>
<body>
<img src="dog.gif" name=“myDog” alt=“Dog”>
</body>
</html>
The DOM allows a program to access all the elements in a document through a “tree” like object structure. The structure begins with a root object; typically in an HTML file, this would be the <html> tag. Within the root object, additional objects are contained in a parent-child type relationship. A child would be considered as any node nested within another node. In the previous example, the <html> node would be a parent to the <body> node. The <img> node would be considered a child to the body node, and so on.
Nodes can be accessed directly by name (if they have a name attribute) by using built-in DOM methods or through parent-child relationship properties. To access a node by name, use the getElementById() method of the Document object. If using the parent-child assesors, the Document.parentNode[], Document.childNodes[], and Document.getSibling[] arrays will be the most useful.
Elements and attributes can be added, modified, or deleted through the DOM. To create a new element, the createElement() method is used. Looking at the following example, we see how to create a new anchor element and add attributes to it:
var myNewLink = document.createElement(‘a’);
myNewLink.setAttribute(‘href’, 'home.html'),
myNewLink.setAttribute(‘name’, ‘Homepage’);
There are many built-in methods and properties for manipulating the DOM. To see a list of all the properties, refer to the W3C DOM Recommendation available at http://www.w3.org/DOM or the DOM browser support information for Netscape, Internet Explorer, or Opera browsers.
DOM Cascading Style Sheets
The DOM can also be used with CSS, which is often used to create Web pages requiring positioning, formatting, or dynamic content. It allows you to define constructs on how your content is presented, and the DOM can be used to expose these constructs to an object model. Once exposed, it allows a JavaScript program to create, modify, or remove CSS properties.
All CSS items should be available within the document interface. In addition, the CSSStyleSheet interface can also be used to access the rules for a particular style sheet. To determine whether the DOM has support for CSS, the hasFeature() method can be called passing CSS for the first argument (feature) and the version (Level) number.
DOM Example
Now that we have discussed what the DOM is, some of its methods, and how to manipulate it, let’s take a look at an example. Listing 4.14 demonstrates three different parts; the first of which is how to add text dynamically within a document. The second shows how to modify an HTML ordered list to an unordered list, and the third part shows how a link can be added to a document dynamically.
Listing 4.14 Example of Different DOM Uses
<html>
<head>
<script "type=“text/javascript” language=“JavaScript”>
<!--
// adds a piece of text to a document
function addtext(text){
if (document.createTextNode){
var mytext=document.createTextNode(text);
document.getElementById(“example”).appendChild(mytext);
}
}
// changes an ordered list to an unordered list
function changeList(){
var oldListItems = myList.innerHTML;
var newNode = document.createElement(“UL”);
myList.replaceNode(newNode);
newNode.innerHTML = oldListItems;
}
// adds link to the document
function addLink(){
var myLink = document.createElement(‘a’);
myLink.setAttribute(‘href’, 'http://www.amazon.com'),
myLink.setAttribute(‘name’,‘Amazon’);
text = document.createTextNode(' Amazon.com '),
myLink.appendChild(text);
document.getElementById(‘firstlink’).appendChild(myLink);
}
// -->
</script>
</head>
<body>
<h3>This is an example of how to use the DOM to perform various tasks</h3>
<!-- First DOM Example -->
<p>
This example shows how to dynamically add new text into a document.
<div id=“example” onClick="addtext('*This is new text* ')">
<b>Click here</b> to add the new text.
</div>
<p>
<hr>
This example shows how to modify the ordered list to an unordered list.
<br>
( works in IE 5 )<br>
<!-- Second DOM Example -->
<form name=“form1”>
<ol id=myList>
<li>Item 1</li>
<li>Item 2</li>
<li>Item 3</li>
</ol>
<input type=“button” value="Change List Type" onclick="changeList()">
</form>
<p>
<!-- Third DOM Example -->
This example shows how to dynamically add a new link
<div id=“firstlink” onClick="addLink()">
<b>Click here</b> to add the new text.
</div>
<hr>
</body>
</html>
Cross Browser DHTML
So far, we have discussed the two ways of creating and handling dynamics in HTML documents: the old DHTML way, and the new DOM way. Earlier in the chapter, we talked about the old way and then showed the basic syntax of how it worked. Later, we discussed the newer DOM method and included an example. Now, we are going to show you a single piece of code that will show and hide a data block, or layer if you will, that works not only in the older version 4 browsers using the DHTML methods, but also in the newer version 5 and 6 browsers using the DOM approach.
As you will see in our example, we will use <div> tags to create our blocks, CSS to perform some basic styling, and finally JavaScript to determine the type of browser the user has and how to handle the scripting of the data blocks. In this example we will create a data block, or layer, and two form buttons. When one button is clicked the block will disappear. When the other one is clicked, it will reappear.
There are several aspects of this listing to review, starting with the simple aspects first. The HTML used is nothing more than a simple form with two buttons that call JavaScript functions on onclick events. Directly below this form is an even more simple <div> block that only contains the text "My block". Also notice that we use the onload event handler within the <body> tag to call a JavaScript function. This code looks similar to
<body onload="checkBrowser()">
<form>
<input type=“button” value=“Hide”
onclick="changeState(‘datablock’,‘hidden’)">
<input type=“button” value=“Show”
onclick="changeState(‘datablock’,‘visible’)">
</form>
<div name=“datablock” id=“datablock”>
<p>My block</p>
</div>
</body>
As for the function, its purpose is to set the proper variables that represent our scripting syntax. It looks like the following, where ieVer represents the major version number of any IE browser accessing the page. As for the "Gecko" reference, that is part of the user agent string within browsers built from Mozilla.org’s Gecko rendering engine, such as Netscape 6.
function checkBrowser(){
// IE 4
if((ieVer < 5) && (ieVer > 0)){
block = ".all";
style = ".style";
isDHTML = "true";
// Navigator 4
}else if(navigator.userAgent.indexOf("Nav") != -1){
block = ".layers";
style = "";
isDHTML = "true";
// IE 5+ and Netscape 6+
}else if((navigator.userAgent.indexOf("Gecko") != -1) ||
(ieVer >= 5)){
isDOM = "true";
}
}
Within Navigator, as we had mentioned, this is accomplished by including the property you want to access immediately after the document.layers[‘layerName’] declaration. For Internet Explorer, however, this is accessed through the additional style collection, so your syntax will be something similar to document.all[‘layerName’].style.property.
These two methods might seem to pose a problem for writing your code because it appears we will have to write two different sets of code for each browser. Within the JavaScript language, however, there is a top-level eval() function that takes a string passed to it, and evaluates it as JavaScript code. This allows us, for instance, to dynamically build a piece of JavaScript code, such as our layer reference, and pass it to the eval() function to be executed.
This only takes care of the older DHTML method, so we also need to take what we learned earlier and use it to access the DOM for the newer browsers. We accomplish this by using the getElementById() method to return a pointer to the layer, and then using the element.style.visibility property to hide or show the layer. You will also notice in the function that we set an isDHTML and an isDOM variable, which we will use later.
The last function takes care of all this and is the one called by our form buttons—changeState(). This function takes two parameters—the first one is the name of the layer it is supposed to effect, and the second is the visibility value that the layer should be changed to. Because we have to access and change the layer properties using different methods, our function will look similar to
function changeState(dblock, state){
if(isDHTML == "true"){
eval(<document> + block + "['" + dblock + "']" + style +
".visibility = '" + state + "'");
}else if(isDOM == "true"){
var blockElement = document.getElementById(dblock);
blockElement.style.visibility = state;
}
At this point, we have gone over most of the code with the exception of some variable declarations and a single style sheet property setting. Listing 4.15 contains the complete example.
Listing 4.15 Manipulating Layers in All Supporting Browsers
<html>
<head>
<style type="text/css">
<!--
#datablock{
background-color: lightblue;
}
-->
</style>
<script type=<text/javascript> language=<JavaScript1.2>>
<!--
// global variables for browser
var block = new String();
var style = new String();
var isDHTML = new Boolean(false);
var isDOM = new Boolean(false);
// determine IE version
var ieVer = parseInt(navigator.userAgent.charAt(parseInt(
navigator.userAgent.indexOf(<MSIE>)) + 5));
// set appropriate variables depending on scripting method
function checkBrowser(){
if((ieVer < 5) && (ieVer > 0)){
block = ".all";
style = ".style";
isDHTML = "true";
}else if(navigator.userAgent.indexOf(<Nav>) != -1){
block = ".layers";
style = "";
isDHTML = "true";
}else if((navigator.userAgent.indexOf(<Gecko>) != -1) ||
(ieVer >= 5)){
isDOM = "true";
}
}
// Take the state passed in, and change it.
function changeState(dblock, state){
if(isDHTML == "true"){
eval(<document> + block + "['" + dblock + "']" + style +
".visibility = '" + state + "'");
}else if(isDOM == "true"){
var blockElement = document.getElementById(dblock);
blockElement.style.visibility = state;
}
}
//-->
</script>
</head>
<body onload="checkBrowser()">
<form>
<input type=<button> value=<Hide>
onclick="changeState(‘datablock’,‘hidden’)">
<input type=<button> value=<Show>
onclick="changeState(‘datablock’,‘visible’)">
</form>
<div name=<datablock> id=<datablock>>
<p>My block</p>
</div>
</body>
</html>
XML-Based User Interface Language (XUL)
In this section, we will discuss the basics of a new language called the XML-based User Interface Language (XUL). XUL works across many different platforms within the Gecko rendering engine and with various programming languages. We will attempt to cover XUL from a high level and provide some insight into how JavaScript can be used in conjunction with XUL.
What Is XUL?
XUL is an XML-based programming language used for defining objects and layouts in a user interface. XUL was created to provide a XML shorthand for describing the contents of windows and dialogs and is heavily used within the Mozilla and Netscape 6 browsers.
File Structure and Syntax
XUL files typically are denoted with a .xul file extension. The language is tag based and similar to XML; and in fact, XUL looks like a cross between XML and HTML, with some additional specialized tags. Like XML, XUL is also case sensitive.
The beginning of an XUL file could look similar to the following code:
<?xml version="1.0"?>
<?xml-stylesheet href="chrome://global/skin/" type="text/css"?>
<!DOCTYPE window>
<window xmlns="http://www.mozilla.org/keymaster/gatekeeper/there.is.only.xul">
The first line denotes that this is an XML file and specifies the version, while the second line defines which style sheets will be used for this particular file. The third line designates the type of document it is, while the fourth line allocates a namespace to the XUL file listed at the end of the URL.
NOTE
Want more information on namespaces in XML? Check out http://www.w3.org/TR/1999/REC-xml-names-19990114.
XUL and JavaScript
XUL by itself does not perform any specific function. For a browser to use XUL, a programming language is needed to tie the different interface components together. For the purpose of this book, JavaScript will be used as the binding language.
JavaScript can be inserted within an XUL document. To denote portions of the document that pertain to JavaScript, the <html:script></html:script> tag is used. Any JavaScript code is inserted between the opening and the closing tags. For more complex functionality requiring a greater deal of scripting, JavaScript code can be separated into its own file (denoted with a .js extension). This file is then included in the XUL file by specifying the src attribute of the <html:script> tag. The following shows an example of this:
<html:script language=<JavaScript> src="myscript.js"/>
XUL works primarily with widgets. These are things such as menus, toolbars, buttons, scrollbars, and so on. These widgets can use JavaScript to interact with the user. For example, suppose that you create a new button widget and want to perform a specific function when the button is pressed. Using the JavaScript onclick event handler, you can determine when the new button has been pressed. This works for other events as well.
XUL Example
Let’s look at an example of an XUL file, which creates a new menu. Listing 4.16 shows a very simple XUL program that uses the menubar widget.
<?xml version="1.0"?>
<?xml-stylesheet href="chrome://global/skin/" type="text/css"?>
<!DOCTYPE window>
<html:script src="myScript.js"/>
<window id="new-window" title="new menus"
xmlns="http://www.mozilla.org/keymaster/gatekeeper/there.is.only.xul">
<menubar>
<menu value=“aNewMenu”>
<menupop>
<menuitem value="First New Item" onclick="shoeFirst();"/>
<menuitem value="Second New Item" onclick="showSecond();"/>
<menuseparator/>
<menuitem value="Last New Item" onclick="showLast();"/>
</menupop>
</menu>
</menubar>
</window>
The example creates a new menu, aNewMenu, and adds three options to it. A separator is used to distinguish between the first two items and the last item. Each item performs a specific JavaScript function, which is defined in a separate file named "myScript.js".
Moving On
In this chapter, we discussed a number of different items related to Client-side scripting with JavaScript. In this edition, we’ve expanded to new technologies including the Document Object Model and XUL. Scripting technology is becoming more advanced every day. With the advent of DOM and XML, developers are able to create a wide variety of dynamic Web content.