In this chapter, you’ll explore all the time and calendar functionality that iPhone has to offer. Topics include the following:
![]() Configuring the New Text Message Sound
Configuring the New Text Message Sound
8 Working with Date & Time and the Calendar
When it comes to time management, iPhone is definitely your friend. On iPhone, you can have multiple clocks for various locations, and you can have various alarms set on each one. Using iPhone’s Calendar, you can view calendars that have been synchronized with your computer’s calendar using MobileMe and applications such as Outlook on Windows PCs or iCal on Macs; of course, you can also make changes to your calendar on iPhone, and they’ll move back to your computer so you have consistent calendar information no matter what device you use.
Configuring iPhone’s Date, Time, and Calendar Settings
You should configure a few time and date settings before you start using iPhone to manage your time.
>>>step-by-step
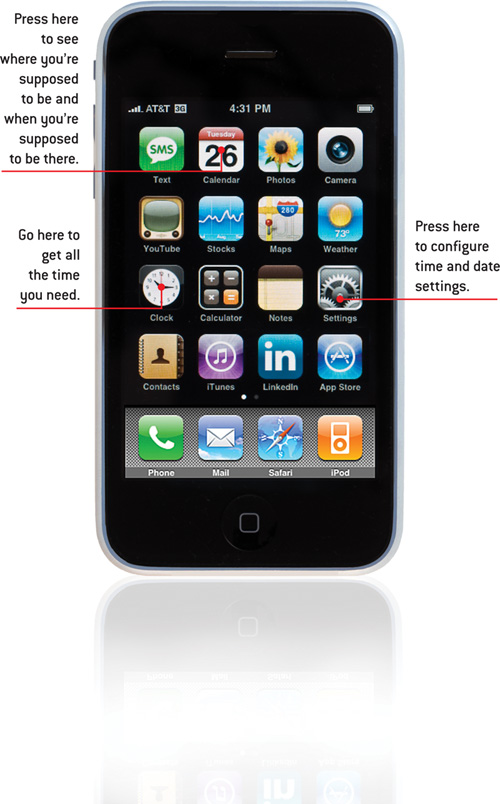
1. On the Home screen, press Settings.
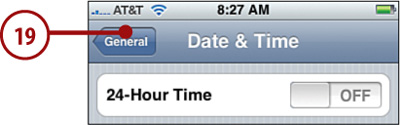
2. Press General.

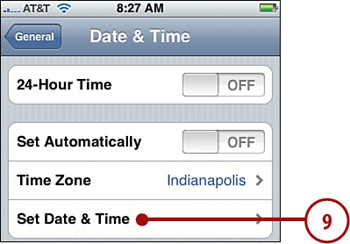
3. Scroll down the screen and press Date & Time. The Date & Time screen appears.

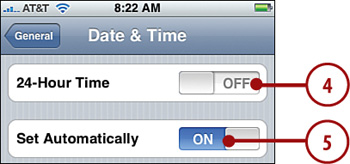
4. To have iPhone display time on a 24-hour clock, press the 24-Hour Time OFF button, which becomes ON to show you that iPhone is now showing time on a 24-hour scale. To have iPhone use a 12-hour clock, press ON to turn off 24-hour time again.
5. If you don’t want iPhone to set its time automatically using its cellular network time (in other words, you want to manage iPhone’s time manually), press ON next to Set Automatically. The status becomes OFF, and two additional options appear; follow steps 6 through 18 to set those options or skip to step 19 if you leave the setting for time to be automatically.
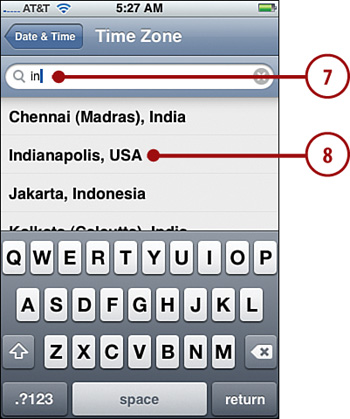
6. Press Time Zone. The Time Zone screen appears.
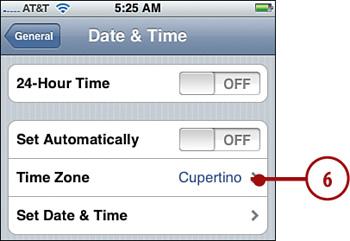
7. Type the name of the city that you want to use to set iPhone’s time zone. As you type, iPhone lists the cities that match your search.
8. When the city you want to use appears on the list, press it. You move back to the Date & Time screen, which shows the city you selected in the Time Zone field.
9. Press Set Date & Time. The Date & Time screen appears.
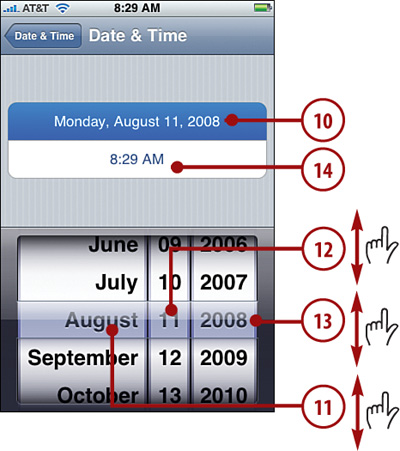
10. Press the date button. The date selection wheel appears.
11. Drag up and down on the month wheel until the center bar shows the month you want to set.
12. Drag up and down on the date wheel until the correct day of the month is shown in the center bar.
13. Scroll and select the year in the same way.
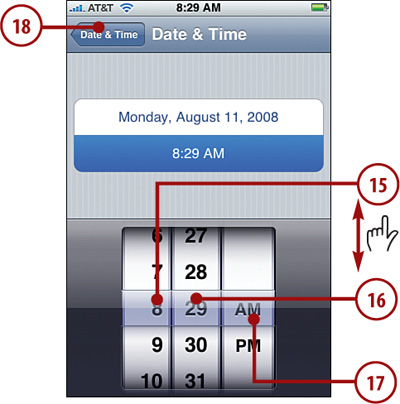
14. Press the time button. The time selection wheel appears.
15. Scroll the hour wheel until the center bar shows the hour you want to set.
16. Use the minutes wheel to select the minutes you want to set, as shown in the center bar.
17. Press AM or PM.
18. Press Date & Time. You move back to the Date & Time screen.
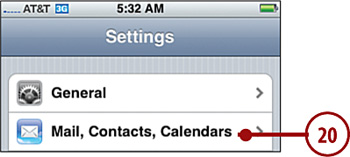
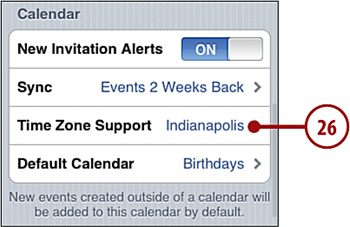
19. Press General.
20. Press Mail, Contacts, Calendars.
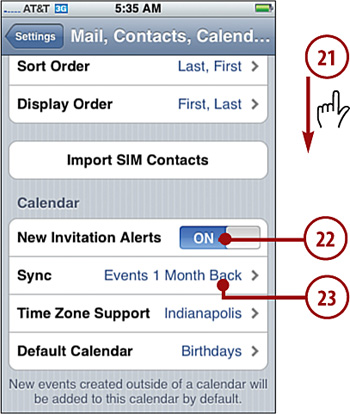
21. Scroll down until you see the Calendar section.
22. If you don’t want to be alerted when you receive invitations to an event, press ON next to New Invitation Events. Its status becomes OFF to show you that you won’t see these alerts. To be alerted again, press OFF so the status becomes ON.
23. To set the period of time over which past events are synced, press Sync. You move to the Sync screen.
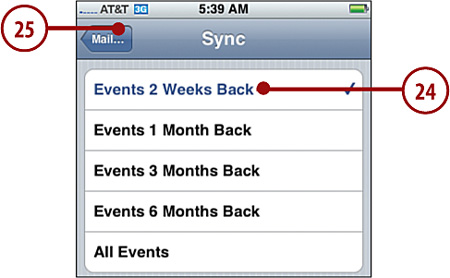
24. Press the amount of time you want events to be synced or press All Events to have all events synced, regardless of their age.
25. Press Mail….
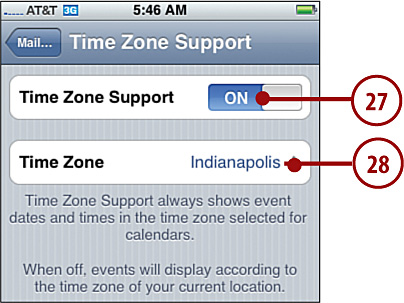
26. Press Time Zone Support.
27. To have iPhone display meeting and event times on its calendar based on your current location, press Time Zone Support ON; it becomes OFF to show you that time zone support is disabled. Skip to step 31.
28. If you leave Time Zone Support ON, press Time Zone. The Time Zone screen appears.
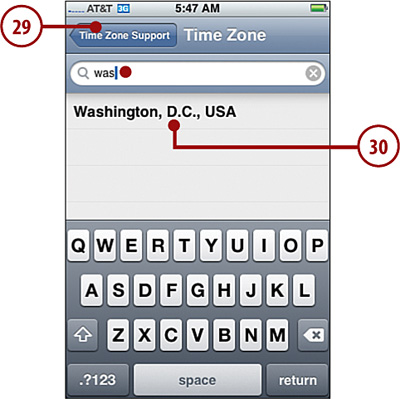
29. Type the name of the city that you want to use to set the time zone. As you type, iPhone lists the cities that match your search.
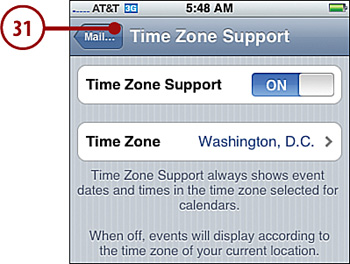
30. When the city you want to use appears on the list, press it. You move back to the Time Zone Support screen and the city you selected is shown.
31. Press Mail….
32. Press Default Calendar.
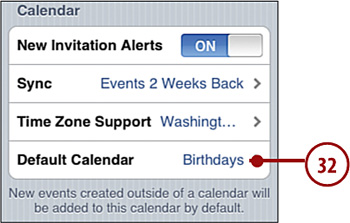
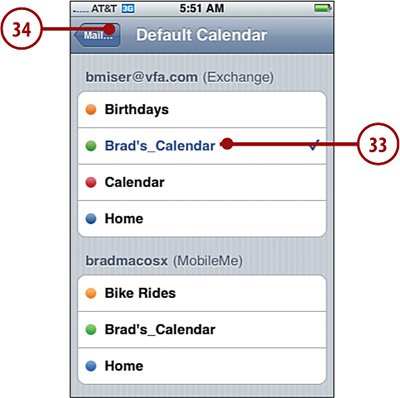
33. Press the calendar that you want to be the default, meaning the one that is selected unless you specifically choose a different one.
34. Press Mail….
35. Press Settings. You move back to the Settings screen and are ready to start using iPhone to manage time and dates.
Using iPhone as a Clock
iPhone is quite a powerful clock. In addition to showing you the time and date where you are currently located (and if you travel a lot as I do, this isn’t always obvious), you can set clocks for a variety of locations and set multiple alarms. With iPhone, you might never need a watch or bedside clock again.
Keeping Up with the Time
In the previous section, you learned how to configure iPhone to set its time automatically or allow you to set the time manually. If iPhone sets the time automatically, the current time and date of your location are always shown. If you set the time manually, iPhone continues to display the time and date based on the settings you configured. Unless you have a very specific reason for not wanting iPhone to keep its time and date set to the current cell network, you should leave the time to be set automatically. You can easily configure clocks to show you the current time in specific locations.
Telling Time with iPhone
iPhone displays the current time at the top of most of its screens for easy viewing.
When iPhone is locked and you press the Sleep/Wake button, iPhone shows the current time and date. If you don’t unlock iPhone, it goes to sleep again in a few seconds, making this a very easy way to check the current time without using much battery power.
Using the Clock Application
You can set iPhone to display a number of clocks with each clock having a specific time zone associated with it. This makes it possible to know the time in several locations at once. Even better, you can configure multiple alarms to remind you of important events, such as getting out of bed. The Clock also provides a basic but very serviceable stopwatch and timer.
>>>step-by-step
Creating, Configuring, and Using Clocks
1. On the Home screen, press Clock. The Clock screen appears.

Like Night and Day
Based on the associated time zone, a clock’s face is black if the current time is between sunset and sunrise (in other words, it’s dark there) or white if the time there is in daylight hours.
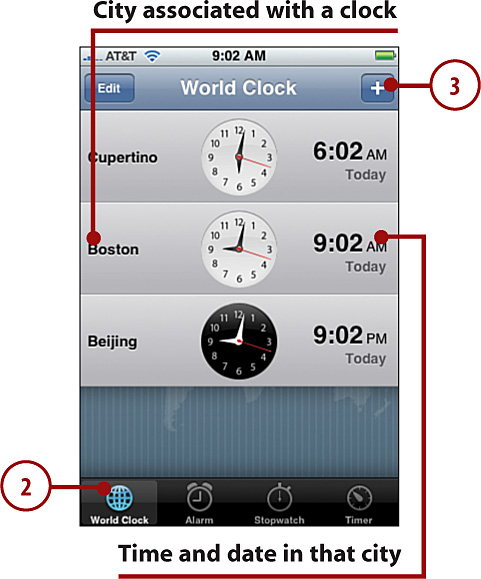
2. Press World Clock. The World Clock screen appears. You see a clock for each location you have configured.
3. To add a clock, press the Add button. The Select City screen appears.
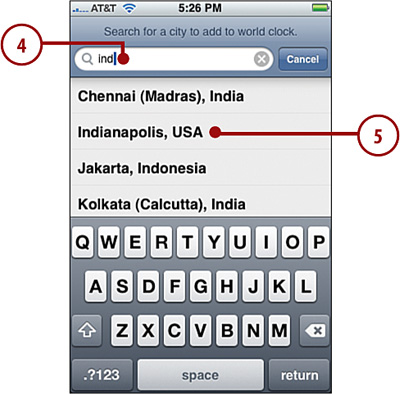
4. Type the name of the city with which the clock is associated; this determines the clock’s time zone. As you type, iPhone tries to match cities to what you are typing and presents a list of matching cities to you.
Missing City
If iPhone can’t find the specific city you want, choose one in the same time zone. The city you select determines the time zone of the clock. However, there is an issue with the clock’s name, which is addressed in the It’s Not All Good. section in this task.
5. Press the city you want to associate with the clock. You return to the World Clock screen, and the clock is created showing the current time in that city.
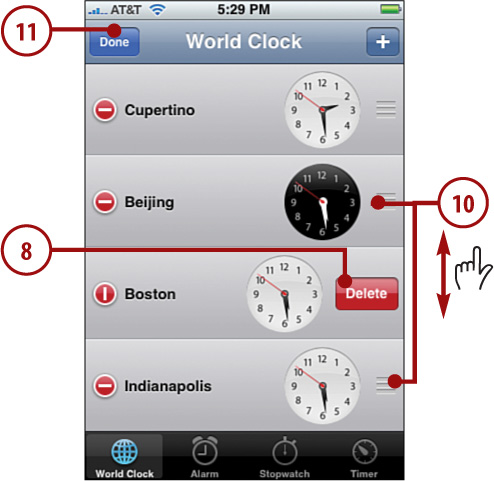
6. To remove a clock or to change the order in which they appear on the screen, press Edit. Unlock buttons appear to the left of each clock.

7. Press the clock’s Unlock button next to the one you want to delete. The Delete button appears.
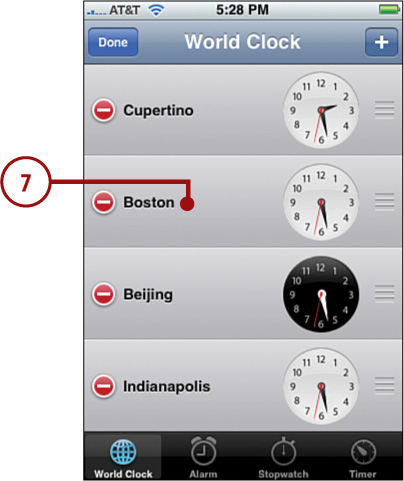
8. Press Delete. The clock is deleted.
9. Repeat steps 7 and 8 until you’ve deleted all the clocks you no longer want to see.
10. Drag clocks up and down the screen by their list icons to re-organize them.
11. Press Done.
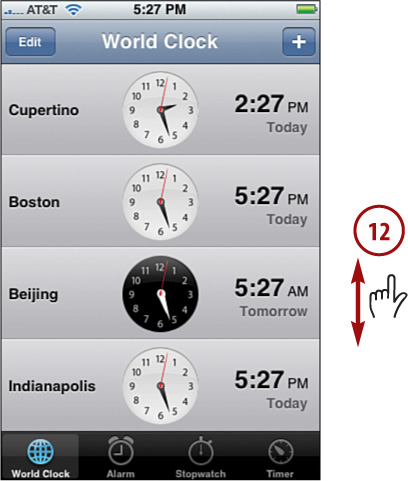
12. To see all your clocks, scroll up and down the screen.
>>>step-by-step
Setting and Using Alarms
1. On the Home screen, press Clock. The Clock screen appears.
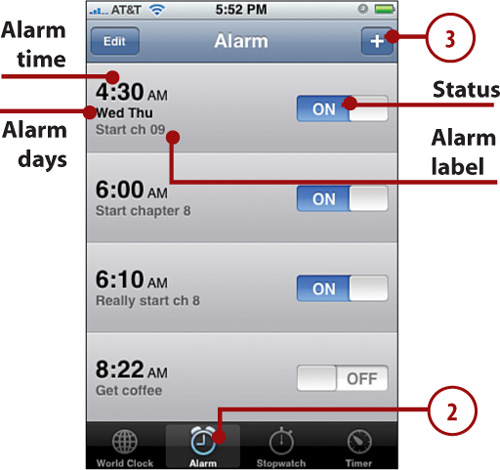
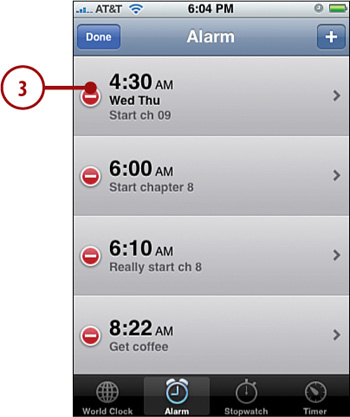
2. Press Alarm. The Alarm screen appears. You see the currently set alarms, listed by their time, with the earlier alarms toward the top of the screen.
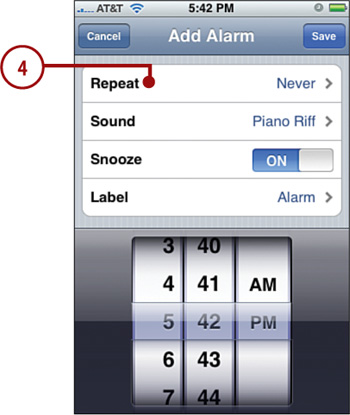
3. To add an alarm, press Add. The Add Alarm screen appears.
4. To configure the alarm to repeat, press Repeat; to set a one-time alarm, skip to step 8. The Repeat screen appears.
5. Press the day of the week on which you want the alarm to repeat. It is marked with a check mark.
6. Repeat step 5 as many times as you need. The most frequently an alarm can repeat is once each day of the week.
7. Press Back. The Repeat option shows you the days you selected for the alarm to repeat.

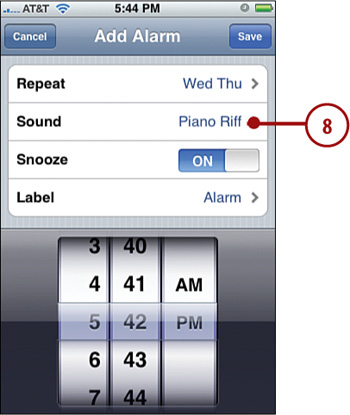
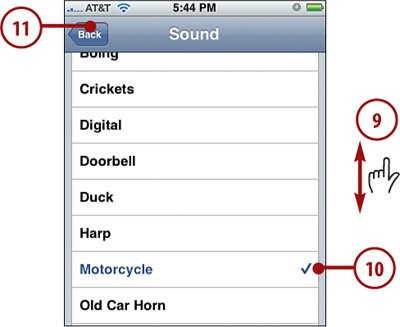
8. To choose the alarm sound, press Sound. The Sound screen appears.
Silent Alarm
If you select the None sound, you won’t hear anything when the alarm goes off, but a visual alarm displays.
9. Browse the list of available sounds.
10. Press the sound you want to use for the alarm. You hear the sound, and it is marked with a check mark.
11. After you have selected the sound you want to use, press Back. You move back to the Add Alarm screen, which shows the sound you selected.
12. To disable the Snooze function, press ON. The status becomes OFF. When an alarm sounds and you dismiss it, it won’t appear again. With Snooze set to ON, you can press Snooze to dismiss the alarm, and it returns at 10-minute increments until you dismiss it.
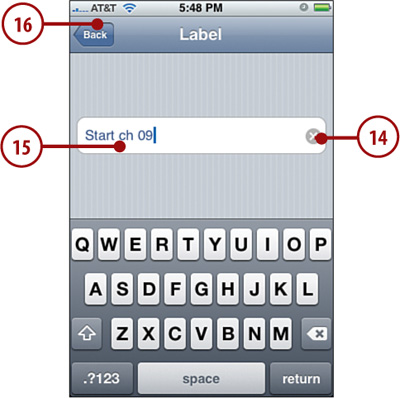
13. To name the alarm, press Label (to leave the default label, which is “Alarm,” skip to step 17). The Label screen appears. The label is what appears on the screen when the alarm activates, so you might want to give it a meaningful label.

14. To remove the current label, press the Clear button.
15. Use the keyboard to create a label for the alarm.
16. Press Back. You return to the Add Alarm screen, which shows the label you created.
Alarming Volume
The ringer volume setting determines an alarm’s volume. As you probably noticed, alarms use the same sounds as the ringer, so this makes sense.
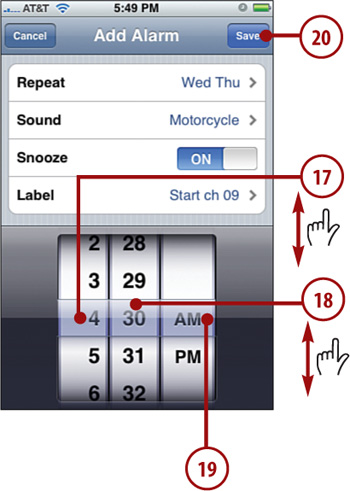
17. Scroll the hour wheel until you see the hour you want to set in the center bar.
18. Scroll the minute wheel until you see the minute you want to set in the center bar.
19. Press AM or PM.
20. Press Save. You return to the Alarm screen, which now shows the new alarm you set. When the appointed time arrives, the alarm sounds and displays on the screen (or just displays on the screen if it is a silent alarm).
How iPhone Alarms Are Like Those on Bedside Clocks
You can’t set an alarm for a specific date; they are set only by day of the week, just like a bedside alarm clock. To set alarm for a specific date, configure an event on the calendar and associate an alarm with that event. You’ll learn about working with calendar events later in this chapter.
Changing Alarms
You can change existing alarms in several ways.
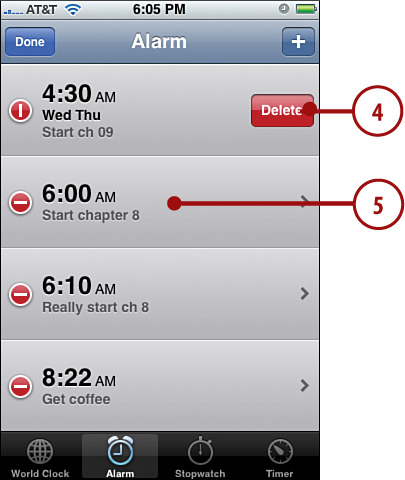
1. Move to the Alarm screen.
2. Press Edit. Unlock buttons appear next to each alarm.

3. To delete an alarm, press its Unlock button. The Delete button appears.
4. Press Delete. The alarm is deleted.
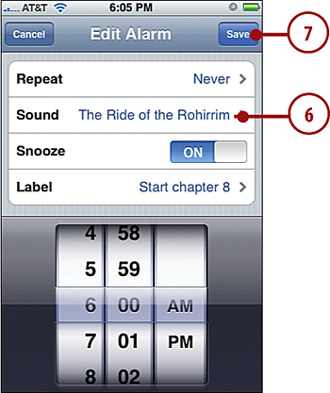
5. To change an alarm, press it. The Edit Alarm screen appears.
6. Use the controls on the Edit Alarm screen to make changes to the alarm. These work just as they do when you create an alarm. (See the previous task, Setting and Using Alarms., for details.)
7. Press Save. The alarm is changed, and you return to the Alarm screen.
8. To disable an alarm, press ON. Its status becomes OFF, and it is no longer active.
9. To enable an alarm, press OFF. Its status becomes ON, and it sounds and appears at the appropriate times.
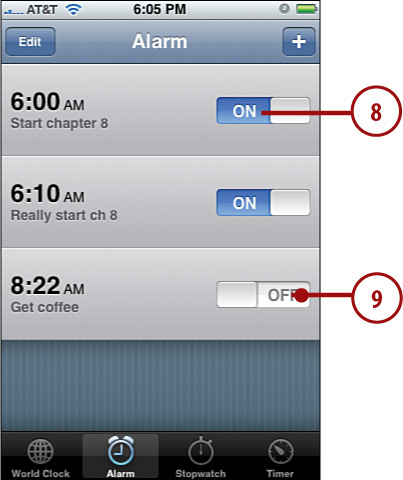
Not Dismissed So Easily
When you dismiss an alarm, it isn’t deleted, but its status is set to OFF. To re-enable the alarm, move to the Alarm screen and press its OFF button. The status becomes ON, and the alarm activates at the next appropriate time.
Managing Alarms
When at least one alarm is active, you see the Alarm Clock icon in the upper right corner of the screen next to the Battery icon. When an alarm triggers, you see an onscreen message and hear the sound associated with it. If the alarm is snooze-enabled, press Snooze to dismiss it; it returns in 10 minutes. To dismiss the alarm, press OK.
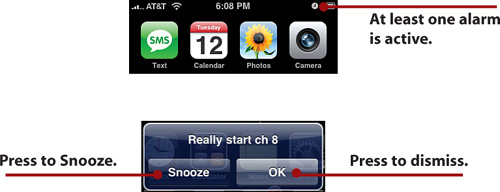
You can also dismiss an alarm by pressing the Sleep/Wake button.
>>>step-by-step
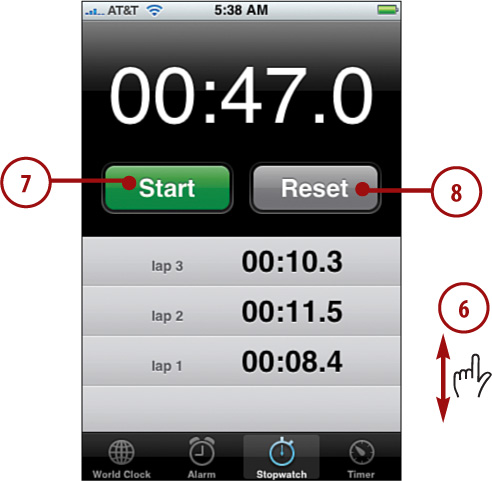
Using iPhone as a Stopwatch
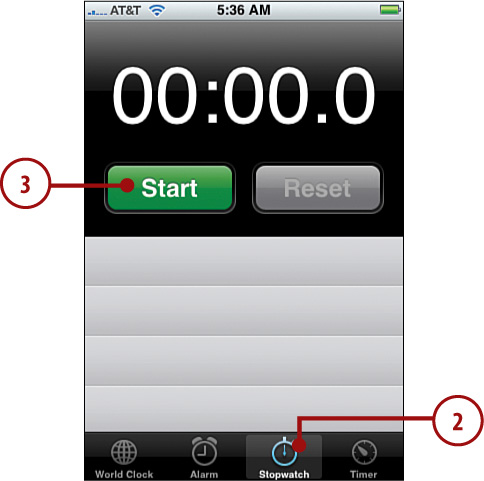
1. On the Home screen, press Clock. The Clock screen appears.
2. Press Stopwatch. The Stopwatch screen appears.
3. Press Start. The stopwatch starts.
4. To set a lap time, press Lap. The lap time appears on the list below the stopwatch.
5. To stop the time, press Stop. The time stops.
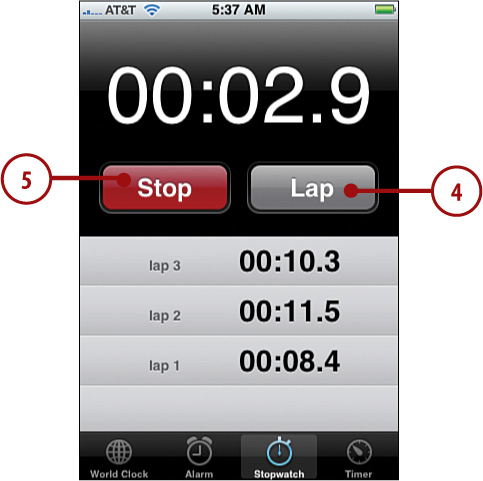
6. Browse the lap times you’ve captured.
7. To restart the stopwatch, press Start.
8. To start a new stopwatch session, press Reset. The current time is set to 00:00.0, and all lap times are removed.
Not Seen but Heard
The alarm, stopwatch, and timer continue to work behind the scenes as you move to other screens. So you don’t need to be viewing the Timer screen to use the timer, as an example. Set the timer and then keep doing whatever you need to be doing. When something happens you need to know about, iPhone lets you know with onscreen messages or sounds.
Using iPhone as a Timer
1. On the Home screen, press Clock. The Clock screen appears.
2. Press Timer. The Timer screen appears.
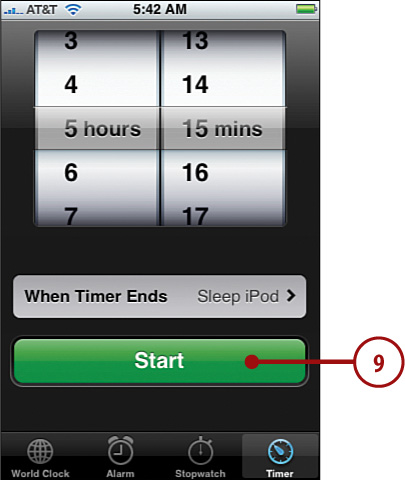
3. Drag the hour wheel up or down until the center bar shows the hour you want to set on the timer; you can select a timer up to 23 hours.
4. Drag the minute wheel up or down until the center bar shows the minute you want to set on the timer.
5. Press When Timer Ends. The When Timer Ends screen appears.
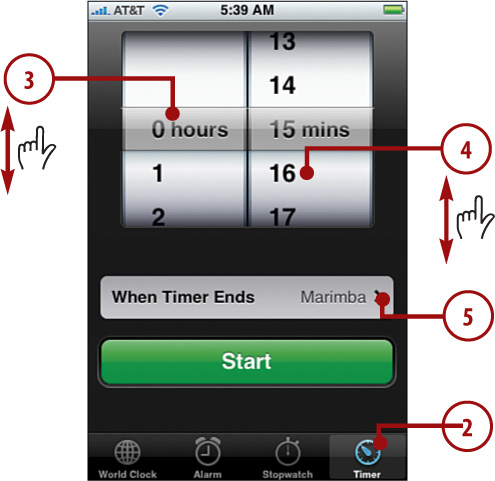
6. Browse the action and sounds available. At the top of the screen, you see the Sleep iPod command which shuts down iPod actions when the timer expires. Under that, you see a collection of your custom ringtones. In the Standard section, you see iPhone’s standard sounds.
7. Press the action or sound you want to associate with the timer. What you select is marked with a check mark. Any sound you select plays.
8. Press Set. You return to the Timer screen, which shows the sound or action you selected.

9. Press Start. The countdown begins. When the countdown ends, an onscreen message appears, and the sound you selected plays or iPod functions go to sleep, if you selected that action.
10. To change the sound or action while the timer is counting down, press When Timer Ends and use steps 6 through 8 to choose a different sound or action.
11. To stop the timer, press Cancel. The timer stops, but your most recent settings remain.
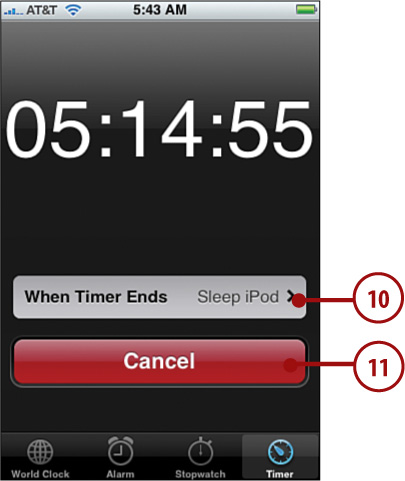

When a timer gets to 0, you see an onscreen message and hear the sound associated with the timer. (If the timer has the Sleep iPod action, you don’t hear or see anything, but any music or video playing stops.)
Sleep iPhone Sleep
If you choose the Sleep iPod action, when the timer ends, any iPod functions pause. This is useful when you want music or video to stop playing after a specific time. This works like a sleep timer on a TV.
Working with Calendars
iPhone can help you manage your calendar. In most cases, you’ll be moving calendar information from a computer onto iPhone, but you can add events directly to iPhone’s calendar. (And when you do, they move to the computer’s calendar the next time it syncs.)
There are a number of ways to sync iPhone’s calendar to calendars on your computers. You can use MobileMe on a Windows PC or on a Mac to move calendar information to the MobileMe cloud from where it can be pushed onto iPhone through your MobileMe account. You can also configure an Exchange email account on iPhone and include calendar information in the sync with that account. Or, you can use the standard iTunes sync process to move calendar information between a Windows PC and iPhone or between a Mac and iPhone. Each of these methods is explained in the following sections.
Go Wireless
Using MobileMe or an Exchange account are the better ways to sync calendar information because you don’t have to connect iPhone to a computer.
If you don’t use Outlook or iCal, you’re out of luck on the calendar syncing front. If you don’t use one of these calendar applications but you can access your calendar on the Web, access it using the Safari web browser instead of iPhone’s Calendar application.
>>>step-by-step
Syncing a Calendar with MobileMe on a Windows PC
Make Me Mobile
To use MobileMe for calendar syncing, you have to obtain a MobileMe account and configure syncing on your Windows PC. See the Prologue for details on MobileMe setup.
1. Open the MobileMe control panel.
2. Click the Sync tab.
3. Check the Calendars check box.
4. Choose Outlook on the Calendars drop-down list.
5. Click OK. The control pane closes and Outlook calendar information is included in the next sync.
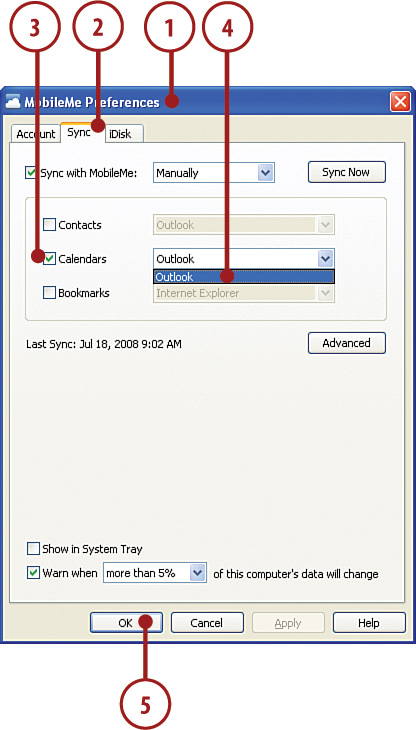
6. Configure iPhone to get calendar information from your MobileMe account (see Syncing iPhone’s Calendar with a MobileMe or Exchange Account. later in this section).
Syncing a Calendar with MobileMe on a Mac
MobileMe
To use MobileMe for calendar syncing, you have to obtain a MobileMe account and configure syncing on your Mac. See the Prologue for details on MobileMe setup.
1. Open the MobileMe pane of the System Preferences application.
2. Click the Sync tab.
3. Check the Calendars check box.
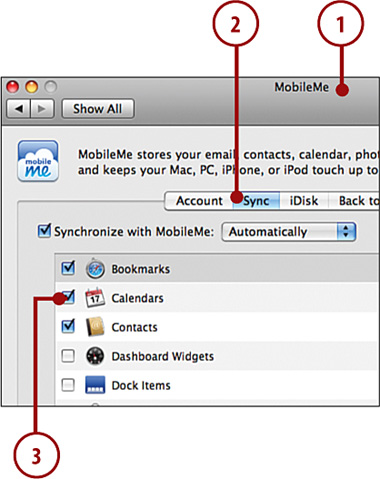
4. Quit the System Preferences application. Calendar information is included in the next sync.
5. Configure iPhone to get calendar information from your MobileMe account (see Syncing iPhone’s Calendar with a MobileMe or Exchange Account. later in this section).
Syncing iPhone’s Calendar with a MobileMe or Exchange Account
1. Configure the MobileMe or Exchange server account on iPhone (see Chapter 5, “Emailing,” for details).
2. Move to the Settings screen.
3. Press Mail, Contacts, Calendars.
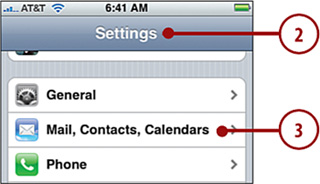
4. Press the account through which you want to get calendar information. You see its configuration screen.
5. Ensure the Calendar status is ON; if not, press OFF so it becomes ON. Your calendars will be moved from the account onto iPhone.
6. Press Mail….
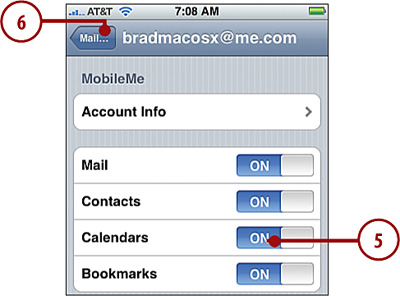
7. Repeat steps 5 through 6 to add calendars for your various accounts.
8. Configure iPhone to get calendar information via push (see Configuring iPhone Push Calendar Syncing. in the next section).
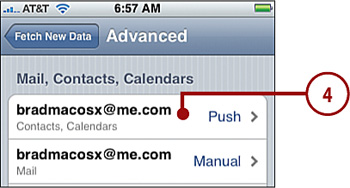
Configuring iPhone Push Calendar Syncing
You can configure your calendar information to be pushed from where it is managed, such as an Exchange server or MobileMe, onto iPhone whenever changes are made so that your calendar information is always current. The downside to this is that push uses more battery power; however, it is unlikely that your calendars change very frequently so having push enabled for calendars doesn’t use as much power as push email does.
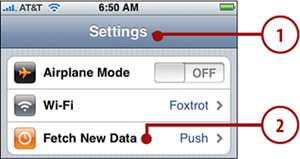
1. Move to the Settings screen.
2. Press Fetch New Data.
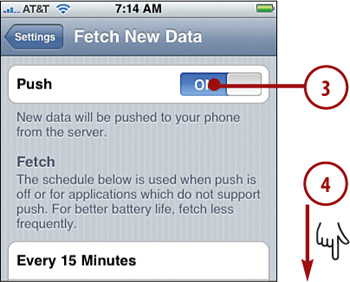
3. If the status of Push isn’t ON, press OFF so it becomes ON.
4. Scroll down until you see the Advanced command.
Saving Power
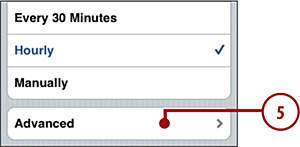
Push syncing causes iPhone to use more power, which means your battery life is shorter. If your calendar or other information doesn’t change that fast, use the Fetch option instead and set a relatively long time between fetches. To do this, move to the Fetch New Data screen and turn Push to OFF. Then press the amount of time between fetches on the list of times, such as Hourly. iPhone will fetch the information only at the appointed times, which saves battery power compared to push. Choose Manually if you want to only fetch information at your command.
5. Press Advanced. You see the Advanced screen that shows the list of all your accounts. Under each account, you see the information that is currently being moved to iPhone. Along the right edge of the table, you see how the information is being moved, either Push or Manual.
6. Press the account you want to configure.
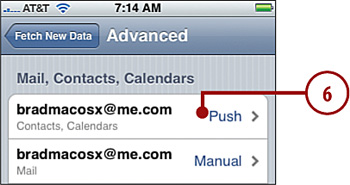
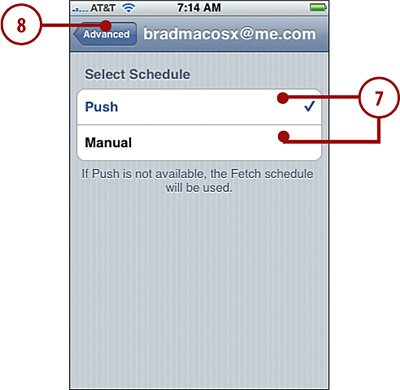
7. Press Push to have the account’s information pushed onto iPhone or Manual to use the Fetch schedule instead.
8. Press Advanced.
9. Repeat steps 6 through 8 for each account.
Multiple Calendar Syncs
Make sure you enable calendar syncing from the same source only once or you’ll end up with the same calendar’s information on iPhone multiple times, which can be confusing. For example, if you use Outlook on a PC and have an Exchange account, you don’t want to sync calendar information both via MobileMe and Exchange because you’ll get the same calendar information twice. Disable Calendar syncing using the MobileMe control panel and only the information you get via Exchange will be moved onto iPhone.
Syncing iPhone’s Calendar with Outlook on Windows PCs
1. Connect iPhone to your computer and open iTunes.
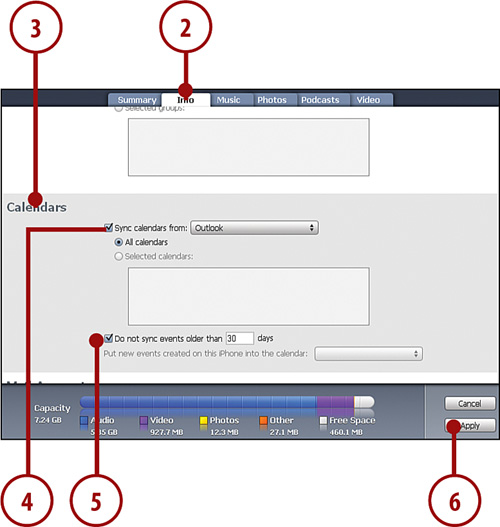
2. Click the Info tab.
3. Scroll until you see the Calendars section.
4. Check Sync calendars from and choose Outlook on the pop-up menu if it isn’t selected by default.
5. If you want to prevent older events from being synced, check the Do not sync events older than check box and enter the number of days in the box. Any events older than the number of days you enter are ignored during syncs.
6. Click Apply. The calendar information you selected is moved onto iPhone. Each time you sync iPhone (if you allow automatic sync, this happens every time you connect iPhone to your computer), iTunes moves changes to your Outlook calendar onto iPhone’s calendar and changes you made on iPhone’s calendar to your Outlook calendar.
Can’t Sync?
If you are syncing calendar information via MobileMe or Exchange, the Calendar section on the Info tab is disabled because you are already syncing this information.
Syncing iPhone’s Calendar with iCal on Macs
1. Connect iPhone to your computer and open iTunes.
2. Click the Info tab.
3. Scroll down until you see the Calendars section.
4. Check Sync iCal calendars.
5. If you want all the calendars you access in iCal to move onto iPhone, click the All calendars radio button and skip to step 8.
6. If you want only selected calendars to move onto iPhone, click the Selected calendars radio button.
7. Check the check box next to each calendar that you want to sync on iPhone.
8. If you want to prevent older events from syncing, check the Do not sync events older than check box and enter the number of days in the box.
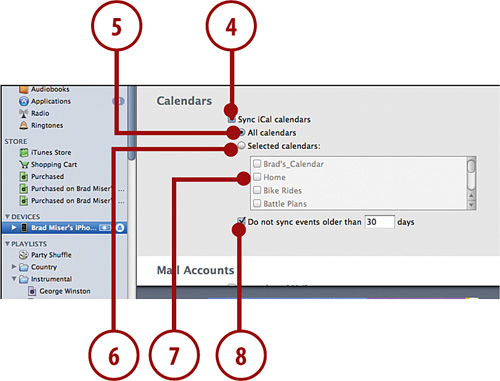
9. Click Apply. The calendar information you selected moves onto iPhone. Each time you sync iPhone, iTunes moves the changes you’ve made to your iCal calendar since the last sync onto iPhone’s calendar, and any changes that you made on iPhone’s calendar move to your iCal calendar.
Using iPhone’s Calendar
iPhone’s Calendar application enables you to view calendar information and add events to or change events on your calendar. When you sync iPhone’s calendar, any changes you make are moved back to the calendar in other locations, such as to the MobileMe cloud, your Outlook calendar, or your iCal calendars.
Viewing Calendars
You use the Calendar application to view time, and you can choose how you view it, such as by month, week, or day.
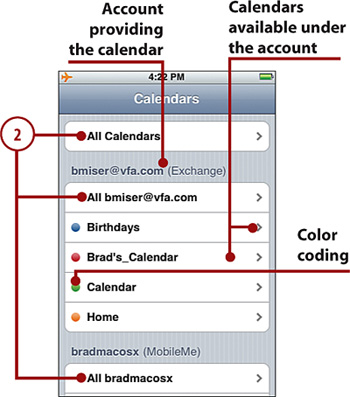
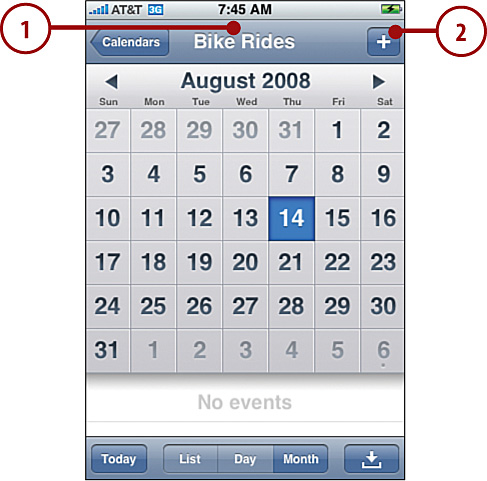
1. On the Home screen, press Calendar. What happens depends on the number of calendars you have on iPhone. If you have only one calendar, you move to that calendar, and you can skip the next step. In most cases, you’ll move to the All Calendars screen, showing all the calendars configured on iPhone. Press Calendars to move to the Calendars screen, on which you see a list of all your calendars, grouped by account.

2. Press the specific calendar you want to view, press the All accountname., where accountname. is the name of the account from which the calendars come, or press All Calendars at the top of the screen to see them all.
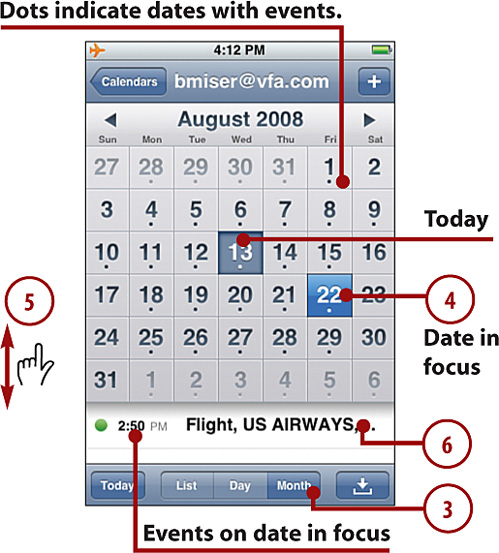
3. Press Month. The Month view appears.
4. Press a date in which you are interested. It becomes highlighted in blue, and the event list shows the events associated with that date.
5. Scroll the list of events.
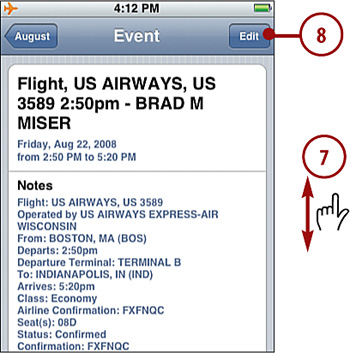
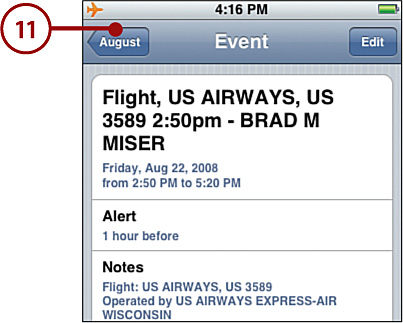
6. To see detailed information for an event, press it. The Event screen appears.
7. Read information about the event; scroll down to see all of it if needed.
8. To change the event, press Edit and follow steps 9 through 11. To delete an event, press Edit and follow steps 12 through 14. The Edit screen appears.
9. Use the tools on this screen to make changes to the event. These work just like when you create a new event. (See Adding Events to the Calendar Manually. for details.)
10. When you finish making changes, press Done. You move back to the Event screen.
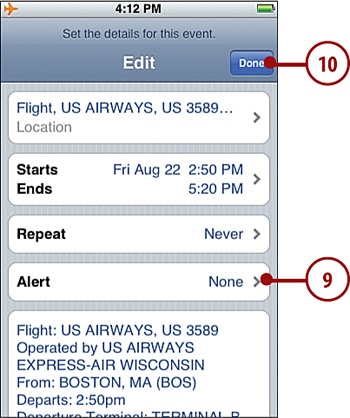
11. Press the Return button, now labeled with the current month. You move back to the Calendar window.
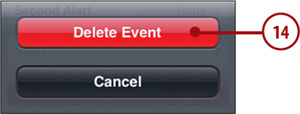
12. To remove an event from the calendar, scroll down until you see the Delete Event button.
13. Press Delete Event. The confirmation box appears.

14. Press Delete Event. The event is removed from the calendar, and you return to the Calendar screen.
15. To move ahead to the next month, press Next.
16. To move back to the previous month, press Back.
17. To move the focus to today, press Today.
18. Press List. The view changes to the List view showing each day in a heading with the events for that day immediately underneath the heading. At the top of the calendar, you see the calendar with which the events are associated.

20. To view or change an event’s details, press it. The Event screen appears; this screen works just as it does when you access it from the Month view. (See steps 7 through 14 for details.)
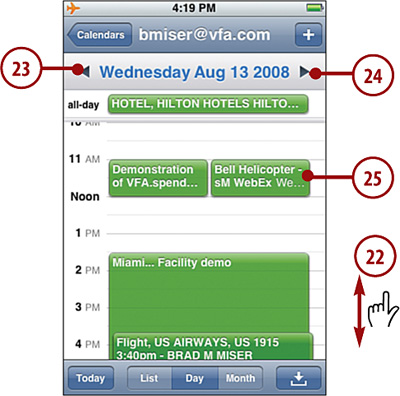
21. Press Day. The Calendar changes to Day view.

22. Scroll up and down to see the entire day.
23. Press Back to move to the previous day.
24. Press Next to move to the next day.
25. To view or change an event’s details, press it. The Event screen appears; this screen works just as it does when you access it from the Month view. (See steps 7 through 14 for details.)
Adding Events to the Calendar Manually
When you are on the move, you can add events to iPhone calendars.
1. View the calendar to which you want to add an event; you can add events to a calendar in any view.
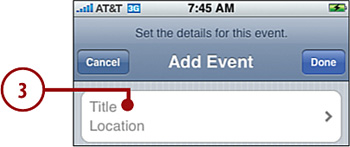
2. Press the Add button. The Add Event screen appears.
3. Press Title Location. The Title & Location screen appears.
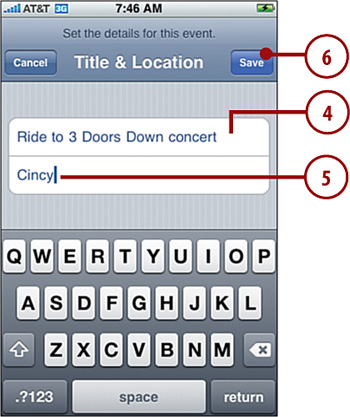
4. With the cursor in the Title bar, type the title of the event.
5. Press the Location bar and type the location of the event.
6. Press Save. You move back to the Add Event screen.
7. Press Starts Ends. The Start & End screen appears.

8. Press Starts. It is highlighted in blue.
9. To make the event an all day event, press All-day OFF; it’s status becomes ON and the date selection wheels appear. Follow steps 10 through 16. To set a time for the event, leave the All-day status as OFF and complete steps 17 through 23.
10. Drag the month wheel until the event’s month is shown in the center bar.
11. Drag the date wheel to set the event’s date.
12. Drag the year wheel to set the year in which the event occurs.
13. Press Ends.
14. Use the month, date, and year wheels to set the end date for the event.
15. Press Save. You return to the Add Event screen and the event’s dates are set.

16. Skip to step 24.
17. Scroll the date wheel until the center bar shows the date of the event.
18. Scroll the hour wheel until the center bar shows the hour of the event.
19. Scroll the minute wheel until the center bar shows the minute of the event.
20. Press AM or PM.
21. Press Ends. It is highlighted in blue.
22. Use the date, hour, and minute wheels and the AM/PM button to set the end time and date.
23. Press Save. You move back to the Add Event screen.

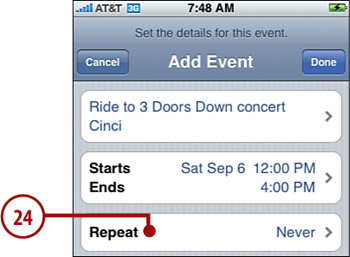
24. To make the event repeat, press Repeat and follow steps 25 through 30. (For a nonrepeating event, skip to step 31.) The Repeat Event screen appears.
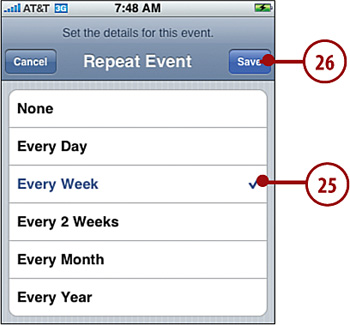
25. Press the period on which you want the event repeated, such as Every Day, Every Week, and so on.
26. Press Save. You move back to the Add Event screen.
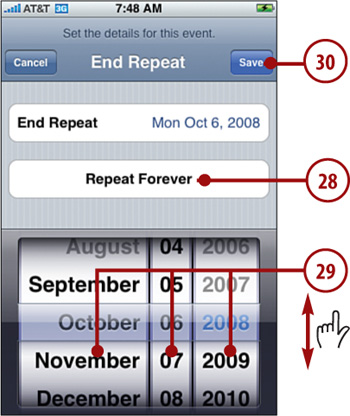
27. Press End Repeat. The End Repeat screen appears.
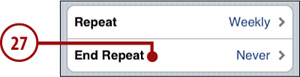
28. To have the event repeat ad infinitum, press Repeat Forever and skip to step 30.
29. To set an end to the repetition, use the month, date, and year wheels.
30. Press Save. You move back to the Add Event screen.
31. To set an alert for the event, press Alert. If you don’t want to set an alert, skip to step 37. The Event Alert screen appears.
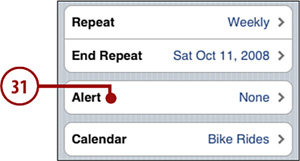
32. Select when you want to see an alert for the event.
33. Press Save. You move back to the Add Event screen.

Alert, Alert!
To hear a sound when an event alert occurs, open the Sounds screen (choose Home, Settings, Sounds), and ensure that ON appears next to Calendar Alerts. If OFF appears, press it to make event alarms audible as well as visual.
34. To set a second alert, press Second Alert. The Event Alert screen appears.
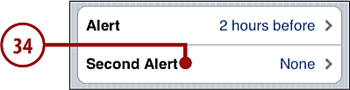
35. Select when you want to see a second alert for the event.
36. Press Save. You move back to the Add Event screen.

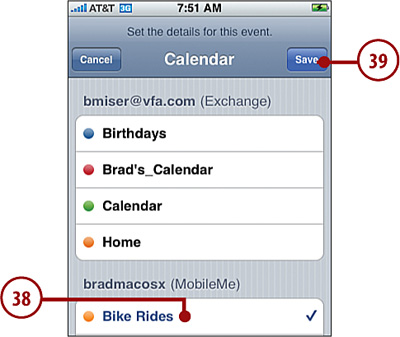
37. To change the calendar with which the event is associated, press Calendar; to leave the current calendar selected, skip to step 40.
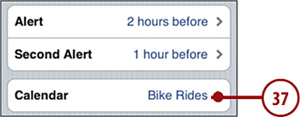
38. Press the calendar with which the event should be associated.
39. Press Save.
Keeping in Sync
When you sync an iPhone, information moves both ways. When you make a change to the calendar from the computer, the changes move to iPhone the next time you sync. Likewise, if you add or change events on iPhone, those changes move to the calendar on the computer during the next sync.
Unfortunately, you can’t choose the alert sound for an event. All event alarms use the standard calendar event alarm sound.
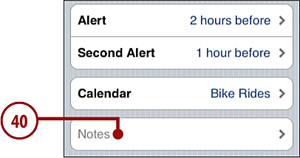
40. Press Notes. The Notes screen appears.
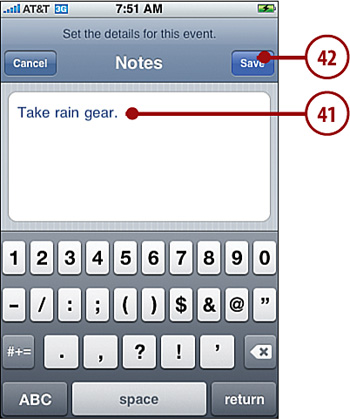
41. Type information you want to associate with the event.
42. Press Save. You return to the Add Event screen.
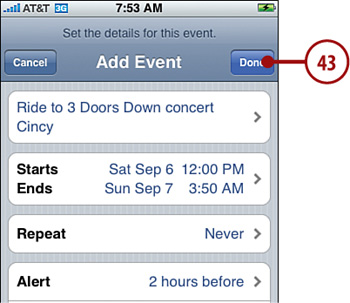
43. Press Done. The event is added to the calendar. Any alarms trigger according to your settings.
>>>step-by-step
Adding Events to the Calendar by Accepting Invitations
When someone invites you to an event, you receive a notification in the Calendar. You can accept invitations at which point the event is added to your calendar. Or, you can decline the event if you don’t want it added to your calendar.
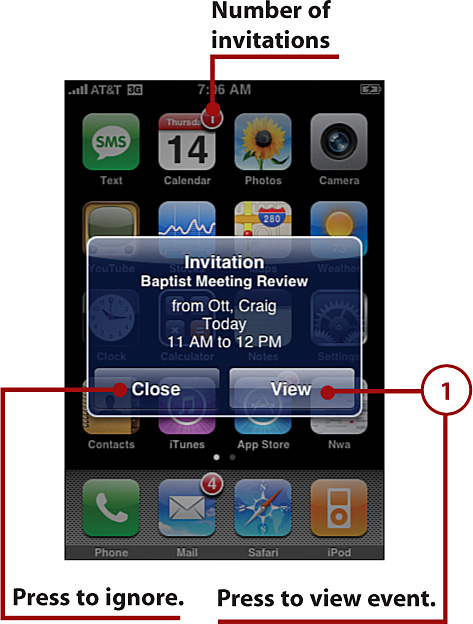
1. When you receive an invitation, you see an alert on the screen; press View to see the details or press Close if you don’t want to work with the event (the rest of these steps assume you press View). You also see an invitation counter over the Calendar icon.
You see the Info screen that shows details for the event.
2. Scroll the event to see all of its details.
3. View details about whom the invitation is from and attendees by pressing their areas. You move to detail screens for each.
4. To configure an alarm for the event, press Alert and use the resulting Alert screen to choose an alert.
5. To choose the calendar on which the event should be shown, press Show in Calendar and on the resulting screen, press the appropriate calendar.
6. To add comments to the event, press Add Comments and use the Comments screen to enter text about the event.
7. Indicate what you want to do with the event by pressing Accept, Maybe, or Decline. If you accept the event or press Maybe, the event is added to the calendar with the status you indicated. If you decline, the event is not placed on a calendar and the recipient receives a notice that you have declined.

After you make a decision, you move to the Invitations screen, where you see the status of all the invitations you’ve received. Events you’ve accepted or declined appear briefly and then disappear as the appropriate action is taken (such as adding an event you’ve accepted to the calendar).
8. Press Done. You move to the calendar.
Managing Invitations
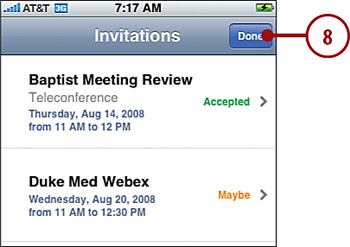
You can use iPhone to view the various invitations with which you’ve worked, such as to see their status.
1. Move into the Calendar.
2. Press Invitations. You move to the Invitations screen where you see all the invitations you’ve received and indicated a Maybe response (invitations you’ve accepted or declined are removed from this list). (Remember that in the current version of iPhone’s software, a Maybe status might indicate that you’ve accepted the meeting in Outlook, so check your calendar before accepting it again).
3. Press an invitation. You see its details.
4. Work with the invitation using the steps in the previous section.
5. Press Done. You return to the calendar.

Working with Event Alarms
When an event’s alarm goes off, you see an onscreen alert and hear the calendar event sound (if it is enabled). Click View Event to view details on the Event screen or click Close to dismiss the alarm.

If the event has a second alarm, it also goes off according to the schedule you set. Handle it the same as the first alarm.