Chapter 3. Work with Server Manager
IN THIS CHAPTER
• Use Initial Configuration Tasks
• Navigate Settings with Server Manager
• Perform Role and Feature Management
• Use the Command-Line Server Manager (ServerManagerCmd.exe)
• Know What R2 Will Bring to Server Manager
Use Initial Configuration Tasks
Solution: The Initial Configuration Tasks Wizard appears immediately after your first login after your installation. This wizard was designed to assist administrators in configuring servers postinstallation. In fact, many of the questions that you might typically answer during a server installation are handled in Windows Server 2008 in this wizard, after the server OS has been installed.
The Initial Configuration Tasks Wizard replaces the Post-Setup Security Updates feature that was introduced in Windows Server 2003, Service Pack 1 and goes beyond security and into the full configuration for a new server.
Note
If you closed the Initial Configuration Tasks Wizard or selected the checkbox Do Not Show This Window at Logon, you can reopen the wizard by typing oobe in the Start menu’s instant search bar.
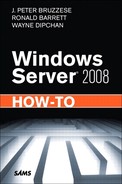
The Initial Configuration Tasks Wizard has three sections, as shown in Figure 3.1:
• Provide Computer Information: In this section, you can set the time zone, configure networking and provide a computer name (the default is a random name you do not want to keep), and join a domain.
• Update This Server: This section is for enabling automatic updates and feedback settings, and for quickly downloading and installing updates.
• Customize This Server: This section allows you to add roles and features, enable Remote Desktop, and configure Windows Firewall.
Figure 3.1 Working with the Initial Configuration Tasks Wizard.
When you close the Initial Configuration Tasks Wizard, Server Manager opens to assist you.
Navigate Settings with Server Manager
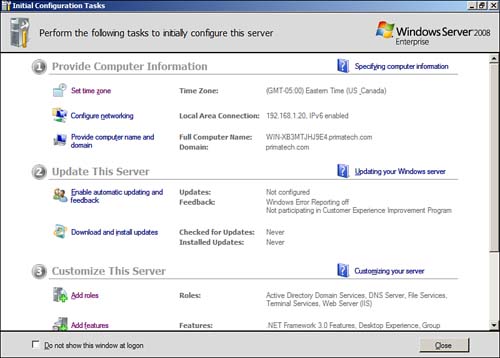
Solution: Server Manager is a single-console replacement for a variety of tools under Windows Server 2003. Within this console, you can view and manage just about every aspect of your server, as shown in Figure 3.2.
Figure 3.2 A look into the one-stop administration of Server Manager.
Through the Server Manager, you can view and make changes to the server roles and features you want to include on your server. You can also perform management operations in regard to those roles or in relation to storage, configuration, and diagnostics (including performance)—all under a single MMC-based interface.
In addition to opening Server Manager after the Initial Configuration Tasks Wizard closes, you see the Server Manager console when you perform any of the following tasks:
• Log in to Windows Server 2008 as an administrator
• Open Server Manager by selecting its icon on the Quick Launch toolbar
• Click Server Manager in Administrative Tools
• Right-click Computer and choose Manage
Once Server Manager is running, you can see the Server Summary section by selecting your server at the top of the hierarchy. Then you see the following sections:
• Computer Information
• Security Information
• Roles Summary
• Features Summary
• Resources and Support
Note
The Server Summary is an excellent place to start if you are working on a server you haven’t configured personally. Typically, consultants move around, and you may at some point be required to perform a task on a server that is unfamiliar to you. The Server Summary should be your first stop.
While the Server Manager is filled with tools that are discussed in detail in different sections of this book, it is Role Management where Server Manager shines. In fact, you might find that this is the reason you return to the Server Manager because you may prefer to use the specific tools for a job. For example, you can use the Server Manager to handle your Active Directory Users and Computers configuration, but as an administrator, you might prefer to simply access that tool under Administrative Tools directly.
Perform Role and Feature Management
Solution: Before performing the steps of role and feature installation, it’s a good idea to get a better grasp of the many different options you actually have at your disposal. Unlike the roles that are allowed through Server Core (which you learned about in Chapter 2, “Configure and Manage Server Core”), there is a great deal more you can do with a fully functional Windows Server 2008 system.
Note
A simple question you might be asking is “What is the difference between a server role and a server feature?” A role, according to Microsoft, “describes the primary function of the server.” So, for example, configuring your server to act as a DNS server involves installing that role. On the other hand, a feature might “provide auxiliary or supporting functions” within a system. An example of a feature is the .NET Framework.
Know Your Server Roles
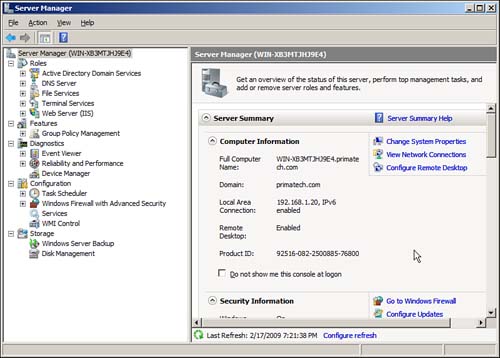
Table 3.1 lists the Server Roles shown in Figure 3.3 (in the Add Roles Wizard) and their descriptions.

Figure 3.3 The Add Roles Wizard.
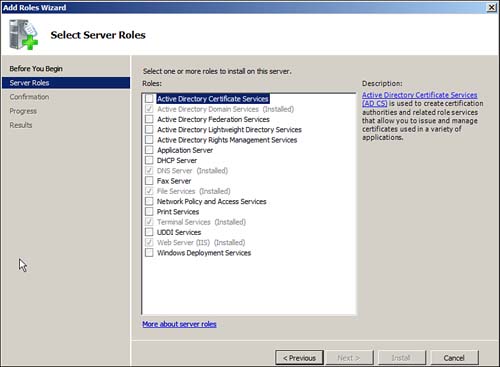
Within a role, role services may be involved as sub-elements. In addition, some roles require that specific features also be installed. For example, the Application Server role notifies you that the .NET Framework 3.0 feature is required in order for the role to function.
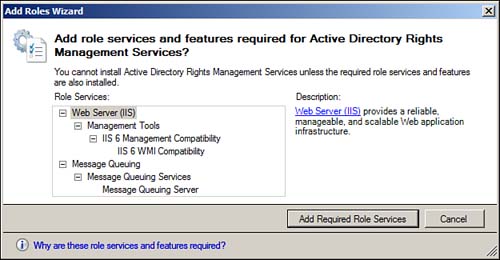
When attempting to install a role that requires additional necessary services and features, you are greeted with the option Add Required Role Services, as shown in Figure 3.4.
Figure 3.4 A request for permission to install necessary services and/or features for a role to function.
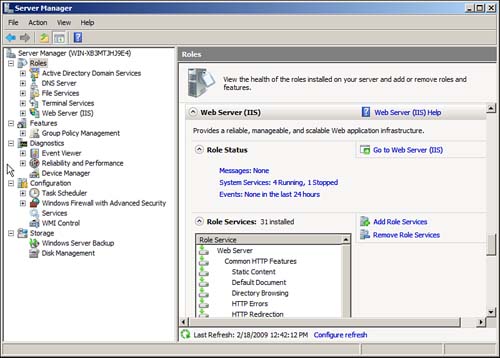
However, the majority of the time, you can install a role with selected services and return later to configure additional ones. Nowhere, perhaps, is this better seen than with regard to your IIS Web Server role. You may choose certain services, such as ASP.NET, HTTP Redirection, and so forth, but you can always return later and add role services. As you can see in Figure 3.5, you can view the health of all roles installed by selecting Roles from the navigation pane and then you can see which services are included within a particular role. You can choose the option Add Role Services or Remove Role Services to make changes to a role (in this case, the Web Server role).
Figure 3.5 A look at services installed from within Server Manager.
Know Your Server Features
As mentioned earlier, server features (shown in Figure 3.6) provide supporting functionality to a role (as in the case of .NET Framework 3.0) or may stand alone (for example, PowerShell). Table 3.2 describes the features you can install on a server.
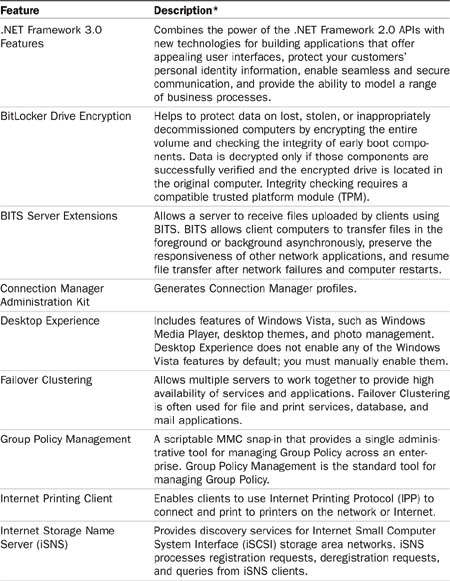
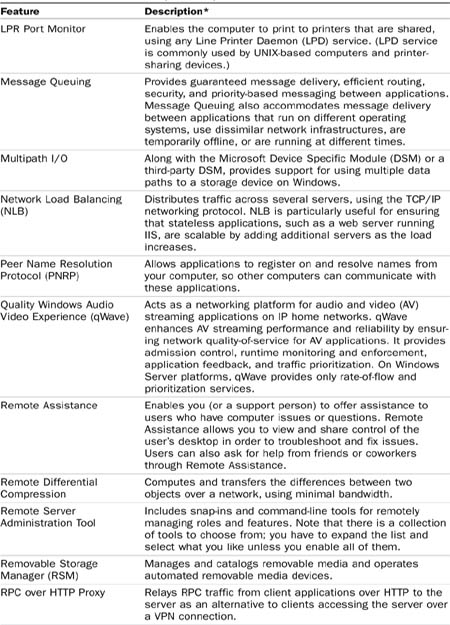

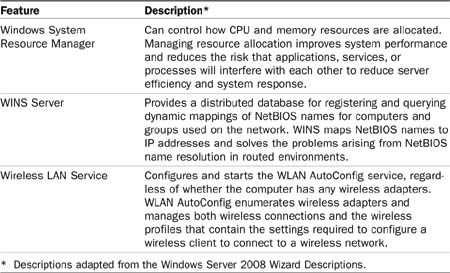
Figure 3.6 The Add Features Wizard.
Install Roles
The process of installing a role or feature varies, depending on exactly what you are installing. In addition, the wizards allow you to select multiple roles/features. The number of variables involved in installing roles is too great to use to provide a step-by-step solution. Therefore, let’s look at installing one role and one feature to show the basic process and provide a basis for other possibilities.
To install roles perform the following:
1. Open Server Manager.
2. Select the Roles link from the navigation pane.
3. Under the Roles Summary portion in the work console, select the link Add Roles.
4. The first time you add a role, you are greeted with a Before You Begin dialog. Select the checkbox Skip This Page by Default now, or you will continue to see this page every time you add a role. Click Next.
5. On the Select Server Roles Page, select one or more roles to install on this server. In this scenario, select Application Server. Click Next.
Note
When you select a role, you may see the pattern on the left change to include the role and role services.
6. On the Application Server page, read the Introduction to Application Server. Note other aspects of the installation of this particular role under the Things to Note section and/or view Additional Information by selecting one of the links provided, as shown in Figure 3.7. Click Next.
Figure 3.7 The Application Server introduction.
7. On the Select Role Services page, choose additional services that relate to the installation of the role. In this case, as you can see in Figure 3.8, there are many services you can add that are not necessarily required. Choose the ones you want and click Next.
Figure 3.8 Selecting role services.

8. On the Confirmation page, review the roles, role services, and/or features you have selected. When you are comfortable moving forward, click Install.
9. Note the Progress of the installation on the Installation Progress. When you see the Installation Results page, click Close.
Remove Roles
To remove a role, follow these steps:
1. Return to Server Manager, select the Roles link from the navigation pane, and then select the Remove Roles link under Roles Summary from the work console. The Remove Roles Wizard begins, with a Before You Begin page.
2. Either read this page or select Skip This Page by Default for future visits to this wizard. Click Next.
3. On the Remove Server Roles page, deselect the roles that are already installed. Click Next.
4. On the Confirm Removal Selections page, make sure this is truly what you want to do and click Remove.
5. Note the progress of the removal, and on the Results page, look for confirmation of the removal of that role. Click Close.
Administer Roles Through Server Manager
The Server Manager may (or may not) be the perfect place to administer your installed role. Some like to use the individual tools from Administrative Tools, whereas others may like a single console for administering all roles at once.
To administer roles through Server Manager, you expand the Roles section in the navigation pane and look for the role you want to manage. From the hierarchy, you can select the expansion link for the role to see the corresponding tools.
Note
When you select a particular role, you see a summary of that role, including events that relate to that role. You might find this more helpful than going to Event Viewer directly because it narrows down the result to match the role you are looking into. You can also quickly see the system services that relate to your role and see if they are running (or you can stop/restart those services) directly from the Roles Summary.
Install Features
To add features to your Windows Server 2008 system, perform the following steps:
1. Open Server Manager.
2. Select the Features link in the navigation pane.
3. Under the Features Summary portion in the work console, click the link Add Features.
4. From the Select Features page, choose any of the many available features. (You might note that some are already installed and perhaps you don’t remember installing them, but remember that certain roles may install features as well.) When you’re done choosing features, click Next.
5. On the Confirm Installation Selections page, confirm your selection and then click Install.
6. Note the progress of your installation. When the Results screen appears, click Close.
Note
To remove a feature, you can select the Remove Features option from the Features Summary and follow the wizard.
Not all features can be managed through the Server Manager console because they do not all come with additional tools for management. For example, PowerShell and the .NET Framework do not have management consoles that you can work within Server Manager.
Use the Command-Line Server Manager (ServerManagerCmd.exe)
Solution: There is quite a bit you can do with the new ServerManagerCmd.exe command, including the following:
• Automatically install or remove roles, role services, and features.
• View logs and run queries regarding roles, role services, and features.
• Run with an XML file to expedite automated installations that are repetitive through the use of an XML answer file.
Note
To learn more about creating an answer file to work with ServerManagerCmd.exe, see http://technet.microsoft.com/en-us/library/cc766357.aspx.
To get started, you need to be a member of the Administrators group on the server and be running a command prompt with elevated privileges. From the command prompt, you can type ServerManagerCmd.exe -help to get started. Note that the response provides syntax and parameter information. For greater detail on the use of ServerManagerCmd.exe, see http://technet.microsoft.com/en-us/library/cc748918.aspx. Let’s look at several examples that make it a bit easier to see how this tool may come in handy.
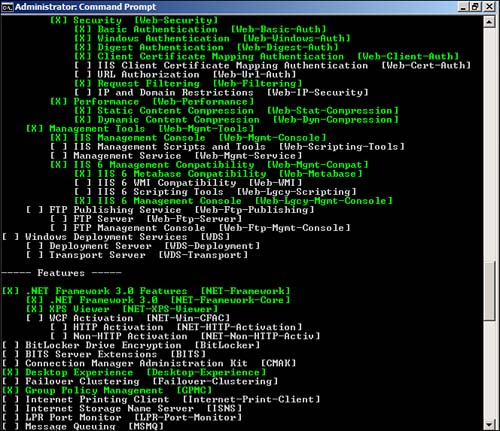
For starters, enter ServerManagerCmd.exe -query to see the various roles and features you have installed as well as roles and features you could install (see Figure 3.9).
Figure 3.9 ServerManagerCmd.exe -query.
Note
If you want to push the result of the query out to an XML file, you can type ServerManagerCmd.exe -query c:.filename.xml
For each role, a role identifier must be used. For example, to install the Print Server role, you use Print-Services as the role identifier. You can install roles by typing the following (making sure to use the correct syntax, as shown in the results from -query):
ServerManagerCmd -install <role identifier>
Note
If you want the system to reboot after the role is installed, you type -restart at the end of the command.
To remove a role, you type the following:
ServerManagerCmd -remove <role identifier>
Remember that features can be installed just as easily as roles, through the use of the ServerManagerCmd command. For example, to quickly install PowerShell from the command prompt, you type the following:
ServerManagerCmd -i PowerShell
Sometimes adding or removing a role will cause other items—role services and/or features—to be added or removed. You might want to see what will be done by the installation and/or removal of a certain role, and this is where the WhatIf command can be helpful. You can type the following:
ServerManagerCmd -install <Role/Feature Name> -whatif
You now see the possible results before you execute the command. (You can include -logpath c:filename.txt at the end of this command to port the response to a .txt file.)
Note
For an overview of Server Manager commands, see http://technet.microsoft.com/en-us/library/cc748918.aspx.
Know What R2 Will Bring to Server Manager
Solution: Learning a new server OS can be somewhat overwhelming at first, and you might not notice deficiencies or areas for improvement. Thankfully, the Microsoft Development Team knows those areas and has certainly made changes for R2 that will make sense once you see them. These changes include the following:
• You will be able to manage remote servers through Server Manager through PowerShell remoting. Server roles and features will be manageable through local and remote PowerShell 2.0 scripts. (Look for more than 240 new cmdlets to work with, too!)
• The Best Practices Analyzer tool will be added to Server Manager. This is a tool that has been quite handy for Exchange, SQL, and other servers for a while now, and we welcome its use in Server 2008.