Chapter 5. Install and Configure Specific Server Roles
IN THIS CHAPTER
• Install and Configure the DNS Server Role
• Install and Configure the DHCP Server Role
• Configure IPv6 in Windows Server 2008
• Install and Configure the File Services Role
• Understand the Improvement Windows Server 2008 R2 Brings to Server Roles
Install and Configure the DNS Server Role
Solution: There are two ways to install the DNS Server role in Windows Server 2008. The first is in the Initial Configuration Tasks window. This screen prompts you to perform several actions after the initial installation of Windows Server 2008, including adding roles and features to your server. Another way is to launch Server Manager (see Chapter 3, “Work with Server Manager”) and choose Add roles.
Note
In this chapter, you will add the DNS Server role using the Initial Configuration Tasks window. In many cases, DNS needs to be installed and configured as an initial task before you add other roles, such as Active Directory Domain Services. You will add additional roles and features in this chapter by using the Server Manager.
To install the DNS Server role, perform the following steps:
1. In the Initial Configuration Tasks window, click Add Roles in the Customize This Server section. When the Add Roles Wizard appears, click Before You Begin, verify the items that appear, and click Next.
2. On the Select Server Roles screen, check the DNS Server role and click Next.
3. On the screen that appears next, which provides an overview of the DNS Server role and information about DNS and Active Directory (Things to Note), as well as links to additional information about DNS in Server 2008, click Next.
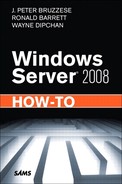
4. The confirmation screen provides an overview of the role(s) to be installed. This screen provides an informational message explaining that the server may need to be restarted after the DNS Server role is installed (see Figure 5.1). Click Install to begin the installation.
Figure 5.1 The confirmation screen for installing the DNS Server role.
5. In the next screen, which informs you that the installation is successful and that DNS can now be configured in the DNS Manager, click Close.
6. Restart the server if you are prompted to complete the installation of the DNS Server role.
You have now installed the DNS Server role. The actual installation is straightforward and quite simple. The installation gives enough information for DNS to be operational. However, you will want to consider how to create and configure zones and look at other configuration tasks for the DNS Server role.
Create and Configure DNS Lookup Zones
The DNS Server role is installed, but there is still work to perform. The installation automatically created the forward lookup zone and the Start of Authority (SOA) for your DNS server. If you need a reverse lookup zone, you need to create one using the Configure a DNS Server Wizard. To round out our discussion, we will look at how to create and configure both forward and reverse lookup zones from start to finish.
You can use the Configure a DNS Server Wizard to work through the process:
1. Select Start, Server Manager or Administrative Tools, DNS Manager.
2. Highlight your DNS server, right-click, and choose Configure a DNS Server.
3. When the Configure a DNS Server Wizard launches, click Next.
4. Choose the lookup zone types for your network: forward lookup (small networks), forward and reverse lookup (large networks), or configure root hints only. In this case, you want to configure forward and reverse lookup zones. Choose the appropriate radio button and click Next.
5. On the next page, click Yes to create a forward lookup zone (recommended). Click No if you do not want to create a forward lookup zone. Click Next.
6. Choose the zone type for this DNS server. These are the options:
• Primary: Creates a copy of the zone that can be updated directly on this server.
• Secondary: Creates a copy of a zone on another server. These zones are used for load balancing and fault tolerance.
• Stub: Creates a copy of only the resource records needed to identify DNS servers for that zone. These servers are not authoritative for that zone.
Select the radio button Store the Zone in Active Directory (which is available to writable domain controllers). You will be setting up a primary zone because this is our first DNS server in our 2008 domain. Click Next.
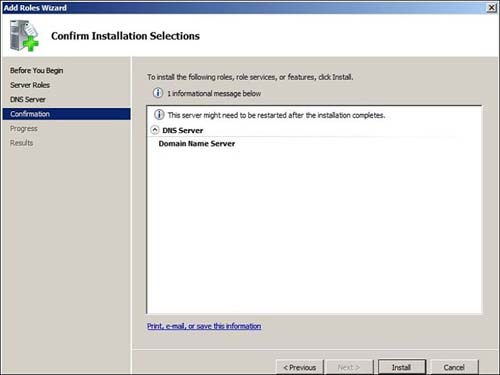
7. Choose the replication scope of the zone data. Figure 5.2 shows the replication options. Choose to replicate to all DNS servers in this domain and click Next.
Figure 5.2 Replication scopes for DNS servers.
8. Choose a zone name. This can be the domain name (for example, rare-tech.com), or perhaps the zone name will reflect a specific area of your domain (for example, research.rare-tech.com) and click Next.
9. When you are asked to choose how the zone handles dynamic updates—the choices are Secure (recommended for Active Directory), both Secure and Non-secure, and Do Not Allow Dynamic Updates—choose Secure and click Next.
10. The wizard now prompts you to set up a reverse lookup zone. You want to create a reverse lookup zone, so choose Yes and click Next.
11. Choose the zone type for reverse lookups: Choose primary and click Next.
12. Choose a replication type for reverse lookups, just as you did for the forward lookups: Choose to replicate all DNS servers in this domain and click Next.
13. Choose whether to use an IPv4 or IPv6 reverse lookup zone. Your choice of IP version will determine this choice. Choose your type and click Next.
14. Choose the network ID (IPv4) or the IP address prefix (IPv6) for the reverse DNS zone. Enter the information for your reverse zone name and click Next.
15. Once again, choose how to handle dynamic updates. Pick your option and click Next.
16. You now have the option to add forwarders for DNS queries. You will not configure this DNS server to forward queries, so choose no and click Next.
Note
Forwarders forward queries that your DNS server cannot resolve. If you do not configure forwarders, the DNS server will simply use the built-in root hints servers to find out how to route the requests.
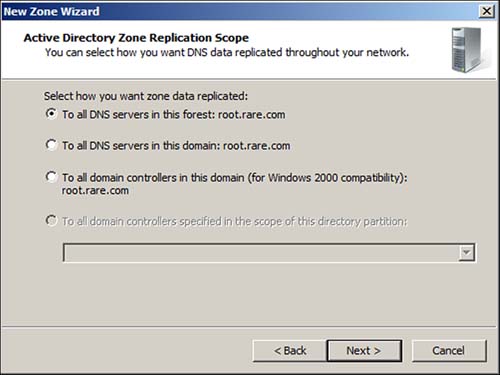
17. Finalize the DNS server role configuration by clicking Finish on the wizard. The zones are now created and ready for use. Figure 5.3 shows the DNS Manager with both IPv4 and IPv6 reverse lookup zones.
Figure 5.3 DNS Manager, showing IPv4 and IPv6 reverse lookup zones.
Now that you have your zones set up, let’s look at some other configuration options that will allow you to optimize and better manage your DNS Server role.
Manage a DNS Server
You now have a fully functioning DNS Server role installed, but you can still do more configuring. Let’s will now take a look at monitoring, logging, management of zone records, and other tasks you can perform.
Begin by opening the DNS Manager and highlighting your DNS server. If you right-click, you can immediately see that there are a number of tasks you can perform at the DNS server level, including the following:
• Configure a DNS Server: You use this to set up lookup zones, dynamic updates, replication, and forwarding.
• Create Default Application Directory Partitions: You use this to create a partition to store and replicate DNS data outside Active Directory.
• New Zone: You use this to create additional forward or reverse lookup zones.
• Set Aging/Scavenging for All Zones: You use this to set a schedule (hours or days) to search for and delete stale records in the DNS database.
• Scavenge Stale Resource Records: You use this to delete stale records in the DNS database immediately.
• Update Server Data Files: You use this to update all data files in a zone for which the DNS server is the primary.
• Clear Cache: You use this to clear out records of resolved queries.
• Launch nslookup: You use this to launch the command-prompt tool for performing DNS troubleshooting and testing.
• All Tasks: You use this to stop, start, pause, and restart.
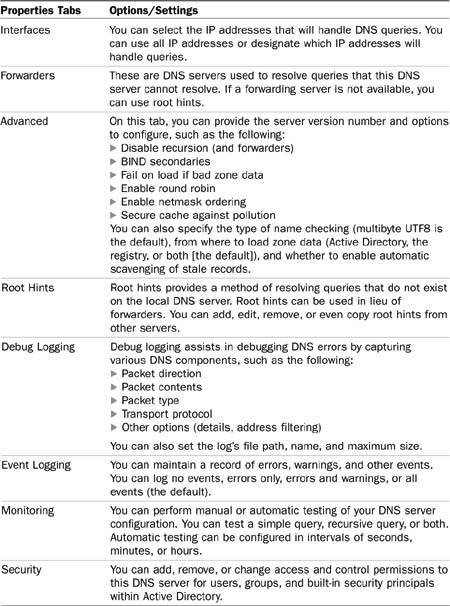
• Properties: You can use these eight tabs for configuring and managing your DNS server. Table 5.1 shows the tabs and the options that can be configured.
Table 5.1 DNS Server Properties
Manage a DNS Zone
As you have seen so far, there are many parts involved in configuring and managing a DNS server. In fact, although the initial installation of the DNS Server role provides a functioning DNS server, it is hardly complete, and there are many ways to customize the DNS server for a particular environment.
It is at the zone level that you perform most of the management of DNS for your network. This is where you add and delete records, establish zone transfers, and establish a WINS server (if needed).
Let’s begin by looking at the properties page for your DNS zones. To view it, right-click the server name in the DNS Manager. If you are using Server Manager, highlight the server and choose Properties from the Action menu to the right.
Note
In the initial zone setup, you made many of these choices. Here you can manage and change the choices you initially made while creating the zone. You will also see many configuration settings that are similar to those of the DNS server. These setting, of course, reflect changes at only the zone level.
Forward and reverse lookup zones have many of the same properties to manage. Therefore, we will look at them from a forward lookup zone viewpoint and make reference to any dissimilarity between the two zones.
The properties page contains six tabs to manage DNS zones. They are the following:
• General: Here you can pause/restart, change the zone type (and Active Directory integration), change replication type, choose how to handle dynamic updates, and set aging/scavenging for this zone.
• Start of Authority (SOA): You use this tab to set the SOA for the zone. On this tab you specify the primary server, the zone administrator’s e-mail address, refresh/retry/expiration intervals, and TTL settings.
• Name Servers: You use this tab to manage authoritative name servers for this zone.
• WINS: Here you can create a WINS lookup database for use with legacy clients or applications that rely on WINS for name resolution. For reverse lookup zones, we configure WINS-R.
• Zone Transfers: On this tab you enable zone data replication to specified servers.
• Security: You can add, remove, or change access and control permissions to this DNS server for users, groups, and built-in security principals within Active Directory.
Right-clicking the server name (or choosing the Action menu) in a zone reveals several other management functions:
• Update Server Data File: Sends a command to update the zone file.
• Reload: Sends a command to reload this zone.
• New Host (A or AAAA): Creates a new resource record for a host.
• New Alias (CNAME): Creates a new alias resource record.
• New Mail Exchanger (MX): Creates a new mail exchange record.
• New Domain: Creates a new DNS domain under the current domain.
• New Delegation: Creates a new delegated domain.
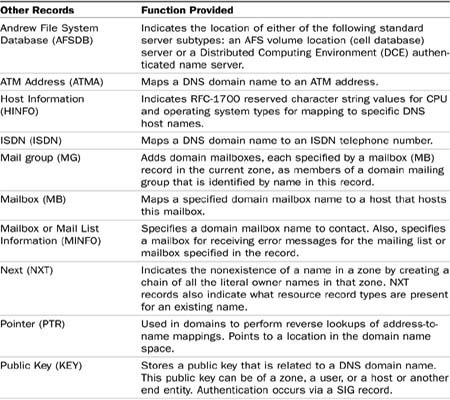
• Other New Records: Creates other records. See Table 5.2 for a list of other DNS records that can be created.
Table 5.2 Other DNS Record Types
Many of the other record types listing in Table 5.2 are unique to Windows Server 2008. So, as you have seen, you need to do more than just click Next to create a complete installed, configured, and managed DNS server.
Note
We looked at how to install and configure DNS as an individual role. If you were installing Active Directory Domain Services on this server, installing this role would automatically launch the installation of the DNS Server role.
Now that the DNS role is set up and configured, you can begin installing other roles, such as Active Directory Domain Services or DHCP, for your server. In fact, let’s look now at installing and configuring the DHCP Server role in Windows Server 2008.
Install and Configure the DHCP Server Role
Solution: With technology budgets shrinking and more demand being put on IT staff to provide business solutions, there is a need to automate normal IT functions and make management easier. One of the often-overlooked but perhaps most efficient time-saving tool is the DHCP Server role. As with the DNS Server role, this role is not automatically installed and needs to be added to your Windows Server 2008 server in order to lease IP addresses to workstations. Let’s look at installing the DHCP Server role and take a look at how to configure it on a network.
To install the DHCP Server role, perform the following steps:
1. Launch the Server Manager, scroll down to the roles summary, and click Add roles.
2. After the Add Roles Wizard launches, choose the DHCP Server role from the selections. You will notice immediately that the wizard populates with seven options on the left side of the screen:
• Network Connection Bindings
• IPv4 DNS Settings
• IPv4 WINS Settings
• DHCP Scopes
• DHCPv6 Stateless Mode
• IPv6 DNS Settings
• DHCP Server Authorization
Click Next to begin the installation of DHCP.
3. On the next screen, which provides an overview of the DHCP Server role, information about DHCP and IP addressing (Things to Note), and links to additional information about DHCP in Windows Server 2008, click Next.
4. Check the bindings of DHCP to ensure that you have a static IP address for the server. Here you have the option of allowing different network cards to service DHCP clients on separate subnets. Check the IP addresses and type (IPv4 or IPv6) and recheck the details to ensure that you are binding the correct IP address to the correct adapter. Click Next.
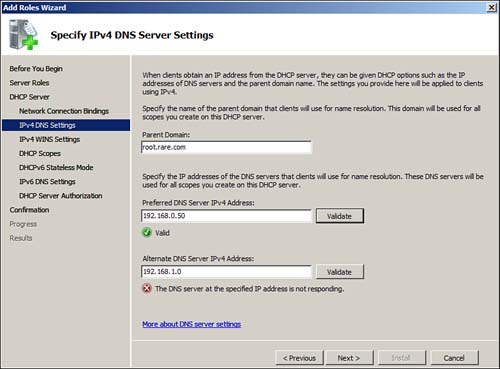
5. Set the parent domain as well as the preferred and alternate DNS servers. Also validate that the preferred and alternate DNS servers are correct and online. Figure 5.4 shows a valid preferred DNS server and an invalid alternate DNS server. Click Next.
Figure 5.4 The Add Roles Wizard showings the IPv4 DNS server settings.
6. Choose whether to use WINS on the network and insert your preferred and alternate WINS server IP addresses. Most newer clients and applications do not require WINS, so accept the default, WINS Is Not Required and click Next.
7. Choose the DHCP scope(s). Click Add and then provide the following:
• Scope name (for example, rare-tech)
• Starting IP address
• Ending IP address
• Subnet mask
• Default gateway
• Subnet type: Wired (with a lease duration of 6 days) or Wireless (with a lease duration of 8 hours)
Check the box to activate the scope (unchecking would not activate the scope) and click OK. Finally, add additional scopes, if needed, and click Next.
8. Set the option to enable or disable the IPv6 stateless mode for the DHCP server. Either DHCPv6 can assign IPv6 addresses or the clients can be configured automatically. When you’re done making your selection, click Next.
Note
When choosing how to handle address leases with DHCPv6, keep in mind that whichever method you choose (stateful or stateless), if the router you are using supports IPv6, the settings in the router must match the settings in the DHCP server.
9. As with IPv4, set the parent domain as well as the preferred and alternate DNS servers. Then validate the DNS servers and click Next.
10. Choose the credentials that will be used to authorize with Active Directory Domain Services (AD DS): You can use the current credentials, choose alternate credentials, or choose to skip authorization with AD DS. Click Next.
11. When you see the confirmation page to review all your DHCP selections before installing the DHCP Server role, if everything matches with your specifications, click Install.
12. Finally, when you see that the installation is successful and that DHCP can now be configured in the DHCP Manager, click Close.
With the DHCP Server role installed, you are now ready to lease IP addresses to clients connected to your Windows Server 2008 server.
Configure Additional Settings in DHCP
Although the DHCP Server role is functional when installation is complete, there are still some configurations to make to the DHCP server. In fact, in some cases (perhaps when decommissioning an old DHCP server), you might not have activated a new DHCP server you installed on your server. So let’s examine how to activate and finish the configuration of DHCP in Windows Server 2008. To configure the DHCP Server role, perform the following steps:
1. Select Start, Server Manager or Administrative Tools, DHCP Manager.
2. Highlight the DHCP server and select the Actions menu. Here you can configure some key items, including the following:
• Add/Remove Bindings: This is useful if network cards were added, removed, or configured after the initial installation.
• Unauthorize: You can remove the authorization of the DHCP server in this directory.
• Backup: You can back up the configuration and the database.
• Restore: You can restore the configuration and the database.
• All Tasks: You can start, stop, pause, resume, or restart the DHCP Server role service.
• Properties: You can view or change the location of the DHCP database and backup files.
We’ll now move on to configuring the settings for IPv4 and IPv6. Because many of the options are the same, and IPv4 is still the dominant protocol, we will look at the settings from an IPv4 perspective. Throughout the section, we highlight where the differences exist, using notes titled “For IPv6.”
Configure IPv4 and IPv6 Settings
This section looks at the options you can configure for IPv4 in the DHCP Server role. Because these settings are unique to each network, this section serves as an overview of available options. To begin configuring IPv4, in the DHCP Manager, expand the DHCP server and highlight IPv4. Next click the Actions menu, and you see several options for configuring and managing IPv4:
• Display Statistics: Shows DHCP server statistics, including uptime, requests, declines, total scopes, total addresses, and percentages of addresses in use and available.
• New Scope: Sets up a scope for delivering IP addresses to clients.
• New SuperScope: Allows you to group several divergent scopes under a logical name.
• New Multicast Scope: Allows the sending of messages to select clients connected to the network without adding overhead and without disturbing clients that are not listening.
• Define User Classes: Adds a class for clients that need similar DHCP options.
• Define Vendor Classes: Adds a class for clients that have a specific vendor type (for example, Windows 98, Windows 2000).
• Reconcile All Scopes: Compares scope information with the registry. In addition, corrects and repairs any inconsistencies found within the scopes examined.
• Set Predefined Options: Verifies and sets options for IPv4 in the DHCP server, such as the router, time server, log server, IP layer forwarding, and so on.
• Properties: Specifies properties, in four tabs:
• General: In this tab you can configure when the statistics are updated, in hours and minutes, enable DHCP audit logging, and show the BOOTP table folder.
• DNS: Here you can enable DNS dynamic updates (always or only if requested), discard A and PTR records when a lease is deleted, and enable dynamic updates for legacy (Windows NT 4.0) clients.
• Network Access Protection: In this tab you can enable or disable NAP. You can also set the behavior of the DHCP server when NPS is unavailable.
• Advanced: On this tab you can configure the number of times DHCP should attempt conflict detection before leasing an IP address. You can also verify and change the audit log file path for DHCP. Again, you can change the connection bindings for network cards. Finally, you can configure the credentials for dynamic DNS updates to the DHCP server.
Note
For IPv6: In the IPv6 properties page, there is not a Network Access Protection tab because security is built in to the protocol. On the Advanced tab, there are no conflict detection settings because IPv6 by design does not experience conflict errors.
Configuring Scope Options
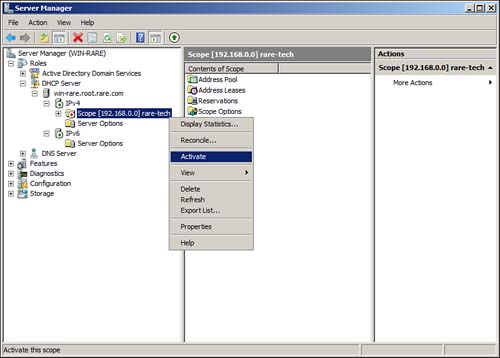
After you have created scopes (superscopes or multiscopes), you still have some options you can configure in the DHCP Manager. Some options available are similar to the server-level configurations. At the scope level, you can view the statistics, reconcile the scope, and set properties. You can also activate or deactivate scopes. If you did not activate the scope during installation of the DHCP Server role, you should activate the scope here. Figure 5.5 shows a scope activation.
Figure 5.5 Activating the IPv4 scope in the DHCP manager.
The properties page is again broken down into four tabs:
• General: In this tab you can set the scope name, starting and ending IP addresses, lease duration, and whether the lease is limited (days, hours, minutes) or unlimited.
• DNS: In this tab you can enable DNS dynamic updates (always or only if requested), discard A and PTR records when a lease is deleted, and enable dynamic updates for legacy (Windows NT 4.0) clients.
• Network Access Protection: This tab allows you to enable or disable NAP and choose to use a default or custom profile.
• Advanced: This tab lets you configure options for leasing to DHCP, BOOTP clients, or both. You can also set the lease duration for BOOTP clients.
Note
For IPv6: At the scope level, there are a few differences on the properties page. On the DNS tab, there is no support for dynamic updates for legacy clients. Again, there is no Network Access Protection tab. The Advanced tab is replaced with the Lease tab, where you can configure settings for temporary and non-temporary addresses. In addition, you can configure both the preferred and valid lifetimes in days, hours, and minutes.
Besides the scope options, you can configure and manage the following options:
• Address Pool: You can add exclusion ranges for IP addresses.
• Address Leases: You can view active leases, the expiration date, and the status of NAP.
• Reservations: You can add reservations to clients that you want to ensure have the same IP address when DHCP renews its lease with the client machine.
• Scope or Server Options: You can assign options that apply to all scopes (server options) or clients within a scope (scope options). Some assigned options are DNS servers, routers, time servers, mail servers, and so on.
Configure IPv6 in Windows Server 2008
Solution: While IPv4 is still a widely used standard and most of our examples focus primarily on IPv4, in installing and configuring server roles, we do give attention to the IPv6 standard. Therefore, it is beneficial to be aware of what IPv6 is and how it will affect you today and going forward in the network.
IPv6 was introduced as a means of addressing the shortcomings of its predecessor, IPv4. The following are some of the advantages of IPv6:
• Larger address space: IPv6 uses a 128-bit address space (3.4 × 1038 available address combinations), making it expandable to virtually indefinite levels. This large address space also allows you to arrange address spaces into multilevel subnets.
• Security: The absence of NAT means IPv6 can implement end-to-end IPSec. IPSec support is not optional (as it is in IPv4); it is required, greatly improving security.
• Better efficiency: IPv6 involves reduced header information and better support for QOS. In addition, fragmentation is handled by the sending host.
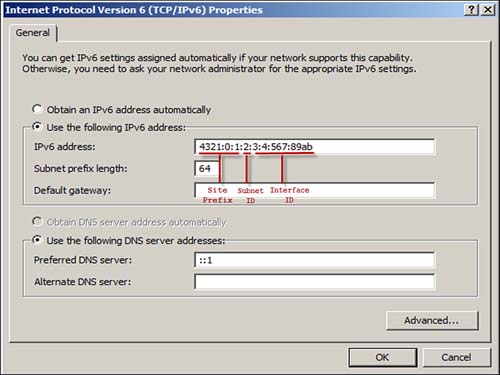
Of course, the enhancements come with some changes. IPv6 addresses use 16-bit blocks that are represented by four-digit hexadecimal numbers. An IPv6 address is broken down into three parts: the site prefix (48 bits), the subnet ID (16 bits), and the interface ID (64 bits). Figure 5.6 shows an example of an IPv6 address.
Figure 5.6 An IPv6 address, showing the site prefix, subnet ID, and interface ID.
This is a big change from the four-digit integers of IPv4, but it is not the only change. The structure of classes, public/private networks, stateful and stateless addressing, and header information have also changed.
IPv6 categorizes addresses by type and scope. IPv6 uses the following three address types:
• Unicast: A packet is delivered to a single interface.
• Multicast: A packet is delivered to multiple interfaces. Broadcasts are not used and have been replaced with multicast.
• Anycast: A packet is delivered to the nearest multiple interfaces.
IPv6 categorizes addresses by the following scopes:
• Global: This scope begins with a prefix of 2 or 3 (for example, 3FFE) that can be used over the Internet. It is assigned by an ISP or the registry.
• Unique local: This scope begins with a prefix of FC or FD (for example, FD00) and is used in internal (private) networks.
• Link local: This scope begins with the prefix FE80, is automatically assigned by the OS, is usable only within a subnet, and is not routable.
In addition to these three scopes, scopes exist for special addresses such as loopback addresses. One notable scope is the 6to4 address scope, which uses the 2002 prefix. This scope is designated for converting IPv4 addresses to IPv6 addresses.
Other features are neighbor discovery, which allows a client to announce its existence to its neighbor in a subnet. Stateless address configuration allows a client to automatically configure itself with an IP address (link-local), using prefix discovery from the router. IPv6 can easily be extended for new functions.
In Windows Server 2008, you can use either IPv4 or IPv6. The advantages of IPv6 make it a highly attractive option. However, the lack of adoption, the learning curve involved, and the fact that you can still use IPv4 make many administrators consider IPv6 more of future consideration. Going forward from Windows Server 2008, IPv6 will become more the standard rather than an option, as it is now. The need to address the lack of available IP addresses for the Internet makes it important to understand how to implement this new standard.
Make Progress with IPv6
The discussion of IPv6 in this chapter is by no means exhaustive. The topic is deep enough to fill a book on its own. In fact, several books have been written and would be beneficial to anyone needing to understand and implement IPv6. These are two great titles to check out:
• TCP/IP Unleashed, 3rd edition, by Karanjit S. Siyan and Tim Parker
• Migrating to IPv6: A Practical Guide to Implementing IPv6 in Mobile and Fixed Networks by Mark Blanchet
The following are great websites that provide information on IPv6:
• The IPv6 Information Page: www.ipv6.org
• IPv6.com, the source for all things IPv6: www.ipv6.com
• Microsoft’s TechNet site, which provides information on IPv6 in Windows: http://technet.microsoft.com/en-us/network/bb530961.aspx
Install and Configure the File Services Role
Solution: You can solve this problem by installing the File Services role in Server 2008. The File Services role is not a single application but a group of services that facilitate sharing files—distributing shares over several servers, managing resources (including reporting), providing search capability, and providing support for POSIX clients.
To install the File Services role, perform the following steps:
1. Launch the Server Manager, scroll down to the roles summary, and Click Add Roles.
2. When the Add Roles Wizard appears, choose the File Services role and click Next.
3. On the next page, which includes Introduction to Files services, Things to Note, and Additional Information sections, take note of the information and check out a few of the links. When you are ready to proceed, click Next.
4. Next, you see the role services you can install (see Figure 5.7), depending on what you want to accomplish with your file server. You can really pick and choose the components you would like to install. In this case, you will install all the file services components except the indexing service.
Figure 5.7 Installation choices for the File Services role.
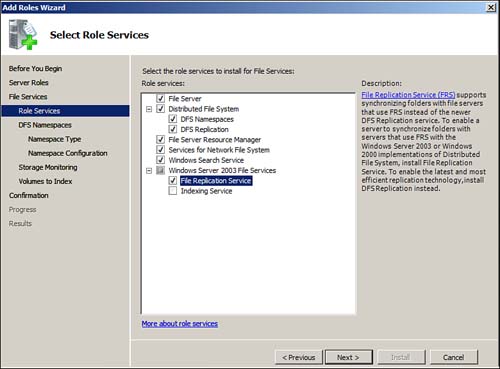
Note
As you may have noted in the Things to Note section of the wizard, Windows Search Service and Indexing Service cannot be installed on the same server. Microsoft recommends installing the Windows Search Service, unless there is a need to support older indexes.
5. Create a DFS namespace. You can choose to create this name now or later by using Server Manager, but in this case, create a DFS namespace now, choose the name, and click Next.
6. Choose the namespace type. Domain-based namespaces are stored on one or more namespace servers and within Active Directory Domain Services. If you choose a domain–based namespace, you then have the option of also enabling Windows Server 2008 mode. Stand-alone namespaces are stored on a single namespace server. After you choose your namespace type, click Next.
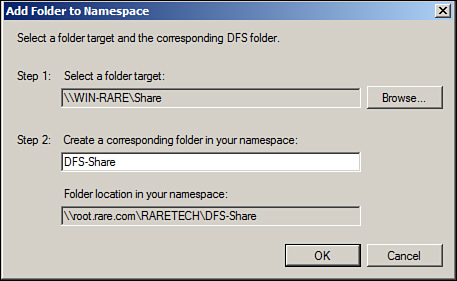
7. Configure your namespace by adding folders (see Figure 5.8) and folder targets, which serves as your virtual view of the namespace. After you have added folders, click Next.
Figure 5.8 Add folders to configure DFS namespaces.
8. At this point, configure your storage usage monitoring. Choose the NTFS volumes you want to monitor and choose the monitoring options. The first section is Specify the Usage Threshold of This Volume; this is a percentage of the volume drive space. The second section offers a choice of reports:
• Large File Report
• Least Recently Accessed Files
• Most Recently Accessed Files
• Quota Usage Report
• Duplicate File Report
• Files by Owner Group Report (default)
• Files by File Group Report (default)
• File Screen Audit Report
Choose the reports and volume threshold and then click Next.
9. Choose the location of the reports that should be created when a volume threshold is reached. You can also choose to receive reports via e-mail. Click the Send Reports to the Following Administrators checkbox, enter an e-mail address and an SMTP server for e-mail delivery, and click Next.
10. Choose your Windows Search Service options by simply checking the options you want to index to be used with Windows Search Service.
11. When you see the confirmation page where you can review your installation choices, confirm that everything is correct and click Install.
12. When the installation is complete, you receive a results report that confirms that all services were installed correctly. If there are any errors, you can view what failed to install and why in this section of the wizard. If all is well and everything has installed correctly, click Close and restart the server.
After the server is restarted, you can go to Server Manager and look at some more options you have for the configuration of your file services.
At the file services level, you can add additional file services roles. Therefore, if you installed only the File Services role or just a few of the roles, you can now add more. The other two configurable/manageable roles are Share and Storage Management and DFS Management. Let’s assume that you’ve installed all the roles you chose earlier, and you now need to manage the File Services role in Windows Server 2008. Let’s take a look at what is involved in managing the remaining file services roles.
Work with Share and Storage Management
The Share and Storage Management role is broken down into two sections: Share and Storage Manager and File Server Resource Manager. Choose the Share and Storage Manager, and you notice immediately that all your shares are visible and sorted by protocol (see Figure 5.9)
Figure 5.9 Managing your file shares by using the Share and Storage Manager.
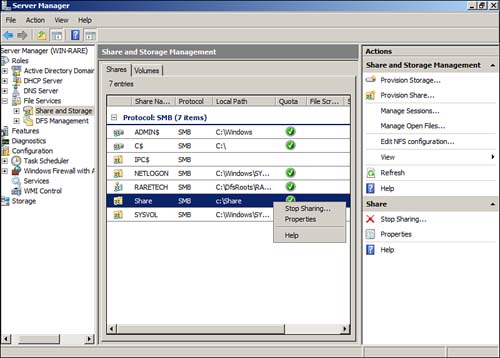
The Actions pane shows the items you can manage:
• Provision Storage: You can create volumes from available disk space on the server or storage subsystems that support Virtual Disk Service (VDS). You can also use this wizard to provision LUNs in a storage array.
• Provision Share: You can create volumes and folders that can be shared. You can also manage access permissions, disk quotas, and file screens.
• Manage Sessions: You can view or disconnect one or more users from shared folders that reside on this server.
• Manage Open Files: You can view or close one or more directories or files that reside on this server.
• Edit NFS Configuration: This configuration guide provides assistance for setting up a file share that can be used with UNIX clients. It contains wizards for identity mapping and creating NFS folder shares. It provides guidance for setting up domain authorization, opening firewall ports, and using additional resources to allow NFS to work correctly.
If you highlight a share, you see more actions:
• Stop Sharing: Stops sharing a folder or volume that is on this server.
• Properties: Contains two tabs for configuration: Sharing and Permissions. The Sharing tab contains information about the share path and advanced setting. In the advanced settings, you can configure the user limit, access enumeration, and availability of offline files (caching). In the Permissions tab you can view and configure share permissions and NTFS permissions.
As you can see, there is not much to configure, but you have quite a bit of control over the Share and Storage Management role. Next let’s look at the File Server Resource Manager.
Work with the File Server Resource Manager
The File Server Resource Manager portion of the Share and Storage Management role contains three areas of management:
• Quota Management: You can create a quota to limit how much disk space a DFS folder can use. You can create a quota by using a quota template, or you can create a custom quota. The quota properties allow you to change the quota template or space limit, set a soft or hard quota or warning thresholds, and disable a quota.
• File Screen Management: You can create a file screen to block particular file types from being saved to a volume or folder. As with quota management, you can use predefined templates (audio/video files, executables), or you can create a custom filter. The screen filters can be active (not allow saving) or passive (allow saving and report). You can set up e-mail alerts, send warnings to the event log, run commands or scripts, and generate reports. You can also create new templates and add or edit existing file groups, as needed, to exclude or include file types.
Note
Editing file groups using File Screen Management can be useful for organizations that need to save video files (for example, in .avi format) to their DFS file shares but perhaps want to block all other audio and video file formats from being saved in the folder. Editing the audio and video file group allows you to remove files with the .avi extension but leave the rest. Conversely, as new formats become used, you can add those file extensions here to be blocked.
• Storage Reports Management: You can configure and schedule reporting tasks for volumes or folders, choose volumes or folders to report on, select reports to generate, select the reporting format, choose the report delivery method (either e-mail or saved to a preset location on the server), and create a schedule for the reports to run. When a report is created, you have the option of running the report on demand from the Actions pane.
Now that you have considered how to manage your file shares and file server resources, let’s look at managing the DFS Management role.
Work with DFS Management
The DFS Management role is broken down into two parts: namespace and replication. The management snap-in begins with a Getting Started page that provides an overview of management tasks; you can also perform some tasks from the Action pane. The Action pane allows you to do the following:
• Create new namespaces
• Create new replication groups
• Add namespaces to display
• Add replication groups to display
The namespace and replication parts provide additional tasks. Let’s look at each one individually and examine how to create and manage a namespace, set up replication, add additional servers to a namespace, delegate management permissions, and create reports. Let’s begin by looking at managing namespaces.
Manage Namespaces
To create a new namespace, you click the New Namespace choice to launch the New Namespace Wizard. Then you follow these steps:
1. Choose a server to host the namespace and click Next.
2. Enter a name for the namespace and edit the settings to change the shared folder permissions. Click Next.
3. Choose Domain-based (and Mode) or Stand-Alone and then click Next.
4. Review the settings and click Create.
You can now choose to display namespace that are not currently viewable in DFS Management. Here’s what you do:
1. Click Add Namespaces to Display from the Actions pane.
2. Choose your domain and server and click Show Namespaces.
3. Choose the namespace to display and click OK.
Here’s how you delegate management permissions:
1. Click Delegate Management Permissions from the Actions pane.
2. Select the domain and click Show Users and Groups.
3. Click Add to delegate permissions of the folder to users and/or groups. Or remove delegation permissions. When you are finished, click OK.
Finally, on the namespace properties page, you can view the namespace, the type, and the number of folders with targets. You can also choose the referral time and the ordering method of referrals for folders. You can also choose to optimize for consistency or scalability.
Manage Replication
You can set up a new replication group by following these steps:
1. Select Actions, New Replication Group.
2. Choose the replication type: Multipurpose or Replication Group for Data Collection. Click Next.
3. Name the replication group, add an optional description, and choose the domain. Click Next.
4. Choose replication group members; add two or more servers to be a part of the replication group. Click Next.
5. Now choose options in the Topology Selection:
• Hub and Spoke: For this topology, three or more servers are needed. Spoke members are connected to one or two hubs, and hubs replicate data out to the spokes.
• Full Mesh: With this topology, each member replicates with all other members of the replication group. This topology should be used with 10 or fewer replication group members.
• No Topology: You use this option to create a custom replication topology. When you are done with the wizard, click Next.
6. Choose the replication schedule: either continuous replication or scheduled replication based on specific days and times. Then choose to throttle your bandwidth (16Kbps – 256Mbps) or use the full bandwidth for replication. Click Next.
7. Choose your primary member. This is the server that contains the content you want replicated to the other partners in the group. Select the server and click Next.
8. Select the folders on the primary member that you want replicated. Click Next.
9. Choose the local path where the data will be stored on the other group members. Click Next.
10. Review the settings and click Create to set up the replication groups.
When the replication group is created, you can view the memberships, connections, replicated folders, and delegations. You can also manage some items:
• New Members: You can add new member servers to the replication group.
• New Replicated Folders: You can add additional folders to the replication group.
• New Connection: You can create a connection between two members.
• Create a Diagnostic Report: You can create a health report or a propagation report, and you can perform a propagation test.
• Verify Topology: You can check that all partners in the replication group are connected and that data can replicate throughout the group.
Understand the Improvement Windows Server 2008 R2 Brings to Server Roles
Solution: Windows Server 2008 R2 will introduce some new security and management features to the current release of Windows Server 2008.
For the DNS Server role, these are some of the improvements to look forward to:
• Added support for DNS Security Extensions (DNSSEC), so you can cryptographically sign a DNS zone, thereby providing better security for your networks.
• The addition of four new resource record types: RRSIG, NSEC, DS, and DNSKEY.
• The ability to sign a DNSSEC zone and host a signed DNSSEC zone.
For the DHCP Server role, these are some of the improvements to look forward to:
• Prevention of IPv4 address exhaustion at the scope level in redundant/highly available scenarios (Split-Scopes).
• Ability to migrate the DHCP Server role, using the Windows Server Migration tool.
• Operational enhancements such as auto-population of network fields (DNS Server, WINS, and so on) during scope creation and configuration; wizard-based split-scope configuration; and movement of the DHCP server service to the Network Service Account for enhanced security in the case of server compromises.
• Support for MAC-based network control access.
For the File Service role, these are some of the improvements to look forward to:
• Improvements to NFS: Netgroup support to simplify the control of users and group logins and support for RPCSEC_GSS, which enables NFS to use Kerberos authentication.
• Improvements to the File Server Resource Manager (FSRM): File classification to define classification properties and to allow you to create, update, and run classification rules to define properties in a specified folder; file management tasks to allow you to create and update file expiration tasks, create and update custom tasks (to run scripts or commands), and send e-mail; and event log notification or running of a command/script on a specified number of days before the task is to commence.
For more information on the improvements and changes available in Windows Server 2008 R2, see the following websites:
• TechNet’s File Services for Windows Server 2008 R2 (Beta): http://technet.microsoft.com/en-us/library/dd463985.aspx
• TechNet’s What’s New in DNS: http://technet.microsoft.com/en-us/library/dd378952.aspx
• Microsoft Windows DHCP Team blog: http://blogs.technet.com/teamdhcp/archive/2009/02/26/new-features-in-dhcp-for-windows-server-2008-r2-windows-7.aspx