Chapter 4. Manage Windows Server 2008
IN THIS CHAPTER
• Use the Microsoft Management Console (MMC)
• Work with Preconfigured MMCs
• Work with the Task Scheduler
• Manage Windows Server 2008 Using Remote Desktop
• Configure Backups and Perform Restores
Use the Microsoft Management Console (MMC)
Solution: The Microsoft Management Console (MMC) can be used to review, configure, and identify issues within the environment. MMC is nothing new to the Windows OS. You may have used it extensively while working with Windows 2000/2003 Server. In fact, you may have seen version 1.0 in the Windows NT 4.0 Option Pack. If this is the case, you can safely move on to the next section or browse through this section for a review. If you are new to Windows Server configuration and management, you will find that the MMC will become the tool that is used most extensively but at the same time is not really recognized as being used at all because it is just the platform used to add snap-ins.
Let’s take a look at how to launch a new MMC and then add snap-ins:
1. Select Start, Run.
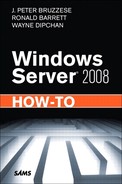
2. Type mmc and click OK. Windows Server 2008 launches a new MMC, as shown in Figure 4.1. Notice that you can’t really do much with this tool at the moment.
For the MMC to be of any use to you, you need to add one or more snap-ins. A snap-in is a program that allows you to perform a specified administrative task. Next, you’ll add a snap-in that will allow you to manage your disks.
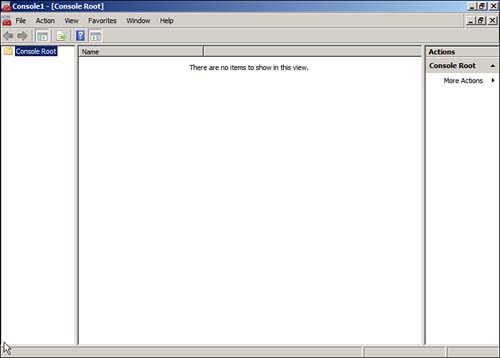
3. On the MMC menu bar, select File, Add/Remove Snap-in (or press Ctrl+M). The Add or Remove Snap-ins dialog box appears, as shown in Figure 4.2. On the left side of the Add or Remove Snap-ins dialog box you see listed all the available snap-ins you can use.
Figure 4.2 The Add or Remove Snap-in dialog box.
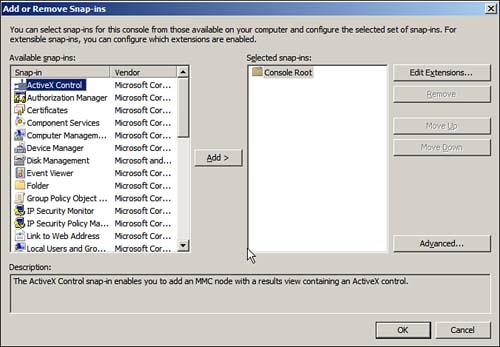
4. You want to be able to manage your disks, so select Disk Management and click the Add button. Now for this and many of the other snap-ins, you are asked if you would like to manage this server or another remote server, as shown in Figure 4.3. You are going to manage the local server.
Figure 4.3 Choose whether to manage this server or a remote server.
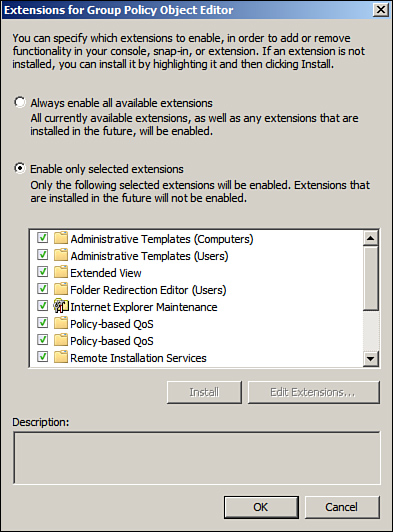
5. Leave This Computer selected and click Finish. You will notice that Disk Management has been added to the Selected Snap-ins area on the right side of the Add or Remove Snap-ins dialog box. At this point, you could add more snap-ins, depending on what you want to manage. If you accidentally add a snap-in, you can easily remove it by highlighting the snap-in and clicking the Remove button. You can further customize snap-ins by editing the extensions available for a snap-in. For example, if you were to select the Group Policy Editor snap-in from the Selected Snap-ins side of the dialog box, you could then click Edit Extensions to bring up the Extensions for Group Policy Object Editor. By selecting the Enable Only Selected Extensions button, you can remove (or, if previously removed, add) extensions for the Group Policy Editor snap-in (see Figure 4.4).
Figure 4.4 Removing snap-in extensions.
Note
You might see different wizard options, depending on what snap-in you select. For example, select ActiveX Controls and Certificates and you will need to answer more configuration prompts. With other snap-ins, such as Authorization Manager, there will be no further configuration prompts; the snap-in will just appear in the Selected Snap-ins list.
6. Now that you have selected the Disk Management snap-in, click OK to add it to your MMC. The Disk Management snap-in appears under Console Root in the left pane of your MMC. Also notice the word Local in parentheses next to the snap-in. This indicates that you will manage the local server with this snap-in.
7. If you are planning to use this MMC again, save it. Saving a custom MMC is as easy as saving a Word document: Just select File, Save. You need to provide a name for your new MMC and then choose where you want to save it.
You have now successfully configured your own custom MMC. Although you added only one snap-in, you can see how you will be able to gather the tools you use the most into one MMC and use it to easily manage Windows Server 2008. You can also manage remote servers from your custom MMC. This comes in handy if you have multiple servers to manage; you can create your custom MMC on your desktop and connect to remote servers to manage (assuming that you have the needed security permissions). Here’s how you connect your custom MMC to a remote server:
1. Open the custom MMC you just configured.
2. Add the Computer Management snap-in, selecting the default Manage the Local Machine when prompted. (Disk Manager allows you to manage only the local server.)
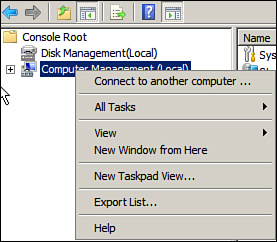
3. After you add the Computer Management snap-in, locate it under Root Console in the left pane of your MMC, right-click it, and select Connect to Another Computer, as shown in Figure 4.5.
Figure 4.5 Selecting to connect to another computer.
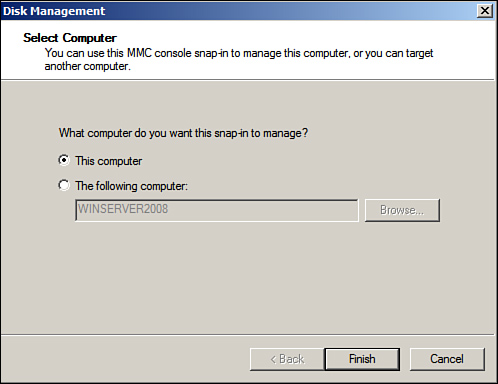
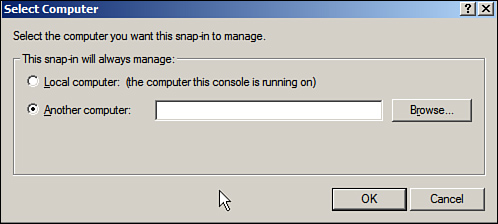
4. In the Select Computer dialog box that appears (see Figure 4.6), insert the name or IP address of the remote server you would like to manage. Then click OK.
Figure 4.6 Inserting the name or IP address of the remote server.
Now you see the remote server name in parentheses after the Computer Management snap-in. You are ready to manage your remote server.
There should be no doubt in your mind now about how the MMC can ease the task of administration in your Windows Server environment. Even if you are managing a global enterprise, you will be able to connect to each of your servers and manage them from one desktop. You may be thinking, however, there would be a lot of work in building all the custom MMCs. No need to worry: Microsoft has preconfigured many MMCs and grouped commonly used tools together. Let’s take a look at some of these preconfigured MMCs.
Work with Preconfigured MMCs
Solution: Although there are many preconfigured MMCs, in this section, we focus on just two MMCs that are directly associated with managing your Windows Server 2008 OS:
Note
There are preconfigured MMCs for just about all the Microsoft applications and roles, such as Exchange, SQL, and IIS, to name just a few. In addition to these, third-party vendors develop applications that also allow you to use an MMC.
Server Manager
The Server Manager MMC contains the snap-ins that allow you to accomplish the following tasks:
• Add or remove server roles
• Add or remove server features
• Monitor system events
• Manage devices
• Schedule tasks
• Manage local users and groups
• Configure storage
• Perform backups
Note
See Chapter 3, “Work with Server Manager,” for more details on how to use the different snap-ins in the Server Manager MMC.
Computer Manager
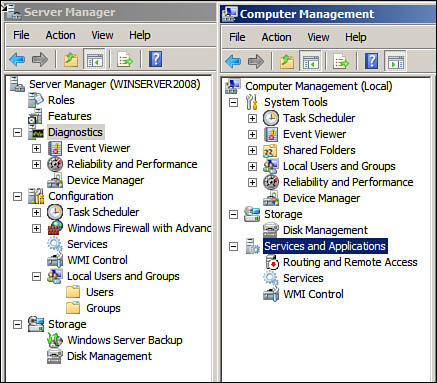
There is some overlap in terms of the tools in Server Manager and in Computer Manager. You may also remember Computer Manager from previous versions of Windows Server (2000/2003). A couple obvious items that you do not see in Computer Manager but do see in Server Manager are the roles and features snap-ins. But as you compare Server Manager and in Computer Manager, as shown in Figure 4.7, you also find many others missing. So when would you choose one over the other? Well, basically, where they overlap, it’s up to you. In these cases, Microsoft has given you multiple ways to accomplish identical tasks. Two specific snap-ins are available in Computer Manager but not in Server Manager:
Figure 4.7 Comparison of Server Manager and Computer Manager.
Routing and Remote Access
As the title of this snap-in suggests, you can configure two functions: routing and remote access. A router is used to separate network segments or subnets. With the routing portion of the Routing and Remote Access snap-in, you have the ability to configure your server to act as a software router. This would be okay for small subnets, with not too much traffic passing from one subnet to another (for example, in a test environment). When traffic increases (for example, in any production environment), you will use hardware routers to accomplish this task.
Note
It is strongly suggested that you use a hardware router even in a test or development environment. When developing or testing new technologies, you will want the testing done in an environment that is close, if not identical, to your production environment.
The remote access portion of the Routing and Remote Access snap-in allows you to configure the server to provide two types of remote connectivity: VPN and dial-up. Remote access allows users to connect to the organization’s network as if they are local. For example, they can connect to drives using Windows Explorer and map to network printers, also Universal Naming Convention (UNC) paths are fully supported.
Shared Folders
The Shared Folders snap-in allows you to see what folders are shared on the server, how many sessions (connections) there are to the shares, and what shared files are open. This snap-in is truly a useful tool when managing your server. Say that you needed to reboot the server and want to see if there are any active sessions to the shares. From the session view, you can easily see who is connected, from where they are connected, how long they have been connected, and even how long the session has been idle. In some cases, you may get a call that a file is in use and should not be—maybe someone has left a file open on his or her workstation and left for the day. You will be able to see whether the file is open and what user has it open. If needed, you can close that open file by using this tool. (It is usually a good idea to make sure the person asking you to close the file has seniority over the person who has the file open.)
Let’s now take a look at some other tools that help you manager Windows Server 2008.
Utilize Device Manager
Solution: The Device Manager is a one-stop shop for hardware management of your server. As shown in Figure 4.8, the Device Manager (found in the Control Panel) lists all your hardware devices. From the Action menu, you can scan for new hardware or add legacy hardware. If there are any issues with a particular type of hardware on the server, you see a yellow triangle with an exclamation point. You can further diagnose the issue by opening the properties of the device to see more details. When you right-click any of the hardware installed, you have the option to update driver software, disable the device, and uninstall the driver. Many times, you will find that either reinstalling a driver or uninstalling and rescanning for hardware will fix issues with hardware drivers.
Figure 4.8 Manage hardware with Device Manager.

Note
You have probably already noticed that the Device Manager is also accessible from the Server Manager MMC and the Computer Manager MMC.
Note
Many server hardware vendors include a web interface that allows you to view the status of your hardware and identify any issues. You can interface such a component, as well as your event alerts, to your ticketing system in order to be proactive in your server management. This is covered in more detail in Chapter 12, “Monitor Performance and Troubleshoot.”
Work with the Task Scheduler
Solution: The Task Scheduler enables you to automate many different tasks on your server. You might be familiar with the Task Scheduler from previous Windows server operating systems. However, the Task Scheduler in Windows Server 2008 has much more functionality than those earlier versions.
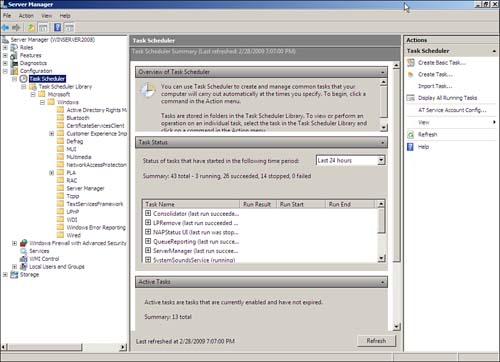
You can get to the Task Scheduler in more than one way, and one of the easiest is to open Server Manager. From Server Manager, you navigate to Configuration and then Task Scheduler. When you highlight the Task Scheduler, you see the following:
• An overview of Task Scheduler: You see information on what you can do with Task Scheduler and some instructions on how to use it.
• Task status: Here you can see whether your scheduled tasks are running successfully. On the top right you can select how far back you want to check, with options of last 1 hour, last 24 hours, last 7 days, and last 30 days. Then, by expanding the tasks listed in the lower portion, you can confirm whether a scheduled task completed successfully.
• Active tasks: All tasks that are active (that is, scheduled tasks that are scheduled to be run and have not expired) are shown in this area.
If you select Task Scheduler, Task Scheduler Library, Microsoft, Windows, you see some preconfigured tasks, as shown in Figure 4.9. Also notice that you can organize your scheduled tasks in folders.
Figure 4.9 Task Scheduler overview and preconfigured tasks.
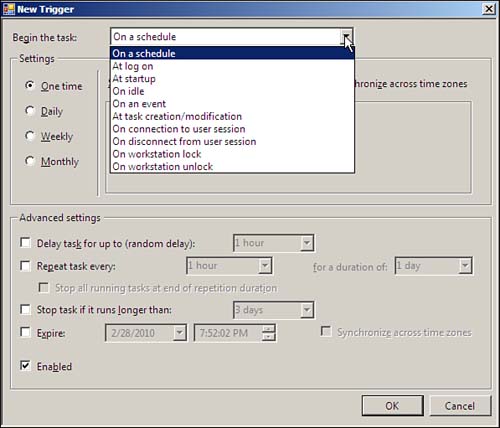
A big difference between older versions of Task Scheduler and the current one is the number of triggers available to kick off a scheduled task. A trigger is an event that causes a scheduled task to start. In previous versions of Windows server operating systems, you could only have a task scheduled to run at a specified time and reoccur at the same time, if needed. The time of day would be the trigger for the scheduled task. With Windows Server 2008, you can use the following triggers:
• On a schedule
• At logon
• On idle
• On an event
• At task creation/modification
• On connection to a user session
• On disconnect from a user session
• On workstation lock
• On workstation unlock
We have certainly come a long way from the AT command prompt tool in the NT 4.0 days. The new Task Scheduler gives you a wide variety of options for scheduling tasks. We will take a look at the steps involved in creating a scheduled task that brings up a message when the server is unlocked. As you go through the steps, you’ll learn about some of the other new features of Task Scheduler. Follow these steps:
1. Open Server Manager (or Computer Manager).
2. Navigate to Task Scheduler. In Server Manager, Task Scheduler is found under Configuration.
3. In the Actions pane (right side) are two options to create a task:
• Create a Basic Task: This takes you through a wizard to create a scheduled task.
• Create Task: This option allows you to create a scheduled task manually.
Click Create Task to open the Create Task dialog box (see Figure 4.10).
Figure 4.10 The Create Task dialog box.
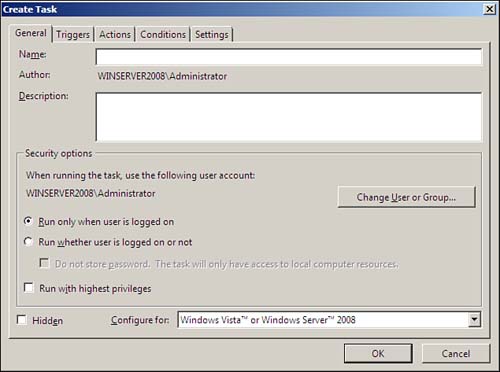
4. In the General tab, enter the following:
• The task name
• A description of the task
• The account the task will run under
• Whether the task should run only when a user is logged on or if it can run whether a user is logged on or not
• The privilege level
• Whether you want the task to be hidden
5. Click the Triggers tab and then click New. The New Trigger dialog box appears (see Figure 4.11). Click on the Begin the Task drop-down box to display all the triggers available. The options in this dialog box change, depending on which trigger is selected. Select On Workstation Unlock.
Figure 4.11 Selecting a trigger for a scheduled task.
6. With this trigger selected, do any of the following, as needed:
• Select any user or a specified user
• Delay the task
• Repeat the task
• Stop the task if it runs longer than a specified time
• Activate and expire the task on set dates
• Enable the task
Notice that you can have more than one trigger for each of your scheduled tasks.
Note
Many of the selections in the New Trigger dialog box are the same for all the triggers, but some differ. Select each one to see the differences.
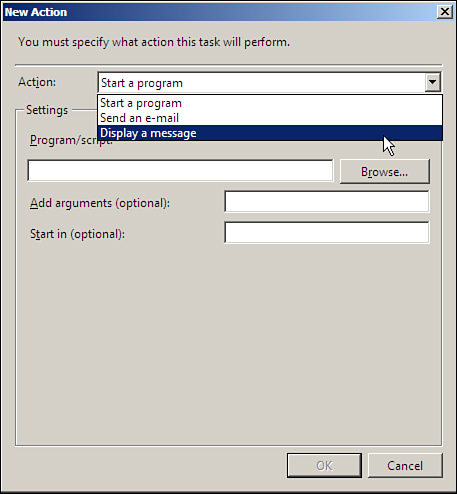
7. Click the Actions tab and then New. The New Action dialog box appears (see Figure 4.12). The action is the task that needs to be run. There are three actions to select from:
• Start a Program
• Send an E-mail
• Display a Message
Select Display a Message. (Note that the dialog box options vary, depending on your selection.)
Figure 4.12 Selecting an action.
8. Give the message a title and add what you want to say in the message. For example, you might want the message to say “Please do not log off user” because when servers run applications in a console, it may be necessary for a user to be logged on to have the application run.
9. Click the Conditions tab and set the following:
• Start only if the computer is idle and specify how long to wait for idle. Also stop if the computer ceases to be idle.
• Start only if connected to AC power and stop if switched to battery power.
• Wake the computer to run the task.
• Run only if a specified network connection is available.
10. Click the Settings tab, and you see the following options for your scheduled task:
• Allow task to be run on demand
• Run task ASAP after the scheduled time is missed
• Restart the task if it fails on a certain interval and up to a specified number of times.
• Stop the task if it runs too long
• Force the task to stop if it does not end when requested
• Delete the task if it is not scheduled to run again after a specified amount of time
You can also specify how to manage a new instance of the task.
When you click OK, you have successfully configured a scheduled task. You can test your task by locking the server and then unlocking it to see if you get the message.
In this section, you created a simple scheduled task to show the functionality of the improved Task Scheduler. You can clearly see that this tool can be leveraged in many ways to successfully manage your Windows Server 2008 infrastructure.
Manage Windows Server 2008 Using Remote Desktop
Solution: Remote Desktop allows you to manage from one central location multiple Windows Server machines that may physically sit in different regional offices.
By default, remote access to your Windows Server 2008 server is disabled. You need to enable this feature to be able to access the server remotely. While this is an easy task, it does differ a little from the process in Windows 2000/2003 Server. Follow these steps to enable remote access:
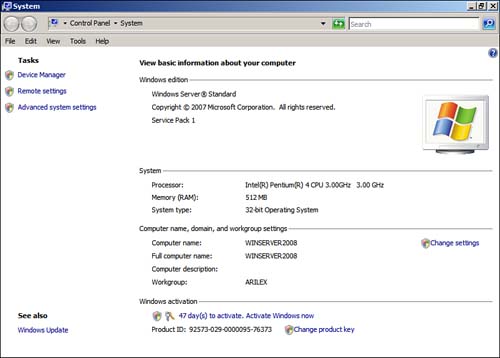
1. Right-click Computer, in the Start menu, and select Properties. The Windows 2000/2003 Server Properties dialog box does not appear; instead, a System Control Panel appears (see Figure 4.13). The System Control Panel gives you a nice overview of your server that has the following sections:
• Windows Edition: This shows the edition of Server 2008 that you are running and what service pack level you have installed.
• System: This shows your processor, RAM, and system type (32 or 64-bit).
• Computer Name, Domain, and Workgroup Settings: If you click the Change Settings link in this area, you can change the server name and join or remove the server from a domain or workgroup.
• Windows Activation: If you are running an evaluation copy of Windows Server 2008, in this section you can see how long your evaluation period has before it expires. If you have purchased the same edition of Windows Server, you can add the product key here by clicking on the Change Product Key link.
Figure 4.13 The System Control Panel.
Note
For information on how to extend your evaluation period, see Chapter 2, “Configure and Manage Server Core.”
2. Click the Remote Settings link in the Tasks section at the top left of the System Control Panel. The other two links, Device Manager and Advanced System Settings, take you to the same dialog box but directly into their respective tabs.
3. When the Systems Properties dialog box appears, if needed, select a setting other than Don’t Allow Connections to This Computer:
• Allow Connection from Computer Running Any Version of Remote Desktop (less secure): This option allows any Windows OS to connect to the server.
• Allow Connection from Computers Running Remote Desktop with Network Level Authentication (more secure): This option allows connections only from clients running at least Remote Desktop version 6 and supports the new Credential Security Support Provider (CredSSP). Windows Vista and Windows XP with Service Pack 3 meet these requirements. However, with Windows XP, Service Pack 3 you need to enable this functionality by updating the registry on the client. (See http://support.microsoft.com/kb/951608 for instructions.)
Note
Network Level Authentication is a new authentication technology that allows a user’s credentials to be authenticated prior to launching Remote Desktop and getting to the logon screen. This can help prevent malicious attacks on the server.
4. To allow users to connect to your server, give them permission. Click the Select Users button and then add local or domain users to the local Remote Desktop Users group. Notice that local administrators do not need to be added here because they already have the permissions needed to connect.
5. Click OK three times, and you have enabled users to connect to this server via Remote Desktop.
Not surprisingly, there are multiple ways to enable Remote Desktop connections. You can accomplish this with Group Policy and also while installing the Terminal Services role.
When you have enabled Windows Server 2008 to accept Remote Desktop connections, you connect from your client workstation as follows:
1. Select Start, Run and enter mstsc.
2. Provide your credentials.
3. Click OK, and you’re connected. (Yep, it’s as easy as 1, 2, 3.)
4. To disconnect, log off the Remote Desktop session.
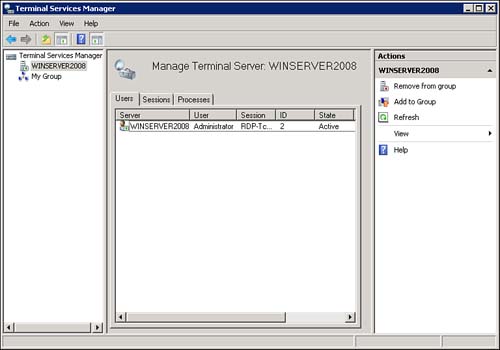
The edition of Windows Server 2008 you have installed dictates how many concurrent connections are allowed. How can you tell how many connections are active at any given time? The Terminal Services Manager helps with that. You can get to this tool by selecting Administrative Tools, Terminal Services, Terminal Services Manager (see Figure 4.14). This tool enables you not only to view who is connected but also to log them off and disconnect their session or send them a message. You might wonder what the difference is between logging off and disconnecting. A user can close his or her connection to a server without logging off; this allows his or her applications to continue to run. Also, upon reconnecting, that person is put back where he or she left off. When logging off the session, you are no longer running any applications under that session. Another way to see who is connected is to use the User tab of the Task Manager, from which you can also disconnect, log off, or send a message to users.
Figure 4.14 Terminal Services Manager.
From time to time, you will find that you are unable to connect because all the allowed connections are being used. How can you see who is connected? In this case, you can use the Terminal Services Manager to connect to a remote computer. There is, however, a command-line tool, Query User, you use while you are connected to another server. Here’s how you use it:
1. Connect to another server on your domain.
2. Get to a command prompt by entering cmd in the Run box under the Start menu.
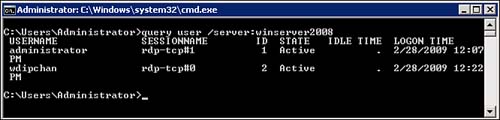
3. Enter Query User /server:<servername>. The output gives you the following information (see Figure 4.15):
• User name
• Session name
• ID
• State
• Idle time
• Logon time
Figure 4.15 Query User results.
Now you know who is connected to the server, but say that you are working on a critical issue and must connect to this server. How will you be able to log off one of the users? Follow these steps:
1. At the command prompt type logoff /<server:servername> <ID>, where <ID> corresponds to the ID number associated with the user you want to log off, which you found when using the Query User command.
2. Run the Query User command again to confirm that the user has been logged off. The user who was connected and then logged off receives a message that his or her connection has been terminated.
You can now connect to the server via a Remote Desktop connection.
Note
You will want to make sure the user you are disconnecting is not currently working on any critical process; he or she may even be logged on to work on the issue you are responding to. If possible, try to communicate to the user that you are logging him or her off prior to doing so.
Configure Backups and Perform Restores
Solution: You need to understand the requirements for recovering your server and data in your organization, most likely dictated by service-level agreements (SLA). SLAs define the amounts of time allowed for the recovery of your servers and what data needs to be available. Another item they define is retention of data, or how long to keep your data. In some environments, you may need to retain data for up to seven years for auditing purposes. (And believe me: The auditors will show up and expect to have access to the data.)
The first step in managing your backups is to devise a backup policy. You need to consider the different types of backups needed, which depends on your organization’s infrastructure. The following are some of the different backups to consider:
• System state backups (Automated System Recovery [ASR])
• File system data backups
• Database backups (full database backups and transaction log backups)
• Exchange Server backups
Note
In this book we cover only Windows Server 2008 system state (ASR) and file system data backups and restores using the backup utility within Windows. In a real-world scenario, you would probably use a third-party tool, such as IBM’s Tivoli Enterprise or Symantec’s NetBackup. Usually these third-party tools also allow you to set the number of versions of a file you want to keep.
Say that you work with your business division and come up with the following SLAs for server and data recovery:
• Data files must be recoverable from at least the prior business day.
• Server recovery should be less than or no more than six hours.
• Data must be retained for at least five years.
Keeping these SLAs in mind, you need to make sure you have a daily backup of all data files and system state. You also need to have a plan that incorporates five-year retention of data, possibly on a monthly archive backup. And you need to consider your space requirements for this and also the media used, as some tape media may not have a good storage life.
If you think about this for a bit, you will realize that a daily backup of all data will cause you to duplicate quite a bit of data on your backups every day. This would waste storage and also require a large backup window (that is, time to run the backup). Ideally, you want to run the backups during a time when server utilization is at its lowest and finish prior to the start of the business day. Making incremental backups of data is the solution to this issue. You can perform full data backups on the weekend (usually when you can afford to have a larger backup window) and then perform incremental backups during the week. Incremental backups back up only the data that changes since the last backup. The drawback to this solution, in the past, was the time it would take to restore the data; you would first have to restore the last full backup and then restore the incremental backups. With Windows Server 2008, you no longer need to restore from multiple backups. Instead, you just choose the date of the backup you would like to restore.
Note
Some third-party backup solutions use what is called “forever incremental” technology. This technology allows you to set your backups to back up only what has changed, and it also keeps active the data that has not changed. When the unchanged data remains active, the restore time will be shorter because you will need to perform only one restore—not restore the full backup and then all the differentials. Many backup solutions back up only what has changed on the block level of a file. Windows Server 2008 also backs up on the block level. Backing up on the block level only backs up identical data once, even if the data can be found on different files. An example of this would be a company letterhead. The letterhead is on many files but is only backed up once with pointers to each file that uses the letterhead. This technology improves space utilization.
Now let’s look at how to configure Windows Server 2008 to back up your data files and system state on a schedule:
1. Select Start, Administrative Tools, Windows Server Backup. The Windows Server Backup window appears.
2. In the Actions pane, click on Backup Schedule to invoke the Backup Schedule Wizard. A scheduled backup automatically includes the system state.
3. Click Next on the Getting Started page.
4. Select one of two options:
• Full Server: Select this option to back up all the data, applications, and system state.
• Custom: Select this option to exclude some volumes from your scheduled backup.
5. On the Backup Configuration page, select Custom and click Next. On the page that appears next, you can exclude volumes. However, notice that you can’t exclude a volume that contains the OS files.
Note
If you had chosen to do a one-time backup, you would be given the option Enable System Recovery at this point to include the system state. If this box is unchecked, you are not forced to back up the volume that contains the OS.
6. Specify the time of day the backup should run. Or, if you like, you can back up the data multiple times in one day.
7. Select your destination type. Windows Server Backup looks for external disks to which to back up the data. You can select a local volume by clicking Show Available Disks; however, in this case, the backup utility reformats that disk and uses it solely for backup data, and you will no longer be able to see the disk via Windows Explorer. The backup disk selected needs to be at least 1.5 times the size of the amount of data being backed up. If it isn’t, you will not be able to complete the Backup Schedule Wizard.
If you choose to do a one-time backup, you have some additional options:
• You can select a local disk or provide a UNC path to a shared folder as a backup destination.
• You can allow all users who have permission to the share access to back up data or specify a user.
• You can decide whether to use VSS Copy backup or VSS Full backup. Use VSS Copy backup if you use third-party backup software to back up your data to ensure that the third-party software will still see the file as not backed up. (Remember that this is a one-time backup that you can run to make sure you back up some select files.)
Note
When launching the Windows Server Backup utility, you may receive the notice “Windows Server Backup is not installed on this computer.” You then need to install the feature from Server Manager. If the command-line feature is selected, you need to also install Windows PowerShell.
Here’s how you recover a file that has been backed up:
1. From the Actions pane in the Windows Server Backup utility, click Recover to open the Recovery Wizard.
2. Select to recover files from the local computer rather than from a remote computer.
3. Choose the date you want to recover the file from.
4. Choose Files and Folders from the three recovery types:
• Files and Folders
• Application
• Volume
You can now navigate to the file you intend to recover. Obviously, you needed to have backed up a file or folder to see it available for recovery here.
5. Select one of the three recovery options:
• Specify the location you would like to recover the file to.
• Indicate what to do if a duplicate file exists in that location.
• Restore the security settings.
6. Confirm your choices and perform the recovery.
Note
For more information on Windows Server 2008 backup capabilities, see http://technet.microsoft.com/en-us/library/cc770266.aspx.
In this chapter, we have really just touched the surface when it comes to managing the Windows Server 2008 infrastructure. The information in this chapter provides a good foundation, and as you become more involved with managing your environment, you will find many other tools, both native Microsoft and third-party tools, that will help you with managing Windows Server 2008.