Chapter 9. Understand and Manage Active Directory
IN THIS CHAPTER
• Understand the Functionality of Active Directory
• Promote Servers as Domain Controllers
• Create Active Directory Objects
• Work with Site and Domain Consoles
• Utilize Other Active Directory Services
• Improve Active Directory with Windows Server 2008 R2
Understand the Functionality of Active Directory
Solution: Active Directory, first introduced with Windows 2000 Server, is a directory service. In the most basic of comparisons, you might liken it to a telephone directory, which is an organization of people based on various fields (name, address, number, and so forth). However, Active Directory has identity management, which allows for more advanced control than simply looking up a person to locate his or her number.
Active Directory allows you to create objects (user accounts, groups, computers, and so forth) for which you can then define attributes (such as name, address, and department) and that you can utilize in a network to determine login settings, permissions for access to resources, computer behavioral auditing, policy settings, and much, much more. It goes beyond a simple, static directory and is much more dynamic, or active, in its functionality.
Note
It’s important to note that this chapter provides a basic understanding of Active Directory and a foundation on which to build. However, if you need to go further, we recommend that you purchase a book that focuses completely on Active Directory (such as Active Directory Domain Services 2008 How-To by John Policelli, ISBN 978-0-672-33045-2) and research Active Directory further on Microsoft’s TechNet site (http://technet.microsoft.com).
Visualize the Physical and Logical Sides of Active Directory
Active Directory was designed to take into consideration the physical and logical sides of a network environment. Consider two persons who work in the same building on the same floor for, what appears to be, the same company. These two persons might sit only feet apart from each other, but they might have completely different physical and logical Active Directory features.
From a physical perspective, Active Directory allows you to group computers (both workstations and servers) into sites. A site would typically include a single subnet or subnets, all located within the same physical area. So, you might have two offices, one in New York and one in Los Angeles. You should, rightist seems, have two different sites. But going beyond that, you might have multiple subnets in New York due to the size of that location. You can break that physical location up into multiple sites as well (or keep them under one site). Active Directory is designed to allow for that level of flexibility so that the final design decisions aren’t forced on the administrative team.
Sites are helpful because they curtail the amount of replication that occurs between the sites, and that gives you the ability to control the amount of bandwidth utilized for replication traffic that may be caused by Active Directory itself.
Beyond the physical side, however, there is also the logical side, which allows for even more flexibility in your design of Active Directory objects. Forests, domains, organizational units...this is the lingo of logical Active Directory.
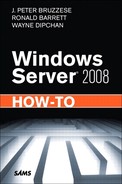
A forest contains trees, of course. You can see in Figure 9.1 that a tree, in this case, is called a domain. There is a parent domain, and there can be subdomains called child domains. So, you might have a forest with a single domain tree (although this would be a very small forest), or you might have multiple domains with multiple child domains, all interconnected by transitive two-way trusts.
Figure 9.1 Physical and logical Active Directory.
What is a transitive two-way trust? Well, with domains of the same forest, there might be resources (printers, file servers, and so forth). If a user wants to access a resource in another domain within the same forest, he or she would need the permission to do so. But the trust is automatic between domains. One might liken it to two countries that allow persons to pass back and forth without a specific visa to do so. For example, if a U.S. citizen attempts to enter Canada, while she might need her passport and go through customs, she isn’t required to obtain a visa the way she would for another country; the trust is already in place to that extent.
You might wonder why you would create multiple domains. Is it based on locations or departments? Actually, it could be for many different reasons. A parent domain such as primatech.com (note the DNS naming structure) might have a research division that is top secret. That research division might want to have special security in place and thus require its own domain. So, you might create the research.primatech.com domain.
Note
Active Directory is based on a standardized directory service called LDAP. LDAP evolved from the X.500 set of standards and a protocol called Directory Access Protocol. The revised, lighter version is called LDAP, for Lightweight DAP, which serves as both the service and protocol. Active Directory relies on the same naming structure as DNS. (Hence primatech.com should be registered for the Internet community at large, but the internal DNS doesn’t need to be.)
Beyond domains being used to create reasonable security or departmental divisions there are organizational units (OUs) that are simply containers that hold objects (such as users, groups, printers, and computers) for the establishment of policies or administrative control.
So, the Active Directory structure basically involves sites based on IP subnets, which help to control replication. It also has forests, domains, and OUs, which help to logically control your objects (which are users, groups, computers, printers, and so forth). Is that all? Well, not quite. We haven’t delved deep into the world of LDAP, Kerberos, and DNS, which are all essential aspects to Active Directory, and we are saving Group Policy for Chapter 10, “Utilize Group Policy,” so although this is a solid overview, there is certainly much more you can learn.
Utilize Domain Controllers Appropriately
A domain controller is a Windows Server (2000/2003/2008) running Active Directory services. These services (Active Directory Domain Services [AD DS]) can be shut down for maintenance (such as defragmentation) and restoration purposes, which essentially makes the server a member server (which is any server that is not running Active Directory).
What exactly does a domain controller (DC) do? A full domain controller retains a copy of every object within the forest, although only a DC that is designated a global catalog (GC) server has a copy of every attribute for those objects. Typically a DC retains both objects and attributes for members within that domain (unless it is a GC server).
When users log in to the domain, a DC validates the login and issues a token that can be used to grant or deny permissions to access resources within the domain (or perhaps across domains). Responding to security authentication requests is one of the key responsibilities of a DC.
DCs are the only types of servers that can serve as one of the five primary FSMO (Flexible Single Master Operation) roles. While, typically, every DC is equal, these five roles make for uniqueness within the domain.
These are the FSMO roles:
• Schema Master: There is one of these per forest. It is responsible for schema modifications.
• Domain Naming Master: There is one of these per forest. It is responsible for the addition or removal of domains in the forest.
• Relative ID Master (RID Master): There is one of these per domain. It allocates security RIDs to the DCs so that Active Directory can assign unique numbers to security principles (such as users, groups, and/or computers).
• Infrastructure Master: There is one of these per domain. It keeps track of security identifiers and globally unique identifiers (GUIDs). It is useful only if you have a multidomain arrangement because it specifically keeps track of users being placed in cross-domain groups and so forth.
• PDC Emulator: There is one of these per domain. It handles password changes and authentication failures.
These five roles are important to the continued life of a domain (and, in some cases, the entire forest), so in the event that a server holding one of these roles crashes, you need to seize the role (using the ntdsutil command). Otherwise, if you have a modicum of advance warning, you would want to transfer the role before the system crashes (or comes offline for maintenance).
Note
Some best practice advice is that you should separate these roles if possible, although initially they will all reside on the first DC in the forest (and the three domain FSMO roles will reside automatically on the first DC of the domain). The Infrastructure Master role shouldn’t reside on a global catalog server (which is also the first server of a forest or domain), so you should move this role. The PDC Emulator and RID Master roles should be on the same DC, if possible, and the Schema Master and Domain Name Master roles should reside together.
For the sake of fault tolerance, you should have two DCs in each domain. That way, if one fails, the other can seize FSMO roles and will also have a copy of all the objects in that domain (all objects and attributes).
Read-Only Domain Controllers (RODCs)
One of the features in the days of Windows NT 4 domain architecture was that we had a primary domain controller (PDC), and all other controllers were backup domain controllers (BDCs). Those BDCs held only a readable copy of the database. Active Directory functions quite a bit differently in that every DC has a complete copy of the database that can be written to. However, with Windows Server 2008 we see the return of the RODC, but with a specific purpose.
RODCs are designed with branch offices in mind. Having an RODC in a remote location (perhaps even a less secure location) than a standard DC will mean persons can log in without sending credentials over a WAN connection (which may be a slow connection), but a person cannot break into the RODC and make any domain configuration changes because it is read-only.
In addition, rather than having a full copy of the domain database sent over to the branch office location across a WAN link (which, again, may be very slow), you can configure the RODC to hold only a copy of the site it is located within. You can also assign permission for a local administrator to maintain and handle that server, without giving that person any level of control over the domain objects.
Note
There are times when other application servers require a writable DC, as in the case of Exchange 2007, Service Pack 1. So you need to be careful when deciding to implement an RODC.
Promote Servers as Domain Controllers
Solution: An Active Directory domain begins with the installation of a single DC. To ensure that the first controller will work, however, you might need to make decisions about your DNS infrastructure. If you have one already, you need to ensure that it is ready for Active Directory. If you do not have one, you may choose to install DNS when you install your first DC.
However, you also need to consider the installation of additional DCs and possibly RODCs. You will need to design your forest (starting with its name) and possible child domains. (As you read the previous section, you learned about sites and physical boundaries that may come into play.) You may also want to install DCs through an unattended installation with answer files. Yes, it can all become quite complicated.
But let’s go back a step and install the first DC, with DNS included in the installation.
Install the First DC of the Forest
Although there are a variety of different ways to set up DCs, in setting up this first one, you are going to start with the basics:
1. To begin the process, from a Windows Server 2008 system that is acting as a member server (that is, not running AD DS), click Start and enter dcpromo in the Instant Search pane (or in the Run dialog). The system checks whether AD DS binaries are installed, and then it installs them. These might already be installed if you ran dcpromo command at an earlier time and cancelled the operation.
2. On the Active Directory Domain Services Installation Wizard startup screen (shown in Figure 9.2), click Next or select the checkbox Use Advanced Mode Installation and then click Next. (You might want to check the box because you might want to see some of the valuable configuration screens that are added to the installation.)
Figure 9.2 The Active Directory Domain Services Installation Wizard.

3. If you have selected advanced mode, you see some information regarding OS compatibility (because of the improved security settings in Windows Server 2008). Read the information and click Next.
4. Under Choose a Deployment Configuration, because this is the first DC in the forest, choose Create a New Domain in a Forest and click Next.
5. Provide the fully qualified domain name (FQDN) of the new forest root domain (for example, corp.contoso.com). Normally, you’d think about your company name and the name you have registered and then, if you choose to use the same name, enter that here. In this scenario, however, enter primatech.com and click Next.
6. The wizard checks to see if this name is already in use, and if it is not, it takes you to the Domain NetBIOS Name screen, which it fills in for you. Change it if you like and click Next.
7. When you are asked to set the forest functional level, choose Windows 2000, Windows Server 2003, or Windows Server 2008. Because this is a brand new forest, you would most likely want to choose Windows Server 2008 and click Next.
Note
As you select the functional level you want, you are shown details that indicate what features are being added with each choice. There are new features between the Windows 2000 and Windows Server 2003 options; however, there are no new features in choosing Windows Server 2008 over Windows Server 2003. The only valid distinction to keep in mind with choosing Windows Server 2008 is that you will be able to add to this forest only DCs that are running Windows Server 2008 or later.
8. If you select Windows Server 2008 as the forest functional level, you do not see Set Domain Functional Level because it is automatically set to Server 2008. If, however, you did not choose Windows Server 2008, you need to choose a domain functional level and click Next.
9. In the Additional Domain Controller Options page, choose to install DNS as an additional option. Because this is the first DC of the forest and/or domain, it is automatically a global catalog server, and that option is selected. There is another option to install as an RODC, but it will be disabled due to the fact that this is your first DC in a new forest and/or domain and therefore cannot be an RODC. In this case, you leave the default settings that install DNS with Active Directory and click Next.
Note
You may see a warning sign because the wizard is not able to create a delegation for the DNS server. In this case, because you are not integrating with an existing DNS server and are making this server a DNS server, you do not have to worry about this warning. Click Yes to continue.
10. Provide the location for the database, log, and SYSVOL folders:
• Database: Stores information about the objects (such as users and computers) on the network
• Logs: Record activities related to Active Directory (such as object updates)
• SYSVOL: Contains Group Policy objects and scripts
Each of these is important. Select locations (or leave the default) and click Next.
11. On the Directory Services Restore Mode Administrator Password page, provide a password for the Administrator account that will be used when the DC is started in Active Directory Directory Services Restore Mode (AD DSRM). Make sure the password you use meets the complexity requirements, or you receive an error.
12. On the Summary page, examine the settings you have chosen or click Export Settings to create an answer file for use with unattended Active Directory configurations. Click Next.
13. A variety of different options are established (DNS, Group Policy Management Console installation, and so forth). When this process is complete, click Finish on the final screen.
14. Restart the server, and the AD DS goes into action.
After you reboot the system, note the new tools available Administrative Tools. They include the following:
• Active Directory Domains and Trusts
• Active Directory Sites and Services
• Active Directory Users and Computers
• ADSI Edit
• DNS
• Group Policy Management
Setting Up Additional DCs
To add more DCs to an existing forest (after the first DC has been created), you run the Active Directory Domain Services Installation Wizard again through dcpromo.
The difference with setting up an additional DC is that when the wizard brings you to the Choose a Deployment Configuration page, you now select Existing Forest, as shown in Figure 9.3.
Figure 9.3 Choosing a deployment configuration.

You can now choose to do one of the following:
• Add a domain controller to an existing domain.
• Create a new domain in an existing forest. (This server will become the first DC in the new domain.)
• Create a new domain tree root instead of a new child domain.
On the Network Credentials page, type in the name of the domain you are looking to add this server to and indicate whether there are alternate credentials you want to use.
Note
To add a DC to a domain, you need to be a member of the Enterprise Admins group and the Domain Admins group for that domain.
You then select a domain and a site or choose the option Use the Site That Corresponds to the IP Address of This Computer.
When you come to the Additional Domain Controller Options screen, you need to decide whether you want to make this server a DNS server, a global catalog server, or an RODC.
On the Install from Media page, you would most likely choose Replicate Data over the Network from an Existing Domain Controller, unless you have a reason to choose otherwise.
On the Source Domain Controller page, you can choose Let the Wizard Choose an Appropriate Domain Controller or Use This Specific Domain Controller and choose the one you think is best.
Note
A replication partner imposes certain logical restrictions. For example, an RODC cannot be an installation partner. If you are installing an RODC, you need a DC that runs Windows Server 2008 for an installation partner. Only DCs within a domain can be installation partners for one another.
For the most part, the rest of the options and dialog screens in the wizard are the same as in the preceding section.
Install an RODC
Recall that an RODC is a DC that you might utilize when you are working with a branch office situation that doesn’t require write capability to the domain (and might be a security risk if you did use a traditional DC).
During the installation procedure, when you reach the Additional Domain Controller Options page, you can choose the Read-Only Domain Controller (RODC) option, as shown in Figure 9.4.

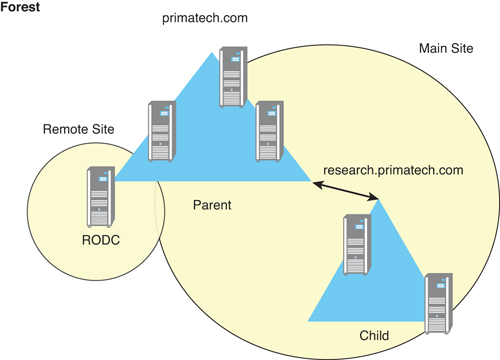
When you select this option, you need to select other options as well. You need to establish a password replication policy in the Specify the Password Replication Policy window, as shown in Figure 9.5. This policy determines which users and their user object information will be replicated to the RODC and stored locally. You can select Deny or Allow as setting choices.
Figure 9.5 The password replication policy.
Note
Typically you want to allow password replication for the accounts that belong in the site where the RODC is located. Then those accounts can authenticate locally against that RODC. However, accounts that are perhaps used only at main sites should not be replicated down to this RODC. It is recommended that you use global groups to control the replication and replicate only those accounts you need to replicate.
An interesting feature is the Delegation of RODC Installation and Administration page, where you can specify a user or group that can administer the RODC locally.
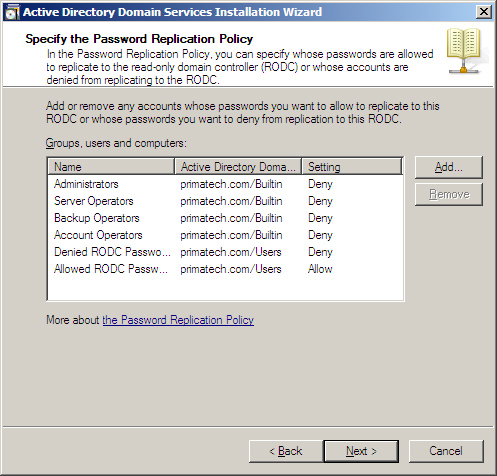
Install from Media
At times you might want to install from media for your DCs because the amount of data transfer over your network lines may be excessive. This is especially the case when you have remote locations with slow WAN links. Installation from Media (IFM) begins with the process of capturing the Active Directory database from an existing DC and then pulls it into your remote DC.
To capture the existing DC, you would use NTDSUTIL. There is some flexibility as to what you can capture. You can choose one of the following four options:
• Create IMF media for a full AD DC or an AD LDS instance.
• Create IMF media without SYSVOL for a full AD DC or AD LDS instance.
• Create IMF media for an RODC.
• Create IMF media without SYSVOL for an RODC.
Depending on which version you choose, you use the NTDSUTIL command on a DC to create the IMF.
When you are doing the installation, you come to the Install from Media screen (shown in Figure 9.6,) where you can select Replicate Data from Media at the Following Location and select the location.
Figure 9.6 The Install from Media page.
Prepare an Existing Domain Schema
In the event that you are attempting to install a Windows Server 2008 machine running AD DS into an existing Windows 2000 Server/Windows Server 2003 domain, you need to modify the schema to reflect this. To accomplish this, you use the adprep command.
To access this command, you use your Windows Server 2008 media and locate the sourcesadprep folder for the command under the command prompt. The adprep command comes with familiar switches (familiar because they were also available in Windows Server 2003) and one new one, /rodcPrep. These are the switches:
• /forestPrep: Updates forest information. Must be run on the Schema Master role.
• /domainPrep: Updates domain information. Must be run on the Infrastructure Master role. Must be run after /forestPrep is finished.
• /domainprep/gpprep: Updates permissions on Group Policy objects in AD DS and SYSVOL. Must be run on the Infrastructure Master role. Must be run after /forestPrep is finished. (You use this switch only if your DCs are running Windows 2000 Server. Otherwise, /domainPrep is fine.)
• /rodcPrep: Updates permissions on Nondomain Naming Context (NDNC) partitions to enable replication for RODCs. Runs remotely and contacts an NDNC replica to update permissions. Must be run after /forestPrep is finished. Can be rerun at any time. You should run this in particular when you have DNS application partitions in your forest.
Create Active Directory Objects
Solution: The creation of objects (computer, contact, group, OU, printer user, and so on) can all be handled with the tool Active Directory Users and Computers. To open this tool, you select Start, Administrative Tools, Active Directory Users and Computers. You then see a hierarchy of items under your domain.
Note that there are automatic containers in place (such as Computers and Users). You also see objects that were created automatically for you when you created the first DC. The computer that is the first DC becomes an object (for example, in the DCs built-in OU). As you add new DCs, they are automatically added. Computers you join to the domain go in the Computers container automatically. Users and groups—such as the Administrator account and various groups, such as the Enterprise Admins and Domain Admins security groups—already exist in the Users container.
Before you begin inadvertently creating new objects, it’s a good idea to consider an OU structure to put in place.
Design and Create an OU Structure
Creating an OU design is important when you first establish your Active Directory domain. Over time, your OUs may grow beyond your initial plan, but you should start things off right. Now, the matter of “right” is a matter of opinion. For example, you might create an OU structure based on location. Or perhaps on department. Or perhaps a combination of both. Each environment is a little different, so this requires some thought.
Let’s consider an example. Primatech is a company that has a main headquarters with four branch offices. Let’s say the offices are all under a single domain structure. In this case, you might create an OU based on each branch office location. However, if each branch has its own child domain, you might create departmental OUs within each domain.
In keeping with the first scenario, you could create OUs that relate to locations and then sub-OUs for individual departments. If it seems like a lot of planning and work, well...planning takes the majority of the time. Actually creating an OU once you have the design in place takes seconds.
To create an OU in Active Directory, perform the following steps:
1. Select Start, Administrative Tools, Active Directory Users and Computers.
2. Your first OU is at the domain level, so begin by right-clicking the domain name and then choosing New, Organizational Unit (as shown in Figure 9.7).

3. When you are asked for a name, provide the name and click OK.
You should see your OU in the hierarchy now, and it will stand out as being different from containers because the folder will have a little graphic inside.
Note
When creating an OU, you see the Protect Container from Accidental Deletion checkbox, which is enabled by default. Enabling this checkbox denies all administrators or users of the domain and DC the ability to delete this object.
Note
To create OUs within OUs, you simply right-click the OU you want to nest within and then select New, Organizational Unit. The console knows you are attempting to create the OU within that particular OU.
Create Computer Objects
Typically, a computer object is created automatically if you add that computer to the domain manually at the workstation level. At that time, you are asked for the credentials necessary to accomplish the addition, and the computer is added to the Computers container. You can choose to move it from there to an OU at a later time.
However, you can also add computers to Active Directory ahead of time, but you need to be a member of the Account Operators group, the Domain Admins group, or the Enterprise Admins group (or been assigned the correct permissions). Adding computer objects prior to their deployment may facilitate the process when you are deploying many systems through an automated deployment across your organization.
Note
The concept of linking physical computers to computer account objects is called prestaging. (Prestaged clients are also referred to as known computers.) The benefits of prestaging include added security and greater flexibility.
To add a computer object, perform the following steps:
1. Select the domain or OU you want to add the computer to.
2. Right-click the domain/OU and then select New, Computer.
3. Provide a computer name (for peer connections) and a computer name (for legacy pre-Windows 2000).
4. Select a user or group. The default is Domain Admins.
5. Select the Pre-Windows 2000 Computer checkbox if applicable.
6. Click OK.
After the computer account is created, you can right-click the account and select Properties. You then see seven tabs you can work with to include further details regarding that account:
• General: This tab provides mostly preset information regarding the name, DNS name, DC type, site, and a configurable description. (On DCs there is a button for NTDS options.)
• Operating System: This is another tab that shows the OS name, version, and service pack.
• Member Of: This tab indicates the groups or built-in security principles the computer belongs to.
• Delegation: Delegation is a security-sensitive operation that allows services to act on behalf of another user. Options include trusting or not trusting the computer for delegation and combinations of trust for Kerberos only or specified services.
• Location: On this tab, you can indicate the location of the system.
• Managed By: Here you can configure the user or built-in security principle that manages this computer. If attributes are configured for the user (for example, office, street, city), those options are automatically displayed on this tab.
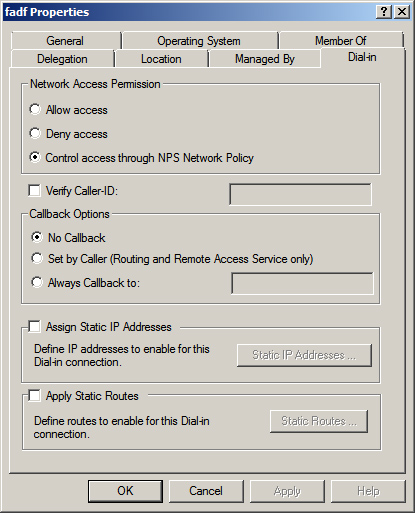
• Dial-in: This tab offers a variety of important settings, as you can see in Figure 9.8. You can allow or deny or control network access permission. You can verify caller ID, set callback options, and assign static IP addresses and static routes.
Figure 9.8 Configuring computer dial-in properties.
Create User Objects
Ultimately, it all comes down to the user, doesn’t it? What is the point of setting up a directory service if a user cannot sit down at his system, type in a user name and password, and access the network? From the administrator’s perspective, it’s the fact that you can track, control, and enforce policy over users that gives Active Directory its true value. In either case, however, the user object must be created first.
To create a new user, you perform the following steps:
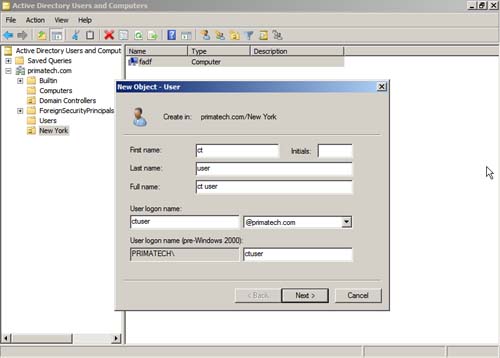
1. Select the domain, built-in users container, or specific OU and then right-click that element. Choose New, User.
2. In the New Object – User dialog shown in Figure 9.9, provide basic information such as first name, initials, last name, and full name. Also provide the user logon name and the domain it belongs to. The pre-Windows 2000 portion fills itself in when you put in the logon name. Make alterations to these items, if needed, and then click Next.
Figure 9.9 Creating a new user.
3. Create a password and confirm that password. Also choose any of the following four checkboxes, as necessary:
• User Must Change Password at Next Logon
• User Cannot Change Password
• Password Never Expires
• Account Is Disabled
After you’ve selected your options, click Next.
4. Review your options and create the user by clicking Finish.
After the new user is created, you can right-click the user and click Properties to see the many tabs with available properties to configure regarding a user. These are the tabs:
• General: This tab allows you to include quite a bit of personal information regarding the person: name, description, office, telephone, e-mail address, and more.
• Address: This tab allows you to provide the full address of the person, including city, state, zip, and country.
• Account: This tab is an important one for administrators because you can configure items such as logon hours (to determine a set time when a person can log in), logon options (to establish which machines the individual can log on to), account options, and expiration date settings.
• Profile: This tab allows you to configure the location of a computer profile (which includes items such as your wallpaper and personal settings that make up your unique profile) and logon script. It also allows you to determine the location of a home folder.
• Telephones: This tab allows you to configure all the possible phone numbers a person might use (home, pager, mobile, fax, and IP phone) and also has a Notes section.
• Organization: This tab contains the person’s job title, department, company, manager name, and a Direct Reports section.
• Remote Control: This tab allows you to manually configure Terminal Services remote control settings. You can enable/disable, require the user’s permission, and specify a level of control.
• Terminal Services Profile: You use this tab to configure the Terminal Services user profile, such as the profile path and home folder.
• COM+: This tab allows you to configure a COM+ partition set for the user.
Note
COM+ partitions are a very specific set of COM components that are developed to work together for services such as queuing, role-based security, and so forth. Unless you have a need to configure multiple COM+ partitions, such as when you need to make two or more versions of an application available to users within your domain, you don’t typically need to worry about this feature.
• Member Of: This tab indicates the groups a person belongs to or is a member of.
• Dial-in: Much like this identical tab for computer properties, this tab allows you to configure a variety of settings, such as allow/deny or control network access permission. You can verify caller ID, set callback options, and assign static IP addresses and static routes.
• Environment: You use this tab to configure the Terminal Services startup environment. You can configure a starting program and whether you want certain devices to be connected (drives, client/main printers).
• Sessions: You use this tab to set Terminal Services timeout and reconnection settings.
Note
In the event that a user leaves the company and you aren’t certain about deleting the account right away, you can right-click the account and choose Disable Account (and, conversely, if the person returns, you choose Enable Account). You can also right-click an account and choose Reset Password if a user has lost her password. And if a user account has property settings you need to duplicate for other users you need to create, you can right-click the account and choose Copy. Finally, if you need to move a user or computer account from one container or OU to another, you can right-click the object(s) and choose Move.
Work with Site and Domain Consoles
Solution: Every console contains a bevy of tools. It’s good to know which ones might overlap with other consoles—remember that there is always more than one way to accomplish a task—and which ones are unique to the console you are working in. In addition, it is important to know why you would reach out to these consoles because in smaller environments, you might never need them.
Active Directory Sites and Services
While there are many different configuration options with the Sites and Services tool, the following are a few of the most common items you might want to consider.
Change the Default-First-Site-Name Name
An administrator with a single site will typically leave the setting Default-First-Site-Name, even though it is quite easy to change. To change the name, perform the following steps:
1. Select Start, Administrative Tools, Active Directory Sites and Services.
2. Expand the Sites folder and look for the Default-First-Site-Name option.
3. Right-click Default-First-Site-Name and choose Rename.
4. Type in the new name and press Enter.
Enable Global Catalog
It is easy to see whether your DCs are also global catalog servers (meaning that they hold a copy of all the objects and attributes for your entire domain). It’s also a simple matter of selecting a checkbox to allow an existing DC to also be a GC.
Note
You should have at least one GC per site.
To enable a GC, perform the following steps:
1. Select Start, Administrative Tools, Active Directory Sites and Services.
2. Expand the Sites folder and then expand the site that has the server you are looking for.
3. Expand the Servers folder and select the server on which you are going to enable GC.
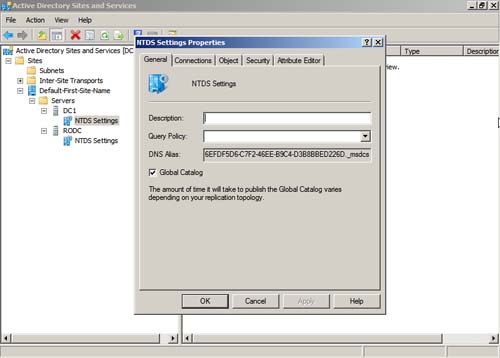
4. Expand the server, right-click NTDS Settings, and choose Properties.
5. On the General tab, shown in Figure 9.10, select the Global Catalog checkbox and click OK.
Figure 9.10 Enabling the Global Catalog setting.
Note
You can establish this same setting from within the Active Directory Users and Computers tool. To do so, go to the Domain Controllers container, and when you access the properties of any of the systems, you can see on the General tab a button that says NTDS Settings. When you select this, you then see the checkbox on the General tab that allows you to enable/disable the GC.
While working with the NTDS settings, you might want to take note of some of the other tabs and settings.
Create a New Site
Sites and subnets are logical representations of physical realities. Your network has routers and IP addressing already in place that you want to utilize in order to ensure that replication breaks exist between your Active Directory sites. The goal is to mirror your physical topology.
Multiple physical subnets may exist within a single site. You can maintain those subnets under one site for Active Directory if the replication factor is not a bandwidth issue, or you can break them up based on those subnets. You may also have multiple sites (physical locations) that have unique subnetting. That would lend itself more easily to a site design because you can quickly see the value and necessity of creating new logical sites based on the physical sites within your organization.
To begin, you need to create a new logical site. To do this, perform the following steps:
1. Select Start, Administrative Tools, Active Directory Sites and Services.
2. Right-click the Sites folder and choose New Site.
3. Enter a name for the site. Note that you cannot use spaces or special characters. A typical name would describe the location (for example, NewYork).
4. Select a site link object. By default, there is only one, DEFAULTIPSITELINK. Then click OK. You receive a message explaining what you need to do, with a list of configuration necessities to make this site function:
• Ensure that the site is linked to other sites with site links, where appropriate.
• Add subnets to the Subnets container.
• Install or move DCs to the site.
5. Click OK, and you are now able to see your new site.
After the site is created, you can assign IP subnets to it, and you can then move servers over to it (or add them directly to the site when you set them up as DCs).
Create a New Subnet
To create a new subnet, perform the following steps:
1. Select Start, Administrative Tools, Active Directory Sites and Services.
2. Expand the Sites branch, right-click Subnets, and choose New Subnet.
3. At this point, you are asked to enter the address prefix, using the network prefix notation address/prefix length. So, for an IPv4 prefix, you might use 157.54.208.0/20, and for an IPv6 prefix you might use 3FFE:FFFF:0:C000::/64
4. Select a site object for the prefix.
5. Click OK.
Keep in mind that you can add more subnets to the mix and assign them under the same site. A site can hold multiple subnets.
Move a DC to a New Site
To move a DC to a new site, follow these steps:
1. Select Start, Administrative Tools, Active Directory Sites and Services.
2. Expand the Sites branch and expand the site that has the server you want to move (for example, Default-First-Site-Name). Expand the Servers branch.
3. Right-click the server you want to move and choose Move.
4. Select the site that should contain the server and click OK.
Working with Site Links and Replication
Typically, sites contain servers that replicate to one another through intrasite replication and replicate between sites through intersite replication.
The Active Directory Knowledge Consistency Checker (KCC) automatically builds the connections to allow for replication. Understanding that WAN links between sites may have limited bandwidth, the KCC is able to configure a topology that uses a least-cost spanning tree design. In other words, in a large environment where items need to replicate from one site to the next, the KCC considers the big picture of bandwidth and makes an estimated best-guess topology based on how items should replicate.
While you do not have to create the connection objects for your sites, you may want to intervene in the timing of intersite replication. To adjust your site link settings, perform the following steps:
1. Select Start, Administrative Tools, Active Directory Sites and Services.
2. Expand the Sites branch and expand the Inter-Site Transports folder.
3. Select IP. DEFAULTIPSITELINK is probably all you see if you are just getting started with your site topology.
4. Right-click the site link and choose Properties.
5. On the General tab, look at which sites are in the site link and look at the cost, the replication frequency (the default is 180 minutes), and the Change Schedule button. Use these settings to manually adjust the site link replication properties.
Check Replication Topology
Although the KCC manages replication quite amazingly, there are times when you might remove a DC from your environment, and the replication topology doesn’t catch up quickly. To correct this, you can initiate Check Replication Topology. To do this, perform the following steps:
1. Select Start, Administrative Tools, Active Directory Sites and Services.
2. Expand the Sites branch and expand the site. Expand the Servers folder and expand a server.
3. Right-click NTDS Settings and choose All Tasks and Check Replication Topology.
Manage and Modify Replication
There are tools for working with replication a bit more. For example, you can use the Replication Diagnostics utility (Repadmin.exe) to verify and troubleshoot replication.
Note
To locate Repadmin.exe and a host of other advanced tools, you can open Server Manager on the DC. Expand the Roles branch and select Active Directory Domain Services. Scroll down to Advanced Tools, and you see the many different AD DS tools that can help you.
Active Directory Domains and Trusts
We mentioned earlier that domains within a forest form automatic two-way transitive trusts with other (child- and parent-level) domains within the forest. You can therefore grant permissions for resources.
There are times when you might want to form an external trust relationship with another forest/domain. The tool for this is Active Directory Domains and Trusts. However, this tool also includes other somewhat hidden features.
Raising Domain and Forest Functional Levels
Determining the level of forest and domain function involves the ability for Active Directory to either assume all the functionality that comes with a Windows Server 2008 level or maintain a functionality with legacy servers and systems (Windows 2000/Windows Server 2003), depending on the functional level you choose.
However, if you want to raise the domain or forest functional level, you can do so from the Active Directory Domains and Trusts tool.
Note
You can also raise the functional level of a domain by using the Active Directory Users and Computers tool.
To raise the forest functional level, perform the following steps:
1. Select Start, Administrative Tools, Active Directory Domains and Trusts.
2. Right-click the top of the hierarchy, where it says Active Directory Domains and Trusts, and select Raise Forest Functional Level.
3. Select the level you want (unless you are already at the highest level).
To raise the domain functional level, perform the following steps:
1. Select Start, Administrative Tools, Active Directory Domains and Trusts.
2. Right-click the domain and select Raise Domain Functional Level.
3. Select the level you want (unless you are already at the highest level).
Note
Again, this is a one-way process, not something you can undo after you agree to raise it.
Changing Operations Master Roles
You can change the Domain Naming Master role from within the Active Directory Domains and Trusts tool. To do this, perform the following steps:
1. Click Start, Administrative Tools, Active Directory Domains and Trusts.
2. Right-click the top of the hierarchy, where it says Active Directory Domains and Trusts, and select Operations Master.
3. Click Change to transfer the role to another DC.
At times a server may crash before you are able to transfer the role to another server. If the server is not repairable in a reasonable amount of time and you need to perform a task that requires one of the Domain Naming Master roles, then you will need to seize that role. To do this, you use the ntdsutil command. You can learn more about this command from the Microsoft Help and Support site, at http://support.microsoft.com/kb/255504.
Note
To change the RID Master, PDC Emulator, and Infrastructure Master roles, you use the Active Directory Users and Computers tool. You right-click the top of the hierarchy and select Operations Masters to see the tabs where you indicate changes. To change the Schema Master role, you would use the Active Directory Schema snap-in. You can also perform these transfers by using PowerShell with Move-ADDirectoryServerOperationMasterRole.
Create an External Trust
To establish manual trusts with external domains, perform the following steps:
1. Select Start, Administrative Tools, Active Directory Domains and Trusts.
2. Right-click the domain and select Properties.
3. Select the Trust tab and click the button on the bottom that says New Trust. The New Trust Wizard launches. You can use this wizard to create a trust to connect to one of the following:
• A Windows domain in this forest or in another forest
• A Windows NT 4.0 domain
• A Kerberos V5 realm trust
• Another forest
4. Click Next and follow the prompts to complete the trust relationship. Depending on your choices, you will be presented with a variety of different options.
Note
To see detailed instructions for every type of trust you might create and the step-by-step method for doing so, visit the Windows Server TechCenter from TechNet, at http://technet.microsoft.com/en-us/library/cc816837.aspx.
Utilize Other Active Directory Services
Solution: Additional Active Directory services, including the following, can be installed for specific purpose:
• Active Directory Certificate Services (AD CS): This tool is used to create CAs and related role services that allow you to issue and manage certificates used in a variety of applications.
• Active Directory Federation Services (AD FS): This tool provides simplified, secured identity federation and Web single sign-on capabilities.
• Active Directory Lightweight Directory Services (AD LDS): This tool provides a store for application-specific data for directory-enabled applications that do not require the infrastructure of AD DS.
• Active Directory Rights Management Services (AD RMS): This tool helps you protect information from unauthorized use. It establishes the identity of users and provides authorized users with licenses for protected information.
It may be difficult for you to see the practical value of these tools up front.
AD LDS, for example, is the update to what was called Active Directory Application Mode in Windows Server 2003. It’s really just an LDAP database where you can store information such as application credentials (although not security principles). One example of its use is in Exchange 2007 Edge Transport role servers. An Edge Transport server resides in the DMZ and is not a part of Active Directory. However, you need to install AD LDS in order for it to work and function.
From a practical standpoint, AD FS provides a single sign-on for enterprise scenarios. Consider, for example, two companies, Company A and Company B. Let’s say that Company A has Active Directory, and users log in without a problem. Company B has a website that requires login using internal credentials. Through AD FS, you can establish a connection between the two so that users who log in in Company A can access the website (or SharePoint, perhaps) resources without logging in with an account in Company B.
AD RMS allows you, as one person put it, to “bake” permissions into a document. These RMS permissions go beyond standard NTFS permissions and relate to documentation issues such as printing, copying to the clipboard, and so forth. So you might be able to view a document but not copy it or e-mail it to another person.
AD CS goes beyond certificate services in times past, where you might have set up a certificate server, but it provides a full-production Public Key Infrastructure (PKI) for an enterprise.
Improve Active Directory with Windows Server 2008 R2
Solution: Yes and no. There have been impressive improvements (seen and unseen) in Active Directory with each release of Windows Server. Windows Server 2008 R2 carries on that tradition but brings with it enhancements that make it unique. Those enhancements include the following:
• A new Active Directory module for Windows PowerShell: This new module (named ActiveDirectory) replaces the large variety of command-line tools that used to work with Active Directory in times past. Now you have a centralized method of administering Active Directory from the command line. There are about 85 Active Directory–oriented PowerShell cmdlets, enabling you to script Active Directory tasks through PowerShell much more easily.
• Active Directory Administrative Center: A new GUI interface allows you to access the same features in the Active Directory Users and Computers tool but with a few new features, such as a list view and breadcrumb bar navigation; it is really a task-oriented interface based on the new PowerShell cmdlets that will provide another method of administration.
• A Recycle Bin: Have you ever accidentally deleted an item (for example, a document, an e-mail message)? Now you can retrieve those items from an Active Directory Recycle Bin. It requires the R2 forest functional level (so that may be a bit of a task for companies that are not ready to go full R2), but it is nice to know it exists.
• Active Directory Best Practices Analyzer: This tool goes through your AD DS and determines whether you are meeting best practice standards and reports back the good, the bad, and the ugly. It also provides instruction on what you need to do to meet best practices for Active Directory.
These features are joined by a few others, including offline domain joining, managed service accounts, the Active Directory Management Pack (for working with System Center Operations Manager, the upgrade to MOM), authentication management assurance, and Active Directory Web Services.