Chapter 6. Work with IIS 7.0
IN THIS CHAPTER
• Create, Configure, and Manage New Websites
• Use the Command Line with IIS 7.0
• See What’s New in Windows Server 2008 R2
Install the Web Server Role
Solution: You can use Server Manager to install the Web Server role on a Windows Server 2008 machine. When you do so, IIS 7.0 is installed. IIS 7.0 has been restructured in order to improve the following:
• Security
• Support costs
• Web space management
• Time-saving workability
IIS 7.0 builds on the security enhancements made to IIS 6.0 to reduce surface area. IIS 6.0 improved security by locking down IIS; the default operating system installation did not include the installation of IIS services. When you installed IIS 6.0, not all the components were activated. IIS 7.0 takes security to a new level. Not only does IIS 7.0 not install by default, but when you do install the Web Server role, only the basic components are installed, to allow static websites supporting HTML and image files. All other components are not even installed. There are more than 40 installable components for the Web Server role. The ability to install only the components you need has many advantages, including the following:
• Having fewer installed components reduces the surface area for attacks.
• You have fewer components to manage, update, and maintain.
• Less components running in memory increases performance, reliability, and scalability.
• The footprint is smaller.
The steps to install the Web Server role are as follows:
1. Open Server Manager and click on Add Roles.
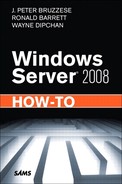
2. On the Select Server Roles page, select Web Server (IIS). If there are any dependent features needed, you are prompted to install them as well (see Figure 6.1). Click Add Required Features and then Next.
Figure 6.1 Installing dependent features.
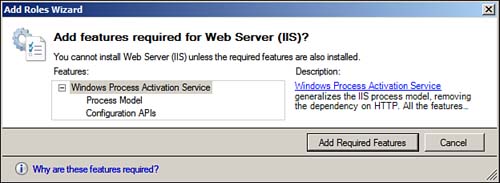
3. You now see an introduction to the Web Server role, some things to take note of, and some links to get more information. Notice that the default installation allows you to host static content with only minor customizations, monitor and log server activity, and configure static content compression (see Figure 6.2). Click Next.
Figure 6.2 Introduction to the Web Server role.
4. The Select Role Services page allows you to add the services needed (see Figure 6.3). This is where you can see the componential design of IIS 7.0. Approach this page with care and add only the components or services that you definitely need. The idea here is to have the fewest possible components installed in order to reduce surface area. Make the following selections on this page:
• Common HTTP Features
• Static Content (selected by default)
• Default Document (selected by default)
• Directory Browsing (selected by default)
• HTTP Errors (selected by default)
• HTTP Redirection
• Application Development
• ASP.NET
• .NET Extensibility
• ASP
• CGI
• ISAPI Extensions
• ISAPI Filters
• Server Side Includes
• Health and Diagnostics
• HTTP Logging (selected by default)
• Logging Tools
• Request Monitor (selected by default)
• Tracing
• Custom Logging
• ODBC Logging
• Security
• Base Authentication
• Windows Authentication
• Digest Authentication
• Client Certificate Mapping Authentication
• IIS Client Certificate Mapping Authentication
• URL Authorization
• Request Filtering (selected by default)
• IP and Domain Restrictions
• Performance
• Static Content Compression (selected by default)
• Dynamic Content Compression
• IIS Management Console (selected by default)
• IIS Management Scripts and Tools
• Management Service
• IIS 6 Management Compatibility
• IIS 6 Metabase Compatibility
• IIS 6 WMI Compatibility
• IIS 6 Scripting Tools
• IIS 6 Management Console
• FTP Publishing Service
• FTP Server
• FTP Management Console
Figure 6.3 Adding only the services you need.

Leave the default services selected and click Next.
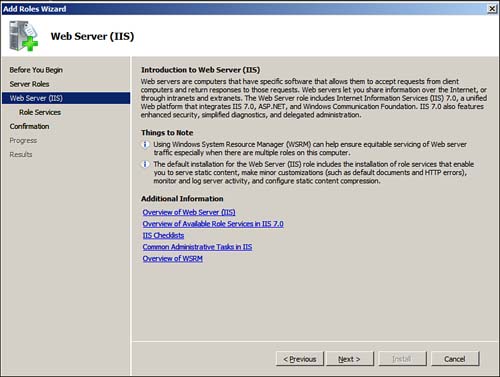
5. On the Confirm Installation Selections page, check your selections to make sure you have everything you need selected and make sure you have not selected any unnecessary services (see Figure 6.4). When you are sure that you have made the correct selections, click Install.
Figure 6.4 Confirming that you have added only the needed services.
6. As the installation is initialized, view the progress via the progress bar on the lower portion of the page (see Figure 6.5).
Figure 6.5 Viewing installation progress.

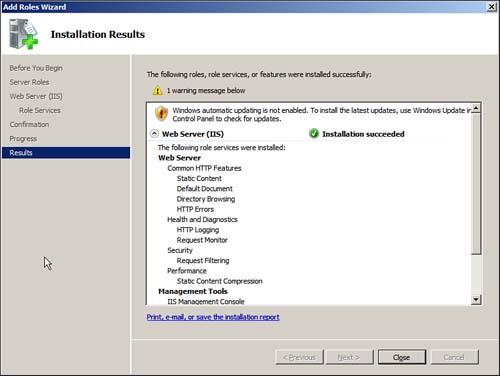
7. When the installation is complete, you are taken to the Installation Results page, which lets you know if there were any issues with the installation and whether the installation was successful, as shown in Figure 6.6. If you like, save, print, or e-mail the Installation Results page.
Figure 6.6 Installation Results page
8. Click Close. You have successfully added the Web Server role to Windows Server 2008.
9. To confirm that your installation is successful, open your browser and go to http://localhost. You should see an IIS 7.0 welcome screen.
The Web Server role can also be installed using the command-line tool pkgmgr.exe. pkgmgr.exe replaces sysocmgr.exe, which was used in earlier versions of Windows to install and uninstall optional features. One drawback to installing the Web Server role using the pkgmgr.exe tool is that you need to know the exact name of each package you want to install, as well as the names of any dependent packages. With the GUI interface in Server Manager, you just needed to check what you want from a list, and you are prompted if any dependent packages are needed.
To install the Web Server role via a command prompt, you will perform the following steps:
1. As an administrator, open a command prompt.
2. Type the following command:
![]()
Note
The /w in this command causes the command prompt to wait until the job has completed before returning it to you.
When your command prompt is returned to you, the installation is complete.
3. To ensure that you have installed the Web Server role with only the default services, open Server Manager and navigate to the roles and then drill down on the Web Server role.
4. To add more components to your Web Server role, use pkgmgr.exe again. The following installs the FTP Publishing Service, FTP Server, and FTP Management components, along with their dependent components:
![]()
As you can see, to install the FTP components, you must know what the dependent components are. If you were to use Server Manager, you would be prompted to add needed components or services. You can take a look at the Web Server role in Server Manager to confirm that the additional components are now installed.
Note
You can use the pkgmgr.exe command-line tool in conjunction with an unattend.xml file to perform unattended installations of this role.
Getting the Web Server role installed is just the beginning of publishing your intranet site. You have, in effect, laid the foundation for your new intranet site. Now you need to create a website.
Create, Configure, and Manage New Websites
Solution: You will use the IIS Manager to build your first website in Windows Server 2008. Follow these steps:
1. Open the IIS Manager by selecting Start, Administrative Tools, Internet Information Services (IIS) Manager. (You may see Internet Information Services [IIS] 6.0 Manager if you installed it in the previous section.)
2. When the IIS Manager appears, as shown in Figure 6.7, note that it displays these four sections:
• Recent Connections
• Connection Tasks
• Online Resources
• IIS News (disabled by default)
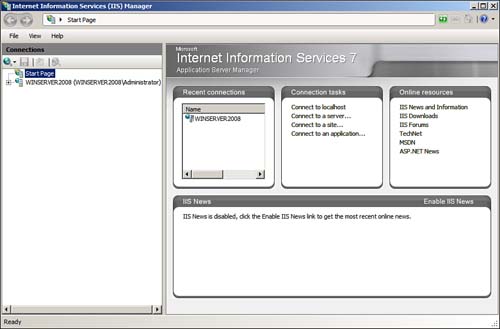
Note
You can enable IIS news by clicking the Enable IIS News link. The lower portion of the start page is then filled in with up-to-date information on IIS 7.0 and links to more information.
3. Expand the tree next to the server name and then select Sites.
4. On the right pane, click the Add Web Site link.
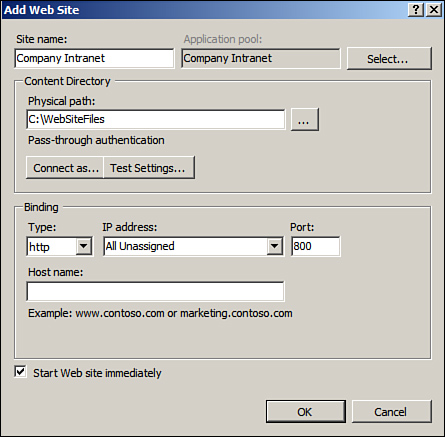
5. In the Add Web Site dialog box that appears (see Figure 6.8), supply the following details:
• Site Name: Call this site Company Intranet. Notice that as you define the site name, that name will also be entered in the Application Pool box. (You have the option to change the application pool by clicking Select to choose another available application pool.)
• Physical Path: Enter the path to the website content files. You can click the Connect As button to specify a user account to run the application pool’s worker process. By default, a low-level privileged account is used. This is for security reasons; you would not want a high-level privileged account used to run your web services. You can also test the settings to make sure they will work.
• Binding: Select the type of website (HTTP or HTTPS), the IP address or All Unassigned, and the port that should be used. In this example, choose a different port number because the default website is using 80.
• Host Name: Insert the host name for your website. Leave this blank for now.
• Start Web Site Immediately: Ensure that this box is selected (which it is by default).
Figure 6.8 The Add Web Site dialog box.
When you are done making these selections, click OK. You have now created a website.
6. If you had valid web content files in step 5 and have set the default document, go to HTTP://<Servername>:<PortNumber> to see your site.
When you have created your website, you can add a web application—a collection of content at the root level of a website or a collection of content at a folder below the root level of a website. When configuring a web application in IIS 7.0, you define a directory as the application’s root and then configure properties for the application (for example, the application pool in which the application will run).
Note
Application pools in IIS 7.0 allow websites on the same web server to run as separate processes; this is also known as sandboxing. Application pools define the borders for the applications or websites they contain. Any application or website running outside the borders of an application pool will not affect applications or websites running within the application pool. The advantage to this is that if one website or application hangs, you can restart that website or application without having to restart the others.
You can use IIS Manager to manage your new website. With this tool, you can do just about all you need to do with your websites. Figure 6.9 shows the configuration tools available in IIS Manager.
Figure 6.9 Managing your websites with IIS Manager.
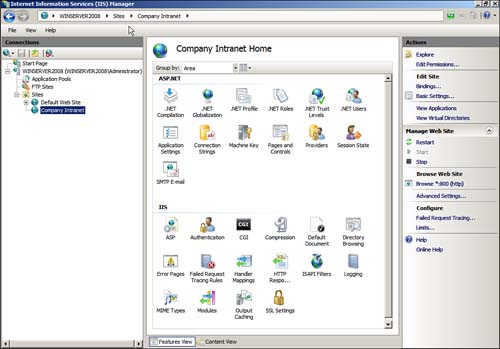
Here’s how you set your default document for the company intranet site:
1. In IIS Manager, navigate to your website and highlight it to display your configuration tools.
2. Under the IIS section (if grouped by area), double-click the Default Document applet.
3. On the default document page, add the name of the default document (that is, the page you want to display first when visiting your website). You will find some files already in there, with the entry type Inherited. If these files are not physically in the directory you configured the website to point to, they are not displayed. You can easily see what files are located in your home directory by clicking the View Content button at the bottom of the middle pane. Also, the order in which you place the files is the order in which IIS will search for the file to be displayed. If you do not see the web page file you want as the default document, you can add it now by clicking the Add link located at the top of the right pane. Enter the filename and click OK. The file is added to the top of your document list.
4. To get back to the website configuration page, double-click on the website in the left pane again.
As you can see, this is just one of many possible configuration changes. In fact, IIS 7.0 could be the subject of an entire book. However, this section shows the basics of where to go and how to use IIS Manager to create, configure, and manage your website. The next important area we need to cover is security.
Secure Websites
Solution: When considering the security of you web server and websites, you have at your disposal a variety of features and tools that are part of IIS 7.0:
• Authentication: By default, IIS7.0 uses anonymous authentication.
• Authorization: You can define which resources a user has access to.
• Certificates: You can verify the identity of a website.
• ISAPI and CGI restrictions: You can allow/deny dynamic content to run on your server.
• SSL settings: You can encrypt data between the server and the client.
• HTTP filters: You can restrict the type of HTTP requests allowed.
• Roles: You can control security for a group of users.
• Trust levels: You can grant permissions via ASP.NET code security policy.
• Users: You can configure user access to web applications.
There are, however, a few tools that you should look at and manually configure, depending on your environment, to make sure you have secured your website:
• Employ Minimal Install (This is covered earlier, in the section “Install the Web Server Role.”)
IP and Domain Restrictions
With IP and Domain Restrictions, you can allow or deny access to a single IP address, a range of IP addresses, or a domain name. You need to take care when using domain names because they require reverse DNS lookups, which has an adverse affect on your server’s performance. IP and domain restrictions can be applied to individual websites or an entire web server.
Restrictive Authentication
You can employ many different methods of authentication:
• Anonymous: Any user can access content, with no prompt for username and password.
• ASP.NET Impersonation: You can run ASP.NET applications under a different security context than the default.
• Basic: This method requires a valid username and password.
• Client Certificate Mapping: This method allows automatic authentication for clients that log on with certificates.
• Digest: This method maps to a domain account for authentication, by using the domain controller. Also known as hashing.
• Forms: This method redirects unauthorized users to a form to provide credentials.
• Windows: You can use NTLM or Kerberos protocols to authenticate.
Only Anonymous authentication is enabled by default.
HTTP Request Filtering
The HTTP request filtering tool was an add-on in earlier versions of IIS. This feature allows you to control the type of requests that will be run on your website. You can apply the following filters:
• Double Encoded Requests: This denies double-encoded requests.
• High Bit Characters: This denies non-ASCII characters.
• Hidden Segments: This identifies which segments are servable.
• Base Extensions: This identifies which extensions are allowed.
• By Verbs: This identifies verbs that IIS will accept.
• Based on URL sequence: This identifies a number of sequences to reject when requested.
• Based on Request Limits: This is a mix of maxQueryString, MaxAllowedContentlength, and maxURL.
Restrict Directory Browsing
Directory browsing is disabled by default. If it is enabled, this feature allows the client to see the directories and drill down on the desired files. To use this feature, you must disable the default document feature. When Restrict Directory Browsing is enabled, you can restrict what the user will see while browsing. When you click the Directory Browsing applet in IIS Manager, you see these options:
• Time
• Size
• Extension
• Date (with a subfeature of long date)
Note
Again, in this chapter, we are just scratching the surface of the security options provided in IIS 7.0. To get more information, see http://IIS.net.
For now, let’s go through the steps to ensure that users must supply credentials to access content on your website:
1. Open IIS Manager.
2. Navigate to the website you would like to restrict.
3. Double-click the Authentication applet. The Authentication pane appears, as shown in Figure 6.10.
Figure 6.10 The Authentication pane in IIS Manager.
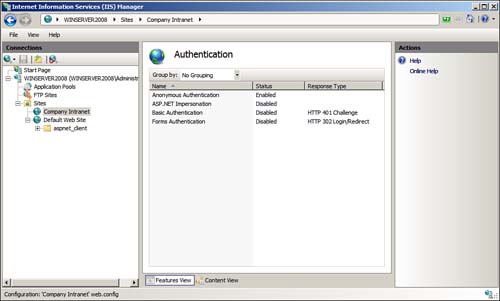
4. Notice that Anonymous Authentication is enabled by default. Click Anonymous Authentication and then click Disable in the Actions pane.
5. Click Basic Authentication and click Enable in the Actions pane.
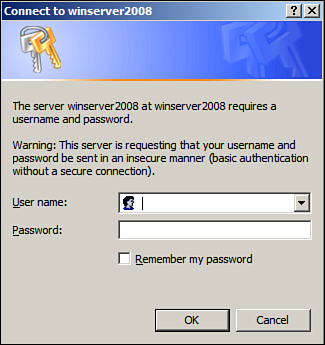
You have successfully placed an authentication restriction on your website. Now when users try to view your web content, they get a logon prompt, as shown in Figure 6.11.
Figure 6.11 A prompt for credentials.
Delegate Rights Assignments
Solution: You can configure IIS 7.0 to be remotely administered, and you can minimize the amount of authority you give. Let’s first look at how to configure IIS 7.0 to be remotely administered:
1. To add the IIS Management Service using Server Manager, begin by opening IIS Manager and selecting your web server in the left pane.
2. In the Management area (if grouped by area), double-click Management Service to open the Management Service pane (see Figure 6.12).
Figure 6.12 The Management Service pane in IIS Manager.
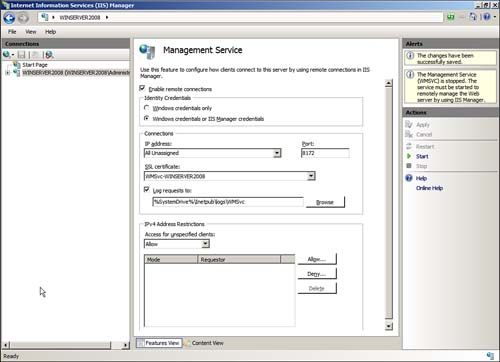
3. Make the following configuration changes:
• Check the box Enable Remote Connections.
• Select Windows Credentials or IIS Manager Credentials.
• Leave the default selections in the Connections section for IP address, port, SSL certificate, and logging.
• On the lower portion, if desired, restrict access by IP address.
• Notice at the top of the right pane that you are told that the Management Service (WMSVC) is stopped, and you need to start the service before remote connections can be made. Start WMSVC by clicking the Start button. By default, the service is set to Manual; you can set the service to Automatic if desired.
Now that you have successfully enabled remote connections to IIS 7.0, you need to define what the remote managers will be able to change within IIS. Follow these steps:
1. With your web server still selected in IIS Manager, double-click the Feature Delegation applet. The Feature Delegation pane appears, showing all the configurable features in IIS 7.0 and the level of delegation allowed for each.
2. Select Directory Browsing, and you see the different levels of delegation you can assign:
• Read/Write: This unlocks the configuration portion of the feature in the Applicationhost.config file.
• Read Only: This locks the configuration portion of the feature in the Applicationhost.config file.
• Not Delegated: This locks the configuration portion of the feature in the Applicationhost.config file.
• Configuration Read/Write: This unlocks the configuration portion of the feature in the Applicationhost.config file. You manage this setting outside IIS.
• Configuration Read/Only: This locks the configuration portion of the feature in the Applicationhost.config file, but it allows configuration changes outside IIS.
• Not Delegated: This locks the configuration portion of the feature in the Applicationhost.config file.
3. While we still have Directory Browsing selected, click Read Only.
4. Select your website in IIS Manager and double-click the Directory Browsing applet. A runtime error is generated, as shown in Figure 6.13, and you cannot configure directory browsing for the website.
Figure 6.13 The runtime error generated.
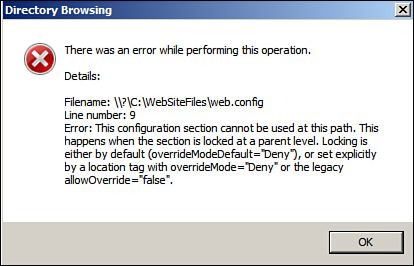
5. Click OK on the error message. In the top of the right pane, a message now states, “Could not retrieve the directory browsing settings.”
You have seen how you can lock down specific configuration features in IIS 7.0. Keep in mind the following points when delegating rights with IIS:
• Back up the configuration files before performing modifications.
• Configure with the most restrictive settings possible.
• Do not change the system account.
When you’re delegating rights, many features need to be considered. What if you have multiple IIS servers in your organization? How can you make sure your configuration is the same on all IIS servers? In this case, you can use the Shared Configuration applet under the Management section (when grouped by area) in order to use a shared configuration file or, if you have the master file, to export your file to a shared location for other servers to use.
Note
The Shared Configuration tool is not limited to the delegation and rights configuration of IIS 7.0. This tool shares all the configuration settings for IIS.
Use the Command Line with IIS 7.0
Solution: The following are some of the command-line administrative tools you can use and their benefits:
• PowerShell:
• Object-oriented data handling
• Namespaces
• Pipelining
• Transparent access to command-prompt commands
• Trusted scripts
• AppCmd:
• Exposing key IIS Server management functionality
• Easily controlling the server without using a GUI
• Automating management tasks without writing code
In this chapter we focus on the Appcmd.exe utility, which is specifically designed to be used for IIS 7.0 management. Appcmd.exe can be found in the %systemroot%system32inetsrv directory. The following is a list of supported object types that you can configure using this tool:
• SITE: Administration of virtual sites
• APP: Administration of applications
• VDIR: Administration of virtual directories
• APPPOOL: Administration of application pools
• WP: Administration of worker process
• REQUEST: Administration of HTTP requests
• BACKUP: Administration of server configuration backups
• MODULE: Administration of server modules
• TRACE: Working with failed request trace logs
Note
You can add the %systemroot%system32inetsrv directory to your path environment variables to be able to run Appcmd.exe from any location.
The object that is being used defines the types of commands available for the object. To see what commands are available and a brief description of what the commands will do for a specific object, you can use appcmd <object> /?. For example, to see what commands are available for the APPPOOL object, follow these steps:
1. Open a command prompt.
2. Navigate to the inetsrv directory by typing CDwindowssystem32inetsrv.
3. Type appcmd apppool /?. The available commands are now listed for the APPPOOL object:
• List: List the application pools.
• Set: Configure the application pool.
• Add: Add a new application pool.
• Delete: Delete the application pool.
• Start: Start the application pool.
• Stop: Stop the application pool.
• Recycle: Recycle the application pool.
You can customize your command further by using an optional parameter such as the following:
• /?: Display help either from appcmd or appcmd <object>.
• /text<:value>: Generate output in text format.
• /xml: Generate output in XML format.
• /in or-: Read and operate on XML input from standard input.
• /config<:*>: Show configuration for displayed objects.
• /metadata: Show configuration metadata when displaying configuration.
• /commit: Set the path where configuration changes are saved.
• /debug: Show debugging information for command execution.
Note
To see more details for these parameters, type appcmd.exe /?.
So now that you have a basic understanding of appcmd.exe, let’s take a look at how we can use it. First let see how we can get a list of the websites on our server:
1. Type appcmd list site.
2. A new line appears for each website, as shown in Figure 6.14, with the following details:
• Name of the site
• ID
• Bindings
• State
Figure 6.14 Results displayed from list sites.

Now let’s take a look at how to add, configure, and remove a site:
Add a Website Using appcmd.exe
To add a website, you need to provide some configuration parameters for the site. Here’s what you do:
1. Type the following:
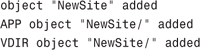
![]()
The command returns three lines:
2. If desired, check in IIS Manager and confirm that the new website has been created.
Configure a Website Using appcmd.exe
Here’s how you reconfigure the port setting from 802 to 82 on the site you just created:
1. Type the following:
appcmd set site "NewSite" /bindings:"http/*:82:"
When the command prompt is returned to you, the task is complete.
2. If desired, you can check the bindings in IIS Manager to confirm the changes.
Delete a Website Using appcmd.exe
The website you have created will have a short life. You are now going to delete it:
1. Type appcmd delete site "NewSite". The command returns SITE object "NewSite" deleted.
2. Refresh the view in IIS Manager to confirm that the website NewSite has been deleted.
Now let’s take a look at backing up and restoring the web server configuration.
Back Up Your Configuration
To back up your configuration, type appcmd add backup "Backup config". (If no name parameter is provided the backup will automatically generate a name, based on a timestamp.) The command returns BACKUP object "backup_config" added.
View Available Configuration Backups
To view available configuration backups, type appcmd list backup. The command returns a list of all available backups of your configuration, including any backups that VSS automatically created.
Restore Configuration Backups
To restore configuration backups, type appcmd restore backup "backup config". This command returns Restored configuration from backup "backup config".
Using appcmd.exe can ease the burden of managing your IIS environment. Being able to run many management tasks from a command line means that you will be able to script these tasks and schedule them as needed.
Improve IIS 7.0 Performance
Solution: When discussing performance, there are many factors to consider, such as hardware, other applications running, network bandwidth, and so on. We are going to focus on four options in IIS 7.0 that can be used to improve performance:
• Windows Server Resource Manager (WSRM)
Output Caching
If you enable output caching, IIS will keep a copy of previously requested pages in memory. Subsequent requests will be returned from memory and will not be reprocessed by IIS. You can really appreciate the advantages of this feature when you’re using it with dynamic web content (for example, with an ASP.NET page that queries a SQL database for data to return to the client).
There are two output caching modes:
• User mode
• Kernel mode
Keep in mind the following when using kernel mode:
• Kernel mode will not cache modules that run in user mode, such as authentication or authorization. For example, if you are using basic authentication with the kernel mode option, the content will not be cached.
• Kernel mode supports the varyByHeaders attribute but not varyBYQuerystring.
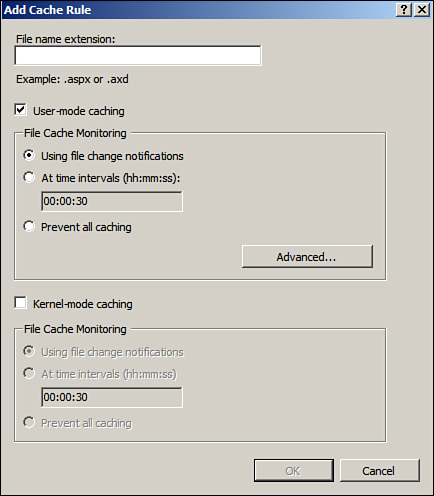
Output caching can be configured on the web server or within individual websites on the server. You also have the option to choose when you would like to time out what is cached and force the server to reprocess the content. The timeout interval relies on how often the data changes in the web content. You can configure the File Caching Monitor to time out what is cached after either a specified amount of time or when a file changes. You can also define what file extensions the caching will apply to, as shown in Figure 6.15.
Figure 6.15 The Add Cache Rule dialog box.
Compression
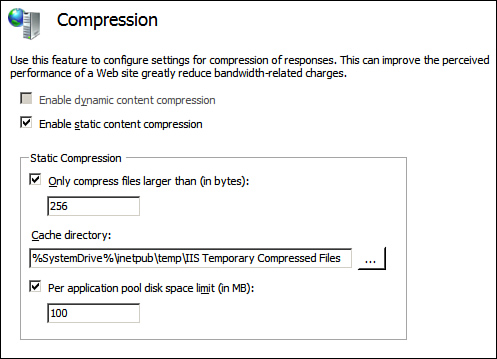
You can use HTTP compression to improve transmission of data by utilizing less bandwidth. Compression can be applied to static files and/or dynamic applications (see Figure 6.16). So in what type of scenarios would you use compression, and what are some things to keep in mind? Consider the following:
• Static compression: You use static compression when you need to improve transmission times and when working with graphic-intensive sites. Keep in mind that you use some CPU power for static compression, but compressed content can be cached.
• Dynamic compression: You use dynamic compression when you have a small number of requests and/or limited network bandwidth. Keep in mind that you use CPU power and RAM for dynamic compression, and compressed content cannot be cached.
Figure 6.16 Configuring compression.
Compression can be configured at the web server level or at each individual website.
Note
Dynamic Content Compression is not installed with the default installation of the Web Server role. To add this functionality, you need to first add the Dynamic Content Compression role service in Server Manager, under the Web Server role.
Logging Frequency
Logging too much information has a negative impact on performance. A best practice with logging is to log as little information as possible for day-to-day normal utilization. If you are having issues with your site or web server, then it might be time to turn up the logging level to include failed request tracing and try to determine what is going on. To enable failed request tracing in IIS Manager, do the following:
1. Select the website on which you would like to enable failed request tracing.
2. In the Actions pane, click Failed Request Tracing to bring up the Edit Web Site Failed Request Tracing Settings dialog box, shown in Figure 6.17.
Figure 6.17 Configuring failed request tracing.
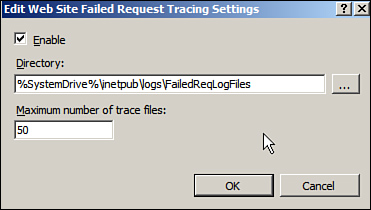
3. Click the Enable box and select the directory where you would like to create the log files and the maximum number of trace files desired. It is a good idea to move the log file creation to a separate volume because you usually do not want logging files to grow on your system drive.
To configure other day-to-day logging, use the Logging applet to set items such as the following:
• Format
• Directory
• Encoding
• Log file rollover
Windows Server Resource Manager (WSRM)
WSRM enables you to control how server resources such as CPU and RAM are allocated to applications, services, and processes. You can use this tool to allocate CPU to application pools in IIS. You can see more information on WSRM and its use with IIS 7.0 at http://learn.iis.net/page.aspx/449/using-wsrm-to-manage-iis-70-apppool-cpu-utilization/.
See What’s New in Windows Server 2008 R2
Solution: Some improvements are being made to IIS 7.0 with the release of Windows Server 2008 R2. In fact, with R2, you will receive a newer release of IIS (IIS 7.5). The following are some of the features and functionality that will be added:
• New management modules in IIS Manager
• Automation of administrative functions, utilizing PowerShell Provider for IIS
• Support for .NET on Server Core, enabling ASP.NET and remote management via IIS Manager
• Best Practices Analyzer (BPA) for IIS 7.5
For more details on IIS 7.5 and its improvements over IIS 7.0, see www.microsoft.com/windowsserver2008/en/us/R2-web-platform.aspx.