
Creating Your First Alert Dialog Box
Have you ever worked with an application that did not inform you of a warning or did not alert you of something? If not, take the following example into consideration. Imagine an e-mail client that does not inform you that you have new e-mail. How annoying would that be? Alerting users of important issues or choices that need to be made is an integral part of any user experience. A few examples of where you might want to use a dialog box to inform the user of a message and/or to have the user perform an action are as follows:
- Something is happening in the background (this is what a ProgressDialog does).
- The values in an EditText view are invalid.
- The network has become unavailable.
- The user needs to select a date or time (as I just demonstrated).
- The state of the phone is not compatible with the application. Maybe the app needs to be GPS enabled or needs an SD Card, and you've detected these issues upon the application starting.
- The user needs to choose from a list of items.
Although this is not a comprehensive list, it does give you an inkling of what is possible with dialog boxes.
The Android system has a framework built around dialog boxes that enables you to provide any implementation that you may need.
Various types of dialog boxes are available, including these, the most common:
- Alert: Alerts the user of something important. Also allows the user to set the text value of the buttons, as well as the actions performed, when they are clicked. As a developer, you can provide the AlertDialog with a list of items to display — allowing the user to select from a list of items.
- Progress: Used to display a progress wheel or bar. This dialog box is created through the ProgressDialog class.
- Custom: A custom dialog box created and programmed by you, the master Android developer. You create a custom dialog class by extending the Dialog base class or through custom layout XML files.
 If you ever work with any type of blocking process (network communication, long-running tasks, and so on), you should always provide the user with some type of dialog box or progress indicator letting the user know what is happening. If the user does not know something is happening, she is likely to think that the application has stopped responding and might stop using the app. The Android framework provides various progress indicators. A couple common progress classes are ProgressDialog and ProgressBar.
 Although the topic is too complex to cover here, the AsyncTask class is the class that you would use to help manage long-running tasks while updating the user interface. A great tutorial for this class exists in the Android documentation under Painless Threading, located at http://d.android.com/resources/articles/painless-threading.html. You can also create a new thread in code, but the AsyncTask class helps simplify this process.
Choosing the right dialog box for a task
It's up to you to determine which dialog box you should use for each given scenario, but I follow a logical series of steps to determine which dialog box to use. (See Figure 13-2.)
Creating your own alert dialog box
At times, you need to notify the user of something important, and to do so, you need to present them with a dialog box. Android has made this very simple with the introduction of the AlertDialog.Builder class. This class allows you to easily create an AlertDialog with various options and buttons. You can react to these button clicks through the onClickListener() of each button.
The AlertDialog.Builder class is not used in the Task Reminder application. However, I demonstrate how to create one in Listing 13-7.
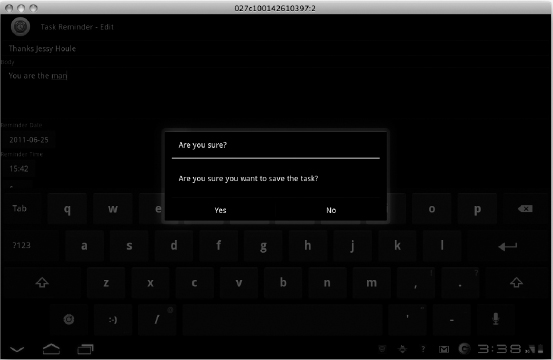
Assume that the user clicked the Save button on the Task Reminder application and that you wanted to pop up a confirmation window that resembles Figure 13-3, asking the user whether he is sure that he wants to save.
Figure 13-2: An EditText view without the gravity set.
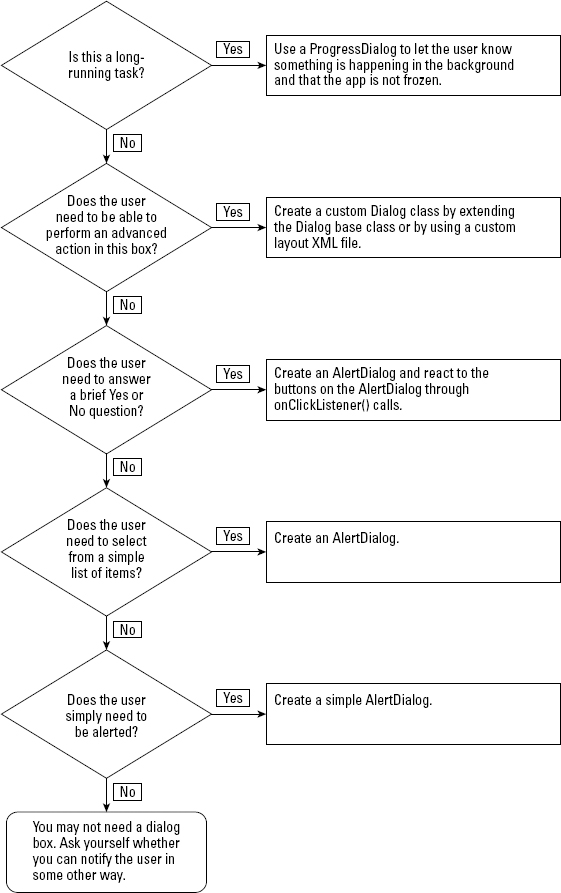
Figure 13-3: The confirmation AlertDialog window.
To present an AlertDialog in this manner, you need to set a click listener for the Save button. Inside that click listener, you create the dialog box as shown in Listing 13-7.
Showing dialog boxes through the showDialog() and onCreateDialog() mechanisms is best. However, for brevity, here you create the dialog box inside the Save button click listener.
Listing 13-7: Creating an AlertDialog with the AlertDialog.Builder Class
AlertDialog.Builder builder
    = new AlertDialog.Builder(ReminderEditActivity.this);            →2
builder.setMessage(“Are you sure you want to save the task?”)        →3
       .setTitle(“Are you sure?”)                                    →4
       .setCancelable(false)                                         →5
       .setPositiveButton(“Yes”,                                     →6
        new DialogInterface.OnClickListener() {                      →7
           public void onClick(DialogInterface dialog, int id) {
                   // Perform some action such as saving the item    →9
           }
        })
       .setNegativeButton(“No”, new DialogInterface.OnClickListener() {
                                                                    →12
           public void onClick(DialogInterface dialog, int id) {
                          dialog.cancel();                          →14
        }
});
builder.create().show();                                            →17
This code is explained as follows:
| →2 | This line sets up the AlertDialog.Builder class with the context of the AlertDialog.Builder as the current running activity. In this case, it's ReminderEditActivity. |
| →3 | This line sets the message that will show in the middle of the AlertDialog (as shown in Figure 13-2). This value can be a string or a string resource. |
| →4 | This line sets the title of the AlertDialog. This value can be a string or a string resource. |
| →5 | This line sets the cancelable attribute to false. This means that the user is required to make a selection by using the buttons on the AlertDialog. The user cannot click the Back button on the device to exit the AlertDialog if this flag is set to false. |
| →6 | This line sets the positive button text. The positive button is the button that the user clicks when she wants to perform the action as indicated in the AlertDialog. In this case, it is set to Yes, indicating that the user wants to perform the action. This value can be a string or a string resource. |
| →7 | This block of code that starts on line 7 and ends on line 11 is the definition of the onClickListener() for the positive (Yes) button. When the button is clicked, this code executes. A comment is included on line 9 indicating where your code would go. |
| →12 | This line sets the negative button text. The negative button is the button that indicates that the user does not want to perform the action that is being requested through the AlertDialog. I have set the text value of this button to No. This value can be a string or a string resource. |
| →14 | This line is the onClickListener() for the negative button. The listener provides a reference to the dialog box that is currently shown. I am calling the cancel() method on the Dialog object to close the dialog box when the user clicks No on the AlertDialog. |
| →17 | This line informs Android to create the Dialog through the create() method and then informs Android to show the dialog box to the end user with the show() method. This projects the AlertDialog onto the screen. |
Creating a dialog box with the AlertDialog.Builder class makes life a lot easier than having to derive your own Dialog class. If at all possible, create your dialog box with the AlertDialog.Builder class because it gives your application a consistent user experience that is familiar to Android users.
When the user clicks the Save button (or whatever button you've attached this code to), he receives an AlertDialog confirming that he wants to save the task. I am not saving the task in this instance, but code could be provided to save the task as demonstrated in Chapter 14, when I save the task to an SQLite database.
Other options also exist on the Dialog class and can be found with great examples here: http://d.android.com/guide/topics/ui/dialogs.html.