
Chapter 6: Indoor Shooting
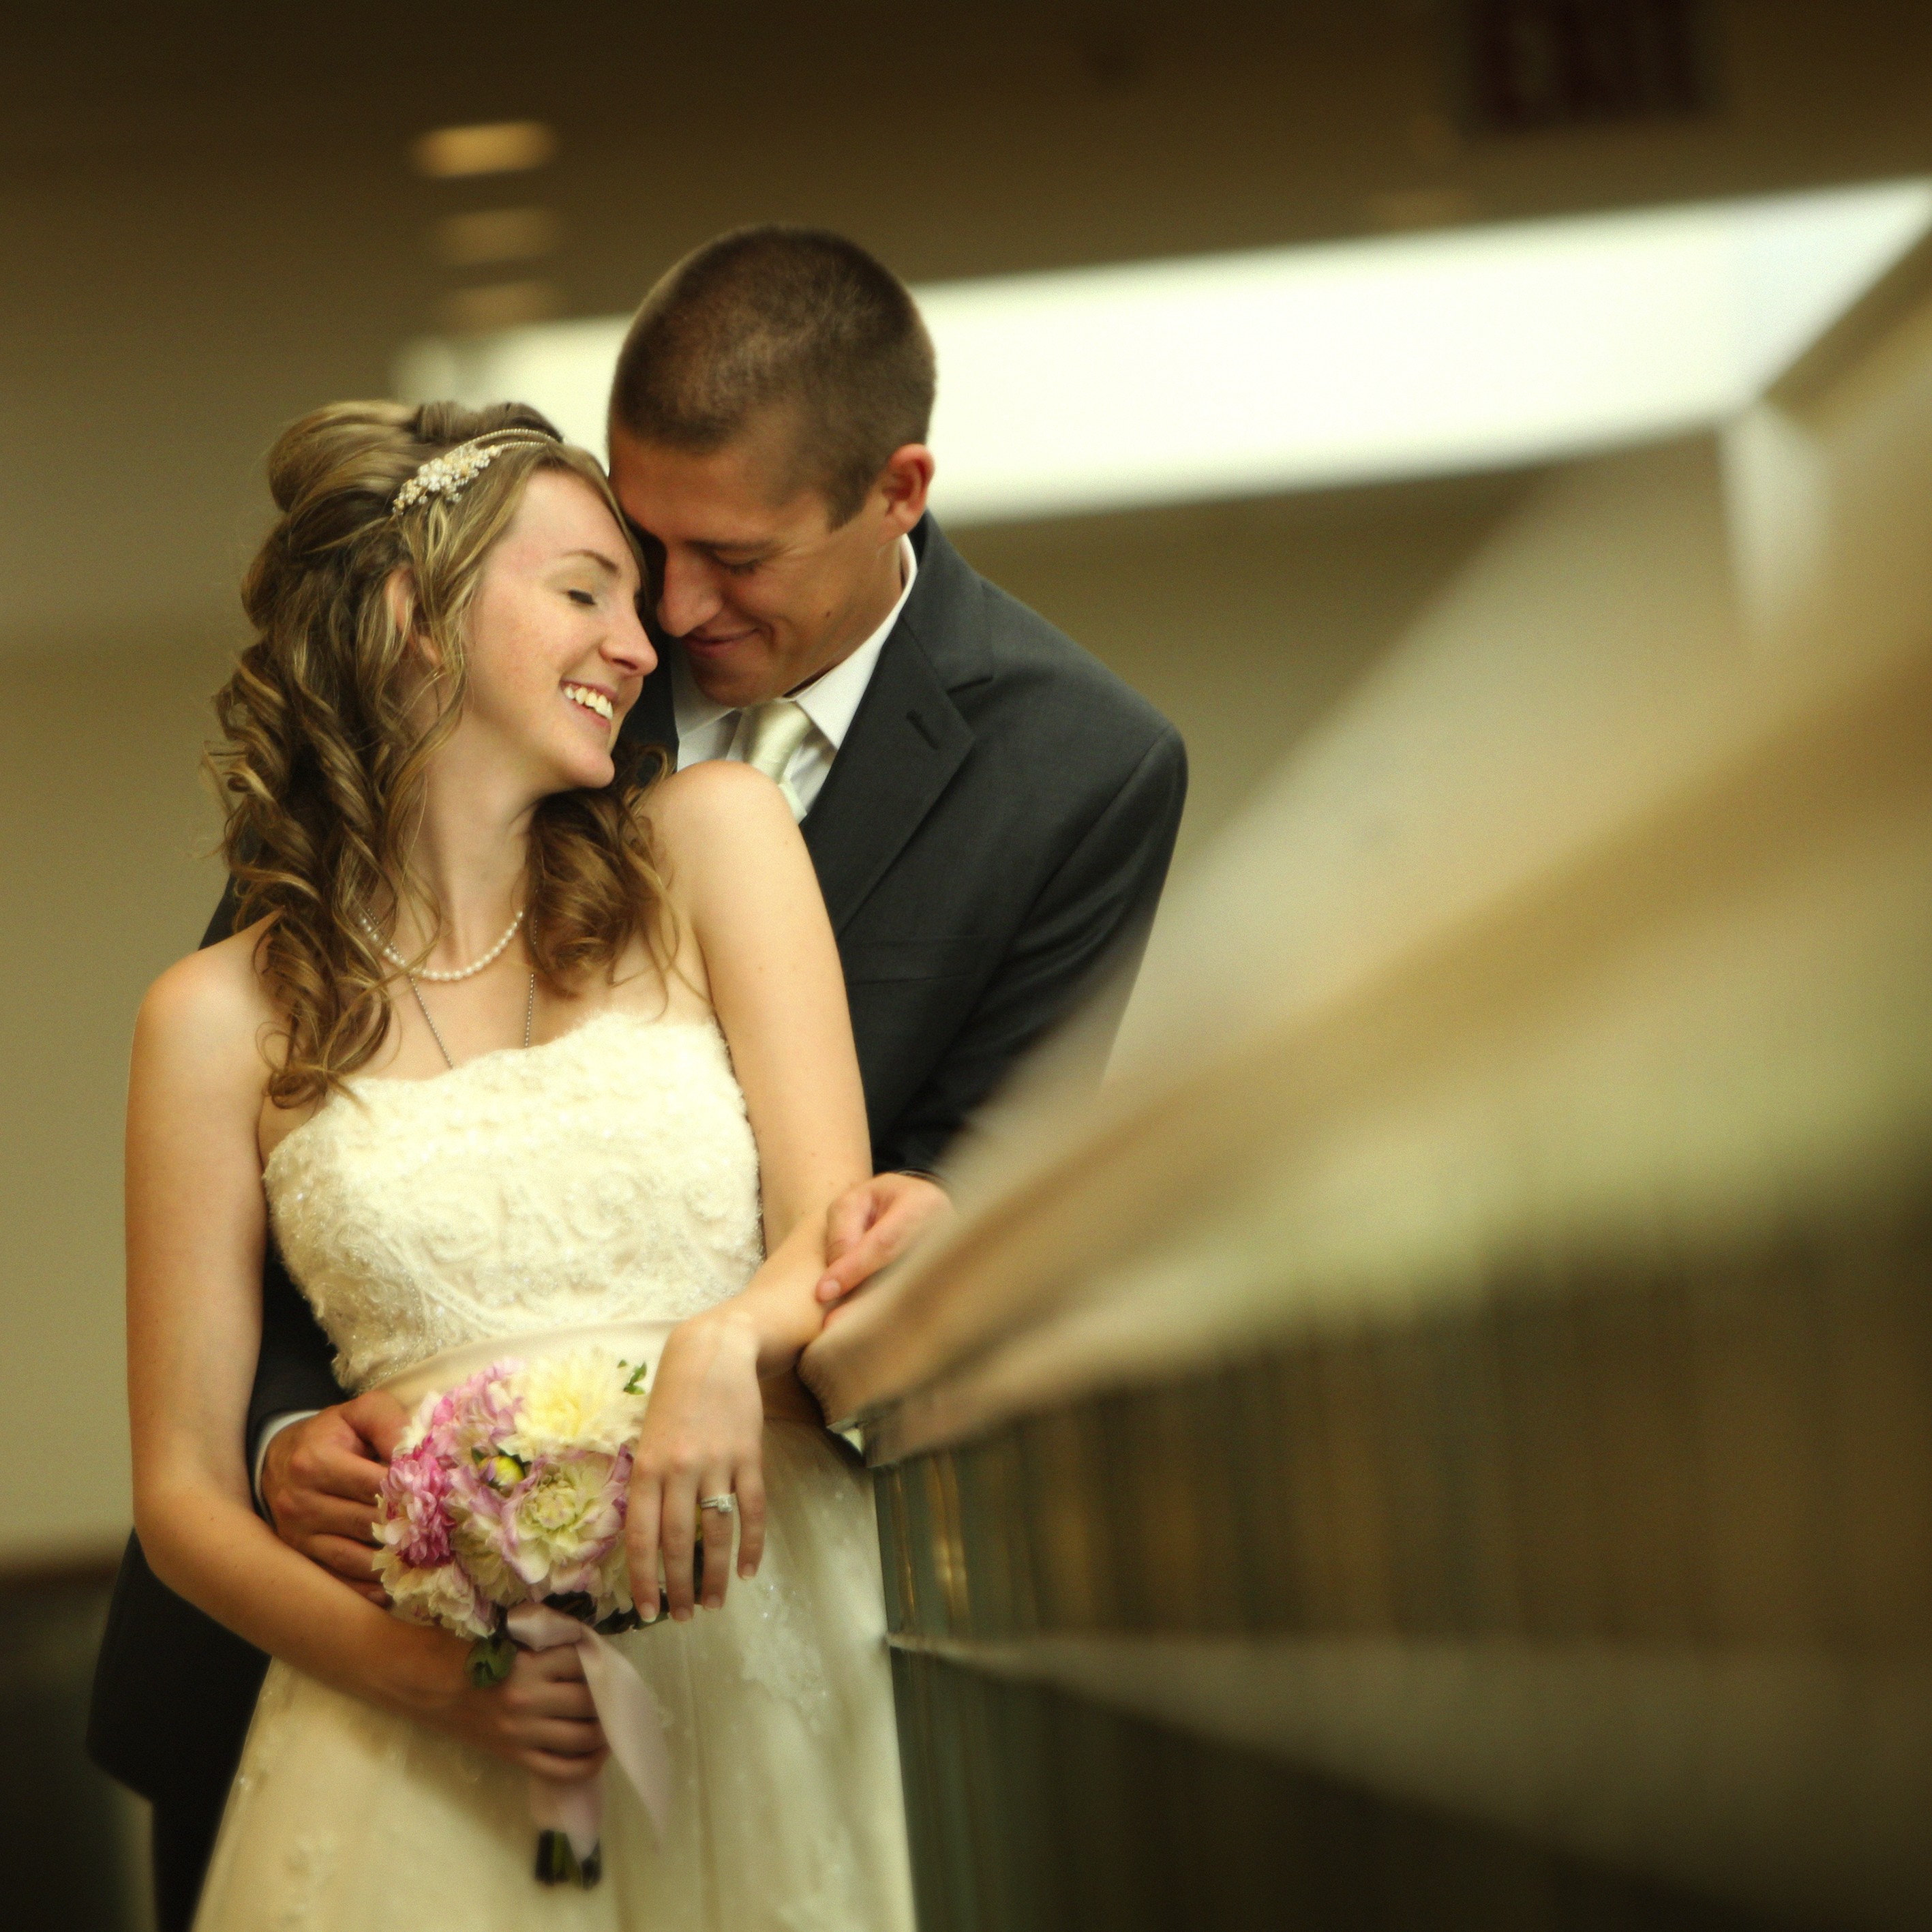
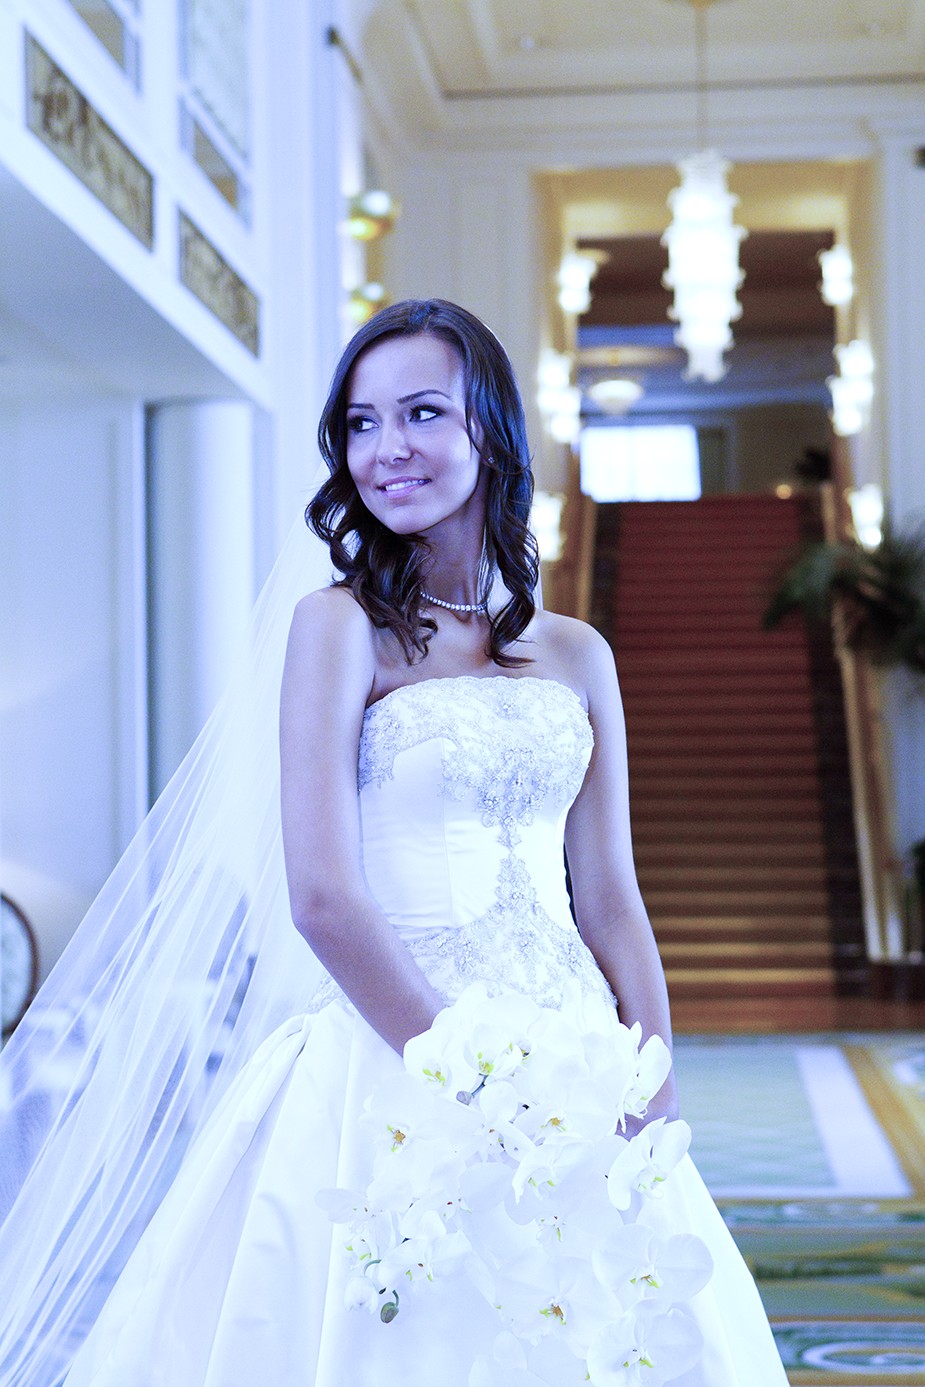
At some time during the wedding you will have to photograph indoors; even if the ceremony and reception are outdoors, the bride and groom have to get ready somewhere, usually indoors. When you think of shooting inside, the first thing that comes to mind is that there will likely be low light. While this is certainly true in a lot of cases and you need to address it, there are plenty of locations inside that have great light, usually streaming in through a window or door, as shown in Figure 6-1. When you are shooting indoors, there are many different things to consider: what lens to use, how to deal with ISO and noise, the color of light and the white balance, especially when it comes to mixed lighting, and, of course, using the flash.
6-1
ABOUT THIS PHOTO The light coming through the window illuminates the bride as she checks on the wedding ceremony site. Taken at ISO 1250, f/6.3, 1/320 second.
Exposure considerations
Shooting indoors challenges you with a wide variety of lighting situations. Exposure is a balancing act between the shutter speed, aperture, and ISO. Each situation requires a different approach.
Window light
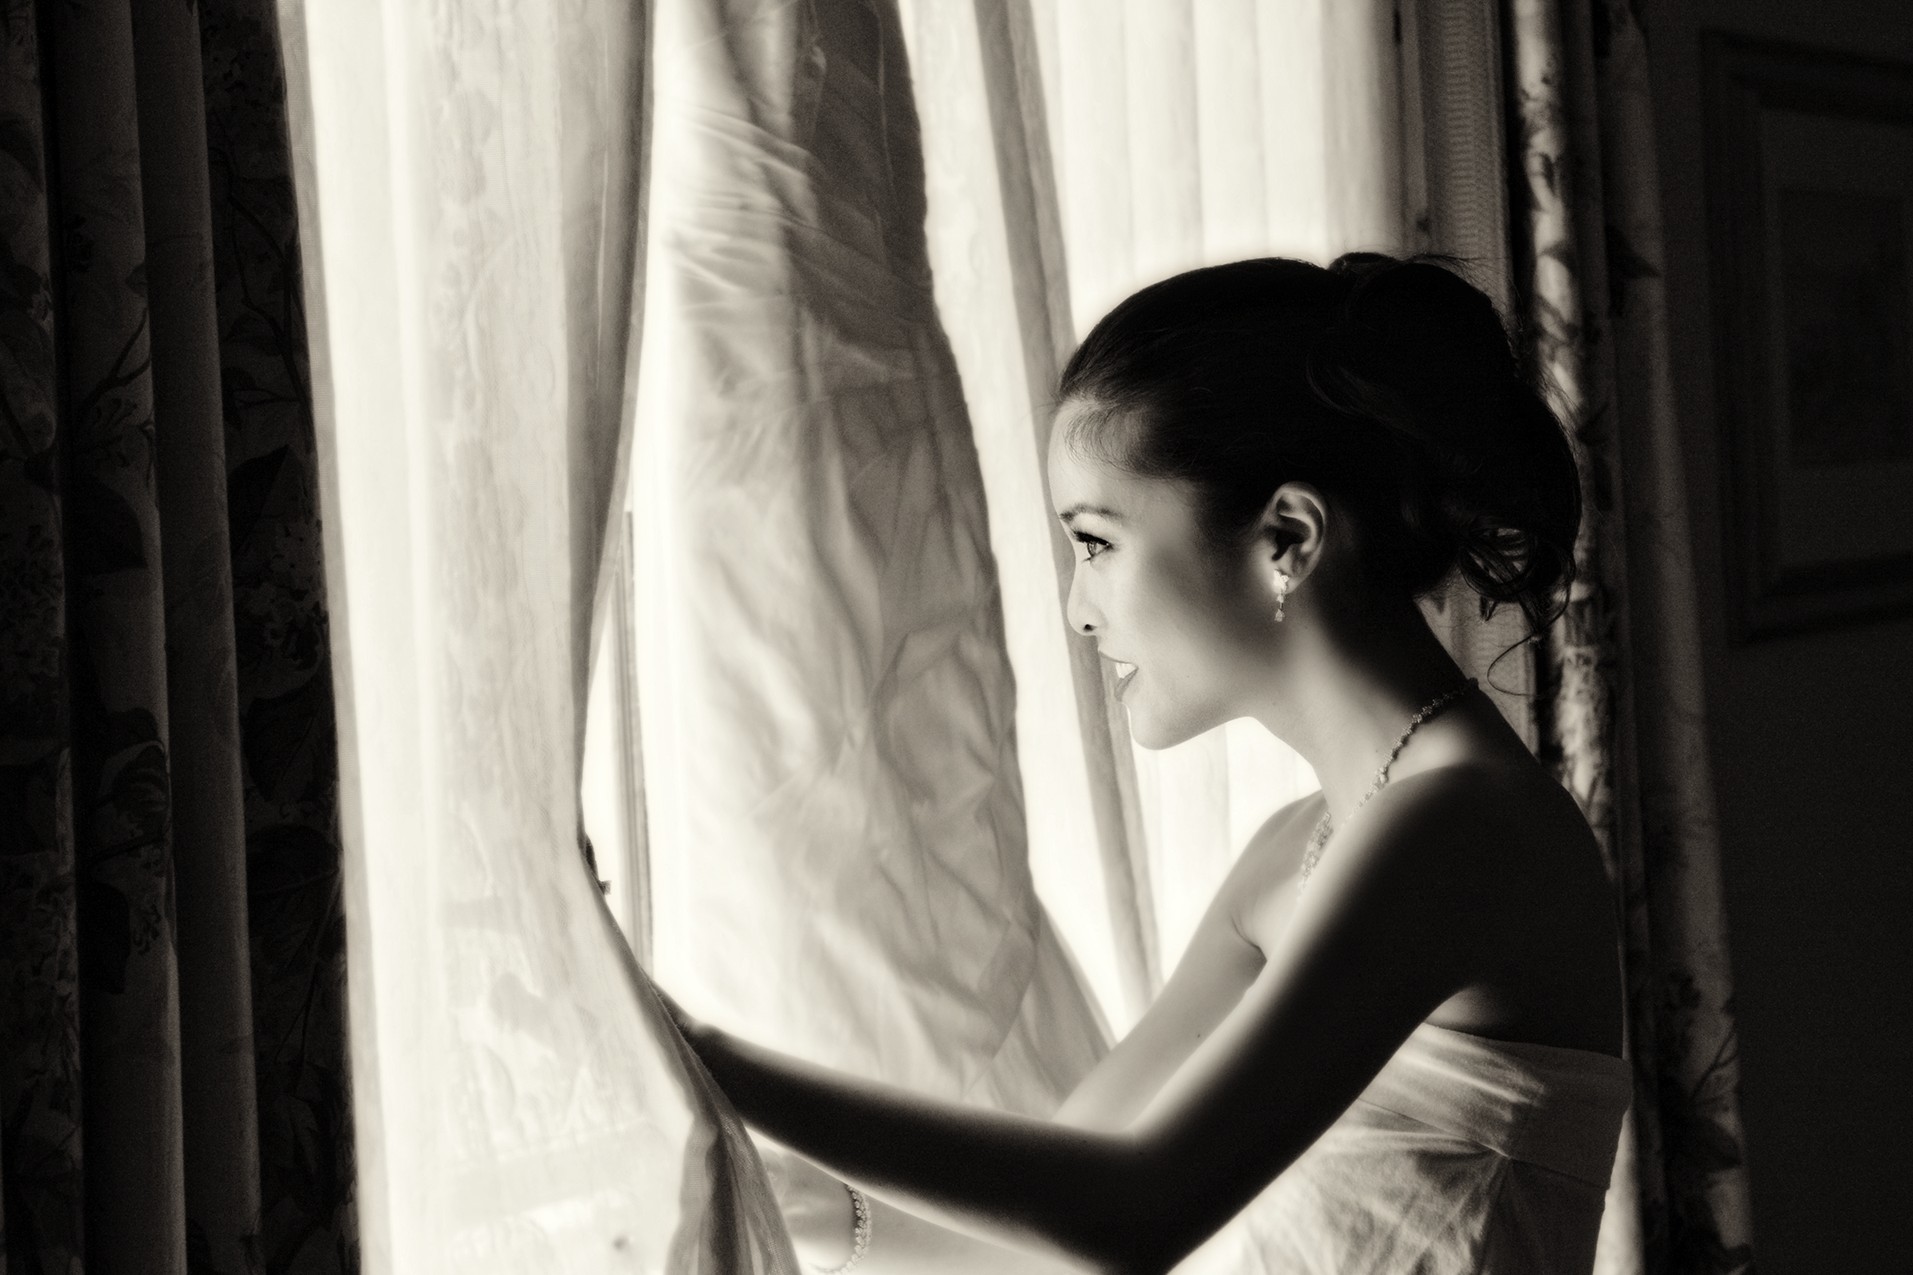
Ask wedding photographers what their favorite light is and many will tell you that it is the diffused sunlight streaming through a window, wrapping around the bride or groom. It really is a very flattering light and when it is present, you need to take advantage of it.
The best part about window light is that it is simple to expose for and the results are unbeatable. Set the metering mode to spot metering and aim it toward the face of the subject. This way you will not have any really bright spots closer to the window and any dark shadows in other parts of the scene affect your meter reading. Then just take the photo. This works just as well for the groom as it does for the bride. Take Figure 6-2, for example: The light coming in from the window illuminates the groom as he patiently waits for the wedding to begin.

6-2
ABOUT THIS PHOTO Placing the groom close to the window allowed me to use the flattering window light for this portrait. Taken at ISO 800, f/2.8, 1/30 second.
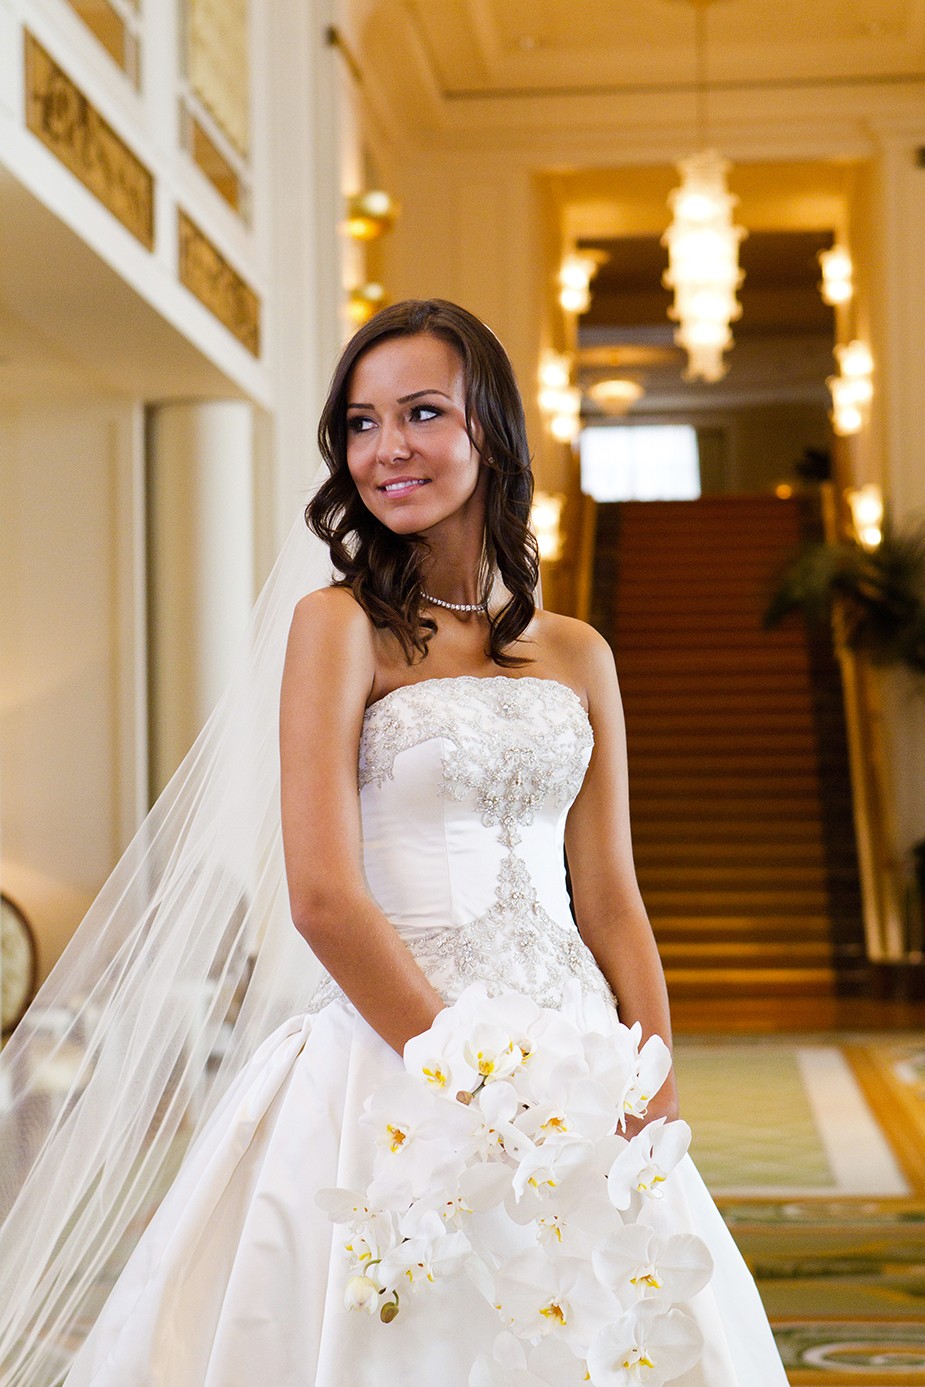
There is another way you can use the light coming through the window, especially when you are shooting the wedding dress. The idea is to hang the dress in the window (see Figure 6-3) and let the light shine through so that the detail is illuminated. To properly expose this type of shot, you need to overexpose the scene slightly, and the easiest way to do this is to use exposure compensation. Just follow these steps to get the perfect exposure:
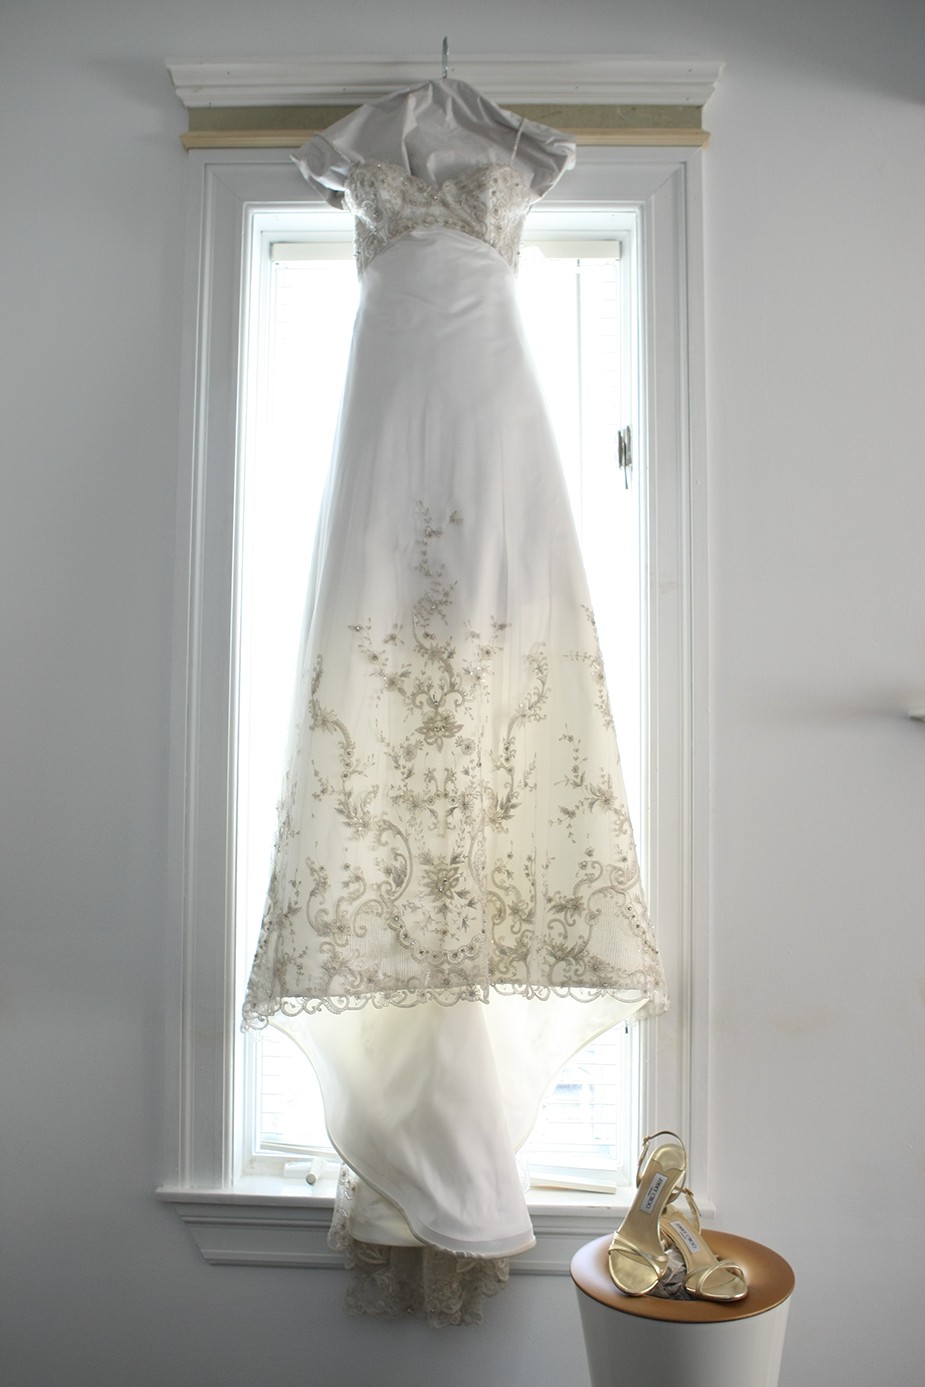
6-3
ABOUT THIS PHOTO The wedding dress beautifully illuminated in the window. Taken at ISO 800, f/3.5, 1/160 second.
1. Place the dress in the window.
2. Set your camera to spot-metering mode.
3. Set your camera to Auto mode.
4. Focus on the gray area of the dress, where the light doesn’t show all the way through the material.
5. Press the shutter release button down halfway to activate the built-in light meter.
6. Make a note of the settings.
7. Dial in + 1/3 exposure compensation.
8. Take a photo.
9. Check the photo on the camera’s LCD. The window should be completely white, while the dress needs to be bright but not pure white.
10. Adjust the exposure compensation. If the image is still too dark, then increase the exposure compensation and shoot again.
Keep an eye out for the light coming through any nearby windows. Because natural light changes all the time, a window with nice soft light might not last long. Take advantage of it when you can.
Low light
The biggest problem when shooting inside can be the lack of available light. It is sad, but true that even with great stained glass windows and beautiful details, as shown in Figure 6-4, many churches and houses of worship are really quite dark and need high ISOs and wide apertures to get enough light to reach the sensor to make a proper exposure. This holds true for many indoor wedding locations and, while our eyes adjust to the low light rather quickly, the camera doesn’t. When it comes to dealing with low-light situations, there are a few practical solutions: Use a lens with a wide aperture to allow as much light as possible to reach the sensor, increase the ISO so that proper exposure can be achieved in really low light, or use a flash to add light if possible.
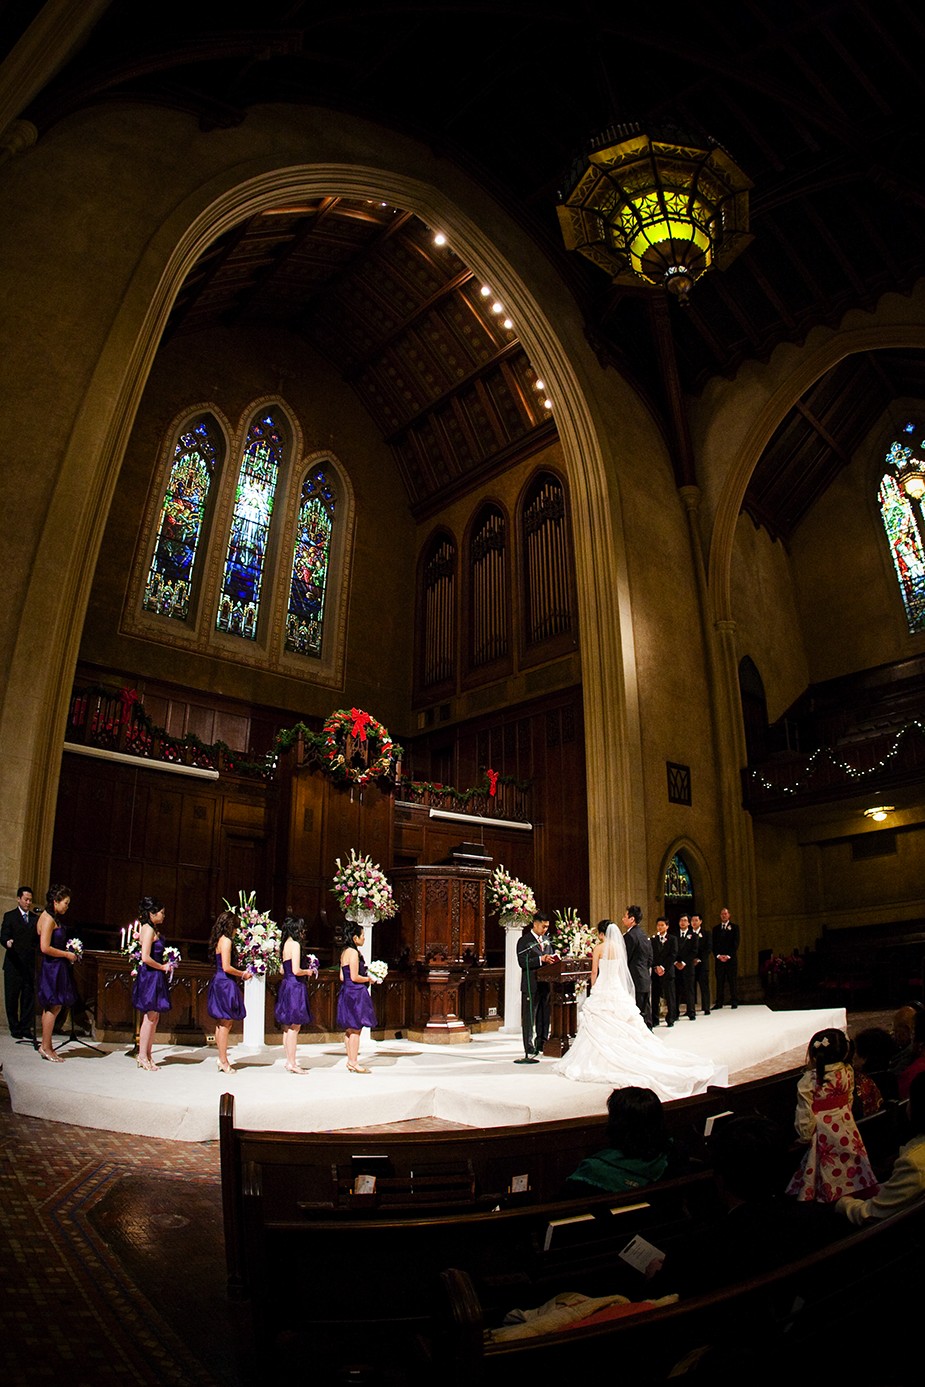
6-4
ABOUT THIS PHOTO The beautiful arches and stained glass windows look great but there really isn’t very much light in the room, which called for these settings for a proper exposure. Taken at ISO 2500, f/2.8, 1/100 second.
Lens choices for low light
When photographing weddings, it is important to have the right lens or lenses for the job. To me, the most important factor when choosing lenses is the speed of the lens — the faster the better. Fast lenses are those with maximum apertures of f/2.8 or greater (f/2.8, f/2, f/1.8, f/1.4 and f/1.2). These allow you to shoot in low-light situations and give you greater control over the depth of field than slower lenses. The maximum aperture available is wholly dependent on the lens you use, because the aperture is the opening in the actual lens.
When it is really dark, one of the best tools at your disposal is a good prime lens with a very wide maximum aperture of f/1.8 or f/1.4, and while there are lenses that open up to f/1.2, they can be very expensive. The good news is that you can purchase a 50mm f/1.8 lens for roughly $100 and, combined with the higher ISO ability of today’s cameras, it is fast enough to be used in all but the very darkest of situations.
If you are planning on making wedding photography your career and find yourself shooting in very dark locations often, then it will pay to invest in some very fast glass. Not only was the photo in Figure 6-5 taken at a high ISO, in this case ISO 1250, it was so dark that an aperture of f/1.2 was needed along with a relatively slow shutter speed of 1/60 second.
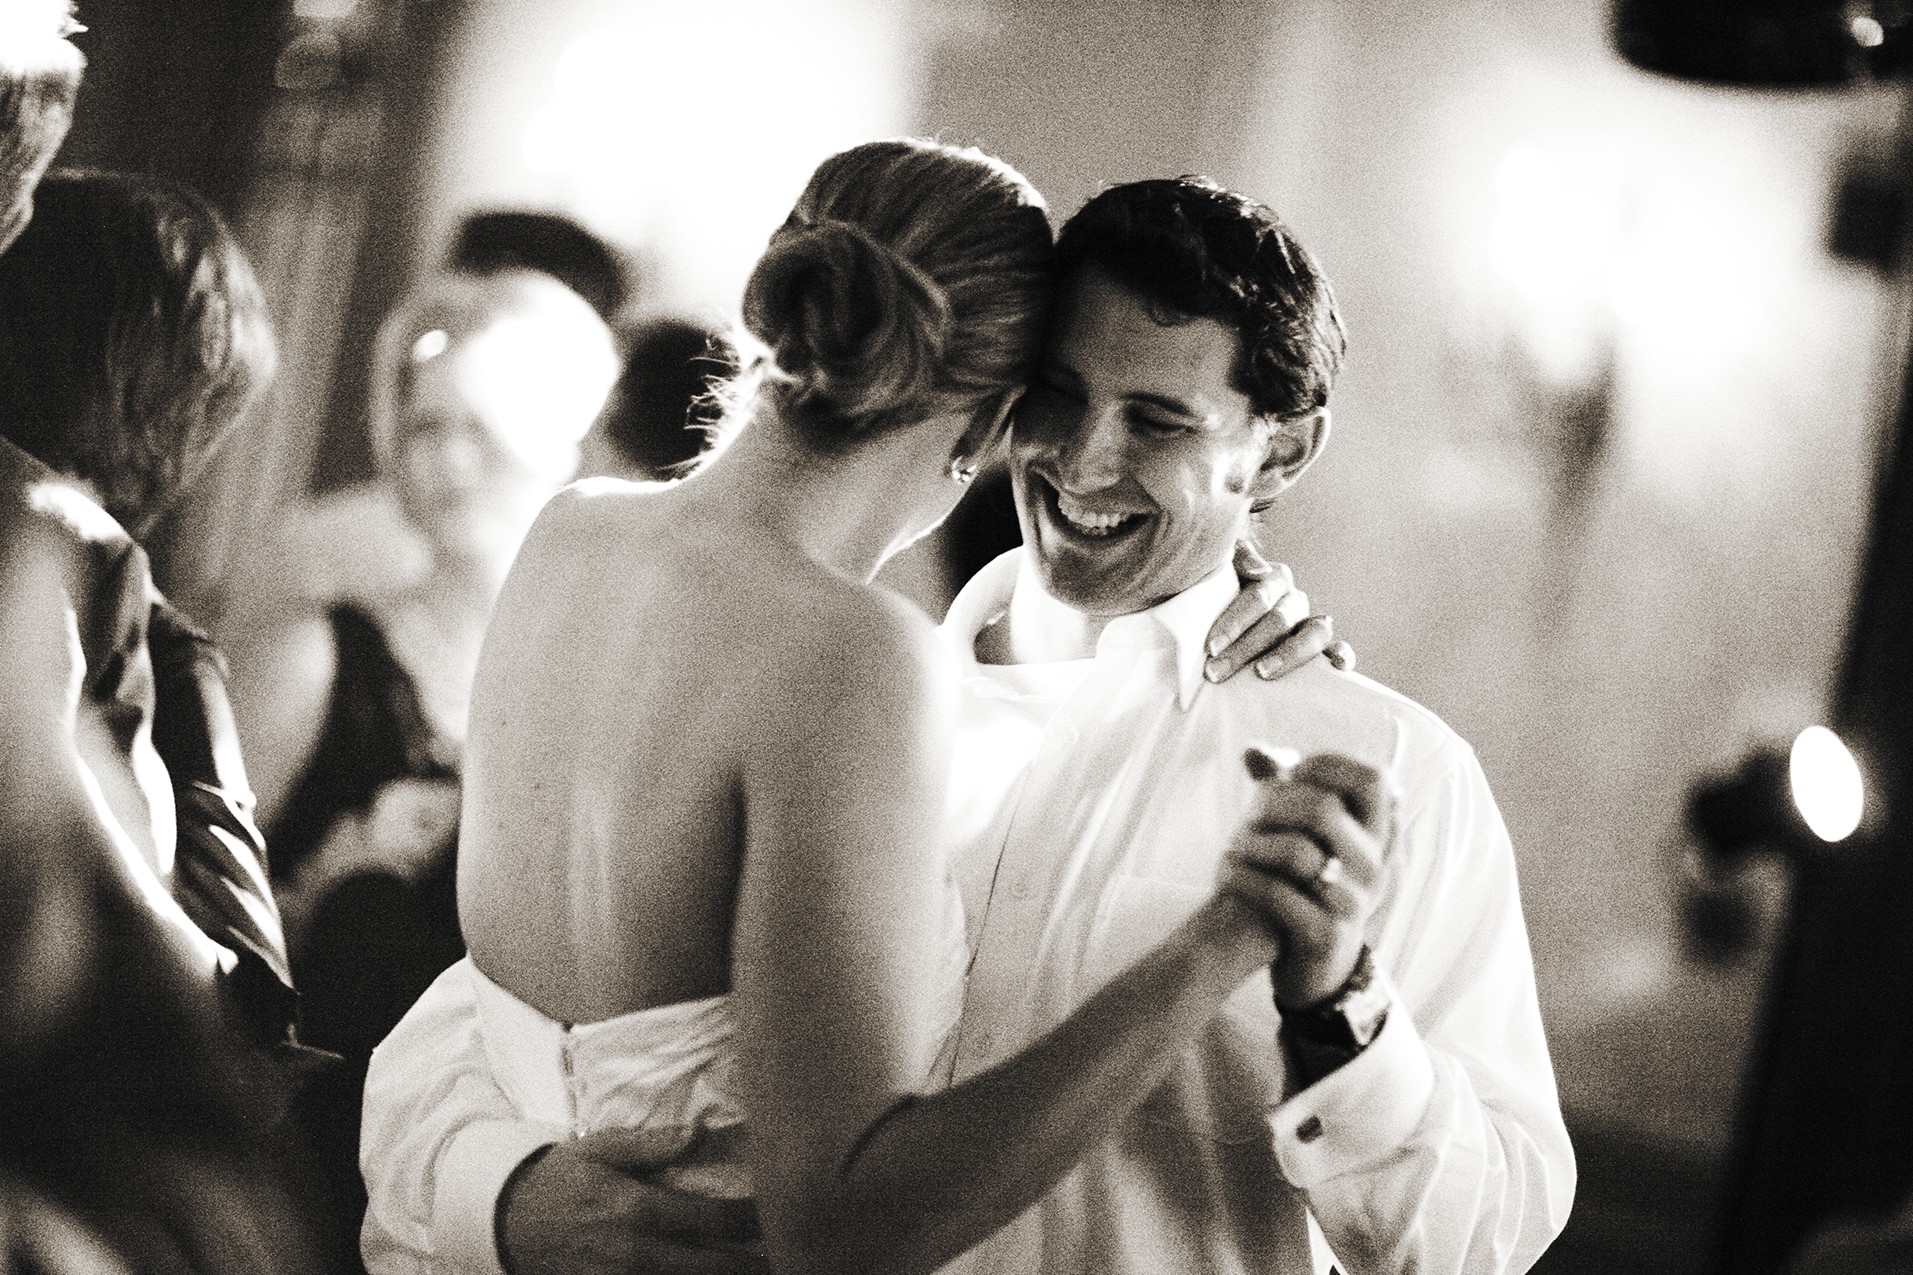
6-5
ABOUT THIS PHOTO The couple enjoys a dance, and even with the really low light, a wide aperture and high ISO was needed to get a proper exposure. Taken at ISO 1250, f/1.2, 1/60 second.
A word of warning about buying some of the older prime lenses. Some don’t have autofocus capabilities on the newer camera bodies. This is because camera manufacturers have started to make the camera bodies lighter, smaller, and cheaper by removing the autofocus motor. Newer lenses have autofocus motors built right into the lens, which does make them more expensive. Make sure you check the lens compatibility before purchasing.
Buying a single prime lens with one focal length seems like a big expenditure; however, there are other lens options, such as fast zoom lenses. These lenses are often more expensive, but they are also more useful, because they provide a maximum aperture of f/2.8 at all focal lengths. These lenses are great in low light and give you the ability to change the composition without having to move. Examples of these lenses include the Canon 16-35mm f/2.8, the 24-70mm f/2.8, and the 70-200mm f/2.8 lenses (other manufacturers make comparable lenses). These three lenses cover a huge range of focal lengths from 16mm all the way to 200mm, and the aperture can be wide open at f/2.8 the whole time. I used a 70-200mm f/2.8 zoom lens to get in close and capture the groom in Figure 6-6. I could have used a prime lens, but I wouldn’t have been able to adjust the composition in the same way.
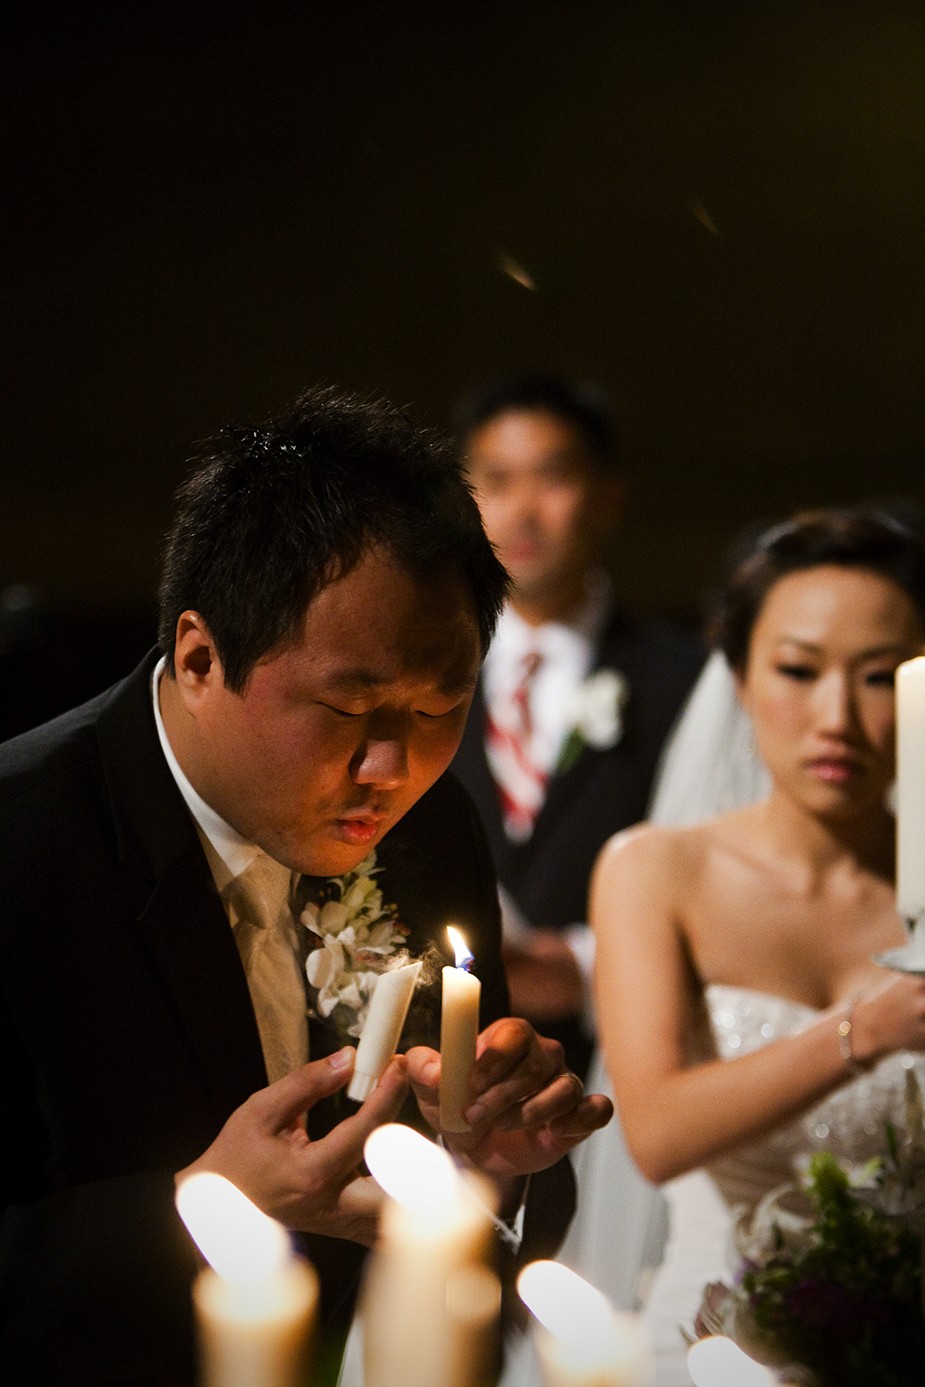
6-6
ABOUT THIS PHOTO The groom is lit by the candle, which called for a wide aperture and high ISO. Taken at ISO 2500, f/2.8, 1/125 second.
Many third-party lens manufacturers make lenses that are top quality but can cost less than the Canon or Nikon equivalents. Sigma and Tamron, for example, both make fast glass compatible with all the major camera manufacturers.
ISO and noise
If there is one place that camera technology has really improved in recent years, it is in how cameras can use high ISO settings without significant digital noise. To change the ISO when shooting with film, you only had to change the film, but when it comes to digital cameras, you can’t actually change the sensor that records the light. In dSLRs, the ISO is adjusted when the computer in the camera amplifies the signal from the sensor. The more the signal is amplified, the more sensitive to light the sensor becomes, and the higher the ISO. The amount that the signal is amplified is calculated to match the characteristics of film so that when you shoot at ISO 400 on one camera, it matches ISO 400 on another camera and the ISO 400 of film. This is important, because as the signal from the sensor is amplified, digital noise is introduced, and the more the signal is amplified, the more visible the noise will be.
Digital noise shows up in your images as unwanted spots of color, and is especially noticeable in darker areas and areas with smooth tones. Using ISO 8000, as shown in Figure 6-7, results in digital noise, particularly in the dark areas of the tuxedo jacket.
6-7
ABOUT THIS PHOTO The low light in the church called for a high ISO, creating a noisy image. Taken at ISO 8000, f/2.8, 1/160 second.
Following are things that can increase the digital noise in your images:
• ISO. The main cause of digital noise is ISO: The higher the ISO, the more noise you will have in your images.
• Exposure time. The longer the shutter is open, the more digital noise you will have, especially when the exposure is longer than a few seconds.
• The relation of sensor size to megapixels. The more megapixels there are crammed onto a sensor, the greater chance there is of noise being introduced. This is one reason that the full-frame sensors, which have more space on the sensors, can produce less noise at higher ISOs than cameras with the same megapixels on cropped sensors.
When you are shooting in a dark church or hall, many times you don’t have an option and will need to shoot at high, and sometimes very high, ISOs. This means that you will need to minimize the noise as much as possible. The first step is to know the limitations of your camera and at what point the noise is just too much. Many of the newer cameras have a lot less noise at the high ISOs and give you the ability to shoot at ISOs that are much higher than film ever was. Using film with ISO 1600 would result in a very grainy photo, and using ISO 1600 would have been unheard of with digital cameras when they first came out. Now using the newer cameras, a photo taken at ISO 1600, like the one in Figure 6-8, is not a problem.

6-8
ABOUT THIS PHOTO There is very little noise in this image of the ring exchange. Taken at ISO 1600, f/5, 1/200 second.
There are a few things you can do to reduce the noise in your images when taking them. The first is to slightly overexpose the image, because noise usually shows up in the dark areas of the image. Making these areas a little lighter will really help. The second is to apply noise reduction either in the camera or with software in post-production. I find that using the software choices available in post-production, especially the noise reduction available in Adobe Photoshop Lightroom 3 and Adobe Camera Raw 6 and above, is the best way to clean up an image. The only downside to noise reduction is that it can cause a slight blurring of the image as it tries to even out the tones and get rid of the unwanted color spots. You need to experiment to see what works best for you, and read your camera manual to find out if your camera has built-in noise reduction.
Most built-in noise reduction comes with a price: It takes longer for each image to be saved, uses more battery power, and can cause slight to moderate blurring in the image. Test your camera’s noise reduction capability before an actual wedding.
The third thing you can do is to turn the image into a black-and-white image, as shown in Figure 6-9. This makes the noise look more like traditional film grain, and many clients actually like the look.

6-9
ABOUT THIS PHOTO A very tired guest. Taken at ISO 10000, f/2.8, 1/1/50 of a second.
The goal is to use a high enough ISO that you can use a shutter speed that freezes the action and gives you a sharp image. So it pays to time the shots right and wait for those moments with little action or movement where you can use a slower shutter speed and still get a sharp photograph which allows you to also use a lower ISO.
White balance and artificial lighting
When you photograph inside, there are numerous light sources available, from the sunlight streaming in through the windows to the incandescent and fluorescent bulbs that seem to be everywhere. To your eye, the light can all look very much the same and moving from one type to another doesn’t make much of a difference. To the sensor in your camera, however, the changes are very noticeable. You compensate for the differences with the white balance setting on your camera. However, to fully understand why you need to make adjustments, you need to understand the color and temperature of the light and how to work with the artificial lights so that you can make the best adjustments.
Color of light
Different types of light have different colorcasts that affect your images. These colorcasts can also change the mood in your image. For example, the more red or orange light in your image, the warmer the photo looks, while the more blue light in the image, the colder the image will look. When the color of the light makes the subjects in your image look green, then there is a real problem. I know you are thinking that you wouldn’t photograph under a green light, but the camera’s sensor sees light very differently than you do, and it records the light as it sees it, not as you see it. Luckily, there is a way to deal with these different colors of light, and that starts with defining what the actual color of each type of light is. This is done using the temperature of the light on the Kelvin scale.
Color temperature
The color temperature is a way to describe the color of light that can then be used to make sure that it is rendered properly by your camera. The Kelvin scale is based on the color produced by a theoretical black body radiator that runs from the very red low temperature (1,900K) to the very blue (16,000K). This makes sense when you think about something being white-hot as hotter than red-hot. If you look at a flame, the hottest part isn’t the red and orange at the edges, but the blue and white areas at the center. Once you understand the various color temperatures of light, you can set your camera to take it into account and render the scene naturally no matter what the light source. This is where the white balance setting on your camera comes into play.
White balance
The white balance setting in your camera tells the sensor what color the light in the scene is and helps to render the colors accurately. After all, it is important for the bride’s dress to look white, not slightly orange or blue. Because each type of light can have a different color to it, your camera can easily be fooled. The human brain and eyes see a white piece of paper as white whether it is outside or in a room with artificial light, but your camera can’t make this distinction. The white balance setting on your camera allows you to adjust the way the camera sees colors so that they are rendered correctly. After all, it is essential that the bride’s white dress actually looks white in the photographs.
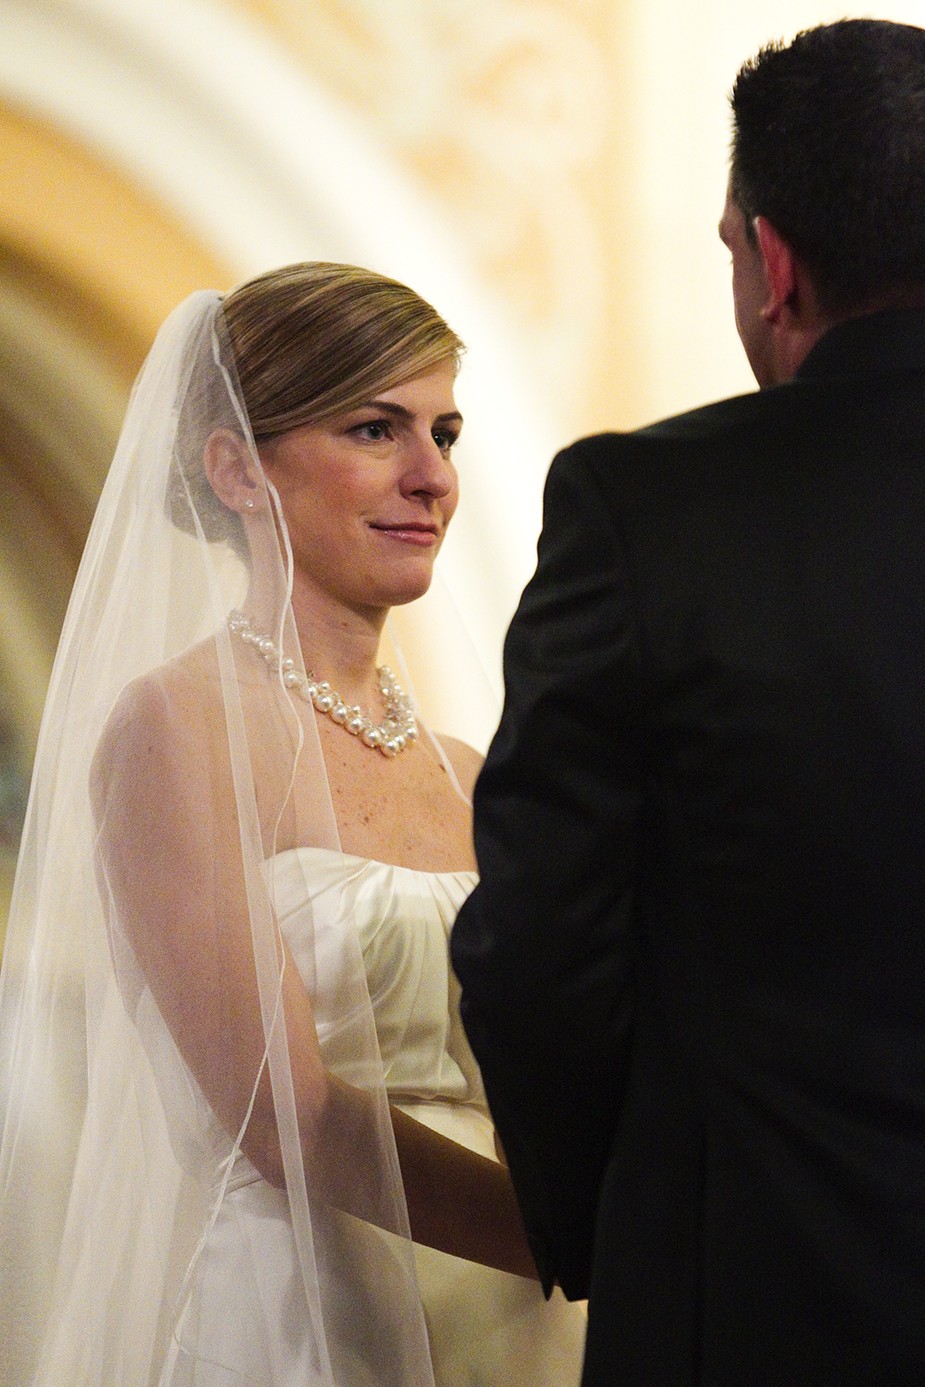
In Chapter 5, I discussed the importance of making sure you set the correct white balance when it comes to the difference between shooting in direct sunlight and in the shade. The difference in those light sources is mild compared to what can happen inside where different types of light bulbs are used. The good news is that you don’t have to memorize the Kelvin scale or where the different types of light fall on the scale, because the camera manufacturers include preset white balance settings for the common type of lights, including Daylight, Cloudy, Shade, Incandescent, Fluorescent, Flash, and a custom white balance option. Check your camera manual for the white balance presets and how to set them; usually it is as easy as choosing a menu option or pressing a dedicated WB (white balance) button. Picking the correct white balance can make all the difference in getting the right colors in your images. Take Figures 6-10 and 6-11 for example, where the wrong white balance can ruin the photo. The first image was taken with the correct color balance, rendering the colors true, while the same image with the incorrect white balance renders the image with massive color problems.
6-10
6-11
ABOUT THESE PHOTO The same image processed with the correct white balance (as in Figure 6-10) is a lot different from when the wrong white balance is used (as in Figure 6-11). Both images were taken at ISO 1600, f/4, 1/300 of a second.
For the white balance setting to work, the camera adds red to the photo when the light is blue and adds blue to the photo when the light is red. This way the colors will look natural, not too red or blue. Each camera manufacturer, and even each camera model, might use slightly different numbers for the actual color temperature, and you can find out what your camera uses in the camera manual. Here are the most common white balance settings and what they do:
• Auto white balance. Most cameras have an auto white balance setting where the cameras set the white balance for every shot. As this is a best guess by the camera and not an exact reading of the color temperature, it can be less accurate than using an actual color temperature setting, but I have found that as technology improves, so does the auto white balance setting, producing good results most of the time. The downside to using the auto white balance is that the camera adjusts the white balance constantly, so each photo has a slightly different white balance, meaning that there can be slight variations in the colors from image to image.
• Daylight. The camera sets the color temperature to 5000K – 5500K, which gives an accurate color for direct sun in the middle of the day. Even though this is the correct temperature for that kind of light, it can still look a little blue or cold.
• Cloudy. The Cloudy setting assumes that the direct sun is being diffused by clouds and makes the color a little warmer. The camera sets the color temperature to 6000K – 7500K and adds a little more red to balance out the slightly bluer light. This is a good choice when photographing outdoors, as it makes people look slightly warmer even when used in direct sunlight.
• Flash. The Flash setting and the Cloudy setting are similar, and it can be tough to tell them apart. The Flash setting is meant to match the color of the light from an electronic flash, usually around 6000K, which tends to be a little cooler, so the white balance setting adds back in some of the warmth to get a natural look.
• Shade. The color temperature of the light in the shade is 7000K – 8500K. The Shade white balance setting in your camera really starts to add red to the image to counteract the blue light present in the shade. This setting also works really well for very cloudy and overcast days.
• Tungsten or incandescent. This setting is used when shooting indoors under the very warm tungsten or incandescent bulbs. These types of bulbs have a color temperature of 2000K – 3000K, which is very red. The camera adds a lot of blue to the image to counteract the very red light in order to end up with a true representation of the color. Many times this setting can actually look a little too blue, and a better choice is the fluorescent white balance setting,
• Fluorescent. Fluorescent bulbs are different from other types of bulbs because of the way they work. They do not have an element that is heated up to produce light but instead use electricity to excite the chemical phosphors that coat the inside of a gas-filled tube. Each different type of phosphor creates a different color of light, and the bulb manufacturers use a variety of phosphors to mimic a nice white light. These lights can have a wide variety of color temperatures from 3200K – 7500K. The camera sensors have a really hard time with this type of light, and many times the subject photographed under fluorescents can have a sickly green cast. Another problem is that small fluctuations in the electric flow to the bulb create shifts in the color that you might not see with your eye but the sensor will pick up every time. The fluorescent white balance tries to counteract this and can do a satisfactory job, but using a custom white balance in these circumstances is a better solution.
• Custom white balance. Some lighting situations are tougher than others (more on that in the next section), and the best solution to this is the custom white balance. This is where you can set the white balance based on the light in the scene and is covered in more detail in the following section.
One of the biggest advantages to using the RAW file type when you’re taking pictures is you can easily adjust the white balance using software in post-production. This works best if the light illuminating the scene is only one type of light.
Mixed lighting conditions
Shooting indoors can mean a mix of different types of lighting, where incandescent bulbs and fluorescent bulbs are used in the same location, or there is natural sunlight illuminating part of the scene and incandescent or fluorescent bulbs illuminating parts of the scene. Because these lights all have different colorcasts, it can be a real headache getting the colors to render properly.
If the subject is predominantly lit by one light with just a smattering of other lights in the scene, then the best bet is to determine what the main light source is and set the camera to render that correctly, as shown in Figure 6-12. For example, if I had set the white balance to render the sunlight correctly, then the interior would have been too orange.
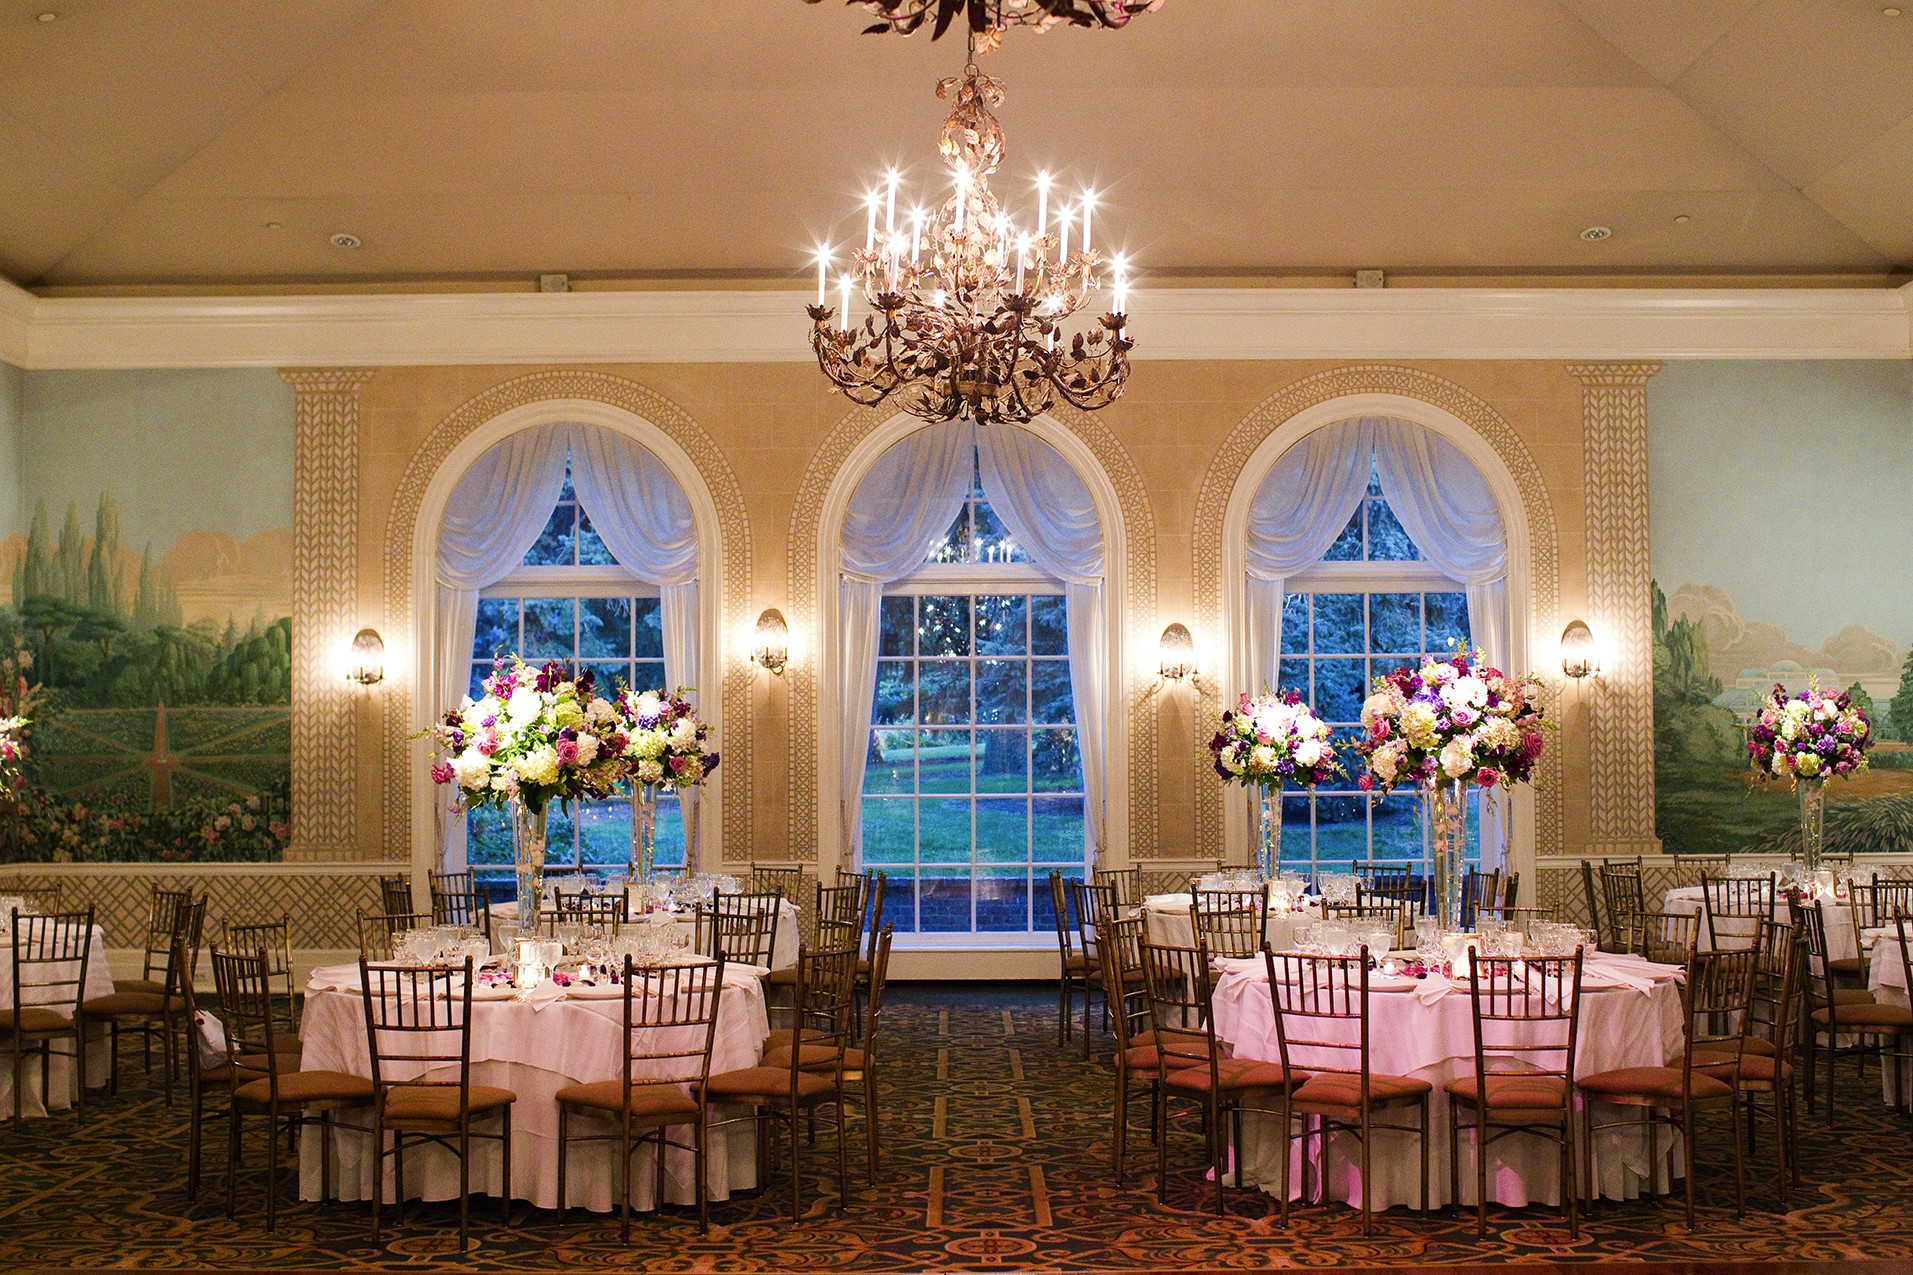
6-12
ABOUT THIS PHOTO This room was lit with a combination of room lights and sunlight from the large windows. I used a custom white balance that correctly rendered the inside lighting to be white, which caused the sunlight to take on a blue cast. Taken at ISO 2500, f/2.8, 1/60 second.
When it is difficult or impossible to tell what the main light is or the mix of lighting makes it impractical to use one of the preset white balance settings, then a custom white balance will help. To learn how to set up the custom white balance for your camera, you will need to read the camera manual, but the idea is the same no matter what camera you are using. Start with a white item that can be placed in the lighting you want to set the white balance for. This can be a piece of paper or a piece of white material. I carry a piece of white cloth in my camera bag for these types of situations. You place the white object in the lighting and take a reference photo of it, and then you tell the white balance that the object is white, and the camera adjust, the colors to match. This works well, but you do need to remember to change the white balance when the lights change.
Many times it is possible to just move the subjects so that they are illuminated by one type of light. However, if that isn’t possible, then look to see if you can turn off one of the light sources. When you do this, you will have to increase the ISO, reduce the shutter speed, or use a wider aperture because there is less light. It’s also possible to use a flash to add a little light back into the scene. When using a flash in mixed lighting situations, adding a gel over the flash head will make it possible for the light from the flash to match the existing light (there is more on using a flash in the next section).
If the mix of lighting is really tough, it is possible to adjust the image in post-production to adjust for the different colors of light. The key to doing this is to process the same image multiple times for each of the different light sources. You can then build a composite image, making sure that the entire image looks correct. This method can take a while to get correct and involves quite a bit of image-editing know-how, which is why it is a last resort. To make it easier to adjust the white balance in postproduction, I recommend shooting using RAW, because this has the most information and allows for the easiest postproduction white balance adjustments.
When to use the flash
It is true that using a flash during the ceremony is usually frowned upon, but there are plenty of times you can use your flash with great success, especially before and after the ceremony and during the reception. There are some general things to keep in mind when using a flash:
• Flash sync speed. When using a flash with your camera, there is a limit to how high of a shutter speed you can use. This is because the shutter inside the camera needs to be open long enough to record the flash. The fastest sync speed is determined by your camera and flash combination, so check with the camera and flash manuals to find out the top sync speed for your camera and flash combination. The usual top sync speed is 1/200 or 1/250 second, but you can use any shutter speed up to and including the top sync speed.
• High speed sync. Some cameras allow you to use a flash at much higher shutter speeds than the 1/200 second or 1/250 second sync speeds. It completely depends on the camera and flash. Being able to use a flash at higher shutter speeds allows easier fill flash usage and gives you a wider range of settings to use.
• Shutter speed. The shutter speed controls how much of the ambient light is present in the image. Because a longer shutter speed allows more ambient light to reach the sensor, when you want to capture parts of the room and backgrounds at weddings, you can. I like to shoot indoors generally with a flash at 1/30 second or even less. The subject appears sharp, because the very short flash duration freezes the subject in place. For example, for the bride waiting to throw her bouquet in Figure 6-13, I used a shutter speed of 1/20 second, and the women waiting in the background are lit by the ambient light. When using the flash, there are actually two exposures being captured at the same time. The first is the ambient exposure, controlled by the shutter speed, and the second is the flash exposure, controlled by the power of the flash and aperture.
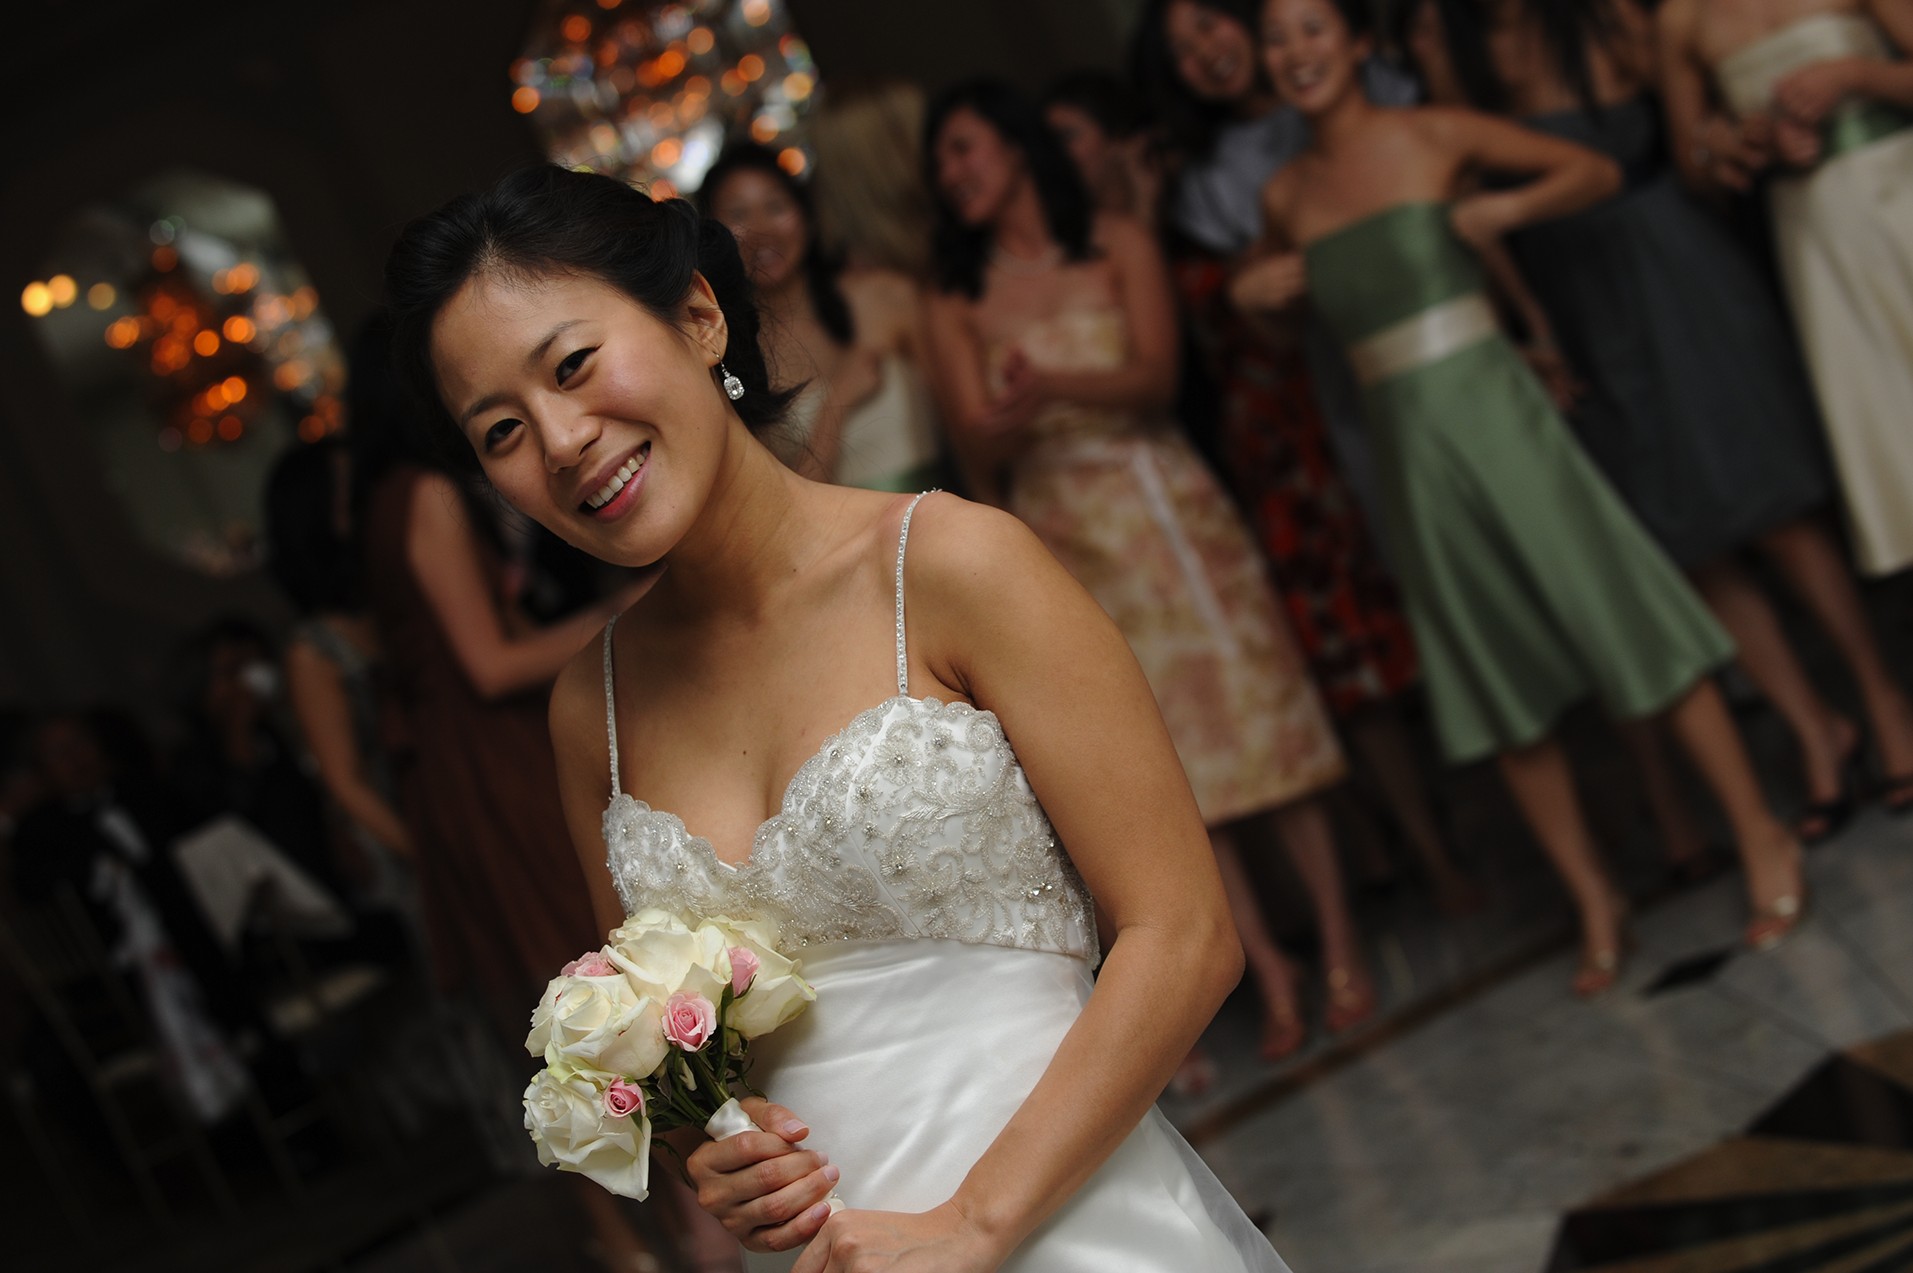
6-13
ABOUT THIS PHOTO The bride is illuminated by the flash, but the women waiting for her to throw the bouquet are lit by the ambient light that was picked up because the shutter was left open long enough to let the light reach the sensor. Taken at ISO 5000, f/4.5, 1/20 second.
• Aperture. The aperture controls the exposure by determining how much of the light from the flash reaches the sensor: The wider the aperture, the more the flash illuminates the scene. The key is to get a nice balance between the shutter speed (ambient light) and the aperture (flash light).
For more on exposure basics see Chapter 3.
• Rear-curtain sync. Most cameras allow you to decide when the flash fires: at the beginning of the exposure or at the end. When you fire the flash at the beginning of the exposure and use a longer shutter speed, any movement happens after you have frozen the subject with the flash (front-curtain sync). When you fire the flash at the end of the exposure (rear-curtain sync), the subjects are frozen at the end of any movement caused by the long shutter speed.
• Off-camera flash. You can do a lot to diffuse the light from an on-camera flash but if you can get the light off your flash, you will instantly see better results. A flash on a light stand set off to the side and a little higher than your camera will result in a better shot. Many manufacturers have built-in controls that allow you to use the built-in flash or dedicated flash unit on the camera to trigger an off-camera flash. There are also flash triggers from companies like Pocket Wizard and radiopopper that allow for off-camera flash triggering from the camera. The placement of the off-camera flash depends on where it can do the most good, but I like to use it placed a little overhead and off at an angle to the subject.
• Gels. The light from your flash(es) is set to be as close to daylight as possible, which works well when you use flash with daylight or all by itself. However, when you are using a flash with the existing fluorescent light in a room, you need to make the color of the light from the flash match. You can do this with gels, which are small pieces of colored material that go over the flash head and change the color of the light. By using gels, you can balance the color of the ambient light with the light from your flash, making it seem like it was all from the same light source.
Keep your flash on the camera and turn it on when wanted or needed. This will save you time, and you are less likely to miss any shots because you weren’t ready. Even when the flash is not allowed during the ceremony, it is usually allowed during the processional, as shown in Figure 6-14. If my flash wasn’t on the camera, I wouldn’t have been able to get this shot because even at ISO 2500 and 1/4 of a second shutter speed, it was still too dark to get a proper exposure.
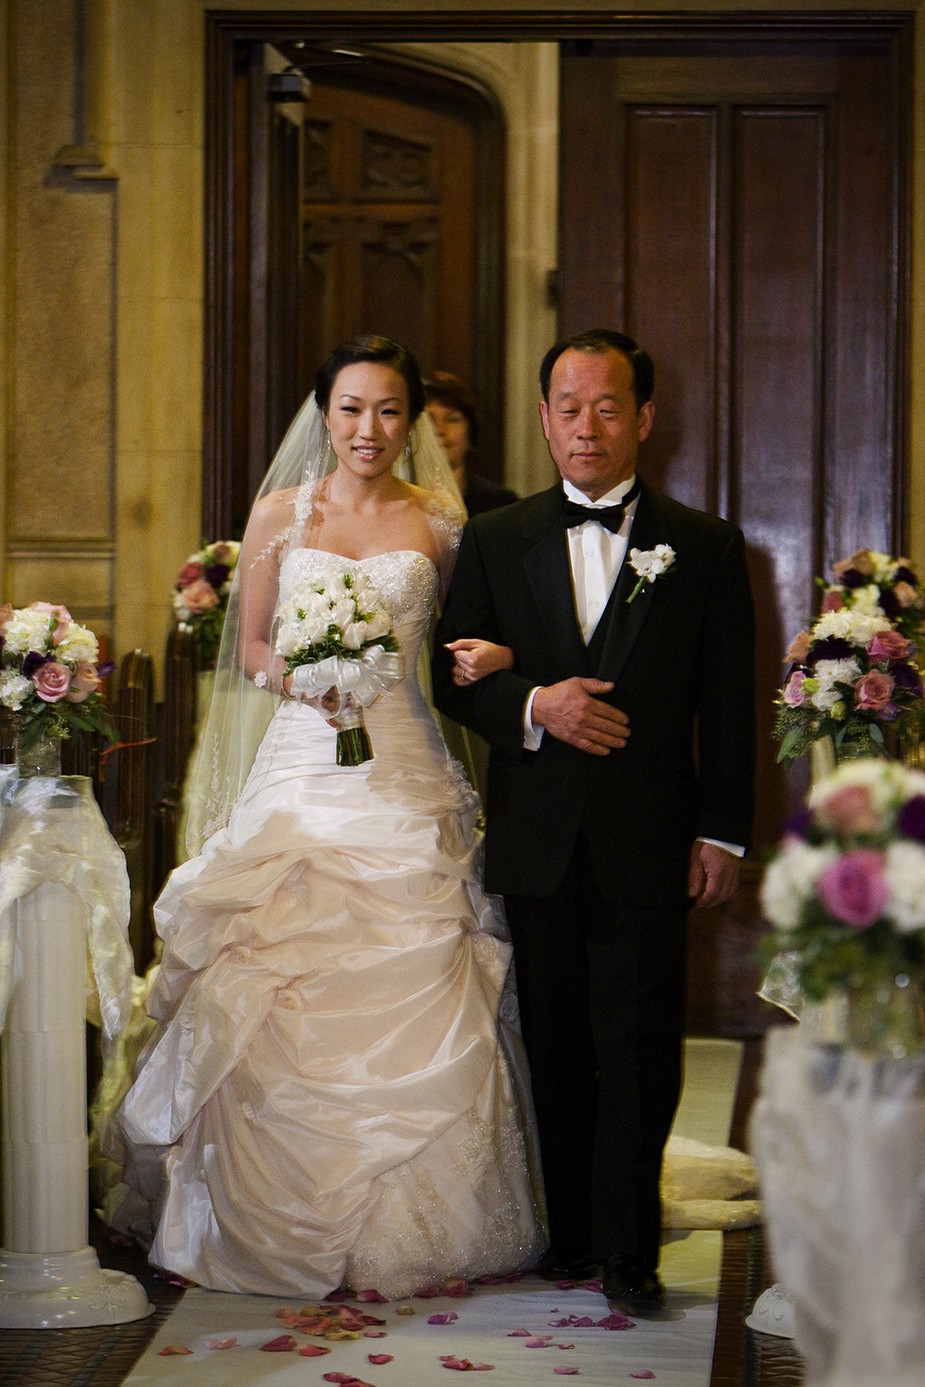
6-14
ABOUT THIS PHOTO The bride being escorted down the aisle by her father. Taken at ISO 2500, f/2.8, 1/40 second with rear-curtain sync.
One last thing to keep in mind when using a flash is the recycle time. The flash needs time to build up a charge between flashes. That means that you need to wait a few seconds between shots. An external battery pack will help the flash recycle faster, but it is up to you to make sure that the flash fired. When in doubt, check the LCD on the back of the camera to make sure everything is working. Some flashes can overheat if you use them too much in a short period of time. If your flash does this, either have another flash ready to go or make sure you time your shots so the flash has plenty of time to cool down.
Assignment
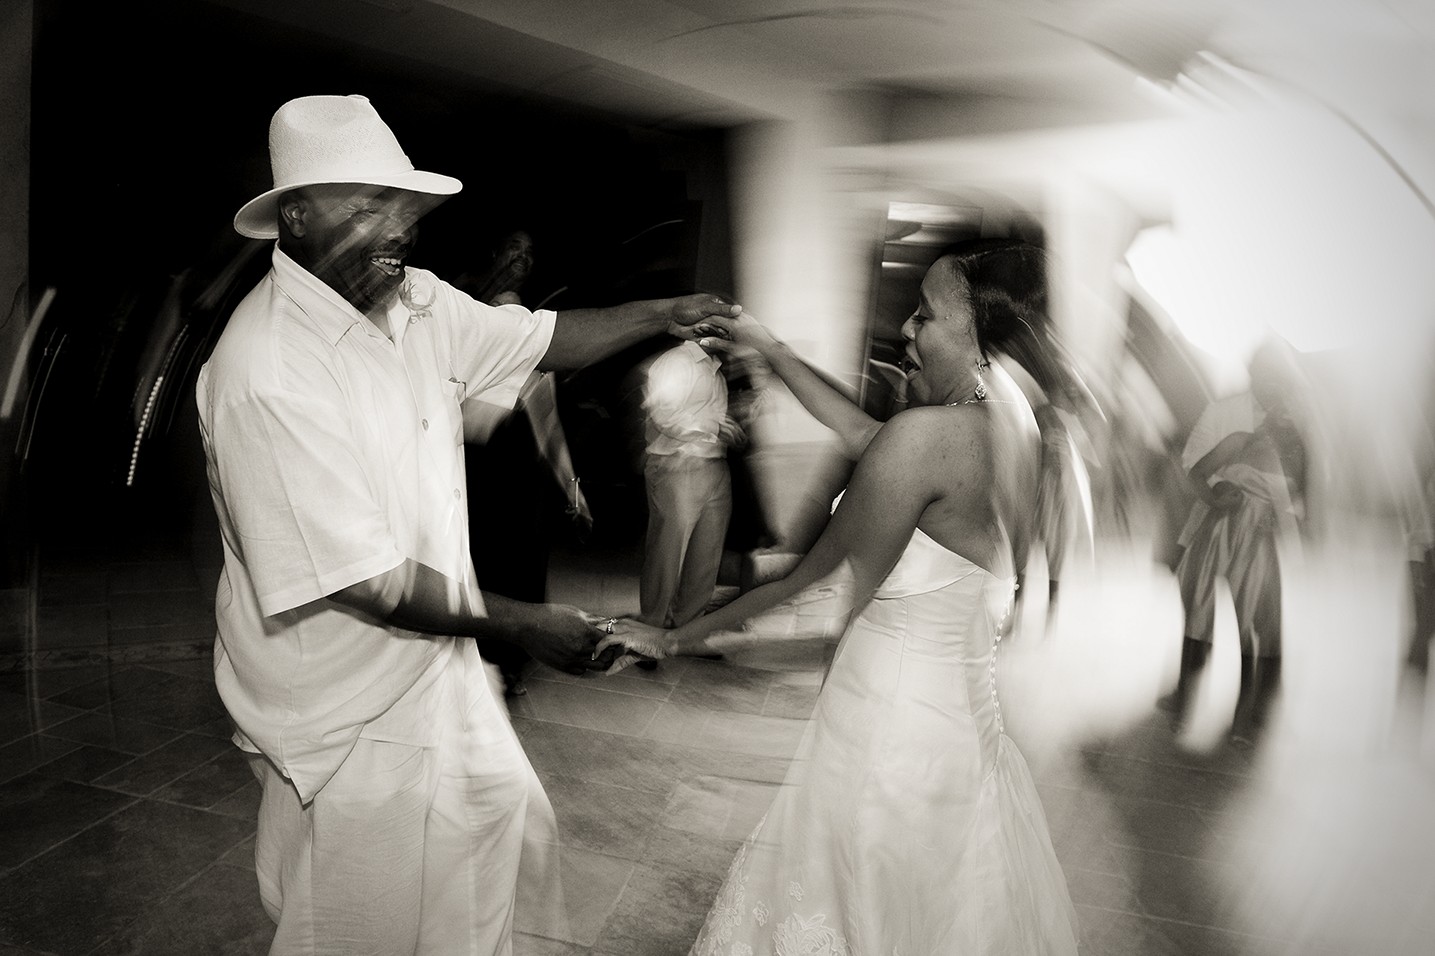
Using Front and Rear Sync Flash Modes
This assignment is to capture the same scene using front curtain sync and rear curtain sync. It is up to you to decide which method conveys the scene you photograph best and post that image to the Web site.
Start with a longer shutter speed, usually 1/15 of a second or longer, and choose a scene that has movement in it. When the flash fires, the movement is frozen, so the big difference between front and rear sync is when the movement is frozen, either at the beginning of the scene or the end of the scene. Each gives the image a different feel. When the flash fires at the beginning of the scene, the subject is frozen and any movement after the flash but before the shutter closes looks like a blur moving away from the subject. When the flash fires at the end of the scene, the movement is captured before the flash, creating a blur that moves toward the subject. If the subject is moving randomly, say a spinning bride, it doesn’t matter where the blur appears, so using rear curtain sync has no advantage.
A great time to use this technique is during the reception when photographing the dancing because it will add a sense of movement to the scene as I did for the assignment figure. For this couple dancing, I used a slower shutter speed, all the way down to 1/6 of a second and an ISO of 800 because the room was quite dark. Then I set the flash to fire in rear curtain sync mode and froze the couple at the end of the exposure.
Remember to visit www.pwassignments.com after you complete the assignment and share your favorite photo! It’s a community of enthusiastic photographers and a great place to view what other readers have created. You can also post comments and read encouraging suggestions and feedback.