CHAPTER 11
Editing Files
Computer documents come in many forms, but one of the most basic and flexible is text files. Because of their importance and ubiquity, you must be able to edit text files. This chapter covers this task, with an emphasis on the simple text-mode pico, nano, and Vi editors. I begin by describing some of the roles that text files play. I then describe how to select a text editor. To edit text files, of course, you must be able to start the editor, either on an existing document or to create a new one. The pico and nano editors are quite similar to each other, so I describe their operation together, followed by Vi, which is a much more unusual editor by modern standards. I conclude this chapter with a look at conventions used in configuration files and common formatted text files—two types of text files you'll probably have to edit sooner or later.
 Understanding the role of text files
- Choosing an editor
- Launching an editor
- Editing files with pico or nano
- Editing files with Vi
- Using configuration file conventions
- Editing formatted text files
Understanding the Role of Text Files
A text editor enables you to edit documents that are stored in a plain text format—typically using the American Standard Code for Information Interchange (ASCII), but such files increasingly use Unicode formats to support additional characters. These formats store text documents that, by themselves, include no special formatting or embedded features. That is, text files can't include graphics, use multiple fonts, emphasize words by italicizing them, or use other features that you probably associate with word processors. (As described shortly, though, markup tools provide a partial exception to this rule.)
ASCII AND UNICODE
ASCII dates to the 1960s. It's a 7-bit code, meaning that it supports a maximum of 27, or 128, characters. (In practice, ASCII uses 8 bits, so an extra 128 characters are available. These encode various control characters or are used in ASCII extensions.) Combined with the fact that it was created to encode the letters used in English, digits, and symbols, ASCII's limited character count makes it rather unhelpful for many non-English languages—there just aren't enough characters available to handle all the characters for all non-English languages.
Over the years, extensions to and variants of ASCII have been used to support additional characters and alphabets that ASCII doesn't support. One way to do this is to use a code page to specify, essentially, an alphabet. Each code page specifies a variant of ASCII that's suitable for a particular alphabet. For instance, code page 866 encodes Cyrillic (the alphabet used by Russian and most other Slavic languages). The problem with code pages is that you can generally use only one code page at a time.
Unicode is a more modern approach. It provides a much larger character set, enabling the encoding of any alphabet in common use on Earth, including the huge logographic writing systems used in languages such as Chinese and Japanese. The problem is that Unicode requires many more bits, and several ways to encode it efficiently exist. Fortunately, these Unicode Transformation Format (UTF) schemes are limited in number compared to code pages. Some, such as UTF-8, map the first characters in the same way ASCII does, so an ASCII file is also a valid UTF-8 file. Many text editors today handle UTF-8 (or other Unicode formats) automatically, so you can use a text editor to write text files in any language you like. You may still need to set localization options to tell Linux what sort of keyboard you use and what code page to use by default for programs that still rely on code pages.
Text files encode the ends of lines using one or two special ASCII characters. End-of-line encoding differs between Unix (or Linux) and Windows, but most programs can handle either method.
Text files consist of lines, which can vary in length from 0 characters to the file's entire size. Frequently, line lengths end at 80 characters or less to make viewing and printing the files easier on conventional terminals and printers, which often have 80-character line-length limits.
Text files can hold any number of types of data. Some of these you might want to create or edit as an ordinary user, and others are important for administering a Linux system. The main file types include the following:
 Human language files
- Programming language files
- Formatted text files
- Program and system configuration files
- Program log files
Formatted text files encode special formatting using unique character sequences. Although you can edit such files with a text editor, specialized editors also exist for many such file types.
Some files contain elements of multiple categories. E-mail, for instance, can be stored in text files. An e-mail file consists largely of human language, but e-mail messages include headers, which describe the origin and destination computers, along with information on how the message traveled from one site to the other, which is similar to formatted text or log file data.
Unlike Unix and Linux, many Windows configuration and log files use binary formats, necessitating the use of specialized utilities to manage them.
Choosing an Editor
All Linux distributions ship with many text editors. Broadly speaking, text editors fall into one of two categories: text-mode and GUI. Beginners are generally more comfortable with GUI editors, and they can be more convenient to use even for experts. Sometimes, though, the X Window System (X for short) doesn't start properly, so you may have to use a text-mode editor. Thus, I recommend that you familiarize yourself with at least one text-mode editor. Some popular text-mode editors include the following:
Most Linux distributions use a version of Vi called Vi Improved, or Vim; you can still launch it by typing vi.
Vi This editor is a Unix staple. It's small and is usually installed by default, so you can be fairly certain it's present on any Linux computer. It is, however, strange by modern standards; it uses multiple editing modes, and you must switch between them to accomplish various tasks. Many longtime Unix and Linux administrators like Vi for its flexibility, power, and small size.
Bash's text-editing commands are modeled on those of emacs, so learning emacs can improve your ability to manage Bash.
emacs This editor is another Unix staple. It's a big editor with lots of features, so it's less likely to be installed by default, particularly on small emergency systems. Its operating model is more like those of text editors with which novices are familiar, but its commands can seem rather odd.
pico Several small editors are modeled after emacs but omit many of its advanced features in an effort to simplify the editor. One of these editors is pico, which originated as part of the pine e-mail package.
nano This editor is a clone of pico that adds extra features. Many distributions install nano by default.
Of the preceding editors, nano is probably the best one to start with; it's common enough that you're likely to find it already installed on your system, and its method of operation is less idiosyncratic than that of Vi. Although emacs is a capable editor, it's less likely to be installed by default, which can be a drawback, particularly when using an emergency recovery system. For the most part, pico works just like nano, but because nano adds to pico's features, nano is a more capable editor. Figure 11.1 shows nano in operation within a text-mode login session, editing a file called fstab.
Some distributions provide pico and some don't. Some don't provide pico, but cause nano to launch when you use the pico command.

FIGURE 11.1 The nano editor enables you to edit a text file in text mode.
As with text-mode editors, several GUI editors are available, including the following:
emacs This editor is both a text-mode editor and a GUI editor. The GUI features of emacs, however, are sometimes a bit odd; for instance, the scroll bar to move through the file appears on the left side of the window rather than the more common right side.
gedit The GNU Network Object Model Environment (GNOME) desktop environment has an associated text editor known as gedit. It's a fairly typical text editor, and it's often installed by default.
KWrite and Kate Just as gedit is associated with GNOME, KWrite and Kate are editors that are associated with the K Desktop Environment (KDE). KWrite is slightly more sophisticated than gedit, and Kate adds some more features, but neither is nearly as powerful as emacs.
Nedit This editor is not tied to any particular desktop environment, but it's also unlikely to be installed by default. It's similar in power to KWrite.
For a new Linux user, any of these is a good starting GUI editor; all offer the basic features you need for light text file editing. Which you choose may depend on which is installed by default on your system. In the long term, you should probably try a variety of editors to find the one you like best.
Launching an Editor
If you're comfortable with a GUI desktop environment, you can launch a GUI text editor using the desktop environment's menu system or by using a file manager to browse to a file you want to edit and double-clicking that file. This approach works well for files that you own, but if you need to edit system files, you're likely to lack permissions to save changes if you launch a text editor in this way.
Another approach to launching a text editor is to do so from the command line. You can do this as a normal user or as root, so you can edit text files that you own as well as system files. You can also select the editor you want to use—you just need to know its filename, which you type to launch the editor:
Chapter 13, “Understanding Users and Groups,” describes accounts, including the root account, in more detail.
$ nano
This example launches nano. When it opens, you'll see a display like that shown in Figure 11.1, but the bulk of the window or text-mode console will be empty, since you didn't specify a filename. Instead, the center of the top line will read New Buffer. You can begin typing your file. When you save the file (as described later, in “Saving Your Changes from nano”), nano will ask for a filename. Alternatively, you can provide a filename when you launch the program:
$ nano great_american_novel.txt
This example opens the great_american_novel.txt file and displays it. If the file doesn't exist, nano displays New File near the bottom of the display, where Read 16 lines appears in Figure 11.1. If you mistype the filename, nano will show an empty file, so if you see an empty file instead of the file you were expecting to see, you may have mistyped the filename. If you see Warning: no write permission in the third line from the bottom, this means that you've loaded a file that you have no permission to write. You'll need to run nano as root or modify file permissions, as described in Chapter 15, “Setting Ownership and Permissions,” if you want to save the file.
Editing Files with pico or nano
![]() If you're familiar with text-mode text editors, you should have few problems learning pico or nano. If you've only used GUI editors to edit text, though, you'll have to learn a few conventions about how to use the keyboard. You must move about the document using the keyboard rather than the mouse, for instance. You can insert, replace, and delete text much as you do in a GUI text editor or word processor.
If you're familiar with text-mode text editors, you should have few problems learning pico or nano. If you've only used GUI editors to edit text, though, you'll have to learn a few conventions about how to use the keyboard. You must move about the document using the keyboard rather than the mouse, for instance. You can insert, replace, and delete text much as you do in a GUI text editor or word processor.
Using Text Editor Conventions
Every text editor has its own conventions for information it displays on the screen, how to manipulate text, and so on. Most text-mode text editors are similar up to a point—for instance, one or more lines at the top or bottom of the display typically show summary information or brief command prompts. Figure 11.1 shows this information for nano, which includes:
The title bar The first line of the display is the title bar. This line includes nano's version number, the name of the file being edited, and the modification status.
The status bar The third line from the bottom of the display is reserved for status information and interactions with the user. This line will prompt you for information such as a filename to write when you save your document or terms you want to find in the document when you perform a search operation.
The shortcut list The bottom two lines of the editor show a summary of some of the most common operations, along with the keystrokes that trigger them.
A carat (^) preceding a letter refers to a control character. In this book, I indicate such key combinations with “Ctrl+” rather than a carat.
In addition to control characters, nano uses meta characters to activate some functions. These key combinations use the Esc key followed by another key. In nano's documentation, meta sequences are denoted by M-k, where k is a key. In this book, I use Esc rather than M to prefix a meta key combination. For instance, Figure 11.1 describes M-? as the key sequence to move to the last line of the document. Note that these are distinct keystrokes, unlike Ctrl key sequences; that is, you would press Esc, release it, and then press the question mark (?) key, including its Shift modifier, to move to the last line of the document.
Exploring Basic nano Text-Editing Procedures
You can use pico instead of nano if you prefer; it works almost identically for this task.
As a method of learning nano, consider the task of editing /etc/fstab to add a new disk to the computer. (Don't worry too much about this file's purpose or format; I'm simply using it as a concrete example for demonstrating the editor.) Listing 11.1 shows the original /etc/fstab file used in this example. If you want to follow along, enter it using a text editor with which you're already familiar, and save it to a file on your disk. Alternatively, copy /etc/fstab from your own system to your home directory and use it, but be aware that it won't be identical to the one shown in Listing 11.1. Don't edit your real /etc/fstab file as a learning exercise; a mistake could render your system unbootable the next time you reboot. Instead, work on a copy of this file.
Listing 11.1: Sample /etc/fstab file
/dev/sda2  /         ext4   defaults         1 1
/dev/sda1  /boot     ext4   defaults         1 2
/dev/sda4  /home     ext4   defaults         1 2
/dev/sda3  swap      swap   defaults         0 0
tmpfs      /dev/shm  tmpfs  defaults         0 0
devpts     /dev/pts  devpts gid=5, mode=620  0 0
sysfs      /sys      sysfs  defaults         0 0
proc       /proc     proc   defaults         0 0
Comments and other configuration file conventions are described later, in “Using Configuration File Conventions.”
The first step to using nano is to launch it and have it load the file. In this example, type nano fstab while in the directory holding the file. The result should resemble Figure 11.1 (shown earlier), which illustrates nano editing Listing 11.1 but with some comments at the start of the file.
You can add a new entry to fstab in a couple of ways. The first way is to create a new empty line and type an entry manually. You can do so as follows:
- Press the down arrow key repeatedly until the cursor appears over the t in tmpfs.
- Press the Enter key. This action opens a new line between the /dev/sda3 line and the tmpfs line.
- Press the up arrow key once to reposition the cursor on the empty new line.
- Type the following new line:
/dev/sdb1 /home2 ext4 defaults 0 0
A second way of creating a new entry demonstrates how to cut and paste text in the editor:
- Move the cursor to the beginning of the /dev/sdb1 line you've just created by using the arrow keys; you should see the cursor resting on the / in /dev/sdb1.
- Press Esc-6. This keystroke copies the line on which the cursor resides into a cut/copy buffer.
Alternatively, Ctrl+K cuts text, meaning that it's removed from the file and copied to the buffer. This is useful to move lines to a new location in the file.
- Press Ctrl+U. This keystroke pastes the contents of the cut/copy buffer into the file in the current location.
- Use the arrow keys to move the cursor to the right of /dev/sdb1.
- Press the Backspace key once and then press the 2 key to change /dev/sdb1 to /dev/sdb2.
- Use the arrow keys to move the cursor to the left of /home2.
- Press the Backspace key once and then press the 3 key to change /home2 to /home3.
You can make more extensive changes to the fstab file, if you like, but be sure to work from a copy of the file!
The result of these changes is a new line, very similar to the one you added earlier:
/dev/sdb2 /home3 ext4 defaults 0 0
You can make additional changes in a similar way. Although nano lacks a GUI, most of its principles are the same as the ones in GUI text editors and word processors; you just need to know the keystroke to activate the feature you want. Pressing Ctrl+G produces a help listing that summarizes the program's features, which can be handy as you get to know the editor.
Some additional features you might want to use include the following:
Move to the start or end of the file You can use the arrow keys, Page Up, Page Down, Home, and End to move the cursor around in ways that are common to other editors. To move to the start of the file, press Esc-; and to move to the end of the file, press Esc-/.
Copy or move multiple lines If you need to copy or move multiple consecutive lines, you can repeat the Esc-6 or Ctrl+K operation; nano retains all the lines you copy or cut, so that when you press Ctrl+U, all of them will be pasted back.
Insert a file Pressing Ctrl+R or F5 enables you to insert another file in the current one, at the cursor's current position.
Search for a string Pressing Ctrl+W or F6 activates a search feature. When activated, nano prompts you for a search term. Type it, followed by the Enter key, and nano finds the next instance of that search term in the file. When you press Ctrl+W or F6 again, the default search term is the last one used, so you can search repeatedly for the same term by pressing Ctrl+W or F6 followed by Enter for each search operation. Alternatively, Esc-W or F16 repeats the last search.
Replace a string You can replace one string with another by pressing Ctrl+, Esc-R, or F14. The program prompts you to enter a search term and the term you want to replace it. The search then commences, and nano asks you to verify each replacement. If you want to replace all the occurrences without prompting, you can press the A key at the first prompt.
Saving Your Changes from nano
Once you've made changes to a text file, of course, you probably want to save them. One way to do this is with the Ctrl+O option. (That's a letter O, not a digit 0.) When you press this key, nano asks:
Write Selection to File:
Ordinarily, the prompt will include the file's original name, so you can press the Enter key to save the file using that name. If you want to use a different name, though, you can delete the old one and type a new name. If you launched nano without specifying a filename, you can type one at this prompt.
Another way to save the file is to press Ctrl+X. This command exits from nano, but if you've modified the file, it produces the following prompt:
Save modified buffer (ANSWERING “No” WILL DESTROY CHANGES) ?
Type y at this prompt to save the file. The program then shows you the filename prompt that you'd have seen if you'd pressed Ctrl+O, so you can change the filename if you like. Once nano saves the file, it terminates.
Editing Files with Vi
Most Linux distributions ship with a variant of Vi known as Vim, or “Vi Improved.” The information presented here applies to both Vi and Vim.
![]() Vi was the first full-screen text editor written for Unix. It's designed to be small and simple. Vi is small enough to fit on tiny, floppy-based emergency boot systems. For this reason alone, Vi is worth learning; you may need to use it in an emergency recovery situation. Vi is, however, a bit strange, particularly if you're used to GUI text editors. To use Vi, you should first understand the three modes in which it operates. Once you understand those modes, you can begin learning about the text-editing procedures Vi implements. You'll also examine how to save files and exit Vi.
Vi was the first full-screen text editor written for Unix. It's designed to be small and simple. Vi is small enough to fit on tiny, floppy-based emergency boot systems. For this reason alone, Vi is worth learning; you may need to use it in an emergency recovery situation. Vi is, however, a bit strange, particularly if you're used to GUI text editors. To use Vi, you should first understand the three modes in which it operates. Once you understand those modes, you can begin learning about the text-editing procedures Vi implements. You'll also examine how to save files and exit Vi.
Understanding Vi Modes
At any given moment, Vi is running in one of three modes:
Command mode This mode accepts commands, which are usually entered as single letters. For instance, i and a both enter insert mode, although in somewhat different ways, as described shortly, and o opens a line below the current one.
Ex mode To manipulate files (including saving your current file and running outside programs), you use ex mode. You enter ex mode from command mode by typing a colon (:), typically directly followed by the name of the ex-mode command you want to use. After you run the ex-mode command, Vi returns automatically to command mode.
Insert mode You enter text in insert mode. Most keystrokes result in text appearing on the screen. One important exception is the Esc key, which exits insert mode and returns to command mode.
If you're not sure what mode Vi is in, press the Esc key. Doing so returns you to command mode, from which you can reenter insert mode, if necessary.
Unfortunately, terminology surrounding Vi modes is inconsistent at best. For instance, command mode is sometimes referred to as normal mode, and insert mode is sometimes called edit mode or entry mode. Ex mode often isn't described as a mode at all, but is referred to as colon commands.
Exploring Basic Vi Text-Editing Procedures
As a method of learning Vi, consider the task of editing /etc/fstab to add a new hard disk—the same task described earlier, in “Exploring Basic nano Text-Editing Procedures,” with respect to nano. Listing 11.1 (in that earlier section) shows the original /etc/fstab file used in this example. If you want to follow along, enter it using a text editor with which you're already familiar, and save it to a file on your disk. Don't edit your real /etc/fstab file as a learning exercise; a mistake could render your system unbootable the next time you reboot. Instead, work on a copy of this file.
The first step to using Vi is to launch it and have it load the file. In this example, type vi fstab while in the directory holding the file. The result should resemble Figure 11.2, which shows Vi displaying the original file in a text session. Although not shown in Figure 11.2, some systems display a line of tildes (~) down the left side of the screen to indicate the end of the file. The bottom line shows the status of the last command—an implicit file load command that loaded 16 lines and 611 characters (16L, 611C) from the fstab file.
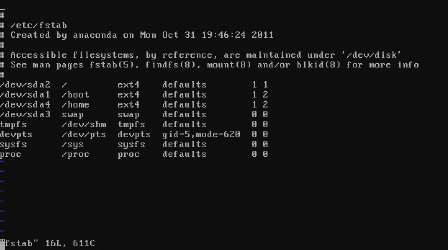
FIGURE 11.2 The last line of a Vi display is a status line that shows messages from the program.
As with nano, you can add a new entry to fstab using Vi either by typing it in its entirety or by duplicating an existing line and then modifying one copy. To do it the first way, follow these steps:
- Move the cursor to the beginning of the /dev/sda3 lines by using the arrow keys.
- Press the O (letter O, not number 0) key. This opens a new line immediately below the current line, moves the cursor to that line, and enters insert mode.
- Type a new entry, such as the following:
/dev/sdb1 /home2 ext4 defaults 0 0
- Press the Esc key to return to command mode.
To practice making changes by modifying an existing entry, follow these steps:
- Move the cursor to the beginning of the /dev/sdb1 line you just created by using the arrow keys, if necessary; you should see the cursor resting on the first / of /dev/sdb1.
- You must now yank one line of text. This term is used much as copy is used in most text editors—you copy the text to a buffer from which you can later paste it back into the file. To yank text, you use the yy command, preceded by the number of lines you want to yank. Thus, type 1yy (do not press the Enter key, though). The dd command works much like yy, but it deletes the lines as well as copying them to a buffer. Both yy and dd are special cases of the y and d commands, respectively, which yank or delete text in amounts specified by the next character, as in dw to delete the next word.
- Move the cursor to the line before the one where you want the new line to appear.
- Type p (again, without pressing the Enter key). Vi pastes the contents of the buffer starting on the line after the cursor. The file should now have two identical /dev/sdb1 lines. The cursor should be resting at the start of the second one. If you want to paste the text into the document starting on the line before the cursor, use an uppercase P command.
- Move the cursor to the 1 in /dev/sdb1 on the line you've just pasted. You're about to begin customizing this line.
- Until now, you've operated Vi in command mode. You can use any of several commands to enter insert mode. At this point, the most appropriate is R, which enters insert mode so that it's configured for text replacement rather than insertion. If you prefer to insert text rather than overwrite it, you can use i or a (the latter advances the cursor one space, which is sometimes useful at the end of a line). For the purposes of these instructions, type R to enter insert mode. You should see -- REPLACE -- appear in the status line.
- Type 2 to change /dev/sdb1 to /dev/sdb2.
- Use the arrow keys to move the cursor to the 2 in /home2. You must modify this mount point name.
- Type 3 to change /home2 to /home3.
You can make more extensive changes to the fstab file, if you like, but be sure to work from a copy of the file!
- Exit insert mode by pressing the Esc key.
- Save the file and quit by typing :wq. This is an ex-mode command, as described shortly. (The ZZ command is equivalent to :wq.)
Many additional commands are available that you may want to use in some situations. Here are some of the highlights:
Change case Suppose you need to change the case of a word in a file. Instead of entering insert mode and retyping the word, you can use the tilde (~) key in command mode to change the case. Position the cursor on the first character you want to change, and press ~ repeatedly until the task is done.
Undo To undo any change, type u in command mode.
Open text In command mode, typing o (a lowercase letter O) opens text—that is, it inserts a new line immediately below the current one and enters insert mode on that line.
Search To search forward for text in a file, type / in command mode, followed immediately by the text you want to locate. Typing ? searches backward rather than forward.
Change text The c command changes text from within command mode. You invoke it much like the d or y command, as in cw to change the next word or cc to change an entire line.
Go to a line The G key brings you to a line that you specify. The H key “homes” the cursor—that is, it moves the cursor to the top line of the screen. The L key brings the key to the bottom line of the screen.
Replace globally To replace all occurrences of one string with another, type :%s/original/replacement, where original is the original string and replacement is its replacement. Change % to a starting line number, comma, and ending line number to perform this change on a small range of lines.
Vi offers a great deal more depth than is presented here; the editor is quite capable, and some Linux users are very attached to it. Entire books have been written about Vi. Consult one of these, or a Vi Web page like http://www.vim.org, for more information.
Saving Your Changes from Vi
To save changes to a file, type :w from command mode. This enters ex mode and runs the w ex-mode command, which writes the file using whatever filename you specified when you launched Vi. Related commands enable other functions:
Edit a new file The :e command edits a new file. For instance, :e /etc/ inittab loads /etc/inittab for editing. Vi won't load a new file unless the existing one has been saved since its last change or unless you follow :e with an exclamation mark (!).
Include an existing file The :r command includes the contents of an old file in an existing one.
Execute an external command The ex-mode command :! executes the external command that you specify. For instance, typing :!ls runs ls, enabling you to see what files are present in the current directory.
Quit Use the :q command to quit the program. As with :e, this command won't work unless changes have been saved or you append an exclamation mark to the command (as in :q!).
You can combine ex commands such as these to perform multiple actions in sequence. For instance, typing :wq writes changes and then quits from Vi.
Using Configuration File Conventions
Most Linux system configuration files reside in the /etc directory tree, but your user configuration files reside in your home directory, usually in files or subdirectories with names that begin with a dot (.), such as .bashrc, which is the Bash configuration file. Configuration file formats vary from one program to another. Therefore, whether you want to edit a system configuration file or a personal configuration file, you're well advised to consult the documentation for the program in question. There are, however, some features that are common to many configuration files.
The Bash configuration file is actually a shell script —that is, a program. Chapter 12, “Creating Scripts,” describes how to create and edit Bash scripts.
One common purpose for configuration files is to set certain program features to particular values. For instance, you might want to tell a mail server program to send outgoing mail to another computer, or you might want to tell a GUI program about its window's height and width. Most configuration files do this by setting a named variable to a value, by placing both on the same line, sometimes with an equal sign between them. For instance, the main Postfix mail server configuration file (/etc/postfix/main.cf) uses an equal sign to set the relayhost variable to a value, as in:
relayhost = franklin.pangaea.edu
The relayhost variable, when set, tells Postfix to relay outgoing mail through the named system—franklin.pangaea.edu, in this example. Another example is the /etc/ntp.conf file, which holds data for the Network Time Protocol (NTP) daemon, which synchronizes your computer's clock with other computers' clocks. You can specify an outside clock source with the server variable:
servertardis.example.com
Don't be too concerned with Postfix or NTP configuration specifically; I merely used them as convenient examples.
This line tells NTP to use tardis.example.com as a time source. Whether or not a configuration file requires an equal sign is a design decision of the program's author. Some configuration files use still more complex formats, but assigning values to variables is quite common in configuration files.
The /etc/fstab file used earlier as an example file doesn't really set variables in either of these ways, but it does link various types of data together, one set per line. The information includes the device filename for a partition, its mount point, its filesystem, and its mount options. Such collections are common in configuration files, but the details differ. For instance, /etc/fstab separates elements with whitespace—that is, spaces or tabs. Some other files use other separating characters, such as the colon (:) that separates user account information in the /etc/passwd, /etc/shadow, and /etc/group files. (Chapter 13 describes these files in more detail.)
Another common feature of configuration files is comments—that is, English (or other natural language) text that describes the purpose of a file, a block of lines, or even a single line. Typically, comments begin with one or more special characters. The comment then continues until the end of the line or, sometimes, until another character or set of characters terminates the comment.
The single most common comment character in configuration files is a hash mark (#), which is used to begin a comment. Such comments typically end with the end of the line on which they appear. For instance, the /etc/ntp.conf file might include the following lines:
# You do need to talk to an NTP server or two (or three).
# server wells.pangaea.edu
server tardis.example.com
The first line is a comment that describes the purpose of the following lines. The second line illustrates an important secondary use of comments: By adding the comment character to the start of the line, you disable it. Thus, the wells.pangaea.edu computer is not configured as an NTP server. Commenting out configuration file entries in this way is useful when you're testing a setup—perhaps you suspect problems with wells.pangaea.edu, so you comment its entry out as a temporary measure. You can easily uncomment the line by removing the hash mark and the following space.
Some servers use other characters or strings to denote comments. For instance, the sendmail e-mail server uses the string dnl to denote comments. If you're examining an unfamiliar configuration file, you should keep an eye out for comments. Even if you don't know the usual comment character used in the file, you can usually figure it out by spotting plain English text in the file.
Some programs provide default configuration files that have quite wordy comments. Such files can help you figure out how to adjust the program's configuration.
Knowing these two conventions alone (variable assignment and comments) can help you determine what a configuration file is doing, and therefore enable you to change how it works.
Editing Formatted Text Files
As noted earlier, in “Understanding the Role of Text Files,” formatted text files use ASCII or Unicode formats, in conjunction with conventions for a layout language, to describe text that's more complex than ASCII or Unicode alone can handle. A common formatted text file format is the Hypertext Markup Language (HTML), which is used on the Web—most Web pages use HTML.
Although a full tutorial on how to edit HTML, or any other formatted text file, is beyond the scope of this book, you may want to take a quick look at this type of file so that you can at least begin to understand it, and perhaps make small changes to such files. To that end, Listing 11.2 shows a simple HTML file.
Listing 11.2: A sample HTML file
<!DOCTYPE HTML PUBLIC “-//W3C//DTD HTML 4.01 Transitional//EN”

“http://www.w3.org/TR/html4/loose.dtd”>
<HTML>
<HEAD>
<TITLE>Linux Essentials</TITLE>
</HEAD>
<BODY BGCOLOR=“#FFFFFF” TEXT=“#000000”>
<CENTER><H1 ALIGN=“CENTER”>Linux Essentials</H1></CENTER>
<P>The <I>Linux Essentials</I> book covers the essential
tools for using Linux!</P>
</BODY>
</HTML>
In HTML, most formatting information appears in angle brackets (<>). These tags are usually paired, with the ending tag carrying the same name as the beginning one, except that the ending tag's name includes a slash (/). For instance, <P> begins a paragraph and </P> ends it. Likewise, begins italic text and ends it.
HTML tags are case-insensitive. An extended version of HTML, known as XHTML, uses case-sensitive lowercase tags.
In Listing 11.2, the first line identifies the version of HTML the document uses. This enables the Web browser to adjust the way it handles the file. The <HTML> tag begins the bulk of the document. The <HEAD> and <BODY> tags identify two key parts of the document—the header that normally appears in a Web browser's title bar and the main body of the document.
Some opening tags include additional information. For instance, the <BODY> tag in Listing 11.2 specifies the background color (BGCOLOR=”#FFFFFF”) and text color (TEXT=”#000000”).
The purpose of describing this is not to make you experts on HTML—it's to point out that you can often parse and even edit formatted text files with minimal knowledge. For instance, you can change the text in the body of Listing 11.2, add new paragraphs by mimicking the way the first one is specified, and so on. If you make a mistake, though, the results can be strange. For instance, if you type Listing 11.2 into a text editor, save it, and point a Web browser to the file, you can see what it looks like as a Web page. If you neglect to type the </I> tag in the paragraph, though, all the text after the book's title will be italicized. If you were to enter another paragraph after the first one, it would be italicized, too! The Web browser will keep on italicizing text until it encounters a </I> tag.
Plain text files, which encode text using ASCII or Unicode, are important on most computer platforms, but they're particularly important on Linux. This is because many of Linux's configuration files use plain text formats, so understanding how to use an editor, such as pico, nano, or Vi, to edit these files enables you to edit a wide variety of configuration files. You should also understand the conventions used by certain configuration file formats, such as common features of configuration files and formatted text files. Even a basic understanding of what you're likely to find will help you edit such files when the need arises.
SUGGESTED EXERCISES
- Launch nano to create a new file and type in a complete paragraph from this chapter. Proofread the text and correct any typos you find. (If you found none, congratulations! Now create a few “errors” and correct them.)
- Type Listing 11.2 into Vi and save it. Point a Web browser at the file (for instance, by typing file:///home/yourusername/sample.html into a Web browser's address field, if you saved it as ~/sample.html). Add a new paragraph by cutting and pasting the existing paragraph and changing the text. Reload the file to see how your Web browser renders it.
REVIEW QUESTIONS
- Which type of file is nano least likely to be useful for examining or editing?
- A /var/log/messages log file
- An HTML Web page file
- An e-mail message saved from an e-mail client
- A LibreOffice word processing document
- An /etc/X11/xorg.conf configuration file
- Which keystrokes invoke the pico or nano search function? (Select all that apply.)
- F3
- F6
- Esc-S
- Ctrl+F
- Ctrl+W
- How would you remove two lines of text from a file using Vi?
- In command mode, position the cursor on the first line and type 2dd.
- In command mode, position the cursor on the last line and type 2yy.
- In insert mode, position the cursor at the start of the first line, hold down the Shift key while pressing the Down arrow key twice, and press the Delete key on the keyboard.
- In insert mode, position the cursor at the start of the first line and press Ctrl+K twice.
- Select the text with the mouse and then select File
 Delete from the menu.
- True or false: Unicode is useful for encoding most European languages but not Asian languages.
- True or false: GUI text editors for ASCII are superior to text-mode ASCII text editors because the GUI editors support underlining, italics, and multiple fonts.
- True or false: Many (but not all) configuration files use a hash mark (#) to identify comment lines.
- ASCII supports _____ unique characters.
- Three keystrokes that can initiate a search-and-replace operation in nano are F14, _____, and ______.
- While in Vi's command mode, you can type ______ to undo a change.