
Lesson 15: HTML5 Geolocation
In this lesson, you will learn to detect and display the location of your site’s users with the Geolocation API from HTML5. You can use this information to pinpoint a user’s location for a variety of reasons, such as displaying the user’s location on a map.
What you’ll learn in this lesson:
- • Understanding Geolocation API and its limitations
- • Detecting the user’s geographic location
- • Displaying the user’s location on a map
- • Utilizing fallbacks for varying devices
- • Understanding JavaScript callbacks and how to use them
- • Creating a “mash-up” geolocation application
Starting up
You will work with several files from the HTML5_15lessons folder in this lesson. Make sure you have loaded the HTML5lessons folder onto your hard drive from www.digitalclassroombooks.com/HTML5. See “Loading lesson files” in the Starting Up section of this book.
To accurately preview the HTML5 content you will create in this lesson, you need a browser that supports HTML5 tags. See “Using web browsers that support HTML5 tags” in the Starting Up section of this book to determine whether you are using such a browser, or for instructions on downloading one.
Understanding Geolocation
Geolocation lets you determine a user’s position anywhere on Earth using a geographic coordinate system (latitude and longitude). To detect the user’s location, browsers and devices rely on GPS hardware, wireless infrastructure, or a user’s IP address.
HTML5 has expanded JavaScript’s capabilities to include this ability in its Geolocation API, which consists of functions you can use to find or track a user’s movement.
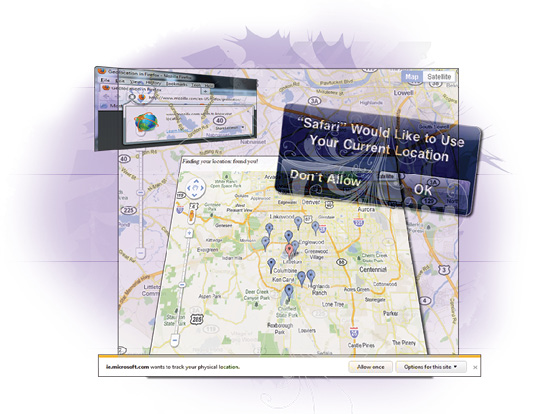
Not everyone wants to share their location, so the user must give their express permission before any browser can divulge this level of personal information. The Geolocation API clearly states, “User agents must not send location information to Web sites without the express permission of the user.” All major browsers prompt the user for permission before sharing their location.
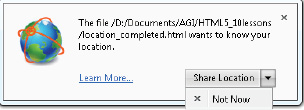
Prompts are used to get the user’s permission; this figure shows an example from Firefox.
Getting the user’s location
The HTML5 Geolocation API lets JavaScript request permission to obtain a user’s geographic location through one of the methods listed above. The majority of this functionality relies on the navigator.geolocation object, specifically the getCurrentPosition function.
The following exercise illustrates the use of this API.
1 Using your text editor, open the 15_location.html file within the HTML5_15lessons folder. Save a copy of the file as location_work.html. Notice that a span and a single function have been defined in this file. The function is called from the body’s onload event.
function setup()
{
output = document.getElementById( 'output' );
if( navigator.geolocation )
{
}
}
2 The setup function from the previous step determines whether the HTML5 Geolocation API is supported. Within the if statement, insert the following call to the navigator.geolocation object’s getCurrentPosition function:
if( navigator.geolocation )
{
navigator.geolocation.getCurrentPosition();
}
Calls to getCurrentPosition usually result in a prompt to the user requesting permission for your application to access the user’s location; the specific method to obtain this permission varies, but all browsers have it.
The getCurrentPosition function receives a maximum of three arguments. The first is a function to call when the user’s location has been determined. The second is a function used for any errors in the location process. The third argument is optional, and it is an PositionOptions object used to configure several properties of the getCurrentPosition function.
|
Property |
Type |
Default |
Notes |
|
enableHighAccuracy |
Boolean |
false |
true (might be slow) |
|
timeout |
long |
(no default) |
milliseconds |
|
maximumAge |
long |
0 |
milliseconds |
3 After the setup function’s curly braces, create a function called showLocation with a single argument: a position object. The function is called when the position of the user has been determined, and the position object contains the information regarding the user’s position.
function showLocation( position )
{
}
The position object has two properties: a coords object and a timestamp. The timestamp indicates when the user’s position was calculated. The coords object has a number of properties, which are the many values that might have been obtained from the device, including the coords.latitude and coords.longitude properties.
4 Within the showLocation function, the user’s location is displayed using the position object’s coords properties. The output.innerHTML property controls the text that appears within a span that has been included with this activity for demonstration purposes only.
Add the following lines of code.
function showLocation( position )
{
output.innerHTML = 'Your location is '
+ position.coords.latitude + ' lat '
+ position.coords.longitude + ' lon';
}
5 Return to the setup function and add the showLocation function as the first argument for the call to getCurrentPosition. When the user grants permission, the showLocation function will be called as a result:
navigator.geolocation.getCurrentPosition( showLocation );
6 This code is enough to get the user’s location, but it does not allow for any errors that might occur. Create a function called locationError to call in the event of an error, and to notify the user of said error.
function locationError( error )
{
output.innerHTML = 'Location could not be determined';
}
The error object passed into this function contains two properties: a numeric code and a message representing that error code in text. You can use the code property to determine the cause of the error:
- • Error code 0: unknown error.
- • Error code 1: the user denies permission to the network.
- • Error code 2: caused by a network failure. You can try to read the user’s position again.
- • Error code 3: caused by a timeout. You can try to read the user’s position again.
Unfortunately, the message property does not always provide enough information.
7 Use the locationError function as the second argument for the getCurrentLocation function:
navigator.geolocation.getCurrentPosition( showLocation, locationError );
8 Add an else case to the conditional if in the setup function to notify users that Geolocation is not supported:
if( navigator.geolocation )
{
navigator.geolocation.getCurrentPosition( showLocation, locationError );
}
else
locationError();
9 Save your file and open it in the browser. Grant permission to share your location when prompted; you should see your geographic coordinates displayed in your browser, similar to what is shown in the following figure:
![]()
Your location will be shown only after granting permission to share your location.
If you simply see ‘Location can not be determined’, your browser does not support Geolocation.
The getCurrentPosition function determines the user’s location at the current moment, but you can watch the user’s location as it changes using the Geolocation API’s watchPosition function. This function has the same arguments as getCurrentPosition, and it also invokes the callback function as the user’s location changes. You could use the watchPosition function for a mobile application that needs to provide directions to the user.
Displaying the user’s location with Google Maps
Now that you have used the Geolocation API to determine the user’s geographic location, your next goal is to show where the user is on a map. Normally, this task would be long and expensive to develop; Google has provided an open-source API for Google Maps. The Google Maps API uses geographic coordinates to create an interactive map of an area, thus opening a large number of opportunities for JavaScript developers.
Google Maps uses a div within an HTML document to render the map. It does not need to be used in conjunction with Geolocation, but together they show enormous potential.
The following exercise illustrates how this feature works. The file map.html contains the necessary HTML markup required to make Google Maps work.
1 Use your text editor to open the 15_map.html file within the HTML5_15lessons folder. Save a copy of the file as map_work.html. In this file, you will notice that an external JavaScript file is referenced. This file contains all the functionality for the Google Maps API.
<script type="text/javascript"
src="http://maps.googleapis.com/maps/api/js?sensor=false">
</script>
Unlike many JavaScript libraries, you do not need to copy the file containing Google Maps onto your file server. The absolute link works wherever there is an internet connection.
The meta tag defined at the top of map_work.html prevents mobile device users from resizing the Google Maps application. Google Maps includes a zoom in and out button, preventing the need for the device’s native zoom feature.
<meta name="viewport" content="initial-scale=1.0, user-scalable=no" />
2 Within the showLocation function, add the following line of code to initialize a set of Google Maps coordinates:
function showLocation( position )
{
var latlng = new google.maps.LatLng( position.coords.latitude,
position.coords.longitude );
}
3 After the code you added in step 2, add the following line of code to create a mapOptions object containing the parameters for the map itself:
function showLocation( position )
{
var latlng = new google.maps.LatLng( position.coords.latitude,
position.coords.longitude );
var mapOptions = {
zoom: 8,
center: latlng,
mapTypeId: google.maps.MapTypeId.ROADMAP
};
}
The mapOptions object contains the following properties:
- • The starting zoom setting.
- • The center coordinates for the map.
- • One of many possible map types implemented in the Google Maps API and set for the mapTypeID property.
For more information about the Google Maps API, visit the developer’s guide at https://developers.google.com/maps/documentation/javascript/.
4 Finally, create the map with the following line of code.
function showLocation( position )
{
var latlng = new google.maps.LatLng( position.coords.latitude,
position.coords.longitude );
var mapOptions = {
zoom: 8,
center: latlng,
mapTypeId: google.maps.MapTypeId.ROADMAP
};
var map = new google.maps.Map( map_canvas, mapOptions );
}
5 Save your file and test it in the browser. You will be prompted for your location; share your location so the map displays properly. You should see your location displayed on the map similar to what is shown in the following figure:
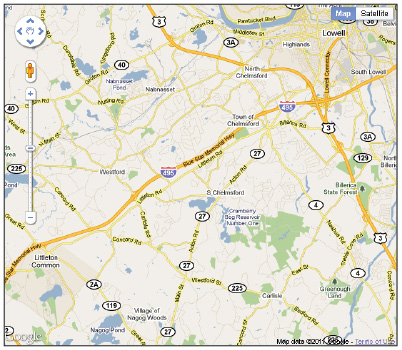
Google Maps displays the location of any user visiting this page.
Creating a HTML5 Geolocation and Google Maps mashup
To further illustrate the use of the geolocation feature, you will create a functional application to plot the location of MegaBooks, a fictional bookstore chain, on a map relative to a user’s location. Using the HTML5 Geolocation API and Google Maps API, you will create a “mashup” application that finds the user’s position, places a marker on a map to indicate the user’s current location, and shows all the MegaBooks stores nearby. The term mashup is used to describe the process of combining APIs from at least two different sources in order to create a new creation you could not otherwise achieve.
This tutorial is not intended to delve into all the features of Google maps, but it reviews some of the key points necessary to complete the exercise. For more information about writing map applications using Google’s API, see the online documentation at https://developers.google.com/maps/documentation/javascript/tutorial.
In the following exercise, you will first get the current location of the user, and then create and center the map based on the user’s coordinates much as you did in the last exercise. Then you will plot the bookstores within a certain distance of the user’s location and display them using markers on the map. For this exercise, you will randomly generate a maximum of 10 longitude and latitude coordinates to simulate the company’s store locations, which would normally be defined and stored in a database.
Adding Google Map markers to your geolocation page
In this exercise, there is a significant amount of code and we have attempted to minimize the amount you will have to type in by providing most of the code in the lesson file and allowing you to fill in the rest. If you are not as comfortable or familiar with working with JavaScript syntax, you may choose to open the 15_geolocation_mashup_finished.html file, located in the 15_done sub-folder within the HTML5_15lessons folder, and view the completed working version there.
1 Choose File > Open and browse to the HTML5_15lessons folder to 15_geolocation_mashup.html. You will need to initialize the Geolocation API by adding an onload event to the <body> tag and a function above the existing code in the script tag:
<body onload="initialize()" onunload="GUnload()">
<section id="wrapper">
<script type="text/javascript" src="http://maps.google.com/maps/api/js?sensor=false"></script>
<article>
<p>Finding your location: <span id="status">checking...</span></p>
</article>
<script>
function initialize() {
if (navigator.geolocation) {
navigator.geolocation.getCurrentPosition(show_location,error_handler);
} else {
alert('Geolocation not supported in this browser.'),
}
}...
</script>
 There is additional script in the code above, as represented by the ellipse (...). You do not need to add any code after the closing bracket.
Using the onload event of the <body> tag, you specify an initialize function to call when the page content has completely loaded in the browser. You then define two callback functions in the parameters: show_location, to process the location object returned; and error_handler, to manage errors that might occur while attempting to retrieve the location object. Obtaining geolocation information can be slow sometimes, so you should use a wait message to give the user feedback while her location is found.
2 The next step is to obtain the user’s coordinates. Add the following variables to the show_location function, the Position object and the Google Maps coordinates:
function show_location (position) {
var s = document.querySelector('#status'),s.innerHTML = "found you!";
// Get the user's latitude and longitude
var latlng = new google.maps.LatLng(
position.coords.latitude,
position.coords.longitude);
If the Geolocation API is available in the browsers’ navigator object, the function getCurrentPosition is called. A Position object is then returned by getCurrentPosition and contains the position.coords.latitude and position.coords.longitude properties. Using these properties, you then initialize a Google maps Point object and place it in a variable called latlng.
3 Create the map within the show_location function:
// Create a container for the map
var mapcanvas = document.createElement('div'),
mapcanvas.id = 'mapcanvas';
mapcanvas.style.height = '400px';
mapcanvas.style.width = '560px';
document.querySelector('article').appendChild(mapcanvas);
In this step, you create a new <div> element with an ID called mapcanvas. You set the map’s dimensions to 560 pixels wide and 400 pixels tall, and then dynamically add it to the HTML5 <article> element of the web page, which serves as the map’s viewport.
4 Once the map is created, center the map display on the user’s marker with the following options array:
var myOptions = {
center: latlng,
zoom: 15,
mapTypeId: google.maps.MapTypeId.ROADMAP
};
In this step, you create an array of options for the map and call it myOptions. You then define three attributes: center, zoom, and mapTypeID.
You set the center attribute to the latlng variable. Recall that latlng contains the user’s coordinates returned in the geolocation Position object, which was in turn created by the call to the HTML5 navigator.getCurrentPosition function. By setting the user’s actual coordinates in Google Maps from the Geolocation API, you created a “mashup” between the two APIs, thus feeding data from one service into another.
 Feeding the user’s geolocation coordinates into a Google Maps object creates a mash-up application.
The zoom attribute sets a zoom factor, so the map displays a fairly close-in view of the city. Finally, the mapTypeID attribute specifies the style of map to draw.
5 Next, create a new map container using the mapcanvas div directly after the code added in the previous step:
var map = new google.maps.Map(document.getElementById("mapcanvas"), myOptions);
This line of code centers the map on the longitude and latitude coordinates by passing the myOptions array to the maps.Map object.
6 Create a marker to show the user’s location:
var marker = new google.maps.Marker({
position: latlng,
map: map,
title:"You are here!"
});
Within the marker object, you set the position property to latlng, the coordinate object created earlier; as a result, the marker appears on the map at the same latlng position the map is centered on. The title attribute displays a tooltip message when the user places the mouse cursor over the marker.
7 Calculate and draw all the bookstore markers. Fill in the following code inside the show_location function and enter a right brace ‘}’ to close the function:
// Create a blue marker for the stores
var iconFile = 'http://maps.google.com/mapfiles/ms/icons/blue-dot.png';
// Add some store markers to the map (random locations for our example)
var southWest = new google.maps.LatLng(latlng.lat() - .10, latlng.lng() - .10);
var northEast = new google.maps.LatLng(latlng.lat() + .10, latlng.lng() + .10);
var bounds = new google.maps.LatLngBounds(southWest, northEast);
var lngSpan = northEast.lng() - southWest.lng();
var latSpan = northEast.lat() - southWest.lat();
map.fitBounds(bounds);
for (var i = 0; i < 10; i++) {
var point = new google.maps.LatLng(
southWest.lat() + latSpan * Math.random(),
southWest.lng() + lngSpan * Math.random());
var storeMarker = new google.maps.Marker({
position: point,
map: map,
title: "store #" + i
});
storeMarker.setIcon(iconFile)
}
}
For this exercise, you are using the built-in JavaScript random number generator to create longitude and latitude values and plot them within the boundaries of the map’s container. In a real application, you would query a database to obtain the longitude and latitude coordinates of each store, along with other details such as name, address, and store hours.
 The google.maps.LatLng boundary ranges are based on the latlng variable.
8 The last step is to implement an error handler for the getCurrentPosition function, which has already been defined at the bottom of the script tag:
function error_handler(msg) {
var s = document.querySelector('#status'),
s.innerHTML = msg + " failed.";
}
Just like the show_location function, error_handler is a callback function to receive instructions if the call to the geolocation API fails.
As you would in a fully functional application, you plot only those stores that fall within the visual boundaries, or viewport, of the map. As such, you use the map object’s LatLng method to set a minimum and maximum range for the markers to plot, based on the coordinates in the original latlng variable.
There are additional callback events incorporated into Google Maps that determine when the viewable region changes; unfortunately a complete review of those callback functions is beyond the scope of this tutorial. For more information about working with the map’s viewport and boundary events, see the Google Maps documentation available online at https://developers.google.com/maps/documentation/javascript/events.
You can now save and test your application. Accept the browser’s prompt to share your location; a map with the location of 10 bookstores within driving distance should appear.
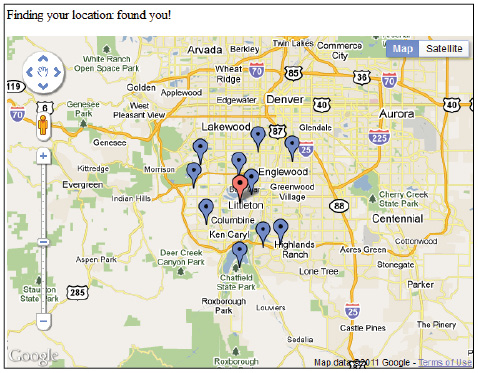
Geolocation example.
The new capabilities in HTML5 offer great opportunities to create exciting new applications; the Geolocation API promises to be one of the most powerful features leveraged by social networking, e-commerce, mobile, and web-based applications.
Self study
Experiment with some of the other map types available for Google Maps. The mapTypeId for the mapOptions object supports the following: ROADMAP, SATELLITE, HYBRID, and TERRAIN.
Review
Questions
1 Can a browser share the user’s location without permission?
2 What is the difference between the Geolocation API’s getCurrentPosition and watchPosition functions?
3 What are the possible error codes that can be passed into the error attribute of the positionError function?
Answers
1 Browsers cannot share the user’s location without permission. Technically, browsers and mobile devices have the ability to share this information without consent, but all major browsers prompt the user for permission.
2 The getCurrentLocation function finds the user at a single point in time; the watchPosition function attempts to follow users as they move.
3 The error attribute can be one of either equal 1 meaning permission was denied; 2: meaning there was a network failure; or 3 meaning the function timed out. If you receive a 2 or 3, you can try to obtain the user’s position again.