
Lesson 16: HTML5 Drag and Drop
In this lesson, you will learn to incorporate the HTML5 drag-and-drop feature into your website to let your users actively interact with your site.
What you’ll learn in this lesson:
- • Working with the drag-and-drop interface
- • The differences in browser APIs and how to account for them
- • Showing visual indicators for drag-and-drop operations
- • Transfering data with a drag-and-drop operation
Starting up
You will work with several files from the HTML5_16lessons folder in this lesson. Make sure you have loaded the HTML5lessons folder onto your hard drive from www.digitalclassroombooks.com/HTML5. See “Loading lesson files” in the Starting Up section of this book.
To accurately preview the HTML5 content you will create in this lesson, you need a browser that supports HTML5 tags. See “Using web browsers that support HTML5 tags” in the Starting Up section of this book to determine whether you are using such a browser, or for instructions on downloading one.
Drag and drop on the Web
Drag-and-drop operations let users visually position elements on the screen instead of positioning elements by clicking a button. This ability has made certain applications, such as Dreamweaver and Photoshop, easy to use.
The HTML5 Drag and Drop API is based on the original Internet Explorer implementation. Some details have changed, but a standardized API is close to being finalized. At the time of this writing, support for certain drag-and-drop features are not shared between browsers. For example, some browsers allow selections or files from other windows or applications to be dropped into the browser; others do not.
Note that in most browsers, you can drag images, links, and text selections by default. This functionality was included to allow selections from the browser to be dragged into other applications. You can also drag file and text selections from the operating system into some browsers.
Cross-browser drag and drop
This lesson focuses on the drag-and-drop features that are supported across multiple browsers. Several differences exist in the visual indicators of a drag-and-drop operation; the functionality of the operation remains fairly consistent with only a small number of fallbacks.
The following exercise illustrates the use of drag and drop.
1 Using your text editor, open the file 16_shopping.html found within the HTML5_16lessons folder. Save a copy of this file as shopping_work.html. Open the file in your browser; notice that a shopping cart exists on the page. The goal of this activity is to create a drag-and-drop interface for purchasing items. We have added the initial JavaScript code for you, but you will be adding the remaining code to make the page fully functional.
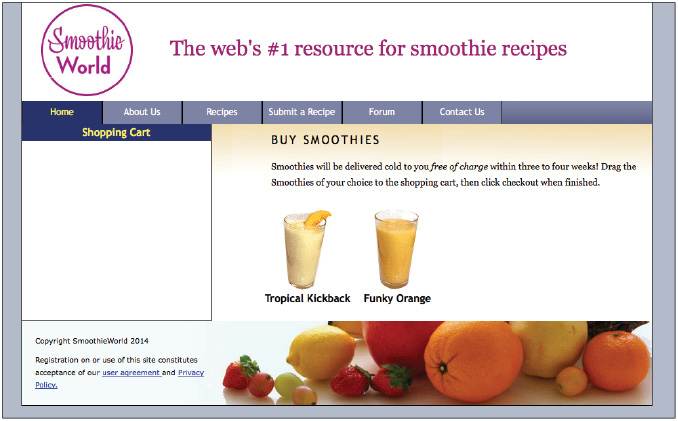
The initial appearance of your page.
Move the mouse cursor over the products on the page. The cursor pointer as well as the outline of the images change. This will let users know that they will be able to drag the image. These rules are set in the base.css style sheet. You will learn about other visual indicators throughout this lesson.
2 The variable shoppingcart found within the setup function has been assigned a reference to the shopping cart div. Your code will use this reference to register the div as a drop zone.
Add the following line of code to prevent the default behavior of the dragenter event:
function setup(){
shoppingcart = document.getElementById('shoppingcart'),
shoppingcart.ondragenter = preventDefault;
}
By default on some browsers, the dragenter event displays an icon indicating that an area is not a drop zone. You need to assign this event, the preventDefault function, to maintain consistency between browsers. The code below has already been added to your script section and defines the preventDefault function, which requires three specific tasks to occur to prevent the default action of some browsers:
function preventDefault( event ){
event.stopPropagation();
event.preventDefault();
return false;
}
- • The stopPropagation function prevents other containers from responding to this event.
- • The preventDefault function prevents the default behavior of the event on some browsers.
- • Since preventDefault is an event callback function, returning false prevents the default behavior in some browsers.
3 In some browsers, the dragover event displays an icon similar to the dragenter event, indicating that this container is not a valid drop zone. To prevent the default behavior of the dragover event, add the code highlighted in red after the line of code from the previous step.
function setup(){
shoppingcart = document.getElementById('shoppingcart'),
shoppingcart.ondragenter = preventDefault;
shoppingcart.ondragover = preventDefault;
}
4 Scroll down to the bottom half of your HTML code. To allow dragging from within the list containing each image, add an ondragstart attribute to the div that has a CSS class called tile_list, and assign to the attribute the value shown below:
<div class="tile_list" ondragstart="dragStarted(event);">
At the time of this writing, the Drag and Drop API was not designed to perform drag-and-drop operations; the Drag and Drop API allows developers to respond to the events, not actually move elements. The following implementation provides the drag-and-drop capabilities you need for a basic shopping cart.
5 Within the dragStarted function, already defined for this activity, add the following line of code to save a reference to the element dragged by the user into the predefined dragging variable:
function dragStarted( event ){
dragging = event.target;
}
6 To implement the drop behavior for the shopping cart, use the dragDrop function to respond to the shopping cart’s drop event:
function setup(){
shoppingcart = document.getElementById('shoppingcart'),
shoppingcart.ondragenter = preventDefault;
shoppingcart.ondragover = preventDefault;
shoppingcart.ondrop = dragDrop;
}
7 Within the predefined dragDrop function, enter the following line of code to add to the shopping cart the object currently being dragged:
function dragDrop(event){
addToCart( dragging, 1 );
}
8 Choose File > Save and preview this page in the browser. Depending on the browser you are using, you will have dramatically different results if you drag one of the images onto the shopping cart. In Webkit browsers, such as Safari 5 or Chrome 11, you will get the desired effect and the image will appear in the cart. In other browsers, such as Firefox 4, the default behavior of an image dropped into a drop zone is to open that image in the same window in which the drop zone exists. To ensure this behavior does not occur, return to your text editor and add the following line of code:
function dragDrop(event){
addToCart( dragging, 1 );
return preventDefault(event);
}
9 Save and test this file in your browser. Dragging smoothies into the shopping cart adds them to the shopping cart for purchase.
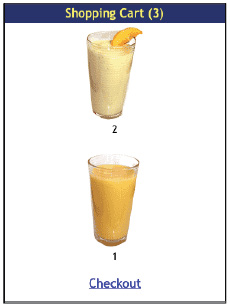
The shopping cart keeps track of the items dropped within it, displays those items, and displays a checkout link.
You can choose to display an alternate image when a drag-and-drop operation starts and use any element as a visual indicator, including a canvas. The canvas provides several options, such as images or the ability to display dynamic text; for example, item names and prices.
10 Within the dragStarted function, add the following lines of code to create a canvas containing the source image and the price:
function dragStarted( event ){
dragging = event.target;
var dragImage = document.createElement( 'canvas' );
var ctx = dragImage.getContext( '2d' );
ctx.drawImage(dragging, 0, 0);
ctx.font = 'bold 1.8em sans-serif';
ctx.fillText( '$5', 30, 100);
}
The only visual difference from this change is text added below the image. The code you added in this step is specific to the canvas element. For more information about the capabilities of the canvas element, see “Working with Canvas” in Lesson 10 of this book.
11 To use the newly created canvas as the drag image for the event target, you must call the setDragImage function in the event’s dataTransfer object. Add following line of code directly after the code from the previous step:
function dragStarted( event ){
var dragImage = document.createElement( 'canvas' );
...
event.dataTransfer.setDragImage( dragImage, 0, 0);
}
The setDragImage function receives three arguments. The first argument is a reference to an element used as the drag image. The other two arguments are the x and y offset for the image. At the time of this writing, full support for the setDragImage function was not available in all browsers.
The canvas element is essential for this application, because the setDragImage function only allows a single element to be used as the drag image. With a canvas element, you can combine text, images, and vector graphics as a visual indicator.
12 Save all changes and preview the result in your browser. Images on the right may be dragged into the shopping cart on the left.
Transferring data with a drag-and-drop operation
In the previous activity, you learned about using the image’s source to determine the item added to the shopping cart. You can transfer a wide range of values with a drag-and-drop operation, thus granting you access to several options.
You can transfer data with the drag event’s dataTransfer object. The dataTransfer object contains several functions for storing data in one or more formats. The normal flow of events is to store data in the dataTransfer object during the dragstart phase, and then access the same data during the drop phase.
The following exercise illustrates how to use this feature.
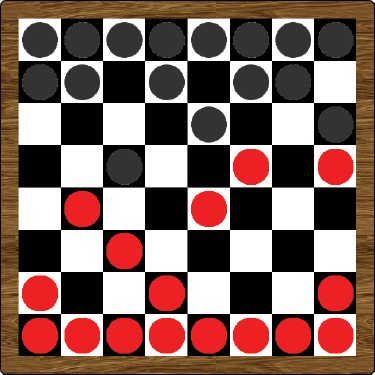
1 Use your text editor to open the file 16_checkers.html located within the HTML5_16lessons folder. Save a copy of this file as checkers_work.html. Open this file in your browser; you will notice that a checkerboard has been created using a series of divs and some CSS positioning. The goal of this activity is to let the user move the pieces on the checkerboard.
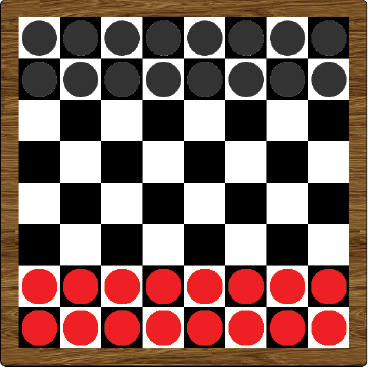
The initial preview of the checkers file.
2 Locate the setup function; the three lines of code listed below enable drag-and-drop on the squares. Note that the callback functions have not been implemented, except for the preventDefault function.
function setup(){
...
for(var i = 0, square; square = squares[i]; i++){
// Enable drag and drop on squares
square.ondragenter = preventDefault;
square.ondragover = preventDefault;
square.ondrop = dragDrop;
This code uses a loop to access each square as the variable square. The square variable has individual callbacks assigned to it that will be used for the drag-and-drop functionality. In addition, the squares are organized into rows in this loop for easy access.
3 Within the dragStarted function, add the following line of code to store the HTML from the container of the dragged checker piece:
function dragStarted( event ){
dragging = event.target;
event.dataTransfer.setData( 'text/html', dragging.parentNode.innerHTML );
}
Data stored in the dataTransfer object’s setData function is defined by the two arguments passed to the setData function: the first argument specifies the data type ('text/html' in the example above); the second argument specifies the actual data (in the example above, the HTML code that represents a checker piece). Data saved in this fashion is always stored as a String value.
At the time of this writing, the dataTransfer object is not supported by all browsers that have drag and drop support. Despite this fact, the dataTransfer object could play a critical part in future interactions between the browser and outside applications.
4 Within the dragDrop function, add the following condition to ensure the square where a checker piece will be dropped is empty:
function dragDrop(event){
if(this.innerHTML == ' '){
}
}
In the example above, the word this refers to where the function is running, and it’s called the scope of a function. The scope of a function could refer to a different object, depending on how the function is used. Since the dragDrop function is attached to individual squares through their dragdrop event callback, this refers to the square itself. If the same function were called elsewhere, the scope of the function might be the root of the document, where the function was originally defined.
5 Enter the following line of code to clear the contents of the square that currently contains the dragged checker piece:
function dragDrop(event){
if(this.innerHTML == ' '){
dragging.parentNode.innerHTML = ' ';
}
}
6 Enter the following line of code to copy the checker piece being dragged from the dataTransfer object’s getData function to the target square’s innerHTML property:
function dragDrop(event){
if(this.innerHTML == ' '){
dragging.parentNode.innerHTML = ' ';
this.innerHTML = event.dataTransfer.getData( 'text/html' );
}
}
7 The default behavior for a dragdrop event on some browsers is to open the dragged image in the current window or tab. Add the following line of code to prevent the default behavior of the dragdrop event.
function dragDrop(event){
if(this.innerHTML == ' '){
dragging.parentNode.innerHTML = ' ';
this.innerHTML = event.dataTransfer.getData( 'text/html' );
}
return preventDefault( event );
}
8 To include a visual indicator of illegal moves, the dragover event must use an alternative callback. The current setting prevents the default behavior from taking place. Create a new function called dragOver, which determines whether another piece is already on a given square.
function dragOver( event ){
}
9 Within the function you created in the previous step, add the following condition to check whether a target square (the square on which a piece might be dragged to) is empty:
function dragOver( event ){
if( this.innerHTML == ' ' )
}
10 Remember that the default behavior of a dragover event is to visually indicate that a container is not a drop zone. If the square is empty, prevent the default behavior of the dragover event by adding the following code:
function dragOver( event ){
if( this.innerHTML == ' ' )
return preventDefault(event);
}
11 If the condition in the previous step returns a value of false, it means the target square already has a checker piece on it. Add the following line of code to use the default behavior of the dragover event to indicate that this square is an invalid move:
function dragOver( event ){
if( this.innerHTML == ' ' )
return preventDefault(event);
return true;
}
12 Finally, return to the setup function and change the callback function used for the dragover event to the newly created dragOver function:
function setup(){
...
for(var i = 0, square; square = squares[i]; i++){
square.ondragenter = preventDefault;
square.ondragover = dragOver;
square.ondrop = dragDrop;
13 Save and test your work in the browser. You should be able to move the pieces freely onto any empty square. Creating an application that follows the rules of the game is beyond the scope of this lesson, but you have just created the foundation for a fully interactive drag-and-drop game.
You can move pieces on the checkerboard to any empty square.
 You can find the WAI-ARIA outline at www.w3.org/WAI/intro/aria.
Self study
Create turns for each player using JavaScript in checkers_work.html. Prevent pieces from being dragged when it is not their turn. You can find a complete solution in the 16_checkers_game.html file.
Review
Questions
1 Why is it necessary to prevent the default behavior and return false for many of the drag-and-drop callback functions?
2 What kind of data can be transferred during a drag-and-drop operation? When would this data be used?
3 How many images can be used with the setDragImage function as visual indicators?
Answers
1 The default behavior on many browsers is to prevent drag-and-drop and display a visual indicator to the user that not all containers are drop targets. Preventing the default behavior shows a separate visual indicator and enables drag-and-drop functionality on certain browsers.
2 You can transfer any type of data during a drag-and-drop operation as a String value. The setData function allows data to be stored under a specific type, and a single value is associated with that type. You can use data stored in this manner at later stages of the drag-and-drop operation, such as the drop or dragover events.
3 The setDragImage function allows only a single element to be used as a visual indicator. You can use the canvas element to show text, vector graphics, and multiple images together as a visual indicator.