

WHAT IS AJAX?
You may have seen Ajax used on many websites, even if you were not aware that it was being used.
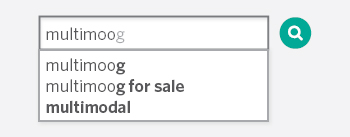
Live search (or autocomplete) commonly uses Ajax. You may have seen it used on the Google website. When you type into the search bar on the home page, sometimes you will see results coming up before you have finished typing.
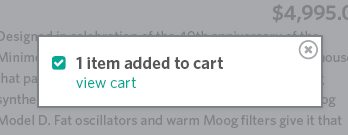
Sometimes when you are shopping online and add items to your shopping cart, it is updated without you leaving the page. At the same time, the site may display a message confirming the item was added.

Websites with user-generated content (such as Twitter and Flickr) may allow you to display your information (such as your latest tweets or photographs) on your own website. This involves collecting data from their servers.
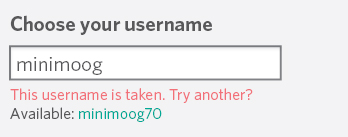
If you are registering for a website, a script may check whether your username is available before you have completed the rest of the form.
Sites may also use Ajax to load data behind the scenes so that they can use or show that data later on.
WHY USE AJAX?
Ajax uses an asynchronous processing model. This means the user can do other things while the web browser is waiting for the data to load, speeding up the user experience.
USING AJAX WHILE PAGES ARE LOADING
When a browser comes across a <script> tag, it will typically stop processing the rest of the page until it has loaded and processed that script. This is known as a synchronous processing model.
When a page is loading, if a script needs to collect data from a server (e.g., if it collects financial exchange rates or status updates), then the browser would not just wait for the script to be loaded and processed; it would also have to wait for a server to send the data that the script is going to display.
With Ajax, the browser can request some data from a server and - once that data has been requested - continue to load the rest of the page and process the user's interactions with the page. It is known as an asynchronous (or non-blocking) processing model.
The browser does not wait for the third party data in order to show the page. When the server responds with the data, an event is fired (like the load event that fires when a page has loaded). This event can then call a function that processes the data.
USING AJAX WHEN PAGES HAVE LOADED
Once a page has loaded, if you want to update what the user sees in the browser window, typically you would refresh the entire page. This means that the user has to wait for a whole new page to download and be rendered by the browser.
With Ajax, if you only want to update a part of the page, you can just update the content of one element. This is done by intercepting an event (such as the user clicking on a link or submitting a form) and requesting the new content from the server using an asynchronous request.
While that data is loading, the user can continue to interact with the rest of the page. Then, once the server has responded, a special Ajax event will trigger another part of the script that reads the new data from the server and updates just that one part of the page.
Because you do not have to refresh the whole page, the data will load faster and the user can still use the rest of the page while they are waiting.
Historically, AJAX was an acronym for the technologies used in asynchronous requests like this. It stood for Asynchronous JavaScript And XML. Since then, technologies have moved on and the term Ajax is now used to refer to a group of technologies that offer asynchronous functionality in the browser.
HOW AJAX WORKS
When using Ajax, the browser requests information from a web server. It then processes the server's response and shows it within the page.
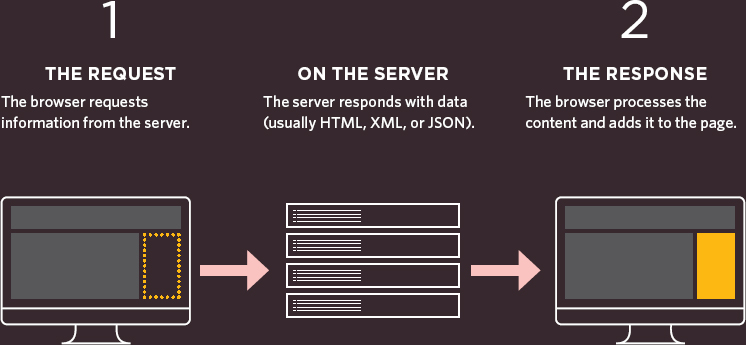
The browser requests data from the server. The request may include information that the server needs - just like a form might send data to a server.
Browsers implement an object called XMLHttpRequest to handle Ajax requests. Once a request has been made, the browser does not wait for a response from the server.
What happens on the server is not part of what is called Ajax.
Server-side technologies such as ASP.net, PHP, NodeJS, or Ruby can generate web pages for each user. When there is an Ajax request, the server might send back HTML, or it might send data in a different format such as JSON or XML (which the browser turns into HTML).
When the server has finished responding to the request, the browser will fire an event (just like it can fire an event when a page has finished loading).
This event can be used to trigger a JavaScript function that will process the data and incorporate it into one part of the page (without affecting the rest of the page).
HANDLING AJAX REQUESTS & RESPONSES
To create an Ajax request, browsers use the XMLHttpRequest object. When the server responds to the browser's request, the same XMLHttpRequest object will process the result.
THE REQUEST

1. An instance of the XMLHttpRequest object is created using object constructor notation (which you met on p106). It uses the new keyword and stores the object in a variable. The variable name xhr is short for XMLHttpRequest (the name of the object).
2. The XMLHttpRequest object's open() method prepares the request. It has three parameters (which you meet on p379):
i) The HTTP method
ii) The url of the page that will handle your request
iii) A Boolean indicating if it should be asynchronous
3. The send() method is the one that sends the prepared request to the server. Extra information can be passed to the server in the parentheses. If no extra information is sent, you may see the keyword null used (although it is not strictly needed): xhr.send(null).
THE RESPONSE

1. When the browser has received and loaded a response from the server, the onload event will fire. This will trigger a function (here, it is an anonymous function).
2. The function checks the status property of the object. This is used to make sure the server's response was okay. (If this property is blank, check the setup of the server.)
Note that IE9 was the first version of IE to support this way of dealing with Ajax responses. To support older browsers, you can use jQuery (see p388).
DATA FORMATS
The response to an Ajax request usually comes in one of three formats: HTML, XML, or JSON. Below is a comparison of these formats. XML and JSON are introduced over the next three pages.
HTML
You are probably most familiar with HTML, and, when you want to update a section of a web page, it is the simplest way to get data into a page.
BENEFITS
- It is easy to write, request, and display.
- The data sent from the server goes straight into the page. There's no need for the browser to process it (as with the other two methods).
DRAWBACKS
- The server must produce the HTML in a format that is ready for use on your page.
- It is not well-suited for use in applications other than web browsers. It does not have good data portability.
- The request must come from the same domain* (see below).
XML
XML looks similar to HTML, but the tag names are different because they describe the data that they contain. The syntax is also more strict than HTML.
BENEFITS
- It is a flexible data format and can represent complex structures.
- It works well with different platforms and applications.
- It is processed using the same DOM methods as HTML.
DRAWBACKS
- It is considered a verbose language because the tags add a lot of extra characters to the data being sent.
- The request must come from the same domain as the rest of the page* (see below).
- It can require a lot of code to process the result.
JSON
JavaScript Object Notation (JSON) uses a similar syntax to object literal notation (which you met on p102) in order to represent data.
BENEFITS
- It can be called from any domain (see JSON-P/CORS).
- It is more concise (less verbose) than HTML/XML.
- It is commonly used with JavaScript (and is gaining wider use across web applications).
DRAWBACKS
- The syntax is not forgiving. A missed quote, comma, or colon can break the file.
- Because it is JavaScript, it can contain malicious content (see XSS on p228).
Therefore, you should only use JSON that has been produced by trusted sources.
XML: EXTENSIBLE MARKUP LANGUAGE
XML looks a lot like HTML, but the tags contain different words. The purpose of the tags is to describe the kind of data that they hold.
<?xml version=“1.0” encoding=“utf-8” ?>
<events>
  <event>
    <location>San Francisco, CA</location>
    <date>May 1</date>
    <map>img/map-ca.png</map>
  </event>
  <event>
    <location>Austin, TX</location>
    <date>May 15</date>
    <map>img/map-tx.png</map>
  </event>
  <event>
    <location>New York, NY</location>
    <date>May 30</date>
    <map>img/map-ny.png</map>
  </event>
</events>
You can process an XML file using the same DOM methods as HTML. Because different browsers deal with whitespace in HTML/XML documents in different ways, it is easier to process XML using jQuery rather than plain JavaScript (just as it can be with HTML).
In the same way that HTML is a markup language that can be used to describe the structure and semantics of a web page, XML can be used to create markup languages for other types of data - anything from stock reports to medical records.
The tags in an XML file should describe the data they contain. As a result, even if you have never seen the code to the left, you can see that the data describes information about several events. The <events> element contains several individual events. Each individual event is represented in its own <event> element.
XML works on any platform and gained wide popularity in the early 2000s because it made it easy to transfer data between different types of applications. It is also a very flexible data format because it is capable of representing complex data structures.
JSON: JAVASCRIPT OBJECT NOTATION
Data can be formatted using JSON (pronounced “Jason”). It looks very similar to object literal syntax, but it is not an object.
JSON data looks like the object literal notation which you met on p102; however, it is just plain text data (not an object).
The distinction may sound small but remember that HTML is just plain text, and the browser converts it into DOM objects.
You cannot transfer the actual objects over a network. Rather, you send text which is converted into objects by the browser.
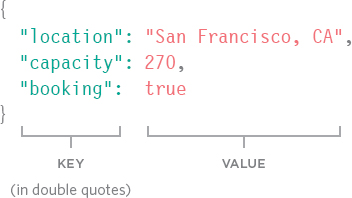
KEYS
In JSON, the key should be placed in double quotes (not single quotes).
The key (or name) is separated from its value by a colon.
Each key/value pair is separated by a comma. However, note that there is no comma after the last key/value pair.
VALUES
The value can be any of the following data types (some of these are demonstrated above; others are shown on the right-hand page):
| DATA TYPE | DESCRIPTION |
| string | Text (must be written in quotes) |
| number | Number |
| Boolean | Either true or false |
| array | Array of values - this can also be an array of objects |
| object | JavaScript object - this can contain child objects or arrays |
| null | This is when the value is empty or missing |
WORKING WITH JSON DATA
JavaScript's JSON object can turn JSON data into a JavaScript object. It can also convert a JavaScript object into a string.
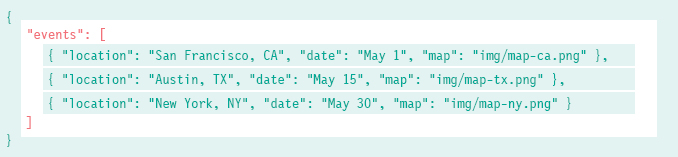
An object can also be written on one line, as you can see here:
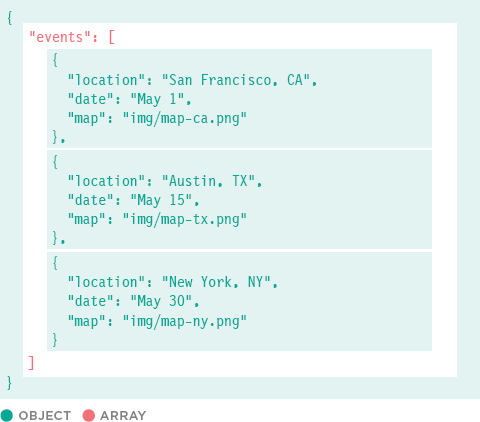
The object on the left represents a series of three events, stored in an array called events. The array uses square bracket notation, and it holds three objects (one for each event).
JSON.stringify() converts JavaScript objects into a string, formatted using JSON. This allows you to send JavaScript objects from the browser to another application.
JSON.parse() processes a string containing JSON data. It converts the JSON data into a JavaScript objects ready for the browser to use.
Browser support: Chrome 3, Firefox 3.1, IE8, and Safari 4
LOADING HTML WITH AJAX
HTML is the easiest type of data to add into a page using Ajax. The browser renders it just like any other HTML. The CSS rules for the rest of the page are applied to the new content.
Below, the example loads data about three events using Ajax. (The result will look the same for the next four examples.)
The page users open does not hold the event data (highlighted in pink). Ajax is used to load it into the page from another file.

When a server responds to any request, it should send back a status message, to indicate if it completed the request. The values can be:
| 200 | The server has responded and all is ok |
| 304 | Not modified |
| 404 | Page not found |
| 500 | Internal error on the server |
If you run the code locally, you will not get a server status property, so this check must be commented out, and return true for the condition. If a server fails to return a status property, check the server setup.
Browsers will only let you use this technique to load HTML that comes from the same domain name as the rest of the page.
Whether HTML, XML, or JSON is being returned from the server, the process of setting up the Ajax request and checking whether the file is ready to be worked with is the same. What changes is how you deal with the data that is returned.
In the example on the right-hand page, the code to display the new HTML is placed inside a conditional statement.
Please note: These examples do not work locally in Chrome. They should work locally in Firefox and Safari. IE support is mixed until IE9.
Later in the chapter, you will see that jQuery offers better cross-browser support for Ajax.
1. An XMLHttpRequest object is stored in a variable called xhr.
2. The XMLHttpRequest object's open() method prepares the request. It has three parameters:
i) Either HTTP GET or POST to specify how to send the request
ii) The path to the page that will handle the request
iii) Whether or not the request is asynchronous (this is a Boolean)
3. Up to this point, the browser has not yet contacted the server to request the new HTML.
This does not happen until the script gets to the last line that calls the XMLHttpRequest object's send() method. The send() method requires an argument to be passed. If there is no data to send, you can just use null.
4. The object's onload event will fire when the server responds. It triggers an anonymous function.
5. Inside the function, a conditional statement checks if the status property of the object is 200, indicating the server responded successfully. If the example is run locally, there will be no response so you cannot perform this check.
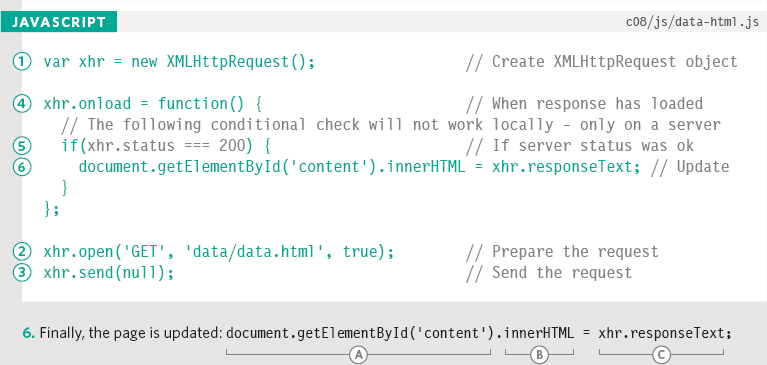
A) The element that will contain the new HTML is selected. (Here it is an element whose id attribute has a value of content.)
B) The innerHTML property replaces the content of that element with the new HTML that has been sent from the server.
C) The new HTML is retrieved from the XMLHttpRequest object's responseText property.
Remember that innerHTML should only be used when you know that the server will not return malicious content. All content that has been created by users or third parties should be escaped on the server (see p228).
LOADING XML WITH AJAX
Requesting XML data is very similar to requesting HTML. However, processing the data that is returned is more complicated because the XML must be converted into HTML to be shown on the page.
On the right-hand page, you can see that the code to request an XML file is almost identical to the code to request an HTML file shown on the previous page. What changes is the part inside the conditional statement that processes the response (points 1-4 on the right-hand page). The XML must be turned into HTML. The structure of the HTML for each event is shown below.
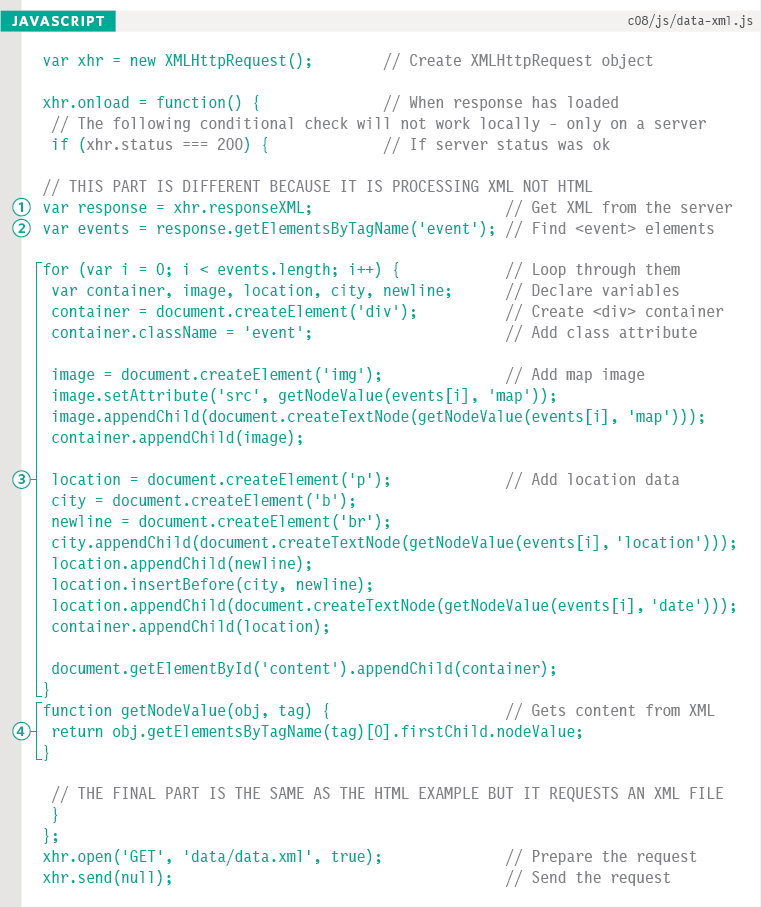
1. When a server responds with XML, it can be obtained using the responseXML property of the XMLHttpRequest object. Here, the XML returned is stored in a variable called response.
2. This is followed by the declaration of a new variable called events, which holds all of the <event> elements from the XML document. (You saw the XML file on p375.)
3. The XML file is then processed using the DOM methods you learned about in Chapter 5. First, the for loop goes through each of the <event> elements, collecting the data stored in their child elements, and placing it into new HTML elements.
Each of those HTML elements is then added into the page.
4. Inside the for loop, you will see the getNodeValue() function is called several times. Its purpose is to get the contents from each of the XML elements. It takes two parameters:
i) obj is an XML fragment.
ii) tag is the name of the tag you want to collect the information from.
The function looks for the matching tag within the XML fragment (using the DOM's getElementsByTagName() method). It then gets the text from the first matching element within that fragment.
The XML for each event is being transformed into the following HTML structure:

LOADING JSON WITH AJAX
The request for JSON data uses the same syntax you saw in the requests for HTML and XML data. When the server responds, the JSON will be converted into HTML.
When JSON data is sent from a server to a web browser, it is transmitted as a string.
When it reaches the browser, your script must then convert the string into a JavaScript object. This is known as deserializing an object.
This is done using the parse() method of a built-in object called JSON. This is a global object, so you can use it without creating an instance of it first.
Once the string has been parsed, your script can access the data in the object and create HTML that can be shown in the page.
The HTML is added to the page using the innerHTML property. Therefore, it should only be used when you are confident that it will not contain malicious code (see XSS on p228).
This example will look the same as the last two examples when you view it in a web browser.
The JSON object also has a method called stringify(), which converts objects into a string using JSON notation so it can be sent from the browser back to a server. This is also known as serializing an object.
This method can be used when the user has interacted with the page in a way that has updated the data held in the JavaScript object (e.g., filling in a form), so that it can then update the information stored on the server.
Here you can see the JSON data that is being processed again (it was introduced on p377). Note how it is saved with the .json file extension.

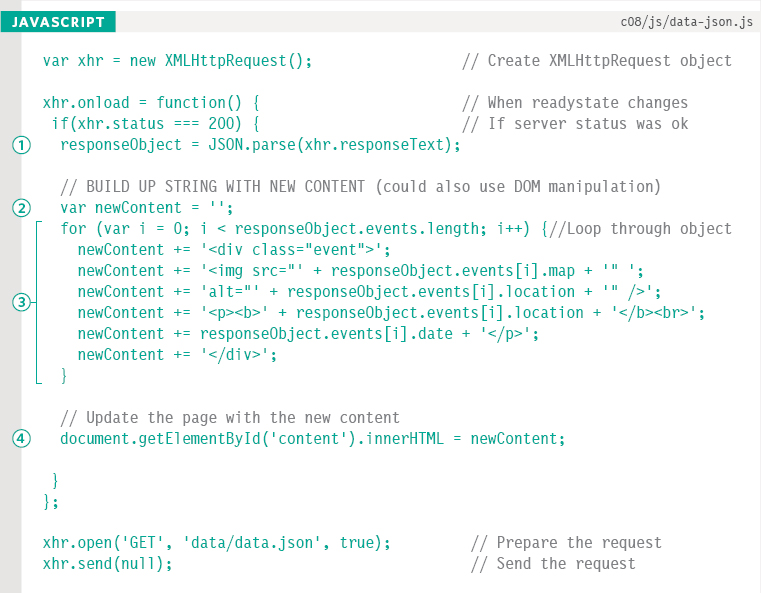
1. The JSON data from the server is stored in a variable called responseObject. It is made available by the XMLHttpRequest object's responseText property
When it comes from the server, the JSON data is a string, so it is converted into a JavaScript object using the JSON object's parse() method.
2. The newContent variable is created to hold the new HTML data. It is set to an empty string outside the loop so that the code in the loop can add to the string.
3. Loop through the objects that represent each event using a for loop. The data in the objects are accessed using dot notation, just like you access other objects.
Inside the loop, the contents of the object are added to the newContent variable, along with their corresponding HTML markup.
4. When the loop has finished running through the event objects in responseObject, the new HTML is added to the page using the innerHTML property.
WORKING WITH DATA FROM OTHER SERVERS
Ajax works smoothly with data from your own server but - for security reasons - browsers do not load Ajax responses from other domains (known as cross-domain requests). There are three common workarounds.
A PROXY FILE ON THE WEB SERVER
The first way to load data from a remote server is to create a file on your server that collects the data from the remote server (using a server-side language such as ASP.net, PHP, NodeJS, or Ruby). The other pages on your site then request the data from the file on your server (which in turn gets it from the remote server). This is called a proxy, because it acts on behalf of the other page.
Because this relies upon creating pages in server-side languages, it is beyond the scope of this book.
JSONP (JSON WITH PADDING)
JSONP (sometimes written JSON-P) involves adding a <script> element into the page, which loads the JSON data from another server. This works because there are no restrictions on the source of script in a <script> element.
The script contains a call to a function, and the JSON-formatted data is provided as an argument to that function. The function that is called is defined in the page that requests the data, and is used to process and display the data. See next page.
ALTERNATIVES
Many people use jQuery when making requests for remote data, as it simplifies the process and handles backward compatibility for older browsers. As you can see in the next column, support for new approaches is an issue.
CROSS-ORIGIN RESOURCE SHARING
Every time a browser and server communicate, they send information to each other using HTTP headers. Cross-Origin Resource Sharing or CORS involves adding extra information to the HTTP headers to let the browser and server know that they should be communicating with each other.
CORS is a W3C specification, but is only supported by the most recent browsers and - because it requires setting up of HTTP headers on the server - is beyond the scope of this book.
CORS SUPPORT
Standard support is as follows: Chrome 4, FF 3.5, IE10, Safari 4 Android 2.1, iOS 3.2
IE8+9 used a non-standard XDomainRequest object to handle cross-origin requests.
HOW JSONP WORKS
First, the page must include a function to process the JSON data. It then requests the data from the server using a <script> element.
BROWSER
The HTML page will use two pieces of JavaScript:
1. A function that will process the JSON data that the server sends. In the example on the next page, the function is called showEvents().
2. A <script> element whose src attribute will request the JSON data from the remote server.
<script>
function showEvents(data) {
  // Code to process data and
  // display it in the page here
}
</script>

<script src=“http://example.org/jsonp”>
</script>
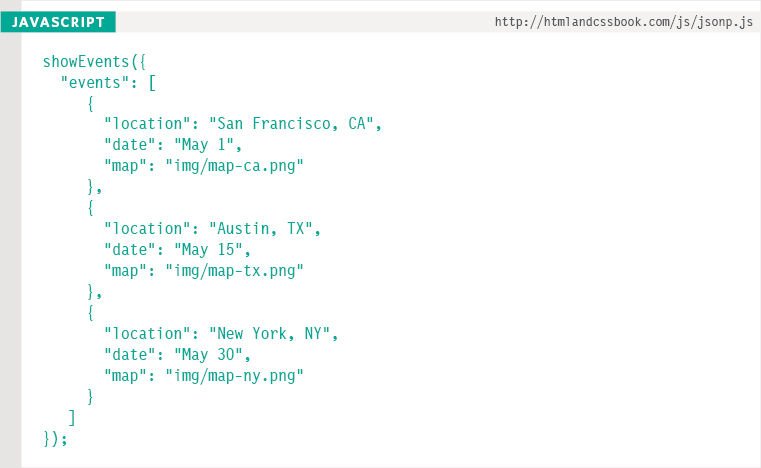
The server returns a file that calls the function that processes the data. The JSON data is provided as an argument to that function.
SERVER
When the server responds, the script contains a call to the named function that will process the data (that function was defined in step 1). This function call is the “padding” in JSONP. The JSON-formatted data is sent as an argument to this function.
So, in this case, the JSON data sits inside the call to the showEvents() function.
showEvents({
  “events”: [
    {
      “location”: “San Francisco, CA”,
      “date”: “May 1”,
      “map”: “img/map-ca.png”
    }…
  ]
});
It is important to note that there is no need to use the JSON object's parse() or stringify() methods when working with JSONP. Because the data is being sent as a script file (not as a string), it will be treated as an object.
The file on the server is often written so that you can specify the name of the function that will process the data that is returned. The name of the function is usually given in the query string of a URL: http://example.org/upcomingEvents.php?callback=showEvents
USING JSONP
This example looks the same as the JSON example, but the event details come from a remote server. Therefore, the HTML uses two <script> elements.
The first <script> element loads a JavaScript file that contains the the showEvents() function. This will be used to display the deals information.
The second <script> element loads the information from a remote server. The name of the function that processes the data is given in the query string.

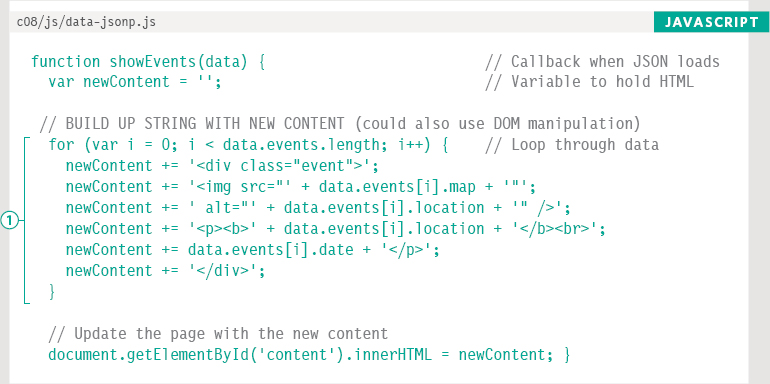
1. The code in the for loop (which is used to process the JSON data and create the HTML) and the line that writes it into the page are the same as the code that processed the JSON data from the same server.
There are three key differences:
i) It is wrapped in a function called showEvents().
ii) The JSON data comes in as an argument of the function call.
iii) The data does not need to be parsed with JSON.parse(). In the for loop, it is just referred to by the parameter name data.
Instead of using a second <script> element in the HTML pages, you can use JavaScript to write that <script> element into the page (just like you would add any other element into the page). That would place all the functionality for the external data in the one JavaScript file.
JSONP loads JavaScript, and any JavaScript data may contain malicious code. For this reason, you should load data only from trusted sources.
Since JSONP is loading data from a different server, you might add timer to check if the server has replied within a fixed time (and, if not, show an error message).
You will see more about handling errors in Chapter 10, and there is an example of a timer in Chapter 11 (where you create a content slider).

The file that is returned from the server wraps the JSON-formatted data inside the call to the showEvents() function. So the showEvents() function is only called when the browser has loaded this remote data.
JQUERY & AJAX: REQUESTS
jQuery provides several methods that handle Ajax requests. Just like other examples in this chapter, the process involves two steps: making a request and handling the response.
Here you can see the six ways jQuery lets you make Ajax requests. The first five are all shortcuts for the $.ajax() method, which you meet last.
The .load() method operates on a jQuery selection (like most jQuery methods). It loads new HTML content into the selected element(s).
You can see that the other five methods are written differently. They are methods of the global jQuery object, which is why they start with $. They only request data from a server; they do not automatically use that data to update the elements of a matched set, which is why the $ symbol is not followed by a selector.
When the server returns data, the script needs to indicate what to do with it.
| METHOD / SYNTAX | DESCRIPTION |
| .load() | Loads HTML fragments into an element It is the simplest method for retrieving data |
| $.get() | Loads data using the HTTP GET method Used to request data from the server |
| $.post() | Loads data using the HTTP POST method Used to send data that updates data on server |
| $.getJSON() | Loads JSON data using a GET request Used for JSON data |
| $.getScript() | Loads and executes JavaScript data using GET Used for JavaScript (e.g., JSONP) data |
| $.ajax() | This method is used to perform all requests The above methods all use this under the hood |
JQUERY & AJAX: RESPONSES
When using the .load() method, the HTML returned from the server is inserted into a jQuery selection. For the other methods, you specify what should be done when the data that is returned using the jqXHR object.
| JQXHR PROPERTIES | DESCRIPTION |
| responseText | Text-based data returned |
| responseXML | XML data returned |
| status | Status code |
| statusText | Status description (typically used to display information about an error if one occurs) |
| JQXHR METHODS | DESCRIPTION |
| .done() | Code to run if request was successful |
| .fail() | Code to run if request was unsuccessful |
| .always() | Code to run if request succeeded or failed |
| .abort() | Halt the communication |
jQuery has an object called jqXHR, which makes it easier to handle the data that is returned from the server. You will see its properties and methods (shown in the tables on the left) used over the next few pages.
Because jQuery lets you chain methods, you can use the .done(), .fail(), and .always() methods to run different code depending on the outcome of loading the data.
RELATIVE URLS
If the content you load via Ajax contains relative URLs (e.g., images and links) those URLs get treated as if they are relative to the original page that was loaded.
If the new HTML is in a different folder from the original page, the relative paths could be broken.
1. This HTML file uses Ajax to load content from a page in the folder shown in step 2.
2. The page in the this folder has an image whose path is a relative link to the second folder:
<img src=“img/box.gif” />
3. The HTML file cannot find the image as the path is no longer correct - it is not in a child folder.
LOADING HTML INTO A PAGE WITH JQUERY
The .load() method is the simplest of the jQuery Ajax methods. It can only be used to load HTML from the server, but when the server responds, the HTML is then loaded into the jQuery Selection for you.
JQUERY SELECTOR
You start by selecting the element that you want the HTML code to appear inside.
URL OF THE PAGE
Then you use the .load() method to specify the URL of the HTML page to load.
SELECTOR
You can specify that you want to load only part of the page (rather than the whole page).
![]()
1. This creates a jQuery object with the element whose id attribute has a value of content.
2. This is the URL of the page you want to load the HTML from. There must be a space between the URL and the selector in step 3.
3. This is the fragment of the HTML page to show. Again, it is the section whose id attribute has a value of content.
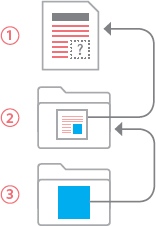
Here, links in the top right corner take the user to other pages. If the user has JavaScript enabled, when they click on a link, code inside the .on() event method stops it from loading a whole new page. Instead, the .load() method will replace the area highlighted in pink (whose id attribute has a value of content) with the equivalent area from the page that the user just requested. Only the pink area is refreshed - not the whole page.

LOADING CONTENT
When users click on any of the links in the <nav> element, one of two things will occur:
If they have JavaScript enabled, a click event will trigger an anonymous function that loads new content into the page.
If they do not have JavaScript enabled, they will move from page to page as normal.
Inside the anonymous function, five things happen:
1. e.preventDefault() stops the link taking users to a new page.
2. A variable called url holds the URL of the page to load. This is collected from the href attribute of the link the user clicked on. It indicates which page to load.
3. The class attributes on the links are updated to indicate which page is the current page.
4. The element holding the content is removed.
5. The container element is selected and .load() fetches new the new content. It is hidden straight away using .hide() so that fadeIn() can fade it in.
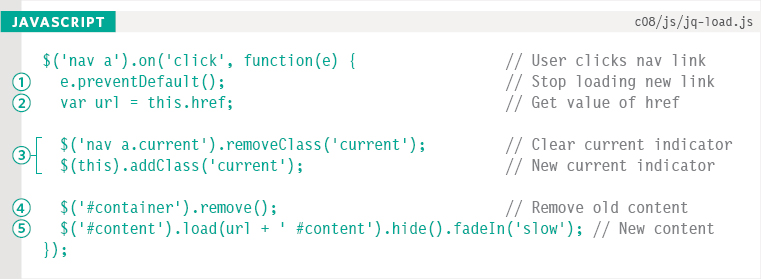

The links still work if JavaScript is not enabled. If JavaScript is enabled, jQuery will load content into the <div> whose id has a value of content from the target URL. The rest of the page does not need to be reloaded.
JQUERY'S AJAX SHORTHAND METHODS
jQuery provides four shorthand methods to handle specific types of Ajax requests.
The methods below are all shorthand methods. If you looked at the source code for jQuery, you would see that they all use the $.ajax() method.
You will meet each one over the next few pages because they introduce key aspects of the $.ajax() method.
These methods do not work on a selection like other jQuery methods, which is why you prefix them with only the $ symbol rather than a jQuery selection. They are usually triggered by an event, such as the page having loaded or the user interacting with the page (e.g., clicking on a link, or submitting a form).
With an Ajax request, you will often want to send data to the server, which will in turn affect what the server sends back to the browser.
As with HTML forms (and the Ajax requests you met earlier in the chapter), you can send the data using HTTP GET or POST.
| METHOD / SYNTAX | DESCRIPTION |
| $.get(url[, data][, callback][, type]) | HTTP GET request for data |
| $.post(url[, data][, callback][, type]) | HTTP POST to update data on the server |
| $.getJSON(url[, data][, callback]) | Loads JSON data using a GET request |
| $.getScript(url[, callback]) | Loads and executes JavaScript (e.g., JSONP) using a GET request |
The parameters in square brackets are optional.
$ shows that this is a method of the jQuery object.
url specifies where the data is fetched from.
data provides any extra information to send to the server.
callback indicates that the function should be called when data is returned (can be named or anonymous).
type shows the type of data to expect from the server.
Note: The examples in this section only work on a web server (and not on local file systems). Server-side languages and server setup are beyond the scope of this book, but you can try out the examples on our website. PHP files have been included with the download code, but they are for demonstration purposes only.
REQUESTING DATA
Here, users vote for their favorite t-shirt without leaving the page.
1. If users click on a t-shirt an anonymous function is triggered.
2. e.PreventDefault() stops the link opening a new page.
3. The user's choice is the value of the id attribute on the image. It is stored in a variable called queryString in the format of a query string, e.g., vote=gray
4. The $.get() method is called using three parameters:
i) The page that will handle the request (on the same server).
ii) The data being sent to the server (here it is a query string, but it could be JSON).
iii) The function that handles the result the server sends back; in this case it is an anonymous function.
When the server responds, the anonymous callback function handles the data. In this case, the code in that function selects the element that the held the t-shirts and replaces it with the HTML sent back from the server. This is done using jQuery's .html() method.
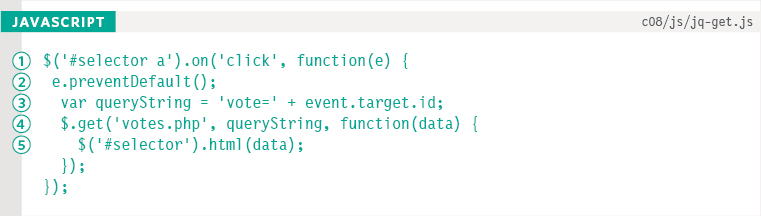

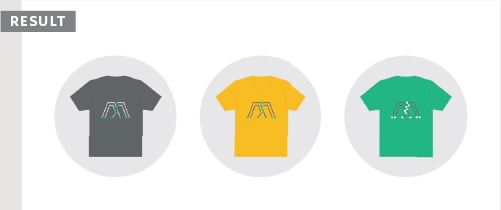
The t-shirt links are created in the JavaScript file to ensure they only show if the browser supports JavaScript (the resulting HTML structure is shown above). When the server responds, it does not have to send back HTML; it can return any kind of data that the browser can process and use.
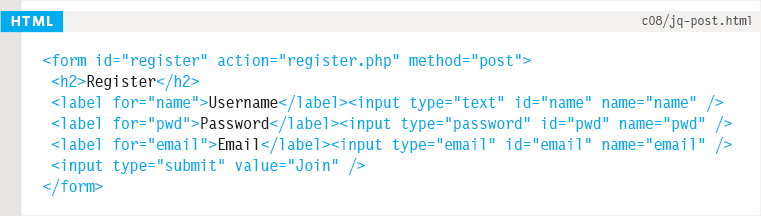
SENDING FORMS USING AJAX
To send data to the server, you are likely to use the .post() method. jQuery also provides the .serialize() method to collect form data.
SENDING FORM DATA
The HTTP POST method is often used when sending form data to a server and it has a corresponding function, the .post() method. It takes the same three parameters as the .get() method:
i) The name of the file on the (same) server that will process the data from the form
ii) The form data that you are sending
iii) The callback function that will handle the response from the server
On the right-hand page you can see the $.post() method used with a method called .serialize(), which is very helpful when working with forms. Together they send the form data to the server.
COLLECTING FORM DATA
jQuery's .serialize() method:
- Selects all of the information from the form
- Puts it into a string ready to send to the server
- Encodes characters that cannot be used in a query string
Typically it will be used on a selection containing a <form> element (although it can be used on individual elements or a subsection of a form).
It will only send successful form controls, which means it will not send:
- Controls that have been disabled
- Controls where no option has been selected
- The submit button
SERVER-SIDE
When a server-side page handles a form, you might want the same page to work whether:
- It was a normal request for a web page (in which case you would send the whole page); or
- It was an Ajax request (where you might respond with just a fragment of the page)
On the server, you can check whether a page is being requested by an Ajax call using the X-Requested-With header.
If it is set and has a value of XMLHttpRequest, you know that the request was an Ajax request.
SUBMITTING FORMS
1. When users submit the form, an anonymous function runs.
2. e.PreventDefault() stops the form from submitting.
3. The form data is collected by the .serialize() method and stored in the details variable.
4. The $.post() method is called using all three parameters:
i) The url of the page that the data is being sent to
ii) The data that was just collected from the form
iii) A callback function that will display the results to the user
5. When the server responds, the content of the element whose id attribute has a value of register is overwritten with new HTML sent from the server.
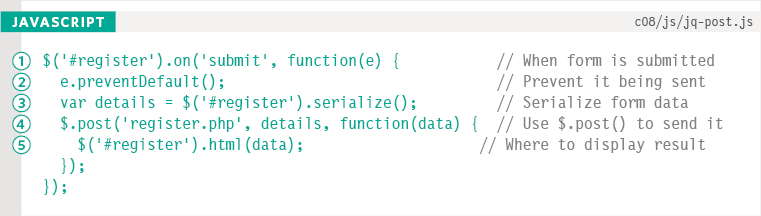

This example needs to be run on a web server. The server-side page will return a confirmation message (but it does not validate the data submitted nor send a confirmation email).
LOADING JSON & HANDLING AJAX ERRORS
You can load JSON data using the $.getJSON() method. There are also methods that help you deal with the response if it fails.
LOADING JSON
If you want to load JSON data, there is a method called $.getJSON() which will retrieve JSON from the same server that the page is from. To use JSONP you should use the method called $.getScript().
AJAX AND ERRORS
Occasionally a request for a web page will fail and Ajax requests are no exception. Therefore, jQuery provides two methods that can trigger code depending on whether the request was successful or unsuccessful, along with a third method that will be triggered in both cases (successful or not).
Below is an example that will demonstrate these concepts. It loads fictional exchange rates.

SUCCESS / FAILURE
There are three methods you can chain after $.get(), $.post(), $.getJSON(), and $.ajax() to handle success / failure. These methods are:
.done() - an event method that fires when the request has successfully completed
.fail() - an event method that fires when the request did not complete successfully
.always() - an event method that fires when the request has completed (whether it was successful or not)
Older scripts may use the .success(), .error(), and .complete() methods instead of these methods. They do the same thing, but these newer methods have been the preferred option since jQuery 1.8.

JSON & ERRORS
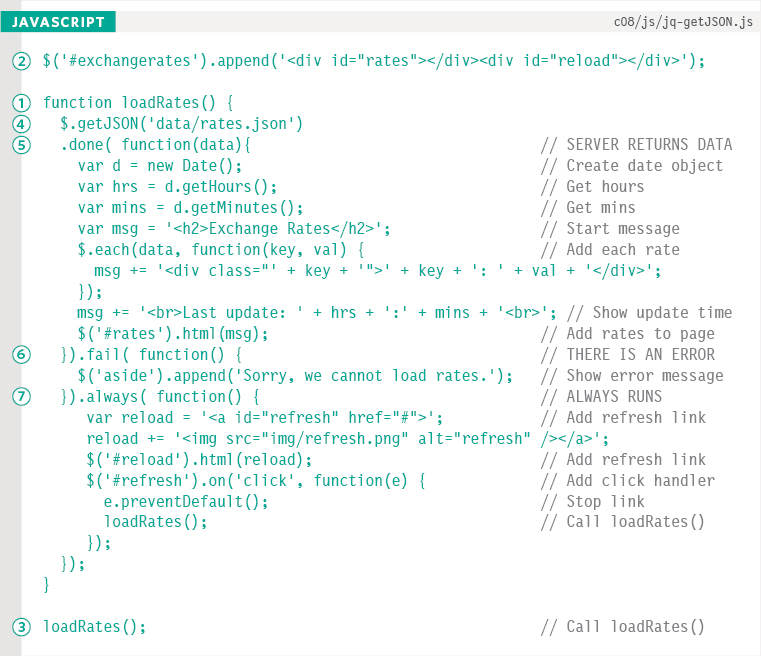
1. In this example, JSON data representing currency exchange rates is loaded into the page by a function called loadRates().
2. On the first line of the script an element is added to the page to hold the exchange rate data.
3. The function is called on the last line of the script.
4. Inside loadRates(), the $.getJSON method tries to load some JSON data. There are three methods chained after this method. They do not all run.
5. .done() only runs if the data is retrieved successfully. It contains an anonymous function that shows exchange rates and the time they were displayed.
6. .fail() only runs if the server cannot return the data. Its job is to display an error message to the user.
7. .always() will run whether or not the answer was returned. It adds a refresh button to the page, along with an event handler that triggers the loadRates() function again.
AJAX REQUESTS WITH FINE-GRAINED CONTROL
The $.ajax() method gives you greater control over Ajax requests. Behind the scenes, this method is used by all of jQuery's Ajax shorthand methods.
Inside the jQuery file, the $.ajax() method is used by the other Ajax helper methods that you have seen so far (which are offered as a simpler way of making Ajax requests).
This method offers greater control over the entire process, with over 30 different settings that you can use to control the Ajax request. You can see a selection of these settings in the table below. These settings are provided using object literal notation (the object is referred to as the settings object).
The example on the right-hand page looks and works like the one that demonstrated the .load() method on p390. But it uses the $.ajax() method instead.
- The settings can appear in any order, as long as they use valid JavaScript literal notation.
- The settings that take a function can use a named function or an anonymous function written inline.
- $.ajax() does not let you load just one part of the page so the jQuery .find() method is used to select the required part of the page.
| SETTING | DESCRIPTION |
| type | Can take values GET or POST depending on whether the request is made using HTTP GET or POST |
| url | The page the request is being sent to |
| data | The data that is being sent to the server with the request |
| success | A function that runs if the Ajax request completes successfully (similar to the .done() method) |
| error | A function that runs if there is an error with the Ajax request (similar to the .fail() method) |
| beforeSend | A function (anonymous or named) that is run before the Ajax request starts In the example on the right, this is used to trigger a loading icon |
| complete | Runs after success/error events In the example on the right, this removes a loading icon |
| timeout | The number of milliseconds to wait before the event should fail |
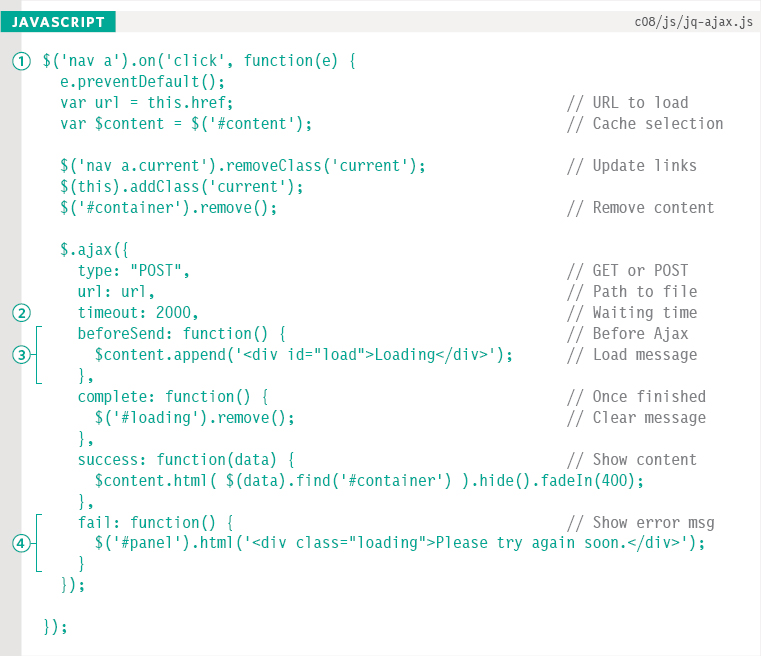
CONTROLLING AJAX
When the user clicks on a link in the <nav> element, new content is loaded into the page. This is very similar to the example on p390 for the .load() method, but that shorthand method only required one line.
1. Here the click event handler triggers the $.ajax() method.
This example sets seven settings for the $.ajax() method. The first three are properties, the final four are anonymous functions triggered at different points in the Ajax request.
2. This example sets the timeout property to wait two seconds for the Ajax response.
3. The code also adds elements into the page to show that data is loading. You may not see them appear if the request is handled quickly, but you will see them if the page is slower to load.
4. If the Ajax request fails, then an error message will be shown to the user.

EXAMPLE
AJAX & JSON
This example shows information about three events. The data used comes from three different sources.
1) When the page loads, event locations are coded into the HTML. Users click on an event in the left-hand column; it updates the timetable in the middle column.
In the left column, the links have an id attribute whose value is a two-letter identifier for the state the event is in:
<a id=”tx“ href=“tx.html”>… Austin, TX</a>
2) The timetables are stored in a JSON object, in an external file collected when the DOM has loaded. When users click on a session in the middle column, its description is shown in the right-hand column.
In the middle column showing timetables, the title of each session is used inside a link that will show the description for the session.
<a href=“descriptions.html#Circuit-Hacking“>
Circuit Hacking</a>
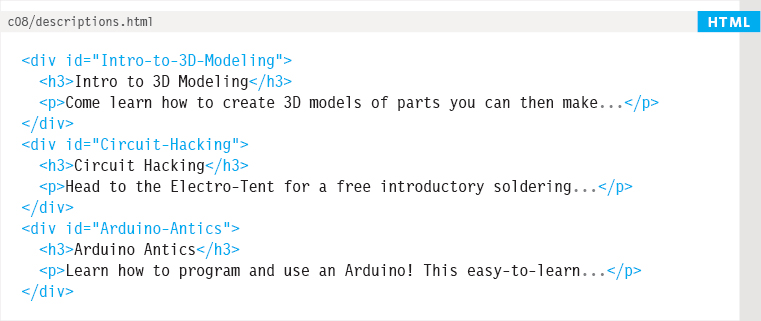
3) Descriptions of all sessions are stored in one HTML file. Individual descriptions are selected using jQuery's .load() method (and the # selector shown on p390).
In the right column, the session description is taken from an HTML file. Each session is stored in an element whose id attribute contains the title of the session (with spaces replaced by dashes).
<div id=“Intro-to-3D-Modeling”>
  <h3>Intro to 3D Modeling</h3>
  <p>Come learn how to create 3D models of …</p>
</div>
Because links are added and removed, event delegation is used.
This example uses data from three separate sources to demonstrate Ajax techniques.
In the left-hand column you can see three locations for an event. These are written into the HTML for the timetable page. Each one is a link.
1. Clicking on an event loads the session times for that event. They are stored in a file called example.json, which is collected when the DOM has loaded.
2. Clicking on a session will load its description. They are stored in descriptions.html, which is loaded when a user clicks on a session title.

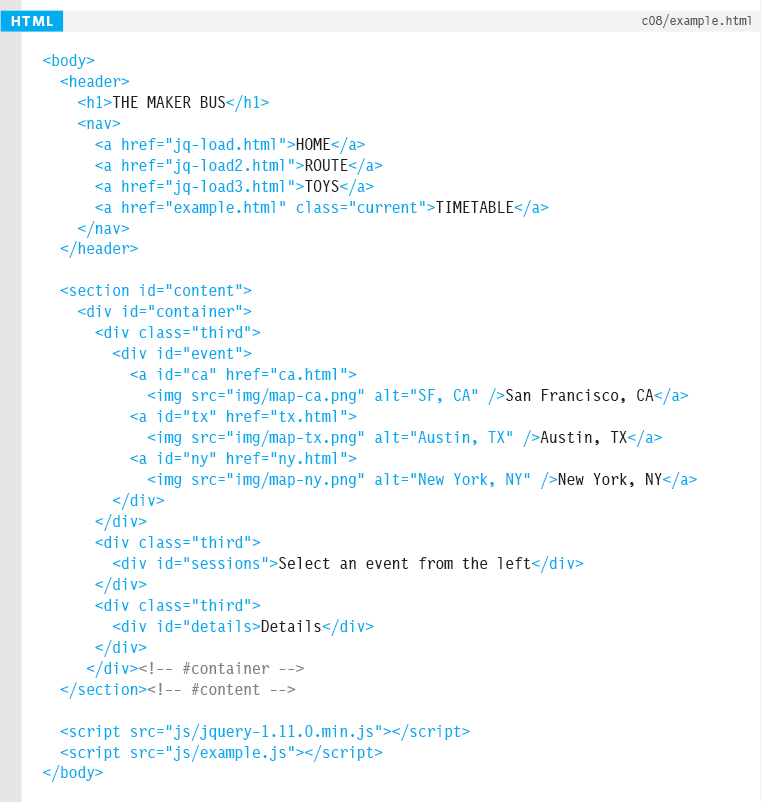
Here you can see the HTML page. It has a header, followed by three columns. Two scripts appear before the closing </body> tag.
Left column: list of the events
Middle column: timetable of the sessions
Right column: description of the sessions
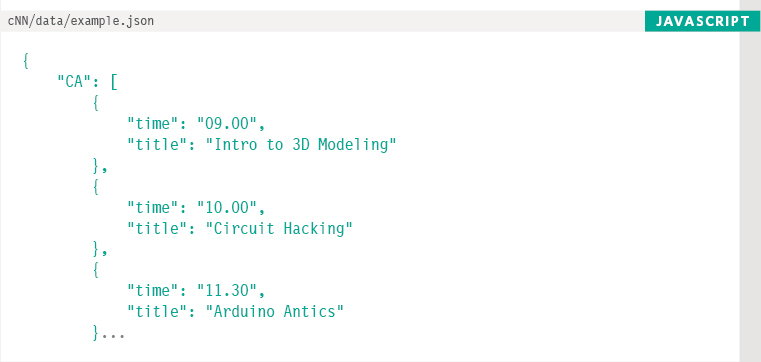
When the script is run, the loadTimetable() function loads the timetables for all three events from a file formatted using JSON, stored in example.json. The data is cached in a variable called times.
Events are identified by a two-letter code for the state. You can see a sample of the JSON-formatted data above and a sample of the HTML that will be created using that data.
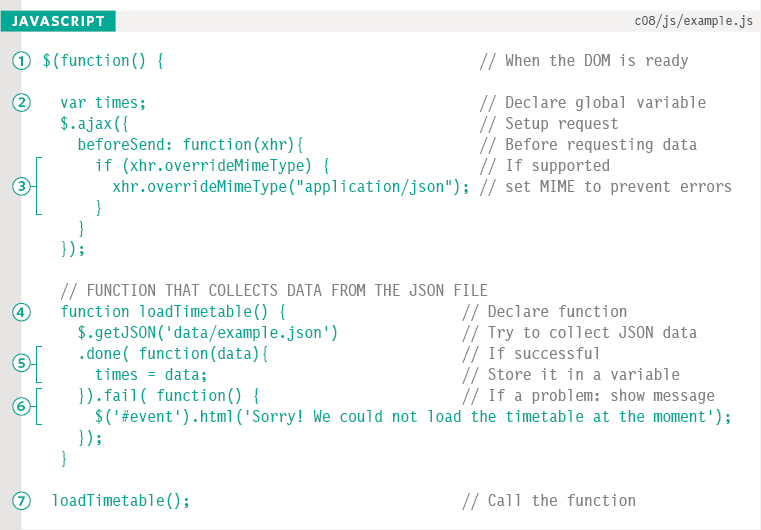
1. The script that does all the work is in example.js. It runs when the DOM has loaded.
2. The times variable will be used to store the session timetables for all of the events.
3. Before the browser requests the JSON data, the script checks if the browser supports the overrideMimeType() method. This is used to indicate that the response from the server should be treated as JSON data. This method can be used in case the server is accidentally set up to indicate that the data being returned is in any other format.
4. Next you can see a function called loadTimetable(), which is used to load the timetable data from a file called example.json.
5. If the data loads successfully, the data for the timetables will be stored in a variable called times.
6. If it fails to load, an error message will be shown to the users.
7. The loadTimetable() function is then called to load the data.

1. A jQuery event helper method waits for users to click on the name of an event. It will load the timetable for that event into the middle column.
2. The preventDefault() method prevents the link from opening a page (because it is will show the AJAX data instead).
3. A variable called loc is created to hold the name of the event location. It is collected from the id attribute of the link that was clicked.
4. The HTML for the timetables will be stored in a variable called newContent. It is set to a blank string.
5. Each session is stored inside an <li> element, which starts by displaying the time of the session.
6. A link is added to the timetable, which will be used to load the description. The link points to the descriptions.html file. It is followed by a # symbol so it links to the correct part of the page.
7. The session title is added after the # symbol. The .replace() method replaces spaces in the title with a dash to match the value of the id attribute in the descriptions.html file for each session.
8. Inside the link you can see the title of the session.
9. The new content is added into the middle column.
10. The class attributes on the event links are updated to shows which event is the current event.
11. The third column is emptied if it had content.
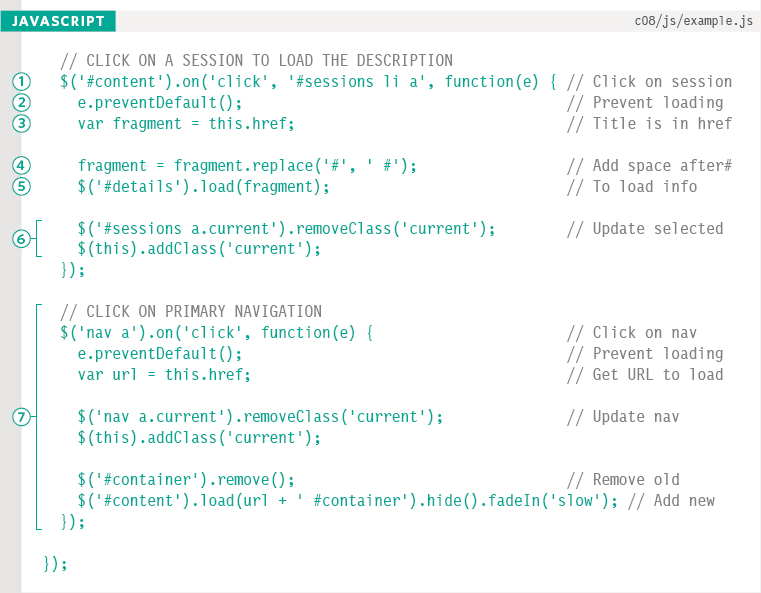
1. Another jQuery event helper method is set up to respond when a user clicks on a session in the middle column. It loads a description of the session.
2. preventDefault() stops the link opening.
3. A variable called fragment is created to hold the link to the session. This is collected from the href attribute of the link that was clicked.
4. A space is added before the # symbol so that it is the correct format for the jQuery load() method to collect part (not all) of the HTML page, e.g., description.html #Arduino-Antics
5. A jQuery selector is used to find the element whose id attribute has a value of details in the third column. The .load() method is then used to load the session description into that element.
6. The links are updated so that they highlight the appropriate session in the middle column.
7. The main navigation is set up as shown on p391.
SUMMARY
- Ajax refers to a group of technologies that allow you to update just one part of the page (rather than reload a whole page).
- You can incorporate HTML, XML, or JSON data into your pages. (JSON is becoming increasingly popular.)
- To load JSON from a different domain, you can use JSONP but only if the code is from a trusted source.
- jQuery has methods that make it easier to use Ajax.
- .load() is the simplest way to load HTML into your pages and allows you to update just a part of the page.
- .ajax() is more powerful and more complex. (Several shorthand methods are also offered.)
- It is important to consider how the site will work if the user does not have JavaScript enabled, or if the page is not able to access the data from a server.
* Browsers only let Ajax load HTML and XML from the same domain name as the rest of the page (e.g., if the page is on www.example.com, the Ajax request must return data from www.example.com).