

PLAYING NICELY WITH OTHERS
You do not always need to know how a script or program works, as long you know how to ask it to do something, and how to process its response. The questions you can ask and the format of the answers form the API.
WHAT THE API CAN DO
If there is a script or program that offers functionality you need, consider using it rather than writing something from scratch.
Because each script, program, or platform has different features, the first thing you need to do is understand what the API allows you to do. For example:
- The DOM and jQuery APIs allow you to access and update a web page that is loaded in the browser and respond to events.
- Facebook, Google+, and Twitter APIs let you to access and update profiles and create status updates on their platforms.
When you know what the API allows you to do, you can decide if it is the right tool for the job.
HOW TO ACCESS IT
Next you need to know how to access the functionality of the API in order to use it.
The DOM's functionality is built into the JavaScript interpreter in the browser.
With jQuery you need to include the jQuery script from your server or a CDN in your pages.
Facebook, Google+, Twitter, and other sites provide various ways to access the functionality of their platforms using APIs.
THE SYNTAX
Finally, you need to learn how to ask the API to do something and the format in which you should expect any replies.
As long as you know how to call a function, create an object, and access the properties and methods of an object, you will be able to use any JavaScript API.
This chapter introduces you to a range of APIs so you gain the confidence to learn more about them and other APIs.
HTML5 JAVASCRIPT APIS
First, we will look at some of the new HTML5 APIs.
Along with the markup in the HTML5 specification, a set of APIs define that describe how to interact with features of web browsers.
WHY HTML5 HAS APIS
As technologies evolve, so does the browsing experience. For example, smartphones may have smaller screens and less power than the latest desktop computers; but they include features that are rarely found on desktop machines such as accelerometers and GPS.
The HTML5 specification has not only added new markup, but also includes a new set of JavaScript APIs that standardize how you can make use of these new features in any device that implements them.
WHAT THEY COVER
Each of the HTML5 APIs focuses on one or more objects that browsers implement to deliver specific functionality.
For example, the geolocation API describes a geolocation object that lets you ask users for their location and two objects that handle the browsers response.
There are also APIs that offer improvements over existing functionality. For example, the web storage API lets you store information within the browser without relying on cookies.
WHAT YOU'LL LEARN
There is not space for an exhaustive reference of each of the HTML5 APIs (there have been whole books dedicated to these new HTML5 features). But you will meet three of the APIs and see examples of how to work with them.
This should get you used to using the HTML5 APIs so that you can then go on and learn more about them as you need them. You will also learn how you can test to see whether or not a browser supports the functionality in any of the APIs.

FEATURE DETECTION
When you write code that uses the HTML5 APIs (or any other new feature in a web browser), you may need to check if the browser supports that feature before your code tries to use it.
The HTML5 APIs describe objects that browsers use to implement new functionality. For example, you are about to meet an object called the geolocation object that is used to determine a user's location. However, this object is only supported in modern browsers, so you need to check whether a browser supports this it before trying to use the object.
You may not be surprised to hear that there are some cross-browser issues with feature detection.
For example, in the case of the code above, there was a bug in IE9 which could result in a memory leak when you check for the geolocation object. This could slow down your pages.
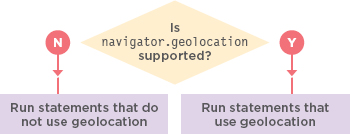
It is possible to check whether a browser supports an object using a conditional statement.
If the browser supports the object, then the condition will return a truthy value and the first set of statements are run. If it is not implemented, the second set of statements is run.
if (navigator.geolocation) {
  // Returns truthy so it is supported
  // Run statements in this code block
} else {
  // Not supported / turned off
  // Or user rejected request
}
Luckily, there is a library called Modernizr, which takes away the hassles of cross-browser issues (like jQuery for feature detection). It is a better way to check if the browser supports recent features. The script is regularly updated and refined to deal with cross-browser issues as they are discovered, so they are less likely to affect you.
MODERNIZR
Modernizr is a script you can use in your pages to tell whether the browser supports features of HTML, CSS, and JavaScript. It will be used in the coming HTML5 API examples.
HOW TO GET MODERNIZR
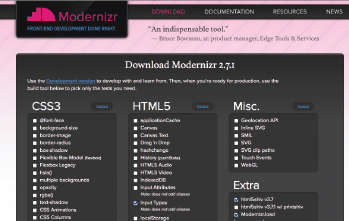
First, you need to download the script from the Modernizr.com website, where you will see:
- A development version of the script. It is uncompressed and features every check that the script is capable of performing.
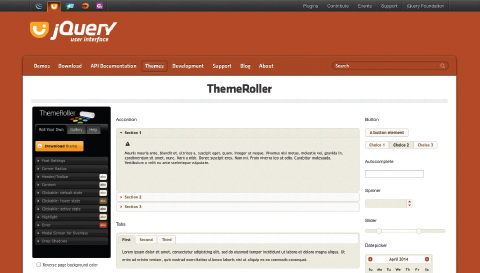
- A tool (see screenshot below) that lets you select which features you want to test for. You can then download a custom version of the script that only contains the checks you need. On a live site, you should not test for features that you do not use as it would slow your site down.
In our examples, Modernizr is used near the end of the page just before the script that uses it. But you may see Modernizr included in the <head> of an HTML page (if the content of the page is uses features that you are testing for).
HOW MODERNIZR WORKS
When you include the Modernizr script in your page, it adds an object called Modernizr, which tests whether the browser supports the features that you specified that it should test for. Each feature you want it to test becomes a property of the Modernizr object. Their values are a Boolean (true or false) that tell you if a feature is supported.
You can use Modernizr as a condition like this: If Modernizr's geolocation property returns true run the code in the curly braces:
if (Modernizr.geolocation) {
  // Geolocation is supported
}
MODERNIZR PROPERTIES
In the screenshot on the left, you can see some of the features that Modernizr can check for. To see a full list of Modernizr's properties, visit:
modernizr.github.io/Modernizr/test/index.html
GEOLOCATION API: FINDING USERS' LOCATIONS
An increasing number of sites offer extra functionality to users who disclose their location. The users' location can be requested using the geolocation API.
WHAT THE GEOLOCATION API DOES
Browsers that implement the geolocation API let users share their location with websites. The location data is provided in the form of longitude and latitude points. There are several ways for the browser to determine its location, including using data from its IP address, wireless network connection, cell towers, or GPS hardware.
In some devices, the geolocation API can give you more data along with longitude and latitude. But, we focus on these features because they have the most support. Having seen how to use them, if you need to work with the other features, you will be able to.
HOW TO ACCESS GEOLOCATION
The geolocation API is available by default in any browser that supports it (just like the DOM is). It was first supported in IE9, Firefox 3.5, Safari 5, Chrome 5, Opera 10.6, iOS3, and Android 2.
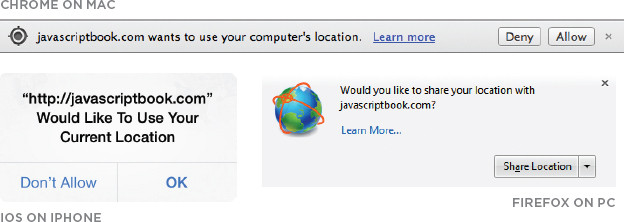
Browsers that support geolocation allow users to turn the feature on and off. If it is on, the browser will ask users if they want to share data for each individual web site that requests that information.
The way in which the browser asks the user if they will share location data differs from one browser to the next and one device to the next.
The geolocation API relies on an object called geolocation. If you want to try and make use of the user's location, first you need to check if the browser supports this object. This example will use the Modernizr script is used to perform this check.
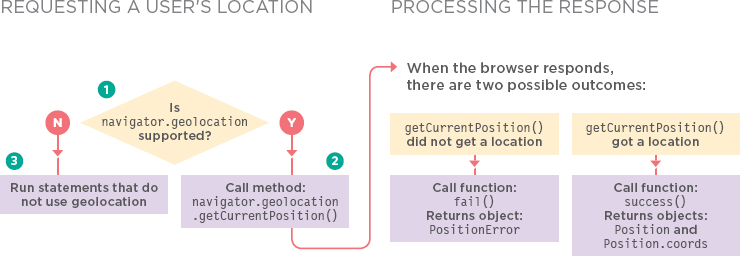
1. A conditional statement is used to check whether the browser supports geolocation.
2. If geolocation is supported, the browser returns a truthy value and the first set of statements run. They request the user's location using the geolocation object's getCurrentPosition()method.
3. If geolocation is not supported, then a second set of statements is run.
if (Modernizr.geolocation) {
  // Returns truthy so it is supported
  // Run statements in this code block
} else {
  // Not supported / turned off
  // Or user rejected request
}
Once you call the getCurrentPosition() method, the code continues onto the next line because it is an asynchronous request (like the Ajax calls in the last chapter). The request is asynchronous because the browser will take a while to determine the user's location (and you do not want the rest of the page to stop loading while the browser works out where the user is). Therefore, the method has two parameters: getCurrentPosition(success, fail)
success is the name of a function to call if the longitude and latitude are successfully returned. This method will automatically be passed an object called position, which holds the user's location.
fail is the name of a function called if the details cannot be obtained. This method will automatically be passed an object called PositionError containing details about the error.
So in all, there are three new objects you need to use in order to work with the geolocation API: geolocation, position, and PositionError. Their syntax is shown on the next page.
THE GEOLOCATION API
There are three objects involved in adding geolocation to your web page. The tables demonstrate how API documentation typically describes the objects, properties, and the methods you can use.
geolocation OBJECT
The geolocation object is used to request location data. It is a child of the navigator object.
| METHOD | RETURNS |
| getCurrentPosition(success, fail) | Requests the position of the user and, if the user permits, returns the user's latitude / longitude plus other location information success is the name of a function to call if coordinates are retrieved fail is the name of a function to call if coordinates are not returned |
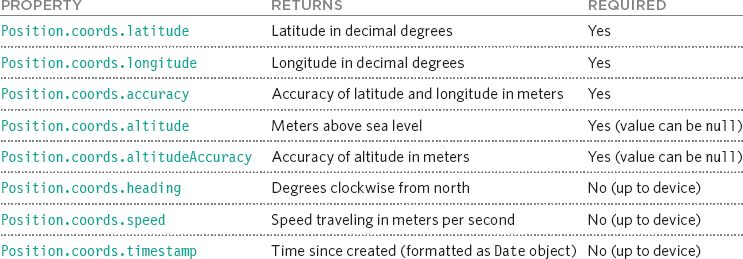
Position OBJECT
If a user's location is found, a Position object is sent to the callback function. It has a child object called coords whose properties hold the user's location. If a device supports geolocation, it must provide a minimum amount of data (see the required column); other properties are optional (they may depend on the device's capabilities).
PositionError OBJECT
If location is not determined, the callback function is passed the PositionError object.

WORKING WITH LOCATION
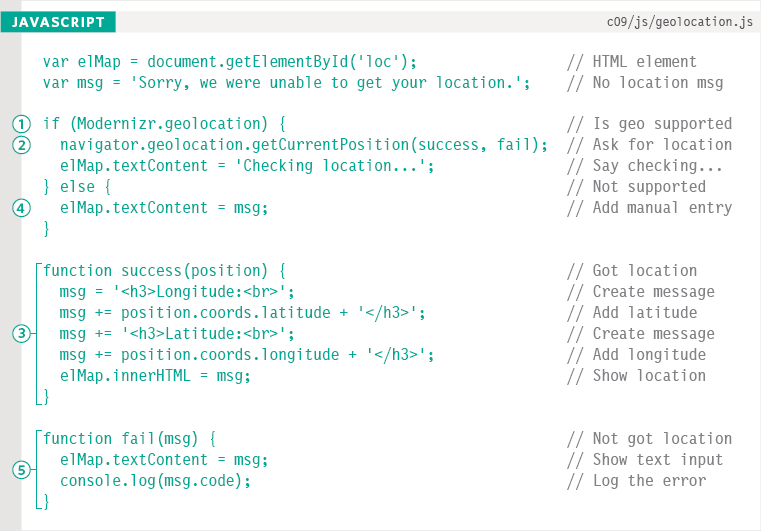
1. In this example, Modernizr checks if geolocation is supported by the browser and enabled by the user.
2. When getCurrentPosition() is called, the user will be asked for permission to share their location.
3. If the location is gained, the user's latitude and longitude are written into the page.
4. If it is not supported, then the user will see a message that shows their location could not be found.
5. If the location is not gained (for any reason), again the message will say that a location cannot be found. The error code is logged to the browser console.

If you are unable to see a result on a desktop browser, try the example on a smart phone. You can try all examples directly from the website for the book, http://www.javascriptbook.com/. To support older browsers, search for a script called geoPosition.js
WEB STORAGE API: STORING DATA IN BROWSERS
Web storage (or HTML5 storage) lets you store data in the browser. There are two different types of storage: local and session storage.
HOW TO ACCESS THE STORAGE API
Before HTML5, cookies were the main mechanism for storing information in the browser. But cookies have several limitations, most notably they are:
- Not able to hold much data.
- Sent to the server every time you request a page from that domain.
- Not considered secure.
Therefore, HTML5 introduced a storage object. There are two different flavors of the storage object, localStorage and sessionStorage. Both use the same methods and properties. The differences are how long the data is stored for and whether all tabs can access the data that is being stored.
Commonly, browsers store 5MB of data per domain in a storage object. If a site tries to store more than 5mb of data, the browser will usually ask the user whether they want to allow this site to store more information (never rely on users agreeing to give a site more space).
The data is stored as properties of the storage objects (using in key/value pairs). The value in the pair is always a string. To protect the information that a website stores in these storage objects, browsers employ a same origin policy, which means data can only be accessed by other pages in the same domain.
![]()
These four parts of the URL must match:
1. Protocol: The protocol must be a match. If data was stored by a page that starts http, the storage object cannot be accessed via https.
2. Subdomain: The subdomain name must match. For example, maps.google.com cannot access data stored by www.google.com.
3. Domain: The domain name must match. For example, google.com cannot access local storage from facebook.com.
4. Port: The port number must match. Web servers can have many ports. Usually a port number is not specified in a URL, and the site uses port 80 for web pages, but the port number can be changed.
The storage objects are just one of the new HTML5 APIs for storing data. Others include access to the file system (through the FileSystem API) and client side databases such as the Web SQL database.
HOW TO ACCESS THE STORAGE API
Both of these objects are implemented on the window object, so you do not need to prefix the method names with any other object name.
To save an item into the storage object, you use the setItem() method, which takes two parameters: the name of the key and the value associated with it.
To retrieve a value from the storage object you use the getItem() method, passing it the key.
// Store information
localStorage.setItem(‘age’, ‘12’);
localStorage.setItem(‘color’, ‘blue’);
// Access information and store in variable
var age = localStorage.getItem(‘age’);
var color = localStorage.getItem(‘color’);
// Number of items stored
var items = localStorage.length;
Data for the storage objects is stored and accessed in a synchronous manner: all other processing stops while the script accesses or saves the data. Therefore, if a lot of data is regularly accessed or stored, the site can appear slower to use.
You can also set and retrieve keys and values of the storage objects as you might with other objects using dot notation.
The storage objects are commonly used to store JSON-formatted data. The JSON object's:
- parse() method is used to turn the JSON-formatted data into a JavaScript object
- stringify() method is used to transform objects into JSON-formatted strings
// Store information (object notation)
localStorage.age = 12;
localStorage.color = ‘blue’;
// Access information (object notation)
var age = localStorage.age;
var color = localStorage.color;
// Number of items stored
var items = localStorage.length;
Below, you can see a table that shows the methods and property of the storage objects. This table is very similar to the one you saw for the geolocation API and is indicative of the types of tables you see in documentation for APIs.
| METHOD | DESCRIPTION |
| setItem(key, value) | Creates a new key/value pair |
| getItem(key) | Gets the value for the specified key |
| removeItem(key) | Removes the key/value pair for the specified key |
| clear() | Clears all information from that storage object |
| PROPERTY | DESCRIPTION |
| length | Number of keys |
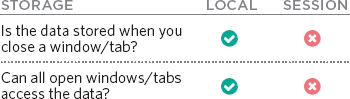
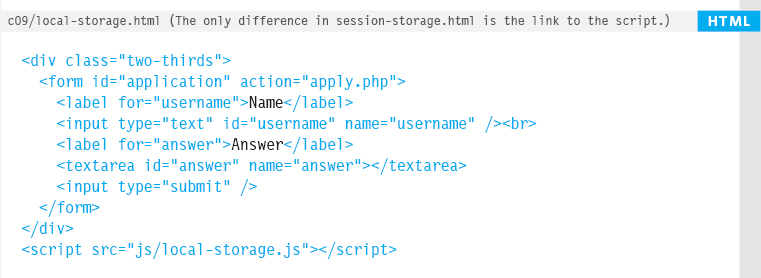
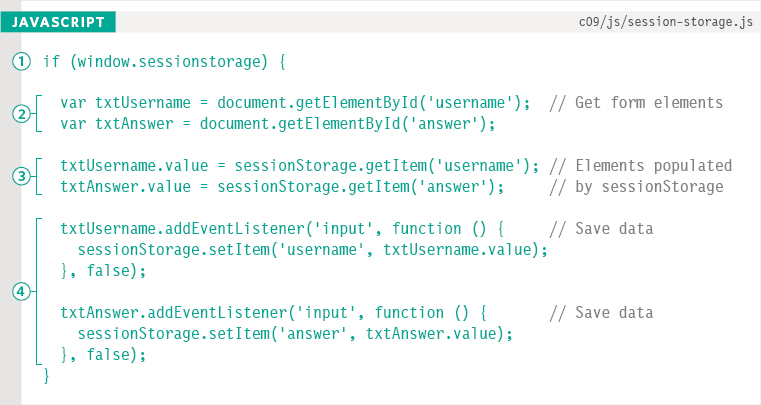
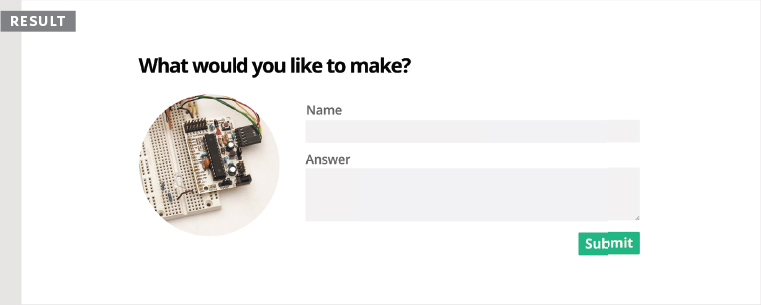
LOCAL STORAGE
The examples on this page and the right-hand page store what the user enters into text boxes, but both examples store it for different lengths of time.
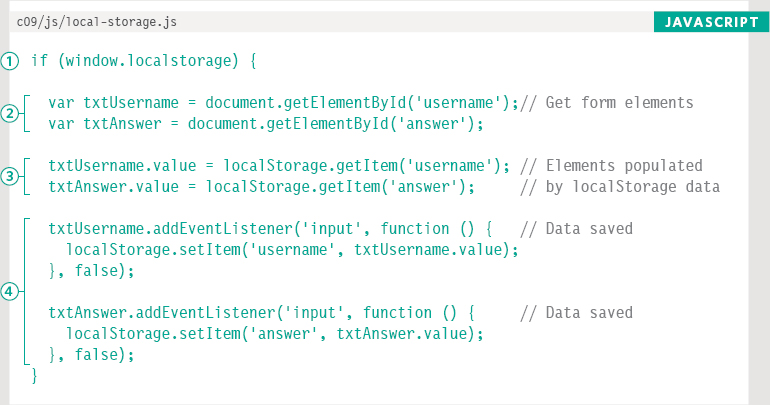
1. A conditional statement is used to check if the browser supports the relevant storage API.
2. References to the inputs for the username and answer are stored in variables.
3. The script checks to see if the storage object has a value for either of these elements using the getItem() method. If so, it is written into the appropriate input by updating its value property.
4. Each time an input event fires on one of the inputs, the form will save the data to the localStorage or sessionStorage object. It will automatically be shown if you refresh the page.
SESSION STORAGE
sessionStorage is more suited to information that:
- Changes frequently (each time the user visits the site - such as whether they are logged in or location data).
- Is personal and should not be viewed by other users of the device.
localStorage is best suited to information that:
- Only changes at set intervals (such as timetables / price lists), which can be helpful to store offline.
- The user might want to come back and use again (such as saving preferences / settings).
HISTORY API & PUSHSTATE
If you move from one page to another, the browser's history remembers which pages you visited. But Ajax applications do not load new pages, so they can use the history API to update the location bar and history.
WHAT THE HISTORY API DOES
Each tab or window in the browser keeps its own history of pages you have viewed. When you visit a new page in that tab or window, the URL is added to the list of pages you have visited in the history.
Because of this, you can use the back and forward buttons in a browser to move between pages you have visited in that tab or window. However, on sites that use Ajax to load information, the URL is not automatically updated (and the back button might not show the last thing that the user was viewing).
HTML5's history API can help fix this problem. It lets you interact with the browser's history object:
- You can update the browser history stack using the pushState() and replaceState() methods.
- Extra information can be stored with each item.
As you will see, information can be added to the history object when an Ajax request is made, and the user can be shown the right content when they press back or forward buttons.
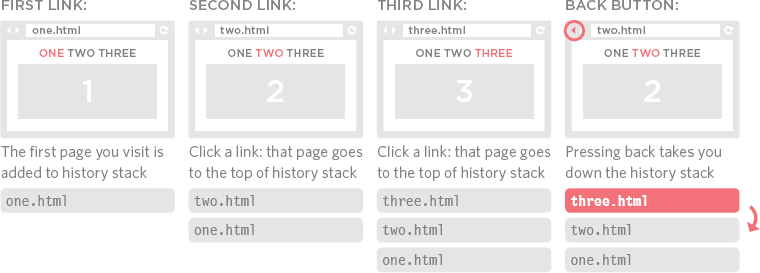
Browsing pages:
As you browse, the URL in your web browser's address bar updates. The page is also added to the top of something called the history stack.
Pressing back: takes you back down the stack
Pressing forward: takes you up the stack (where possible)
New page: if you request a new page, it will replace anything above the current page in the stack
State refers to the condition that something is in at a particular time. The browser history is like a pile (or stack) of states, one on top of the other. The three methods on this page allow you to manipulate the state in browsers.
ADDING INFORMATION TO THE HISTORY OBJECT
pushState() adds an entry to the history object. replaceState() updates the current entry. Both take the same three parameters (below), each of which updates the history object.
Because the history object is a child of the window object, you can use its name directly in the script; you can write history.pushState(), you do not need to write window.history.pushState().
![]()
1. The history object can store information with each item in the history. This is provided in the state parameter and can be retrieved when you go back to that page.
2. Currently unused by most browsers, the title parameter is intended to change the title of the page. (You can specify a string for this value, ready for when browsers support it.)
3. The URL that you want the browser to show for this page. It must be on the same origin as the current URL and it should show the correct content if the user goes back to that URL.
GETTING INFORMATION FROM THE HISTORY OBJECT
Adding content to the browser history is only part of the solution; the other half is loading the right content when the user presses the back or forward buttons. To help show the right content, the onpopstate event fires whenever the user requests a new page.
This onpopstate event is used to trigger a function that will load the appropriate content into the page. There are two ways to determine what content should be loaded into the page:
- The location object (which represents the browser's location bar)
- The state information in the history object
The location object:
If the user presses back or forward, the address bar will update itself, so you can get the URL for the page that should be loaded using location.pathname (the location object is a child of the window object and its pathname property is the current URL). This works well when you are updating an entire page.
The state:
Because the first parameter of the pushState() method stores data with the history object for that page, you can use it to store JSON-formatted data. That data can then be loaded directly into the page. (This is used when the new content loads data rather than a traditional web page.)
THE HISTORY OBJECT
The HTML5 history API describes the functionality of the history object in modern web browsers. It lets you access and update the browser history (but only for pages the user visited on your site).
Even if the visitor is not taken to a new page in the browser window (for example, when only a part of the page is updated using Ajax), you can modify the history object to ensure that the back and forward buttons work as the user would expect them to on non-Ajax pages.
Again, the table below is indicative of the kind you might see in API documentation. As you become comfortable using the methods, properties, and events of an object you will find it easier to work with all kinds of APIs.
history OBJECT
| METHOD | DESCRIPTION |
| history.back() | Takes you back in the history, like the browser's back button |
| history.forward() | Takes you forward in the history, like the browser's forward button |
| history.go() | Takes you to a specific page in the history. It is an index number, starting at 0. .go(1) is like clicking the forward button and .go(-1) is like clicking back |
| history.pushState() | Adds an item to the history stack (Clicking on a relative link in a page usually triggers a hashchange event, rather than load, but no event fires if you use pushState() and the url contains a hash) |
| history.replaceState() | Does the same as pushState() except it modifies the current history entry |
| PROPERTY | DESCRIPTION |
| length | Tells you how many items are in the history object |
| EVENT | DESCRIPTION |
| window.onpopstate | Used to handle the user moving backwards or forwards |
WORKING WITH HISTORY
1. The loadContent() function uses jQuery's .load() method (see p390) to load content into the page.
2. If a link is clicked on, an anonymous function runs.
3. The page to load is held in a variable called href.
4. The current links are updated.
5. The loadContent() function is called (see step 1).
6. The pushState() method of the history object updates the history stack.
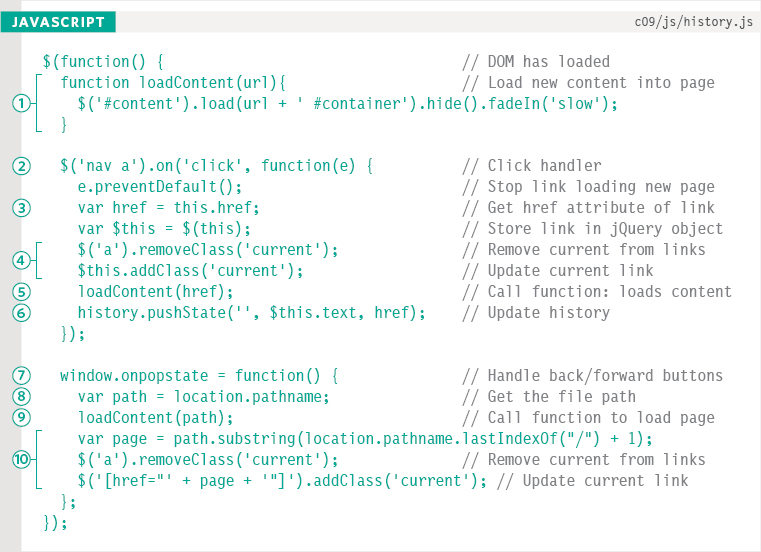

7. When the user clicks backwards or forwards, the onpopstate event fires. This is used to trigger an anonymous function.
8. The browser's location bar will display the corresponding page from the history stack, so location.pathname is used to obtain the path for the page that needs to be loaded.
9. The loadContent() function (in step 1) is called again, to retrieve the specified page.
10. The file name is retrieved so that the current link can be updated.
SCRIPTS WITH APIS
There are hundreds of scripts available for free on the web. Many have an API you need to use to get them to work for you.
SCRIPT APIS
Lots of developers share their scripts through a range of websites. Some are relatively simple scripts with a single purpose (such as sliders, lightboxes, and table sorters). Others are far more complicated and can be used for a range of purposes (such as jQuery).
In this section, you will meet two different types of scripts whose code you can make use of when you have learned their API:
- A set of jQuery plugins known as jQuery UI.
- A script that makes it easier to create web apps called AngularJS.
JQUERY PLUGINS
Many developers have written code that adds extra functionality to jQuery. These scripts add methods to extend the jQuery object, which are known as jQuery plugins.
When you use these plugins, first you include the jQuery script, followed by the plugin script. Then, when you select elements (as you do with standard in jQuery methods), the plugin allows you to apply new methods that it has defined to that selection, offering new functionality that was not in the original jQuery script.
ANGULAR
Angular.js is another JavaScript library, but it is very different from jQuery. Its purpose is to make it easier to develop web applications.
One of the most striking things is that it allows you to access and update the contents of a page without writing code to handle events, select elements, or update the content of an element. We only have space to provide a very basic introduction to Angular in this chapter, but it does help demonstrate the variety of scripts available.
THIRD-PARTY SCRIPTS
Before writing your own script it can pay to check if someone else has already done the hard work for you (there is no point reinventing the wheel).
It is always a good idea to check:
- Whether it has been updated fairly recently
- That the JavaScript is separate from the HTML
- Reviews of the script if they are available
This helps to ensure that the script uses modern practices and is still being updated. It is also worth noting that the instructions for using a script are not always called an API.
JQUERY UI
The jQuery foundation maintain its own set of jQuery plugins called jQuery UI. They help create user interfaces.
WHAT JQUERY UI DOES
jQuery UI is a suite of jQuery plugins that extends jQuery with a set of methods to create:
- Widgets (such as accordions and tabs)
- Effects (that make elements appear and disappear)
- Interactions (such as drag and drop functionality)
jQuery UI not only provides JavaScript you can use, but it also comes with a set of themes that help control how the plugins look on the page.
If you want fine-grained control over how the jQuery plugins look in the browser, you can also use the theme roller, which gives you more precise control over the appearance of the elements.
HOW TO ACCESS IT
To use jQuery UI, first you must include jQuery in your page; then you must include the jQuery UI script (after the jQuery file).
Versions of jQuery UI are available on the same CDNs as the main jQuery file. But, if you only need part of the jQuery UI functionality, you can just download the relevant parts from the jqueryui.com website. This creates a smaller JavaScript file, which in turn makes the script faster to download.
SYNTAX
Once you have included the jQuery and jQuery UI scripts in the page, the syntax is very similar to using other jQuery methods. You create a jQuery selection and then call a method that will be defined in the plugin.
As you will see, the jQuery UI documentation not only has to explain the JavaScript methods and properties it uses, but also how to structure your HTML if you want to use many of its widgets and interactions.
JQUERY UI ACCORDION
Creating an accordion with jQuery UI is very simple. You only need to know:
- How to structure your HTML
- What element(s) should be used in the jQuery selector
- The jQuery UI method to call
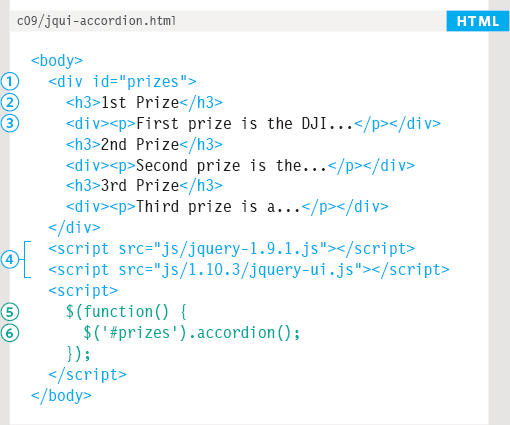
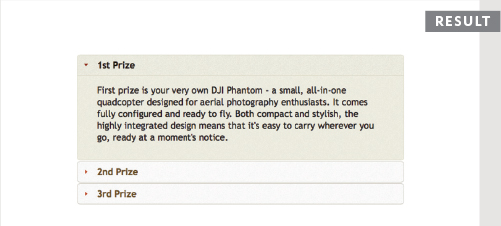
1. In this example, the HTML for an accordion is contained within a <div> element (its id attribute has a value of prizes, which will be used in the script). Each panel of the accordion has:
2. An <h3> element for the clickable heading
3. A <div> element for the content of that panel
4. Before the closing </body> tag the jQuery and jQuery UI scripts are both included in the page.
5. Finally, you can see a third <script> element containing an anonymous function that runs when the page has loaded.
6. Inside that function, a standard jQuery selector picks the containing <div> element that contains the accordion (using the value of its id attribute). The accordion functionality is triggered by calling the .accordion() method on that selection.
You do not need to know how the jQuery plugin achieves this, as long as you know how to:
- Structure your HTML
- Create the jQuery selection
- Call the new method defined in the jQuery plugin
Note: On a live site, the JavaScript should be kept in an external file to maintain a separation of concerns. It is shown here for convenience and to show how little work needs to be done to achieve this effect.
JQUERY UI TABS
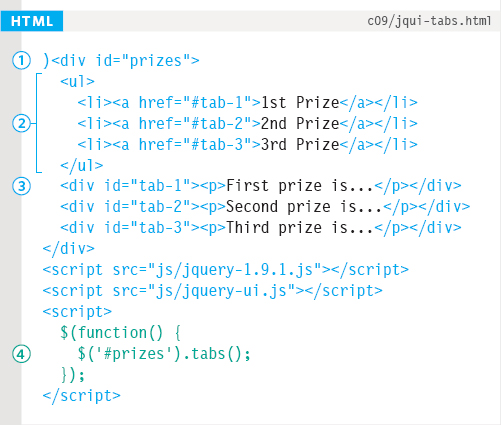
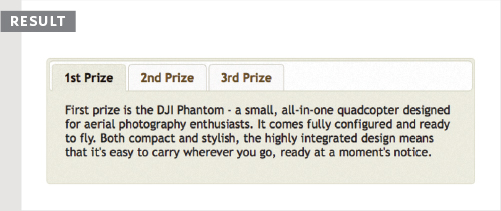
The tabs are a similar concept to the accordion.
1. They are kept in a containing <div> element that will be used in the jQuery selector. The content, however, is slightly different.
2. The tabs are created using an unordered list. The link inside each list item points to a <div> element lower down the page that holds content for that tab.
3. Note that the id attributes on the <div> elements must match the value of the href attribute on the tabs.
Once you have included jQuery and jQuery UI in the page, there is a third script tag with an anonymous function that runs when the DOM has loaded.
4. A jQuery selector picks the element whose id attribute has a value of prizes (this is the containing element for the tabs). Then it calls the .tabs() method is called on that selection.
This structure is common in most jQuery plugins:
1. jQuery is loaded.
2. The plugin is loaded.
3. An anonymous function runs when the page is ready.
The anonymous function will create a jQuery selection and applies the method defined in the jQuery plugin to that selection. Some methods will also require parameters in order to do their job.
On a live site, the JavaScript should be kept in an external file to maintain a separation of concerns, but it is shown here for convenience and to show how little work needs to be done to achieve this effect.
JQUERY UI FORM
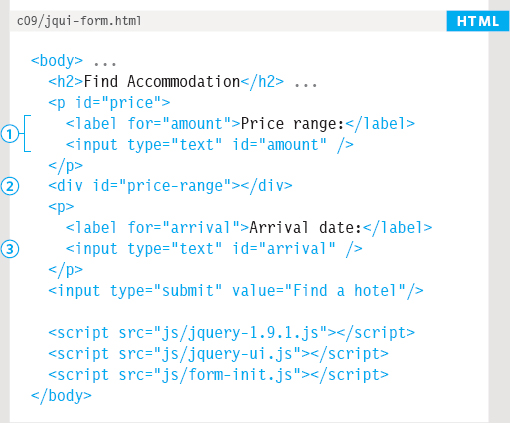
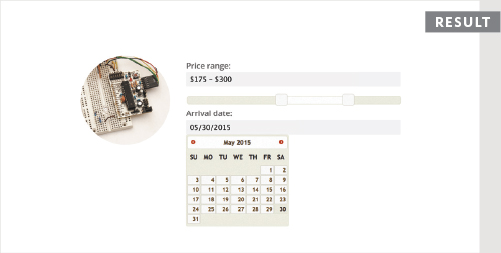
jQuery UI introduces several form controls that make it easier for people to enter data into forms. This example demonstrates two of them:
Slider input: This allows people to select a numeric value using a draggable slider. This slider has two handles that allow the user to set a range between two numbers. As you can see on the right, the HTML for the slider is made up of two components:
1. A normal label and text input that would allow users to enter a number.
2. An extra <div> element used to hold the slider that you see on the page.
Date picker: This allows people to pick a date from a pop-up calendar, which helps ensure that users provide the date in the correct format that you need.
3. It is just a text input, and does not need any additional markup.
Before the closing </body> tag, you can see that there are three <script> elements: the first is the jQuery script, the second is jQuery UI, and the third contains the instructions to setup these two form controls (see right-hand page). If JavaScript is not enabled, these controls look like normal form controls without the jQuery's enhancements.
Most jQuery scripts live within the .ready() function or its shortcut (used on the next page). As you saw in Chapter 7, this ensures that the script only runs when the DOM has loaded.
If you include more than one jQuery plugin, each of which uses the .ready() method, you do not repeat the function - you combine the code from inside both functions into the one.
1. The JavaScript is contained within the shortcut for the jQuery .ready() method. It contains the setup instructions for both of the form controls.
2. To turn a text input into a date picker, all you need to do is select the text input and then call the datepicker() method on that selection.
3. Cache the inputs for price.
4. The slider uses an object literal to set the properties of the .slider() method (see below).
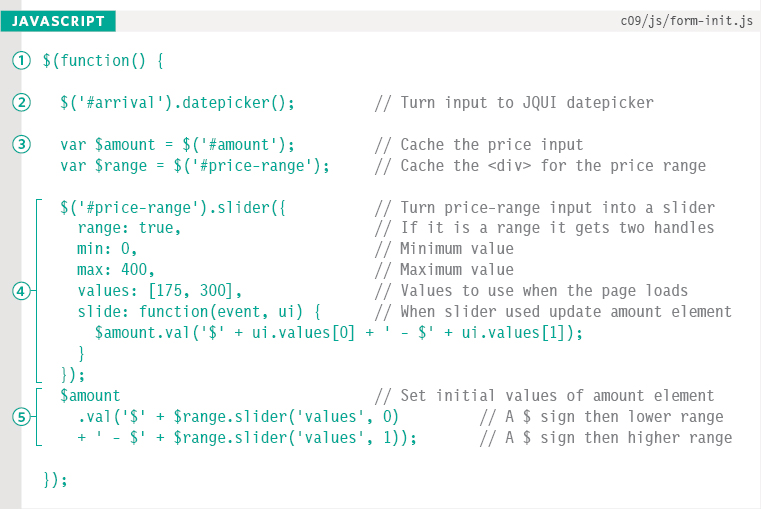
5. When the form loads, the text input that shows the amount as text needs to know the initial range for the slider. The value of that input is made up of:
a) A dollar sign: $ followed by the lower range value.
b) A dash and dollar sign: - $ followed by the higher range value.
The script is called form-init.js. Programmers often use init as a shorthand for initialize; and this script is used to set an initial state for the form.
When a jQuery plugin has settings that vary each time it is used, it is common to pass the settings in an object literal. You can see this with the .slider() method; it is passed several parameters and a method:
| PROPERTY | DESCRIPTION |
| range | A Boolean to give the slider two handles (not just a single value) |
| min | The minimum value for the slider |
| max | The maximum value for the slider |
| values | An array containing two values to specify an initial range in the slider when the page first loads |
| METHOD | DESCRIPTION |
| slider() | Updates the text input which shows the text values for the slider (the documentation shows examples for this) |
ANGULARJS
AngularJS is a framework that makes it easier to create web apps. In particular, it assists in creating apps that write, read, update, and delete data in a database on a server.
Angular is based on a software development approach called model view controller or MVC. (It is actually variant on MVC, not strict MVC). To use Angular, first you include the angular.js script in your page, and then it makes a set of tools available to you (just like jQuery does).
The point of MVC is that it separates out parts of a web application, in the same way that front-end developers should separate content (HTML), presentation (CSS), and behavior (JavaScript).
We do not have space to go into Angular in detail, but it introduces another example of a very different script with an API, as well as concepts such as the MVC approach, templating, and data binding. You can download Angular and view the full API at http://angularjs.org.

The View is what the user sees. In a web app, it is the HTML page. Angular lets you create templates with spaces for particular types of content. If the user changes values in the view, commands (1) are sent to up the chain to update the model.
There can be different views of the same data, e.g., users and administrators.
This ViewModel (or controller) will update the view if there are changes to the model, and will update the model if there are changes in the view. The task of keeping data synchronized between the two is known as data binding (2).
For example, if a form in the view is updated, it reflects the changes and updates the server.
In a web app, the Model is usually stored in the database, and managed by server-side code that can access and update the model.
When the model has been updated, change notifications (3) are sent to the ViewModel. This info can be passed onto the View to keep it updated.
USING ANGULAR
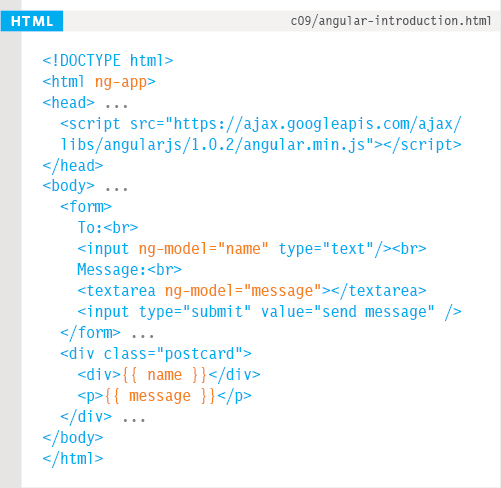
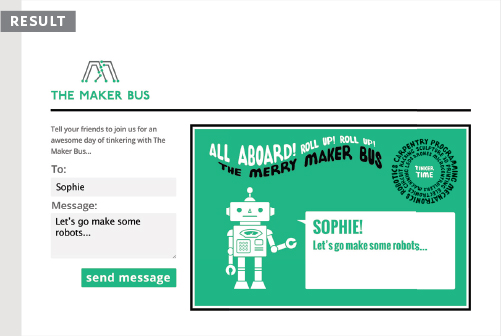
This example takes the content of the <input> and <textarea> elements and writes it into another part of the page (where you can see the double curly braces in the HTML file).
First, include the Angular script in your page. You can store it locally or use the version on Google's CDN. Until you understand more about Angular, place it in the <head> element.
Note the new markup in the HTML. There are attributes that start with ng- (which is short for Angular). These are called directives. There is one on the opening <html> tag and one on each of the form elements. The value of the ng-model attribute on the text inputs matches the values inside the double curly braces. Angular automatically takes the content of the form elements and writes it into the page where the corresponding curly braces are.
No more JavaScript is needed to achieve this, whereas in jQuery, this would involve four steps:
1. Writing an event handler for the form elements
2. Using that to trigger code to get the elements’ content
3. Selecting new element nodes that represent the postcard
4. Writing the data into the page
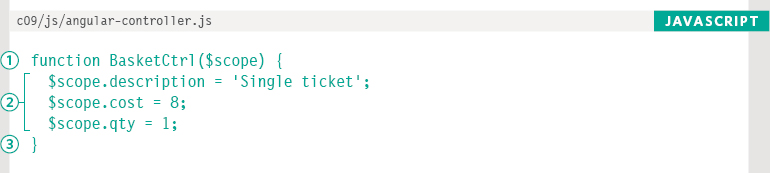
VIEW & VIEWMODEL
Below, look at the angular-controller.js file. It uses a a constructor function to create an object called BasketCtrl. This object is known as a controller or ViewModel. It is passed another object called $scope as an argument. Properties of the $scope object are set in the constructor function.
1. Note the object's name (BasketCtrl) matches the value of the ng-controller attribute on the opening <table> tag. In this example, there is no database, so the controller will also act as the model: sharing data with the view.
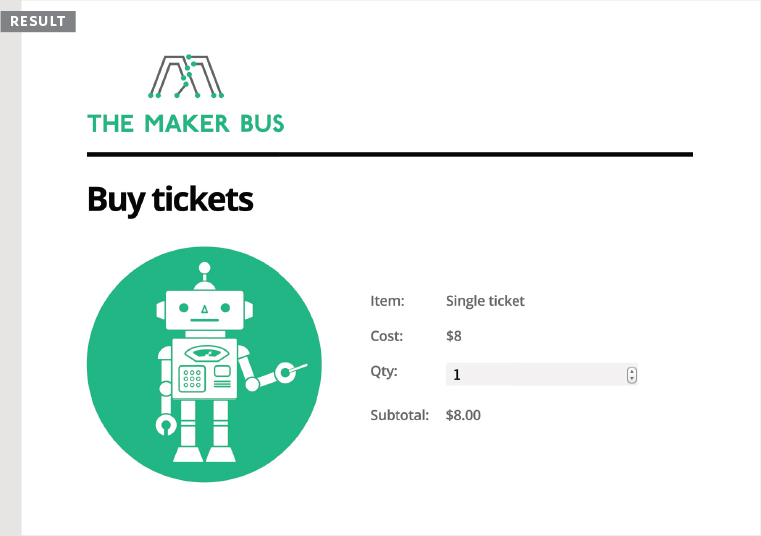
The HTML file (the view) gets its data from the BasketCtrl object in the JavaScript controller. In the HTML, note how the names in curly braces, e.g., {{ cost }} and {{ qty }}, match the properties of the $scope object in the JavaScript.
The HTML file is now called a template because it will display whatever data is in the corresponding controller. The names in curly braces are like variables that match the data in the object. If the JavaScript object had different values, the HTML would show those values.
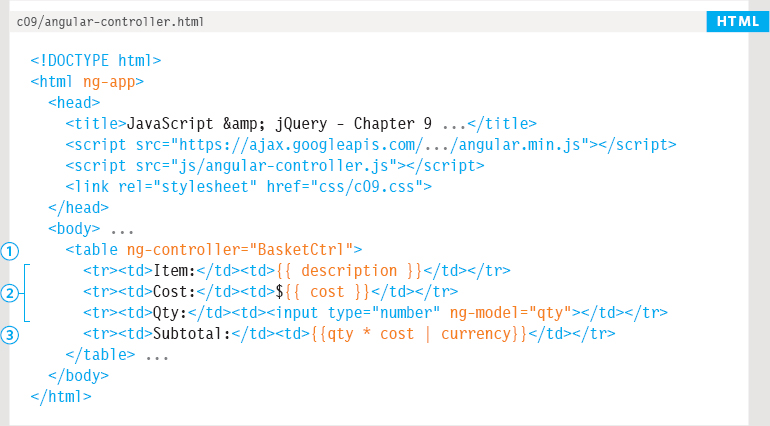
DATA BINDING & SCOPE
2. It is also possible to evaluate expressions inside the curly braces. In step 3, the subtotal is calculated in the template. This is then formatted as a currency. Furthermore, if you update the quantity in the form, the underlying data model (in the JavaScript object) is updated along with the subtotal. Try updating the values in the JavaScript file, then refreshing the HTML to see the connection. This is an example of something programmers call data binding; the data in the JavaScript file is bound to the HTML and vice-versa. If the ViewModel changes, the view updates. If the view changes, the ViewModel updates.
As this shows, Angular is particularly helpful when you load data from a separate file into the view. A page can have multiple controllers, each of which has its own scope. In the HTML, the ng-controller attribute is used on an element to define the scope of that controller. This is similar to variable scope. For example, a different element might have a different controller (e.g., StoreCtrl), and both controllers would be able to have a property called description. Because the scope is only within that element, each controller's description property would only be used within that controller's scope.
GETTING EXTERNAL DATA
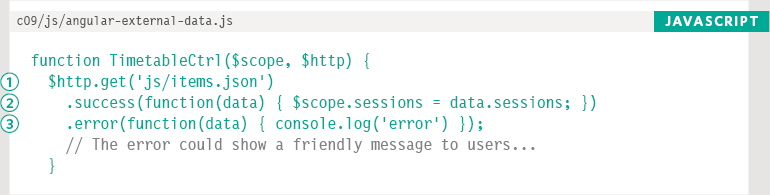
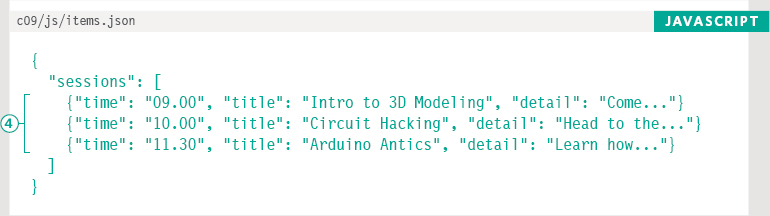
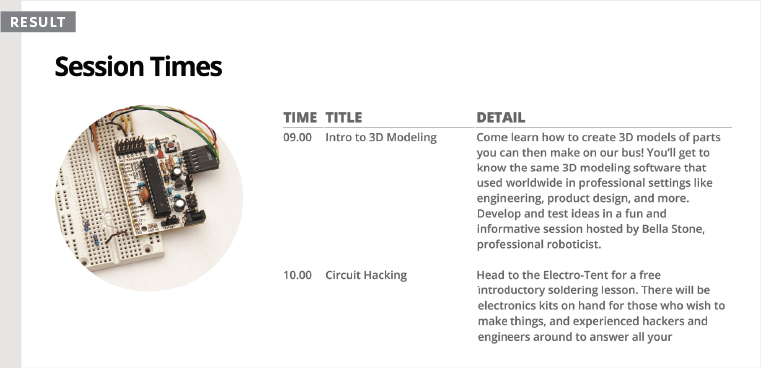
Here, the controller (the JavaScript file) collects the model (the JSON data) from a file on the server. (In a web app, the JSON data would usually come from a database.) This updates the view in the HTML.
To collect the data, Angular uses what it calls the $http service. Inside the angular.js file, the code uses the XMLHttpRequest object to make Ajax requests (like those you saw in Chapter 8).
1. The path to the JSON file is relative to the HTML template, not the JavaScript file (even though the path is written in the JavaScript).
Just like jQuery's .ajax() method, the $http service has several shortcuts to make it easier to create some requests. To fetch data it uses get(), post(), and jsonp(); to delete data it uses delete(); and to create new records: put(). This example uses get().
LOOP THROUGH RESULTS
2. If the request successfully fetches data, the code in the success() function runs. In this case, if it is successful the $scope object is passed the data from the JSON object. This allows the template to display the data.
3. If it fails, the error() function is run instead. This would to show an error message to users. Here it writes to the console (which you meet on p464).
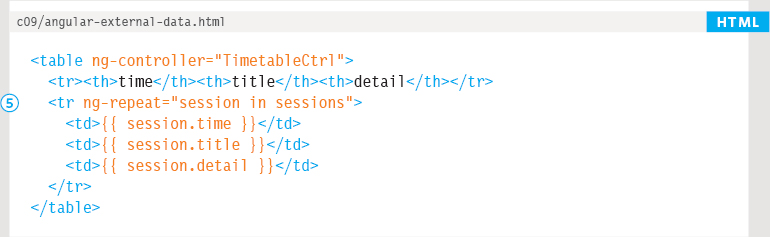
4. The JSON data contains several objects, each of which is displayed in the page. Note, there is no JavaScript loop written in the controller. Instead, the HTML template (or view) is where the loop occurs.
5. The ng-repeat directive on the opening <tr> tag indicates that the table row should act like a loop. It should go through each object in the sessions array and create a new table row for each of them.
In the HTML, the value of the ng-repeat directive is: session in sessions
- sessions matches the JSON data; it corresponds with the object name.
- session is the identifier used in the template to indicate the name of each individual object within the sessions object.
If the ng-repeat attribute used different names than session, the value in the curly braces in the HTML would have to change to reflect that name. For example, if it said lecture in sessions, then the curly braces would change to reflect that:
{{ lecture.time }}, {{ lecture.title }}, etc.
This is just a very high-level introduction to Angular, but does demonstrate some popular techniques when using JavaScript to develop web apps, such as:
- The use of templates that take content from JavaScript and update the HTML page.
- The rise in MVC-influenced frameworks for web-based application development.
- The use of libraries to save developers having to write so much code.
For more on Angular, see http://angularjs.org
Another very popular alternative is Backbone http://backbonejs.org
PLATFORM APIS
Many large websites expose their APIs that allow you to access and update the data on their sites, including Facebook, Google, and Twitter.
WHAT YOU CAN DO
Each site offers different capabilities, for example:
- Facebook offers features such as allowing people to like sites or add comments and discussion to the bottom of a web page.
- Google Maps lets you to include various types of maps in your pages.
- Twitter allows you to display your latest tweets on your web pages or send new tweets.
By exposing some of the functionality of their platforms these companies are advertising their sites and encouraging people back to them. This in turn increase their total amount of activity (and their revenue).
Be aware that companies can change either how you access APIs or change what you are allowed to use the APIs for.
HOW TO ACCESS
On the web, you can access several of these platform APIs by including a script they provide in your page. That script will typically create an object (just like the jQuery script adds a jQuery object). In turn, that object will have methods and properties that you can use to access (and sometimes update) the data on that platform.
Most sites that offer an API will also provide documentation that explains how to use its objects, methods, and properties (along with some basic examples).
Some of the larger sites provide pages where you can get code that you can copy and paste into your site without even needing to understand the API.
Facebook, Google, and Twitter have all made changes to both how you access their APIs and what you can use them for.
THE SYNTAX
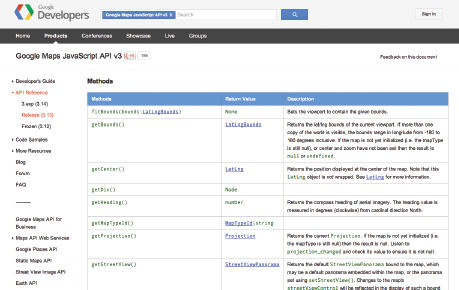
The syntax of an API will vary from platform to platform. But they will be documented using tables of objects, methods, and properties like those you saw in the first section of this chapter. You may also see sample code that demonstrates tasks people commonly use the API for (like the examples you have seen in this chapter).
Some platforms offer APIs in multiple languages, so that you can interact with them using server-side languages such as PHP / C# as well as using JavaScript.
In the rest of this chapter we will be focusing on the Google Maps API as an example of what you can do with platform APIs.
If you work on a site for a client, make them aware that APIs can change (and that could result in recoding pages that use them).
GOOGLE MAPS API
Currently, one of the most popular APIs in use on the web is the Google Maps API, which allows you to add maps to web pages.
WHAT IT DOES
The Google Maps JavaScript API allows you to show Google maps in your web pages. It also allows you to customize the look of the maps and what information is shown on them.
You may find it helpful to look at the documentation for the Google Maps API while going through this example. It will show you other things that you can do with the API. https://developers.google.com/maps/
WHAT YOU'LL SEE
We only have space to show a few of the features of the Google Maps API, as it is very powerful and contains a lot of advanced features. But the examples in this chapter will get you used to working with its API.
You will start by seeing how to add a map to your web pages, then you will see how to change the controls, and finally how to change the colors and add markers on top of the map.
API KEY
Some APIs require that you register and request an API key in order to get data from their servers. An API key is a set of letters and numbers that uniquely identify you to the application so the owners of the site can track how much you use the API and what you use it for.
At the time of writing, Google allowed websites to call their maps API 25,000 times per day for free without an API key, but sites that consistently make more requests are required to use a key and pay for the service.
If you run a busy site, or the map is part of the core application, it is good practice to use an API key with Google Maps because:
- You can see how many times your site requests the API
- Google can contact you if they change terms of service or charge for use
To get a Google API key, see https://cloud.google.com/console
BASIC MAP SETTINGS
Once you have included the Google Maps script in your page, you can use their maps object. It lets you display Google maps in your pages.
CREATING A MAP
The maps object is stored within an object called google. This creates scope for all Google objects.
To add a map to your page, you create a new map object using a constructor: Map(). The constructor is part of the maps object, and it has two parameters:
- The element into which you want the map drawn
- A set of map options that control how it is displayed given using object literal notation
Zoom level is typically set using a number between 0 (the full earth) and 16. (Some cities can go higher.)

MAP OPTIONS
The settings that control how the map should look are stored inside another JavaScript object called mapOptions. It is created as an object literal before you call the Map() constructor. In the JavaScript on the right, you can see that the mapOptions object uses three pieces of data:
- Longitude and latitude of the center of the map
- The zoom level for the map
- The type of map data you want to show
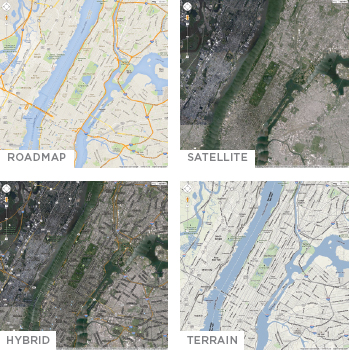
The images that make up the map are called tiles. Four map types each show a different style of map.
A BASIC GOOGLE MAP

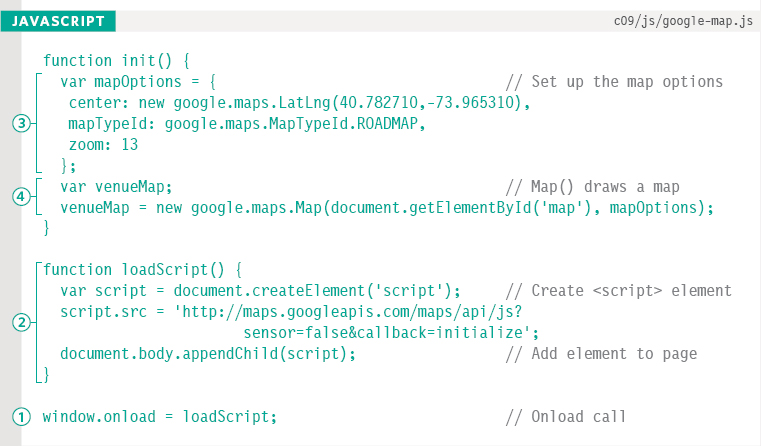
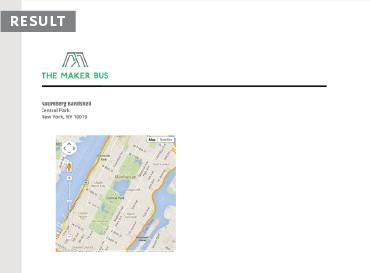
1. Starting at the bottom of the script, when the page has loaded, the onload event will call the loadScript() function.
2. loadScript() creates a <script> element to load the Google Maps API. When it has loaded, it calls init(), to initialize the map.
3. init() loads the map into the HTML page. First it creates a mapOptions object with three properties.
4. Then it uses the Map() constructor to create a map and draw the map into the page. The constructor takes two parameters:
- The element that the map will appear inside
- The mapOptions object
CHANGING CONTROLS
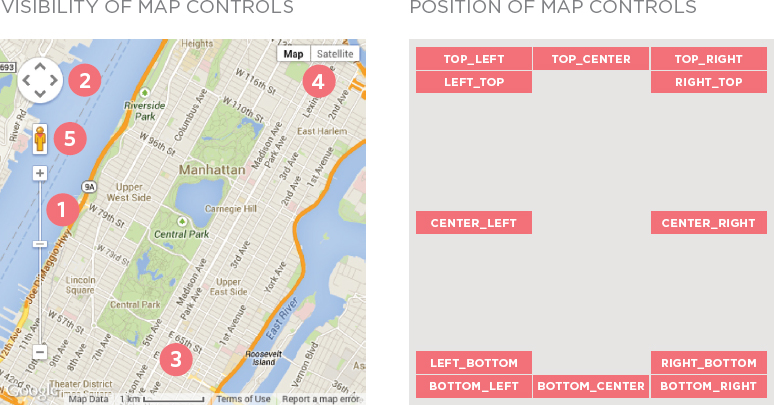
To show or hide the controls, use the control name followed by a value of true (to show it) or false (to hide it). Although Google Maps tries to prevent overlaps, use judgement to position controls on your map.

GOOGLE MAP WITH CUSTOM CONTROLS
APPEARANCE OF CONTROLS
To alter the appearance and position of map controls, you add to the mapOptions object.
1. To show or hide a control, the key is the name of the control, and the value is a Boolean (true will show the control; false will hide it).
POSITION OF THE CONTROL
2. Each control has its own options object used to control its style and position. The word Options follows the control name, e.g., zoomControlOptions. Styles are discussed below. The diagram on the left-hand page shows options for the position property.
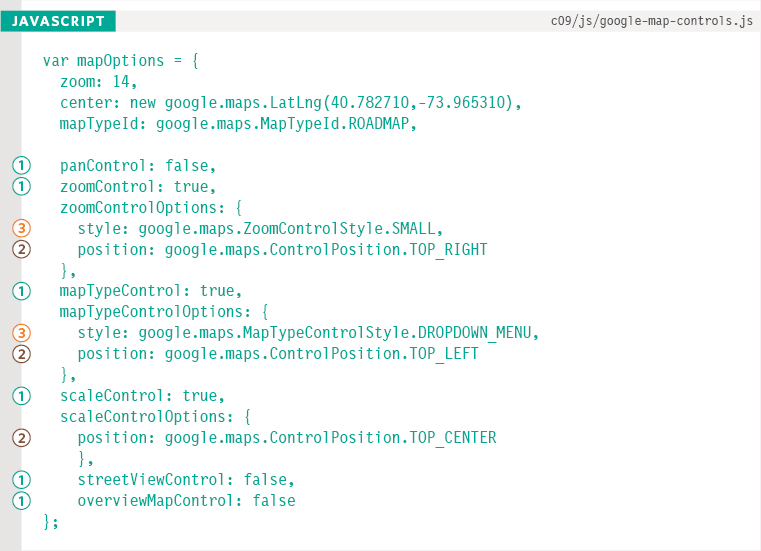
STYLE OF MAP CONTROLS
3. You can change the appearance of the zoom and map type controls using the following options:
| zoomControlStyle: | |
| SMALL | Small +/- buttons |
| LARGE | Vertical slider |
| DEFAULT | The default for that device |
| MapTypeControlStyle: | |
| HORIZONTAL_BAR | Buttons side-by-side |
| DROPDOWN_MENU | Dropdown select box |
| DEFAULT | The default for that device |
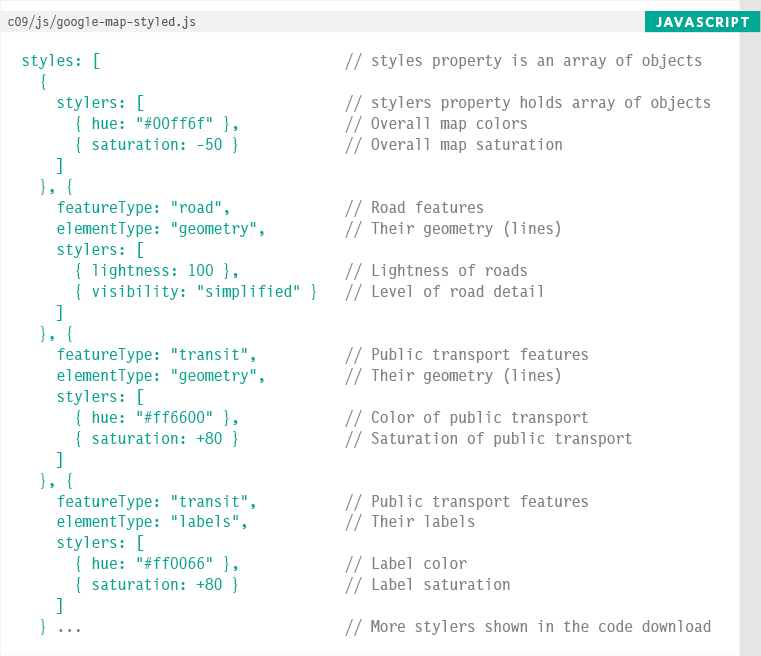
STYLING A GOOGLE MAP
To style the map you need to specify three things:
- featureTypes: the map feature you want to style: e.g., roads, parks, waterways, public transport.
- elementTypes: the part of that feature you want to style, such as its geometry (shapes) or labels.
- stylers: properties that allow you to adjust the color or visibility of items on the map.
The styles property in the mapOptions object sets the map style. It's value is an array of objects. Each object affects a different feature fo the map.
The first stylers property alters the colors of the map as a whole. It, too, contains an array of objects.
- hue property adjusts color, its value is a hex code
- lightness or saturation can take a value from -100 to 100
Then each feature that shows up on the map can have its own object, and its own stylers property. In it, the visibility property can have three values:
- on to show the feature type
- off to hide it
- simplified to show a more basic version
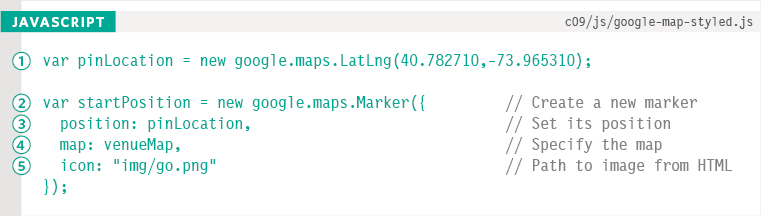
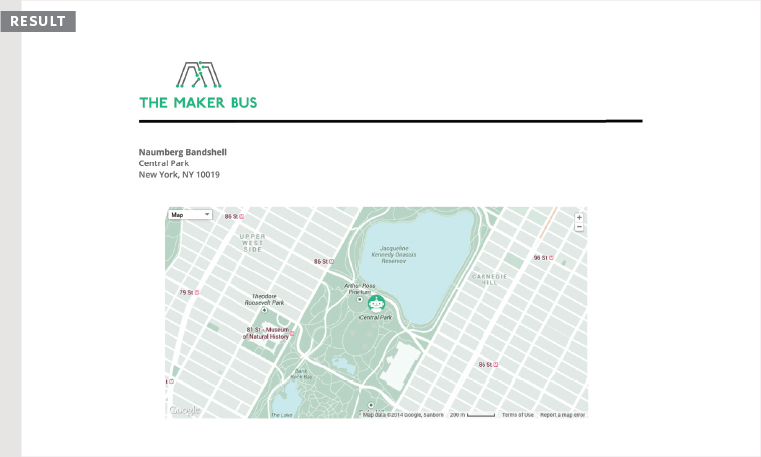
ADDING MARKERS
Here you can see how to add a marker to a map. The map has been created, and its name is venueMap.
1. Create a LatLng object to store the position of the marker using object constructor syntax. Below that object is called pinLocation.
2. The Marker() constructor creates a marker object. It has one parameter: an object that contains settings using object literal notation.
The settings object contains three properties:
3. position is the object storing the location of the marker (pinLocation).
4. map is the map that the marker should be added to (because a page can have more than one map).
5. icon is the path to the image that should be displayed as the marker on the map (this should be provided relative to the HTML page).
SUMMARY
- APIs are used in browsers, scripts, and by websites that share functionality with other programs or sites.
- APIs let you write code that will make a request, asking another program or script to do something.
- APIs also specify the format in which the response will be given (so that the response can be understood).
- To use an API on your website, you will need to include a script in the relevant web pages.
- An API's documentation will usually feature tables of objects, methods, and properties.
- Providing you know how to create an object and call its methods, access its properties, and respond to its events, you should be able to learn any JavaScript API.