

WHAT IS JQUERY?
jQuery is a JavaScript file that you include in your web pages. It lets you find elements using CSS-style selectors and then do something with the elements using jQuery methods.
1: FIND ELEMENTS USING CSS-STYLE SELECTORS
A function called jQuery() lets you find one or more elements in the page. It creates an object called jQuery which holds references to those elements. $() is often used as a shorthand to save typing jQuery(), as shown here.
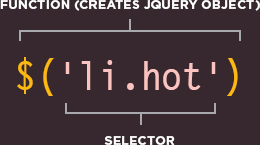
The jQuery() function has one parameter: a CSS-style selector. This selector finds all of the <li> elements with a class of hot.
SIMILARITIES TO DOM
- jQuery selectors perform a similar task to traditional DOM queries, but the syntax is much simpler.
- You can store the jQuery object in a variable, just as you can with DOM nodes.
- You can use jQuery methods and properties (like DOM methods and properties) to manipulate the DOM nodes that you select.
The jQuery object has many methods that you can use to work with the elements you select. The methods represent tasks that you commonly need to perform with elements.
2: DO SOMETHING WITH THE ELEMENTS USING JQUERY METHODS
Here a jQuery object is created by the jQuery() function. The object and the elements it contains is referred to as a matched set or a jQuery selection.
You can then use the methods of the jQuery object to update the elements that it contains. Here, the method adds a new value to the class attribute.
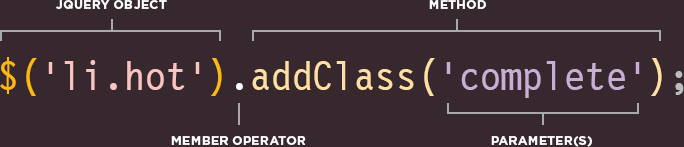
The member operator indicates that the method on the right should be used to update the elements in the jQuery object on the left.
Each method has parameter(s) that provide details about how to update the elements. This parameter specifies a value to add to the class attribute.
KEY DIFFERENCES FROM DOM
- It's cross-browser, and there's no need to write fallback code.
- Selecting elements is simpler (because it uses CSS-style syntax) and is more accurate.
- Event handling is simpler as it uses one method that works in all major browsers.
- Methods affect all the selected elements without the need to loop through each one (see p310).
- Additional methods are provided for popular required tasks such as animation (see p332).
- Once you have made a selection, you can apply multiple methods to it.
A BASIC JQUERY EXAMPLE
The examples in this chapter revisit the list application used in the previous two chapters, and they will use jQuery to update the content of the page.
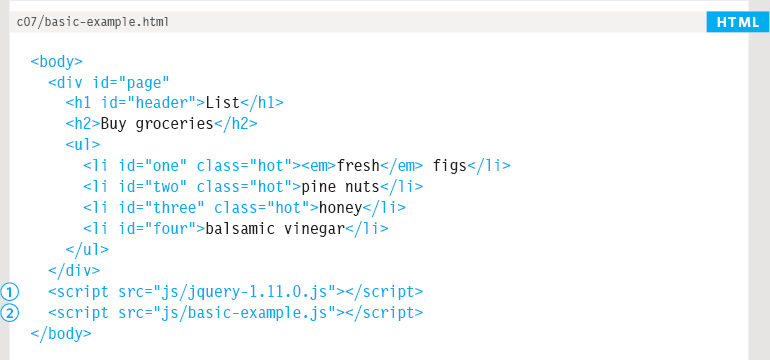
1. In order to use jQuery, the first thing you need to do is include the jQuery script in your page. You can see that it is included before the closing </body> tag.
2. Once jQuery has been added to the page, a second JavaScript file is included that uses jQuery selectors and methods to update the content of the HTML page.
WHERE TO GET JQUERY AND WHICH VERSION TO USE
Above, jQuery is included before the closing </body> tag just like other scripts. (Another way to include the script is shown on p355.) A copy of jQuery is included with the code for this book, or you can download it from http://jquery.org. The version number of jQuery should be kept in the file name. Here, it is jquery-1.11.0.js, but by the time you read this book, there may be a newer version. The examples should still work with newer versions.
You often see websites use a version of the jQuery file with the file extension .min.js. It means unnecessary spaces and carriage returns have been stripped from the file. e.g., jquery-1.11.0.js becomes jquery-1.11.0.min.js.
It is done using a process called minification (hence min is used in the file name). The result is a much smaller file which makes it faster to download. But minified files are much harder to read.
If you want to look at the jQuery file, you can open it with a text editor - it is just text like JavaScript, albeit very complicated JavaScript.
Most people who use jQuery do not try to understand how the jQuery JavaScript file achieves what it does. As long as you know how to select elements and how to use its methods and properties, you can reap the benefits of using jQuery without looking under the hood.
Here, the JavaScript file uses the $() shortcut for the jQuery() function. It selects elements and creates three jQuery objects that hold references to the elements.
The methods of the jQuery object fade the list items in, and remove them when they are clicked on. Don't worry if you don't understand the code yet.
First, you will learn how to select elements using jQuery selectors, and then how to update those elements using the methods and properties of the jQuery object.
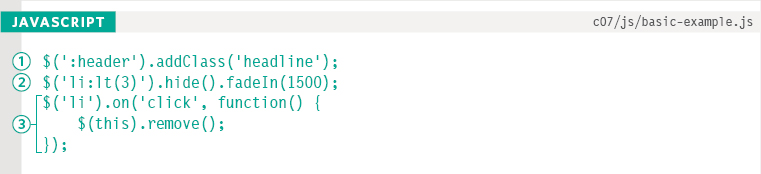
1. The first line selects all of the <h1> - <h6> headings, and adds a value of headline to their class attributes.
2. The second line selects the first three list items and does two things:
- The elements are hidden (in order to allow the next step).
- The elements fade into view.
3. The last three lines of the script set an event listener on each of the <li> elements. When a user clicks on one, it triggers an anonymous function to remove that element from the page.

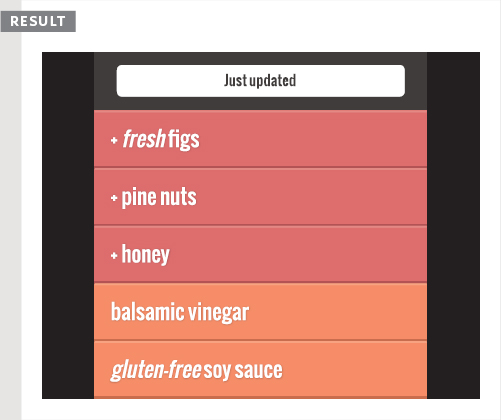
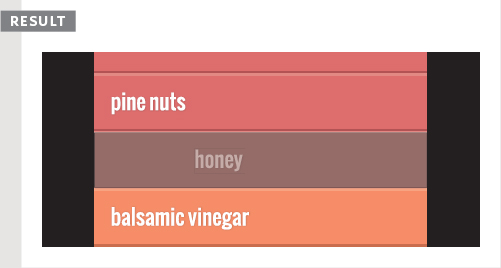
Here is a reminder of the colors used to convey the priority and status of each list item:
![]()
WHY USE JQUERY?
jQuery doesn't do anything you cannot achieve with pure JavaScript. It is just a JavaScript file but estimates show it has been used on over a quarter of the sites on the web, because it makes coding simpler.
1: SIMPLE SELECTORS
As you saw in Chapter 5, which introduced the DOM, it is not always easy to select the elements that you want to. For example:
- Older browsers do not support the latest methods for selecting elements.
- IE does not treat whitespace between elements as text nodes, while other browsers do.
Such issues make it hard to select the right elements on a page across all major browsers.
Rather than learn a new way to select elements, jQuery uses a language that is already familiar to front-end web developers: CSS selectors. They:
- Are much faster at selecting elements
- Can be a lot more accurate about which elements to select
- Often require a lot less code than older DOM methods
- Are already used by most front-end developers
jQuery even adds some extra CSS-style selectors which offer additional functionality.
Since jQuery was created, modern browsers have implemented the querySelector() and querySelectorAll() methods to let developers select elements using CSS syntax. However, these methods are not supported in older browsers.
2: COMMON TASKS IN LESS CODE
There are some tasks that front-end developers need to do regularly, such as loop through the elements that have been selected.
jQuery has methods that offer web developers simpler ways to perform common tasks, such as:
- Loop through elements
- Add / remove elements from the DOM tree
- Handle events
- Fade elements into / out of view
- Handle Ajax requests
jQuery simplifies each of these tasks, and allows you to write less code to achieve them.
jQuery also offers chaining of methods (a technique which you will meet on p311). Once you have selected some elements, this allows you to apply multiple methods to the same selection.
jQuery's motto is “Write less, do more,” because it allows you to achieve the same goals but in fewer lines of code than you would need to write with plain JavaScript.
3: CROSS-BROWSER COMPATIBILITY
jQuery automatically handles the inconsistent ways in which browsers select elements and handle events, so you do not need to write cross-browser fallback code (such as that shown in the previous two chapters).
To do this, jQuery uses feature detection to find the best way to achieve a task. It involves the use of many conditional statements: if the browser supports the ideal way to achieve a task, it uses that approach; otherwise, it tests to see if it supports the next best option to achieve the same task.
This was the technique used in the last chapter to determine whether or not the browser supported event listeners. If event listeners were not supported, an alternative approach was offered (aimed at users of Internet Explorer 8 and older versions of IE).
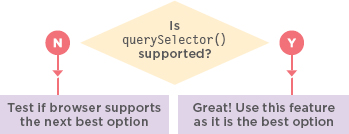
Here, a conditional statement checks if the browser supports querySelector(). If it does, that method is used. If it doesn't, it checks to see if the next best option is supported and uses that instead.
JQUERY 1.9.X+ OR 2.0.X+
As jQuery developed, it built up a lot of code to support IE6, 7, and 8; which made the script bigger and more complicated. As version 2.0 of jQuery was approaching, the development team decided to create a version that would drop support for older browsers in order to create a smaller, faster script.
The jQuery team was, however, aware that many people on the web still used these older browsers, and that developers therefore needed to support them. For this reason, they now maintain two parallel versions of jQuery:
jQuery 1.9+: Encompasses the same features as 2.0.x but still offers support for IE6, 7, and 8
jQuery 2.0+: Drops support for older browsers to make the script smaller and faster to use
The functionality of both versions is not expected to diverge significantly in the short term.
The jQuery file name should contain the version number in it (e.g., jquery-1.11.0.js or jquery-1.11.0.min.js). If you don't do this, a user's browser might try to use a cached version of the file that is either older or newer - which could prevent other scripts from working correctly.
FINDING ELEMENTS
Using jQuery, you usually select elements using CSS-style selectors. It also offers some extra selectors, noted below with a ‘jQ’.
Examples of using these selectors are demonstrated throughout the chapter. The syntax will be familiar to those who have used selectors in CSS.
BASIC SELECTORS
| * | All elements |
| element | All elements with that element name |
| #id | Elements whose id attribute has the value specified |
| .class | Elements whose class attribute has the value specified |
| selector1, selector2 | Elements that match more than one selector (see also the .add() method, which is more efficient when combining selections) |
HIERARCHY
| ancestor descendant | An element that is a descendant of another element (e.g., li a) |
| parent > child | An element that is a direct child of another element (you can use * in the place of the child to select all child elements of the specified parent) |
| previous + next | Adjacent sibling selector only selects elements that are immediately followed by the previous element |
| previous ~ siblings | Sibling selector will select any elements that are a sibling of the previous element |
BASIC FILTERS
| :not(selector) | All elements except the one in the selector (e.g., div:not(‘#summary’)) |
| :first | jQ The first element from the selection |
| :last | jQ The last element from the selection |
| :even | jQ Elements with an even index number in the selection |
| :odd | jQ Elements with an odd index number in the selection |
| :eq(index) | jQ Elements with an index number equal to the one in the parameter |
| :gt(index) | jQ Elements with an index number greater than the parameter |
| :lt(index) | jQ Elements with an index number less than the parameter |
| :header | jQ All <h1> - <h6> elements |
| :animated | jQ Elements that are currently being animated |
| :focus | The element that currently has focus |
CONTENT FILTERS
VISIBILITY FILTERS
| :hidden | jQ All elements that are hidden |
| :visible | jQ All elements that consume space in the layout of the page Not selected if: display: none; height / width: 0; ancestor is hidden Selected if: visibility: hidden; opacity: 0 because they would take up space in layout |
CHILD FILTERS
| :nth-child(expr) | The value here is not zero-based e.g. ul li:nth-child(2) |
| :first-child | First child from the current selection |
| :last-child | Last child from the current selection |
| :only-child | When there is only one child of the element (div p:only-child) |
ATTRIBUTE FILTERS
| [attribute] | Elements that carry the specified attribute (with any value) |
| [attribute=‘value’] | Elements that carry the specified attribute with the specified value |
| [attribute!=‘value’] | jQ Elements that carry the specified attribute but not the specified value |
| [attribute^=‘value’] | The value of the attribute begins with this value |
| [attribute=‘value’] | The value of the attribute ends with this value |
| [attribute*=‘value’] | The value should appear somewhere in the attribute value |
| [attribute|=‘value’] | Equal to given string, or starting with string and followed by a hyphen |
| [attribute~=‘value’] | The value should be one of the values in a space separated list |
| [attribute][attribute2] | Elements that match all of the selectors |
FORM
| :input | jQ All input elements |
| :text | jQ All text inputs |
| :password | jQ All password inputs |
| :radio | jQ All radio buttons |
| :checkbox | jQ All checkboxes |
| :submit | jQ All submit buttons |
| :image | jQ All <img> elements |
| :reset | jQ All reset buttons |
| :button | jQ All <button> elements |
| :file | jQ All file inputs |
| :selected | jQ All selected items from drop-down lists |
| :enabled | All enabled form elements (the default for all form elements) |
| :disabled | All disabled form elements (using the CSS disabled property) |
| :checked | All checked radio buttons or checkboxes |
DOING THINGS WITH YOUR SELECTION
Once you have seen the basics of how jQuery works, most of this chapter is dedicated to demonstrating these methods.
These two pages both offer an overview to the jQuery methods and will also help you find the methods you are looking for once you have read the chapter.
You often see jQuery method names written starting with a period (.) before the name. This convention is used in this book to help you easily identify those methods as being jQuery methods rather than built-in JavaScript methods, or methods of custom objects.
When you make a selection, the jQuery object that is created has a property called length, which will return the number of elements in the object.
If the jQuery selection did not find any matching elements, you will not get an error by calling any of these methods - they just won't do or return anything.
There are also methods that are specifically designed to work with Ajax (which lets you refresh part of the page rather than an entire page) shown in Chapter 8.
CONTENT FILTERS
Get or change content of elements, attributes, text nodes
GET/CHANGE CONTENT
| .html() | p316 |
| .text() | p316 |
| .replaceWith() | p316 |
| .remove() | p316 |
ELEMENTS
| .before() | p318 |
| .after() | p318 |
| .prepend() | p318 |
| .append() | p318 |
| .remove() | p346 |
| .clone() | p346 |
| .unwrap() | p346 |
| .detach() | p346 |
| .empty() | p346 |
| .add() | p338 |
ATTRIBUTES
| .attr() | p320 |
| .removeAttr() | p320 |
| .addClass() | p320 |
| .removeClass() | p320 |
| .css() | p322 |
FORM VALUES
| .val() | p343 |
| .isNumeric() | p343 |
FINDING ELEMENTS
Find and select elements to work with & traverse the DOM
GENERAL
| .find() | p336 |
| .closest() | p336 |
| .parent() | p336 |
| .parents() | p336 |
| .children() | p336 |
| .siblings() | p336 |
| .next() | p336 |
| .nextAll() | p336 |
| .prev() | p336 |
| .prevAll() | p336 |
FILTER/TEST
| .filter() | p338 |
| .not() | p338 |
| .has() | p338 |
| .is() | p338 |
| :contains() | p338 |
ORDER IN SELECTION
| .eq() | p340 |
| .lt() | p340 |
| .gt() | p340 |
Once you have selected the elements you want to work with (and they are in a jQuery object), the jQuery methods listed on these two pages perform tasks on those elements.
DIMENSION/POSITION
Get or update the dimensions or position of a box
DIMENSION
| .height() | p348 |
| .width() | p348 |
| .innerHeight() | p348 |
| .innerWidth() | p348 |
| .outerHeight() | p348 |
| .outerWidth() | p348 |
| $(document).height() | p350 |
| $(document).width() | p350 |
| $(window).height() | p350 |
| $(window).width() | p350 |
POSITION
| .offset() | p351 |
| .position() | p351 |
| .scrollLeft() | p350 |
| .scrollTop() | p350 |
EFFECTS & ANIMATION
Add effects and animation to parts of the page
BASIC
| .show() | p332 |
| .hide() | p332 |
| .toggle() | p332 |
FADING
| .fadeIn() | p332 |
| .fadeOut() | p332 |
| .fadeTo() | p332 |
| .fadeToggle() | p332 |
SLIDING
| .slideDown() | p332 |
| .slideUp() | p332 |
| .slideToggle() | p332 |
CUSTOM
| .delay() | p332 |
| .stop() | p332 |
| .animate() | p332 |
EVENTS
Create event listeners for each element in the selection
DOCUMENT/FILE
| .ready() | p312 |
| .load() | p313 |
USER INTERACTION
| .on() | p326 |
There used to be methods for individual types of event, so you may see methods such as .click(), .hover(), .submit(). However, these have been dropped in favour of the .on() method to handle events.
A MATCHED SET / JQUERY SELECTION
When you select one or more elements, a jQuery object is returned. It is also known as a matched set or a jquery selection.
SINGLE ELEMENT
If a selector returns one element, the jQuery object contains a reference to just one element node.
![]()
This selector picks the <ul> element from the page. So the jQuery object contains a reference to just one node (the only <ul> element in the page):
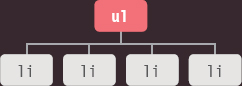
Each element is given an index number. Here there is just one element in the object.
| INDEX | ELEMENT NODE |
| 0 | ul |
MULTIPLE ELEMENTS
If a selector returns several elements, the jQuery object contains references to each element.
![]()
This selector picks all the <li> elements. Here, the jQuery object has references for each of the nodes that was selected (each <li> element):
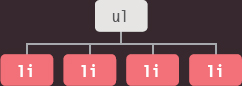
The resulting jQuery object contains four list items. Remember that index numbers start at zero.
| INDEX | ELEMENT NODE |
| 0 | li#one.hot |
| 1 | li#two.hot |
| 2 | li#three.hot |
| 3 | li#four |
JQUERY METHODS THAT GET AND SET DATA
Some jQuery methods both retrieve information from, and update the contents of, elements. But they do not always apply to all elements.
GET INFORMATION
If a jQuery selection holds more than one element, and a method is used to get information from the selected elements, it will retrieve information from only the first element in the matched set.
In the list example we have been using, the following selector chooses the four <li> elements from a list.
![]()
When you use the .html() method (which will be introduced on p316) to get information from an element, it will return the content of the first element in the matched set.
![]()
This will retrieve the content of the first list item, and store it in the variable called content.
To get a different element, you can use methods to traverse (p336) or filter (p338) the selection, or write a more specific selector (p302).
To get the content of all of the elements, see the .each() method (p324).
SET INFORMATION
If a jQuery selection holds more than one element, and a method is used to update information on the page, it will update all of the elements in the matched set, not just the first one.

When you use the .html() method (which you meet on p316) to update the element, it will replace the contents of each element in the matched set. Here, it updates the content of each item in the list.
![]()
This will update the content of all of the list items in the matched set with the word Updated.
To update just one element, you can use methods to traverse (p336) or filter (p338) the selection, or write a more specific selector (p302).
JQUERY OBJECTS STORE REFERENCES TO ELEMENTS
When you create a selection with jQuery, it stores a reference to the corresponding nodes in the DOM tree. It does not create copies of them.
As you have seen, when HTML pages load, the browser creates a model of the page in memory. Imagine your browser's memory is a set of tiles:
| Nodes in the DOM take up a tile | |
| Variables take up a tile | |
| Complex JavaScript objects may take several tiles because they hold more data |
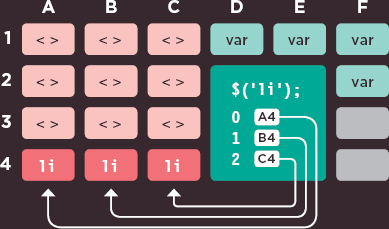
In reality, the items in the browser's memory are not spread out as they are in this diagram, but the diagram helps explain the concept.
When you create a jQuery selection, the jQuery object holds references to the elements in the DOM - it does not create a copy of them.
When programmers say that a variable or object is storing a reference to something, what it is doing is storing the location a piece of information in the browser's memory. Here, the jQuery object would know that the list items are stored in A4, B4, and C4. Again, this is purely for illustration purposes; the browser's memory is not quite as simple as a checkerboard with these locations.
The jQuery object is an array-like object because it stores a list of the elements in the same order that they appear in the HTML document (unlike other objects where the order of the properties is not usually preserved).
CACHING JQUERY SELECTIONS IN VARIABLES
A jQuery object stores references to elements.
Caching a jQuery object stores a reference to it in a variable.
To create a jQuery object takes time, processing resources, and memory. The interpreter must:
- Find the matching nodes in the DOM tree
- Create the jQuery object
- Store references to the nodes in the jQuery object
So, if the code needs to use the same selection more than once, it is better to use that same jQuery object again rather than repeat the above process. To do this, you store a reference to the jQuery object in a variable.
Below, a jQuery object is created. It stores the locations of the <li> elements in the DOM tree.
$(‘li’);
A reference to this object is in turn stored in a variable called $listItems. Note that when a variable contains a jQuery object, it is often given a name beginning with the $ symbol (to help differentiate it from other variables in your script).
$listItems = $(‘li’);

Caching jQuery selections is similar to the idea of storing a reference to a DOM node once you have made a DOM query (as you saw in Chapter 5).
LOOPING
In plain JavaScript, if you wanted to do the same thing to several elements, you would need to write code to loop through all of the elements you selected.
With jQuery, when a selector returns multiple elements, you can update all of them using the one method. There is no need to use a loop.
In this code, the same value is added to the class attribute for all of the elements that are found using the selector. It doesn't matter if there are one or many.

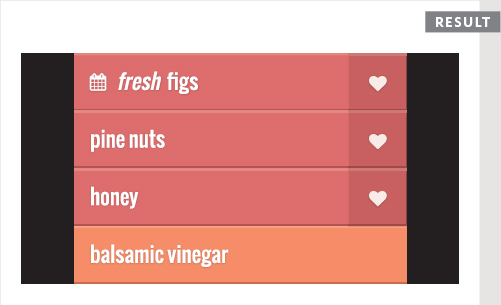
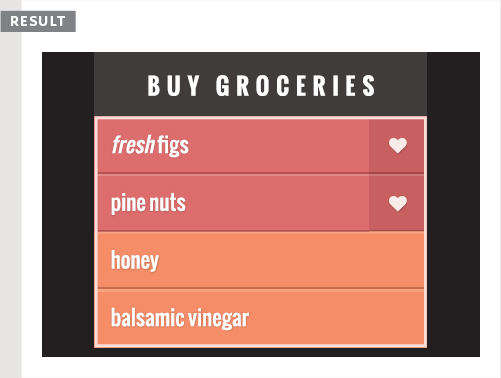
In this example, the first selector applies only to one element and the class attribute's new value triggers a CSS rule that adds a calendar icon to the left of it.
The second selector applies to three elements. The new value added to the class attribute for each of these elements triggers a CSS rule that adds a heart icon on the right-hand side.
The ability to update all of the elements in the jQuery selection is known as implicit iteration.
When you want to get information from a series of elements, you can use the .each() method (which you meet on p324) rather than writing a loop.
CHAINING
If you want to use more than one jQuery method on the same selection of elements, you can list several methods at a time using dot notation to separate each one, as shown below.
In this one statement, three methods act on the same selection of elements: hide() hides the elements delay() creates a pause fadeIn() fades in the elements
The process of placing several methods in the same selector is referred to as chaining. As you can see, it results in code that is far more compact.

To make your code easier to read, you can place each new method on a new line:
$(‘li[id!=”one”]’)
  .hide()
  .delay(500)
  .fadeIn(1400);
Each line starts with the dot notation, and the semicolon at the end of the statement indicates that you have finished working with this selection.
Most methods used to update the jQuery selection can be chained. However the methods that retrieve information from the DOM (or about the browser) cannot be chained.
It is worth noting that if one method in the chain does not work, the rest will not run either.
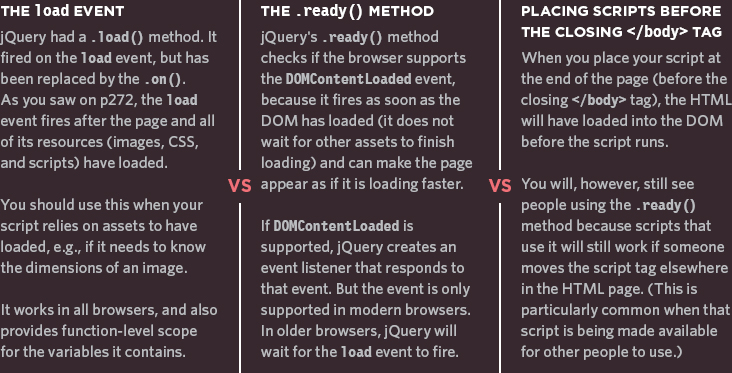
CHECKING A PAGE IS READY TO WORK WITH
jQuery's .ready() method checks that the page is ready for your code to work with.

As with plain JavaScript, if the browser has not yet constructed the DOM tree, jQuery will not be able to select elements from it.
If you place a script at the end of the page (just before the closing </body> tag), the elements will be loaded into the DOM tree.
If you wrap your jQuery code in the method above, it will still work when used elsewhere on the page or even in another file.
A shorthand for this is shown on the right-hand page. It is more commonly used than this longer version.
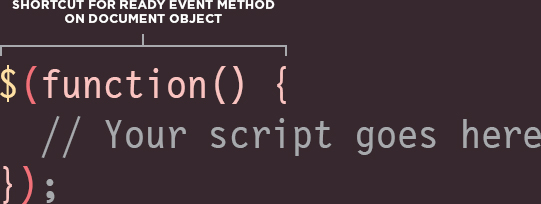
Above, you can see the shorthand that is commonly used instead of $(document).ready()
A positive side-effect of writing jQuery code inside this method is that it creates function-level scope for its variables.
This function-level scope prevents naming collisions with other scripts that might use the same variable names.
Any statements inside the method automatically run when the page has loaded. This is the version that will be used in the examples in the rest of the chapter.
GETTING ELEMENT CONTENT
The .html() and .text() methods both retrieve and update the content of elements. This page will focus on how to retrieve element content. To learn how to update element content, see p316.
.html()
When this method is used to retrieve information from a jQuery selection, it retrieves only the HTML inside the first element in the matched set, along with any of its descendants.
For example, $(‘ul’).html(); will return this:
<li id=”one”><em>fresh</em> figs</li>
<li id=”two”>pine nuts</li>
<li id=”three”>honey</li>
<li id=”four”>balsamic vinegar</li>
Whereas $(‘li’).html(); will return this:
<em>fresh</em> figs
Note how this returns only the content of the first <li> element.
If you want to retrieve the value of every element, you can use the .each() method (see p324).
.text()
When this method is used to retrieve the text from a jQuery selection, it returns the content from every element in the jQuery selection, along with the text from any descendants.
For example, $(‘ul’).text(); will return this:
fresh figs
pine nuts
honey
balsamic vinegar
Whereas $(‘li’).text(); will return this:
fresh figspine nutshoneybalsamic vinegar
Note how this returns the text content of all <li> elements (including spaces between words), but there are no spaces between the individual list items.
To get the content from <input> or <textarea> elements, use the .val() method shown on p343.
GETTING AT CONTENT
On this page you can see variations on how the .html() and .text() methods are used on the same list (depending on whether <ul> or <li> elements are used in the selector).
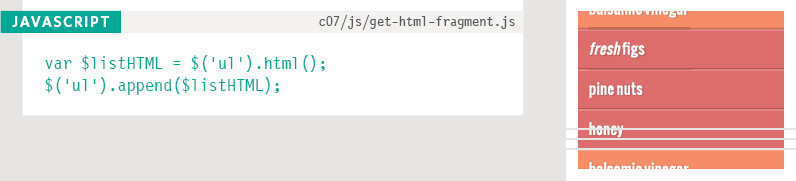
The selector returns the <ul> element. The .html() method gets all the HTML inside it (the four <li> elements). This is then appended to the end of the selection, in this case after the existing <li> elements.
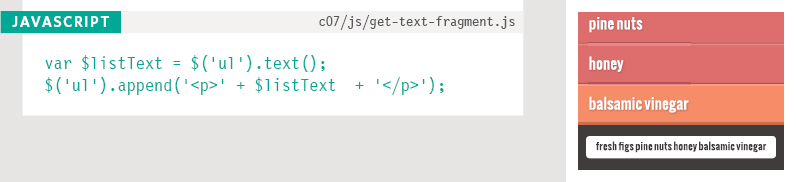
The selector returns the <ul> element. The .text() method gets the text from all of the <ul> element's children. This is then appended to the end of the selection, in this case after the existing <ul> element.
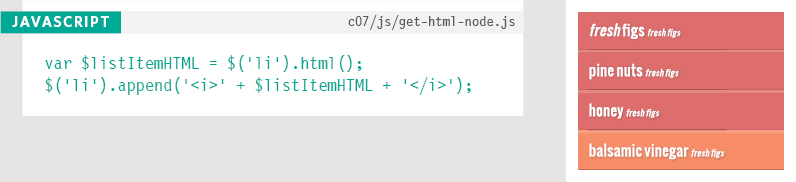
The selector returns the four <li> elements, but the .html() method returns only the contents of the first one. This is then appended to the end of the selection, in this case after each existing <li> element.
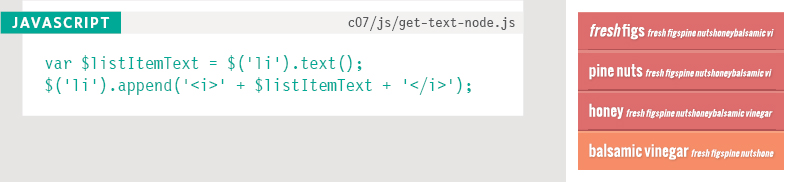
The selector returns the four <li> elements. The .text() method gets the text from these. This is then appended to each of the <li> elements in the selection.
Please note: The .append() method (covered on p318) lets you add content to the page.
UPDATING ELEMENTS
Here are four methods that update the content of all elements in a jQuery selection.
When the .html() and .text() methods are used as setters (to update content) they will replace the content of each element in the matched set (along with any content and child elements).
The .replaceWith() and .remove() methods replace and remove the elements they match (as well as their content and any child elements).
The .html(), .text(), and .replaceWith() methods can take a string as a parameter. The string can:
- Be stored in a variable
- Contain markup
When you add markup to the DOM, be sure to escape all untrusted content properly on the server. Both the .html() and .replaceWith() methods carry the same security risks as using the DOM's innerHTML property. See p228 - p231 on XSS.
.html()
This method gives every element in the matched set the same new content. The new content may include HTML.
.text()
This method gives every element in the matched set the same new text content. Any markup would be shown as text.
.replaceWith()
This method replaces every element in a matched set with new content. It also returns the replaced elements.
.remove()
This method removes all of the elements in the matched set.
USING A FUNCTION TO UPDATE CONTENT
If you want to use and amend the content of the current selection, these methods can take a function as a parameter. The function can be used to create new content. Here the text from each element is placed inside <em> tags.

1. return indicates that content should be returned by the function.
2. <em> tags are placed around the text content of the list item.
3. this refers to the current list item. $(this) places that element in a new jQuery object so that you can use jQuery methods on it.
CHANGING CONTENT
In this example, you can see three methods that allow you to update the content of the page.
When updating the content of an element, you can use a string, a variable, or a function.
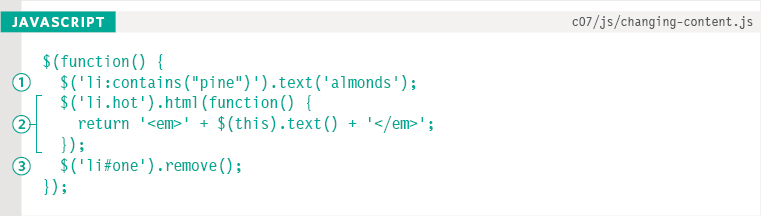
1. This line selects any list items that contain the word pine. It then changes the text of the matching element to almonds using the .text() method.
2. These lines select all list items whose class attribute contains the word hot, and uses the .html() method to update the content of each of them.
The .html() method uses a function to place the content of each element inside an <em> element. (See the bottom of the left-hand page for a closer look at the syntax.)
3. This line selects the <li> element that has an id attribute whose value is one, then uses the remove() method to remove it. (This does not require a parameter.)
When specifying new content, carefully choose when to use single quotes and when to use double quotes. If you append a new element that has attributes, use single quotes to surround the content. Then use double quotes for the attribute values themselves.
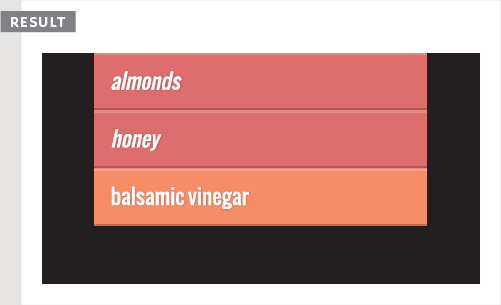
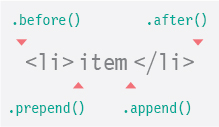
INSERTING ELEMENTS
Inserting new elements involves two steps:
1: Create the new elements in a jQuery object
2: Use a method to insert the content into the page
You can create new jQuery objects to hold text and markup that you then add to the DOM tree using one of the methods listed in step 2 on the right.
If you create a selection that returns multiple elements, these methods will add the same content to each of the elements in the matched set.
When adding content to the DOM, make sure you have escaped all untrusted content properly on the server. (See p228 - p231 on XSS.)
1: CREATING NEW ELEMENTS IN A JQUERY OBJECT
The following statement creates a variable called $newFragment and stores a jQuery object in it. The jQuery object is set to contain an empty <li> element: var $newFragment = $(‘<li>’);
The following statement creates a variable called $newItem and stores a jQuery object in it. This jQuery object in turn contains an <li> element with a class attribute and some text:
var $newItem = $(‘<li class=”new”>item</li>’);
2: ADDING THE NEW ELEMENTS TO THE PAGE
Once you have a variable holding the new content, you can use the following methods to add the content to the DOM tree:
.before()
This method inserts content before the selected element(s).
.after()
This method inserts content after the selected element(s).
.prepend()
This method inserts content inside the selected element(s), after the opening tag.
.append()
This method inserts content inside the selected element(s), before the closing tag.
There are also .prependTo() and .appendTo() methods. They work the other way around from .prepend() and .append(). So:
a.prepend(b) adds b to a
a.prependTo(b) adds a to b
a.append(b) adds b to a
a.appendTo(b) adds a to b
ADDING NEW CONTENT
In this example, you can see three jQuery selections are made. Each selection uses a different method to amend the content of the list.
The first adds a new notice before the list, the second adds a + symbol before the hot items, and the third adds a new element to the end of the list.
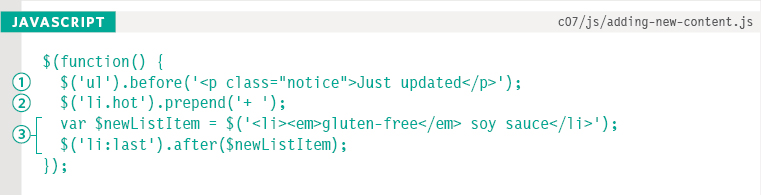
1. The <ul> element is selected, and the .before() method is used to insert a new paragraph before the list.
2. Selects all <li> elements whose class attribute contains a value of hot and uses the .prepend() method to add a plus symbol (+) before the text.
3. A new <li> element is created and stored in a variable. Then the last <li> element is selected, and the new element is added using the .after() method.
GETTING AND SETTING ATTRIBUTE VALUES
You can create attributes, or access and update their contents, using the following four methods.
You can work with any attribute on any element using the attr() and removeAttr() methods.
If you use the attr() method to update an attribute that does not exist, it will create the attribute and give it the specified value.
The value of the class attribute can hold more than one class name (each separated by a space). The addClass() and removeClass() methods are very powerful because they let you add or remove an individual class name within the value of the class attribute (and they do not affect any other class names).
.attr()
This method can get or set a specified attribute and its value. To get the value of an attribute, you specify the name of the attribute in the parentheses.
$(‘li#one’).attr(‘id’);To update the value of an attribute, you specify both the attribute name and its new value.
$(‘li#one’).attr(‘id’,‘hot’);.removeAttr()
This method removes a specified attribute (and its value). You just specify the name of the attribute that you want to remove from the element in the parentheses.
$(‘li#one’).removeAttr(‘id’);.addClass()
This method adds a new value to the existing value of the class attribute. It does not overwrite existing values.
.removeClass()
This method removes a value from the class attribute, leaving any other class names within that attribute intact.
These two methods are another good example of how jQuery adds helpful functionality commonly needed by web developers.
WORKING WITH ATTRIBUTES
The statements in this example use jQuery methods to change the class and id attributes of the specified HTML elements.
When the values of these attributes change, new CSS rules are applied to the elements, changing how they look.
Using events to trigger changes to attribute values that apply new CSS rules is a popular way to make a web page interactive.

1. The first statement finds the third list item (it has an id attribute with a value of three) and removes hot from the class attribute on that element. This is important to note because it affects the next statement.
2. The second statement selects all <li> elements whose class attribute has a value of hot. It adds a new class name called favorite. Because step 1 updated the third list item, this statement affects only the first two.
3. The third statement selects the <ul> element and adds an id attribute, giving it a value of group (which triggers a CSS rule that will add a margin and border to the <ul> element).
GETTING & SETTING CSS PROPERTIES
The .css() method lets you retrieve and set the values of CSS properties.
To get the value of a CSS property, you indicate which property you want to retrieve in parentheses. If the matched set contains more than one element, it will return the value from the first element.
To set the values of a CSS property, you specify the property name as the first argument in the parentheses, then a comma, followed by its value as the second argument. This will update every element in the matched set. You can also specify multiple properties in the same method using object literal notation.
Note: In the method used to set an individual property, the property name and its value are separated by a comma (because all parameters in a method are separated by a comma).
In the object literal notation, properties and their values are separated by a colon.
HOW TO GET A CSS PROPERTY
This will store the background color of the first list item in a variable called backgroundColor. The color will be returned as an RGB value.
var backgroundColor = $(‘li’).css(‘background-color’);
HOW TO SET A CSS PROPERTY
This will set the background color of all list items. Note how the CSS property and its value are separated using a comma instead of a colon.
$(‘li’).css(‘background-color’, ‘#272727’);
When dealing with dimensions that are specified in pixels, you can increase and decrease the values using the += and -= operators.
$(‘li’).css(‘padding-left’, ‘+=20’);
SETTING MULTIPLE PROPERTIES
You can set multiple properties using object literal notation:
- Properties and values are placed in curly braces
- A colon is used to separate property names from their values
- A comma separates each pair (but there is not one after the last pair)
This sets the background color and typeface for all list items.
$(‘li’).css({
   ‘background-color’: ‘#272727’,
   ‘font-family’: ‘Courier’
});
CHANGING CSS RULES
This example demonstrates how the .css() method can be used to select and update the CSS properties of elements.
The script checks what the background color of the first list item is when the page loads and then writes it after the list.
Next, it updates several CSS properties in all list items using the same .css() method with object literal notation.
1. The backgroundColor variable is created. The jQuery selection contains all <li> elements, and the .css() method returns the value of the background-color property of the first list item.
2. The background color of the first list item is written into the page using the .append() method (which you met on p318). Here, it is used to add content after the <ul> element.
3. The selector picks all <li> elements, and then the .css() method updates several properties at the same time:
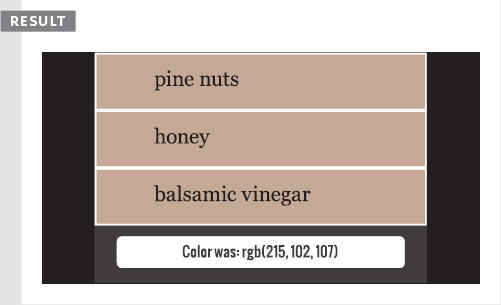
- The background color is changed to brown
- A white border is added
- The color of the text is changed to black
- The typeface is changed to Georgia
- Extra padding is added on the left
Note: It is better to change the value of a class attribute (to trigger new CSS rules in the style sheet) rather than to change CSS properties from within the JavaScript file itself.
WORKING WITH EACH ELEMENT IN A SELECTION
jQuery allows you to recreate the functionality of a loop on a selection of elements, using the .each() method.
You have already seen several jQuery methods that update all of the elements in a matched set without the need for a loop.
There are, however, times when you will want to loop through each of the elements in the selection. Often this will be to:
- Get information from each element in the matched set.
- Perform a series of actions on each of the elements.
The .each() method is provided for this purpose. The parameter of the .each() method is a function. This could be an anonymous function (as shown here) or a named function.
.each()
Allows you to perform one or more statements on each of the items in the selection of elements that is returned by a selector - rather like a loop in JavaScript.
It takes one parameter: a function containing the statements you want to run on each element.
this or $(this)
As the .each() method goes through the elements in a selection, you can access the current element using the this keyword.
You also often see $(this), which uses the this keyword to create a new jQuery selection containing the current element. It allows you to use jQuery methods on the current element.
1. The jQuery selection contains all of the <li> elements.
2. .each() applies the same code to each element in the selection.
3. An anonymous function is run for each of the items in the list.
Since this refers to the current node, if you want to access a property of that node, e.g., that element's id or class attributes, it is better to use plain JavaScript to access those attributes:
ids = this.id;
It is more efficient than writing ids = $(this).attr(‘id’); because this would involve the interpreter creating a new jQuery object, and then using a method to access info that is available as a property.
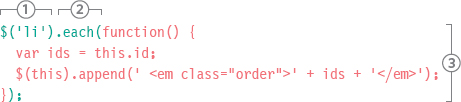
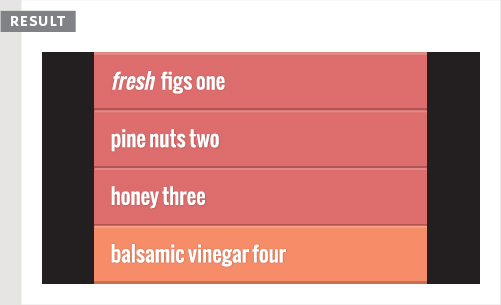
USING .EACH()
This example creates a jQuery object containing all of the list items from the page.
The .each() method is then used to loop through the list items and run an anonymous function for each of them.
The anonymous function takes the value from the id attribute on the <li> element and adds it to the text in the list item.
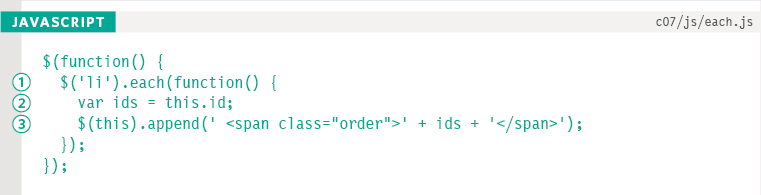
1. The selector creates a jQuery object containing all <li> elements. The .each() method calls an anonymous function for each of the list items in the matched set.
2. The this keyword refers to the current element node in the loop. It is used to access the value of the current element's id attribute, which is stored in a variable called ids.
3. $(this) is used to create a jQuery object that contains the current element in the loop.
Having the element in a jQuery object enables you to use jQuery methods on that element. In this case the .append() method is used to add a new <span> element to the current list item.
The content of that element is the value of its id attribute, which was obtained in step 2.
EVENT METHODS
The .on() method is used to handle all events. Behind the scenes, jQuery handles all of the cross-browser issues you saw in the last chapter.
Using the .on() method is no different than using any other jQuery method; you:
- Use a selector to create a jQuery selection.
- Use .on() to indicate which event you want to respond to. It adds an event listener to each element in the selection.
.on() was introduced in v 1.7 of jQuery. Prior to that, jQuery used separate methods for each event, e.g., .click() and .focus(). You may come across them in older code, but you should only use the .on() method now.
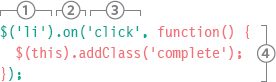
1. The jQuery selection contains all of the <li> elements.
2. The .on() method is used to handle events. It needs two parameters:
3. The first parameter is the event you want to respond to. Here it is the click event.
4. The second parameter is the code you want to run when that event occurs on any element in the matched set. This could be a named function or an anonymous function. Above, it is an anonymous function that adds a value of complete to the class attribute.
You will see more advanced options for this method on p330.
JQUERY EVENTS
Some of the most popular events that .on() deals with are listed below. jQuery also added some extras to make life easier, such as ready, which fires when the page is ready to be worked with. These are noted with a pink asterisk:*
| UI | focus, blur, change |
| KEYBOARD | input, keydown, keyup, keypress |
| MOUSE | click, dblclick, mouseup, mousedown, mouseover, mousemove, mouseout, hover* |
| FORM | submit, select, change |
| DOCUMENT | ready*, load, unload* |
| BROWSER | error, resize, scroll |
EVENTS
In this example, when the mouse moves over a list item, the content of its id attribute is written into the list item.
The same happens if the user clicks on a list item (because mouseover does not work on touchscreen devices).
The mouseout event also removes this extra information from the page to prevent the added content building up.
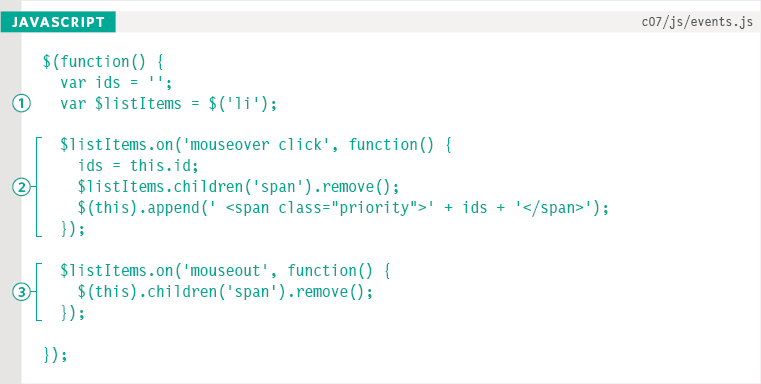
1. The selector finds all list items on the page. The resulting jQuery object is used more than once, so it is stored in a variable called $listItems.
2. The .on() method creates an event listener, which waits for when the user moves a mouse over a list item or clicks on it. It triggers an anonymous function.
Note how the two events are specified in the same set of quote marks, with a space between them.
The anonymous function:
- Gets the value of the id attribute on that element.
- Removes <span> elements from all of the list items.
- Adds the value of the id attribute to the list item in a new <span> element.
3. The .mouseout() method triggers the removal of any child <span> elements to prevent build-up of added values.
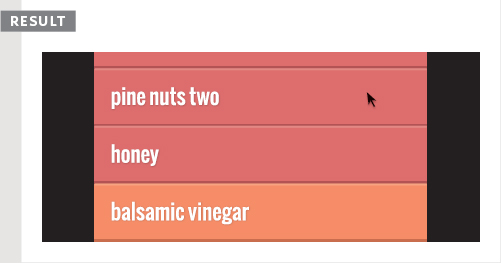
THE EVENT OBJECT
Every event handling function receives an event object. It has methods and properties related to the event that occurred.
Just like the JavaScript event object, the jQuery event object has properties and methods that tell you more about the event that took place.
If you look at the function that is called when the event occurs, the event object is named in the parentheses. Like any other parameter, this name is then used within the function to refer to the event object.
The example on the right uses the letter e as shorthand for the event object. However, as noted in the previous chapter, you should be aware that this shorthand is also often used for the error object.
1. Give the event object a parameter name.
2. Use that name in the function to reference the event object.
3. Access the properties and methods of the object using the familiar dot notation (the member operator).
| PROPERTY | DESCRIPTION |
| type | Type of event, (e.g., click, mouseover) |
| which | Button or key that was pressed |
| data | An object literal containing extra information passed to the function when the event fires (See right-hand page for an example) |
| target | DOM element that initiated the event |
| pageX | Mouse position from left edge of viewport |
| pageY | Mouse position from top of viewport |
| timeStamp | Number of milliseconds from Jan 1st, 1970, to when the event was triggered (this is known as Unix Time). Does not work in Firefox. |
| METHOD | DESCRIPTION |
| .preventDefault() | Prevents the default (e.g., submitting a form) |
| .stopPropagation() | Stops the event bubbling up to ancestors |
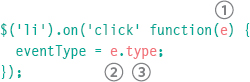
EVENT OBJECT
In this example, when users click on a list item, the date that the event happened on is written next to that item, along with the type of event that triggered it.
To achieve this, two properties of the event object will be used: timeStamp states when the event occurred; type states the kind of event that triggered it.
To prevent the list from becoming cluttered with multiple date entries, whenever a list item is clicked, any <span> elements will be removed from the list.

1. Any <span> elements that already exist inside the <li> elements are removed.
2. A new Date object is created, and its time is set to the time at which the event was clicked.
3. The time the event was clicked is then converted into a date that can be read.
4. The date that the list item was clicked is written into the list item (along with the type of event that was used).
Note that the timeStamp property does not display in Firefox.
ADDITIONAL PARAMETERS FOR EVENT HANDLERS
The .on() method has two optional properties that let you: Filter the initial jQuery selection to respond to a subset of the elements; Pass extra information into the event handler using object literal notation.
Here you can see two additional properties that can be used with the .on() method.
When square brackets are used inside a method, they signify that the parameter is optional.
Leaving out a parameter written in square brackets will not stop the method working.
1. This is the event(s) that you want to respond to. If you want to respond to more than one event, you can provide a space-separated list of event names, e.g., ‘focus click’ will work on both focus and click.
2. If you just want to respond to the event happening on a subset of the elements in the initial jQuery selection, you can provide a second selector that will filter its descendants.
3. You can pass extra information to the function that is called when the event is triggered. This information is passed along with the event object (e).

4. This is the function that should be run when the specified events occur on one of the elements in the matched set.
5. The function is automatically passed the event object as a parameter, as you saw on the previous two pages. (Remember, if you use it you must give it a name in the parentheses.)
Older jQuery scripts may use the .delegate() method for delegation. However, since jQuery 1.7 .on() is the preferred approach to delegation.
DELEGATING EVENTS
In this example, the event handler will run when users click or mouseover items in the list, except for the last list item.
It writes out the content of the element the user interacted with, a status message (using the data property), and the event type.
The information passed in the data property here uses object literal notation (so it could handle multiple properties).

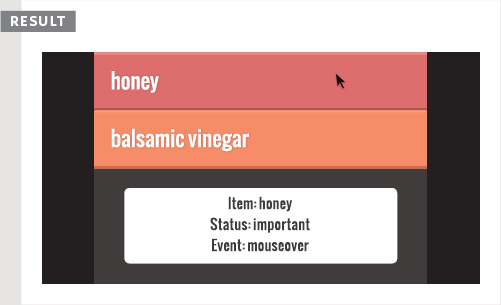
There is an extra element in the HTML for this example to hold the data that appears under the list.
1. The event handler is triggered by click and mouseover events.
2. The selector parameter filters out the element whose id attribute has a value of four.
3. Additional data that will be used by the event handler is passed in as an object literal.
4. The event handler uses the event object to display the content of the element the user interacts with, the information from the data that was passed into the function, and the event type, under the list in a white box.
EFFECTS
When you start using jQuery, the effects methods can enhance your web page with transitions and movement.
Here you can see some of the jQuery effects that show or hide elements and their content. You can animate them fading in and out, or slide them up and down.
When an element that was previously hidden is shown, faded in, or slides into view, the other elements on the page may move to make space for it.
When an element is hidden, has been faded out, or has slid out of view, the other elements on the page can move into the space these elements took up.
Methods with toggle in their name will look at the current state of the element (whether it is visible or hidden) and will switch to the opposite state.
Increasingly it is possible to create animations using CSS3. They are often faster than their jQuery counterparts, but they only work in recent browsers.
BASIC EFFECTS
| METHOD | DESCRIPTION |
| .show() | Displays selected elements |
| .hide() | Hides selected elements |
| .toggle() | Toggles between showing and hiding selected elements |
FADING EFFECTS
| METHOD | DESCRIPTION |
| .fadeIn() | Fades in selected elements making them opaque |
| .fadeOut() | Fades out selected elements making them transparent |
| .fadeTo() | Changes opacity of selected elements |
| .fadeToggle() | Hides or shows selected elements by changing their opacity (the opposite of their current state) |
SLIDING EFFECTS
| METHOD | DESCRIPTION |
| .slideUp() | Shows selected elements with a sliding motion |
| .slideDown() | Hides selected elements with a sliding motion |
| .slideToggle() | Hides or shows selected elements with a sliding motion (in the opposite direction to its current state) |
CUSTOM EFFECTS
| METHOD | DESCRIPTION |
| .delay() | Delays execution of subsequent items in queue |
| .stop() | Stops an animation if it is currently running |
| .animate() | Creates custom animations (see p334) |
BASIC EFFECTS
In this example, it appears as if list items are faded into view when the page loads. Each item is faded out when it is clicked on.
In fact, the items are loaded normally along with the rest of the page, but then immediately hidden using JavaScript.
Once hidden, only then are they faded into view. This is so they will still be visible in browsers that do not have JavaScript enabled.

1. In the first statement, the selector picks the <h2> element and hides it so that it can be animated in. The chosen effect to show the heading is the .slideDown() method. Note how the methods are chained; there is no need to make a new selection for each of the tasks.
2. The second part causes the list of items to appear one by one. Again, before they can be faded in, they must be hidden. Then the .each() method is used to loop through each of the <li> elements in turn. You can see that this triggers an anonymous function.
Inside the anonymous function, the index property acts as a counter indicating which <li> element is the current one.
The .delay() method creates a pause before the list item is shown. The delay is set, multiplying the index number by 700 ms (otherwise all of the list items would appear at the same time). Then it is faded in using the fadeIn() method.
3. The final part creates an event listener that waits for the user to click on a list item. When they do, it will fade that item out to remove it from the list (the fade will take 700 milliseconds).
ANIMATING CSS PROPERTIES
The .animate() method allows you to create some of your own effects and animations by changing CSS properties.
You can animate any CSS property whose value can be represented as a number, e.g., height, width, and font-size. But not those whose value would be a string, such as font-family or text-transform.
The CSS properties are written using camelCase notation, so the first word is all lowercase and each subsequent word starts with an uppercase character, e.g.: border-top-left-radius would become borderTopLeftRadius.
The CSS properties are specified using object literal notation (as you can see on the right-hand page). The method can also take three optional parameters, shown below.
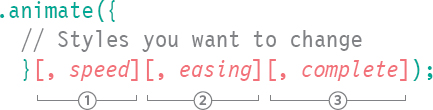
1. speed indicates the duration of the animation in milliseconds. (It can also take the keywords slow and fast.)
2. easing can have two values: linear (the speed of animation is uniform); or swing (speeds up in the middle of the transition, and is slower at start and end).
3. complete is used to call a function that should run when the animation has finished. This is known as a callback function.
EXAMPLES OF JQUERY EQUIVALENTS OF CSS PROPERTY NAMES

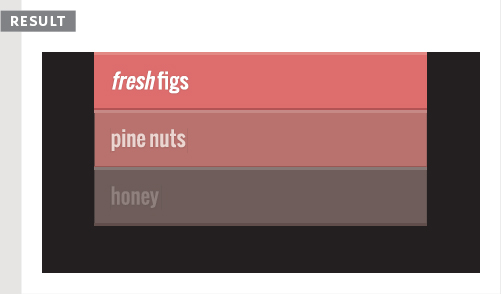
USING ANIMATION
In this example, the .animate() method is used to gradually change the values of two CSS properties. Both of them have numerical values: opacity and padding-left.
When the user clicks on a list item, it fades out and the text content slides to the right. (This takes 500ms.) Once that is complete, a callback function removes the element.
You can increase or decrease numeric values by a specific amount. Here, +=80 is used to increase the padding property by 80 pixels. (To decrease it by 80 pixels, you would use -=80.)
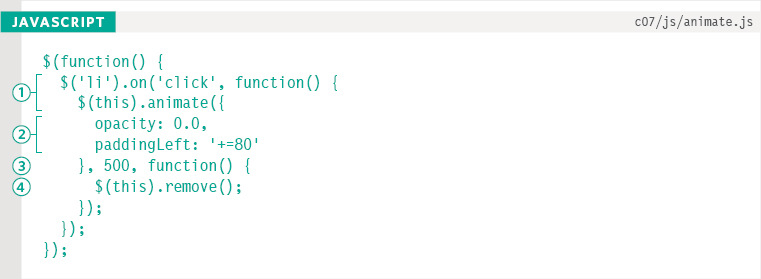
1. All list items are selected and, when a user clicks on one of them, an anonymous function runs. Inside it, $(this) creates a new jQuery object holding the element the user clicked on. The .animate() method is then called on that jQuery object.
2. Inside the .animate() method, the opacity and paddingLeft are changed. The value of the paddingLeft property is increased by 80 pixels, which makes it look like the text is sliding to the right as it fades out.
3. The .animate() method has two more parameters. The first is the speed of the animation in milliseconds (in this case, 500ms). The second is another anonymous function indicating what should happen when the animation finishes.
4. When the animation has finished, the callback function removes that list item from the page using the .remove() method.
If you want to animate between two colors, rather than using the .animate() method, there is a helpful jQuery color plugin here:
TRAVERSING THE DOM
When you have made a jQuery selection, you can use these methods to access other element nodes relative to the initial selection.
Each method finds elements that have a different relationship to those that are in the current selection (e.g., parents or children of the current selection).
The .find() and .closest() methods both require a CSS-style selector as an argument.
For the other methods, the CSS-style selector is optional. But if a selector is provided, both the method and selector must match in order for the element to be added to the new selection.
For example, if you start with a selection that contains one list item, you could create a new selection containing the other items from the list using the .siblings() method.
If you added a selector into the method such as this: .siblings(‘.important’) then it would find only siblings with a class attribute whose value included important.
SELECTOR REQUIRED
| METHOD | DESCRIPTION |
| .find() | All elements within current selection that match selector |
| .closest() | Nearest ancestor (not just parent) that matches selector |
SELECTOR OPTIONAL
| METHOD | DESCRIPTION |
| .parent() | Direct parent of current selection |
| .parents() | All parents of current selection |
| .children() | All children of current selection |
| .siblings() | All siblings of current selection |
| .next() | Next sibling of current element |
| .nextAll() | All subsequent siblings of current element |
| .prev() | Previous sibling of current element |
| .prevAll() | All previous siblings of current element |
If the original selection contains multiple elements, these methods will work on all of the elements in the selection (which can result in quite an odd selection of elements). You may need to narrow down your initial selection before traversing the DOM.
Behind the scenes, jQuery will handle the cross-browser inconsistencies involved in traversing the DOM (such as whitespace nodes being added by some browsers).
TRAVERSING
When the page loads, the list is hidden, and a link is added to the heading that indicates the users can display the list if they wish.
The link is added inside the heading and, if the user clicks anywhere on the <h2> element, the <ul> element is faded in.
Any child <li> elements that have a class attribute whose value is hot are also given an extra value of complete.

1. A click event anywhere in the <h2> element will trigger an anonymous function.
2. The .next() method is used to select the next sibling after the <h2> element, which is the <ul> element.
3. The <ul> is faded into view.
4. The .children() method then selects any child elements of the <ul> element, and the selector indicates that it should pick only those whose class attribute has a value of hot.
5. The .addClass() method is then used on those <li> elements to add a class name of complete. This shows how you can chain methods and traverse from one node to another.
6. In the last step, the .find() method can be used to select the <a> element that is a child of the <h2> element and fade it out because the list is now being shown to the users.

ADD & FILTER ELEMENTS IN A SELECTION
Once you have a jQuery selection, you can add more elements to it, or you can filter the selection to work with a subset of the elements.
The .add() method allows you to add a new selection to an existing one.
The second table on the right shows you how to find a subset of your original selection.
The methods take another selector as a parameter and return a filtered matched set.
The items in this table that begin with a colon can be used wherever you would use a CSS-style selector.
The :not() and :has() selectors take another CSS-style selector as a parameter. There is also a selector called :contains() that lets you find elements that contain specific text.
The .is() method lets you use another selector to check whether the current selection matches a condition. If it does, it will return true. This is helpful in conditional statements.
ADDING ELEMENTS TO A SELECTION
| METHOD | DESCRIPTION |
| .add() | Selects all elements that contain the text specified (parameter is case sensitive) |
FILTERING WITH A SECOND SELECTOR
| METHOD/SELECTOR | DESCRIPTION |
| .filter() | Finds elements in matched that in turn match a second selector |
| .find() | Finds descendants of elements in matched set that match the selector |
| .not()/:not() | Finds elements that do not match the selector |
| .has()/:has() | Finds elements from the matched set that have a descendant that matches the selector |
| :contains() | Selects all elements that contain the text specified (parameter is case sensitive) |
The following two selectors are equivalent:
$(‘li’).not(‘.hot’).addClass(‘cool’);
$(‘li:not(.hot)’).addClass(‘cool’);
In browsers that support querySelector() / querySelectorAll(), :not() is faster than .not() and :has() is faster than .has()
TESTING CONTENT
| METHOD | DESCRIPTION |
| .is() | Checks whether current selection matches a condition (returns Boolean) |
FILTERS IN USE
This example selects all list items and then uses different filters to select a subset of the items from the list to work with.
The example uses both the filtering methods as well as the CSS-style pseudo-selector :not().
Once the filters have selected a subset of the list items, other jQuery methods are used to update them.
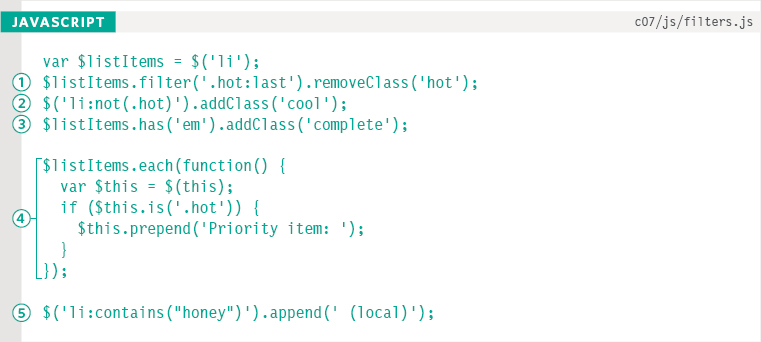
1. The .filter() method finds the last list item with a class attribute whose value is hot. It then removes that value from the class attribute.
2. The :not() selector is used within the jQuery selector to find <li> elements without a value of hot in their class attribute and adds a value of cool.
3. The .has() method finds the <li> element that has an <em> element within it and adds the value complete to the class attribute.
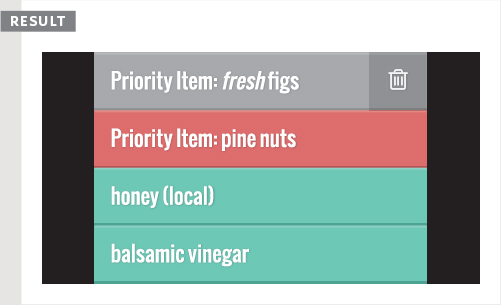
4. The .each() method loops through the list items. The current element is cached in a jQuery object. The .is() method looks to see if the <li> element has a class attribute whose value is hot. If it does, ‘Priority item: ’ is added to the start of the item.
5. The :contains selector checks for <li> elements that contain the text “honey” and appends the text “(local)” to the end of those items.
FINDING ITEMS BY ORDER
Each item returned by a jQuery selector is given an index number, which can be used to filter the selection.
The jQuery object is sometimes referred to as being an array-like object because it assigns a number to each of the elements that is returned by a selector. That number is an index number, which means it starts at 0.
You can filter the selected elements based on this number using methods or these additional CSS-style selectors that jQuery has added.
Methods are applied to the jQuery selection, whereas selectors are used as part of the CSS-style selector.
On the right, you can see a selector which picks all of the <li> elements from the list example used throughout this chapter. The table shows each list item and its corresponding index number. The example on the next page will use these numbers to select list items and update their class attributes.
FINDING ELEMENTS BY INDEX NUMBER
| METHOD / SELECTOR | DESCRIPTION |
| .eq() | The element that matches the index number |
| :lt() | Elements with an index less than the number specified |
| :gt() | Elements with an index greater than the number specified |
$(‘li’)
| INDEX | HTML |
| 0 | <li id=”one” class=”hot”><em>fresh</em> figs</li> |
| 1 | <li id=”two” class=”hot”>pine nuts</li> |
| 2 | <li id=”three” class=”hot”>honey</li> |
| 3 | <li id=”four”>balsamic vinegar</li> |
USING INDEX NUMBERS
This example demonstrates how jQuery gives an index number to each of the elements in the jQuery selection.
The :lt() and :gt() selectors and the .eq() method are used to find elements based on their index numbers.
For each of the matching elements, the value of the class attributes are changed.

1. The :lt() selector is used in the selector to pick list items with an index number less than 2. It removes the value hot from their class attribute.
2. The .eq() method selects the first item (using the number 0 because the index numbers start at zero). It adds the value of complete to the class attribute.
3. The :gt() selector is used in the jQuery selector to pick the list items with an index number higher than 2. It adds a value of cool to their class attribute.
SELECTING FORM ELEMENTS
jQuery has selectors that are designed specifically to work with forms, however, they are not always the quickest way to select elements.
If you use one of these selectors on its own, jQuery will examine each element in the document to find a match (using code in the jQuery file, which is not as quick as CSS selectors).
Therefore, you should narrow down the part of the document the script needs to look through by placing an element name or other jQuery selector before using the selectors shown on this page.
You can also access elements in a form using the same selectors used to pick any element in jQuery. This will often be the faster option.
It is also worth noting that, because jQuery handles inconsistencies in the way browsers treat whitespace, it is easier to traverse between form elements using jQuery than it is when you are using plain JavaScript.
SELECTORS FOR FORM ELEMENTS
| SELECTOR | DESCRIPTION |
| :button | <button> and <input> elements whose type attribute has a value of button |
| :checkbox | <input> elements whose type attribute has a value of checkbox. Note that you get better performance with $(‘[type=”checkbox”]’) |
| :checked | Checked elements from checkboxes and radio buttons (see :selected for select boxes) |
| :disabled | All elements that have been disabled |
| :enabled | All elements that are enabled |
| :focus | Element that currently has focus. Note that you get better performance with $(document.activeElement) |
| :file | All elements that are file inputs |
| :image | All image inputs. Note that you get better performance using [type=”image”] |
| :input | All <button>, <input>, <select>, and <textarea> elements. Note that you get better performance from selecting elements, then using .filter(”:input”) |
| :password | All password inputs. Note that you get better performance using $(‘input:password’) |
| :radio | All radio inputs. To select a group of radio buttons, you can use $(‘input[name=”gender”]:radio’) |
| :reset | All inputs that are reset buttons |
| :selected | All elements that are selected. Note that you get better performance using a CSS selector inside the .filter() method, e.g., .filter(”:selected”) |
| :submit | <button> and <input> elements whose type attribute has a value of submit. Note that you will get better performance using [type=”submit”] |
| :text | Selects <input> elements with a type attribute whose value is text, or whose type attribute is not present. You will likely get better performance from (‘input:text’) |
FORM METHODS & EVENTS
RETRIEVE THE VALUE OF ELEMENTS
| METHOD | DESCRIPTION |
| .val() | Primarily used with <input>, <select>, and <textarea> elements. It can be used to get the value of the first element in a matched set, or update the value of all of them. |
OTHER METHODS
| METHOD | DESCRIPTION | ||||||
| .filter() | Used to filter a jQuery selection using a second selector (especially form-specific filters) | ||||||
| .is() | Often used with filters to check whether a form input is selected/checked | ||||||
| $.isNumeric() | Checks whether the value represents a numeric value and returns a Boolean. It returns true for the following:
|
EVENTS
| METHOD | DESCRIPTION |
| .on() | Used to handle all events |
| EVENT | DESCRIPTION |
| blur | When an element loses focus |
| change | When the value of an input changes |
| focus | When an element gains focus |
| select | When the option for a <select> element is changed |
| submit | When a form is submitted |
When submitting a form, there is also a helpful method called .serialize() which you will learn about on p394-p395.
The .val() method gets the value of the first <input>, <select>, or <textarea> element in a jQuery selection. It can also be used to set the value for all matching elements.
The .filter() and .is() methods are commonly used with form elements. You met them on p338.
$.isNumeric() is a global method. It is not used on a jQuery selection; rather, the value you want to test is passed as an argument.
All of the event methods on the left correspond to JavaScript events that you might use to trigger functions. As with other jQuery code, they handle the inconsistencies between browsers behind the scenes.
jQuery also makes it easier to work with a group of elements (such as radio buttons, checkboxes, and the options in a select box), because, once you have selected the elements, you can simply apply individual methods to each of them without having to write a loop.
There is an example using forms on the next page, and there are more examples in Chapter 13.
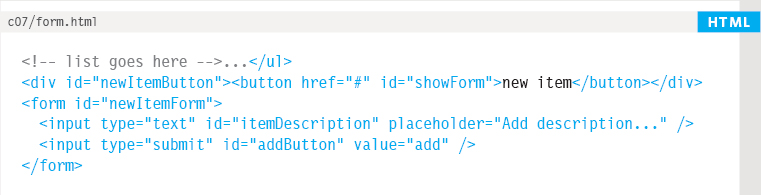
WORKING WITH FORMS
In this example, a button and form have been added under the list. When the user clicks on the button to add a new item, the form will come into view.
The form lets users add a new item to the list with a single text input and a submit button. (The new item button is hidden when the form is in view.)
When the user presses the submit button, the new item is added to the bottom of the list. (The form is also hidden and the new item button is shown again.)

1. New jQuery objects are created to hold the new item button, the form to add new items, and the add button. These are cached in variables.
2. When the page loads, the CSS hides the new item button (and shows the form), so jQuery methods show the new item button and hide the form.
3. If a user clicks on the new item button (the <button> element whose id attribute has a value of showForm), the new item button is hidden and the form is shown.
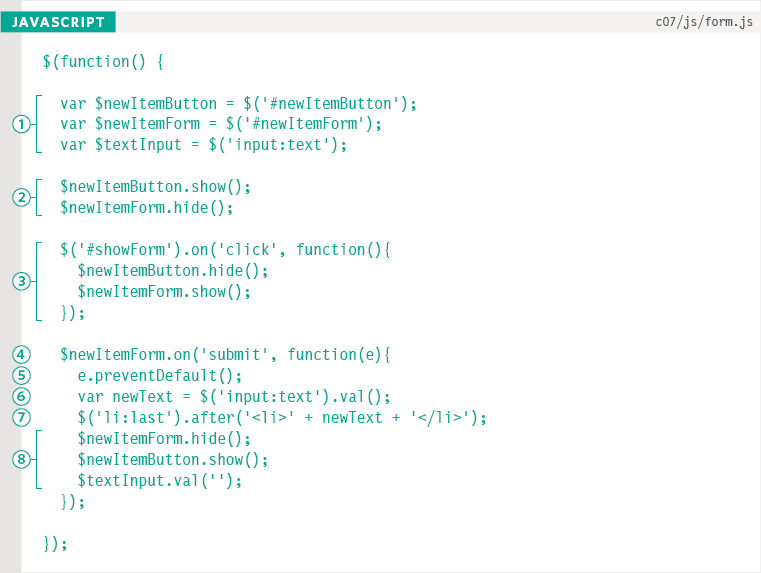
4. When the form is submitted, an anonymous function is called. It is passed the event object.
5. The .preventDefault() method can stop the form being submitted.
6. The :text selector picks the <input> element whose type attribute has a value of text, and the .val() method gets the value the user entered into it. This value is stored in a variable called newText.
7. A new item is added to the end of the list using the .after() method.
8. The form is hidden, the new item button is shown again, and the content of the text input is emptied (so the user can add a new entry if they want to).
CUTTING & COPYING ELEMENTS
Once you have a jQuery selection, you can use these methods to remove those elements or make a copy of them.
The .remove() method deletes the matched elements and all of their descendants from the DOM tree.
The .detach() method also removes the matched elements and all of their descendants from the DOM tree; however, it retains any event handlers (and any other associated jQuery data) so they can be inserted back into the page.
The .empty() and .unwrap() methods remove elements in relation to the current selection.
The .clone() method creates a copy of the matched set of elements (and any descendants). If you use this method on HTML that contains id attributes, the value of the id attributes would need updating otherwise they would no longer be unique. If you want to pass any event handlers, you should add true between the parentheses.
CUT
| METHOD | DESCRIPTION |
| .remove() | Removes matched elements from DOM tree (including any descendants and text nodes) |
| .detach() | Same as .remove() but keeps a copy of them in memory |
| .empty() | Removes child nodes and descendants from any elements in matched set |
| .unwrap() | Removes parents of matched set, leaving matched elements |
COPY
| METHOD | DESCRIPTION |
| .clone() | Creates a copy of the matched set (including any descendants and text nodes) |
PASTE
You saw how to add elements into the DOM tree on p318.
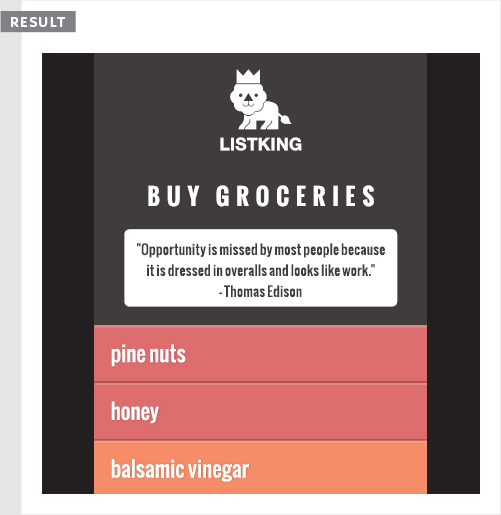
CUT, COPY, PASTE
In this example, you can see parts of the DOM tree being removed, duplicated, and placed elsewhere on the page.
The HTML has an extra <p> element after the list, which contains a quote. It is moved to a new position under the heading.
In addition, the first list item is detached from the list and moved to the end of it.
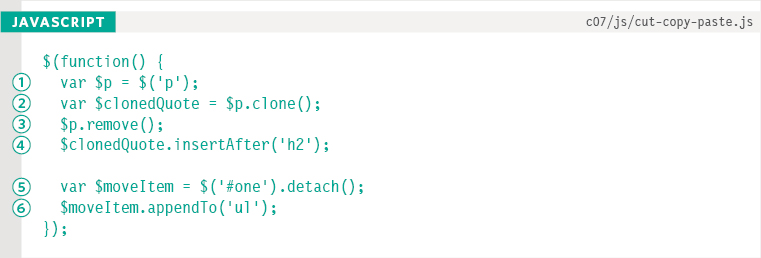
1. A jQuery selection is made containing the <p> element at the end of the page, and this is cached in a variable called $p.
2. That element is copied using the .clone() method (along with its content and child elements). It is stored in a variable called $clonedQuote.
3. The paragraph is removed.
4. The cloned version of the quote is inserted after the <h2> element at the top of the page.
5. The first list item is detached from the DOM tree and stored in a variable called $moveItem (effectively removing it from the DOM tree).
6. That list item is then appended to the end of the list.
BOX DIMENSIONS
These methods allow you to discover or update the width and height of all boxes on the page.
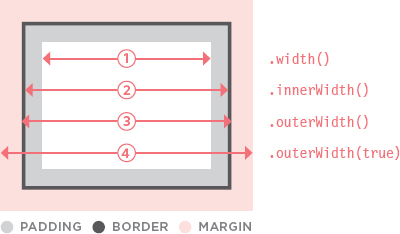
CSS treats each element on a web page as if it were in its own box. A box can have padding, a border, and a margin. If you set the width or height of the box in CSS, it does not include any padding, border, or margin - they are added to the dimensions.
The methods shown here allow you to retrieve the width and height of the first element in the matched set. The first two also allow you to update the dimensions of all boxes in the matched set.
The remaining methods give different measurements depending on whether you want to include padding, border, and a margin. Note how the .outerHeight() and .outerWidth() methods take a parameter of true if you want the margin included.
When retrieving dimensions, these methods return a number in pixels.
RETRIEVE OR SET BOX DIMENSIONS
| METHOD | DESCRIPTION |
| .height() | Height of box (no margin, border, padding) |
| .width() | Width of box (no margin, border, padding) (1) |
RETRIEVE BOX DIMENSIONS ONLY
| METHOD | DESCRIPTION |
| .innerHeight() | Height of box plus padding |
| .innerWidth() | Width of box plus padding (2) |
| .outerHeight() | Height of box plus padding and border |
| .outerWidth() | Width of box plus padding and border (3) |
| .outerHeight(true) | Height of box plus padding, border, and margin |
| .outerWidth(true) | Width of box plus padding, border, and margin (4) |
CHANGING DIMENSIONS
This example demonstrates how the .height() and .width() methods can be used to retrieve and update box dimensions.
The page displays the height of the container. It then changes the width of the list items using percentages and pixels.
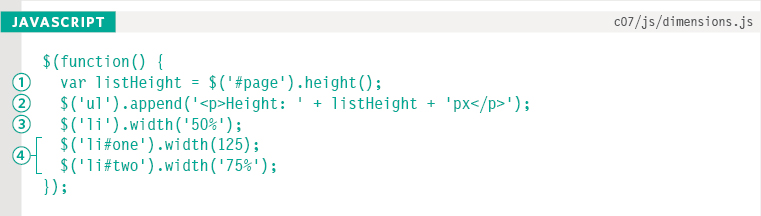
1. A variable called listHeight is created to store the height of the page container. It is obtained using the .height() method.
2. The height of the page is written at the end of the list using the .append() method and may vary between browsers.
3. The selector picks all the <li> elements and sets their width to 50% of their current width using the .width() method.
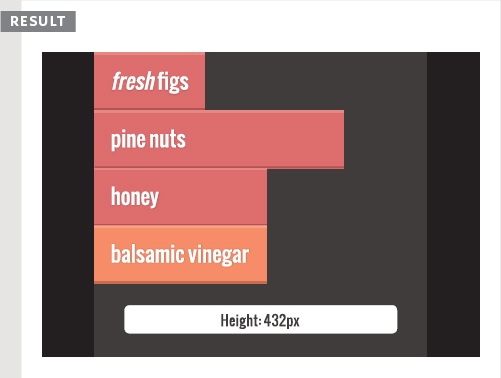
4. These two statements set the width of the first list item to 125 pixels and the width of the second list item to be 75% of the width it was when the page loaded.
Measurements in percentages or ems should be given as a string, with the suffix % or em. Pixels do not require a suffix and are not enclosed in quotes.
WINDOW & PAGE DIMENSIONS
The .height() and .width() methods can be used to determine the dimensions of both the browser window and the HTML document. There are also methods to get and set the position of the scroll bars.
On p348, you saw that you can get and set the height or width of a box using the .height() and .width() methods.
These can also be used on a jQuery selection containing the window or document objects.
The browser can display scroll bars if the height or width of:
- A box's content is larger than its allocated space.
- The current page represented by the document object is larger than the dimensions of the browser window's viewable area (viewport).
The .scrollLeft() and .scrollTop() methods allow you to get and set the position of the scroll bars.
When retrieving dimensions, these methods return a number in pixels.
| METHOD | DESCRIPTION |
| .height() | Height of the jQuery selection |
| .width() | Width of the jQuery selection |
| .scrollLeft() | Gets the horizontal position of the scroll bar for the first element in the jQuery selection, or sets the horizontal scroll bar position for matched nodes |
| .scrollTop() | Gets the vertical position of the scroll bar for the first element in the jQuery selection, or sets the vertical scroll bar position for matched nodes |
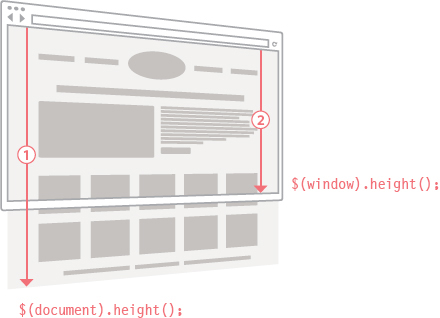
This method will often return the incorrect value unless a DOCTYPE declaration is specified for the HTML page.
POSITION OF ELEMENTS ON THE PAGE
The .offset() and .position() methods can be used to determine the position of elements on the page.
| METHOD | DESCRIPTION |
| .offset() | Gets or sets coordinates of the element relative to the top left-hand corner of the document object (1) |
| .position() | Gets or sets coordinates of the element relative to any ancestor that has been taken out of normal flow (using CSS box offsets). If no ancestor is out of normal flow, it will return the same as .offset() (2) |
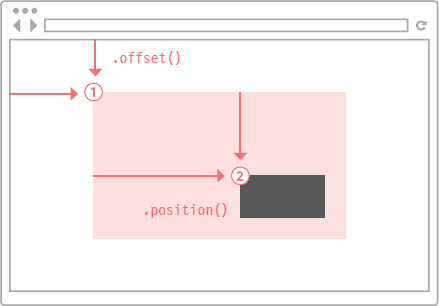
To get the offset or position, store the object that is returned by these methods in a variable. Then use the left or right properties of the object to retrieve their position.
var offset = $(‘div’).offset();
var text = ‘Left: ’ + offset.left + ‘ Right: ’ + offset.right;
The two methods on the left help you to determine the position of an element:
- Within the page.
- In relation to an ancestor that is offset from normal flow.
Each of them returns an object that has two properties:
top - the position from the top of the document or containing element.
left - the position from the left of the document or containing element.
As with other jQuery methods, when used to retrieve information, they return the co-ordinates of the first element in the matched set.
If they are used to set the position of elements, they will update the position of all elements in the matched set (putting them in the same spot).
DETERMINING POSITION OF ITEMS ON THE PAGE
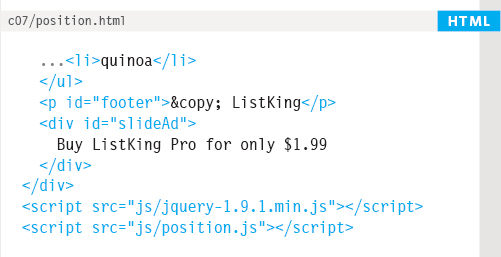
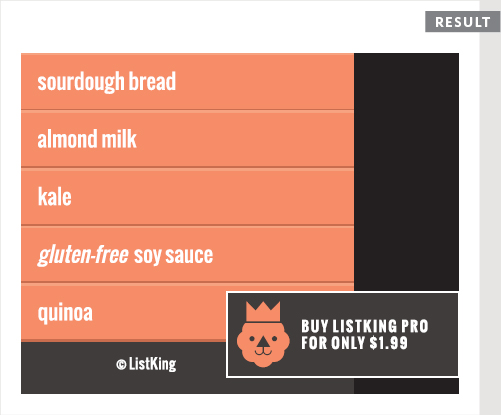
In this example, as the user scrolls down the page, a box slides into view if they get within 500 pixels of the footer.
We will call this part of the page the end zone, and you need to work out the height at which the endZone starts.
Every time the user scrolls, you then check the position of the scroll bar from the top of the page.
If the scroll bar is further down the page than the start of the end zone, the box is animated into the page. If not, then the box is hidden.
The HTML for this example contains an extra <div> element at the end of the page containing the advert. A lot of items have been added to the list to create a long page that scrolls.
1. Cache the window and advert.
2. The height of the end zone is calculated, and stored in a variable called endZone.
3. The scroll event triggers an anonymous function every time the user scrolls up or down.
4. A conditional statement checks if the user's position is further from the top of the page than the start of the end zone.
5. If the condition returns true, the box slides in from the right-hand edge of the page. This takes 250 milliseconds.
6. If the condition is false or the box is in the middle of animating, it is stopped using the .stop() method. The advert then slides off the right-hand edge of the page. Again, this animation will take 250 milliseconds.
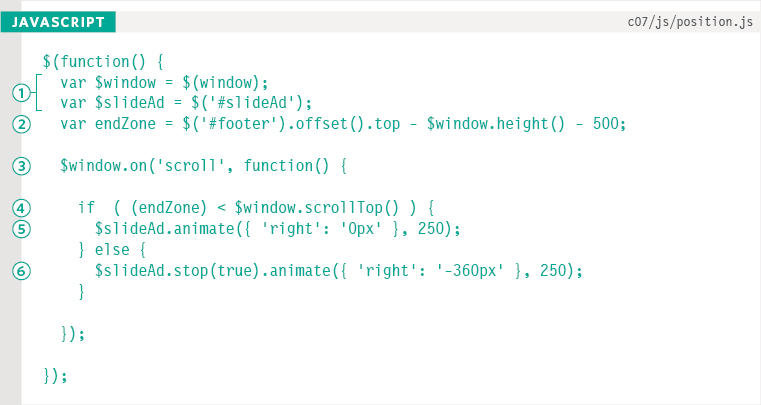
CALCULATING THE END ZONE
Calculate the height at which the box should come into view by:
a) Getting the height from the top of the page to the top of the footer (the gray bar) in pixels.
b) Subtracting the height of the viewport from this result.
c) Subtracting a further 500px for the area where the box will come into view (shown in pink).
You can tell how far the user has scrolled down the page using:
$(window).scrollTop();
If the distance extends down further than the height at which the end zone should show, the box should be made visible.
If not, then the box should move off the page.
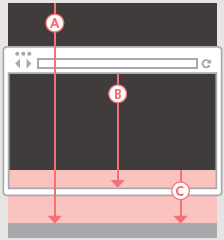
WAYS TO INCLUDE JQUERY IN YOUR PAGE
In addition to hosting the jQuery file with the rest of your website, you can also use a version that is hosted by other companies. However, you should still include a fallback version.
At the time of writing, the main CDNs to offer jQuery are jQuery CDN (powered by Max CDN), Google, and Microsoft.

A Content Delivery Network (or CDN) is a series of servers spread out around the world. They are designed to serve static files (such as HTML, CSS, JavaScript, images, audio, and video files) very quickly.
The CDN tries to find a server near you, then sends files from that server so the data does not travel as far. With jQuery, users might have already downloaded and cached the file from a CDN when visiting another site.
When including jQuery in your pages, you can try to load it from one of these CDNs. Then you check if it loaded, and if not, you can include a version that is stored on your own servers (this is known as a fallback).
LOADING JQUERY FROM A CDN
When a page loads jQuery from a CDN, you will often see a syntax like the one shown below. It starts with a <script> tag that tries to load the jQuery file from the CDN. But note that the URL for the script starts with two forward slashes (not http:).
This is known as a protocol relative URL. If the user is looking at the current page through https, then they will not see an error that tells them there are unsecure items on the page. Note: This does not work locally with the file:// protocol.
This is often followed by a second <script> tag that contains a logical operator, which checks to see if jQuery has loaded. If it has not loaded, the browser tries to load the jQuery script from the same server as the rest of the website.
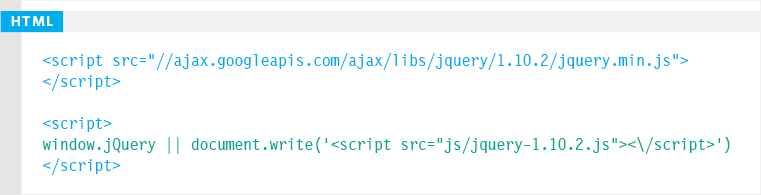
The logical operator looks for the jQuery object that the jQuery script makes available. If it exists, then a truthy value is returned and the logical operator short circuits (see p157).
If jQuery has not loaded, then the document.write() method is used to add a new <script> tag into the page. This will load a version of jQuery from the same server as the rest of the website.
The fallback option is important because the CDN may be unavailable, the file may have moved, and some countries ban some domain names (such as Google).
WHERE TO PLACE YOUR SCRIPTS
The position of <script> elements can affect how quickly a web page seems to load.
SPEED
In the early days of the web, developers were told to place the <script> tags in the <head> of the page as you do with style sheets. However, this can make pages seem slower to load.
Your web page may use files from several different locations (e.g., images or CSS files might be loaded from one CDN, jQuery could be loaded from the jQuery or Google CDNs, and fonts might be loaded from another third party).
Usually a browser will collect up to two files at a time from each different server. However, when a browser starts to download a JavaScript file, it stops all other downloads and pauses laying out the page until the script has finished loading and been processed.
Therefore, if you place the script at the end of the page before the closing </body> tag, it will not affect the rendering of the rest of the page.
HTML LOADED INTO THE DOM TREE
Whenever a script is accessing the HTML within a web page, it also needs to have loaded that HTML into the DOM tree before the script can work. (This is often referred to as the DOM having loaded.)
You can use the load event to trigger a function so that you know the HTML has loaded. However, it fires only when the page and all of its resources load. You can also use the HTML5 DOMContentLoaded event, but it does not work in older browsers.
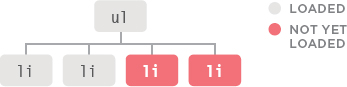
If the script tries to access an element before it has loaded, it causes an error. In the diagram above, the script could access the first two <li> elements, but not the third or fourth.
Where possible, do consider using alternatives to scripts. For example, use CSS for animations or HTML5's autofocus attribute rather than using the load event to bring focus to an element.
If your page is slow to load and you only want to include a small amount of code before the rest of the page has loaded, you can place a <script> tag within the body of the page.
At the time of writing, this technique was commonly used by Google for speed advantages, but it is acknowledged that it makes code much harder to maintain.
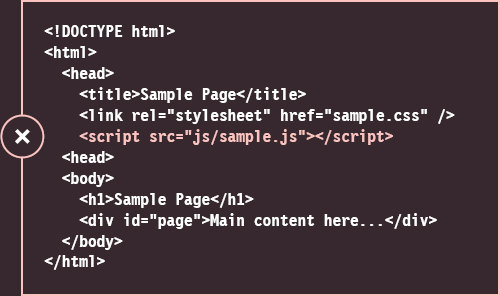
IN THE HEAD
This location is best avoided as:
1. Pages seem slower to load.
2. DOM content is not loaded, when the script is executed so you have to wait for an event like load or DOMContentLoaded to trigger your functions.
If you must use a <script> element within the head of the page, it should be just before the closing </head> tag.
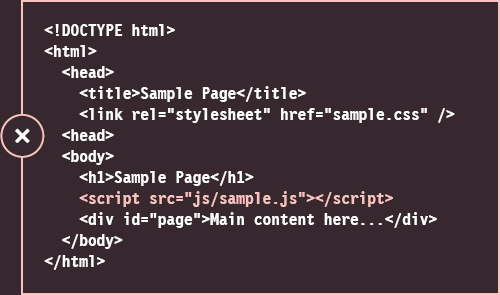
IN THE PAGE
As with scripts in the <head>, those in the middle of the page will slow the rest of the page down when it is loading.
If you use document.write(), the <script> element has to be placed where you want that content to appear. This is one of several good reasons to avoid using document.write().
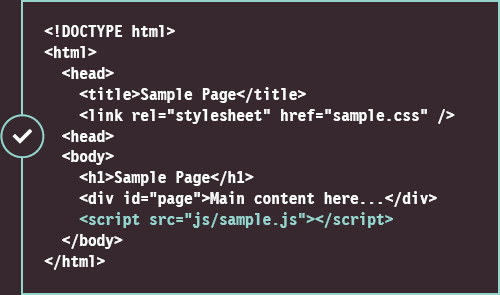
BEFORE THE CLOSING </body> TAG
This is an ideal location as:
1. The script is not blocking other things from downloading.
2. The DOM has already loaded by the time the script is executed.
JQUERY DOCUMENTATION
For an exhaustive list of the functionality provided in jQuery, visit http://api.jquery.com
It is not possible to teach you everything about jQuery in one (albeit long) chapter. But you have seen many of the most popular features, and you should now know enough about jQuery to understand how it works and how to make use of it in your scripts.
Throughout the remaining chapters of this book, you will see many more examples that use jQuery.
What you have learned should also give you enough experience to work with the comprehensive jQuery documentation available online at: http://api.jquery.com
This site lists each method and property available to you, along with new functionality added in the latest versions, and notes that indicate which features are scheduled to be dropped.
HOW THE DOCUMENTATION WORKS
On the left-hand side of the page, you will see the different types of functionality that you can explore.
When you click on any of the methods in the main column, you will see a list of the parameters that it can take. When parameters are optional, they are shown in square brackets.
You will also find deprecated methods. This means that you are no longer advised to use this markup because it is likely to be removed from future versions of jQuery (if it has not already been removed).
EXTENDING JQUERY WITH PLUGINS
Plugins are scripts that extend the functionality of the jQuery library. Hundreds have been written and are available for you to use.
Plugins offer functionality that is not included in the jQuery library. They usually deal with a particular task such as creating slideshows or video players, performing animations, transforming data, enhancing forms, and displaying new data from a remote server.
To get an idea of the number and range of plugins available, see http://plugins.jquery.com. All of these are free for you to download and use on your own sites. You may also find other sites listing jQuery plugins for sale (such as codecanyon.net).
Plugins are written so that new methods extend the jQuery object and can, therefore, be used on a jQuery selection. As long as you know how to do the following with jQuery:
- Make a selection of elements
- Call a method and use parameters
You can use a lot of the functionality of these plugins without having to write the code yourself. In Chapter 11, you will see an example of how to create a basic jQuery plugin.
HOW TO CHOOSE A PLUGIN
When you are choosing a plugin to work with, it can be worth checking that it is still being maintained or whether other people have experienced problems using it. Finding out the following can help:
- When was the plugin last updated?
- How many people are watching the plugin?
- What do the bug reports say?
If you ask a question or find a bug in a script, bear in mind that their authors may have a day job and only maintain these plugins in their spare time to help others and to give back to the community.
JAVASCRIPT LIBRARIES
jQuery is an example of what programmers call a JavaScript library. It is a JavaScript file that you include in your page, which then lets you use the functions, objects, methods, and properties it contains.
The concept of a library is that it allows you to borrow code from one file and use its functions, objects, methods, and properties in another script.
Once you have included the script in your page, its functionality is available to use. The documentation for the library will tell you how to use it.
DOM & EVENTS
Zepto.js
YUI
Dojo.js
MooTools.js
TEMPLATING
Mustache.js
Handlebars.js
jQuery Mobile
jQuery is the most widely used library on the web, but when you have learned it, you might like to explore some of the other libraries listed below.
Popular libraries have the advantage that they will be well-tested, and some have a whole team of developers who work on them in their spare time.
USER INTERFACE
jQuery UI
jQuery Mobile
Twitter Bootstrap
YUI
WEB APPLICATIONS
Angular.js
Backbone.js
Ember.js
One of the main drawbacks with a library is that they will usually contain functionality that you will not need to use. This means users have to download code that will not be needed (which can slow your site down). You may find that you can strip out the subset of the library you need or indeed write your own script to do that job.
GRAPHICS & CHARTS
Chart.js
D3.js
Processing.js
Raphael.js
COMPATIBILITY
Modernizr.js
YepNope.js
Require.js
PREVENTING CONFLICTS WITH OTHER LIBRARIES
Earlier in the chapter, you saw that $() was shorthand for jQuery(). The $ symbol is used by other libraries such as prototype.js, MooTools, and YUI. To avoid conflicts with those scripts, use these techniques.
INCLUDING JQUERY AFTER OTHER LIBRARIES
Here, jQuery's meaning of $ takes precedence:
<script src=”other.js”></script>
<script src=”jquery.js”></script>
You can use the .noConflict() method at the start of your script, to tell jQuery to release the $ shortcut so that other scripts can use it. Then you can use the full name rather than the shortcut:
jQuery.noConflict();
jQuery(function() {
    jQuery(‘div’).hide();
});
You can wrap your script in an IIFE and still use $:
jQuery.noConflict();
(function($) {
    $(‘div’).hide();
})(jQuery);
Or you can specify your own alias instead, e.g., $j:
var $j = jQuery.noConflict();
$j(document).ready(function() {
    $j(‘div’).hide();
});
INCLUDING JQUERY BEFORE OTHER LIBRARIES
Here, the other scripts' use of $ takes precedence:
<script src=”jquery.js”></script>
<script src=”other.js”></script>
$ will have the meaning defined in the other library. There is no need to use the .noConflict() method because it will have no effect. But you can continue to use the full name jQuery:
jQuery(document).ready(function() {
    jQuery(‘div’).hide();
});
You can pass $ as an argument to the anonymous function called by the .ready() method like so:
jQuery(document).ready(function($) {
    $(‘div’).hide();
});
This is equivalent to the code shown above:
jQuery(function($){
    $(‘div’).hide();
});
EXAMPLE
JQUERY
This example brings together a number of the techniques you have seen in this chapter to create a list that users can add items to and remove items from.
- Users can add new list items.
- They can also click to indicate that an item is complete (at which point it is moved to the bottom of the list and marked as complete).
- Once an item is marked as complete, a second click on the item will remove it from the list.
An updated count of the number of items there are in the list will be shown in the heading.
As you will see, the code using jQuery is more compact than it would be if you were writing this example in plain JavaScript, and it will work across browsers even though there is no explicit fallback code.
Because new items can be added to the list, the events are handled using event delegation. When the user clicks anywhere on the <ul> element, the .on() event method handles the event. Inside the event handler, there is a conditional statement to check whether the list item is:
- Not complete - in which case, the click is used to change the item to complete, move it to the bottom of the list, and update the counter.
- Complete - in which case, the second click on the item fades it out and removes it from the list altogether.
The use of conditional statements and custom functions (used for the counter) illustrate how jQuery techniques are used in combination with traditional JavaScript that you have been learning throughout the book.
The appearance and removal of the elements is also animated, and these animations demonstrate how methods can be chained together to create complex interactions based on the same selection of elements.
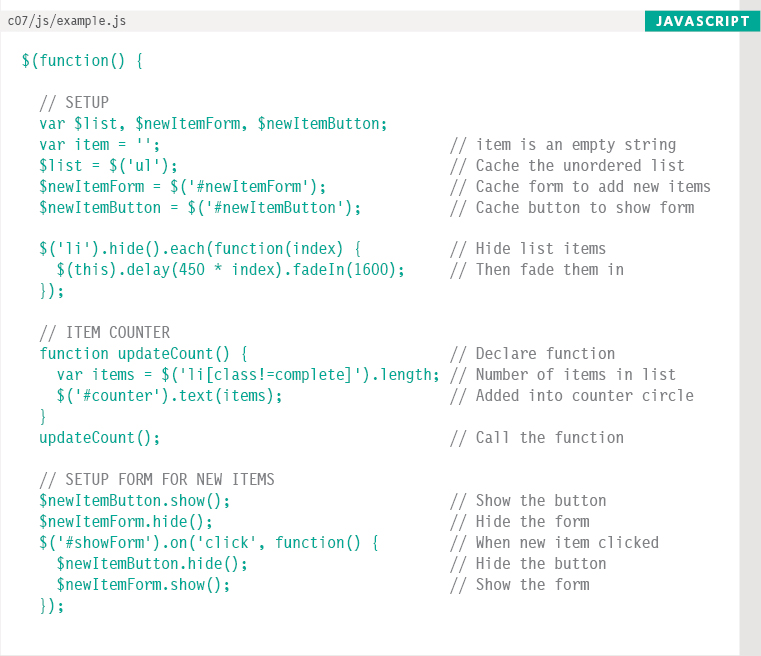
The entire script will wait until the DOM is ready before running, because it is inside the shorthand for the document.ready() method. Variables are created that will be used in the script, including jQuery selections that need to be cached.
The updateCounter() function checks how many items are in the list and writes it into the heading. It is called straight away to calculate how many list items are on the page when it loads, and then write that number next to the heading.
The form to add new items is hidden when the page loads, and is shown when the user clicks on the add button. When the user clicks on the add button a new item is added to the form and the updateCounter() is called.
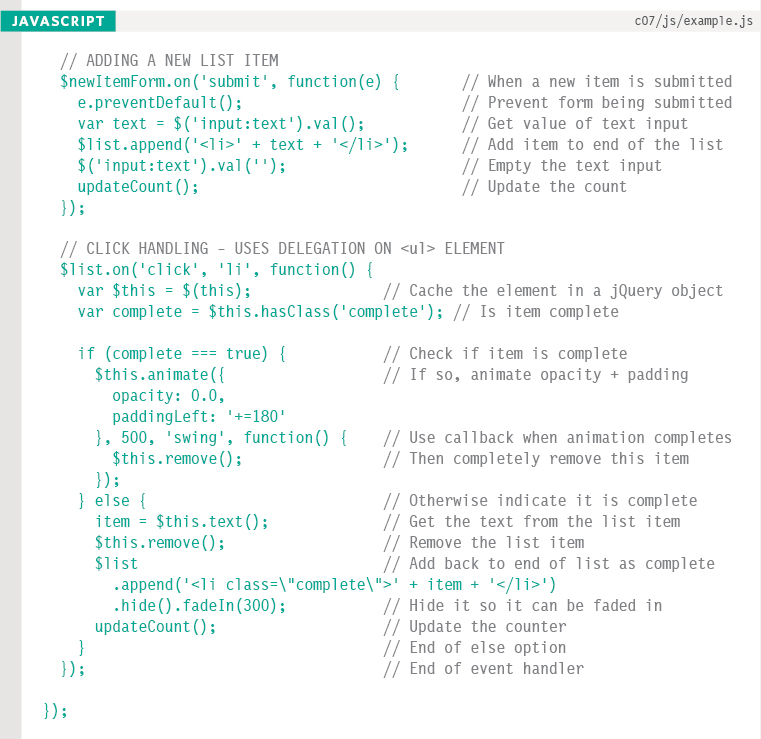
The .on() event method listens for the user clicking anywhere on the list because this script uses event delegation. When they do, the element that was clicked on is stored in a jQuery object and cached in a variable called $this.
Next, the code checks if that element has a class name of complete. If it does, then the list item is animated out of view and removed. If it was not already complete, then it is moved to the end of the list.
When it is added to the end of the list, its class attribute is given a value of complete.
Finally, updateCount() is called to update the number of items left to do on the list.
JQUERY
- jQuery is a JavaScript file you include in your pages.
- Once included, it makes it faster and easier to write cross-browser JavaScript, based on two steps:
1. Using CSS-style selectors to collect one or more nodes from the DOM tree.
2. Using jQuery's built-in methods to work with the elements in that selection.
- jQuery's CSS-style selector syntax makes it easier to select elements to work with. It also has methods that make it easier to traverse the DOM.
- jQuery makes it easier to handle events because the event methods work across all browsers.
- jQuery offers methods that make it quick and simple to achieve a range of tasks that JavaScript programmers commonly need to perform.