

HELPER FUNCTIONS
The first section of this chapter uses plain JavaScript, no jQuery. We will create our own JavaScript file to handle cross-browser issues, it will contain one helper function to create events.
Forms use a lot of event handlers and (as you saw in Chapter 6) IE5-8 used a different event model than other browsers. You can use jQuery to deal with cross-browser event handling. But, if you do not want to include the entire jQuery script just to handle events in older version of IE, then you need to write your own fallback code to handle the events.
Instead of writing the same fallback code every time you need an event handler, you can write the fallback code once in a helper function, and then call that function every time you need to add an event handler to a page.
On the right-hand page you can see a function called addEvent(). It lives in a file called utilities.js. Once that file has been included in the HTML page, any scripts included after it will be able to use this function to create cross-browser event handler:
![]()
The function takes three parameters:
i) el is a DOM node representing the element that the event will be added to or removed from.
ii) event is the type of event being listened for.
iii) callback is the function that is to be run when the event is triggered on that element.
The utilities.js file on the website also has a method to remove events.
If you look inside the addEvent() method on the right-hand page, a conditional statement checks whether the browser supports addEventListener(). If it does, a standard event listener will be added. If not, then the IE fallback will be created.
The fallback addresses three points:
- It uses IE's the attachEvent() method.
- In IE5-8, the event object is not automatically passed into the event-handling function (and is not available via the this keyword) see p264. Instead it is available on the window object. So the code must pass the event object into the event handler as a parameter.
- When you pass parameters to an event-handling function, the call must be wrapped in an anonymous function see p256.
To achieve this, the fallback adds two methods to the element the event handler will be placed upon (see steps 5 and 6 on the right-hand page). It then uses IE's attachEvent() method to add the event handler code to the element.
The functions demonstrate two new techniques:
- Adding new methods to DOM nodes: You can add methods to DOM nodes because they are just objects (that represent elements).
- Creating method names using a variable: Square brackets can be used to set a property/method, their content is evaluated into a string.
UTILITIES FILE
Here, you can see the addEvent() function that will be used to create all of the event handlers in this chapter. It lives in a file called utilities.js.
These reusable functions are often referred to as helper functions. As you write more JavaScript, you are increasingly likely to create this type of function.
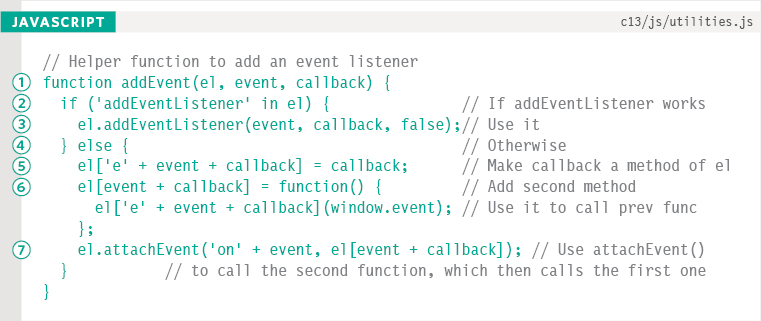
1. The addEvent() function is declared with three parameters: element, event type, callback function.
2. A conditional statement checks if the element supports the addEventListener() method.
3. If it does, then addEventListener() is used.
4. If not, the fallback code will run instead.
The fallback must add two methods to the element the event handler will be placed upon. It then uses Internet Explorer's attachEvent() method to call them when the event occurs on that element.
5. The first method added to the element is the code that should run when the event occurs on this element (it was the third parameter of the function).
6. The second method calls the method from the previous step. It is needed in order to pass the event object to the function in step 5.
7. The attachEvent() method is used to listen for the specified event, on the specified element. When the event fires, it calls the method that it added in step 6, which in turn calls the method in step 5 using the correct reference to the event object.
In steps 5 and 6, square bracket notation is used to add a method name to an element:
![]()
i) The DOM node is stored in el. The square brackets add the method name to that node. That method name must be unique to that element, so it is created using three pieces of information.
ii) The method names are made up of:
- The letter e (used for the first method in step 5 but not used in step 6)
- The event type (e.g., click, blur, mouseover)
- The code from the callback function
In the code on the right-hand page, the value of this method is the callback function. (This could lead to a long method name, but it serves the purpose.) This function is based on one by John Resig, who created jQuery (http://ejohn.org/projects/flexible-javascript-events/).
THE FORM ELEMENT
DOM nodes for form controls have different properties, methods, and events than some of the other elements you have met so far. Here are some you should note for the <form> element.
| PROPERTY | DESCRIPTION |
| action | The URL the form is submitted to |
| method | If it is to be sent via GET or POST |
| name | Rarely used, more common to select a form by the value of its id attribute |
| elements | A collection of the elements in the form that users can interact with. They can be accessed via index numbers or the values of their name attributes. |
The DOM methods you saw in Chapter 5, such as getElementById(), getElementsByTagName(), and querySelector(), are the most popular techniques for accessing both the <form> element and the form controls within any form. However, the document object also has something called the forms collection. The forms collection holds a reference to each of the <form> elements that appear on a page.
Each item in a collection is given an index number (a number starting at 0, like an array). This would access the second form using its index number:
document.forms[1];
You can also access a form using the value of its name attribute. The following would select a form whose name attribute has a value of login:
document.forms.login
| METHOD | DESCRIPTION |
| submit() | This has the same effect as clicking the submit button on a form |
| reset() | Resets the form to the initial values it had when the page loaded |
| EVENT | DESCRIPTION |
| submit | Fires when the form is submitted |
| reset | Fires when the form is reset |
Each <form> element in the page also has an elements collection. It holds all of the form controls within that form. Each item in the elements collection can also be accessed by index number or by the value of its name attribute.
The following would access the second form on the page and then select the first form control within it:
document.forms[1].elements[0];
The following would access the second form on the page, then select the element whose name attribute had a value of password from that form:
document.forms[1].elements.password;
Note: index numbers in a collection of elements can change if the markup of a page is altered. So, use of index numbers ties a script to the HTML markup (- it does not achieve a separation of concerns).
FORM CONTROLS
Each type of form control uses a different combination of the properties, methods, and events shown below. Note that the methods can be used to simulate how a user would interact with the form controls.
| PROPERTY | DESCRIPTION |
| value | In a text input, it is the text the user entered; otherwise, it is the value of the value attribute |
| type | When a form control has been created using the <input> element, this defines the type of the form element (e.g., text, password, radio, checkbox) |
| name | Gets or sets the value of the name attribute |
| defaultValue | The initial value of a text box or text area when the page is rendered |
| form | The form that the control belongs to |
| disabled | Disables the <form> element |
| checked | Indicates which checkbox or radio buttons have been checked. This property is a Boolean; in JavaScript it will have a value of true if checked |
| defaultChecked | Whether the checkbox or radio button was checked or not when the page loaded (Boolean) |
| selected | Indicates that an item from a select box has been selected (Boolean - true if selected) |
| METHOD | DESCRIPTION |
| focus() | Gives an element focus |
| blur() | Removes focus from an element |
| select() | Selects and highlights text content of an element, (e.g., text inputs, text areas, and passwords) |
| click() | Triggers a click event upon buttons, checkboxes, and file upload Also triggers a submit event on a submit button, and the reset event on a reset button |
| EVENT | DESCRIPTION |
| blur | When the user leaves a field |
| focus | When the user enters a field |
| click | When the user clicks on an element |
| change | When the value of an element changes |
| input | When the value of an <input> or <textarea> element changes |
| keydown, keyup, keypress | When the user interacts with a keyboard |
SUBMITTING FORMS
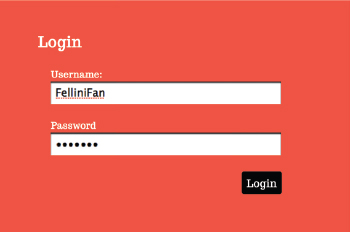
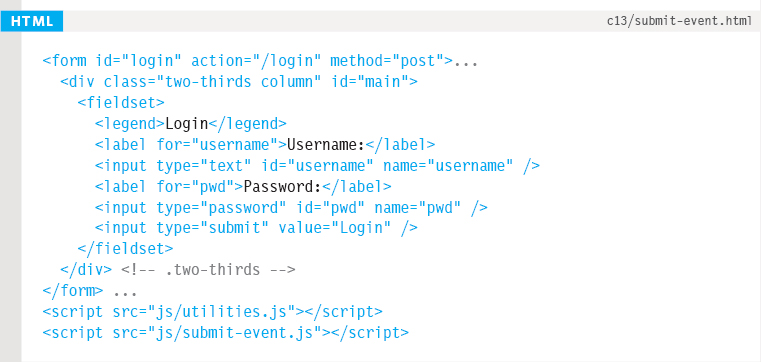
In this example, a basic login form lets users enter a username and password. When the user submits the form, a welcome message will replace the form. On the right-hand page you can see both the HTML and the JavaScript for this example.
1. Place the script in an Immediately Invoked Function Expression (IIFE see p97). (This is not shown in the flowchart.)
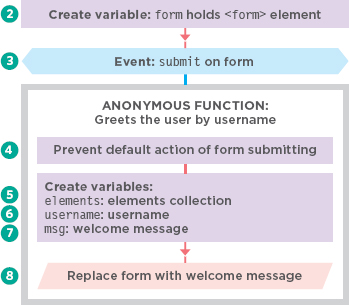
2. A variable called form is created and it is set to hold the <form> element. It is used in the event listener in the next line of code.
3. An event listener triggers an anonymous function when the form is submitted. Note how this is set using the addEvent() function that was created in the utilities.js file that you saw on p571.
4. To prevent the form being sent (and to allow this example to show a message to the user) the preventDefault() method is used on the form.
5. The collection of elements in this form is stored in a variable called elements.
6. To get the username, first select the username input from the elements collection using the value of its name attribute. Then, to get the text the user entered, the value property of that element is used.
7. A welcome message is created and stored in a variable called msg; this message will incorporate the username that the visitor entered.
8. The message replaces the form within the HTML.
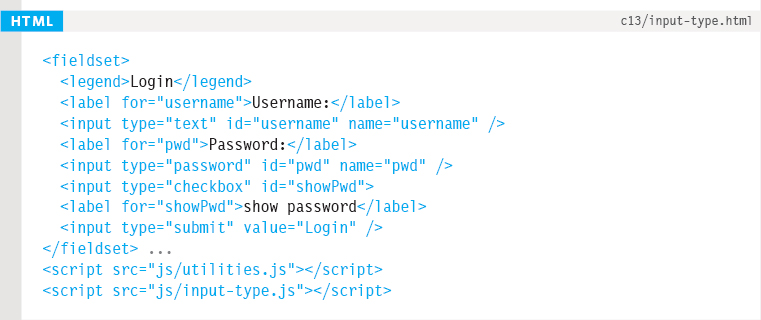
In the HTML page, the utilities.js file you saw on p571 is included before the submit-event.js script because its addEvent() function is used to create the event handlers for this example. utilities.js is included for all examples in this section.
The event listener waits for the submit event on the form (rather than a click on the submit button) because the form can be submitted in other ways than clicking on the submit button. For example, the user might press the Enter key.
THE SUBMIT EVENT & GETTING FORM VALUES

When selecting a DOM node, if you are likely to use it again, it should be cached. On the right, you can see a variation of the above code, where the username and the main element have both been stored in variables outside of the event listener. If the user had to resubmit the form, the browser would not have to make the same selections again.
var form = document.getElementById(‘login’);
var elements = form.elements;
var elUsername = elements.username;
var elMain = document.getElementById(‘main’);
addEvent(form, ‘submit’, function(e) {
e.preventDefault();
var msg = ‘Welcome ’ + elUsername.value;
elMain.textContent = msg;
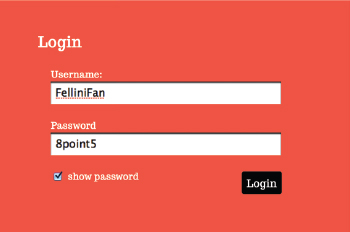
});CHANGING TYPE OF INPUT
This example adds a checkbox under the password input. If the user checks that box, their password will become visible. It works by using JavaScript to change the type property of the input from password to text. (The type property in the DOM corresponds to type attribute in the HTML.)
Changing the type property causes an error in IE8 (and earlier), so this code is placed in a try… catch statement. If the browser detects an error, the script continues to run the second code block.
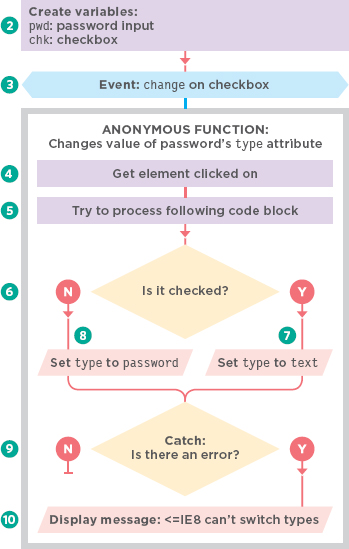
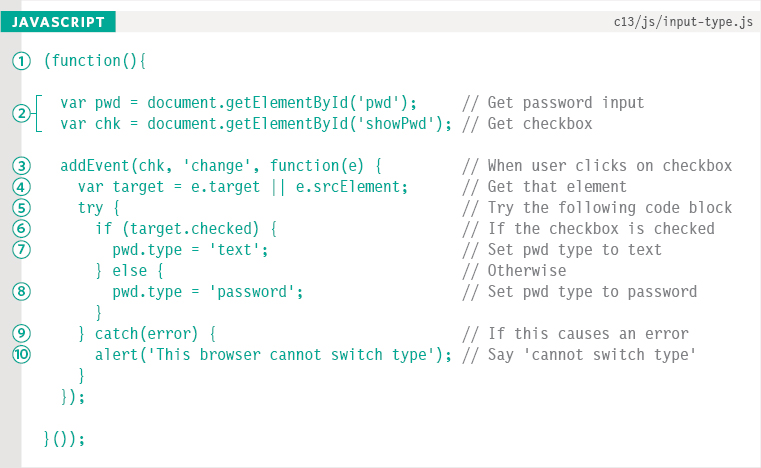
1. Place the script in an IIFE (not shown in flowchart).
2. Put password input and checkbox in variables.
3. An event listener triggers an anonymous function when the show password checkbox is changed.
4. The target of the event (the checkbox) is stored in a variable called target. As you saw in Chapter 6, e.target will retrieve this for most browsers. e.srcElement is only used for old versions of IE.
5. A try… catch statement checks if an error is caused when the type attribute is updated.
6. If the checkbox is selected:
7. The value of the password input's type attribute is set to text.
8. Otherwise, it is set to password.
9. If trying to change the type causes an error, the catch clause runs another code block instead.
10. It shows a message to tell the user.
As you saw in Chapter 10, an error can stop a script from running. If you know something may cause an error for some browsers, placing that code in a try… catch statement lets the interpreter continue with an alternative set of code.
SUBMIT BUTTONS
This script disables the submit button when:
- The script first loads. The change event then checks when the password changes and enables submit if the password is given a value.
- The form has been submitted (to prevent the form being sent multiple times).
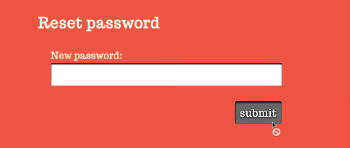
The button is disabled using the disabled property. It corresponds with the HTML disabled attribute, and can be used to disable any form elements that a user can interact with. A value of true disables the button; false lets the user click on it.
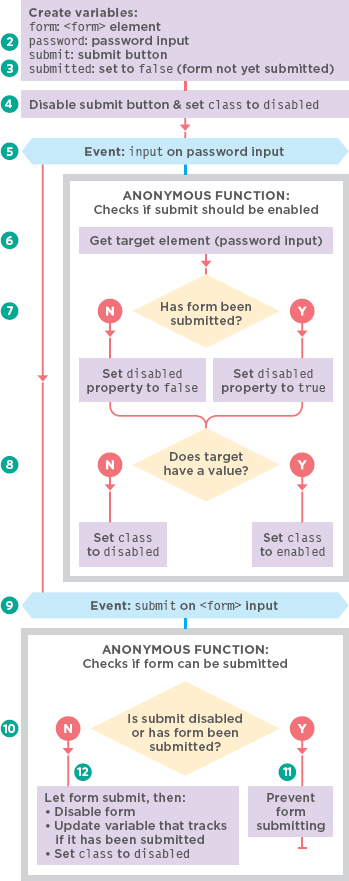
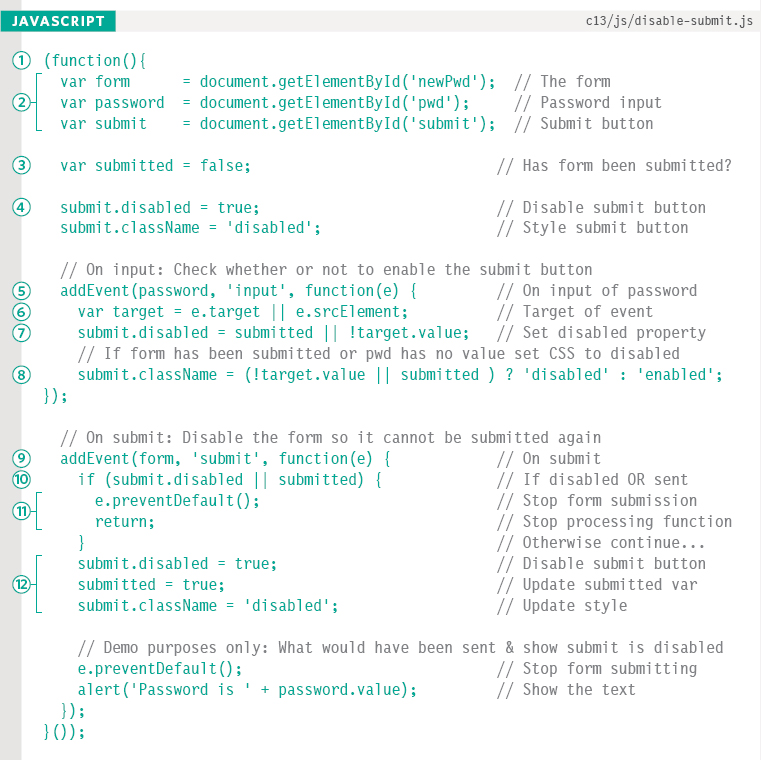
1. Place the script in an IIFE (not shown in flowchart).
2. Store the form, password input, and submit button in variables.
3. The submitted variable is known as a flag; it remembers if the form has been submitted yet.
4. The submit button is disabled at the start of the script (rather than in the HTML) so that the form can still be used if a visitor has JavaScript disabled.
5. An event listener waits for the input event on the password input; it triggers an anonymous function.
6. Store the target of the event in target.
7. If the password input has a value, the submit button is enabled, and (8) its style updated.
9. A second event listener checks for when the user submits the form (and runs an anonymous function).
10. If the submit button is disabled, or the form has been submitted, the subsequent code block is run.
11. The default action of the form (submitting) is prevented, and return leaves the function.
12. If step 11 did not run, the form is submitted, the submit button disabled, the submitted variable updated with a value of true, and its class updated.

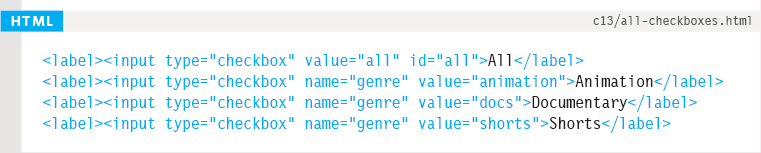
CHECKBOXES
This example asks users about their interests. It has an option to select or deselect all of the checkboxes. It has two event handlers:
- The first fires when the all checkbox is selected; it loops through the options, updating them.
- The second fires when the options change; if one is deselected, the all option must be deselected.

You can use the change event to detect when the value of a checkbox, radio button, or select box changes. Here, it is used to tell when the user selects / deselects a checkbox. The checkboxes can be updated using the checked property, which corresponds with HTML's checked attribute.
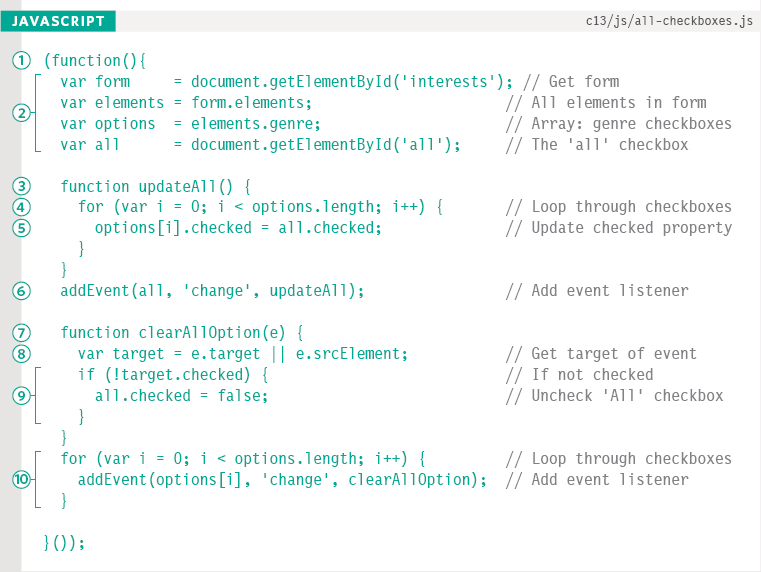
1. Place the script in an IIFE (not shown in flowchart).
2. The form, all of the form elements, the options, and the all checkbox are stored in variables.
3. The updateAll() function is declared.
4. A loop runs through each of the options.
5. For each one, the checked property is set to the same value as the checked property on the all option.
6. An event listener waits for the user to click on the all checkbox, which fires a change event and calls the updateAll() function.
7. The clearAllOption() function is defined.
8. It gets the target of the option the user clicked on.
9. If that option is deselected, then the all option is also deselected (as they are no longer all selected).
10. A loop runs through the options, adding an event listener. When the change event happens on any of them, clearAllOption() is called.

RADIO BUTTONS
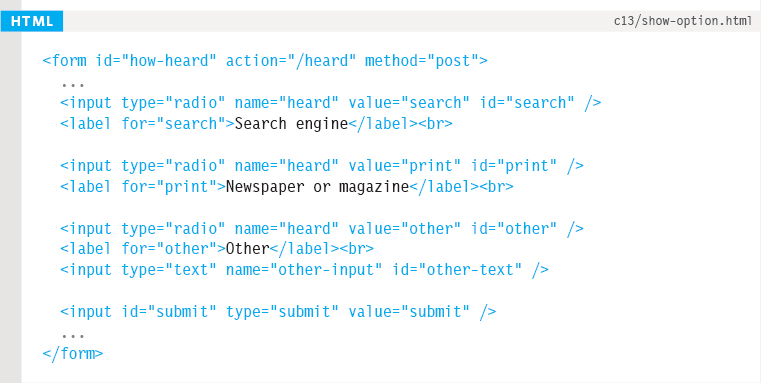
This example lets users say how they heard about a website. Every time the user selects a radio button, the code checks if the user selected the option that says other, and one of two things happens:
- If other is selected, a text input is shown so they can add further detail.
- If the first two options are selected, the text box is hidden and its value is emptied.

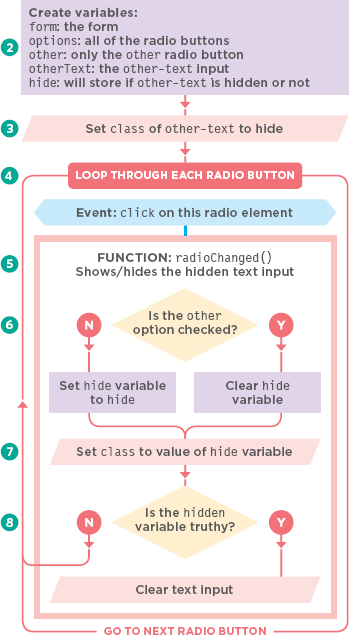
1. Place the script in an IIFE (not shown in flowchart).
2. The code starts out by setting up variables to hold the form, all radio buttons, the radio button for the other option, and the text input.
3. The text input is hidden. This uses JavaScript to update the class attribute so that the form still works if the user has JavaScript disabled.
4. Using a for loop, an event listener is added to each of the radio buttons. When one of them is clicked, the radioChanged() function is called.
5. The radioChanged() function is declared.
6. If other is checked, the value of the hide variable is set to be a blank string, otherwise it is set to hide.
7. The hide variable is, in turn, used to set the value of the class attribute on the text input. If it is blank, the other option is shown; if it has a value of hide, the text input is hidden.
8. If the hide attribute has a value of hide, then the contents of the text input are emptied (so that the text input is blank if it is shown).

SELECT BOXES
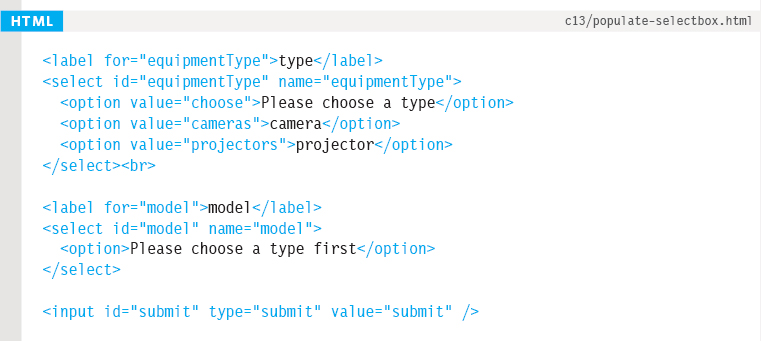
The <select> element is more complex than the other form controls. Its DOM node has a number of extra properties and methods. Its <option> elements contain the values a user can select.
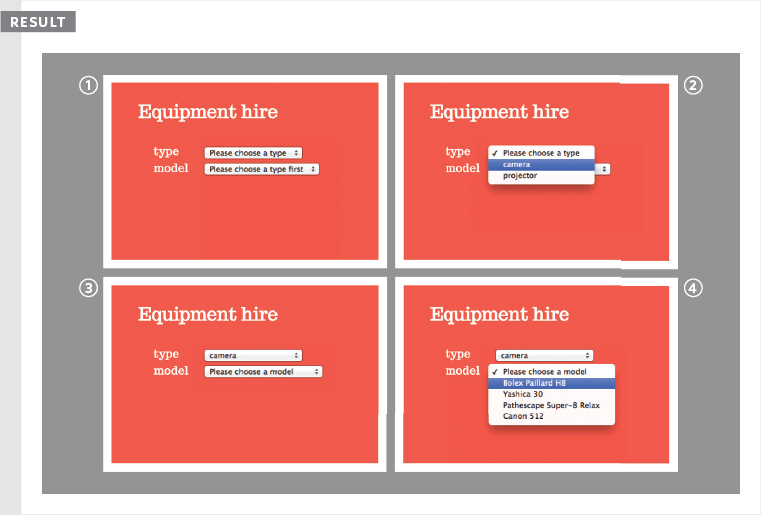
This example features two select boxes. When the user selects an option from the first select box, the contents of the second select box are updated with corresponding options.
In the first select box, users can choose to rent a camera or a projector. When they make their choice, a list of options are shown in the second select box. Because this example is a bit more complex than the ones you have seen so far in this chapter, the HTML and screen shots are shown to the right, and the JavaScript file is discussed on p586-p587.
When the user selects an option from the dropdown list, the change event fires. This event is often used to trigger scripts when the user changes the value of a select box.
The <select> element also has some extra properties and methods that are specific to it; these are shown in the tables below.
If you want to work with the individual options the user can select from, a collection of <option> elements is available.
| PROPERTY | DESCRIPTION |
| options | A collection of all the <option> elements |
| selectedIndex | Index number of the option that is currently option |
| length | Number of options |
| multiple | Allows users to select multiple options from the select box (Rarely used because the user-experience is not very good) |
| selectedOptions | A collection of all the selected <option> elements |
| METHOD | DESCRIPTION |
| add(option, before) | Adds an item to the list: The first parameter is the new option; the second is the element it should go before If no value is given, the item will be added to the end of the options |
| remove(index) | Removes an item from the list: Has only one parameter - the index number of the option to be removed |
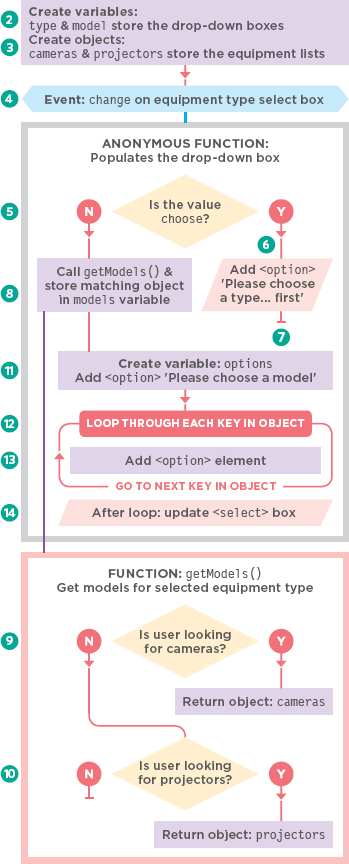
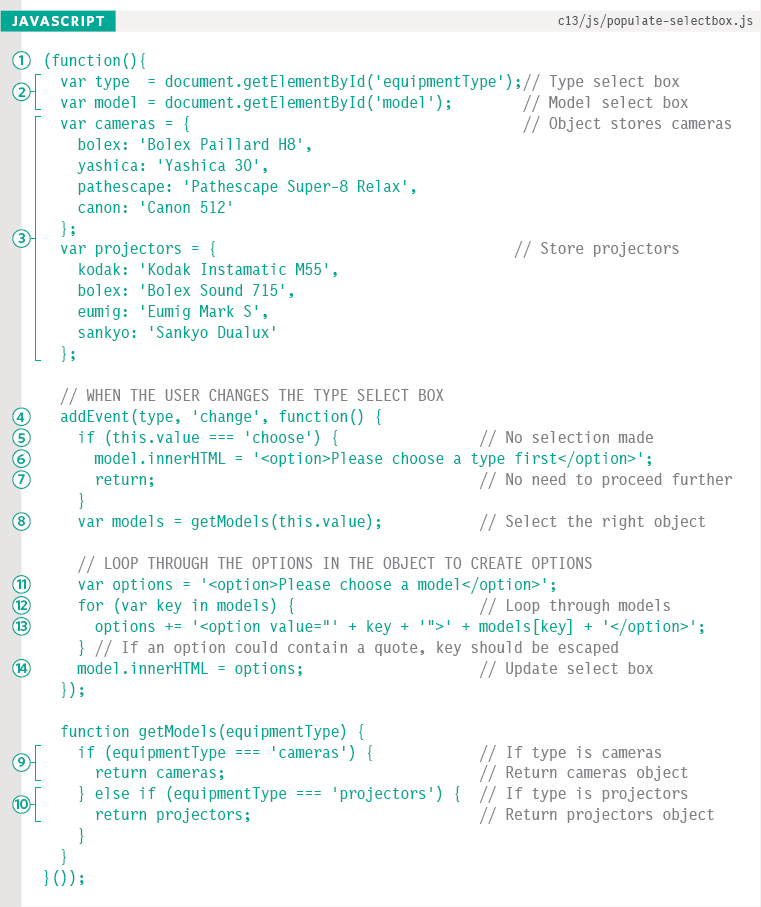
1. Place the script in an IIFE (not shown in flowchart).
2. Variables hold the two select boxes.
3. Two objects are created; each one holds options used to populate the second select box (one has types of cameras, the other has types of projectors).
4. When the user changes the first select box, an event listener triggers an anonymous function.
5. The anonymous function checks if the first select box has a value of choose.
6. If so, the second select box is updated with just one option, which tells the user to select a type.
7. No further processing is needed, and the return keyword exits the anonymous function (until the user changes the first select box again).
8. If a type of equipment has been selected, the anonymous function continues to run, and a models variable is created. It will store one of the objects defined in step 3 (cameras or projectors). This correct object is retrieved using the getModels() function declared at the end of the script (9+10). The function takes one parameter this.value, which corresponds to the value from the option that was selected in first select box.
9. Inside the getModels() function, an if statement checks if the value passed in was cameras; if so, it returns the cameras object.
10. If not, it continues to run, checking to see if the value was projectors, and if so, it returns the projectors object.
11. A variable called options is created. It will hold all the <option> elements for the second select box. When this variable is created the first <option> is added to it; it tells users to choose a model.
12. A for loop goes through the contents of the object that was placed in the models variable in step (8-10). Inside the loop, key refers to the individual items in the object.
13. Another <option> element is created for every item in the object. Its value attribute uses the property name from the object. The content that sits between the <option> tags is that property's value.
14. The options are then added to the second select box using the innerHTML property.
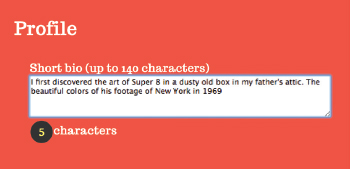
TEXTAREA
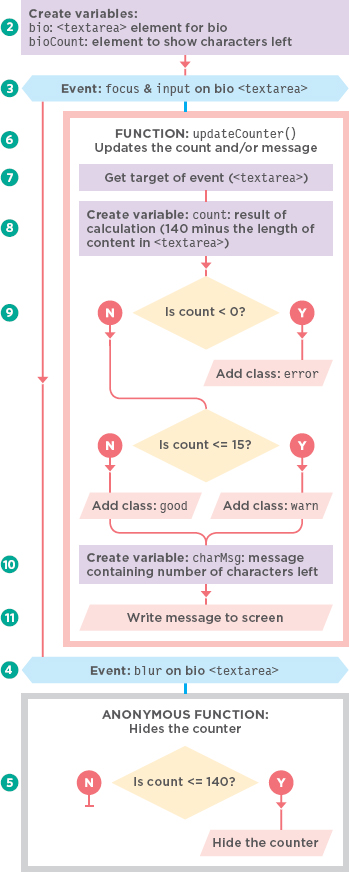
In this example, users can enter a biography of up to 140 characters. When the cursor is in the textarea, a <span> element will be shown with a count of how many characters the user has remaining. When the textarea loses focus, this message is hidden.
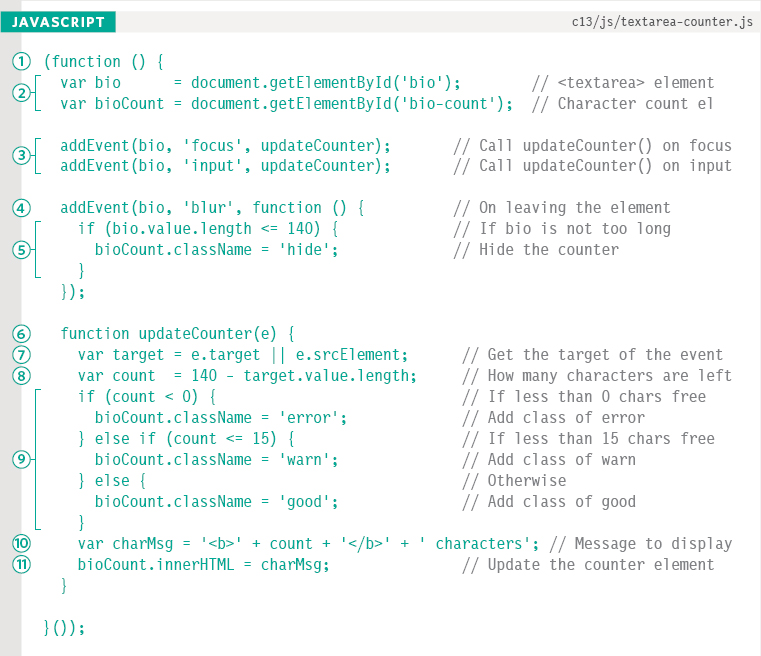
1. Place the script in an IIFE (not shown in flowchart).
2. The script sets up two variables to hold: a reference to the <textarea> element and a reference to the <span> that holds the message.
3. Two event listeners monitor the <textarea>. The first checks for when the element gains focus; the second checks for a input event. Both events trigger a function called updateCounter() (6-11) The input event does not work in IE8, but you can use keyup to support older browsers.
4. A third event listener triggers an anonymous function when the user leaves the <textarea>.
5. If the number of characters is less than or equal to 140 characters, the length of the bio is okay, and it hides the message (because it is not needed when the user is not interacting with the element).
6. The updateCounter() function is declared.
7. It gets a reference to the element that called it.
8. A variable called count holds the number of characters left to use (it does this by subtracting the number of characters used from 140).
9. if… else statements are used to set the CSS class for the element that holds the message (these can also show the message if it was hidden).
10. A variable called charMsg is created to store the message that will be shown to the user.
11. The message is added to the page.

HTML5 ELEMENTS & ATTRIBUTES
HTML5 adds form elements and attributes to perform tasks that had previously been performed by JavaScript. However, their appearance can vary a lot between different browsers (especially their error messages).
SEARCH
<input type=“search”
  placeholder=“Search…”
  autofocus>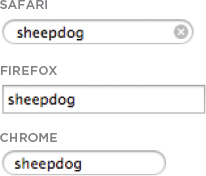
Safari rounds the corners of its search inputs to match the user interface of the operating system. When you enter text, Safari shows a cross icon which, when clicked or tapped, allows the user to clear the text from the field. Other browsers show an input like any other text input.
EMAIL, URL, PHONE
<input type=“email”>
<input type=“url”>
<input type=“telephone”>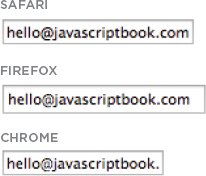
Email, URL, and phone inputs all look like text input fields, but the browser performs checks on the data entered into these inputs to see if it is in the right format to be an email address, URL, or phone number, then shows a message if it is not.
NUMBER
<input type=“number”
  min=“0”
  max=“10”
  step=“2”
  value=“6”>
Number inputs sometimes add arrows to increase or decrease the number specified (also known as spinboxes). You can specify a minimum and a maximum value, a step (or increment), and an initial value. The browser checks that the user entered a number, and shows a message if a number was not entered.
RANGE
<input type=“range”
  min=“0”
  max=“10”
  step=“2”
  value=“6”>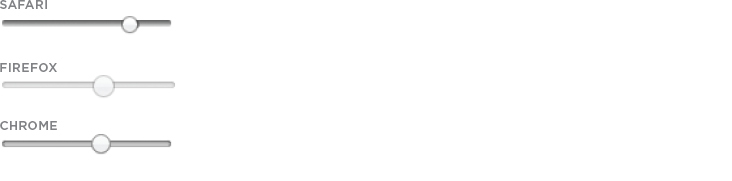
The range input offers another way to specify a number - this time the control shows a slider. As with the spinbox, you can specify a minimum and a maximum value, a step, and an initial value.
COLOR PICKER
<input type=“color”>![]()
At the time of writing, Chrome and Opera are the only browsers to implement a color input. It allows users to specify a color. When they click on the control, the browser will usually show the operating system's default color picker (except for Linux, which offers a more basic palette). It inserts a hex color value based on the user's selection.
DATE
<input type=“date”> (below)
<input type=“month”>
<input type=“week”>
<input type=“time”>
<input type=“datetime”>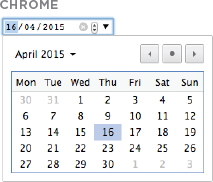
There are several different date inputs available. At the time of writing, Chrome was the only browser to have implemented a date picker.
SUPPORT & STYLING
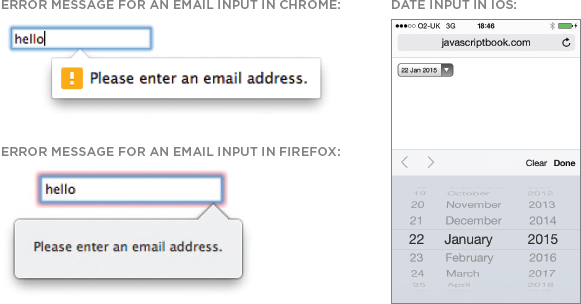
HTML5 form elements are not supported in all browsers and, when they are, the inputs and error messages can look very different.
DESKTOP BROWSERS
At the time of writing, many developers were still using JavaScript instead of these new HTML5 features because:
- Older browsers do not support the new input types (they just show a text box in their place).
- Different browsers present the elements and their error messages in very different ways (and designers often want to give users a consistent experience across browsers).
Below, you can see how the error messages look very different in two of the main browsers.
MOBILE
On mobile devices the situation is very different, as most modern mobile browsers:
- Support the main HTML5 elements
- Show a keyboard that's adapted to the type: email brings up a keyboard with the @ sign number type brings up a number keyboard
- Give helpful versions of the date picker
Therefore, in mobile browsers, the new HTML5 types and elements make forms more accessible and usable for your visitors.
CURRENT APPROACHES
Until more visitors' browsers support these new features, and do so in a consistent way, developers will think carefully about how they use them.
POLYFILLS
A polyfill is a script that provides functionality you may expect a browser to support by default. For example, because older browsers do not support the new HTML5 elements, polyfills can be used to implement a similar experience / functionality in those older browsers. Typically this is achieved using JavaScript or a jQuery plugin.
Polyfills often come with CSS files that are used to style the functionality the script adds.
You can find a list of polyfills for various features here:
http://html5please.com
There is an example of how to use a polyfill on p594, where you see how to get the HTML5 placeholder attribute to show up in older browsers.
FEATURE DETECTION
Feature detection means checking whether a browser supports a feature or not. You can then decide what to do if a feature is, or is not, supported. On p415 you learned about a script called modernizr.js, which tests for browser features.
Commonly, if a feature is not supported, a polyfill script will be loaded to emulate that feature. To save loading the polyfill script into browsers that do not need it, Modernizr includes a conditional loader; it will only load a script if the test indicates that the script is needed.
Another popular conditional loader is Require.js (available from http://requirejs.org), but it is a bit more complex when you are first starting out because it offers many other features.
CONSISTENCY
Many designers and developers want to control the appearance of form controls and error messages to give a consistent experience across all browsers. (Consistency in error messages is considered important because different styles of error messages can confuse users.)
Therefore, the long example used at the end of this chapter will disable HTML5 validation and try to use JavaScript validation as its first choice. (HTML5 validation is only shown if the user does not have JavaScript enabled; it is used as a fallback in modern browsers.)
In that example, you also see jQuery UI used to ensure that the date picker is consistent across all devices, with as little code as possible.
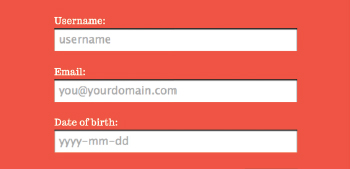
PLACEHOLDER FALLBACK
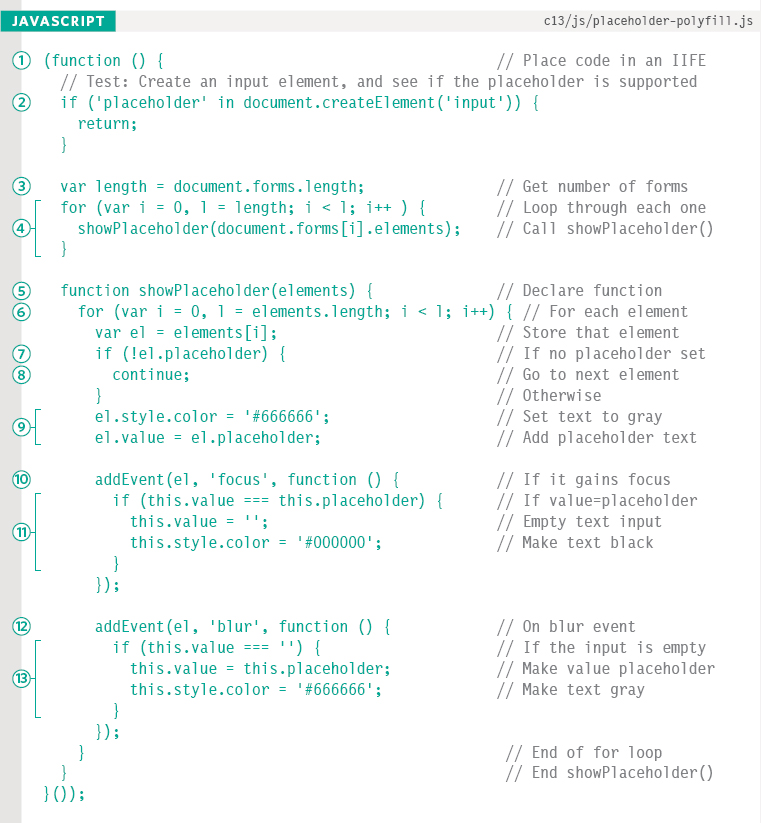
The HTML5 placeholder attribute lets you put words in text inputs (to replace labels or to add hints about what to enter). When the input gains focus and the user starts typing, the text disappears. But it only works in modern browsers, so this script ensures that the user sees placeholder text in older browsers too. It is a basic example of a polyfill.
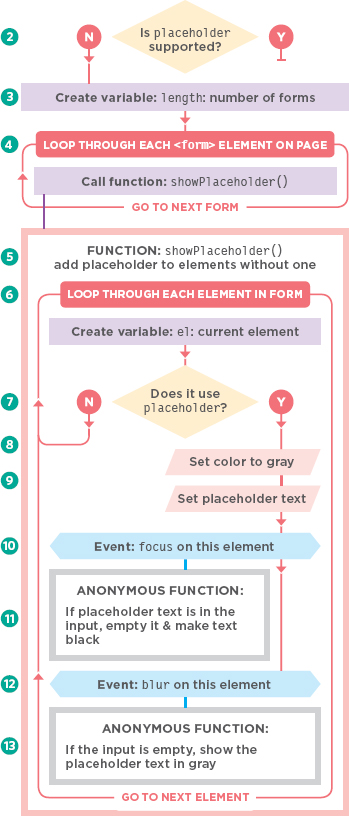
1. Place the script in an IIFE (not shown in flowchart).
2. Check if the browser supports the HTML5 placeholder attribute. If it does, there is no need for the fallback. Use return to exit the function.
3. Find out how many forms are on the page using the length property of the forms collection.
4. Loop through each <form> element on the page and call showPlaceholder() for each one, passing it the collection of elements in that form.
5. The showPlaceholder() function is declared.
6. A for loop runs through elements in the collection.
7. An if statement checks each element to see if the element has a placeholder attribute with a value.
8. If there is no placeholder attribute, continue tells it to go on to the next element. Otherwise, it:
9. Changes the text color to gray, and sets the value of the element to be the placeholder text.
10. An event listener triggers an anonymous function when the element gains focus.
11. If the current value of the element matches the placeholder text, the value is cleared (and color changed to black).
12. An event listener triggers an anonymous function when the element loses focus.
13. If the input is empty, the placeholder text is added back in (and its color changed to gray).
PLACEHOLDER POLYFILL
There are a few differences from the HTML5's placeholder attribute: e.g., if the user deletes their text, the placeholder only returns when the user leaves the input (not immediately - as with some browsers). It will not submit text that has the same value as the placeholder. Placeholder values may be saved by autocomplete.
POLYFILL USING MODERNIZR & YEPNOPE
You met Modernizr in Chapter 9, here you can see it used with a conditional loader so that it only loads a fallback script if one is needed.
Modernizr lets you test whether or not a browser and device support certain features; this is known as feature detection. You can then take different courses of action depending on whether or not the features were supported. For example, if an older browser does not support a feature, you might decide to use a polyfill.
Modernizr is sometimes included in the <head> of an HTML page when it needs to perform checks before the page has loaded (for example, some HTML5 / CSS3 polyfills must be loaded before the page).
MODERNIZR ON ITS OWN
Each feature you test using Modernizr becomes a property of the Modernizr object. If the feature is supported, the property contains true; if not, it contains false. You then use the properties of the Modernizr object in a conditional statement as shown below. Here, if Modernizr's cssanimations property does not return true the code in the curly braces runs.
if (!Modernizr.cssanimations) {
  // CSS animations are not supported
  // Use jQuery animation instead
}
Rather than loading a polyfill script for everyone who visits your site (even if they do not need to use it), you can use something called a conditional loader, which will let you load different files depending on whether a condition returns true or false. Modernizr is commonly used with a conditional loader called YepNope.js, so polyfills are only loaded if needed.
Once you have included the YepNope script in your page, you can call the yepnope() function. It uses object literal syntax to indicate a condition to test, and then what files to load depending on whether the condition returned true or false.
MODERNIZR + YEPNOPE
YepNope is passed an object literal, which usually contains a minimum of three properties:
- test is the a condition being checked. Here Modernizr is used to check if cssanimations are supported.
- yep is the file to load if the condition returns true.
- nope is the file to load if the condition returns false (here it loads two files using array syntax).
yepnope({
  test: Modernizr.cssanimations,
  yep: ‘css/animations.css’,
  nope: [‘js/jquery.js’, ‘js/animate.js’]
});
CONDITIONAL LOADING OF A POLYFILL

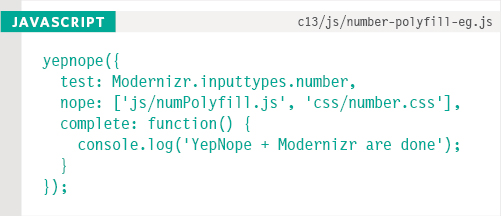

This example tests if the browser supports the <input> element using a type attribute with a value of number. Both Modernizr and YepNope are included in the <head> of the page so that the fallback is shown correctly.
The yepnope() function takes an object literal as a parameter. It's properties include:
- test: the feature you are checking for. In this case it is checking Modernizr to see if the number input is supported.
- yep: not used in this example can load files if the feature is supported.
- nope: what to do if feature is not supported (you can load multiple files in an array).
- complete: can run a function when the checks are complete, and any necessary files have loaded. Here it adds a message to the console to demonstrate how it works.
Note that Modernizr stores the value of the <input> element's type attribute, in a child object called inputtypes. E.g., to check if the HTML5 date selector is supported, you use:
Modernizr.inputtypes.date (not Modernizr.date).
FORM VALIDATION
The final section of this chapter uses one big script to discuss the topic of form validation. It helps users give you responses in the format you need. (The example also has some form enhancements, too.)
Validation is the process of checking whether a value meets certain rules (for example, that a password has a minimum number of characters). It lets you tell users if there is a problem with the values they entered so that they can correct the form before they resubmit it. This has three key advantages:
- You are more likely to get the information you need in a format you can use.
- It is faster to check values in the browser than it is to send data to the server to be checked.
- It saves resources on the server.
In this section you see how to check the values a user enters into a form. These checks happen when the form is submitted. To do this users could press submit or use the Enter on the keyboard, so the validation process will be triggered by the submit event (not the click event of a submit button).
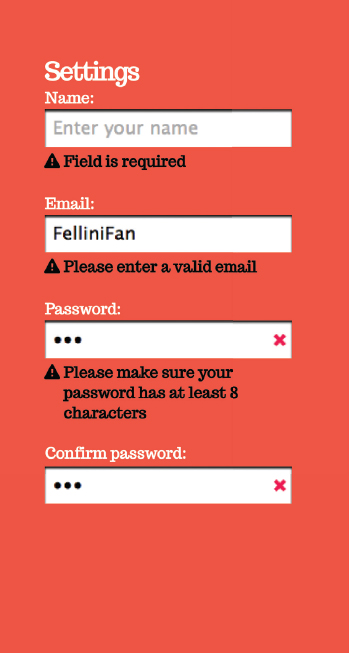
We will look at validation using one long example. You can see the form below, and the HTML is shown on the right. It uses HTML5 form controls, but the validation is going to be done using JavaScript to make sure that the experience is consistent across all browsers (even if they do support HTML5).
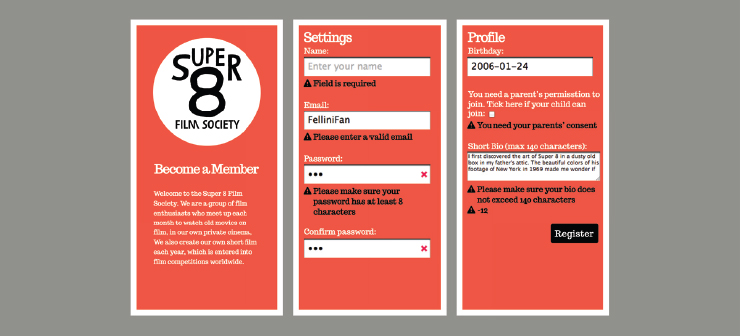
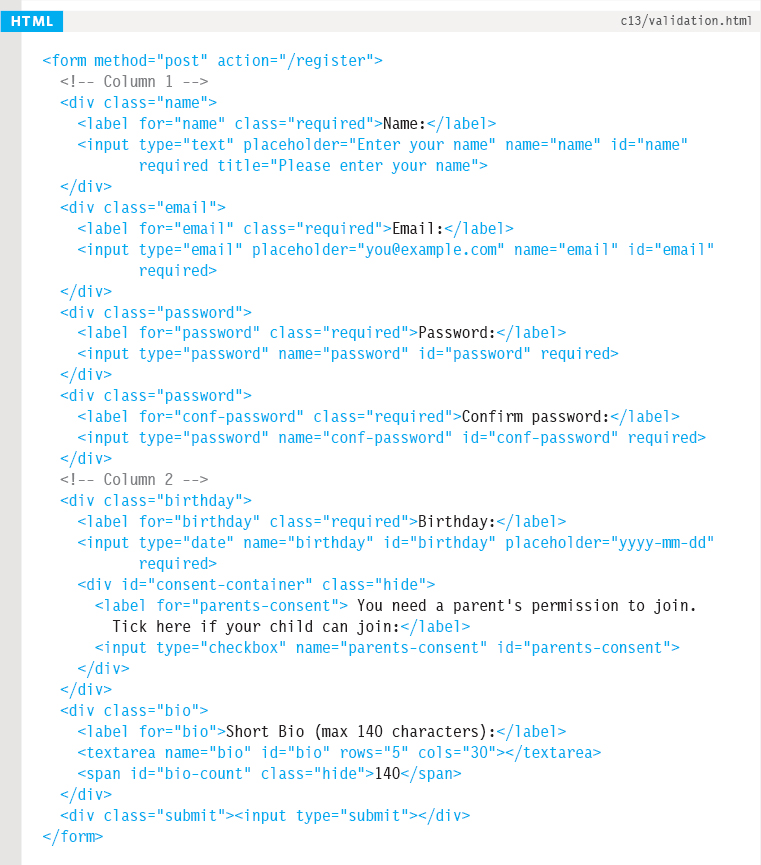
FORM HTML
This example uses HTML5 markup, but validation is performed using JavaScript (not HTML5 validation).
Due to limited space, the code below only shows the form inputs (not the markup for the columns).
VALIDATION OVERVIEW
This example has over 250 lines of code and will take 22 pages to explain. The script starts by looping through each element on the page performing two generic checks on every form control.
GENERIC CHECKS
First, the code loops through every element in the form and performs two types of generic checks. They are generic checks because they would work on any element, and would work with any form.
1. Does the element have the required attribute? If so, does it have a value?
2. Does the value match with the type attribute? E.g., Does an email input hold an email address?
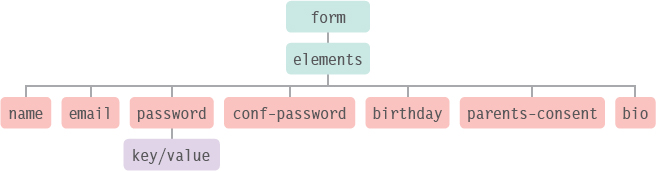
CHECKING EACH ELEMENT
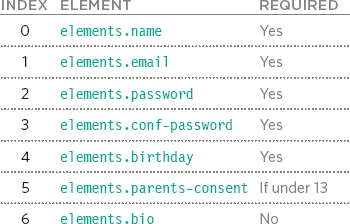
To work through each element in the form, the script makes use the form's elements collection (which holds a reference to each form control). The collection is stored in a variable called elements. In this example, the elements collection will hold the following form controls. The right-hand column tells you which elements are required to have a value:
Some developers proactively cache form elements in variables in case validation fails. This is a good idea, but to keep this (already very long) example simpler, the nodes for the form elements are not cached.
If you have not already done so, it would be helpful to download the code for this example from the website, javascriptbook.com, and have it ready when you are reading through the following pages.
Once the generic checks have been performed, the script then makes some checks that apply to individual elements on the form. Some of these checks apply only to this specific form.
CUSTOM VALIDATION TASKS
Next the code performs checks that correspond with specific elements in the form (not all elements):
- Do the passwords match?
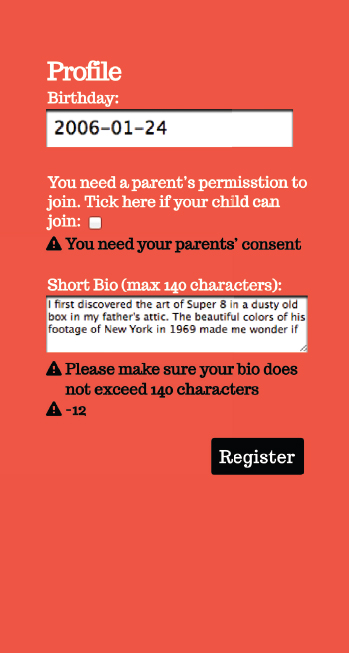
- Is the bio in the textarea under 140 characters?
- If the user is less than 13 years old, is the parental consent checkbox selected?
These checks are specific to this form and only apply to selected elements in the form (not all of them).
TRACKING VALID ELEMENTS
To keep track of errors, an object called valid is created. As the code loops through each element performing the generic checks, a property is added to the valid object for each element:
- The property name is the value of its id attribute.
- The value is a Boolean. Whenever an error is found on an element, this value is set to false.
| PROPERTIES OF THE VALID OBJECT |
| valid.name |
| valid.email |
| valid.password |
| valid.conf-password |
| valid.birthday |
| valid.parents-consent |
| valid.bio |
DEALING WITH ERRORS
If there are errors, the script needs to prevent the form being submitted and tell the user what they need to do in order to correct their answers.
As the script checks each element, if an error is found, two things happen:
- The corresponding property of the valid object is updated to indicate the content is not valid.
- A function called setErrorMessage() is called. This function uses jQuery's .data() method, which allows you to store data with the element. So the error message is stored in memory along with the form element that has the problem.
After each element has been checked, then error messages can be shown using showErrorMessage(). It retrieves the error message and puts it in a <span> element, which is added after the form control.
Each time the user tries to submit the form, if an error was not found on an element it is important to remove any error messages from that element. Consider the following scenario:
a) A user filled out a form with more than one error.
b) This triggered multiple error messages.
c) The user fixes one problem, so its corresponding message must be removed, while error message(s) for problems that have not been fixed must remain visible.
Therefore, when each of the elements is looped through, either an error message is set, or the error message is removed.
Above you can see a representation of the form and its elements collection. There was a problem with the email input, so the .data() method has stored a key/value pair with that element.
This is how the setErrorMessage() function will store the error messages to show to the user. If the error is fixed, then the error value is cleared (and the element with the error message removed).
SUBMITTING THE FORM
Before sending the form, the script checks whether there were any errors. If there were, the script stops the file from being submitted.
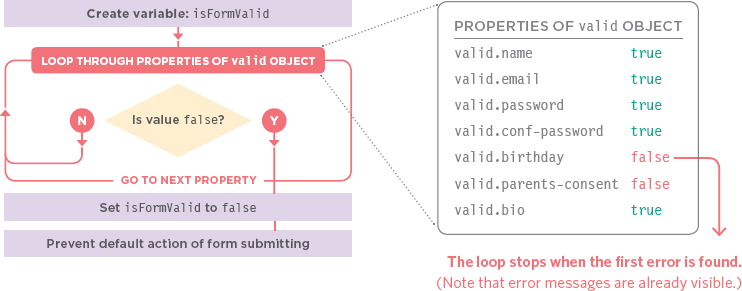
In order to check whether any errors were found, a variable called isFormValid is created and is given a value of true. The script then loops through each property of the valid object, and if there was an error (if any property of that object has a value of false), then there is an error in the form and the isFormValid variable is also set to false.
So, isFormValid is being used as a flag (you can think of it being like a master switch) if an error is found, it is turned off. At the end of the script, if isFormValid is false then an error must have been found and the form should not be submitted (using the preventDefault() method).
It is important to check and process all of the elements before deciding whether to submit the form so that you can show all of the relevant error messages in one go.
If every value has been checked, the user can be shown all of the things they have to amend before re-submitting the form.
If the form only showed the first error it came across, and stopped, the user would only see one error each time they submitted the form. This could soon become frustrating for the user if they were to keep trying to submit the form and see new errors.
CODE OVERVIEW
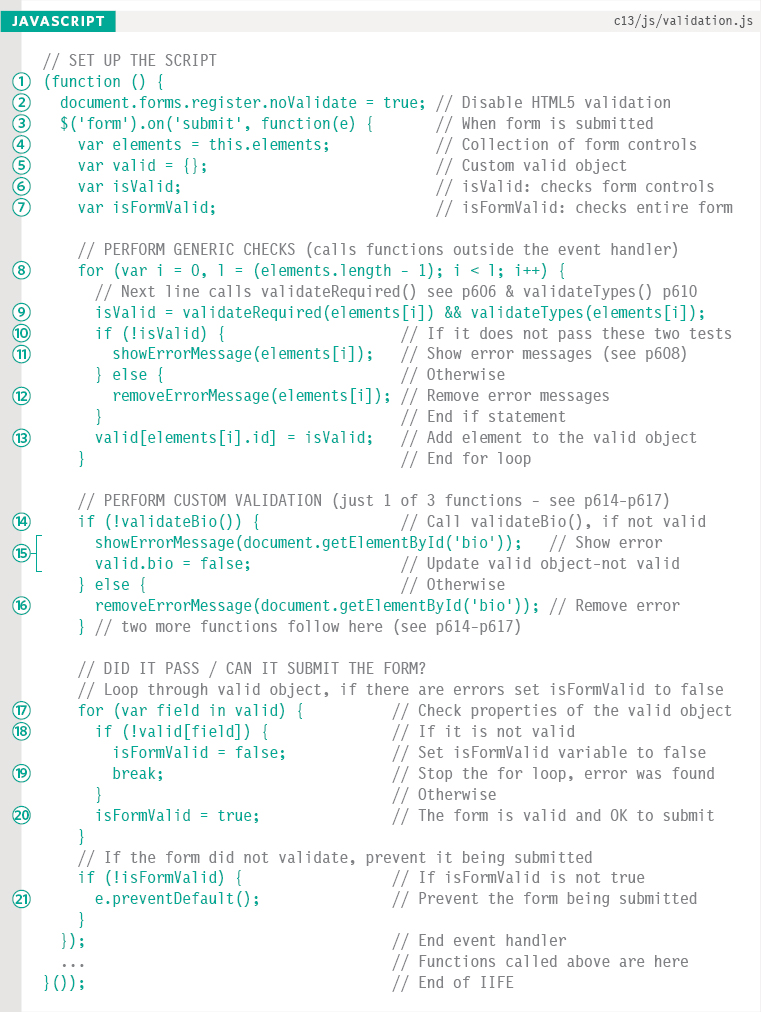
On the right is an outline of the validation code, split into four sections. On line 3, an anonymous function is called when the form is submitted. It orchestrates the validation, in turn calling other functions (not all of which are shown on the right-hand page, see further pages for more).
A: SET UP THE SCRIPT
1. The code lives inside an IIFE (creating functionlevel scope).
2. This script uses JavaScript validation to ensure that error messages look the same on all browsers, so HTML5 validation is turned off by setting the noValidate property of the form to true.
3. When the user submits the form, an anonymous function is run (this contains the validation code).
4. elements holds a collection of all form elements.
5. valid is the object that keeps track of whether or not each form control is valid. Each form control is added as a property of the valid object.
6. isValid is a flag that is re-used to check whether individual elements are valid.
7. isFormValid is a flag that is used as a master switch to check whether the entire form is valid.
B: PERFORM GENERIC CHECKS
8. The code loops through each form control.
9. It performs two generic checks on each one:
i) Is the element required? If so, does it have a value? Uses validateRequired(). See p606.
ii) Does the value correspond with the type of data it should hold? Uses validateTypes(). See p610.
If either of these functions does not return true, then isValid is set to false.
10. An if…else statement checks if that element passed the tests (by checking if isValid is false).
11. If the control is not valid, showErrorMessage() shows an error message to the user. See p609.
12. If it is valid, removeErrorMessage() removes any errors associated with that element.
13. The value of the element's id attribute is added as a property valid object; its value is whether or not the element was valid.
C: PERFORM CUSTOM VALIDATION
14. After the code has looped through every element on the form, the custom validation can occur. There are three types of custom validation occurring (each one uses its own function):
i) Is the bio too long? See p615.
ii) Do passwords match?
iii) Is user old enough to join on own? If not, is the parental approval checkbox selected? See p617.
15. If an element fails one of the custom validation checks, showErrorMessage() will be called, and the corresponding property in the valid object will be set to false.
16. If the element passes the check, removeErrorMessage() is called for that element.
D: DID THE FORM PASS VALIDATION?
The valid object now has a property for each element, and the value of that property states whether or not the element was valid or not.
17. The code loops through each property in the valid object.
18. An if statement checks to see if the element was not valid.
19. If it was not valid, set isFormValid to false and stop the loop.
20. Otherwise, isFormValid is set to true.
21. Finally, having looped through the valid object, if isFormValid is not true, the preventDefault() method prevents the form being submitted. Otherwise, it is sent.
REQUIRED FORM ELEMENTS
The HTML5 required attribute indicates a field must have a value. Our validateRequired() function will first check for the attribute. If present, it then checks whether or not it has a value.
validateRequired() is called for each element individually (see step 9, p605). Its one parameter is the element it is checking.
In turn, it calls upon three other named functions.
i) isRequired() checks for the required attribute.
ii) isEmpty() can check if the element has a value.
iii) setErrorMessage() sets error messages if there are problems.
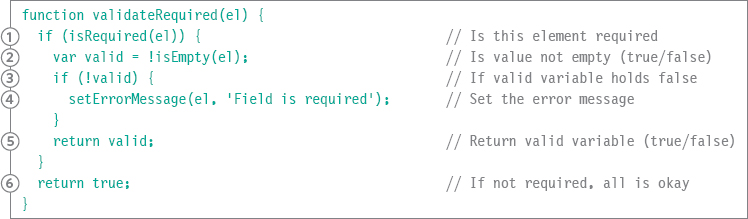
A: DOES IT HAVE A REQUIRED ATTRIBUTE?
1. An if statement uses a function called isRequired() to check whether the element carries the required attribute. You can see the isRequired() function on the right-hand page. If the attribute is present, the subsequent code block is run.
6. If not, the code skips to step to step 6 to say this element is OK.
B: IF SO, DOES IT HAVE A VALUE?
If the field is required, the next step is to check whether or not it has a value. This is done using a function called isEmpty(), also shown on the right-hand page.
2. The result from isEmpty() is stored in a variable called valid. If it is not empty, the valid variable will hold a value of true. If it is empty, it holds false.
C: SHOULD AN ERROR MESSAGE BE SET?
3. An if statement checks if the valid variable is not true.
4. If it is not true, an error message is set using the setErrorMessage() function, which you meet on p608.
5. The valid variable is returned on the next line, and that is where this function ends.
validateRequired() uses two functions to perform checks:
1: isRequired() checks whether the element has a required attribute.
2: isEmpty() checks whether the element has a value.
isRequired()
The isRequired() function takes an element as a parameter and checks if the required attribute is present on that element. It returns a Boolean.
There are two types of check: The first, in blue, is for browsers that support the HTML5 required attribute. The one in orange is for older browsers.
To check if the required attribute is present, the typeof operator is used. It checks what datatype the browser thinks the required attribute is.

MODERN BROWSERS
Modern browsers know the required property is a Boolean, so the first part of this check tells us if it is a modern browser. The second part checks if it is present on this element. If the attribute is present, it will evaluate to true. If not, it returns undefined, which is considered a falsy value.
isEmpty()
The isEmpty() function (below) takes an element as a parameter and checks to see if it has a value. As with isRequired(), two checks are used to handle both new and older browsers.
OLDER BROWSERS
Browsers that do not know HTML5 can still tell whether or not an HTML5 attribute is present on an element. In those browsers, if the required attribute is present, it gets treated as a string, so the condition would evaluate to true. If not, the type would be undefined, which is falsy.
ALL BROWSERS
The first check looks to see if the element does not have a value. If it has a value, the function should return false. If it is empty, it will return true.
WHAT IS VALIDATED
It is important to note that the required attribute only indicates that a value is required. It doesn't stipulate how long the value should be, nor does it perform any other kind of validation. Specific checks, such as these, would have to be added in the validateTypes() function or the script's custom validation section.
OLDER BROWSERS
If older browsers use a polyfill for placeholder text, the value would be the same as the placeholder, so it is considered empty if those values match.

CREATING ERROR MESSAGES
The validation code processes elements one by one; any error messages are stored using jQuery's .data() method.
HOW ERRORS ARE SET
Throughout the validation code, whenever an error is found, you will see calls to a function called setErrorMessage(), which takes two parameters:
i) el: the element that the error message is for
ii) message: the text the error message will display
For example, the following would add the message ‘Field is required’ to the element that is stored in the el variable:
setErrorMessage(el, ‘Field is required’);
HOW DATA IS STORED WITH NODES
Each error message is going to be stored with the element node that it relates to using the jQuery .data() method. When you have elements in a jQuery matched set, the .data() method allows you to store information in key/value pairs for each individual element.
The .data() method has two parameters:
i) The key, which is always going to be errorMessage
ii) The value, which is the text that the error message will display
setErrorMessage()

DISPLAYING ERROR MESSAGES
After each element has been checked, if one or more were not valid, showErrorMessage() will display the error messages on the page.
HOW ERRORS ARE DISPLAYED
If an error message needs to be shown, first a <span> element will be added to the page directly after the form field with the error.
Next, the message is added into the <span> element. To get the text for the error message, the same jQuery .data() method that set the message is used again. This time, it only takes one parameter: the key (which is always errorMessage).
This all happens within the function called showErrorMessage() which is shown below.
1. $el holds a jQuery selection containing the element that the error message relates to.
2. $errorContainer looks for any existing errors on this element by checking if it has any sibling elements that have a class of error.
3. If the element does not have an error message associated with it, the code in the curly braces runs.
4. $errorContainer is set to hold a <span> element. Then .insertAfter() adds the <span> element into the page after the element causing the error.
5. The content of the <span> element is populated with the error message for that element, which is retrieved using the .data() method of the element.
showErrorMessage()

VALIDATING DIFFERENT TYPES OF INPUT
HTML5's new types of input come with built-in validation. This example uses HTML5 inputs, but validates them with JavaScript to ensure that the experience is consistent across all browsers.
The validateTypes() function is going to perform the validation just like modern browsers do with HTML5 elements, but it will do it for all browsers. It needs to:
- Check what type of data the form element should hold
- Ensure the contents of the element matches that type
1. The first line in the function checks if the element has a value. If the user has not entered any information, you cannot validate the type of data. Furthermore, it is not the wrong type of data. So, if there is no value, the function returns true (and the rest of the function does not need to run).
2. If there is a value, a variable called type is created to hold the value of the type attribute. First, the code checks to see if jQuery stored info about the type using its .data() method (see why on p618). If not, it gets the value of the type attribute.
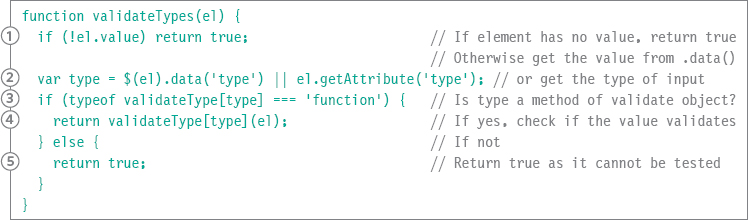
The getAttribute() method is used rather than the DOM property for type because all browsers can return the value of the type attribute, whereas browsers that don't recognize a new HTML5 DOM property types would just return text.
3. This function uses an object called validateType (shown on the next page) to check the content of the element. The if statement checks if the validateType object has a method whose name matches the value of the type attribute. If it has a method name that matches the type of form control:
4. The element is passed to the object; it returns true or false.
5. If there is no matching method, the object is not able to validate the form control and no error message should be set.
CREATING AN OBJECT TO VALIDATE DATA TYPES
The validateType object (outlined below) has three methods:
var validateType = {
  email: function(el) {
  // Check email address
  },
  number: function(el) {
  // Check it is a number
  },
  date: function(el) {
  // Check date format
  }
}
The code inside each method is virtually identical. You can see the format of the email() method below. Each method validates the data using something called a regular expression. The regular expression is the only thing that changes in each method to test the different data types.
Regular expressions allow you to check for patterns in strings, and here they are used with a method called test().
You can learn more about regular expressions and their syntax on the next two pages. For now, you just need to know that they are used to check the data contains a specific pattern of characters.
Storing these checks as methods of an object makes it easy to access each of the the different checks when it comes time to validate the different types of input in a form.
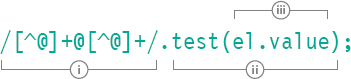
i) The regular expression is [^@]+@[^@]+ (it is between the / and / characters). It states a pattern of characters that are found in a typical email address.
ii) The test() method takes one parameter (a string), and checks whether the regular expression can be found within the string. It returns a Boolean.
iii) In this example, the test() method is passed the value of the element you want to check. Below you can see the method to test email addresses.

1. A variable called valid holds the result of the test using the regular expression.
2. If the string does not contain a match for the regular expression,
3. an error message is set.
4. The function returns the value of the valid variable (which is true or false).
REGULAR EXPRESSIONS
Regular expressions search for characters that form a pattern. They can also replace those characters with new ones.
Regular expressions do not just search for matching letters; they can check for sequences of upper/lowercase characters, numbers, punctuation, and other symbols.
The idea is similar to the functionality of find and replace features in text editors, but it makes it possible to create far more complicated searches for combinations of characters.
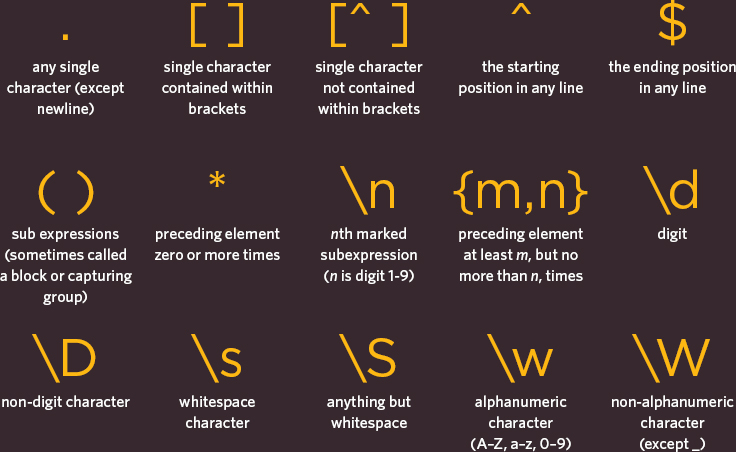
Below you can see the building blocks of regular expressions. On the right-hand page, you can see some examples of how they are combined to create powerful pattern-matching tools.
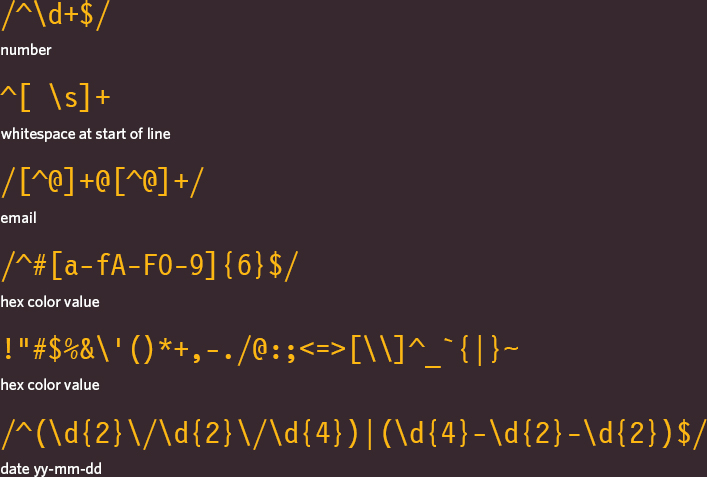
COMMON REGULAR EXPRESSIONS
Here are a selection of regular expressions you can use in your code. Some of these are more powerful than those adopted by browsers.
At the time of writing, some of the validation rules applied by the major browsers were not very strong. Some of the regular expressions shown below are more stringent.
But regular expressions are not perfect. There are still strings that would not be valid data, but would pass these tests below.
Also, bear in mind that there are many different ways to express the same thing using regular expressions. So you may see a very different regular expression that does something similar.
CUSTOM VALIDATION
The final part of the script performs three checks that apply to individual form elements; each check lives in a named function.
On the next pages, you will see these three functions. Each is called in the same manner as the validateBio() function shown below. (The full code that calls them is available from the website, along with the code for all examples from the book.)
| FUNCTION | PURPOSE |
| validateBio() | Check bio is 140 characters or less |
| validatePassword() | Check password is at least 8 characters |
| validateParentsConsent() | If user is under 13, test if parental consent box is checked |
Each of these functions will return a value of true or false.

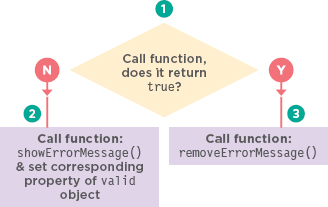
1. The function is called as a condition in an if… else statement. This was shown in steps 14-16 on p605.
2. If the function returns false, an error message is shown and the corresponding property of the valid object is set to false.
3. If the function returns true, the error message is removed from the corresponding element.
BIO & PASSWORD VALIDATION
1. Stores the form element containing the user's biography in a variable called bio.
2. If the length of the bio is less than or equal to 140 characters, the valid variable is set to true (otherwise, it is set to false).
3. If valid is not true, then…
4. The setErrorMessage() function is called (see p608).
5. The valid attribute is returned to the calling code, which will show or hide the error.

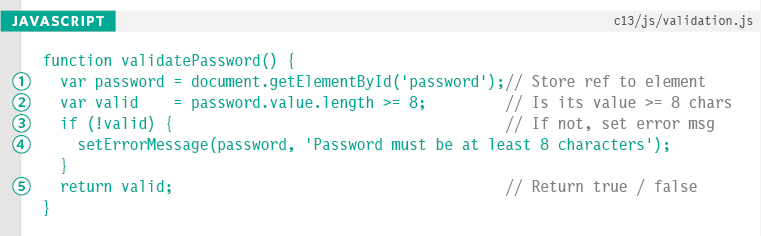
The validatePassword() function starts by:
1. Storing the element containing the password in a variable called password.
2. If the length of the value in the password input is greater than or equal to 8, valid is set to true (otherwise, it is set to false).
3. If valid is not true, then…
4. The setErrorMessage() function is called.
5. The valid attribute is returned to the calling code, which will show or hide the error.
CODE DEPENDENCIES & REUSE
In any project, avoid writing two sets of code that perform the same task. You can also try to reuse code across projects (for example, using utility scripts or jQuery plugins). If you do, note any dependencies in your code.
DEPENDENCIES
Sometimes one script will require another script to be included in the page in order to work. When you write a script that relies on another script, the other script is known as a dependency.
For example, if you are writing a script that uses jQuery, then your script depends upon jQuery being included in the page in order to work; otherwise, you would not be able to use its selectors or methods.
It is a good idea to note dependencies in a comment at the top of the script so that they are clear to others. The final custom function in this example depends on another script that checks the user's age.
CODE REUSE VS. DUPLICATION
When you have two sets of code that do the same job, it is referred to as code duplication. This is usually considered bad practice.
The opposite is code reuse where the same lines of code are used in more than one part of a script (functions are a good example of code reuse).
You may hear programmers refer to this as the DRY principle: don't repeat yourself. “Every piece of knowledge must have a single, unambiguous, authoritative representation within a system.” It was formulated by Andrew Hunt and Dave Thomas in a book called The Pragmatic Programmer (Addison-Wesley, 1999).
To encourage reuse, programmers sometimes create a set of smaller scripts (instead of one big script). Therefore, code reuse can lead to more code dependencies. You have already seen an example of this with the helper functions for event handling. You are about to see another example…
VALIDATING PARENTAL CONSENT
When the validation script was introduced, it was noted that the form would use a couple of scripts to enhance the page. You start to see those scripts on the next page, but one of them needs to be noted now because it hides the parental consent checkbox when the page loads.
That parental consent checkbox is only shown again if the user indicates that they are 13 years old or younger.
The validation code to check whether the parent has given their consent will only run if that checkbox is showing.
So the code to check whether the parent has given consent depends upon (reuses) the same code that checked if the checkbox should be shown. This works well as long as the other script (to show/hide the checkbox) is included in the page before the validation script.
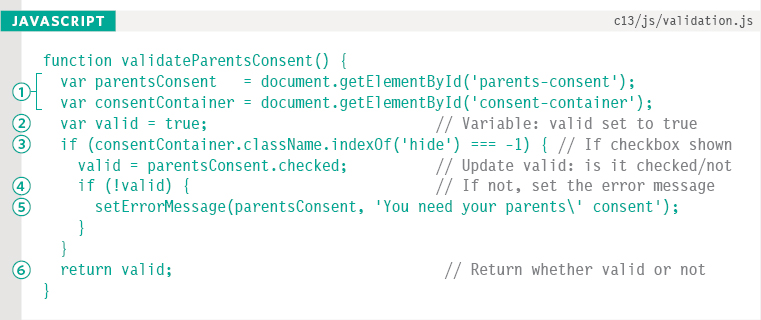
The validateParentsConsent() function is called in the same way as the other two custom validation checks (see p614). Inside the function:
1. It stores the checkbox for parental consent and its containing element in variables.
2. Sets a valid variable to true.
3. An if statement checks whether the container for the checkbox is not hidden. It does this by fetching the value of its class attribute and using the indexOf() function (which you saw on p128) to check if it contains a value of hide. If the value is not found, then indexOf() will return -1.
4. If it is not hidden, the user is under 13. So, if the checkbox is selected, the valid variable is set to the true, and if it was not selected, it will be set to false.
5. If it is not valid, an error message is added to the element.
6. The function returns the value of the valid variable to indicate whether the consent was given.
HIDE PARENTAL CONSENT
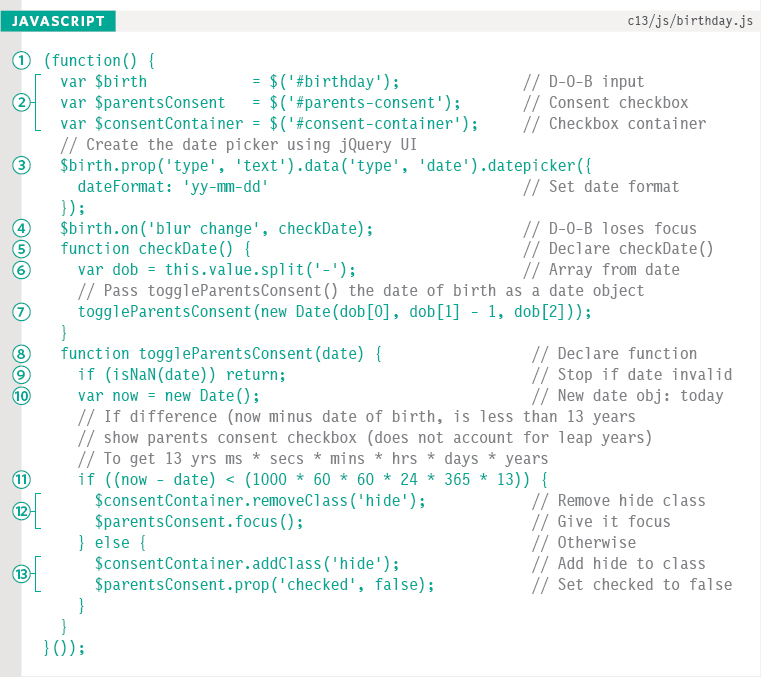
As you saw on the previous page, the subscription form uses two extra scripts to enhance the user experience. Here is the first; it does two things:
- Uses the jQuery UI date picker to show a consistent date picker across browsers
- Checks whether the parental consent checkbox should be shown when the user leaves the date input (it does this if they are under 13)
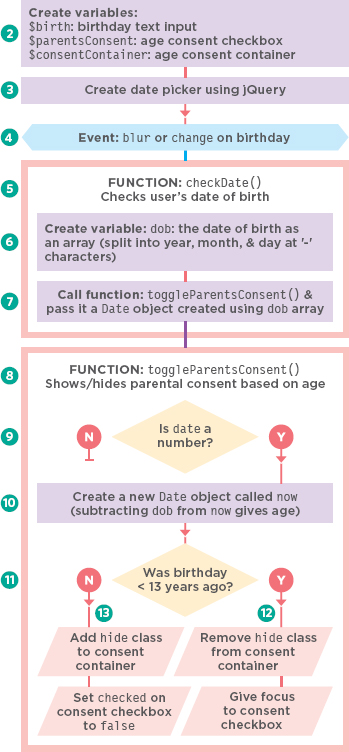
1. Place the script in an IIFE (not shown in flowchart).
2. Three jQuery selections store the input where users enter their birthday, the consent checkbox, and the container for the consent checkbox.
3. The jQuery selection for the date of birth input is converted from a date input to a text input so that it does not conflict with HTML5 date picker functionality (done using the jQuery .prop() method to alter the value of its type attribute). The selection uses .data() to note that it is a date input and jQuery UI's .datepicker() method to create the jQuery UI date picker.
4. When the user leaves the date input, the checkDate() function is called.
5. The checkDate() function is declared.
6. A variable called dob is created to hold the date the user selected. The date is converted into an array of three values (month, day, and year) using the split() method of the String object.
7. toggleParentsConsent() is called. It has one parameter: the date of birth. It is passed into the function as a Date object.
8. toggleParentsConsent() is declared.
9. Inside the function, it checks the date is a number. If not, return indicates the function should stop.
10. The current time is obtained by creating a new Date object (the current time is the default value of a new Date object). It is stored in a variable called now.
11. To find the user's age, the date of birth is subtracted from the current date. For simplicity, leap years are ignored. If that is less than 13 years:
12. Show the container for the parental consent.
13. Otherwise, the container of the consent box is hidden, and the checkbox is unchecked.
AGE CONFIRMATION
When creating a date picker using jQuery UI, you can specify the format in which you want the date to be written. On the right you can see several options for the format of the date and what this would look like if the date were the 20th December 1995. In particular note that y gives you two digits for the year, and yy gives you four digits for the year.
| FORMAT | RESULT |
| mm/dd/yy | 12/20/1995 |
| yy-mm-dd | 1995-12-20 |
| d m, y | 20 Dec, 95 |
| mm d, yy | December 20, 1995 |
| DD, d mm, yy | Saturday, 20 December, 1995 |
PASSWORD FEEDBACK
The second script designed to enhance the form provides feedback to the users as they leave either of the password inputs. It changes the value of the class attribute for the password inputs, offering feedback to show whether or not the password is long enough and whether or not the value of the password and its confirmation box match.
1. Place the script in an IIFE (not shown in flowchart).
2. Variables store references to the password input and the password confirmation input.
3. setErrorHighlighter() function is declared.
4. It retrieves the target of the event that called it.
5. An if statement checks the value of that element. If it is less than 8 characters, that element's class attribute is given a value of fail. Otherwise, it is given a value of pass.
6. removeErrorHighlighter() is declared.
7. It retrieves the target of the event that called it.
8. If the value of the class attribute is fail, then the value of the class attribute is set to a blank string (clearing the error).
9. passwordsMatch() is declared (it is only called by the password confirm box).
10. It retrieves the target of the event that called it.
11. If the value of that element is the same as the first password input, its class attribute is given a value of pass; otherwise, it is given a value of fail.
12. Event listeners are set up:
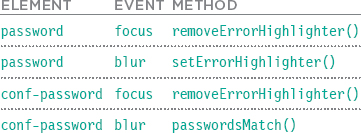
This demonstrates how scripts often group all of the functions and the event handlers together.


SUMMARY
FORM ENHANCEMENT & VALIDATION
- Form enhancements make your form easier to use.
- Validation lets you give users feedback before the form data is sent to the server.
- HTML5 introduced new form controls which feature validation (but they only work in modern or mobile browsers).
- HTML5 inputs and their validation messages look different in various browsers.
- You can use JavaScript to offer the same functionality as the new HTML5 elements in all browsers (and control how they appear in all browsers).
- Libraries like jQuery UI help create forms that look the same across different browsers.
- Regular expressions help you find patterns of characters in a string.