
Chapter 10
Access and the Web
In This Chapter
![]() Understanding Access 2013 and Office 365 and how they use the web
Understanding Access 2013 and Office 365 and how they use the web
![]() Taking a look at the Custom Web App template
Taking a look at the Custom Web App template
![]() Creating and using hyperlinks in Access tables and forms
Creating and using hyperlinks in Access tables and forms
![]() Embedding web content into your Access forms
Embedding web content into your Access forms
Access can be a great resource for Internet and intranet information. If the data you’re working with really needs global exposure — or if you simply want to be able to reach your data from anywhere you might be — Access 2013 (and the entire Office suite, for that matter) is ready to help. In fact, a connection to all things web-related has been a priority for Microsoft as each new version of Office has been released over the years, and Office 365 takes that to a whole new level with the suite’s new connection to the cloud.
In this chapter, I explain the new Office connection to the cloud and discuss the overall capabilities of Access with regard to the web. Then you find out how to use hyperlinks within your Access tables, how to utilize web content within your database, and how to make use of the new Custom Web App template for creating a web application with Access 2013.
How Access Works with the Web
It’s almost a requirement these days that software be web-ready, or at least web-friendly. Even word processors — which should never be used to create a web page — contain “Save for Web” commands and tools (and Word is no exception on either count, despite improvements since the command first appeared). Graphics software has evolved to help you create web-ready images — leaving (in some cases) print formats in the dust in terms of support and new gadgets when the new software releases come out.
Of course, Access is a natural fit for the web because data is something we’ve all come to expect to find online. Access makes it easy to both export your data to the web, using External Database Tools, and to build a quick web app (shorthand for “application”) using the new Custom Web App template.
 To make Access do its Internet tricks, you should have or be able to obtain:
![]() A version of your browser that’s no more than a year old (so it will be compatible with the current version of Office)
A version of your browser that’s no more than a year old (so it will be compatible with the current version of Office)
![]() A connection to the Internet (or to your company’s intranet)
A connection to the Internet (or to your company’s intranet)
![]() A SharePoint account (for sharing your data with other SharePoint users)
A SharePoint account (for sharing your data with other SharePoint users)
Understanding Office 365
Office 365 is not the same thing as Office 2013. Office 2013 is just the combined suite of applications — Word, Excel, PowerPoint, Outlook, and Access. Office 365 is a subscription-based set of tools that enable companies to collaborate and share their data online.
Microsoft offers a variety of monthly fee-based plans for businesses of all shapes and sizes, providing a variety of options. As of this writing, the prices range from $4 to $20 a month. You can investigate these plans by visiting this website and choosing the right plan for you:
http://www.microsoft.com/en-us/office365/compare-plans.aspx
Now, this is not to say that you have to use Office 365, because you absolutely do not. You can use Office 2013’s applications without setting foot on the cloud, and install the applications locally. You don’t need to put your Office data (documents, worksheets, presentations, and so on) in the cloud if you don’t want to. You can store your data locally, just as you always have. In fact, everything done in this book was done with a locally installed copy of Access 2013.
Whether you’re planning to use it or not, you’re probably asking, “What is the cloud?” The term the cloud simply describes services that are hosted outside of your organization, using the web. You may already be using the cloud, as lots of services you use all the time are part of the cloud — things like web-based e-mail, mobile banking, and online data storage services. Because this data is located online, you can access it from just about anywhere, using any PC, laptop, tablet, or mobile phone.
When it comes to Office 365, the cloud also provides online versions of your software, meaning that you can work with any of the Office applications online, rather than from locally installed copies. This is where the fee-based subscription plans come into play — along with sharing options for online collaboration with coworkers and clients anywhere in the world.
Meet the Custom Web App
So what is a web app anyway? Well, web means it’s online, and app is just shorthand for “application.” So the Custom Web App is a template for creating a quick, online database application that are distributed via SharePoint.
To access the Custom Web App, click the File tab, and then click the word New in the red left-hand panel (see Figure 10-1).
Once you click the Custom Web App button (it’s rather large, so you can’t miss it), the following dialog box (Figure 10-2) opens, through which you can name your app and choose where to store it online.
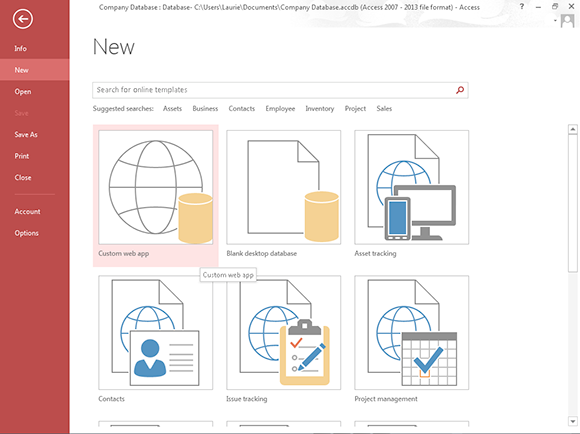
Figure 10-1: The File tab’s New command gives you access to the Custom Web App template.
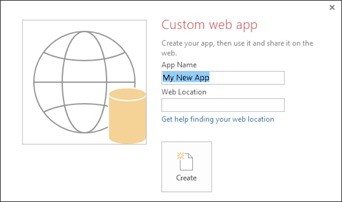
Figure 10-2: Choose a name and online location for your web app.
Note that just below the Web Location box, is a link that says Get Help Finding Your Web Location, which takes you to a website (shown in Figure 10-3) that provides options for you to use if you choose to continue developing your web app.

Figure 10-3: Don’t have a web location yet? Check out your options here.
The options include the Office 365 SkyDrive, which you can use as a location if you’ve opted to utilize Office 365.
Once you’ve given your app a name and chosen where to store it online, you can begin building it — table by table, just like any other Access database (see Chapters 3 through 6 for all the basics of building and populating Access tables). To save it, click Save on the Quick Access Toolbar or press Ctrl+S. This uploads your changes to the SharePoint server or Office 365 site chosen in the first dialog box (back in Figure 10-2).
If you want to backup or move your web app, you can save it as a SharePoint app, using the File⇒Save As⇒Save As Package command. Give your app a title and choose whether you’re saving just the app’s design or want to back up data stored in the tables as well.
Click! Using Hyperlinks in Your Access Database
If you’ve ever looked into or done any web page design, the term link is probably quite familiar — it’s the text or pictures that serve as jumping-off points to other data. Click a link, and you go to another web page. Click an image that’s set up as a link (your mouse pointer turns to a pointing finger), and you go to a larger version of the image — or to another website where information pertaining to the subject of the image can be found. Underlined text (or text in a different color or that changes color when you point to it) is the typical sign of the existence of a link; another term, tag, is what’s added to the web-page code to make the text or image perform as a link.
So what’s this hyperlink stuff? Although hyperlink makes it sound like a link that’s had way too much coffee, within the context of Microsoft Office (of which Access is a part), it’s actually a special storage compartment for storing the address of a resource on either the Internet or your local corporate network (or a file stored on your local computer) Hyperlinks start with a special identification code that explains to the computer what kind of resource it’s pointing to and where that resource is.
Table 10-1 lists the most common protocol codes (a harmless but scary-sounding term that simply refers to portions of the programming code that allow a browser to use a hyperlink). You’ll find, along with the code itself, an explanation of the kind of resource the code refers to.
Table 10-1 Types of Hyperlink Protocol Codes in Access
|
Protocol Code |
What It Does |
|
|
Opens a local or network-based file. |
|
|
File Transfer Protocol; links to an FTP server. |
|
|
Hypertext Transfer Protocol; links to a web page. |
|
|
Sends e-mail to a network or Internet address. |
|
|
Opens an Internet newsgroup. |
 For more information on links and how Access understands and uses them, press F1 or click the handy Help icon the question mark in upper-right corner of the workspace) to open the Access Help system and then search for the term hyperlink.
If you surf the web regularly, many of these terms and concepts should be familiar. Although most of them are geared to Internet or intranet applications, Access can also use hyperlinks to identify locally stored Microsoft Office documents (that’s what file:// does). This enables you, for example, to create a hyperlink in your Access table that opens a Word document, or a hyperlink in an Excel worksheet that opens an Access table. Links can be placed in PowerPoint slides, Outlook e-mail messages, and anywhere within any file created by — or for use with — Office. This technology is so flexible that the sky’s literally (thanks to wireless and satellites) the limit.
Adding a Hyperlink field to your table
Access provides a handy field type specifically designed for this special type of data. As you probably guessed, this type is called the Hyperlink field.
Adding a Hyperlink field to a table doesn’t require special steps. Just use the same steps for adding any field to a table — get to Design view for your table and use the Data Type column to choose the Hyperlink Field type, as shown in Figure 10-4, where the web addresses for various organizations will be stored in a Web Address field.
The Hyperlink field type is no different from the other field types in terms of applying it. When you hop back to Table view, you’ll see that your entries (if any) in the Hyperlink field are underlined, looking just like link text on a web page.
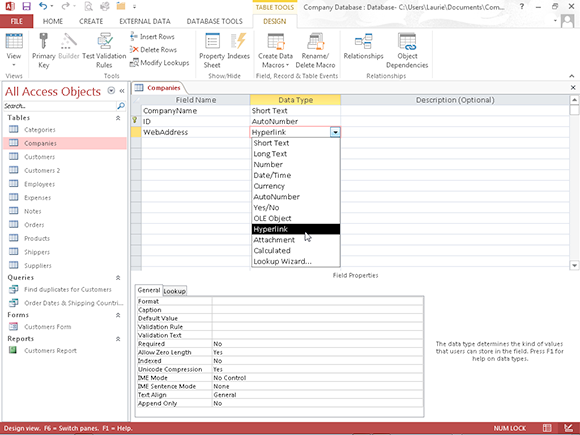
Figure 10-4: In Design view, choose Hyperlink from the list of data types.
To switch between Design and Datasheet views of your data, click the View button on the Ribbon’s Home tab or its Design tab. It’s the first button, and either appears as
![]() A table icon (a small grid), as it appears in Figure 10-4
A table icon (a small grid), as it appears in Figure 10-4
![]() An icon combining images of pencil, ruler, and angle
An icon combining images of pencil, ruler, and angle
Typing your hyperlinks
Hyperlinks in Access can have up to four parts, all separated by pound signs (#). In order, the parts of the hyperlink look like this:
display text#address#subaddress#screen tip
Table 10-2 lists these four parts individually and tells a little about what each one does. Most of the parts are optional, as the table shows.
Table 10-2 Formatting Hyperlinks in Access
|
Hyperlink Part |
Requirement |
What It Is |
|
Display text |
Optional |
The text that’s displayed. If omitted, Access displays the URL. |
|
Address |
Required |
The URL (Uniform Resource Locator), such as a web page. |
|
Subaddress |
Optional |
A link on the same page or document. |
|
ScreenTip |
Optional |
Text that pops up if the user pauses his or her mouse cursor over the address. |
Here are some examples of formatted hyperlinks and the obscure commands required to create them. (But don’t fret about the complexity. The following section shows an easier way to make complex hyperlinks.)
![]()
www.microsoft.com displays the URL http://www.microsoft.com in the field.
![]()
Microsoft Corporation# http://www.microsoft.com# displays the words Microsoft Corporation in your Access table instead of showing the hyperlink itself.
![]()
Microsoft Corporation# http://www.microsoft.com#Information# displays Microsoft Corporation and links to a topic called Information on the Microsoft home page.
![]()
Microsoft Corporation# http://www.microsoft.com#Information#Bill Gates# displays Microsoft Corporation and links to a topic called Information on the Microsoft home page. When the user pauses the mouse pointer over the link, the words Bill Gates pop up.
This sort of hyperlink works well when referring to documentation on an in-house website — for example, you can set up a link that appears as Vacation Request and have it link to a document that lives in a folder on a network drive, the actual address of which would tell no one what the document is or what it’s used for.
Here’s a variant on the Bill Gates screen tip: Microsoft Corporation# http://www.microsoft.com##Bill Gates# displays Microsoft Corporation but doesn’t link to a more specific topic. When the user pauses the mouse pointer over the link, the name Bill Gates pops up.
Because this hyperlink doesn’t include a subaddress, it uses two pound signs (##) between the URL and the tip (Bill Gates).
Fine-tuning your hyperlinks
If all of those pound signs seem a little complicated, or you’re afraid you’ll forget where and how to use them, fear not. You can format your hyperlinks the easy way with the Edit Hyperlink menu. Follow these steps:
1. Right-click the hyperlink field you want to change in your table.
2. Choose Hyperlink and then select Edit Hyperlink from the pop-up menu, shown in Figure 10-5.
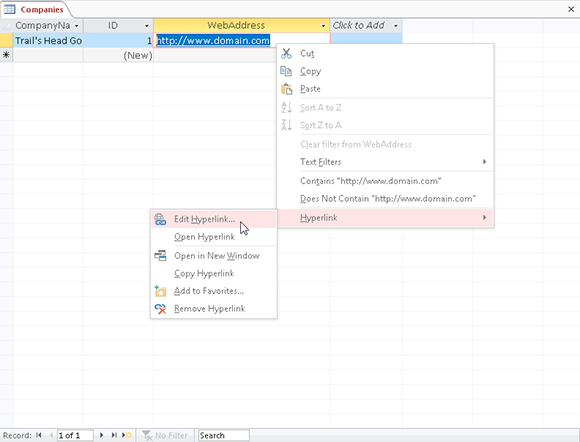
Figure 10-5: Right-click a stored hyperlink within the table and access tools for editing it.
The nifty little dialog box shown in Figure 10-6 appears.

Figure 10-6: The Edit Hyperlink dialog box.
3. Use the dialog box to fill in the following information:
• The text that’s displayed.
• The screen tip (the little text that pops up when your mouse pointer hovers over a web address). To create one, click the ScreenTip button and use the resulting Set Hyperlink ScreenTip dialog box to create your tip — then click OK to return to the Edit Hyperlink dialog box.
• Links for documents, spreadsheets, graphics, or even e-mail addresses in an Access database.
• The site address.
4. Click OK.
Your hyperlink is edited, showing the text you chose to display and pointing to the web address (document or other file) that you designated. If you chose to create a ScreenTip, you can test the new tip by mousing over your hyperlink and seeing what appears.
Pretty neat, huh? Experiment with the dialog box a little to find out how everything works. It takes only a moment.
 Although most hyperlinks store web or other Internet addresses, they can point to just about anything in the known world. Thanks to their flexible tags, hyperlinks understand web pages, intranet servers, database objects (reports, forms, and such), and even Microsoft Office documents on your computer or another networked PC.
Testing links
Hyperlinks in your table work just like the ones you find on the web — just point and click. You can double-check for yourself by doing the following:
1. Either log on to your network or start your Internet connection.
Although Internet Explorer (or whichever browser you’re using) will open whenever a hyperlink that points to a website is clicked, if you’re not online at the time, it won’t go where the hyperlink points.
2. Open the Access database you want to use.
3. Open the table containing hyperlinks.
The fun is about to begin!
A few words about the web (and why you care)
Although hyperlinks may seem like just so much technohype, they really are important. Nearly all businesses have a web presence, and many (if not most) are moving information to the web. Many companies also have in-house intranets (custom servers offering information to networked employees on private, in-house networks, often with connections to the web).
The capabilities of Access put it in the middle of the web-and-intranet excitement — and that presents a great opportunity for you. Duties that used to belong exclusively to those computer people are landing in graphic arts, marketing, and almost everywhere else. New jobs are born overnight as companies wrestle with the web’s powerful communication features, and the Office 365 reliance on the cloud and the web make this even truer now than it’s been in the past.
If you’re looking for a new career path in your corporate life, a thorough understanding of the web may be just the ticket. Whether you move into website development, information management, or even your own web-oriented consulting business, this is an exciting time full of new possibilities. Dive in and discover what’s waiting for you — certainly in the current economy, any business with the low overhead of a web storefront, eliminating expensive printed materials, expensive real estate, and salespersons’ travel expense accounts can be a real advantage for the people who create the tools to run such a business — or who run one themselves.
4. Click the hyperlink of your choice.
• If the hyperlink leads to a web page, Internet Explorer leaps onto the screen, displaying the website from the link.
• If the link leads to something other than a website, Windows automatically fires up the right program to handle whatever the link has to offer.
Embedding Web Content into Your Access Forms
Forms make it easier to enter and edit your database content — populating one or more tables quickly, in an orderly fashion. It only makes sense, then, to be able to bring the power of the web to your forms — to access web pages from within the form and to embed links within the form (through fields that contain web addresses) and within the header and other display sections of the form.
As shown in Figure 10-7, both text (Click Here for Our Company Directory) and an image (the organization’s logo) can be added to the header section. Fields from the database table also serve as links. Of course, any hyperlink fields within a database were established as such through Design view of the table(s) in question, a process covered earlier in this chapter.
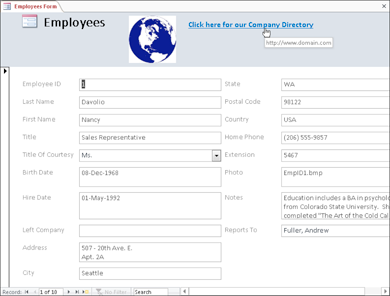
Figure 10-7: Images and text can serve as links to web addresses, giving your form real depth and usefulness.
Adding hyperlinks to your form
To add a hyperlink — be it an image or a line of text that links to somewhere else (a web page, local or network document, or e-mail address) — you need to have a form to which the link will be added. If you’re not sure how to create a form, check out Chapter 7, where you find out how to use the Form Wizard.
So, assuming you have that form created, here’s a look at some places where you might need (or want) to put some web content:
![]() A link to a website where information pertinent to the database can be found would enable someone using the form to enter or edit records to find needed information. Need a zip code for a mailing list database? A link to a website that lists zip codes (or postal codes outside the U.S.) would be really handy.
A link to a website where information pertinent to the database can be found would enable someone using the form to enter or edit records to find needed information. Need a zip code for a mailing list database? A link to a website that lists zip codes (or postal codes outside the U.S.) would be really handy.
![]() Does the data pertain to a particular company, organization, or person? It can be useful to be able to jump to the website for that entity with a simple click. Doing so opens a browser window, where the website (or any page within it, if you want the link to be that specific) appears onscreen. The form remains open in the Access workspace; a quick toggle of Alt+Tab allows the user to hop between the website and the database form.
Does the data pertain to a particular company, organization, or person? It can be useful to be able to jump to the website for that entity with a simple click. Doing so opens a browser window, where the website (or any page within it, if you want the link to be that specific) appears onscreen. The form remains open in the Access workspace; a quick toggle of Alt+Tab allows the user to hop between the website and the database form.
![]() If you’re publishing the form through Sharepoint for people to use in entering data online, having an e-mail link for asking questions or reporting problems with the form would be very useful.
If you’re publishing the form through Sharepoint for people to use in entering data online, having an e-mail link for asking questions or reporting problems with the form would be very useful.
Inserting an image to serve as a link
So you’ve come up with a web address that would be useful for someone using your form, but you’d really like to use a picture as a link, rather than (or in addition to) a text link. It’s simple to add the image to the form and then turn it into a link — and now you’ll know how to add images to your forms or reports, too, because that part of the procedure is the same, no matter which application part you’re creating/editing in Design view.
1. Open the form to which you want to add the image/link.
2. Switch to Design view.
3. On the Ribbon’s Design tab, click the Insert Image button found nestled in the Form Design Tools group, as shown in Figure 10-8.
Any images added recently appear in the drop-down list, along with a Browse button. If you want one of the recently used pictures, simply click it, or use the Browse button to navigate to and then select your image.
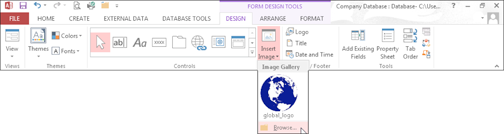
Figure 10-8: Click Browse to find the image you want to insert.
4. In the resulting Insert Picture dialog box (shown in Figure 10-9), navigate to the folder containing the image you want to use.
5. After you’ve found the image you want to use, double-click it or click once on it and then click the Open button.
6. Note that, back in Design view, your mouse pointer now appears as a picture icon with a small plus sign. Click and drag to draw a box for the image you’ve just selected.
As soon as you release the mouse button after drawing the box, the image appears in it, as shown in Figure 10-10.
7. Turn that image into a hyperlink by clicking it to select it.
An orange border and little box handles appear around the image.

Figure 10-9: The organization’s logo serves as a link to its website.

Figure 10-10: Draw a box, and voilá! Your image appears.
8. Display the Properties sheet for this form element (if the panel’s not already visible), as shown in Figure 10-11.
To display Properties for the image, right-click it and choose Properties from the pop-up menu.
9. Edit the Hyperlink Address field in the Properties sheet, typing the full web address (including the http://).
The Hyperlink Address field is found on both the Format and All tabs within the Property sheet. Note that you can also click the ellipsis (three little dots) to open and use the Edit Hyperlink dialog box, which you saw back in Figure 10-6.
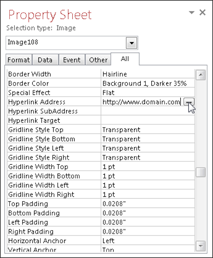
Figure 10-11: Enter the web address that the hyperlink image should point to.
10. Using the first button on the Ribbon, switch from Design to Form view to check your form and make sure the link works properly.
Figure 10-12 shows the finished form, with the image in place.
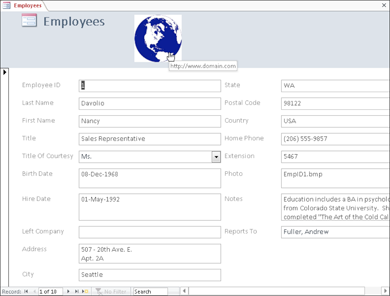
Figure 10-12: Click the logo to open a browser window on the website you designated for this image link.
Using text links
Adding a text hyperlink is even easier than adding an image that serves as a link. In Design view of your form, follow these steps:
1. Locate the spot where the text should appear.
The Form Header area (where you added the image in Figure 10-12) is a good spot, although you can also add it to the Form Footer.
2. Click the Hyperlink button, found on the Design tab in the Controls section of the Ribbon.
The big globe-and-chain button opens the Insert Hyperlink dialog box, which is shown in Figure 10-13.
3. Using the Text to Display field in the dialog box, type the text that you want to appear as the link.
Here I typed Click here to view our Company Directory.
4. Click in the Address field in the dialog box, and then type the web address that this text should point to.
Here I typed the address of the blog, as shown in Figure 10-13.
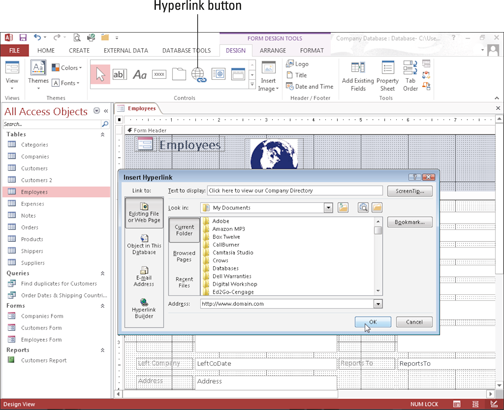
Figure 10-13: In the Insert Hyperlink dialog box, you can both create the text and decide where the link should point.
5. Click OK to create the link and return to Design view.
You may (probably will) have to drag the new text object to the desired location on the Form Header or Form Footer, and may also need to resize it to accommodate a long string of text.
Want your text link to stand out? Use the Form Design tool’s Format tab to change the font and size of the link text.
6. Click the Form View button (you’re currently in Design view) to see the form with the new text link in place and then test it, as shown in Figure 10-14.
Publishing Your Data to the Web
If Access contains your most desirable and important information, why not share your stuff with others in your company — or even publish it for the world? Whether you’re building a commercial site geared toward fame and online fortune or an interdepartmental intranet to infuse your company with valuable information, Access contains all the tools you need to whip your data into web-ready shape in no time.
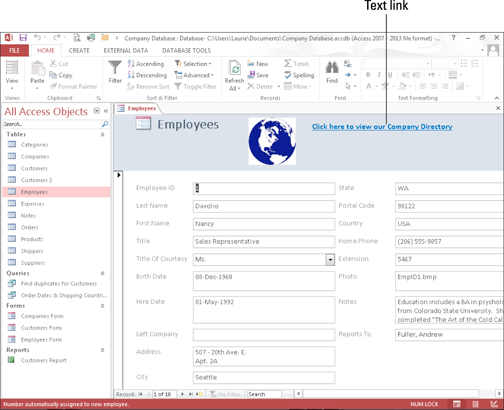
Figure 10-14: The text link points to a blog for the organization to which this database pertains.
Although you don’t need to know anything about HTML (HyperText Markup Language, the scripting language that is used to build web pages), if you want to create web pages with Access, you probably will need to know some HTML before your project is finished:
![]() For a painless introduction to HTML, check out HTML, XHTML, and CSS For Dummies, 6th Edition.
For a painless introduction to HTML, check out HTML, XHTML, and CSS For Dummies, 6th Edition.
![]() You can find out quite a bit online, specifically at the World Wide Web Consortium’s website:
You can find out quite a bit online, specifically at the World Wide Web Consortium’s website: www.w3.org. From their home page, you can pursue any of their links to the scoop on web-related technologies.
![]() To focus solely on HTML, visit the W3C’s markup page, which tells you all about HTML and other such languages. Check this out at
To focus solely on HTML, visit the W3C’s markup page, which tells you all about HTML and other such languages. Check this out at www.w3.org/markup.
![]() If you want to sample the information at other websites, enter the keywords HTML in the Google search box (or use any other search engine you prefer). While the W3C’s site offers the most accurate and up-to-date information, you can also learn a lot from web developers who maintain websites designed to showcase their knowledge and experience with HTML.
If you want to sample the information at other websites, enter the keywords HTML in the Google search box (or use any other search engine you prefer). While the W3C’s site offers the most accurate and up-to-date information, you can also learn a lot from web developers who maintain websites designed to showcase their knowledge and experience with HTML.
Microsoft provides two ways to take your data to the world (or to the next cubicle) with Access 2013:
![]() Publish your tables individually as HTML documents. The rest of this chapter shows how to publish HTML tables.
Publish your tables individually as HTML documents. The rest of this chapter shows how to publish HTML tables.
![]() Publish your whole database with Office’s SharePoint services. SharePoint is beyond the scope of this book. To find out more about SharePoint, check out SharePoint 2013 For Dummies.
Publish your whole database with Office’s SharePoint services. SharePoint is beyond the scope of this book. To find out more about SharePoint, check out SharePoint 2013 For Dummies.
Publishing your Access tables
Just sticking web content into your tables and forms (or reports, for that matter) isn’t the end of the connection between Access and the Internet. You can publish your Access tables, queries, and reports as HTML documents, which enables you to upload them to a web server and make them available to the world online. Visitors can view the data in a grid (as they do when a table or form is published as an HTML document) or as a screenful of data if you publish a report.
Follow these steps to make your tables and their data available with a web browser:
1. Open the database containing the table (or data within a table) destined for your intranet or the web.
The database window hops to the screen.
2. In the All Access Objects list on the left side of your window, select the table that you want to save as an HTML document.
Your desired table opens in the central part of the Access window. Note that you can also simply right-click the table in the left panel (which lists the parts of your database) without opening the table. If you want to publish only certain records, however, you have to open the table so you can perform Step 3.
3. As needed, select the records you want to make part of the HTML document. If you have a query that when run elicits the records you want, you can use that as the object selected in Step 2.
Drag through a series of records to select them.
You don’t need to select individual records if you want to publish the entire table. The idea here is to select a range of records if you want only those records to appear in the HTML document.
4. In the External Data tab, locate the Export section and click the More button.
The available Export types, in addition to the standards, appear in a list, as shown in Figure 10-15. Note that you can also right-click the table in the database list at the left of the screen, and choose HTML Document from the Export command submenu.
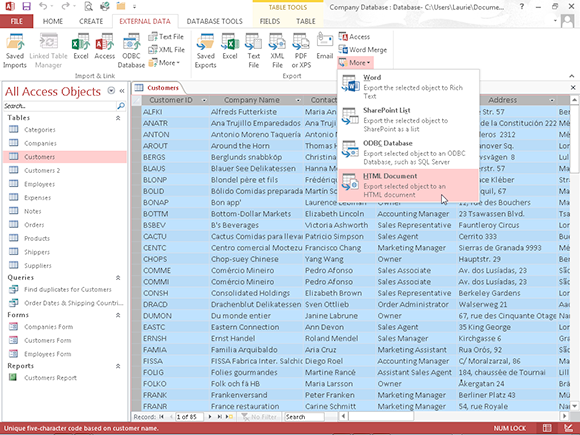
Figure 10-15: Choose to export your table as an HTML document.
5. Select HTML Document from the list.
The Export – HTML Document dialog box opens (see Figure 10-16). The current table’s location and filename appear in the File Name field, with the table’s file extension changed to .html.

Figure 10-16: The Export – HTML Document dialog box allows you to name your web page and choose how the export will happen.
6. If needed, click the Browse button to establish the folder location and filename of the file you’re about to publish.
You’re better off having selected the table within the Access workspace (as described in Steps 1 through 5) than trying to change horses at this point. You can also type a new name for the HTML document by editing the last segment of the File Name field content. The last segment is the actual filename, ending in .html — just edit the name, which appears to the left of the period.
7. Click the box next to the Export Data with Formatting and Layout option to place a check mark there.
The remaining two options are now available:
• Open the Destination File After Export Operation Is Complete
• Export Only the Selected Records (this is available only if you selected one or more records in the table before beginning this process)
8. Click the Open the Destination File After Export Operation Is Complete option to select it.
If you don’t want to publish all your available records — that is, if you selected specific records back in Step 3 — be sure you check Export Only the Selected Records as well.
9. Click OK.
At this point, a second dialog box opens, entitled HTML Output Options (see Figure 10-17). The HTML document is created, and an Internet Explorer window with your HTML document name is opened, represented by a button on your taskbar.
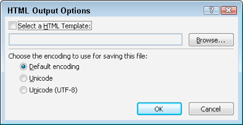
Figure 10-17: Choose an HTML template or click OK to accept the defaults.
10. Select an HTML output option and click OK:
• If you don’t have an HTML template and simply want a table to appear in a browser window, just click OK.
• If you do have a template — in the form of an existing HTML document — click in the Select a HTML Template check box and then click the Browse button to navigate to the template, telling Access where to find it. In the resulting HTML Template to Use dialog box, you can return to the Export HTML Document dialog box by selecting the template file you want and clicking OK.
• You don’t have to worry about the encoding method (unless a knowledgeable geek in your IT department has advised you of such a need), so accept the Default Encoding option.
11. Click Close.
The Export HTML Document dialog box closes.
Access asks you whether you want to save your Export settings. Leave the Save Export Steps option unchecked and click Close. There’s no need to save the steps. The procedure is simple; there really aren’t any unique steps taken that you’d want or need to skip next time.
12. Open Internet Explorer (or the web browser of your choice) and view your new HTML document.
As shown in Figure 10-18, your table (or the records you chose from within it) appears in a simple grid right within the browser window. Note that if you chose Open the Destination File After Export Operation Is Complete in Step 8 of this procedure, you don’t need to fire up a browser — a browser window opens automatically, displaying your new HTML document.

Figure 10-18: Congrat-ulations! You’ve just created an HTML document!
If you didn’t choose the Open the Destination File After Export Operation Is Complete option (in Step 8), you will have to remember where you chose to save the file back in Step 6.
Now all that’s left to do is upload your HTML document to one of two locations:
![]() Your in-house intranet server
Your in-house intranet server
![]() A web server for global accessibility
A web server for global accessibility
You’ll need some FTP software (FTP stands for File Transfer Protocol and the software simply ensures that what you upload conforms to the rules for uploading documents to servers) and login information for the server where your document will be stored. After the file is uploaded, you can view it online by typing the URL (web address) for the website that contains your HTML document into any browser’s address bar.
You can find plenty of shareware and freeware versions of FTP software. Just search at Google or Yahoo! (or the search site of your choice) for FTP software. If you’re uploading files to your company’s intranet or web server, you’ll probably be given IT-approved software and instructions for how and where to upload your files.