
Chapter 4
vSphere Update Manager and the vCenter Support Tools
Software patches are an unfortunate fact of life in today's IT departments. Most organizations recognize that software updates are necessary to correct problems or flaws and to add new features. Fortunately, VMware offers a tool to help centralize, automate, and manage these patches for vSphere. This tool is called vSphere Update Manager (VUM). The remainder of the vCenter Support Tools assist in centrally deploying and managing hosts.
In this chapter you will learn to
- Install VUM and integrate it with the vSphere Client
- Determine which hosts or VMs need to be patched or upgraded
- Use VUM to upgrade VM hardware or VMware Tools
- Apply patches to ESXi hosts and older ESX hosts
- Upgrade hosts and coordinate large-scale datacenter upgrades
- Utilize alternative approaches to VUM updates when required
- Install logging collectors
- Configure hosts for centralized logging
vSphere Update Manager
VUM is a tool designed to help VMware administrators automate and streamline the process of applying updates, which could be patches or upgrades, to their vSphere environment. VUM is fully integrated within vCenter Server and offers the ability to scan and remediate ESXi hosts, host extensions (such as EMC's Powerpath/VE multipathing software), older ESX and ESXi hosts (circa 4.0, 4.1, 5.0, and 5.1), and virtual appliances. VUM can also upgrade VMware Tools and upgrade VM hardware. And VUM is the vehicle used to install and update the Cisco Nexus 1000V third-party distributed virtual switch.
VUM's HOST PATCHING CAPABILITIES IN VSPHERE 5.5
As we have already covered in the previous chapters, vSphere 5 has only the ESXi variant of the hypervisor. With ESX being retired, VUM 5 can migrate ESX 4.x hosts across to ESXi. Unfortunately, because of the size allocated for the /boot partition in ESX 3.x, these hosts have no migration path to ESXi 5.x. Any ESX 4.x hosts that had previously been upgraded from ESX 3.x will not have the required minimum 350 MB of space in the /boot partition. In these cases a fresh install is required, so you'll need to consider how you want to migrate their settings. If you are licensed for vSphere at the Enterprise Plus level, you should check out the Host Profiles feature because that could help in the migration.
Despite “vanilla” ESX being replaced wholesale with ESXi in vSphere 5.0, VUM 5.5 still supports the great patching capabilities for legacy ESX/ESXi 4.x hosts. So in this chapter there will often be callouts to ESX or ESX/ESXi; most of the rest of this book is bereft of such references, but these are here purposefully. Companies will work in a mixed mode of hosts during their migration to vSphere 5, and many will keep older ESX hosts for some time, so this capability of VUM is worth remembering.
VUM integrates itself tightly with vSphere's inherent cluster features. It can use the Distributed Resource Scheduler (DRS) for nondisruptive updating of ESX/ESXi hosts by moving its VMs between hosts in the cluster and avoiding downtime. It can coordinate itself with the cluster's Distributed Power Management (DPM), High Availability (HA), and Fault Tolerance (FT) settings to ensure that they don't prevent VUM from updating at any stage. With vSphere 5, the cluster can even calculate if it can remediate multiple hosts at once while still appeasing its cluster constraints, thus speeding up the overall patching process.
VUM AND THE VSPHERE WEB CLIENT
As vSphere 5 has matured, the Web Client has become the primary user and administrator client. The older Windows-only C#-based vSphere Client is still available in 5.5, but essentially all the new features are accessible only in the Web Client. There are very few reasons why an administrator needs the vSphere Client installed. VUM is one of those reasons because it remains heavily tied to the incumbent.
Since the release of 5.5 (and Update 1 to 5.1), VUM has included a small Web Client plug-in that enables rudimentary capabilities. It allows baselines to be attached to objects and scans to be initiated, and it displays compliance levels. The Web Client can't administer VUM, configure or make changes to it, or remediate objects—for that you have to go back to the Windows Client. But the Web Client is useful. It's far more visible to the average user. How compliant the object is with your baseline is now front and center on the summary page. Users now realize how up-to-date their VMs are and can see the hosts on which their VMs run.
The Web Client's VUM abilities are limited, and the vSphere Client can do it all, but we'll use the Web Client to demonstrate anything that can be done in both tools. The workflow for these tasks is very similar, so it should be straightforward to follow along in either. In general, because you'll spend most of your time in the Web Client, it seems appropriate to favor that tool where possible.
In the vSphere Client, VUM uses two views: the administrative view, where you can configure VUM settings and manage baselines, and a compliance view, where you can scan and remediate vSphere objects. When applying updates to VMs, VUM can apply snapshots to them to enable rollback in the event of problems. It can identify when hardware upgrades and VMware Tools are needed and combine them into a single, actionable task.
To help keep your vSphere environment patched and up-to-date, VUM utilizes your company's Internet connection to download information about available updates, the products to which those updates apply, and the actual updates themselves. Based on rules and policies defined and applied by the VMware administrator using the vSphere Client, VUM will then apply updates to hosts and VMs. You can schedule update installations and even apply automated updates to VMs that are powered off or suspended.
UPGRADING, PATCHING, AND UPDATING WITHOUT DISCOMBOBULATION
Several common terms sometimes lead to confusion. Upgrading refers to the process of bringing the object to a new version, which often includes new features and capabilities. For example, for hosts, this can mean moving from 4.1 to 5.0 or, when the next minor version is available, from 5.1 to 5.5. VM hardware, virtual appliances, and host extensions all tend to be associated with upgrades because they are usually rip-and-replace-type software changes.
The term patching is usually reserved for applying remedial software changes to individual host components. This will normally change the host's build number but not its version number. Often these are rolled up into host updates, so expect ESXi 5.5 to receive 5.5 Update 1 before you see another 5.x version change. However, and certainly somewhat confusingly, the term updates is often used to explain the generic process of both patching and upgrading. So applying updates might include host patches (some of which might be rolled into a host update) and various upgrades.
Regardless of the terminology used, it is useful to think about updating in terms of how routine it is—in fact, this is the way this chapter splits it up. Routine updates would include host patches, host updates, and upgrading a VM's VMware Tools. These are the sort of remediation tasks you could expect to perform on, say, a monthly basis because many guest OS patches are, and should be, more trivial to test and apply. Nonroutine updates are the upgrades to hosts and VM hardware. These updates will often change the functionality of the object, so they need to be tested in your environment to make sure they are fully “sociable” and to understand how best to take advantage of the new capabilities that the upgrades are likely to bring.
The one gray area is upgrading host extensions and virtual appliances, because they need to be evaluated on a case-by-case basis. Some of their upgrades will be simple improvements; others can bring significant changes to the way they work. You need to evaluate each extension and appliance upgrade and decide for yourself how much testing is required before you deploy it.
Putting VUM to work in your vSphere deployment involves installing and configuring VUM, setting up baselines, scanning hosts and VMs, and applying patches.
Installing vSphere Update Manager
VUM installs from the vCenter Server DVD installation media and requires that a vCenter Server instance be already installed. You will find that installing VUM is much like installing vCenter Server, which you saw in the previous chapter.
You perform the following high-level steps to install VUM:
- Configure VUM's database.
- Create an Open Database Connectivity (ODBC) data source name (DSN) for VUM.
- Install VUM.
- (Optional) Install the Update Manager Download Service (UMDS) if desired.
- Install the VUM plug-in for the vSphere Client.
VUM has a one-to-one relationship with vCenter. That is, for every vCenter instance you need a separate VUM install, and each VUM can provide update services to only one vCenter. The one exception to this is that you can share the job of downloading patches between multiple VUMs (and therefore multiple vCenters) with the use of an optional component known as Update Manager Download Services (UMDS), which is discussed in the section “Installing the Update Manager Download Service (Optional).”
If you have multiple vCenters that are connected via linked mode, you can use VUM, but a separate instance is still required for each vCenter. All the installation, configuration, permissions, update scanning, and remediation are done on a per-VUM basis because they operate independently.
As discussed previously, with vSphere 5.5 there are now two deployment options for vCenter: the conventional Windows installation and the newer Linux-based prebuilt vCenter Server Appliance (vCSA). VUM can happily connect to either installation; however, for obvious reasons, your choice helps to shape your deployment model. If you have a Windows-based vCenter, you can either install VUM on the same server instance or use a separate Windows install. However, because the vCSA is Linux based, if you are opting for this you will have to install VUM on its own Windows install because there is no VUM service available on the vCSA yet.
Defining the Requirements
VUM requires access to a dedicated vCenter instance, so your vSphere licensing must include vCenter. This therefore excludes the free stand-alone ESXi hypervisor version currently available.
The VUM server should have 2 GB of RAM at a minimum, and if it's installed on the same server as vCenter itself, there should be at least 4 GB. We discuss various database options in the next section, but you should avoid installing VUM on the same database as vCenter (it can be on the same server; it just should not be on the same database).
Even though VUM is a 32-bit application, it can only be installed on a 64-bit version of Windows. During the install, you receive a warning if you attempt to put the download repository on a drive with less than 120 GB of free space. Additionally, you cannot install VUM on a server that is also a domain controller.
AVOID INSTALLING VUM ON A VM THAT SITS ON A HOST THAT IT REMEDIATES
Be wary of installing VUM on a VM running on a host in a cluster that it is responsible for remediating. If DRS is disabled on the cluster at any stage, or the cluster has a problem migrating this VUM VM to another host, then to prevent VUM from shutting itself down, the remediation will fail.
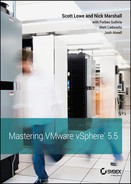
Table 4.1 shows the default ports that need to be opened if any of your components are separated by a firewall.
TABLE 4.1: Firewall requirements for VUM
Configuring VUM's Database
Like vCenter Server, VUM requires its own database. Where vCenter Server uses the database to store configuration and performance statistics, VUM uses a database to store patch metadata.
SUPPORTED DATABASE SERVERS
VUM's database support is similar to that of vCenter Server but not identical. In general, most versions of SQL Server 2005, 2008, and 2012 and Oracle 10g/11g are supported by VUM. For the most up-to-date database compatibility matrix, refer to the latest vSphere compatibility matrixes, available from VMware's website.
For small installations (up to 5 hosts and 50 VMs), VUM can use an instance of SQL Server 2008 R2 Express Edition (SQL Express). SQL Express is included on the VMware vCenter media, and the VUM installation will automatically install and configure the SQL Express instance appropriately. No additional work is required outside of the installation routine. However, as you learned in Chapter 3, “Installing and Configuring vCenter Server,” SQL Express does have some limitations, so plan accordingly. If you do plan on using SQL Express, you can skip ahead to the section “Installing VUM.”
If you decide against using SQL Express, you must now make another decision: Where do you put the VUM database? Although it is possible for VUM to use the same database as vCenter Server, it is strongly recommended that you use a separate database, even if you keep both databases on the same database server. When you move beyond 100 hosts or 1,000 VMs, you should be sure to use separate database servers for both the vCenter Server database and the VUM database as well as separate servers for vCenter Server and the VUM server software. Other factors, such as high availability or capacity, may also affect this decision. Aside from knowing which database server you'll use, the decision to use a single computer versus multiple computers won't affect the procedures described in this section.
In either case, there are specific configuration steps that you'll need to follow, just as you did when installing vCenter Server. You'll need to create and configure the database, assign ownership, and grant permissions to the MSDB database. Be sure to complete these steps before trying to install VUM because this information is required during installation.
Perform the following steps to create and configure a Microsoft SQL Server 2005/2008/2012 database for use with VUM:
- Launch the SQL Server Management Studio application. When prompted to connect to a server, connect to a supported database server. Select Database Engine as the server type.
- From the Object Explorer on the left side, expand the server node at the top level.
- Right-click the Databases node and select New Database.
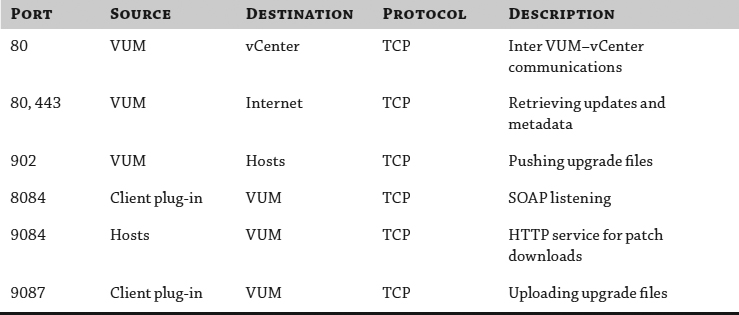
- In the New Database window, specify a database name. Use a name that is easy to identify, such as VUM or vSphereUM.
- Set the owner of the new database.
Unless you are running the separate database on the same computer as VUM, you will need to set the owner of the database to an SQL login; integrated Windows authentication is not supported with a remote database.
Figure 4.1 shows a new database being created with an SQL login set as the owner.
- For ideal performance, set the location of the database and log files so they are on different physical disks or VMDKs than the operating system and the patch repository. Scroll along to the right of the large pane to set the locations.
Figure 4.2 shows the database and log files stored on a separate drive from the operating system.
- After the settings are configured, click OK to create the new database.
As with the vCenter Server database, the login that VUM will use to connect to the database server must have dbo permissions on the new database as well as on the MSDB database.
FIGURE 4.1 Set the owner of the database correctly when you create the database.

FIGURE 4.2 Place the database and log files for VUM on different physical drives than the operating system and patch repository.
Creating the Open Database Connectivity Data Source Name
After you configure the separate database server, you must create an ODBC DSN to connect to the backend database. You'll need to have the ODBC DSN created before you start VUM installation, and because VUM is a 32-bit application, the ODBC DSN must be a 32-bit DSN. This is true even though VUM installs only on a 64-bit version of Windows.
Perform the following steps to create an ODBC DSN for the VUM database:
- Run the 32-bit ODBC Data Source Administrator application found at %systemroot%SysWOW64odbcad32.exe.
The 32-bit ODBC Data Source Administrator application looks identical to the 64-bit version. If you're unsure which one you launched, exit and restart to be sure that you have the correct version.
Is THERE ANY WAY TO TELL THE DIFFERENCE?
There is a way to tell the difference between the 64-bit and 32-bit versions of the ODBC Data Source Administrator application: The 64-bit and 32-bit system DSNs are not shared between the two applications. So, if you see your vCenter Server DSN listed on the System DSN tab, you're running the 64-bit version of the tool (because vCenter Server requires a 64-bit DSN).
- Select the System DSN tab.
- Click the Add button.
- From the list of available drivers, select the correct driver for the database server you're using.
As with vCenter Server, you will need to ensure that the correct ODBC driver is installed for the database server hosting the VUM database. SQL Server 2005, 2008, and 2012 all have their own optimized SQL Server Native Client. Make sure the appropriate Native Client is installed.
- On the first screen of the Create A New Data Source Wizard, fill in the name of the DSN, a description, and the name of the server to which this DSN will connect.
Be sure to make a note of the DSN name; you'll need this information later. Click Next when you're finished.
- On the next screen you need to supply an authentication type and credentials to connect to the separate database server. Select With SQL Server Authentication Using A Login ID And Password Entered By The User, and specify an SQL login and password that are valid on the database server and that have the appropriate permissions assigned to the VUM and MSDB databases. Click Next.
Windows Integrated Authentication is an option only if you have installed the database server component locally on the same server as VUM. It is advised that you use SQL Server Authentication in all cases, even if the database is local, because it makes moving the database easier in the future should your environment grow and require scaling beyond a local instance.
- Change the default database to the one you created in Figure 4.1 and click Next.
- Click Finish.
- In the ODBC Microsoft SQL Server Setup dialog box, click the Test Data Source connection to verify the settings.
If the results say the tests completed successfully, click OK twice to return to the ODBC Data Source Administrator window. If not, go back and double-check the settings and change them as needed.
With the database created and the ODBC connection defined, you're now ready to proceed with the installation of VUM.
Installing VUM
Now that you have met all the prerequisites—at least one instance of vCenter Server running and accessible across the network, a separate database running and configured appropriately, and an ODBC DSN defined to connect to the preconfigured database—you can start the VUM installation. Before you begin, make sure that you have made a note of the ODBC DSN you defined previously and the SQL login and password configured for access to the database. You'll need these pieces of information during the installation.
Perform the following steps to install VUM:
- Mount the vCenter Server DVD in the server.
The VMware vCenter Installer runs automatically; if it does not, simply double-click the DVD drive in My Computer to invoke AutoPlay.
- Select vSphere Update Manager and click Install.
- Choose the correct language for the installation, and click OK.
- On the Welcome To The InstallShield Wizard For VMware vSphere Update Manager screen, click Next to start the installation.
- Click Next to continue past the end-user patent agreement.
- Accept the terms in the license agreement, and click Next.
- The Support Information screen clarifies that VUM 5.5 supports upgrades from ESX/ESXi 4.x upward. Leave the check box Download Updates From Default Sources Immediately After Installation ticked, unless the VUM server does not have access to the Internet or you want to postpone a large Internet download until a more convenient time. Click Next.
- Fill out the next screen with the correct IP address or hostname, HTTP port, username, and password for the vCenter Server instance to which this VUM server will be associated. If you have created a service account to use for VUM, enter it here. Click Next when the information is complete.
- Select to either install an SQL 2008 Express instance or to use an existing database instance. If you are using a supported separate database server, select the correct DSN from the list, and click Next.
As described previously, using a supported database instance requires that you have already created the database and ODBC DSN. If you haven't created the ODBC DSN yet, you'll need to exit the installation, create the DSN, and restart the installation.
- The next screen prompts you for user credentials to connect to the database specified in the DSN and configured for use by VUM. Supply the username and password for the SQL login you created before starting the installation, as shown in Figure 4.3.
FIGURE 4.3 Supply the correct username and password for the VUM database.
- If the SQL Server database is set to the Full recovery model (the default), a dialog box pops up warning you about the need for regular backups.
Click OK to dismiss the dialog box and continue with the installation, but be sure to arrange for regular backups of the database. Otherwise, the database transaction logs could grow to consume all available space.
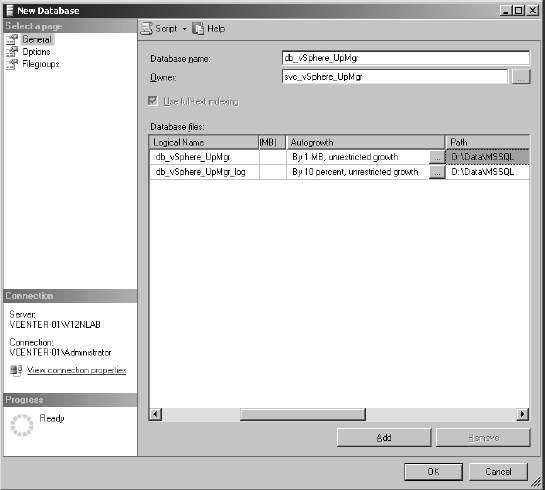
- Unless there is a need to change the default port settings, leave the default settings, as shown in Figure 4.4. If there is a proxy server that controls access to the Internet, click the check box labeled Yes, I Have Internet Connection And I Want To Configure Proxy Settings Now. Otherwise, if there isn't a proxy or if you don't know the correct proxy configuration, leave the box deselected, and click Next.
CONFIGURING PROXY SETTINGS DURING INSTALLATION
If you forget to select the box to configure proxy settings during installation, fear not! All is not lost. After you install VUM, you can use the vSphere Client to set the proxy settings accordingly. Just be aware that VUM's first attempt to download patch information will fail because it can't access the Internet.
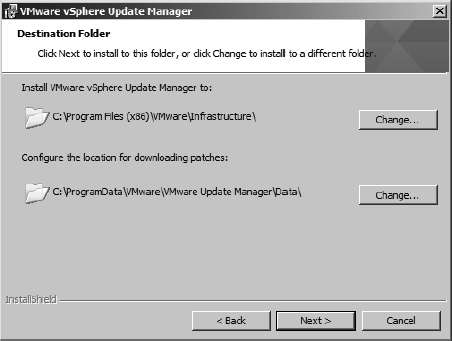
- VUM downloads patches and patch metadata from the Internet and stores them locally for use in remediating hosts and guests.
The next screen allows you to specify where to install VUM as well as where to store the patches, as shown in Figure 4.5. Use the Change button to modify the location of the patches to a location with sufficient storage capacity.
FIGURE 4.4 The VUM installation provides the option to configure proxy settings. If there is no proxy, leave the box deselected.
FIGURE 4.5 The default settings for VUM place the application files and the patch repository on the system drive.
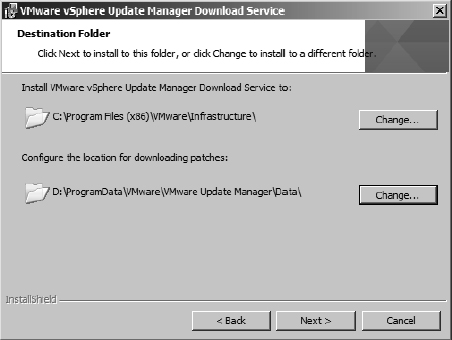
In Figure 4.6, you can see where a drive different from the system drive has been selected to store the downloaded patches.
FIGURE 4.6 During installation, you can tell VUM to store the down-loaded patches on a drive other than the system drive.
- If you select a drive or partition with less than 120 GB, a dialog box will pop up warning you to be sure you have sufficient space to download the appropriate patches. It's very reasonable to initially use a smaller disk footprint than 120 GB and grow the disk over time. Just remember to manage this space appropriately because patches will download automatically over time. Click OK to proceed.
- Click Install to install VUM.
- Click Finish when the installation is complete.

Installing the Update Manager Download Service (Optional)
An optional step in the deployment of VUM is to install the Update Manager Download Service (UMDS). UMDS provides a centralized download repository. Installing UMDS is especially useful in two situations. First, UMDS is beneficial when you have multiple VUM servers; using UMDS prevents consuming more bandwidth than necessary because the updates need to be downloaded only once. Instead of each VUM server downloading a full copy, multiple VUM servers can leverage the centralized UMDS repository. Second, UMDS is beneficial in environments where the VUM servers do not have direct Internet access. Internet access is required to download the updates and update metadata, so you can use UMDS to download and distribute the information to the individual VUM servers.
To install UMDS on a server, browse the vCenter DVD installation media. UMDS, like VUM, can be installed only on 64-bit servers. From the root of the DVD there is a umds folder. Within that folder run the executable VMware-UMDS.exe.
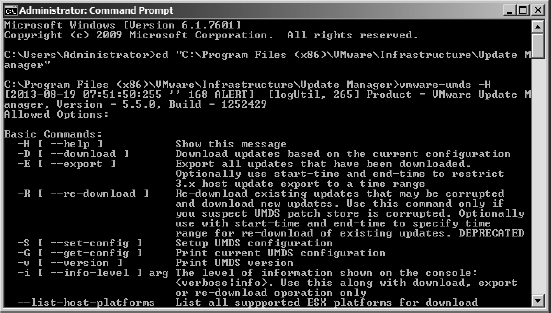
UMDS is a command-line tool. By default the UMDS tool is installed in C:Program Files (x86)VMwareInfrastructureUpdate Manager.
You can configure many options in UMDS, but to start using it, you need to configure the following three settings:
- Specify the updates to download using the -S switch.
- Download the updates with the -D switch.
- Export the updates and metadata with the -E switch.
Full details of all the command's switch options are available from the built-in help, by running vmware-umds -H. Figure 4.7 shows the UMDS utility being run from the command prompt. Along with the basic switches that can be seen in Figure 4.7, the full help file provides all the arguments and provides a series of examples of common usage tasks.
FIGURE 4.7 You must configure the UMDS utility at the command prompt.
There are two different designs for using UMDS:
- The VUM server does not have network connectivity to the UMDS server. In this case you need to move the downloaded patches and metadata to a removable media drive and physically transfer the data via old-fashioned “sneakernet.”
- The VUM server can connect to the UMDS server. Although the VUM server may not be allowed to connect directly to the Internet, if it can hit the UMDS, then it can effectively use it as a web proxy. You need to configure a web server on the UMDS server, such as IIS or Apache. Then the VUM server can connect to the UMDS server and download its patches. This is also typically the approach you would take if you wanted to use UMDS as a centralized download server for several VUM instances.
At this point VUM is installed, but you have no way to manage it. In order to manage VUM, you must install the vSphere Client and the VUM plug-in for vCenter Server, as we discuss in the next section.
Installing the vSphere Update Manager Plug-in
The tools to manage and configure VUM are implemented as a vCenter Server plug-in and are completely integrated into vCenter Server and the vSphere Client. However, to access these tools, you must first install and register the plug-in in the vSphere Client. This enables the vSphere Client to manage and configure VUM by adding an Update Manager tab and some extra context menu commands to objects in the vSphere Client. vSphere Client plug-ins are managed on a per-client basis; that is, each installation of the vSphere Client needs to have the plug-in installed in order to access the VUM administration tools.
Perform the following steps to install the VUM plug-in for each instance of the vSphere Client:
- Launch the vSphere Client if it isn't already running and connect to the vCenter Server instance that has VUM associated with it.
- From the vSphere Client's Plug-ins menu, select Manage Plug-ins.
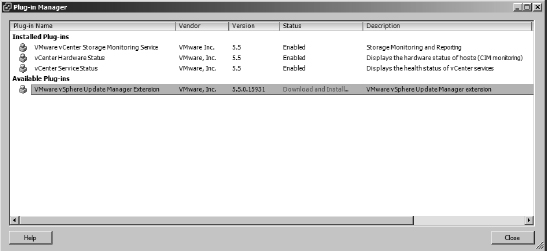
- Find the vSphere Update Manager extension, and click the blue Download And Install link, as shown in Figure 4.8.
FIGURE 4.8 Installing the vSphere Client plug-in is done from within the vSphere Client.
- Run through the installation of the vSphere Update Manager extension, selecting the language, agreeing to the license terms, and completing the installation.
- After the installation is complete, the status of the plug-in is listed as Enabled. Click Close to return to the vSphere Client.
The VUM plug-in is now installed into this instance of the vSphere Client. Remember that the VUM plug-in is per instance of the vSphere Client, so you need to repeat this process on each installation of the vSphere Client. If you have the vSphere Client installed on your desktop workstation and your laptop, you'll need to install the plug-in on both systems as well. After that is done, you are ready to configure VUM for your environment.
VSPHERE WEB CLIENT PLUG-IN
The plug-in for the vSphere Web Client is integrated automatically during a VUM 5.5 installation. Users need only log out and back into the Web Client to see the new VUM details.
Reconfiguring the VUM or UMDS Installation with the Update Manager Utility
When you install VUM or UMDS on a server, a small reconfiguration utility is silently installed. This tool, the Update Manager Utility, allows you change some of the fundamental installation settings without the need to reinstall either VUM or UMDS.
The settings that the tool allows you to change are these:
- Proxy settings
- Database username and password
- vCenter Server IP address
- SSL certificate (provides a set of instructions to follow)
Perform the following steps to run the Update Manager Utility:
- Stop the Update Manager service on the server.
- Browse to the utility's directory. By default this is: C:Program Files (x86)VMwareInfrastructureUpdate Manager.
- Run the executable VMwareUpdateManagerUtility.exe.
The utility is a simple GUI tool that steps through these VUM/UMDS settings.
Upgrading VUM from a Previous Version
It is possible to upgrade VUM from any VUM installation that is version 4.0 or above. When the VUM 5.5 installation starts, it will recognize the previous version and offer to upgrade it. You can choose to delete the previously downloaded patches and start afresh or keep the existing downloads and potentially save some bandwidth. Remember that like the install itself, the account that VUM uses to connect to the database will need dbo permissions on the MSDB database during the upgrade procedure. You will not be able to change the patch repository's location using an upgrade.
VUM 5.5 is installable only on 64-bit versions of Windows. If you have a 4.x VUM install on 32-bit Windows, you need to migrate the data to a new 64-bit server first. There is a special tool on the vCenter 5.0 installation DVD in the datamigration folder to help you back up and restore the installation to a new 64 bit machine. You are then able to upgrade it from 5.0 to 5.5.
Configuring vSphere Update Manager
After you have installed and registered the plug-in with the vSphere Client, a new Update Manager icon appears on the vSphere Client home page. Additionally, in the Hosts And Clusters or VMs And Templates inventory view, a new tab labeled Update Manager appears on objects in the vSphere Client. From this Update Manager tab, you can scan for patches, create and attach baselines, stage patches to hosts, and remediate hosts and guests.
Clicking the Update Manager icon at the vSphere Client home page takes you to the main VUM administration screen. Figure 4.9 shows that this area is divided into seven main sections: Baselines And Groups, Configuration, Events, Notifications, Patch Repository, ESXi Images, and VA Upgrades. Initially, as in many other areas of the vSphere Client, you will also see a leading Getting Started tab.
FIGURE 4.9 The tabs in the Update Manager Administration area within the vSphere Client
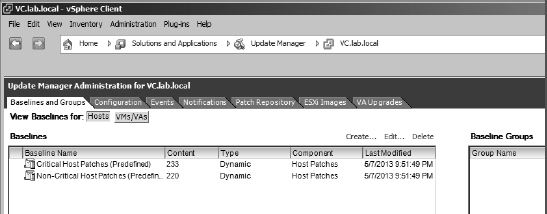
These seven tabs make up the major areas of configuration for VUM, so let's take a closer look at each section:
Baselines And Groups Baselines are a key part of how VUM works. To keep ESX/ESXi hosts and VMs updated, VUM uses baselines.
VUM uses several different types of baselines. First, baselines are divided into host baselines, designed to update ESX/ESXi hosts, and VM/VA baselines, which are designed to update VMs and virtual appliances.
IMPORTANCE OF BASELINES
As vSphere becomes more central to an organization's infrastructure, baselines become increasingly important. Host baselines provide a stable platform for ever intertwined components. Many datacenter tools take advantage of vSphere APIs, such as the storage arrays via vSphere APIs for Array Integration (VAAI) and backup tools via vSphere APIs for Data Protection (VADP), and interact with vCenter and the hosts in a nontrivial way. Keeping all hosts at the same build level is crucial to maintaining a reliable environment. Additionally, keeping your VMs at a standardized hardware level with the same VMware Tools guest drivers minimizes the variances that can create support issues and troubleshooting headaches.
Baselines are further subdivided into patch baselines, upgrade baselines, and host extension baselines. Patch baselines define lists of patches to be applied to an ESX/ESXi host; upgrade baselines define how to upgrade an ESX/ESXi host, the VM's hardware, VMware Tools, or a virtual appliance. There's also another type of baseline for hosts, known as host extension baselines; these are used to manage the extensions installed onto your ESX/ESXi hosts.
Finally, patch baselines are divided again into dynamic baselines and fixed baselines. Dynamic baselines can change over time—for example, all security host patches since a certain date. But fixed baselines remain constant—for example, a specific host patch that you want to ensure is applied to your hosts.
WHEN SHOULD YOU USE FIXED BASELINES OR DYNAMIC BASELINES?
Fixed baselines are best used to apply a specific fix to a group of hosts. For example, let's say that VMware released a specific fix for ESX/ESXi and you wanted to be sure that it was installed on all your hosts. By creating a fixed baseline that included just that patch and attaching that baseline to your hosts, you could ensure that your hosts had that specific fix installed. Another use for fixed baselines is to establish the approved set of patches that you have tested and are now ready to deploy to the environment as a whole.
Dynamic baselines, on the other hand, are best used to keep systems current with the latest sets of patches. Because these baselines evolve over time, attaching them to your hosts can help you understand just how current your systems are (or aren't!).
Configuration The bulk of the configuration of VUM is performed on the Configuration tab. From here, users can configure the full range of VUM settings, including network connectivity, download settings, download schedule, notification check schedule, VM settings, ESX/ESXi host settings, and vApp settings. These are some of the various options that you can configure:
Network Connectivity Under Network Connectivity, you can change the ports on which VUM communicates. In general, there is no need to change these ports, and you should leave them at the defaults.
Download Settings The Download Settings area allows you to configure what types of patches VUM will download and store. You can add custom URLs to download third-party patches by adding sources, as shown in Figure 4.10.
FIGURE 4.10 Select patch sources so that VUM downloads only certain types of patches.
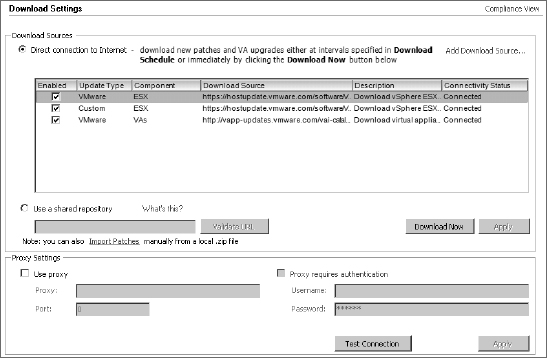
This is also the area in the settings where you can point to a web server configured on a UMDS instance if you are centralizing your downloads. You set VUM to use a download server by choosing the Use A Shared Repository radio button. You can also import offline patch bundles, distributed as zip files, to add collections of VMware or third-party patches and updates.
The Download Settings area is also where you would set the proxy configuration, if a proxy server is present on your network. VUM needs access to the Internet in order to download the patches and patch metadata, so if a proxy server controls Internet access, you must configure the proxy settings here in order for VUM to work.
Download Schedule The Download Schedule area allows you to control the timing and frequency of patch downloads. Click the Edit Download Schedule link in the upper-right corner of this area to open the Schedule Update Download Wizard, which allows you to specify the schedule for patch downloads as well as gives you the opportunity to configure email notifications.
EMAIL NOTIFICATIONS REQUIRE SMTP SERVER CONFIGURATION
To receive any email notifications that you might configure in the Schedule Update Download Wizard, you must also configure the SMTP server in the vCenter Server settings, accessible from the Administration menu of the vSphere Client.
Notification Check Schedule VUM regularly checks for notifications about patch recalls, patch fixes, and other alerts. The schedule for checking for these notifications is configured in this area. As in the Download Schedule area, you can click the Edit Notifications link in the upper-right corner of the window to edit the schedule VUM uses to check for notifications.
VM Settings Under VM Settings, vSphere administrators configure whether to use VM snapshots when applying upgrades to VMs. As you'll see in Chapter 7, “Ensuring High Availability and Business Continuity,” snapshots provide the ability to capture a VM's state at a given point and then roll back to that captured state if so desired. Having the ability, via a snapshot, to undo the installation of a driver from a VMware Tools upgrade can be incredibly valuable. Be careful not to keep the snapshot for an unnecessary length of time because it can affect the VM's performance and, more important, can cause storage issues because it can grow and fill your datastore unexpectedly.
Figure 4.11 shows the default settings that enable snapshots.
FIGURE 4.11 By default, VM snapshots are enabled for use with VUM.

ESX Host/Cluster Settings The ESX Host/Cluster Settings area provides controls for fine-tuning how VUM handles maintenance mode operations. Before an ESX/ESXi host is patched or upgraded, it is first placed into maintenance mode. When the ESX/ESXi host is part of a cluster that has VMware Distributed Resource Scheduler (DRS) enabled, this will also trigger automatic vMotions of VMs to other hosts in the cluster. These settings allow you to control what happens if a host fails to go into maintenance mode and how many times VUM retries the maintenance mode operation. The default settings specify that VUM will retry three times to place a host in maintenance mode.
You can configure whether VUM will disable certain cluster features in order to perform remediation. Otherwise, VUM may not perform updates on the hosts with these features enabled. The features that VUM can control are Distributed Power Management (DPM), High Availability Admission Control, and Fault Tolerance (FT). You can opt to let the cluster determine if more than one host can be updated at once while safely maintaining compliance with the rest of the cluster settings. If so, then multiple hosts can be patched or upgraded at once.
Last, you can select whether to patch any PXE-booted ESXi 5.x hosts.
PATCHING STATELESS PXE-BOOTED SERVERS
When you patch a PXE-booted server, those changes won't survive the host's next reboot because it will revert to the network image. You should apply these patches to the image itself for them to remain persistent.
So why apply them to the hosts?
VUM can apply live install patches, which do not require a host reboot. This means that you can quickly apply a patch to a fleet of PXE-booted ESXi hosts without needing to reboot them, or without needing to update and test the images, in order to pick up an important patch.
vApp Settings The vApp Settings allow you to control whether VUM's smart reboot feature is enabled for vApps. vApps are teams, if you will, of VMs. Consider a multitier application that consists of a frontend web server, a middleware server, and a backend database server. These three different VMs and their respective guest OSes could be combined into a vApp. The smart reboot feature simply restarts the different VMs within the vApp in a way that accommodates inter-VM dependencies. For example, if the database server has to be patched and rebooted, then it is quite likely that the web server and the middleware server will also need to be rebooted, and they shouldn't be restarted until after the database server is back up and available again. The default setting is to leverage smart reboot.
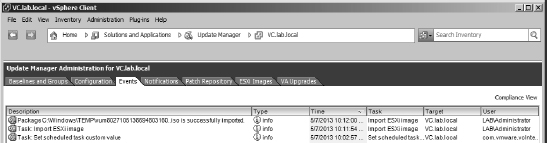
Events The Events tab lists the VUM-specific events logged. As shown in Figure 4.12, the Events tab lists actions taken by administrators as well as automatic actions taken by VUM. Administrators can sort the list of events by clicking the column headers, but there is no functionality to help users filter out only the events they want to see. There is also no way to export events from here.
FIGURE 4.12 The Events tab lists events logged by VUM during operation and can be a good source of information for troubleshooting.
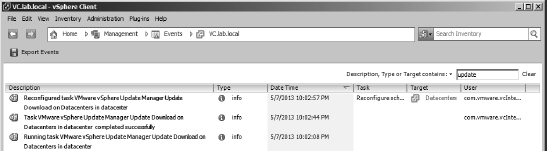
However, you can also find the events listed in the holistic Management ![]() Events area of the vSphere Client home page (or via the Ctrl+Shift+E keyboard shortcut), and that area does include some filtering functionality as well as the ability to export the events. The Export Events button, shown in Figure 4.13 in the upper-left corner, allows you to export events to a file. (The functionality of the Management
Events area of the vSphere Client home page (or via the Ctrl+Shift+E keyboard shortcut), and that area does include some filtering functionality as well as the ability to export the events. The Export Events button, shown in Figure 4.13 in the upper-left corner, allows you to export events to a file. (The functionality of the Management ![]() Events area of vCenter Server was discussed in detail in Chapter 3.)
Events area of vCenter Server was discussed in detail in Chapter 3.)
FIGURE 4.13 Events from VUM Manager are included in the Management area of vCenter Server, where information can be exported or filtered.
Notifications This tab displays any notifications gathered by VUM regarding patch recalls, patch fixes, and other alerts issued by VMware.
For example, if VMware recalled a patch, VUM would mark the patch as recalled. This prevents you from installing the recalled patch. A notification that the patch was recalled would be displayed in the Notifications area. Similarly, if a patch is fixed, VUM would update the new patch and include a notification that the patch has been updated.
Patch Repository The Patch Repository tab shows all the patches that are currently in VUM's patch repository. From here, you can also view the details of any specific patch by right-clicking the patch and selecting Show Patch Detail or by double-clicking a patch. Figure 4.14 shows the additional information displayed about a patch when you select Show Patch Detail from the context menu (right click).
This particular item shown in Figure 4.14 is the Virtual Ethernet Module for the Cisco Nexus 1000V.
The Import Patches link in the upper-right corner of the Patch Repository tab allows you to upload patches directly into the repository. Importing patches here is the same as importing them on the Configuration ![]() Download Settings page.
Download Settings page.
ESXi Images This is the area where you will upload ISO files for upgrading ESX/ESXi. These ISO files are the same images used to create the CD installation media for a base ESXi install. You can find more information on this task in the section “Upgrading Hosts With vSphere Update Manager.”
VA Upgrades The VA Upgrades tab lists any suitable virtual appliance upgrades. You can view different versions, see a log of all the changes that have been made since the previous version, and accept any required licensing agreements. For a virtual appliance to be upgradable via VUM, it must have been built with VMware's own free Studio package (at least version 2.0 must have been used).
FIGURE 4.14 The Patch Repository tab also offers more detailed information about each of the items in the repository.

Creating Baselines
VMware provides a few baselines with VUM when it's installed. The following baselines are present upon installation:
- Two dynamic host patch baselines named Critical Host Patches and Non-Critical Host Patches
- A dynamic baseline for upgrading VMware Tools to match the host
- A dynamic baseline for upgrading VM hardware to match the host
- A dynamic VA upgrade baseline named VA Upgrade To Latest
Although these baselines provide a good starting point, many users will need to create additional baselines that better reflect their organizations' specific patching policy or procedures. For example, organizations may want to ensure that ESX/ESXi hosts are kept fully patched with regard to security patches but not necessarily critical nonsecurity patches. This can be accomplished by creating a custom dynamic baseline.
Perform the following steps to create a new dynamic host patch baseline for security-related ESX/ESXi host patches:
- Launch the vSphere Client, and connect to the vCenter Server instance with which VUM is registered.
- In the vSphere Client, navigate to the Update Manager Administration area via the vCenter home page, and click the Baselines And Groups tab.
- Just under the tab bar, you need to select the correct baseline type, Hosts or VMs/VAs. In this case, click the Hosts button.
- Click the Create link in the area to the right of the list of baselines (not the Create link for Baseline Groups on the far right). This launches the New Baseline Wizard.
- Supply a name and description for the new baseline, and select Host Patch as the baseline type. Click Next.
- Select Dynamic, and click Next.
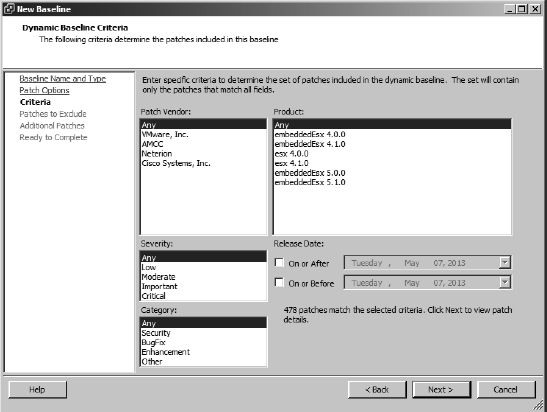
- On the next screen you define the criteria for the patches to be included in this baseline. Select the correct criteria for the baseline you are defining, and then click Next.
Figure 4.15 shows a sample selection set—in this case, all security-related patches.
FIGURE 4.15 Dynamic baselines contain a set of criteria that determine which patches are included in the baseline and which are not.
- Select any patches that match the selection criteria but that you want to exclude from the baseline.
Use the up/down arrows to move patches out of or into the exclusion list in the lower pane, respectively. In this case, don't exclude any patches and just click Next.
- Now you have the option to permanently include any patches that are available but that were not automatically included by the selection criteria.
Once again, use the up/down arrows to remove patches or add patches to be included, respectively. Don't add any additional patches; just click Next.
- Click Finish to create the baseline.
You can now use this baseline to determine which ESX/ESXi hosts are not compliant with the latest security patches by attaching it to one or more hosts, a procedure you'll learn later in this chapter in the section “Routine Updates.”
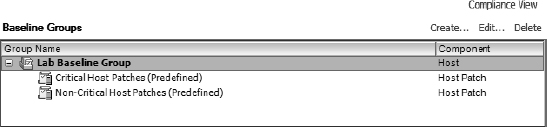
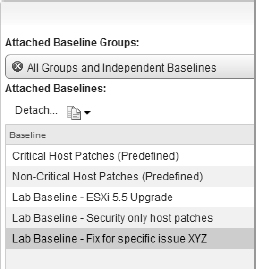
Groups, or baseline groups, are simply combinations of nonconflicting baselines. You might use a baseline group to combine multiple dynamic patch baselines, like the baseline group shown in Figure 4.16. In that example, a baseline group is defined that includes the built-in Critical Host Patches and Non-Critical Host Patches baselines. By attaching this baseline group to your ESX/ESXi hosts, you would be able to ensure that your hosts had all available patches installed.
FIGURE 4.16 Combining multiple dynamic baselines into a baseline group provides greater flexibility in managing patches.
You can also use baseline groups to combine different types of baselines. Each baseline group can include one of each type of upgrade baseline. For a host baseline group, there is only one type of upgrade baseline—a host upgrade. For VM/VA upgrade baselines, there are multiple types: VA Upgrades, VM Hardware Upgrades, and VM Tools Upgrades. When you are working with a host baseline group, you also have the option of adding a host extension baseline into the baseline group. This ability to combine different types of baselines together into a baseline group simplifies the application of multiple baselines to objects in your vCenter Server hierarchy.
Another use for baseline groups would be to combine a dynamic patch policy and a fixed patch policy into a baseline group. For example, there might be a specific fix for your ESX/ESXi hosts, and you want to ensure that all your hosts have all the critical patches—easily handled by the built-in Critical Host Patches dynamic baseline—as well as the specific fix. To do this, create a fixed baseline for the specific patch you want included, and then combine it in a baseline group with the built-in Critical Host Patches dynamic baseline.
Figure 4.17 shows an example of a host baseline group that combines different types of host baselines. In this example, a baseline group is used to combine a host upgrade baseline and dynamic patch baselines. This would allow you to upgrade an ESX/ESXi host and then ensure that the host has all the applicable updates for the new version.
FIGURE 4.17 Use baseline groups to combine host upgrade and dynamic host patch baselines.

Perform the following steps to create a host baseline group combining multiple host baselines:
- Launch the vSphere Client if it isn't already running, and connect to the vCenter Server instance with which VUM is registered.
- Navigate to the Update Manager Administration area, and make sure the Baselines And Groups tab is selected.
- In the upper-right corner of the Update Manager Administration area, click the Create link to create a new baseline group. This starts the New Baseline Group Wizard.
- Select Host Baseline Group as the baseline type and create a name for the new baseline group. Click Next.
- Because we haven't yet discussed how to create a host upgrade baseline, you probably don't have an upgrade baseline listed. Instead, for this procedure, you will combine a dynamic and a fixed-host patch baseline. Select None and click Next to skip attaching an upgrade baseline to this host baseline group.
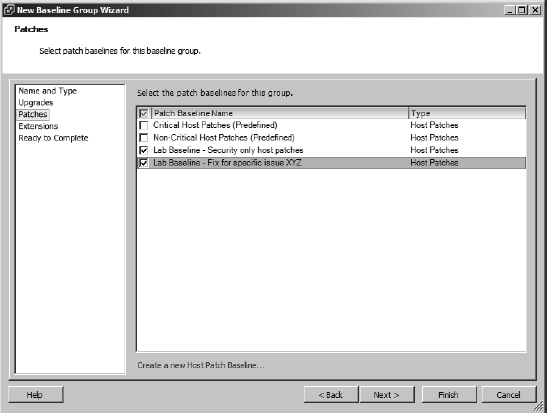
- Place a check mark next to each individual baseline to include in this baseline group, as shown in Figure 4.18, and click Next.
FIGURE 4.18 A baseline group combines multiple individual baselines for a more comprehensive patching capability.
- If you want to include a host extension baseline, select the desired host extension baseline and click Next. Otherwise, just click Next to proceed without adding a host extension baseline.
- On the summary screen, review the settings, and click Finish to create the new baseline group.
The new baseline group you just created is now included in the list of baseline groups, and you can attach it to ESX/ESXi hosts or clusters to identify which of them are not compliant with the baseline.
You'll see more about host upgrade baselines in the section “Upgrading Hosts with vSphere Update Manager.”
Having examined the different areas present within VUM, let's now take a look at actually using VUM to patch hosts and VMs.
Routine Updates
VUM uses the term remediation to refer to the process of applying patches and upgrades to a vSphere object. As described in the previous section, VUM uses baselines to create lists of patches based on certain criteria. By attaching a baseline to a host or VM and performing a scan, VUM can determine whether that object is compliant or noncompliant with the baseline. Compliance with the baseline means that the host or VM has all the patches included in the baseline currently installed and is up-to-date; noncompliance means that one or more patches are missing and the target is not up-to-date.
After noncompliance with one or more baselines or baseline groups has been determined, the vSphere administrator can remediate—or patch—the hosts or VMs. Optionally, the administrator can stage patches to ESX/ESXi hosts before remediation.
The first step in this process is actually creating the baselines that you will attach to your ESX/ESXi hosts or VMs. How to create a host patch baseline was covered earlier, so you have already seen this process. The next step is attaching a baseline to—or detaching a baseline from—ESX/ESXi hosts or VMs. Let's take a closer look at how to attach and detach baselines.
Attaching and Detaching Baselines or Baseline Groups
Before you patch a host or guest, you must determine whether an ESX/ESXi host or VM is compliant or noncompliant with one or more baselines or baseline groups. Defining a baseline or baseline group alone is not enough. To determine compliance, you must first attach the baseline or baseline group to a host or VM. After it is attached, the baseline or baseline group becomes the “measuring stick” that VUM uses to determine compliance. Attaching and detaching baselines is performed in one of vCenter's inventory views. To attach or detach a baseline or baseline groups for ESX/ESXi hosts, you need to be in the Hosts And Clusters view; for VMs, you need to be in the VMs And Templates view. In both cases, you'll use the Update Manager tab to attach or detach baselines or baseline groups.
In both views, baselines and baseline groups can be attached to a variety of objects. In the Hosts And Clusters view, baselines and baseline groups can be attached to datacenters, clusters, or individual ESX/ESXi hosts. In the VMs And Templates view, baselines and baseline groups can be attached to datacenters, folders, or specific VMs. Because of the hierarchical nature of the vCenter Server inventory, a baseline attached at a higher level will automatically apply to eligible child objects as well. You may also find yourself applying different baselines or baseline groups at different levels of the hierarchy; for example, there may be a specific baseline that applies to all hosts in the environment but another baseline that applies only to a specific subset of hosts.
Let's look at attaching a baseline to a specific ESX/ESXi host. The process is much the same, if not identical, for attaching a baseline to a datacenter, cluster, folder, or VM.
Perform the following steps to attach a baseline or baseline group to an ESX/ESXi host:
- Launch the vSphere Web Client in your web browser of choice.
This instance of vCenter Server should have an instance of VUM associated with it.
Because VUM is integrated with and depends on vCenter Server, you cannot manage, attach, or detach VUM baselines when connected directly to an ESX/ESXi host with the Windows vSphere Client.
- On the Web Client's home screen, select Hosts And Clusters.
- In the inventory tree on the left, select the ESX/ESXi host to which you want to attach a baseline or baseline group.
- In the central panel, select the Monitor tab, followed by the Update Manager subtab. Unlike the Windows vSphere Client, the Web Client lists all applicable baselines and baseline groups, even those not attached.
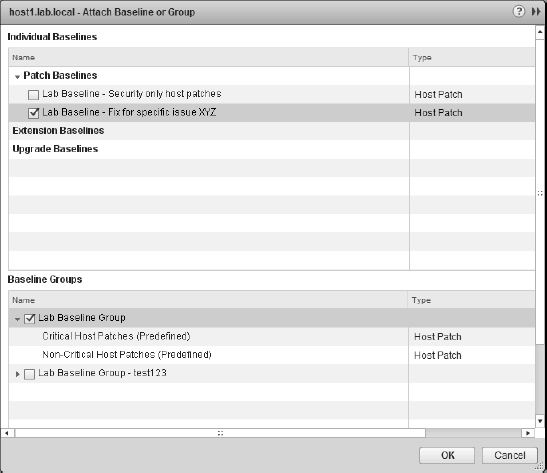
- Click the Attach link in the upper-right corner; this link opens the Attach Baseline Or Group dialog box, shown in Figure 4.19.
FIGURE 4.19 The Attach Baseline Or Group dialog box
- Select the baselines and/or baseline groups that you want to attach to this ESX/ESXi host, and then click OK.
The steps for attaching a baseline or baseline group to a VM with a guest OS installed are similar, but let's walk through the process anyway. A very useful baseline to point out is named VMware Tools Upgrade To Match Host. This baseline is a default baseline that is defined upon installation of VUM, and its purpose is to help you identify which VMs have guest OSes running outdated versions of VMware Tools. As you'll see in Chapter 7, using VMware Tools is an important piece of optimizing your guest OSes to run in a virtualized environment, and it's great that VUM can help identify which VMs have guest OSes with an outdated version of VMware Tools installed.
Perform the following steps to attach a baseline to a datacenter so that it applies to all the objects under the datacenter:
- Launch the vSphere Web Client if it is not already running.
- Switch to the VMs And Templates inventory view from the Web Client's home screen.
- Select a datacenter object from the inventory on the left.
- From the contents pane in the middle, click the Monitor tab followed by the Update Manager tab.
- Click the Attach button in the top right-hand corner of the Update Manager tab's panel. This opens the Attach Baseline Or Group dialog box.
- Click to select the VMware Tools Upgrade To Match Host upgrade baseline, and then click OK.
In the event that you need to detach a baseline from an object, highlight the baseline in question, and use the Detach button just above the left corner of the list. Figure 4.20 shows the Detach button about half-way down on the left. This link is visible only when a baseline is highlighted.
FIGURE 4.20 Detaching baselines
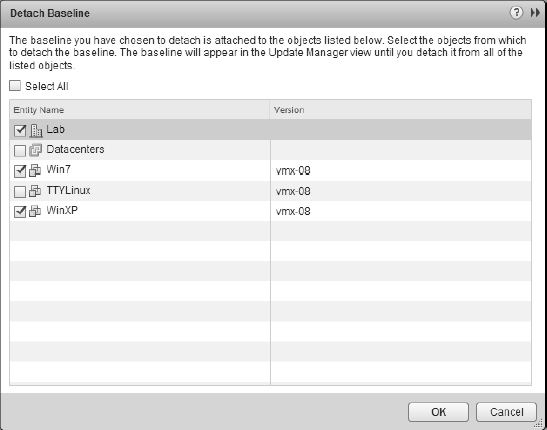
Clicking the Detach link then takes you to a screen that also allows you to detach the baseline from other objects to which it is attached. Figure 4.21 shows how VUM allows you to detach the selected baseline or baseline group from other objects at the same time (it does not allow you to detach baselines from objects that have inherited the baseline, only those that have been explicitly attached to each child object—if an object has inherited the baseline, then this can be detached only at the point it was applied).
FIGURE 4.21 When you're detaching a baseline or baseline group, VUM offers the option to detach it from other objects at the same time.
In much the same way as simply defining a baseline or baseline group wasn't enough, simply attaching a baseline or baseline group to an ESX/ESXi host or VM isn't enough to determine compliance or noncompliance. To determine compliance or noncompliance with a baseline or baseline group, you need to perform a scan.
Performing a Scan
The next step after attaching a baseline is to perform a scan. The purpose of a scan is to determine the compliance, or noncompliance, of an object with the baseline. If the object being scanned matches what's defined in the baseline, then the object—be it an ESX/ESXi host, VM, or virtual appliance instance—is compliant. If something is missing from the object, then it's noncompliant.
While the process of scanning these objects within vCenter Server is essentially the same, there are enough differences in the processes and requirements to make it worthwhile to examine each one.
SCANNING VMs
You might perform any of three different types of scans against a VM and virtual appliances using VUM:
- Scan the installed version of VMware Tools to see if it's the latest version.
- Scan the VM hardware to see if it's the latest version.
- Scan a virtual appliance to see if a new version is available and if it can be upgraded.
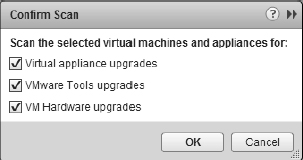
The process for actually conducting a scan is identical in all three instances except for the check box that indicates what type of scan you'd like to perform, as shown in Figure 4.22.
FIGURE 4.22 Different types of scans are initiated depending on the check boxes selected at the start of the scan.
What differs among these three types of scans are the requirements needed to perform a scan:
Scanning for VMware Tools Upgrades If you scan a VM for VMware Tools upgrades and that VM does not have VMware Tools installed, the scan will succeed but VUM will report the VM as Incompatible. To get a Compliant or Non-Compliant report, some version of the VMware Tools needs to already be running within the guest OS installed in the VM. Other than that requirement, VUM has no other restrictions. VUM can scan both online and offline VMs and templates.
Scanning for VM Hardware Upgrades Scanning for VM hardware upgrades requires that the latest version of VMware Tools be installed in the VM first. This, of course, means that a guest OS is installed in the VM. You can perform VM hardware upgrade scans on both online as well as offline VMs and templates.
Scanning Virtual Appliances Scanning virtual appliances for virtual appliance upgrades can be performed only on virtual appliances created with VMware Studio 2.0 or later. In addition, because of the nature of virtual appliances as prepackaged installations of a guest OS and applications, it's generally not recommended to scan virtual appliances for VMware Tools upgrades or VM hardware upgrades. Virtual appliances are generally distributed in such a way that if the developer of the virtual appliance wants to update VMware Tools or the VM hardware, they will create a new version of the appliance and distribute the entire appliance.
UNMANAGED VMWARE TOOLS
Creators of virtual appliances have the option of installing operating system specific packages (OSPs) for VMware Tools. Because installing VMware Tools through the vSphere Client is mutually exclusive to using the OSP VMware Tools, the OSP VMware Tools will report Unmanaged as the status in the vSphere Client. In addition, scans of virtual appliances for VMware Tools upgrades will report the virtual appliance as Incompatible. It's not something to be concerned about because it allows the virtual appliance creators to use the native operating system packaging tools to more effectively manage the driver updates.
SCANNING ESX/ESXI HOSTS
As with VMs, the requirements for being able to scan an ESX/ESXi host vary depending on the type of scan VUM is performing. In all cases, the ESX/ESXi hosts need to be online and reachable via the network from the VUM server. VUM 5.5 can scan 4.0 and above hosts for updates to patches and extensions or for potential upgrades.
Let's look at the steps involved to perform a scan. Keep in mind that performing a scan on a VM and performing a scan on a virtual appliance are extremely similar processes.
Perform the following steps to initiate a scan of an ESX/ESXi host for patches, extensions, or upgrades after a baseline is attached:
- Launch the vSphere Web Client if it is not already running.
- Go to the Hosts And Clusters inventory view from the Web Client's home screen.
- Select an ESX/ESXi host from the inventory tree on the left.
- From the contents pane on the right, click the Update Manager tab sitting under the Monitor tab.
- Click the Scan link in the upper-right corner.
- Select whether you want to scan for patches and extensions, upgrades, or both, and then click Scan.
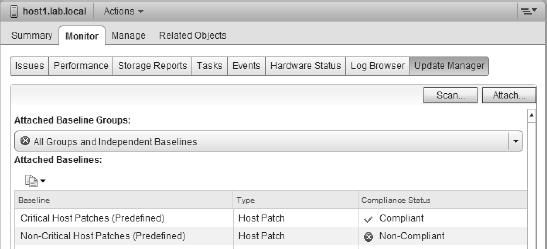
When the scan is complete, the Update Manager tab will update to show whether the object is compliant or noncompliant. Compliance is measured on a per-baseline basis. In Figure 4.23, you can see that the selected ESXi host is compliant with the Critical Host Patches baseline but not the Non-Critical Host Patches baseline. This means the host is compliant overall. If a host is noncompliant with at least one attached baseline, the host is considered noncompliant.
FIGURE 4.23 When multiple baselines are attached to an object, compliance is reflected on a per-baseline basis.
When you are viewing the Update Manager tab for an object that contains other objects, such as a datacenter, cluster, or folder, then compliance might be mixed. That is, some objects might be compliant, while other objects might be noncompliant. Figure 4.24 shows a datacenter with mixed compliance reports. In this particular case, you're looking at a compliance report for VMware Tools upgrades to match the host. The compliance report shows objects that are compliant (VMware Tools is up-to-date), noncompliant (VMware Tools is outdated), and incompatible (VMware Tools cannot be installed for some reason).
FIGURE 4.24 VUM can show partial compliance when viewing objects that contain other objects.
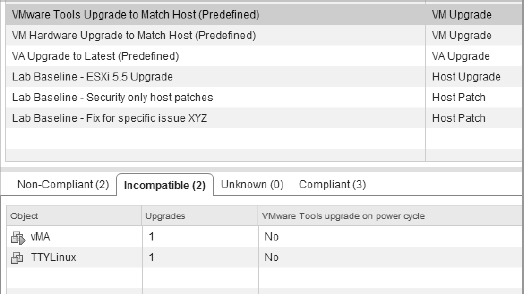
VUM can report an object as Incompatible for a number of reasons. In this particular case, VUM is reporting two objects as Incompatible when scanning for VMware Tools. Taking a closer look at Figure 4.24, you can see that these two objects are a VM named TTYLinux and a virtual appliance named vMA. The VM is reported as Incompatible because this is a fresh VM with no guest OS installed yet, and the vMA is reporting Incompatible because it is a virtual appliance running the OSP VMware Tools, which is not intended to be managed by the vSphere Client.
Depending on the type of scan you are performing, scans can be fairly quick. Scanning a large group of VMs for VMware Tools upgrades or VM hardware upgrades may also be fairly quick. Scanning a large group of hosts for patches, on the other hand, might be more time consuming and more resource intensive. Combining several tasks at the same time can also slow down scans while they run concurrently. You can consult VMware's latest copy of the vSphere Configuration Maximums document for version 5.5, which lists the maximum number of concurrent VUM operations possible.
After the scanning is complete and compliance is established, you are ready to fix the non-compliant systems. Before we discuss remediation, let's first look at staging patches to ESX/ESXi hosts.
Staging Patches
If the target of remediation—that is, the object within vCenter Server that you are trying to remediate and make compliant with a baseline—is an ESX/ESXi host, an additional option exists. VUM offers the option of staging patches to ESX/ESXi hosts. Staging a patch to an ESX/ESXi host copies the files across to the host to speed up the actual time of remediation. Staging is not a required step; you can update hosts without staging the updates first, if you prefer. VUM won't stage patches to a PXE-booted ESXi host such as a host provisioned via standard Auto Deploy (although it will stage patches to hosts using stateful Auto Depoy).
Staging host patches is particularly useful for companies whose VUM-connected hosts are spread across slow WAN links. This can substantially reduce the outage required on such sites, especially if the WAN link is particularly slow or the patches themselves are very large. Hosts do not need to be in maintenance mode while patches are being staged, but they do during the remediation phase. Staging patches reduces the maintenance mode period associated with remediation. Staging patches also allows the uploads to be scheduled for a time when heavy WAN utilization is more appropriate, allowing the administrator to remediate the host at a more agreeable time.
At this stage you need to switch back to the Windows vSphere Client. Perform the following steps to stage patches to an ESX/ESXi host using VUM:
- Launch the vSphere Client if it is not already running, and connect to a vCenter Server instance.
- Navigate to the Hosts And Clusters view by selecting View
 Inventory Hosts And Clusters, by using the Ctrl+Shift+H keyboard shortcut, or by using the navigation bar.
 - From the inventory list on the left, select an ESX/ESXi host.
- From the contents pane on the right, scroll through the tabs and select the Update Manager tab.
- Click the Stage button in the bottom-right corner of the contents pane, or right-click the host and select Stage Patches. Either method activates the Stage Wizard.
- Select the baselines for the patches you want to be staged, and click Next to proceed.
- The next screen allows you to deselect any specific patches you do not want to be staged. If you want all the patches to be staged, leave them all selected, and click Next.
- Click Finish at the summary screen to start the staging process.
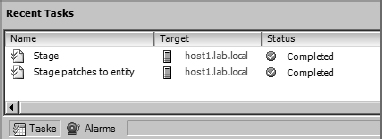
After the staging process is complete, the Tasks pane at the bottom of the vSphere Client reflects this, as shown in Figure 4.25.
FIGURE 4.25 The vSphere Client reflects when the process of staging patches is complete.
After you stage patches to the ESX/ESXi hosts, you can begin the task of remediating immediately or defer to a later or more appropriate time window.
Remediating Hosts
After you have attached a baseline to a host, scanned the host for compliance, and optionally staged the updates to the host, you're ready to remediate, or update, the ESX/ESXi host.
REMEDIATION
The term remediation is simply VMware parlance to mean the process of applying patches or upgrades to an object to bring it up to a compliant level.
Perform the following steps to patch an ESX/ESXi host:
- Launch the vSphere Client if it is not already running, and connect to a vCenter Server instance.
- Switch to the Hosts And Clusters view by using the navigation bar, by using the Ctrl+Shift+H keyboard shortcut, or by selecting View Inventory Hosts And Clusters.
- Select an ESX/ESXi host from the inventory tree on the left.
- From the contents pane on the right, select the Update Manager tab. You might need to scroll through the available tabs to see the Update Manager tab.
- In the lower-right corner of the window, click the Remediate button. You can also right-click the ESX/ESXi host and select Remediate from the context menu.
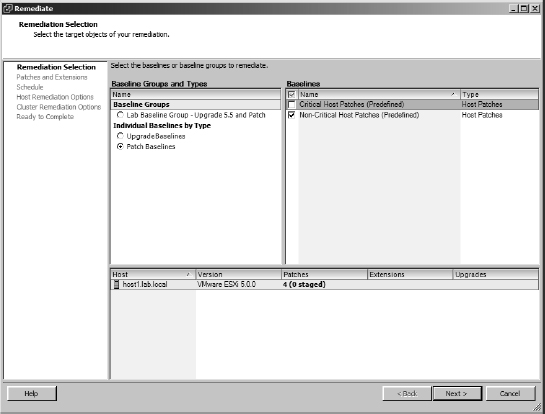
- The Remediate dialog box opens, as shown in Figure 4.26. From here, select the baselines or baseline groups that you want to apply. Click Next.
FIGURE 4.26 The Remediate dialog box allows you to select the baselines or baseline groups against which you would like to remediate an ESX/ESXi host.
- Deselect any patches or extensions that you don't want applied to the ESX/ESXi host.
This allows you to customize the exact list of patches. Click Next after you've deselected any patches to exclude.
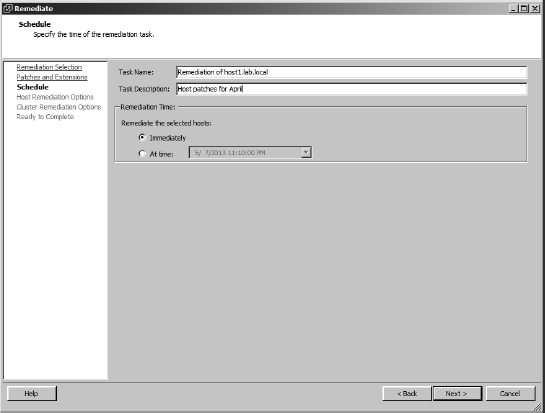
- Specify a name and description for the remediation task. Also, choose whether you want the remediation to occur immediately or whether it should run at a specific time.
Figure 4.27 shows these options.
FIGURE 4.27 When remediating a host, you need to specify a name for the remediation task and a schedule for the task.
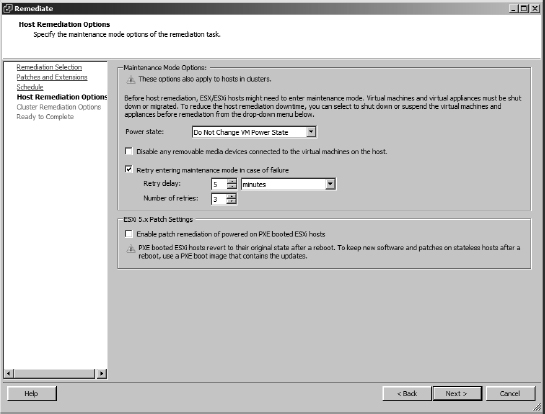
- The Host Remediation Options page gives you the option to modify the default settings for how VUM should handle a host's VMs if it has to enter maintenance mode. It also lets you patch PXE-booted ESXi hosts but warns you that those changes will be lost on the next power cycle. Figure 4.28 shows the options available during this stage. Make any changes required and click Next.
FIGURE 4.28 Host remediation options available if the host has to enter maintenance mode
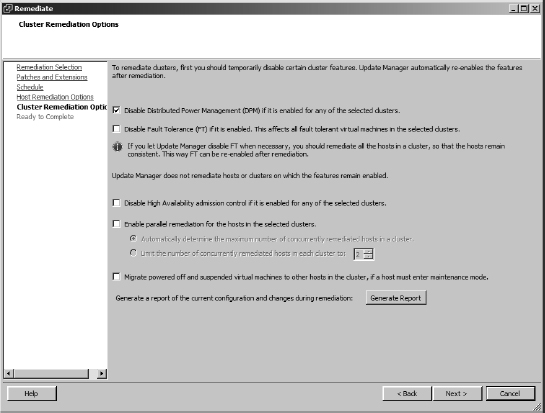
- If the host is a member of a cluster, you can choose whether to disable any of the cluster settings for DPM, HA, and FT, if you think they may interfere with the remediation process. VUM version 5 now has the option to remediate several hosts at once if the cluster has sufficient compute resources to meet the other cluster controls. In Figure 4.29 you can see the full gamut of cluster options.
FIGURE 4.29 Cluster options during host remediation
- Review the summary screen, and click Finish if everything is correct. If there are any errors, use the Back button to double-check and change the settings.
If you selected to have the remediation occur immediately, which is the default setting, VUM initiates a task request with vCenter Server. You'll see this task, as well as some related tasks, in the Tasks pane at the bottom of the vSphere Client.
If necessary, VUM automatically puts the ESX/ESXi host into maintenance mode. If the host is a member of a DRS-enabled cluster, putting the host into maintenance mode will, in turn, initiate a series of vMotion operations to migrate all VMs to other hosts in the cluster. It's common to see the remediation task pause for an extended time at the 22% point. This is normal and it often takes around 15 minutes to complete the migrations before progressing further. After the patching is complete, VUM automatically reboots the host, if it is required, and then takes the host out of maintenance mode.
KEEPING HOSTS PATCHED IS IMPORTANT
Keeping your ESX/ESXi hosts patched is important. We all know this, but too often VMware administrators forget to incorporate this key task into their operations.
VUM makes keeping your hosts patched much easier, but you still need to actually do it! Be sure to take the time to establish a regular schedule for applying host updates and take advantage of VUM's integration with vMotion, vCenter Server, and VMware Distributed Resource Scheduler (DRS) to avoid downtime for your end users during the patching process.
Upgrading VMware Tools
VUM can scan and remediate not only ESX/ESXi hosts but also the VMware Tools package running inside your VMs. VMware Tools is an important part of your virtualized infrastructure. The basic idea behind VMware Tools is to provide a set of virtualization-optimized drivers for all the guest OSes that VMware supports with VMware vSphere. These virtualization-optimized drivers help provide the highest levels of performance for guest OSes running on VMware vSphere, and it's considered a best practice to keep VMware Tools up-to-date whenever possible. (You can find a more thorough discussion of VMware Tools in Chapter 9, “Creating and Managing Virtual Machines.”)
To help with that task, VUM comes with a prebuilt upgrade baseline named VMware Tools Upgrade To Match Host. This baseline can't be modified or deleted from within the vSphere Client, and its sole purpose is to help vSphere administrators identify VMs that are not running a version of VMware Tools that is appropriate for the host on which it is currently running.
In general, follow the same order of operations for remediating VMware Tools as you did for ESX/ESXi hosts:
- Attach the baselines to the VMs you want to scan and remediate.
- Scan the VMs for compliance with the attached baseline.
- Remediate VMware Tools inside the VMs if it is noncompliant.
The procedure for attaching a baseline was described in the section “Attaching and Detaching Baselines or Baseline Groups,” and the process of performing a scan for compliance with a baseline was described in the section “Performing a Scan.”
If you have attached a baseline to a VM and scanned VMware Tools on that VM for compliance, the next step is actually remediating VMware Tools inside the VM.
Perform the following steps to remediate VMware Tools:
- Launch the vSphere Client if it is not already running, and connect to an instance of vCenter Server.
- Using the menu, navigate to the VMs And Templates area by selecting View Inventory VMs And Templates. You can also use the navigation bar or the Ctrl+Shift+V keyboard shortcut.
- Right-click the VM that you want to remediate, and select Remediate from the context menu. To remediate several VMs, select an object farther up the hierarchy. This displays the Remediate dialog box.
- In the Remediate dialog box, select the VMware Tools Upgrade To Match Host baseline, and then click Next.
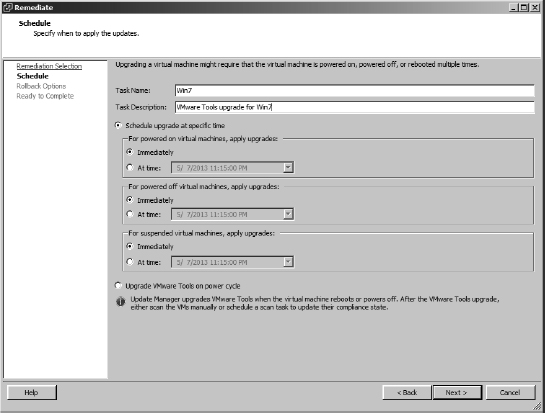
- Provide a name for the remediation task, and select a schedule for the task. Different schedules are possible for powered-on VMs, powered-off VMs, and suspended VMs, as shown in Figure 4.30.
- Select an appropriate schedule for each of the different classes of VMs, and then click Next.
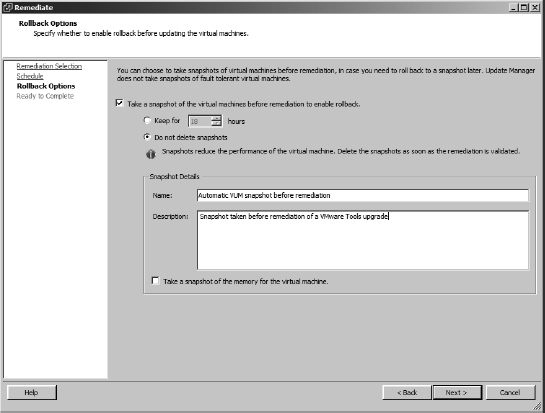
- If you want to take a snapshot of the VM, supply a name for the snapshot and a description.
You may also specify a maximum age for the snapshot and whether to snapshot the VM's memory. The default settings, as shown in Figure 4.31, are Do Not Delete Snapshots and Take A Snapshot Of The Virtual Machines Before Remediation To Enable Rollback.
FIGURE 4.30 VUM supports different schedules for remediating powered-on VMs, powered-off VMs, and suspended VMs.
FIGURE 4.31 VUM integrates with vCenter Server's snapshot functionality to allow remediation operations to be rolled back in the event of a problem.
- Review the information in the summary screen. If anything is incorrect, use the Back button to double-check and change the settings. Otherwise, click Finish to start the remediation.
A reboot of the guest OS is often required after the VMware Tools upgrade is complete, although this varies from guest OS to guest OS. Windows guests with a version of VMware Tools prior to 5.1 will require a reboot, so plan accordingly. vSphere 5.1 introduced the “zero downtime” tools upgrade, which is designed to minimize guest reboots after the tools have been updated. Updates to certain device drivers still mean a reboot is necessary, but the incidence has been significantly reduced. The Knowledge Base article at http://kb.vmware.com/kb/2015163 details the circumstances that still require a reboot.
Where multiple VMs are joined together in a vApp, VUM and vCenter Server will coordinate restarting the VMs within the vApp to satisfy inter-VM dependencies unless you turned off Smart Reboot in the VUM configuration.
When you are dealing with VMs brought into a VMware vSphere environment from previous versions of VMware Infrastructure, you must be sure to first upgrade VMware Tools to the latest version and then deal with upgrading VM hardware. This process is explained at the end of the section “Upgrading Hosts with vSphere Update Manager.” By upgrading the VMware Tools first, you ensure that the appropriate drivers are already loaded into the guest OS when you upgrade the VM hardware.
Upgrading Virtual Appliances and Host Extensions
Once again, you follow the same overall procedure to upgrade virtual appliances and host extensions in VUM as you did with VMware Tools in the previous section:
- Attach the baseline.
- Scan for compliance.
- Remediate.
However, it is worth noting that both virtual appliances and host extensions are less likely to be upgraded quite so routinely. When upgraded, they are replaced wholesale, and their settings are migrated across to the new version.
Virtual appliances and host extensions often come from third-party hardware or software providers. Each vendor will make its own decisions regarding what changes to functionality are included in these upgrades. For some, you may find that the upgrade includes merely minor bug fixes and no change in the way the appliance or extension works. Another upgrade might bring significant changes to how it operates.
For this reason, it is prudent to treat each upgrade to a virtual appliance or host extension as something that needs to be tested thoroughly before running a wide-scale upgrade.
Now let's look at the last major piece of VUM's functionality: upgrading vSphere hosts.
Upgrading Hosts with vSphere Update Manager
Upgrading vSphere ESXi 5.x to the newest versions when they become available, and upgrading legacy vSphere 4.x ESX and ESXi hosts to ESXi 5.5, is principally a three-stage process. Although ESX and ESXi are fundamentally very different hypervisors, VUM can seamlessly upgrade either variant to ESXi 5.5. In fact, while running the Upgrade Wizard, which we'll step through later in this chapter, if you blink, you won't even spot the difference.
Perform the following steps to upgrade a host server with VUM 5.5:
- Import an ESXi image and create a host upgrade baseline.
- Upgrade the host by remediating with the upgrade baseline.
- Upgrade the VMs' VMware Tools and hardware.
Strictly speaking, the last point is not part of the host upgrade procedure. However, most of the time when you upgrade VMs' hardware, it is immediately following a host upgrade (at least you should be upgrading them at that time!).
Importing an ESXi Image and Creating the Host Upgrade Baseline
Previous versions of vSphere used Update Bundles to upgrade hosts. These offline bundle Zip files are still used by vSphere to patch hosts and third-party software but not for host upgrades. In VUM 5.5, all host upgrades use the same image file that is used to install ESXi.
Perform the following steps to import the ISO file into VUM and create the baseline:
- Launch the vSphere Client if it is not already running, and connect to a vCenter Server instance.
- Navigate to the Update Manager Administration area by using the navigation bar or by selecting View Solutions And Applications Update Manager.
- Click the ESXi Images tab.
- Click the blue Import ESXi Image link in the top-right corner of this tab.
- Use the Browse button, shown in Figure 4.32, to select the new ESXi ISO file. Click Next.
FIGURE 4.32 Select the ESXi image to use for the host upgrade.
- Monitor the progress of the file upload, as shown in Figure 4.33; this might take a few minutes to complete. Once the file import is complete, verify the summary information and click Next.
FIGURE 4.33 ESXi image import
- Take this opportunity to let the wizard create a host upgrade baseline for you by leaving the check box selected. Give the baseline a name and appropriate description and click Finish. Figure 4.34 shows an image uploaded into the list of imported images. When an image is selected, the lower pane lists all the software packages included in the image and their version number.
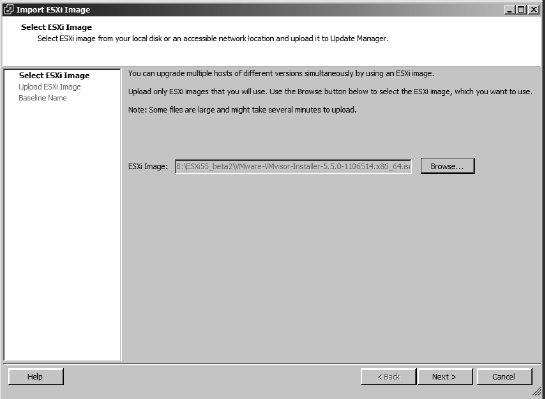

Upgrading a Host
After you've created a host upgrade baseline, you can use this baseline to upgrade an ESX/ESXi host following the same basic sequence of steps outlined previously to remediate other vSphere objects:
- Attach the baseline to the ESX/ESXi hosts that you want to upgrade. Refer to the previous section “Attaching and Detaching Baselines or Baseline Groups” for a review of how to attach a baseline to an ESX/ESXi host or several hosts.
- Scan the ESX/ESXi hosts for compliance with the baseline. Don't forget to select to scan for upgrades when presented with the scan options.
- Remediate the host.
BACK UP YOUR HOST CONFIGURATION AS REQUIRED
Unlike with previous host upgrade methods, VUM no longer supports rollbacks after a problematic upgrade. Before you start the upgrade, make sure you have sufficient information about the state of the host to restore or rebuild it if necessary.
FIGURE 4.34 All the packages contained in the imported ESXi image are shown.
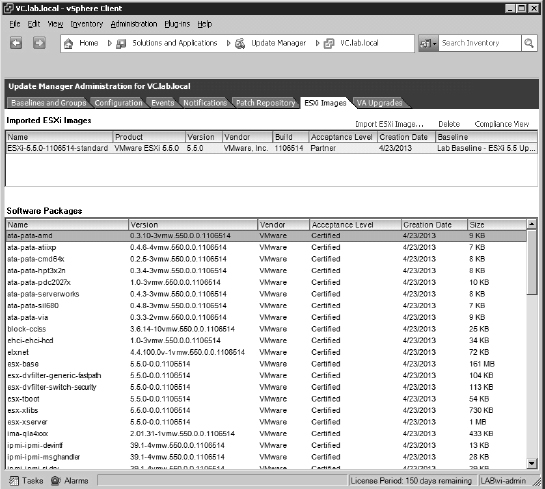
The Remediate Wizard is similar to the process discussed in the section “Remediating Hosts” (Figure 4.25 through Figure 4.29), but there are enough differences to warrant reviewing the process.
Perform the following steps to upgrade an ESX/ESXi host with a VUM host upgrade baseline:
- Launch the vSphere Client if it is not already running, and connect to a vCenter Server instance.
- Switch to the Hosts And Clusters view by using the navigation bar, by using the Ctrl+Shift+H keyboard shortcut, or by selecting View Inventory Hosts And Clusters.
- Select the ESX/ESXi host from the inventory tree on the left.
- From the contents pane on the right, select the Update Manager tab. You might need to scroll through the available tabs to see the Update Manager tab.
- In the lower-right corner of the window, click the Remediate button. You can also right-click the ESX/ESXi host and select Remediate from the context menu.
- The Remediate dialog box opens (Figure 4.35). From here, ensure that the Upgrade Baselines radio button is selected in the Baseline Groups And Types frame, then choose the baseline that you want to apply. Click Next.
- Select the check box to accept the license terms, and then click Next.
- If you are upgrading the hosts from vSphere 4, the next screen gives you the option to explicitly ignore any third-party software on the host that might prevent a host upgrade, as shown in Figure 4.36. Either select the check box or leave it unchecked and click Next.
FIGURE 4.35 Select the correct upgrade baseline in the right pane if multiple versions are listed.
FIGURE 4.36 Upgrades can ignore third-party software on legacy hosts.
- Specify a name, description, and a schedule for the remediation task, and then click Next.
- Choose how the host's VMs should react to the host entering maintenance mode, and click Next.
- The next page gives you the same cluster options shown in Figure 4.29. You can control how the host's cluster should conform to its own DPM, HA, and FT settings and whether to allow multiple hosts to be upgraded at the same time if the cluster has sufficient resources. Select the options required and click Next.
- Review the summary, and use the Back button if any settings need to be changed. Click Finish when the settings are correct.
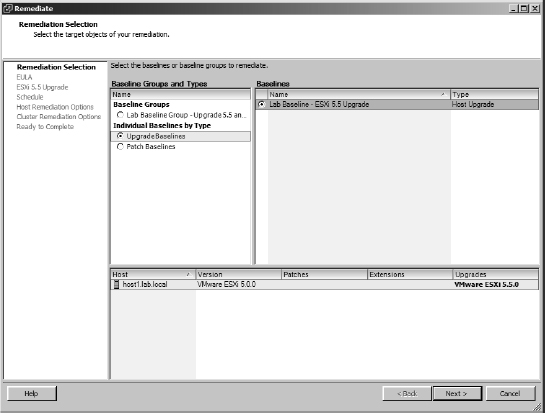
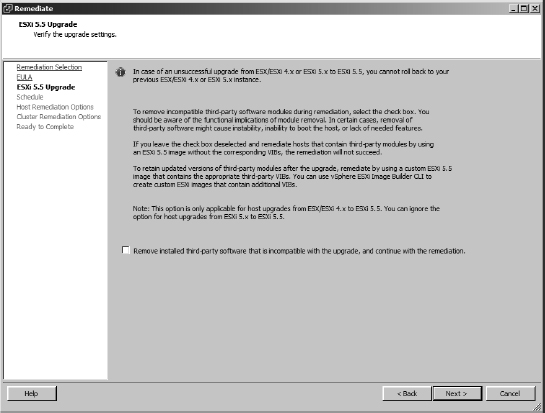
VUM then proceeds with the host upgrade at the scheduled time (Immediately is the default setting in the wizard). The upgrade will be an unattended upgrade, and at the end of the upgrade the host will automatically reboot.
Surprisingly enough, considering the inherent differences between ESX and ESXi, VMware has done a great job of hiding the complex differences during this upgrade procedure. In fact, unless you know which type of host you selected to upgrade beforehand, the only way you can tell during the Remediate Wizard process is by the host version discreetly listed in the lower pane shown in Figure 4.35.
After upgrading all the hosts in a cluster, you should consider upgrading VMware Tools on the VMs and then their virtual hardware version. Upgrading a VM's hardware can prevent that VM from running on older hosts, which is why you should ensure that all the hosts in the same cluster are upgraded first. Otherwise, you can restrict the efficiency of fundamental cluster operations such as DRS and HA.
Keeping in mind that you should upgrade VMware Tools on the VMs first, discussed in the section “Upgrading VMware Tools,” let's look at how to upgrade the virtual hardware.
Upgrading VM Hardware
So far, the idea of VM hardware hasn't been discussed, but the topic is covered in Chapter 9. For now, suffice it to say that VMs brought into a VMware vSphere environment from previous versions of ESX/ESXi will have outdated VM hardware. You'll see outdated hardware most often after you upgrade a host. In order to use all the latest functionality of VMware vSphere with these VMs, you will have to upgrade the VM hardware. To help with this process, VUM lets you scan for and remediate VMs with out-of-date VM hardware.
VUM already comes with a VM upgrade baseline that addresses this: the VM Hardware Upgrade To Match Host baseline. This baseline is predefined and can't be changed or deleted from within the vSphere Client. The purpose of this baseline is to determine whether a VM's hardware is current. vSphere 5.5 VMs use hardware version 10 by default. Hardware version 9 is the version used by vSphere 5.1, and version 8 was used by 5.0.
To upgrade the virtual VM version, you again follow the same general sequence:
- Attach the baseline.
- Perform a scan.
- Remediate.
To attach the baseline, follow the same procedures outlined in the section “Attaching and Detaching Baselines or Baseline Groups.” Performing a scan is much the same as well; be sure you select the VM Hardware upgrade option when initiating a scan so VUM will detect outdated VM hardware. Even if the correct baseline is attached, outdated VM hardware won't be detected during a scan unless you select this box.
Remediation of VMs found to be noncompliant—for example, found to have outdated VM hard-ware—is again much like the other forms of remediation that have already been discussed. The important thing to note is that VM hardware upgrades are done while the VM is powered off. This means you must plan for downtime in the environment to remediate this issue.
VUM performs VM hardware upgrades only when the VM is powered off. It's also important to note that VUM might not be able to conduct an orderly shutdown of the guest OS to do the VM hardware upgrade. To avoid an unexpected shutdown of the guest OS when VUM powers off the VM, specify a schedule in the dialog box shown previously in Figure 4.30 that provides you with enough time to perform an orderly shutdown of the guest OS first.
Depending on which guest OS and which VMware Tools version is running inside the VM, the user may see prompts for “new hardware” after the VM hardware upgrade is complete. If you've followed the recommendations and the latest version of VMware Tools is installed, then all the necessary drivers should already be present, and the “new hardware” should work without any real issues.
![]() Real World Scenario
Real World Scenario
KEEP A RECORD OF YOUR VM's IP ADDRESSES
The most common problem faced with upgrading VM hardware is losing the VM's IP address. This occurs if VMware Tools has not been upgraded properly before you start the hardware upgrade process. Normally the new version of VMware Tools can record the VM's IP settings, and if a new VM hardware upgrade changes the network card's driver, VMware Tools can migrate the IP settings across automatically. However, VMware Tools can drop the settings for several reasons; for example, it does not recognize an issue with VMware Tools before it proceeds with the hardware upgrade, you may not have allowed for enough reboots after the VMware Tools upgrade, there may be OS issues caused by the new drivers, and so forth.
While this shouldn't happen, it is seen often enough that a quick plan B is in order. One simple approach, prior to initiating the remediation step, is to list all the VMs to be upgraded in the VMs And Templates view. Right-click one of the columns, and add the IP address to the view. Then from the File menu, select Export List To A Spreadsheet. This way, should one or more VMs lose their IP settings in the upgrade, you have a quick reference you can pull up. It's not foolproof, but this 30-second action might just save you some time trawling through DNS records if things go awry.
Although you might find virtual appliances with old versions of virtual hardware, it's advisable to treat these as special cases and wait for the software vendors to include the hardware upgrade in the next version. Virtual appliances are custom built and tuned by the vendors for their purpose. They are often released with older hardware so they are compatible with as many versions of vSphere as possible. If a new version of VM hardware is available that would benefit the vendor's appliance, the vendor will likely provide a new version of its appliance to take advantage of the new hardware version.
By combining some of the different features of VUM, you can greatly simplify the process of upgrading your virtualized infrastructure to the latest version of VMware vSphere through an orchestrated upgrade.
Performing an Orchestrated Upgrade
A specific use case for baseline groups is the orchestrated upgrade. For an orchestrated upgrade, you run a host baseline group and a VM/VA baseline group sequentially to help automate the process of moving an organization's environment fully into VMware vSphere 5.5. Quite simply, it upgrades your hosts and then your VMs in one job.
Consider this sequence of events:
- You create a host baseline group that combines a host upgrade baseline with a dynamic host patch baseline to apply the latest updates.
- You create a VM baseline group that combines two different VM upgrade baselines—the VMware Tools upgrade baseline and the VM hardware upgrade baseline.
- You schedule the host baseline group to execute, followed at some point by the VM baseline group.
- The host baseline group upgrades the hosts from ESX/ESXi 4.x and ESXi 5.0/5.1 to ESXi 5.5 and installs all applicable patches and updates.
- The VM baseline group upgrades VMware Tools and then upgrades the VM hardware to version 10.
When these two baseline groups have completed, all the hosts and VMs affected by the baselines will be upgraded and patched. Most, if not all, of the tedious tasks surrounding the VMware Tools and VM hardware upgrade have been automated. Congratulations! You've just simplified and automated the upgrade path for your virtual environment.
Investigating Alternative Update Options
In most circumstances, using the VUM tools in the vSphere Client is the easiest and most efficient method of keeping your hosts, VMs, and virtual appliances patched and at the latest, greatest level. However, there are sometimes circumstances where you want to look beyond the standard tools and investigate the alternatives. As you'll learn, vSphere can be updated in several other ways.
Using vSphere Update Manager PowerCLI
vSphere takes advantage of Microsoft's PowerShell scripting environment with the PowerCLI extensions that are discussed in Chapter 14, “Automating VMware vSphere.”
Without getting ahead of ourselves, it's worth noting the PowerCLI tools that are available to script many of VUM's functions. The VUM PowerCLI cmdlets cover the most common tasks, like working with baselines and scanning, staging, and remediating vSphere objects. Figure 4.37 shows the list of cmdlets currently available.
FIGURE 4.37 VUM PowerCLI cmdlets available
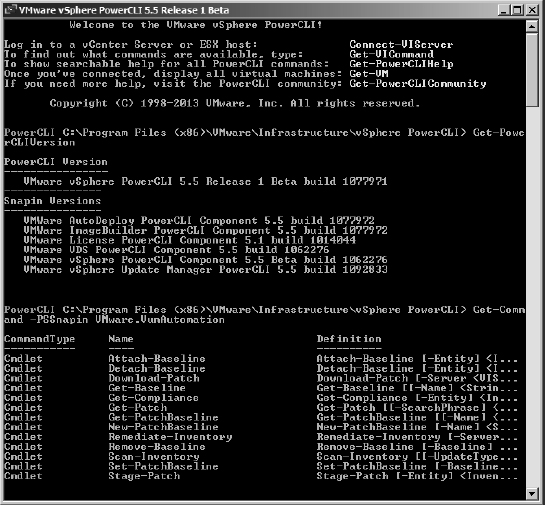
To use the VUM PowerCLI, you need to first install the vSphere PowerCLI and then download and install the Update Manager PowerCLI package. You can get more information about this package from VMware's own “VMware vSphere Update Manager PowerCLI Installation and Administration Guide” for VUM 5.5.
Upgrading and Patching without vSphere Update Manager
You can maintain your vSphere environment, keeping the elements patched and upgraded, without resorting to the use of VUM. Also, you may want to use VUM for certain updating tasks but take an alternative approach for others. For example, you might not want to use VUM in the following situations:
- You are using the free stand-alone vSphere ESXi hypervisor, which does not come with vCenter Server. Without a licensed vCenter Server, you can't use VUM.
- You have only a small environment with one or two small host servers. To maximize the use of your server hardware for VMs, you don't want the infrastructure overhead of another application and another database running.
- You rely heavily on scripting to manage your environment, and you would like to take advantage of tools that don't need PowerShell, such as the PowerCLI toolset that VMware offers.
- You don't want to use VUM for host upgrades because you choose to always run fresh host rebuilds when required.
- You already have kick-start scripts, PowerShell post-install scripts, host profiles, and EDA/UDA tools, or you want to set up an Auto Deploy server to control the installation and upgrading of your hosts.
So, what alternatives are available?
Upgrading and Patching Hosts To upgrade your legacy ESX or ESXi hosts to vSphere 5.5, you have two non-VUM options. You can run through an interactive install from the ESXi 5.5 ISO media, choosing an in-place upgrade. Or you can run a kick-start scripted upgrade along with the same ESXi 5.5 media to perform an unattended upgrade. No command-line utility can upgrade an older ESX or ESXi host to 5.5.
For upgrades from ESXi 5.0 or 5.1 to newer versions, you can likewise use an interactive or unattended upgrade. If you have used VMware's Auto Deploy technology to roll out vSphere, then you will be able to leverage this tool to upgrade or patch it to the latest updates. ESXi 5.x hosts can also be patched and upgraded with the vCLI command-line esxcli software vib tool.
The esxupdate and vihostupdate tools are no longer supported for ESXi 5.x updates.
Upgrading VMs Without VUM, upgrading VM hardware can only be done via the vSphere Client. If the hosts are connected to vCenter, then your connected client can manually upgrade the hardware. You must shut down the VMs yourself and initialize each upgrade. Even without vCenter you can still upgrade each VM by connecting your client straight at the host. Similarly, VMware Tools can be upgraded in each guest OS manually from within the VM's console. You must mount VMware Tools from your vSphere Client.
The vmware-vmupgrade.exe tool should not be used to upgrade VMs anymore.
vCenter Support Tools
In addition to VUM, the vCenter Windows installation DVD and the vCSA include a handful of other useful support tools. Figure 4.38 shows the installable Support Tools options available from the DVD.
ESXi Dump Collector
The ESXi Dump Collector is a centralized service that can receive and store memory dumps from ESXi servers should they crash unexpectedly. These memory dumps occur when an ESXi host suffers what is known as a purple screen of death (PSOD), analogous to the Windows blue screen of death (BSOD) or a Linux kernel panic. The kernel grabs the contents of memory and dumps them to nonvolatile disk storage before the server reboots. This allows VMware support services to investigate the cause of the PSOD and hopefully recommend an action to prevent the issue from occurring again.
FIGURE 4.38 vCenter Support Tool options on DVD

Ordinarily these dumps are sent to the host's local storage in a separate partition not normally mounted to the running filesystem, known as vmkDiagnostic. If the host has been deployed to a USB key/SD card, or via Auto Deploy, then a core dump partition isn't available. For these hosts, it is important to redirect these dumps to a central dump collector. Even if your hosts are not installed or deployed in this way, it can be beneficial, particularly in larger environments, to manage this potentially valuable data in one place.
ESXI DUMP COLLECTOR ON VCSA
The ESXi Dump Collector is installed and already running by default on vCSA instances. Figure 4.39 shows the service enabled.
Here are the steps to check the service status, or to restart or stop it:
- Log into the console of the vCSA with the root account.
- The list of services and their status is available on the first screen in the bottom left. If you have navigated away from this screen, it can be found under the vCenter Server tab, and then the Summary subtab.
Only one configuration option is available on the vCSA's ESXi Dump Collector. You can change the amount of storage reserved for all dumps. Core dumps can be anywhere from 100 MB to 300 MB, so size this space appropriately depending on how many hosts are configured, how frequently you might expect them to PSOD, and how long you need to retain the information. If you have a large environment, are experiencing frequent PSODs, or have to keep troubleshooting data for extended periods, then you should consider increasing this level. Figure 4.40 is the console's service configuration tab.
FIGURE 4.39 vCSA services running by default
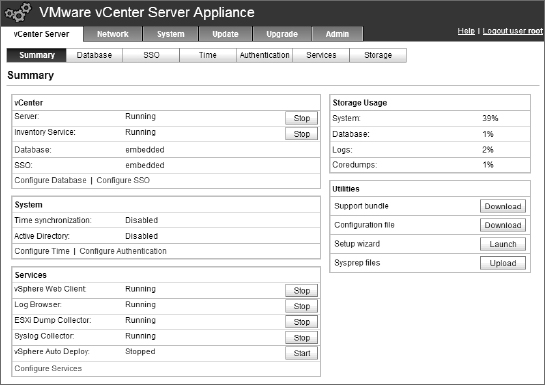
FIGURE 4.40 vCSA Services tab

Follow these steps to increase the size reserved for core dumps:
- Log into the console of the vCSA with the root account.
- Under the vCenter Server tab, click the Services subtab.
- The first service option allows you to change the default 2 GB repository.
ESXI DUMP COLLECTOR ON A WINDOWS SERVER
If you are using a Windows-based vCenter Server, you can also install the ESXi Dump Collector on a Windows server. This can be the same server as vCenter or a separate server. To install ESXi Dump Collector on Windows, follow these steps:
- Mount the vCenter Server DVD on the Windows server.
- If the Autorun splash screen does not appear, manually run the setup wizard from the root of the DVD.
- Select the appropriate language for the install.
- Accept the end-user license agreement.
- Select where to install the application and where the dumps should be stored. As with any volatile data, it is advisable to move the dump repository off the C: drive. Figure 4.41 shows the dump repository moved to the D: drive. This screen of the wizard also allows you to increase (or decrease) the maximum amount of storage that the tool can use to keep core dumps.
FIGURE 4.41 Move the dump repository off the C: drive if possible.
- The setup type screen allows the installer to register the Dump Collector instance with a vCenter Server instance. Select VMware vCenter Server Installation and click Next.
- If you selected to integrate the install with a vCenter instance, as described in the previous step, you will now enter the vCenter details and appropriate account credentials. After you click Next, the installer will ask you to verify the server's SSL certificate. Click Yes to accept the certificate.
- Accept the default port of 6500 and click Next.
- The next screen allows you to choose how the Dump Collector should be addressed by the hosts on the network. You can pick between hostname or IP address. Using the hostname has the advantage that it is easily recognizable by administrators during troubleshooting, but it relies on name resolution. If a host that has a kernel panic might be running the only contactable DNS VM, then using a straight IP address would be a better option. If the Windows server has multiple IP addresses, you need to pick the address that the hosts can route to. The Dump Collector service will only bind to IPv4 addresses.
- Click Install.
- Click Finish to complete the installation.
- If you selected to integrate the installation with a vCenter installation, log into the vSphere Client and check that it is registered. In the Client's home screen, under Administration, click the VMware ESXi Dump Collector icon. You should see the Dump Collector's details and port number.
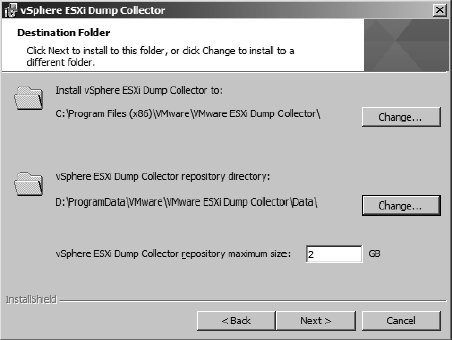
DOES THE DUMP COLLECTOR SUPPORT MY DISTRIBUTED SWITCHES?
The vSphere 5.5 Dump Collector (or any 5.x collector) will happily receive dumps regardless of which switches the hosts use. However, ESXi 5.0 hosts don't support sending dumps to a centralized Dump Collector if their VMkernel default gateway (on the management network IP, usually vmk0) is connected to a distributed switch. This can be a native virtual distributed switch (vDS) or a third-party switch such as the Cisco 1000v. This was particularly troublesome before being resolved with ESXi 5.1 because the larger enterprises that were probably licensed and using vDS connections for converged network cabling and/or Auto Deploy provisioning were also the most likely candidates to want to use the Dump Collector feature.
If you have existing ESXi 5.0 hosts that use distributed switches, then there are a number of options available. You can upgrade the hosts to at least 5.1, you can move your management connection off the distributed switch to a standard host-based vSwitch, or you can point the core dumps to a local disk.
CONFIGURING ESXI HOSTS TO REDIRECT THEIR CORE DUMPS
The primary method to configure hosts to redirect their core dumps to your newly minted ESX Dump Collector is to use the esxcli command-line tool:
- Log into your host via SSH, via the local ESXi shell, or using a vMA or vCLI installation (vMA or vCLI usage requires additional context switches to identify the host).
- Review the existing Dump Collector configuration:
esxcli system coredump network get
- Configure the host's dump redirection settings (management VMkernel interface and collector's IP and port):
esxcli system coredump network set -v vmk0 -i 192.168.199.5 -o 6500
- Turn on dump redirection:
esxcli system coredump network set -e true
- Confirm that the settings are configured correctly:
esxcli system coredump network get
Figure 4.42 shows the process in a console session.
FIGURE 4.42 Configuring a host to redirect dumps to a Dump Collector
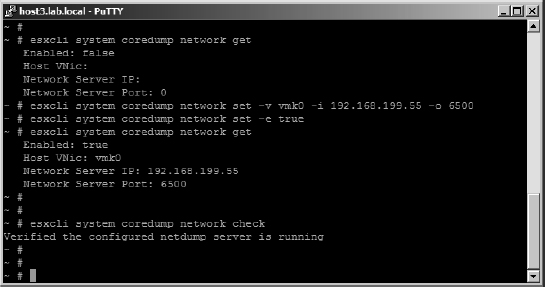
Hosts can also be configured for a centralized dump collector via the Host Profiles feature. The recommended approach is to configure one host via the command line, use it as a reference host, and then apply that configuration to the remaining hosts.
It is possible to set the configuration directly by editing a host profile, selecting Network Configuration and then Network Coredump Settings, and selecting the Enabled check box. From here, specify the NIC, server IP, and port details. This is shown in Figure 4.43.
FIGURE 4.43 Configuring a host to a Dump Collector via its host profile
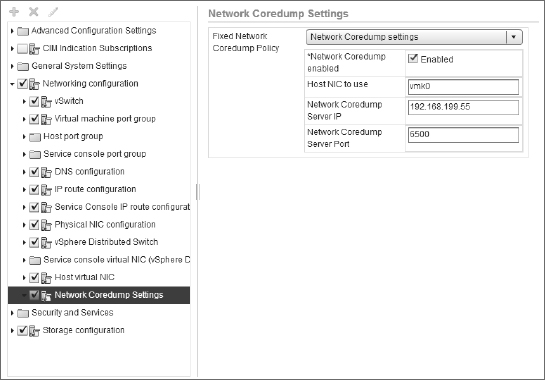
TESTING THE ESXI DUMP COLLECTOR
You should check that each host is configured correctly and can communicate with the Dump Collector.
- Log into your host via SSH, via the local ESXi shell, or using a vMA or vCLI installation (vMA or vCLI usage requires additional context switches to identify the host).
- Send a test dump to the collector:
esxcli system coredump network check
- Connect to the Dump Collector server and check that a new dump file is present (check that the date/time stamp of the file aligns to your test). On a vCSA, the dumps are put in /var/log/vmware/netdumps/. On a Windows-based dump collector, they will be in whatever directory you set on the wizard screen shown in Figure 4.41; by default this is %ProgramData%VMwareVMware ESXi Dump CollectorData. In both cases the dumps are organized into directories named after the sending hosts' IP address.
Syslog Collector
An ESXi host will by default save its log files locally. Just as with the ESXi Dump Collector we discussed, it can be beneficial to store all your hosts' logs to a centralized service. This is particularly important for hosts deployed without a persistent scratch partition, such as a stateless host provisioned via Auto Deploy, because those logs are stored in a ramdisk-based partition and are therefore lost on reboots.
There is a wide range of third-party syslog server applications, but vSphere comes with a tool specifically for the task. It is available both on the vCSA and as a Windows installable tool.
SYSLOG COLLECTOR ON VCSA
A Syslog Collector service is installed and by default running on the vCSA. Figure 4.39 shows this service already running. There are no additional configuration steps necessary to enable the central collector; just configure the hosts to send their logs to this collector.
SYSLOG COLLECTOR ON A WINDOWS SERVER
As you saw earlier in Figure 4.38, the Windows-based version of the Syslog Collector can be installed directly from the Autorun DVD splash screen. This syslog server component can be installed on the vCenter Server instance itself or on another Windows server. To install the Syslog Collector on Windows, follow these steps:
- Mount the vCenter Server DVD on the Windows server.
- If the Autorun splash screen does not appear, manually run the setup wizard from the root of the DVD.
- Select the appropriate language for the install.
- Accept the end user license agreement.
- Select where to install the application and where the logs should be stored. As with any volatile data, it's advisable to move the syslog repository off the C: drive. As we showed earlier in Figure 4.41 of the Dump Collector install, move the store off to another drive if possible. This screen in the Syslog Collector Install Wizard also allows you to change the size of log files before they get rotated (default of 2 MB) and the number of logs to keep (default of eight logs). Unless you have specific logging requirements and need to keep logs for extended periods, the existing values should suffice.
- The setup type screen allows the installer to register the Syslog Collector instance with a vCenter server. Select VMware vCenter Server Installation and click Next.
- If you selected to integrate the install with a vCenter instance, as described in the previous step, you will now enter the vCenter details and appropriate account credentials. After you click Next, the installer will ask you to verify the server's SSL certificate. Click Yes to accept the certificate.
- Accept the default port settings and click Next.
- The next screen allows you to choose how the Syslog Collector should be addressed by the hosts on the network. You can pick between hostname or IP address. Using the hostname has the advantage that it is easily recognizable by administrators during troubleshooting, but it relies on name resolution. If the Windows server has multiple IP addresses, then you need to pick one that the hosts can route to. Like the Dump Collector service, the Syslog Collector service will only bind to IPv4 addresses.
- Click Install.
- Click Finish to complete the installation.
- If you selected to integrate the installation with a vCenter installation, log into the vSphere Client and check that it is registered. In the Client's home screen, under Administration, click the Network Syslog Collector icon. Figure 4.44 shows a configured Syslog Collector with a couple of hosts already connected to it.
FIGURE 4.44 The Network Syslog Collector registered in vCenter
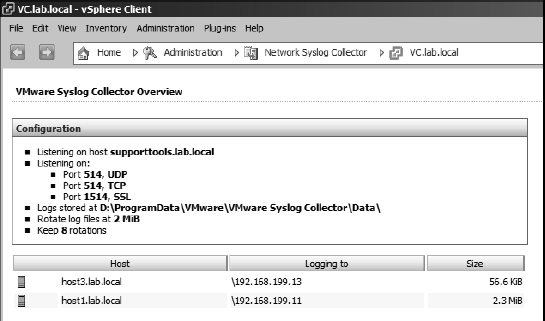
CONFIGURING ESXI HOSTS TO REDIRECT TO A SYSLOG COLLECTOR
There are several ways to configure your ESXi hosts to redirect their logs to a Syslog Collector. The easiest way to configure a host is directly from the vSphere Web Client:
- Log into the vSphere Web Client, and from the home screen, select Hosts And Clusters.
- Select the host you want to configure for the Syslog Collector.
- In the main object pane, select the Manage tab, followed by the Settings subtab.
- Under Settings, select Advanced System Settings.
- In the Filter box in the top-right corner of the Advanced System Settings page, type syslog.global. Figure 4.45 shows the global syslog settings.
FIGURE 4.45 Setting host syslog settings in the vSphere Web Client
- Five options are available. The important setting to redirect logs to a Syslog Collector is syslog.global.logHost. You can stipulate the protocol (UDP, TCP, or SSL) and the port number, but a resolvable hostname or IP address will suffice. To change this setting, highlight the row and click the edit icon (a pencil) above.
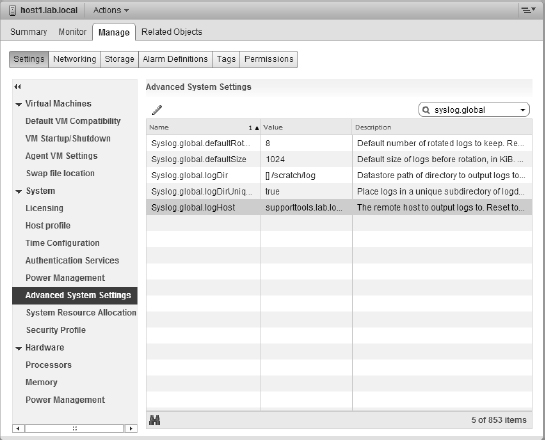
Another popular way to set the syslog configuration setting is via the host's command line. Two commands are required: one to set the configuration and another to enable (reload). Figure 4.46 shows a typical setup.
FIGURE 4.46 Setting host syslog settings via the host's command line
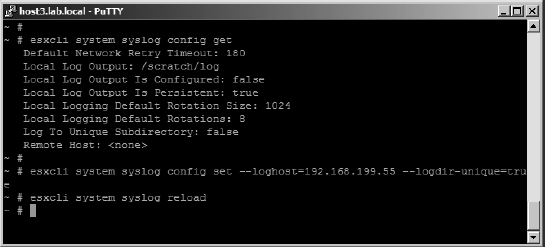
A third option for setting the host's syslog settings is to capture and propagate them through the Host Profile feature. The easiest way to do this is to configure the first host via its advanced settings in the vSphere Web Client and then use that as a reference host to apply the settings to other hosts.
However the hosts are configured for the Syslog Collector, their firewall needs the appropriate ports opened so they can communicate with the Collector. To do this, as seen in Figure 4.47, take the following action:
- In the vSphere Web Client, select the host.
- Select the Manage tab, then the Settings subtab.
- Under System, select Security Profile from the left-hand menu and click the Edit button in the top right.
- Scroll down the list of named services until you find the syslog entry and select the check box.
(Optional) You can also restrict the IP address or IP range.
FIGURE 4.47 Opening up the firewall ports to communicate with the Syslog Collector
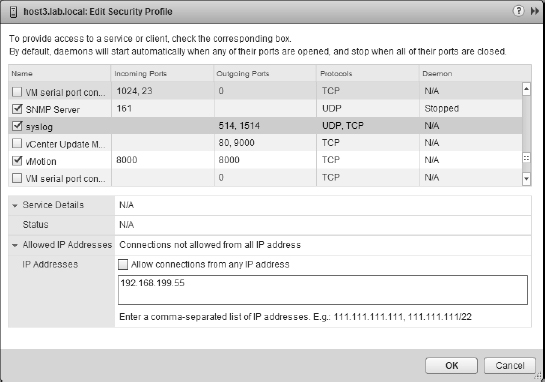
REVIEWING THE LOGS
You can connect the directory on the Syslog Collector and check that it is receiving logs from the host. The directory is shown in the vSphere Client Syslog Collector's overview, which appeared earlier in Figure 4.44. This overview shows a list of the hosts that are connecting. When you browse to the directory, you gain access to the logs themselves (they are not available from the client itself).
VCENTER LOG INSIGHT
At the time of vSphere 5.5's release, VMware introduced a new product called Log Insight. This is a separately licensed tool that competes with other third-party log collection and analysis tools. Log Insight can replace the Syslog Collector tool and provides a much richer searching and cross-host correlation analysis. If you find that the included vCenter Log Collector is not sufficient for your internal support needs, then VCenter Log Insight is a tool you may wish to investigate.
Other vCenter Support Tools
In addition to VUM, the ESXi Dump Collector, and the Syslog Collector; several other vCenter Support Tools are shown in Figure 4.38. Each of these tools have already been discussed in previous chapters as it was pertinent to the deployment of ESXi or vCenter.
Auto Deploy Auto Deploy is a tool to provision ESXi hosts from a central deployment source. Auto Deploy was covered in Chapter 2, “Planning and Installing VMware ESXi.”
Authentication Proxy The Authentication Proxy allows hosts to join an Active Directory domain without needing to include domain credentials in deployment tools such as Auto Deploy depots or scripted install files. Authentication Proxy was covered in Chapter 2.
Host Agent Check The Host Agent Check tool is a pre-upgrade solution that checks that hosts connected to vCenter are suitable to be connected to vCenter 5.5. This verification prevents host issues after a vCenter upgrade. Host AgentCheck was covered in Chapter 3.
Now you're ready to start taking advantage of the new networking functionality available in VMware vSphere in Chapter 5.
The Bottom Line
Install VUM and integrate it with the vSphere Client. vSphere Update Manager (VUM) is installed from the VMware vCenter installation media and requires that vCenter Server has already been installed. Like vCenter Server, VUM requires the use of a backend database server. Finally, you must install a plug-in into the vSphere Client in order to access, manage, and configure VUM.
Master It You have VUM installed, and you've configured it from the vSphere Client on your laptop. One of the other administrators on your team is saying that she can't access or configure VUM and that there must be something wrong with the installation. What is the most likely cause of the problem?
Determine which ESX/ESXi hosts or VMs need to be patched or upgraded. Baselines are the “measuring sticks” whereby VUM knows whether an ESX/ESXi host or VM instance is up-to-date. VUM compares the ESX/ESXi hosts or VMs to the baselines to determine whether they need to be patched and, if so, what patches need to be applied. VUM also uses baselines to determine which ESX/ESXi hosts need to be upgraded to the latest version or which VMs need to have their VM hardware upgraded. VUM comes with some predefined baselines and allows administrators to create additional baselines specific to their environments. Baselines can be fixed—the contents remain constant—or they can be dynamic, where the contents of the baseline change over time. Baseline groups allow administrators to combine baselines and apply them together.
Master It In addition to ensuring that all your ESX/ESXi hosts have the latest critical and security patches installed, you need to ensure that all your ESX/ESXi hosts have another specific patch installed. This additional patch is noncritical and therefore doesn't get included in the critical patch dynamic baseline. How do you work around this problem?
Use VUM to upgrade VM hardware or VMware Tools. VUM can detect VMs with outdated VM hardware versions and guest OSes that have outdated versions of VMware Tools installed. VUM comes with predefined baselines that enable this functionality. In addition, VUM has the ability to upgrade VM hardware versions and upgrade VMware Tools inside guest OSes to ensure that everything is kept up-to-date. This functionality is especially helpful after upgrading your ESX/ESXi hosts to version 5.5 from a previous version.
Master It You've just finished upgrading your virtual infrastructure to VMware vSphere. What two additional tasks should you complete?
Apply patches to ESX/ESXi hosts. Like other complex software products, VMware ESX and VMware ESXi need software patches applied from time to time. These patches might be bug fixes or security fixes. To keep your ESX/ESXi hosts up-to-date with the latest patches, VUM can apply patches to your hosts on a schedule of your choosing. In addition, to reduce downtime during the patching process or perhaps to simplify the deployment of patches to remote offices, VUM can stage patches to ESX/ESXi hosts before the patches are applied.
Master It How can you avoid VM downtime when applying patches (for example, re-mediating) to your ESX/ESXi hosts?
Upgrade hosts and coordinate large-scale datacenter upgrades. Upgrading hosts manually, each with dozens of VMs on them, is burdensome and doesn't scale well once you have more than a handful to deal with. Short outage windows, host reboots, and VM downtime mean that coordinating upgrades can involve complex planning and careful execution.
Master It Which VUM functionality can simplify the process of upgrading vSphere across a large number of hosts and their VMs?
Utilize alternative approaches to VUM updates when required. VUM presents the simplest and most efficient method to upgrade your vSphere hosts. However, sometimes VUM may not be available. For example, VUM is reliant on vCenter, so if the host isn't connected to a licensed vCenter, then an alternate method to upgrade the host must be used.
Master It Without using VUM, how else can you upgrade an existing host?
Install logging collectors. vSphere includes two different logging tools for the ESXi hosts. The ESXi Dump Collector takes kernel dumps from the hosts, and the Syslog Collector can centrally store the host's log files.
Master It You have just started a new job as the vSphere administrator at a company. The company hasn't previously centralized the hosts' logs and you decide you want to collect them, and so you want to install the vSphere Syslog Collector tool and the ESXi Dump Collector tool as well. How do you install them on the company's vCSA instance?
Configure hosts for centralized logging. To make use of the ESXi Dump Collector or the Syslog Collector tools, you must configure each host to point to the centralized loggers.
Master It List the ways you can configure your hosts for centralized logging.