
Chapter 14
Automating VMware vSphere
The role of a VMware vSphere administrator has become increasingly more demanding as the features and capabilities of vSphere have increased in both quantity and quality. VMware has done a great job of making these features quickly consumable for an administrator, as you have seen throughout this book. However, these new features lead to additional responsibilities, more opportunities for error and inconsistency, and lower tolerances for outages as more critical and complex workloads can be, and are, virtualized.
As a vSphere administrator, you will need to perform many repetitive tasks with increasingly more touch points. Examples include creating multiple VMs from a template, changing the network configuration on all VMs or ESXi hosts, migrating VMs to new datastores with Storage vMotion, and gathering considerable information about the environment for internal and external audits. Automation can help you complete these task more quickly, provide greater consistency, and ultimately save your organization money through reduced risk of errors and unplanned outages. Clearly, automation is an area that can benefit every administrator and every organization that adopts vSphere in their environment. This benefit can be realized regardless of scale or previous experience.
In this chapter, you will learn to
- Identify tools available for automating vSphere
- Create a PowerCLI script for automation
- Use vCLI to manage ESXi hosts from the command line
- Use vCenter in combination with vMA to manage all of your hosts
- Employ the Perl toolkit and VMware SDK for virtual server operations from the command line
- Configure vCenter Orchestrator
- Use a vCenter Orchestrator workflow
Why Use Automation?
This question comes up time and again, and over the years we have narrowed it down to a very simple reason. You are only one person. An individual is capable of performing only a finite amount of work manually in any given hour, day, or week. Automation tools allow the administrator the ability to increase their efficiency, accuracy, and capacity.
Efficiency Automation allows for the completion of repeat tasks with less effort. A phone call or colleague has never distracted a script or workflow, causing it to miss a step or complete its work in a timely manner.
Accuracy Automation allows for the consistent repetition of tasks. Configuration changes, reports, and process workflows can be automated with high confidence that errors will not be made.
Capacity Automation allows for the increased productivity of an administrator. Tasks that would take hours manually can be completed in minutes or seconds with automation.
The benefits of automation are applicable in any environment, especially virtual ones. The increased needs and expectations of businesses mean we must find ways to extend our capabilities and ensure that we deliver consistently. As you are about to see, VMware has invested heavily in tools to automate vSphere environments that are ideal for administrators with a variety of needs and backgrounds.
vSphere Automation Options
VMware has made significant improvements in the automation capabilities and options it offers. This advancement means that VMware vSphere administrators have multiple options to choose from to accomplish their automation goals regardless of their skill level or requirements. In this section, we will briefly outline the different vSphere automation tools and the existing experience that best aligns with them.
OTHER AUTOMATION AND ORCHESTRATION PRODUCTS
This chapter will not cover in any detail non-VMware tools that are available to automate vSphere environments. These tools take advantage of the same VMware vSphere APIs that the VMware automation tools leverage.
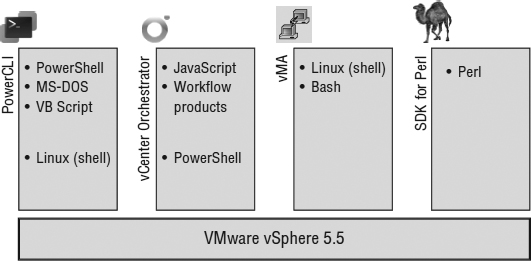
The vSphere automation tools discussed in this chapter are PowerCLI, vSphere Management Assistant (vMA), vCenter Orchestrator (vCO), and the vSphere Software Development Kit (SDK) for Perl (Figure 14.1). These tools are covered based on common usage in the virtualization industry and relative learning curve. Our intent is to demonstrate how even those with little or no automation experience can start leveraging these tools to automate tasks in their environment.
FIGURE 14.1 vSphere automation choices
Clearly, you have several options for bringing automation into your vSphere environment—and that is without taking into account any of the numerous third-party solutions available!
In our experience, the most widely adopted automation tool provided by VMware is PowerCLI. It appeals to people with both Windows and Linux backgrounds, as we will discuss in later sections. The vCLI on vMA is also widely used and is an easy draw to those with Linux or general command-line backgrounds. This is especially true for administrators who wish to execute bash scripts against multiple ESXi hosts with minimal effort.
Adoption of vCenter Orchestrator (vCO) is considerably less common, though we highly recommend that anyone reading this book start investing time in understanding how it works. vCO is becoming tightly woven into many VMware products, including the vSphere Web Client and vCloud Automation Center (vCAC).
AUTOMATION AND ESXI FREE VERSION
Testing in production is a bad idea. Because many administrators will want to test and learn the various automation tools outlined in this chapter, it is important to note some limitations when using the free version of ESXi. Unfortunately, remote management tools like PowerCLI, vMA, and vSphere Perl SDK are limited to read-only functionality with the free version of ESXi. Full capabilities are available at no cost by taking advantage of VMware's 60-day trial periods.
Automating with PowerCLI
PowerCLI is VMware's mostly widely adopted and accessible automation tool. Since its inception as the VI Toolkit, it has been unanimously considered the best tool for automating a vSphere environment. This claim is supported by PowerCLI's ability to manage most components in a vSphere environment and its ease of use. People with Windows administration backgrounds generally have some familiarity with PowerShell and find adopting PowerCLI more natural than adopting the other tools. Individuals comfortable with console administration will find PowerCLI very easy to pick up and use.
In the following sections, we'll introduce you to PowerShell, cover the initial configuration of PowerCLI, show you some essential PowerCLI cmdlets to start using and how to build more complicated scripts, demonstrate the complex functionality of PowerCLI, and discuss the new features found in PowerCLI 5.5.
PowerShell and PowerCLI
It is important to understand a little about what Microsoft Windows PowerShell is and how it works. Without PowerShell, PowerCLI would not be possible. PowerShell is Microsoft's standard automation platform that has shipped natively with Microsoft Windows since Windows 7 and Server 2008 but has been available for much longer. Microsoft Exchange and SharePoint administrators have been using PowerShell for many years because those products were among the earliest for which Microsoft made PowerShell the management tool of choice. Built on the .NET framework, PowerShell has tremendous capabilities for managing a wide range of Windows systems and applications. Additionally, many companies—such as VMware, NetApp, and Cisco—have developed modules and snap-ins for PowerShell for managing their applications and hardware. In this section we'll briefly cover some core concepts about PowerShell that will help you get started with PowerCLI.
POWERSHELL V3 NEW FEATURES
PowerShell v3 comes with many new enhancements that can be extremely advantageous when managing vSphere with PowerCLI 5.5. Here are a few:
- Workflows and more robust sessions mean long or complex operations are less likely to fail.
- Improved cmdlet discovery and automatic module loading are especially useful when adding community resources.
- The Show-Command cmdlet provides a visual dialog box, allowing users to identify a cmdlet's parameters.
CMDLETS
The first PowerShell term that needs defining is cmdlets (pronounced “command-lets”), which are compiled .NET classes that perform a single action on an object. Their format is <verb> -<singular noun>. For the most part cmdlets are simple to use because they don't attempt to do too much at once. Also, because there is an established naming convention, often you can find the cmdlet you need by simply guessing. For instance, to get all the VMs in vCenter, you run Get-VM—intuitive by design.
OBJECTS
PowerShell is built on the Microsoft .NET Framework, and as such, objects are a critical component to understand in order to be successful with PowerCLI. Put simply, an object is a container of properties and methods. When you execute the PowerCLI cmdlet Get-VM while connected to a Virtual Center server, the information that is returned is a collection of virtual machine objects. Each VM can be treated as its own object that contains unique information for that VM. The information for VM A and VM B will be different, but they will be the same type of object, or container. This means that you can filter or compare properties of each object because they share the same format. To do this, it helps to understand what properties are available. You can do this a variety of ways. We'll show you how to quickly get general and detailed information from an object.
ABOUT THIS SECTION
The information in this section will be more meaningful once you have installed PowerCLI and connected to your virtual environment. We recommend returning to this section at that time and trying out the steps listed next.
General information can be gained by simply entering the cmdlet and reviewing the output. The default output provided has been programmed into PowerCLI to return the most commonly wanted properties of the given object. For instance, running the Get-VM cmdlet will return all of the VMs in the inventory with the attributes VM name, power state, number of CPUs, and memory (MB). You can specify which information you want to see using the Select-Object cmdlet in the pipeline as follows:
Get-VM | Select-Object Name, PowerState
If you would like to see all information associated with all of the VMs, then you could run the following one-liner with the second option demonstrating the very common Select-Object alias Select:
Get-VM | Select-Object *
OR
Get-VM | Select *
We recommend outputting that to a CSV or text file because it's likely to fill up the screen quickly. You can do that by piping to the Export-CSV cmdlet:
Get-VM | Select * | Export-CSV -Path C:TestVMs.csv -NoTypeInformation
We mentioned previously that you can get more detailed information about objects. Using Select * gives you a full output of all property values, but there is an easier way to identify what properties are available. Using the Get-Member cmdlet, you can get a full listing of available properties and methods of a particular object type. Try one of the following where the second option uses GM, the shortened alias for Get-Member:
Get-VM | Get-Member
OR
Get-VM | GM
We have one final tip before moving on to other important PowerShell terms. If you have a large inventory and want things to run faster while you learn, use the capability in the Select-Object cmdlet to select only the first couple of returned objects. The following one-liner will return the first three VM objects in your inventory:
Get-VM | Select -First 3
We'll go over more functionality with objects, but this should give you a taste of how simple it is to select properties that you're interested in and a better understanding of the structure of objects in PowerShell/PowerCLI.
VARIABLES
Variables are not unique to PowerShell; they are used in many programming and scripting languages. In PowerShell, variables begin with a $ followed by alphanumeric characters. There are both global and user-defined variables, and we'll touch on examples of each.
The easiest way to think of a variable is as an empty container where we can store objects within PowerShell. Most common use cases for variables are to collect results of a script or to store information that will be used later in a script. Building on our example in the discussion of objects, let's say we wish to collect all of the VM objects into a variable for later use:
$vm = Get-VM | Select-Object Name, PowerState
The variable $vm now contains all of the same data that was produced when we ran the one-liner earlier. You can now simply type $vm into the PowerCLI console and you'll see the same results. This means you can do a variety of things with the variable later in your console or in scripts:
$vm | Export-CSV -Path C:TestVMs.csv -NoTypelnformation
$vm | Where-Object{$_.PowerState -eq "PoweredOn"}
Keep in mind that there are also global variables already in use with PowerShell and PowerCLI. You can get a full listing of them with the Get-Variable cmdlet. Most notably, keep in mind that $host is already in use by the system and cannot be set within your scripts. It is common to use $vm and $vmhost instead. You'll also learn about $DefaultVIserver in the section later in this chapter on connecting to your virtual infrastructure with PowerCLI.
You'll see the use of variables throughout this chapter and when you're looking at code examples from both VMware and the community. Always be mindful not to use the same variable twice in your script, and try to name the variable so it's easy to discern what information is located within that container.
PIPELINE
At the base of PowerShell's capability is the pipeline. Those coming from a Unix background will be well versed in the concept of a pipeline. However, PowerShell took the traditional pipeline and kicked it up a notch. In the past, pipelines were a means to pass text from one command to another, simplifying the syntax of a given operation. In PowerShell, pipelines are a means to pass whole .NET objects from one cmdlet to another. This ability greatly increased the power of the pipeline while simplifying its ability to accomplish almost any administrative action. In short, this means that as you use PowerCLI cmdlets, you'll be able to pass a Cluster object through the pipeline and retrieve all of the hosts within that single cluster. In this example, we do so and then check each VMhost object so that we return only those that are in maintenance mode.
Get-Cluster <cluster name> | Get-VMhost | `
 Where{$_.ConnectionState -eq "Maintenance"}
CONTINUING PIPELINE OVER MULTIPLE LINES
When using PowerShell and the pipeline, you may have lines that do not fit cleanly on the screen or your editor. In this book we use the ` symbol to indicate that the code continues onto the next line. This symbol is recognized by PowerShell to continue the current pipeline even though it is written on a separate line. An attempt is made with each use to make the break logical in order to maintain the readability of the code.
Alternatively, you could check all of your clusters for hosts in maintenance mode. Doing so means that you pass a collection of all Cluster objects in inventory through the pipeline and then gather the VMhosts that are in maintenance mode:
Get-Cluster | Get-VMhost | Where{$_.ConnectionState -eq "Maintenance"}
Note that the Where-Object cmdlet, using the alias Where, is collecting the VMhost objects to check for the ConnectionState property value. This is just a touch of what the pipeline can really provide as you pass objects through. You will see many more examples of the pipeline throughout this chapter, and hopefully the concepts of objects and the pipeline will become second nature to you.
What's New in PowerCLI 5.5
Each version of PowerCLI has included new cmdlets to take advantage of the many new features provided in vSphere. PowerCLI 5.5 provides improvements to existing cmdlets, support for Windows PowerShell 3.0, and the long-awaited Virtual Distributed Switch (VDS) snap-in. The VDS snap-in now provides native capabilities for automating and managing distributed switches and distributed port groups. This gives vSphere administrators the ability to script tasks like adding or removing hosts from a distributed virtual switch, migrating virtual network adapters from standard to distributed port groups, and even import, clone, or roll back the configuration of a distributed virtual switch or distributed port group. We recommend taking some time to review the PowerCLI 5.5 release notes for a full breakdown of the new capabilities, improvements of previous cmdlets, and known issues.
Installing and Configuring PowerCLI
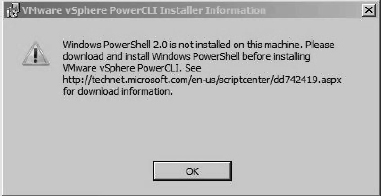
To install PowerCLI 5.5, you must have Microsoft Windows PowerShell v2.0 or v3 as well as .NET Framework 2.0SP2, 3.0, or 3.5 (Figure 14.2). We recommend that you go ahead and upgrade PowerShell to version 3, given that it is now supported with PowerCLI 5.5 and includes several valuable new features, as mentioned previously. At the time of this writing, PowerShell v4 has been announced, but no announcement of PowerCLI support of PowerShell v4 has been made.
FIGURE 14.2 PowerShell 2 reauired
Installing PowerCLI actually means installing two different components:
- PowerShell is a core component of Windows since Windows 7, but if you're running an older version of Windows, you'll need to install the Windows Management Framework, available for download from Microsoft's website at www.microsoft.com/download.
- PowerCLI is available for download from VMware's website at www.vmware.com/go/PowerCLI.
Perform the following steps to install PowerCLI:
- Launch the PowerCLI installer that you downloaded from VMware's website.
- Click Continue if prompted by Microsoft Windows User Access Control.
- If the installer displays a dialog box informing you that VMware VIX will be installed at the end of setup, click OK to continue.
- If a message is displayed warning that the PowerShell execution policy is currently set to Restricted, click Continue. You will change this later.
- On the first screen of the VMware vSphere PowerCLI Installation Wizard, click Next to start the installation.
- Select the radio button marked “I Accept The Terms In The License Agreement” (assuming you have read and accept the terms), and click Next.
- Click Next to accept the default installation location, or change the location where PowerCLI will be installed.
- Choose the option to install vCloud Director if you plan to use PowerCLI to manage your vCloud Director environment. Then click Next.
- Click Install.
POWERCLI 64-BIT VERSUS POWERCLI 32-BIT
If you installed PowerCLI on a 64-bit operating system, you'll notice that you have two icons on your Desktop: one for 64-bit and one for 32-bit. There is only one major functionality difference between the two that you should be aware of. When executing certain PowerCLI cmdlets in environments earlier than vSphere 5.0, you'll need to run PowerCLI 32-bit. Examples include Invoke-VMscript and Copy-VMGuestFile.
Reference the PowerCLI 5.5 release notes for a full list of the 32-bit-only cmdlets.
You have now successfully installed PowerCLI 5.5, and you should see two shortcuts for PowerCLI on your Desktop. However, you're not quite ready to start scripting. Even though you have installed PowerCLI, you still need to modify the script execution policy of PowerShell.
Perform the following steps to set the PowerShell script execution policy:
- Right-click one of the PowerCLI Desktop shortcuts, and select Run As Administrator.
- At the PowerShell prompt, enter the following command:
Set-ExecutionPolicy RemoteSigned
- Type Y and press Enter to validate the change when prompted, or simply press Enter to accept the default Y.
- To verify the setting, use the Get-ExecutionPolicy cmdlet:
Get-ExecutionPolicy
The Get-ExecutionPolicy cmdlet should return RemoteSigned.
- Type Exit and press Enter to close the PowerCLI/PowerShell session.
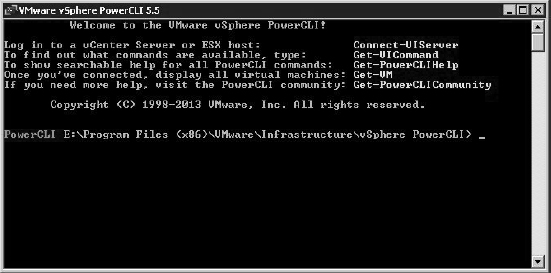
Now when you relaunch PowerCLI, you are greeted with several excellent starting cmdlets, such as Connect-VIServer, Get-VIcommand, and Get-PowerCLIHelp (Figure 14.3). These suggestions are important, especially since Connect-VIServer is a required first cmdlet for connecting to your virtual infrastructure. You're now ready to get started with PowerCLI!
FIGURE 14.3 The PowerCLI startup screen provides quick tips on a few useful commands.
POWERSHELL SCRIPT EXECUTION POLICY
The PowerShell script execution policy allows you to manage which scripts can be run on your computer. By default, PowerShell is run as Restricted, which means that no scripts can be run and PowerShell can run only in interactive console mode. This also includes PowerCLI. The recommended setting is RemoteSigned, which allows scripts that you write as well as those signed by a trusted publisher, such as VMware. You will likely see recommendations to set the execution policy to Unrestricted, which will allow you to run all Windows PowerShell/PowerCLI scripts. This certainly makes things easier for troubleshooting, but you should consider the security of the system before setting the execution policy to Unrestricted. Unrestricted allows even malicious scripts to run.
You can learn more about PowerShell script execution policies by entering the following into a PowerShell/PowerCLI console:
get-help about_Execution_Policies
ADDITIONAL POWERCLI CAPABILITIES
VMware has also released a variety of other PowerShell snap-ins to work alongside PowerCLI to manage vSphere environments. Snap-ins for Auto Deploy, Image Builder, Licensing, and the new VDS capabilities are included during the core PowerCLI 5.5 installation. You'll note during the install that there is a custom option to also install and enable the vCloud Director snap-in. Additional snap-ins are available for download to manage VMware View and VMware Update Manager (VUM), and installation of these snap-ins is similar to the PowerCLI installation. The core PowerCLI components include over 370 cmdlets providing considerable capabilities, with more available with the additional snap-ins.
POWERCLI BACKWARD COMPATIBILITY
VMware has done an excellent job making the newest version of PowerCLI backward compatible with previous versions of vSphere. You'll always want to check the release notes of the latest version of PowerCLI to ensure that your scripts will run properly against your environment. PowerCLI 5.5 supports vSphere 4.0 Update 4 and greater.
One exception to backward compatibility with PowerCLI is with the VMware Update Manager (VUM) snap-in. You'll always need to have the version of the snap-in that matches the version of VUM you are running. Keep this in mind when upgrading PowerCLI. In our environments, we would generally have a specific server, sometimes the separate VUM server itself, configured with the correct version so that we could update our core systems more freely.
Getting Started with PowerCLI
The first and most important thing to remember about PowerCLI is that the PowerShell <verb>-<noun> nomenclature for cmdlets makes them easy to read and also makes it easy to find the right cmdlets for the job. In the following sections, we'll go through the basics starting points of PowerCLI. By the end of this discussion, you'll be able to connect PowerCLI to your vSphere resources, locate the cmdlet that you need, get information about how to use that cmdlet, and start creating “one-liner” scripts. These are the first steps to automating vSphere with PowerCLI and skills that you will use frequently as you become a more mature user.
FINDING CMDLETS
VMware has provided a special cmdlet in PowerCLI to aid in finding the cmdlet that you need, Get-VICommand. Get-VICommand is much like Get-Command but is specific to the PowerCLI-provided cmdlets. Let's say that you are looking for available cmdlets for managing your logs. Using the following code, you'll receive a listing of available log cmdlets:
Get-VICommand *log*
Alternatively, you could also use the Get-Command cmdlet and narrow your search criteria to only the <noun> section of the cmdlet.
Get-Command -Noun *log*
If you tried these cmdlets, you'll notice that using the Get-Command cmdlet returns more results. Why is this? The Get-Command cmdlet will return all PowerShell cmdlets that contain log in the cmdlet noun section, whereas Get-VICommand will return only those associated with PowerCLI.
If you're using PowerShell version 3, you can then use the Show-Command cmdlet to get a visual of the cmdlet and its parameters.
Also keep in mind that PowerShell provides tab completion for all cmdlets. This means that if you type Get-VM and press Tab, PowerShell will start sorting through all of the available cmdlets that begin with Get-VM, starting with Get-VM and then Get-VMGuest. This is not usually the fastest method of finding the cmdlet you're looking for, but it certainly works when you're in a pinch. Tab completion also works within the cmdlet. Pressing the spacebar after a cmdlet and then pressing Tab repeatedly will cycle you through the list of parameters for which you can specify values.
GETTING HELP
It doesn't matter how long you have been working with PowerShell or PowerCLI, there will always be times when you need help. PowerShell provides a very useful cmdlet for just this occasion, Get-Help. Get-Help can provide helpful information about cmdlets or topics within PowerShell. Simply type the cmdlet in your console and press Enter for a breakdown of its capabilities. In the context of PowerCLI, we want to show you how you can get more information from the cmdlets you located previously using Get-VIcommand.
Once you identify the cmdlet you need, you can use Get-Help to find out more about it, like the parameters or parameter sets, description of how it is used, and examples of how to use the it. Try this:
Get-Help Get-Log
You should notice that it returns a brief synopsis of what Get-Log will do, the syntax for usage, a more detailed description, and links associated with the cmdlet. If you're specifically looking for examples of how to use the cmdlet, simply use the -examples parameter:
Get-Help Get-Log -examples
There are several other parameters to choose from under the Remarks section, but the most common to use are -full and -examples.
CONNECTING TO VCENTER SERVER AND ESXI HOSTS
The first cmdlet that any PowerCLI user has to know is Connect-VIServer. This cmdlet has many features that make connecting to your vCenter Server or ESXi hosts easy. We'll go over a few of those features in this section. If you'd like to see the full capabilities of Connect-VIServer, you can check the PowerCLI help by entering the following:
get-help Connect-VIServer -full
Connecting to vCenter Server is the most common use of Connect-VIServer. To connect, you'll need to provide at least the vCenter Server name, a username, and a password:
Connect-VIServer -server <vCenter Server Name> `
 -user <username> -password <password>
This works well but is certainly not something you'd want to do with someone looking over your shoulder or as part of a script that you may want to share. Including a password in plaintext is simply asking for trouble. PowerCLI will natively use the user's credentials for the system login. If your account has vCenter access, no credentials are required. Many organizations follow the practice of separate administrative accounts, and as such it is important to demonstrate ways to protect credentials. To solve this problem, you can securely prompt for credentials in your scripts and store them encrypted in a variable using the Get-Credential cmdlet. When you call Get-Credential in a script, it will prompt the user for a username and password. It then stores them in the pscredential object, which can then be used by Connect-VIServer as follows:
$credential = Get-Credential
Connect-VIServer -server <vCenter Server Name> -Credential $credential
The best part of this method, aside from security, is that the $credential variable information remains as long as your PowerCLI session is opened or until you replace it with new information. This means you can have the same variable set to different credentials in different instances of PowerCLI. This is ideal for running multiple scripts simultaneously on the same system and prevents people from seeing your virtual environment credentials if they're not supposed to.
You can also connect to multiple vCenter Server instances or ESXi hosts in the same session by separating them with a comma:
Connect-VIServer -server vCenter1,vCenter2 -Credential $credential
Here is one final Connect-VIServer tip for vSphere administrators running multiple vCenter Server instances in linked mode. If you have common permissions for an account across vCenter servers in linked mode, you can connect to all of those instances with PowerCLI using the -AllLinked parameter:
Connect-VIServer -server vCenterl -Credential $credential -AllLinked:$true
Before we leave the Connect-VIServer cmdlet, it's important to know its counterpart, Disconnect-VIServer. If you run Disconnect-VIServer by itself in the PowerCLI console, you will prompted for verification that you want to disconnect from the server. You can press Enter and it will disconnect from the active server (identified by VIServer). If you are connected to multiple systems, this command will not disconnect from all of them by default. You can accomplish this by specifying the name of the systems you wish to disconnect from or using a wildcard *. Use the -Confirm parameter to prevent being prompted to disconnect:
Disconnect-VIServer -Server vCenter1,vCenter2 -Confirm:$false
Disconnect-VIServer * -Confirm:$false
You may wish to verify what vCenter servers or ESXi hosts you are connected to. Do this by simply typing in the variable $DefaultVIServers. You can also identify the current default system by typing $DefaultVIServer. The default server is the one disconnected if no server is specified when using Disconnect-VIServer.
YOUR FIRST ONE-LINER: REPORTING
The most common use of PowerCLI is reporting. A vSphere administrator can gather tremendous amounts of data about their environment in a very short period of time. Previously, in the discussion about the pipeline, we showed you how quickly you can identify the hosts in your environment that are in maintenance mode. That small script is called a one-liner. One-liners are scripts that can be written out and executed in a single line using the pipeline to pass information. Let's now combine a few things we've discussed to show you how you can generate quick reports about your environment.
Since ESXi no longer stores logging information for any extended period of time, it is important to have all of your ESXi hosts point their syslog data to an external location. Failure to do so would mean that logs would be lost at reboot. How do you know which hosts are configured and which are not? Using PowerCLI, you can find that information very quickly:
Get-VMhost | Get-VMHostSyslogServer | `
 Export-CSV E:ReportsSyslog.csv -NoTypeInformation
This one-liner gathers a collection of all of your ESXi hosts in inventory and then collects the syslog server settings for each host. The final pipeline takes that syslog server information for the hosts and exports it to a CSV file. You may note that this script does not tell you which host has what configuration!
You can fix this by creating a parameter for the VMHost object in the pipeline. This is an intermediate PowerShell technique but one we want to show you because it is very helpful with cmdlets like Get-VMHostSyslogServer and Get-VMHostNTPServer:
Get-VMHost | Select Name, @{N="SyslogServer";E={$_ |Get-VMHostSyslogServer}} |`
 Export-CSV E:ReportsSyslog.csv -NoTypeInformation
Now that you have this information, what do you do if you have multiple ESXi hosts with the incorrect syslog settings? Write a one-liner to update them of course!
YOUR FIRST ONE-LINER: CONFIGURATION CHANGE
PowerCLI is not just for reporting data on the environment. You also have the capability to modify the environment, assuming you have the appropriate privileges. In the preceding section, you identified systems that did not have the correct syslog settings. To change them, you need to identify the supporting cmdlet. In situations like this, where a Get-verb is used in a cmdlet, it is common that a Set-verb is also available. In this instance, you'll want to use the Set-VMHostSyslogServer cmdlet. Get-Help Set-VMHostSyslogServer -full tells you that you'll need to specify the -SyslogServer parameter and perhaps the -SysLogServerPort parameter if the syslog collector is listening on a specific port. Assume in this scenario that you are sending your logs to the VMware syslog collector on a server with IP address 192.168.0.100. Go ahead and specify port 514:
Get-VMHost | Set-VMHostSyslogServer -SysLogServer`
 192.168.0.100 -SysLogServerPort 514
You may have noticed that this one-liner does more than set the correct syslog server settings on the systems that had the incorrect settings. It actually sets the settings on all of the VMHosts collected with Get-VMHost. While this is not necessarily a problem, it could take a long time to run in large environments. Let's assume that you wish to change only those that are not correct.
If you have a small environment, we recommend just running the previous one-liner to update all systems with each pass. If, however, you have a large environment or a strong desire to update only the incorrect settings, let's move forward. We're going to build on what we've gone over previously and use some new PowerShell techniques. Let's identify the hosts with the incorrect setting and update them with a single one-liner:
Get-VMHost | Select Name, @{N="SyslogServer";E={$_ |Get-VMHostSyslogServer}} |`
Where{$_.SyslogServer -notlike "192.168.0.100:514"} |`
Set-VMHostSyslogServer -SysLogServer 192.168.0.100 -SysLogServerPort 514
If you are following along, you'll note that this throws up an error. We wanted to show you how this method has changed the VMHost object type, which Set-VMHostSyslogServer cannot accept through the pipeline. One way to fix this is by using a ForEach loop (using the common alias %) so that you process each VMHost and changing its object type back to something Set-VMhostSyslogServer can use:
Get-VMHost | Select Name, @{N="SyslogServer";E={$_ |Get-VMHostSyslogServer}} |`
 Where{$_.SyslogServer -notlike "192.168.0.100:514"} |`
 %{Set-VMHostSyslogServer -VMhost (Get-VMHost -Name $_.Name)`
 -SysLogServer 192.168.0.100 -SysLogServerPort 514}
Thanks for following along. We recognize that we had to do a few new things there to accomplish something relatively simple. We wanted to go through this exercise to demonstrate the value of the pipeline, the importance of understanding objects, and how much can be done with a single line of PowerCLI code. You should now have enough exposure to start branching beyond one-liners into multiline PowerCLI scripts.
Building PowerCLI Scripts
You have seen that one-liners are nothing more than a series of PowerCLI cmdlets strung into a series of PowerShell pipelines. Scripts can often be as straightforward as a one-liner saved to a text file with a .ps1 filename extension for future reuse. Many times, as you have seen, it is necessary to do multiple steps to accomplish your automation goal. This is where you begin to tie all of the topics we've discussed together. With that in mind, we will cover a few more examples of how PowerCLI can make your life easier.
MIGRATING ALL VIRTUAL MACHINES ON A HOST
In the first example, you'll build a simple pipeline using multiple PowerCLI cmdlets. By combining cmdlets in a pipeline, you can build more complex commands, such as the following:
Get-VMHost <FirstHost> | Get-VM | Move-VM -destination (Get-VMHost <SecondHost>)
This command relocates all VMs on the ESXi host specified by FirstHost to the ESXi host represented by SecondHost. This includes both running VMs, which are moved with VMotion, as well as powered-off VMs. Notice that we use parentheses when defining the destination VMHost. PowerShell will run the content within the parentheses first and use the result for the -destination parameter. This is similar to the mathematical order of operations.
You could also do this action by storing the source and destination VMHost in a variable:
$SourceHost = Get-VMHost <FirstHost>
$DestinationHost = Get-VMHost <SecondHost>
Get-VMHost $SourceHost | Get-VM | Move-VM -destination $DestinationHost
Set-VMHost $SourceHost -State Maintenance
Suffice it to say there are always multiple ways to accomplish the same thing.
MANIPULATING VIRTUAL MACHINE SNAPSHOTS
Let's look at a second example of how to use PowerCLI in your VMware vSphere environment. In this example, you'll use PowerCLI to work with VM snapshots.
Let's say that you need to perform an application upgrade for a system with multiple servers. It may be useful to create a snapshot for all the VMs associated with that application, which you have organized in a vCenter inventory folder. This one-liner would accomplish that task for you:
Get-Folder <Folder Name> | Get-VM | New-Snapshot -Name "Pre-Upgrade"
If you later needed to remove the snapshot you created, you could use the Remove-Snapshot cmdlet to delete it:
Get-Folder <Folder Name> | Get-VM | Get-Snapshot -Name "Pre-Upgrade " |` Remove-Snapshot
Finally, you could use the Get-Snapshot cmdlet to list all snapshots so that you could be sure you had actually created or deleted them:
Get-Folder <Folder Name> | Get-VM | Get-Snapshot
This command would return a list of any snapshot objects for all the VMs in the specified folder.
RECONFIGURING VIRTUAL MACHINE NETWORKING
In this third example, let's say that you want to move all the VMs currently connected to one port group to an entirely different port group. This is actually possible with a one-line command in PowerCLI:
Get-VM | Get-NetworkAdapter | Where-Object {$_.NetworkName -like `
 "OldPortGroupName"} | Set-NetworkAdapter -NetworkName "NewPortGroupName"`
  -Confirm:$false
There are a few of the new ideas introduced here, so let us break it down a little bit:
- The Get-VM cmdlet retrieves VM objects.
- These VM objects are passed to the Get-NetworkAdapter cmdlet, which returns virtual NIC objects for all VMs.
- These virtual NIC objects are parsed using the Where-Object cmdlet to include only those virtual NICs whose NetworkName property is like the "OldPortGroupName" string.
- The parsed list of virtual NICs is passed to the Set-NetworkAdapter cmdlet, which sets the NetworkName property to the "NewPortGroupName" value.
- The Confirm parameter instructs PowerShell to not ask the user for confirmation of each operation.
MOVING VIRTUAL MACHINES BETWEEN RESOURCE POOLS
In this last example, you'll use PowerCLI to move a group of VMs from one resource pool to another. However, you want to move only a subset of the VMs in this resource pool. Only the VMs that are running a Microsoft Windows guest operating system (guest OS) should be moved to the new resource pool.to the new resource pool.to the new resource pool.to the new resource pool.
We'll build this example in steps. First, you've probably guessed that you can use the Get-ResourcePool, Get-VM, and Get-VMGuest cmdlets to create a list of VM guest OS objects in the resource pool:
Get-ResourcePool <ResourcePoolName> | Get-VM | Get-VMGuest
Next, you would need to filter the output to return only those objects identified as Microsoft Windows guest OSes. As you saw in a previous example, you can use the Where-Object cmdlet to filter the output list in a pipeline:
Get-ResourcePool <ResourcePoolName> | Get-VM | Get-VMGuest |
Where-Object { $_.OSFullName -match ""Microsoft Windows.*" }
This should do it, right? To finish the command, you should be able to add the Move-VM cmdlet and move the VMs to the destination resource pool. Unfortunately, that won't work. You're working with objects with PowerShell, and a VM guest OS object—which is what is being returned by the Get-VMGuest cmdlet—isn't the kind of object that the Move-VM cmdlet will accept as input.
Instead, you'll have to use a multiline script for this, as shown in Listing 14.1.
LISTING 14.1: A PowerCLI script to selectively move VMs to a new resource pool
$VMs = Get-VM -Location (Get-ResourcePool Infrastructure)
foreach ($vm in $VMs) {
$vmguest = Get-VMGuest -VM $vm
if ($vmguest.OSFullName -match "^Microsoft Windows.*") {
Move-VM -VM $vm -Destination (Get-ResourcePool "Windows VMs") } }
Again, we'll break down the script so that it is easier to understand:
- Line 1 uses the Get-VM and Get-ResourcePool cmdlets to retrieve a list of VM objects in the specified resource pool. That list of VM objects is stored in the $VMs variable.
- Line 2 creates a loop that operates for each of the objects in the $VMs variable. Each individual VM object is stored as $vm.
- Line 3 uses the Get-VMGuest cmdlet with the $vm variable to retrieve the guest OS object for that VM object and store the result in the $vmguest variable.
- Line 4 tests to see whether the OSFullName property of the $vmguest object matches a string starting with Microsoft Windows.
- Line 5 executes only if the test on the fourth line was successful; if it executes, it uses the Move-VM and Get-ResourcePool cmdlets to move the VM object represented by the $vm variable to the resource pool named Windows VMs.
If you were to save the script in Listing 14.1 as MoveWindowsVMs.ps1, then you could run it in PowerCLI like this:
<Path to Script>MoveWindowsVMs.ps1
There is so much more that you can do with PowerShell and PowerCLI; these simple examples barely scratch the surface. In the next section, we'll look at some of the advanced capabilities available to automate vSphere with PowerCLI.
PowerCLI Advanced Capabilities
You should now have a fair understanding of the many possibilities for automating a vSphere environment with PowerCLI. We'd like to spend a little time demonstrating some advanced functionality that is available to you to directly leverage the vSphere vCenter API.
PowerCLI users are not limited to just the cmdlets included in PowerCLI 5.5. VMware extends the capabilities of PowerCLI by allowing users to access various methods and information within the vSphere API. The Get-View cmdlet gives PowerCLI users the ability to call these methods as part of their PowerCLI scripts or directly from the PowerShell console.
In Listing 14.2, we share a situation where we recognized functionality in the vCenter server that was not natively available in the PowerCLI cmdlets. Specifically, when attempting to vMotion a VM, we recognized that vCenter would perform checks to verify that the prerequisites for vMotion to that host were met. If something was found to be incorrect, vCenter would notify the administrator that vMotion could not be performed and generally identify the root cause. What we wanted to accomplish was to check every VM in a cluster prior to a scheduled maintenance window, allowing us to identify any issues prior to the scheduled maintenance and address them to minimize delays or the need to roll back.
LISTING 14.2: A PowerCLI function to test vMotion capabilities of VMs
Function Test-vMotion{
 param(
  [CmdletBinding()]
  [Parameter(ValueFromPipeline=$true,Position=0,Mandatory=$false,`
     HelpMessage="Enter the Cluster to be checked")]
  [PSObject[]]$Cluster,
  [Parameter(ValueFromPipeline=$false,Position=1,Mandatory=$false,`
     HelpMessage="Enter the VM you wish to migrate")]
  [PSObject[]]$VM,
  [Parameter(ValueFromPipeline=$false,Position=2,Mandatory=$false, `
    HelpMessage="Enter the Destination Host")]
  [PSObject[]]$VMHost,
  [Parameter(ValueFromPipeline=$false,Position=3,Mandatory=$false, `
    HelpMessage="Set to false to Turn off console writing for use in Scheduled Tasks")]
  [Boolean]$Console=$true
)
$report = @()
#Sets information based on type of work being done.
#Whole cluster or single VM
   If($Cluster -ne $null){
      If($VM -ne $null){
             If($Console = $true){
                Write-Host "VM value $VM cannot be used`
                      when using -Cluster paramenter. Value is being set to null"
             }
$VM = $null
      }
      If($VMHost -ne $null){
         $DestHost = Get-VMHost $VMHost
         If(($DestHost.ConnectionState -ne "Connected") -or`
                 ($DestHost.PowerState -ne "PoweredOn")){
             Return "You must provide a target host that is Powered on and`
                not in Maintenance Mode or Disconnected"
         }
      }
      $singlevm = $false
      $targetcluster = Get-Cluster $Cluster
      $vms = $targetcluster | Get-VM | `
        Where{$_.PowerState -eq "PoweredON"} | Sort-Object
      $vmhosts = $targetcluster | Get-VMHost | Where{($_.ConnectionState -eq "Connected")
-and ($_.PowerState -eq "PoweredOn")}
        If ($vmhosts.Count -lt 2){
           Return "You must provide a target host that is not`
             the source host $sourcehost"
        }
     $count = $vms.Count
     If($Console = $true){
        Write-Host "Checking $count VMs in cluster $cluster"
     }
} ELSE {
   $vms = Get-VM $VM
   If($VMHost -eq $null){
     $DestHost = Get-Cluster -VM $vms | Get-VMHost | `
     Where{($_.ConnectionState -eq "Connected") -and `
      ($_.PowerState -eq "PoweredOn")} | Get-Random | Where{$_ -ne $vms.VMhost}
      } ELSE {
         $DestHost = Get-VMHost $VMHost
}
$singlevm = $true
}
# Functional Loop
foreach($v in $vms) {
   If($Console = $true){
      Write-Host "-------------------------"
      Write-Host "Checking $v …"
}
$sourcehost = $v.VMhost
If($singlevm -eq $false){
   While(($DestHost -eq $null) -or ($DestHost -eq $sourcehost)){
      #Select random host from the cluster in the event that Source and Destination
      #are the same or Destination is Null.
      $DestHost = $vmhosts | Get-Random | Where{($_ -ne $sourcehost)`
        -and ($_ -ne $null)}
}
}
If($Console = $true){
   Write-Host "from $sourcehost to $DestHost"
}
#       Set Variables needed for CheckMigrate Method
$pool = ($v.ResourcePool).ExtensionData.MoRef
$vmMoRef = $v.ExtensionData.MoRef
$hsMoRef = $DestHost.ExtensionData.MoRef

$si = Get-View ServiceInstance -Server $global:DefaultVIServer
$VmProvCheck = get-view $si.Content.VmProvisioningChecker
$result = $VmProvCheck.CheckMigrate( $vmMoRef, $hsMoRef, $pool, $null, $null )

#       Organize Output
$Output = "" | Select VM, SourceHost, DestinationHost,'
   Error, Warning, CanMigrate
$Output.VM = $v.Name
$Output.SourceHost = $sourcehost
$Output.DestinationHost = $DestHost.Name

#       Parse Error and Warning messages
If($result[0].Warning -ne $null){
   $Output.Warning = $result[0].Warning[0].LocalizedMessage
   $Output.CanMigrate = $true
   If($Console = $true){
     Write-Host -ForegroundColor Yellow`
        "$v has warning but can still migrate"
  }
}
If($result[0].Error -ne $null){
   $Output.Error = $result[0].Error[0].LocalizedMessage
   $Output.CanMigrate = $False
   If($Console = $true){
      Write-Host -ForegroundColor Red "$v has error and can not migrate"
  }
}Else {
   $Output.CanMigrate = $true
   If($Console = $true){
      Write-Host -ForegroundColor Green "$v is OK"
   }
}
$report += $Output
#This resets the Destination Host to the preferred host
#in case it had to be changed.
If($VMHost -ne $null){
   $DestHost = Get-VMHost $VMHost
 }
}
 Return $report
 # End Function
}
To accomplish this, we had to identify the method used in the vSphere API. VMware publishes the vSphere API reference at www.vmware.com/support/pubs/sdk_pubs.html. In that reference we were able to locate the CheckMigrate method. The documentation outlines the required information to invoke the method. You should note in the provided script that we collect those components, the VM, the destination host, and the resource pool as variables in the script prior to calling the CheckMigrate method. The entirety of the script revolves around the small amount of code listed here. Most of the script works on setting the required variables to use the CheckMigrate method and then handling the output of that method:
# Set Variables needed for CheckMigrate Method
    $pool = ($v.ResourcePool).ExtensionData.MoRef
    $vmMoRef = $v.ExtensionData.MoRef
    $hsMoRef = $DestHost.ExtensionData.MoRef

    $si = Get-View ServiceInstance -Server $global:DefaultVIServer
    $VmProvCheck = get-view $si.Content.VmProvisioningChecker
    $result = $VmProvCheck.CheckMigrate($vmMoRef,$hsMoRef,$pool,$null,$null)
You should also note that this script is built as a PowerShell function. This means it is designed to be loaded into a PowerShell console session and used like a cmdlet. For example, once you have loaded the function, you can call this command:
Get-Cluster "ClusterName" | Test-vMotion
LOADING POWERSHELL FUNCTIONS
When you receive functions from trusted sources such as VMware or trusted community contributors, you'll need to make sure you load them into your PowerCLI/PowerShell session. This is done by “dot-sourcing” the function. You simply need to type a period followed by a space followed by the complete path to the function. Unless you add the function to your PowerShell profile, you will need to reload it for each new session of PowerCLI, as in this example:
PowerCLI C:> . "C:TestTest-vMotion.psl!"
You should now have a solid understanding of the vast capabilities of PowerCLI and how to get started. We've tried to provide you with the essential information that we have shared with others to start their journey to automating their VMware environments. Remember to always look to the community forums and bloggers for assistance as you navigate PowerCLI. We also highly recommend the book VMware vSphere PowerCLI Reference (Wiley, 2011). It contains a wealth of information and detailed explanations of PowerCLI capabilities.
Using vCLI from vSphere Management Assistant
VMware vSphere 5 saw the retirement of VMware ESX and the traditional Linux-based Service Console. This meant that a lot of vSphere administrators and organizations needed to adapt to not having a Linux environment available on each host. Since administrators still require this type of functionality, VMware released the vSphere CLI (vCLI). The vCLI is built on the vSphere SDK for Perl and implements the familiar console commands from the old ESX Service Console onto Windows and Linux servers. This improves both security and scalability by providing a single managed point of contact for your environment.
VMware took this a step further in introducing the vSphere Management Assistant, most commonly referred to by its acronym, vMA. This 64-bit virtual appliance can be quickly downloaded and implemented into your vSphere environment and comes preloaded with vCLI and the vSphere SDK for Perl. This centrally provides vSphere administrators with the tools they were accustomed to in the service console prior to vSphere 5.0. The vMA can manage vSphere 5.0, 5.1, and vSphere 5.5 environments. Additional features are available in the vMA to make managing multiple ESXi hosts easier. We'll go over a few of those features in the following sections, but let's start with what is new with vCLI and vMA.
What's New in vCLI and vMA for vSphere 5.5
The release of vSphere 5.5 means the inclusion of new features in the vSphere Command Line Interface (vCLI) and the vSphere Management Assistant (vMA). Most notable is the inclusion of commands for managing VSAN configurations, coredump, and vFlash. Check out the vCLI release notes for a full listing of new capabilities. The vMA has not changed significantly with this release outside of the updates to vCLI and SDK for Perl.
Getting Started with vCLI
Whether you are running vCLI from your own deployed server or the vMA, there are a great deal of tasks that you can automate. In this section we'll go over a few examples of using the vCLI.
One common use case for the vCLI that we've used in the past is the manipulation of vSwitches in vSphere. Typically this may be necessary for troubleshooting network connections. Fortunately, the vCLI allows you to do a great deal for reporting and configuring networking on your ESXi hosts. For example, to add a vSwitch to a host with the vCLI, you use the exact same syntax as previously, with an added option to specify the host to which you need to connect:
esxcfg-vswitch --server <Hostname> --list
Alternatively, you can use the newer vCLI naming convention where the commands use the vicfg- prefix in place of esxcfg-. The esxcfg- prefix is kept for backward compatibility but will be phased out over time. Therefore, you can currently use either format. We suggest you begin adopting vicfg- as soon as you can and update existing scripts accordingly.
By using this set of commands, you can perform common tasks needed for basic host configuration that would previously be done from the bash Service Console. For instance, Listing 14.3 will perform the following:
- Create a new vSwitch named vSwitch1.
- Add vmnic1 as an uplink to the new vSwitch.
- Create a new VM portgroup.
- Add a VLAN to the new vSwitch.
LISTING 14.3: Create a new vSwitch from vMA
# add a new vSwitch
vi-admin@vma01:~> vicfg-vswitch --server pod-1-blade-6.v12nlab.net -a vSwitch1

# add an uplink to the vSwitch
vi-admin@vma01:~> vicfg-vswitch --server pod-1-blade-6.v12nlab.net'
 -L vmnic1 vSwitch1

# add a VM portgroup to the new vSwitch
vi-admin@vma01:~> vicfg-vswitch vSwitch --server pod-1-blade-6.v12nlab.net -A "VM-Public"
vSwitch1

# set the VLAN for the new portgroup
vi-admin@vma01:~> vicfg-vswitch --server pod-1-blade-6.v12nlab.net'
 -v 10 -p "VM-Public" vSwitch1
Executing these commands, however, becomes tedious very quickly because you must constantly enter the username and password to connect to the server. One workaround would be to wrap the commands in a bash script and pass the username and password as parameters. This is somewhat undesirable, however, because you are leaving credentials to your ESXi hosts available to anyone who can log into your server. This is where the benefit of using vMA over a standard host with the vCLI installed comes into play.
vMA has some additional functionality installed on it called fastpass. Fastpass allows you to securely add ESXi hosts, and even vCenter servers, to your vMA once and connect to them without a password during script execution. This allows you to treat the vMA's command line as you would the native host. You must first initialize the host with fastpass to take advantage of this feature. This is easily done:
vifp addserver <Hostname>
This command then prompts for the ESXi host's root password, connects to the host, and adds two users to the host. These two users are used for executing commands. Should you specify the “adauth” authpolicy, fastpass would use an Active Directory account for authentication to the host.
You can view any hosts that fastpass has been configured for using the vifp listservers command:
vi-admin@vma01:~> vifp listservers
vSphere01.vSphere.local ESXi
You can see that a single host is fastpass enabled, and it is an ESXi host.
Now that fastpass is aware of the host, you set the host as the current target using the vifptarget command:
vifptarget -s <Hostname>
After this you can execute ESXi configuration commands as though you are logged into the console of that host. The list of commands now looks like standard ESX configuration commands from the old Service Console. Note that you can still use the esxcfg- prefix for the commands, so existing scripts can be copied into place with minimal changes. For example, Listing 14.4 adds a vSwitch to the vSphere01 host using vMA fastpass.
LISTING 14.4: Add a vSwitch using vMA fastpass
vi-admin@vma01:~>vifptarget -s vSphere01.vSphere.local
vi-admin@vma01:~[vSphere01.vSphere.local]> vicfg-vswitch -a vSwitch1
vi-admin@vma01:~[vSphere01.vSphere.local]> vicfg-vswitch -L vmnic1 vSwitch1
vi-admin@vma01:~[vSphere01.vSphere.local]> vicfg-vswitch -A "VM-Public"
vSwitch1
vi-admin@vma01:~vSphere01.vSphere.local]> vicfg-vswitch -v 10 -p
"VM-Public" vSwitch1
By adding additional ESXi servers to fastpass, you can configure multiple hosts quickly using a simple bash loop. For example, Listing 14.5 will connect to each host and add the vm_nfs01 datastore.
LISTING 14.5: Add an NFS datastore or multiple hosts by using vMA fastpass
for server in "vSphere01 vSphere02 vSphere03 vSphere04 vSphere05"; do
> vifptarget -s $server
> vicfg-nas -a -o FAS3210A.vSphere.local -s /vol/vm_nfs01 vm_nfs01
> vifptarget -c
> done
Using vSphere Management Assistant for Automation with vCenter
Leveraging the fastpass technology with vCenter allows you a simple luxury: You no longer have to add each host to fastpass. However, there is a caveat that you must specify an additional command-line parameter for each command.
This has both advantages and disadvantages. It's extremely convenient to no longer be concerned about whether the host you are manipulating has been initialized for fastpass. Scripts that are written can simply use the vCenter credentials to manipulate host settings while still being logged in vCenter's task list. Additionally, all tasks executed through vCenter are logged in vCenter for auditing purposes. The downside is losing the ability to use legacy scripts that assume you are on the console of the host and have not had the additional parameter set.
Connecting vCenter to fastpass is the same as it is for hosts. vMA is kind enough to warn you that storing the vCenter credentials is a security risk, and we do recommend you use vCenter's role-based access to limit the permissions to the minimum needed. That being said, you should always protect your vMA as you would any other server in your environment and ensure that a sufficiently complex password is used for the vi-admin user to prevent unauthorized access. Keep in mind that should the vMA become compromised, all of the hosts that are fastpass enabled are also compromised. You should use the same command for vCenter as for your ESXi hosts:
vi-admin@vma01:~> vifp addserver vCenter01
Enter username for vCenter01: fp_admin
fp_admin@vCenter01's password:
This will store username and password in credential store which is
a security risk. Do you want to continue?(yes/no): yes
vi-admin@vma01:~> vifp listservers
vCenter01.vSphere.local vCenter
vi-admin@vma01:~> vifptarget -s vCenter01
vi-admin@vma01:~[vCenter01.vSphere.local]>
Notice that you can set the fastpass target server to vCenter just as you can an ESXi host, and you can execute standard host commands against it as well:
vi-admin@vma01:~[vCenter01.vSphere.local]> vicfg-vswitch -l
The --vihost option must be specified when connecting to vCenter.
For a summary of command usage, type '/usr/bin/vicfg-vswitch --help'.
For documentation, type 'perldoc /usr/bin/vicfg-vswitch'.
But wait! There's an error. Notice that you must specify which ESXi host you want to actually execute the command against now that you are connecting to vCenter. Following the recommendation of the error message, you specify the host using the --vihost or -h option and execute the command:
vi-admin@vma01:~[vCenter01.vSphere.local]> vicfg-vswitch -h vSphere01 -l
Switch Name  Num Ports  Used Ports  Configured Ports  MTU   Uplinks
vSwitch0     128        3           128               1500  vmnic0

  PortGroup Name                  VLAN ID     Used Ports   Uplinks
  VM Network                      0           0            vmnic0
  Management Network              0           1            vmnic0
You can do the same management tasks as before, just using the extra -h switch when executing each one. For example, you can set advanced options and kernel module options on multiple hosts by running the following:
vi-admin@vma01:~> vifptarget -s vCenter01
vi-admin@vma01:~[vCenter01.vSphere.local]> for server in "vSphere01
vSphere02 vSphere03 vSphere04 vSphere05"; do
echo "$server is being configured…"
> # see http://kb.vmware.com/kb/1268 for more info on this setting
> vicfg-advcfg -h $server -s 64 Disk.SchedNumReqOutstanding
> # see http://kb.vmware.com/kb/1267 for more info on this setting
> vicfg-module -h $server -s ql2xmaxqdepth=128 qla2xxx
> done
vi-admin@vma01:~[vCenter01.vSphere.local]> vifptarget -c
There are lots of ways this script could be improved; for example, there's no error checking to ensure that a matching port group and VMkernel interface are actually found by the first command. Readers already familiar with bash scripting should find utilizing the vCLI and vMA quite comfortable for automating vSphere environments. Make sure you check the vCLI concepts and examples guide from VMware for more examples and instructions on how to utilize vCLI and vMA in your environment.
Leveraging the Perl Toolkit with vSphere Management Assistant
vMA's fastpass with vCenter and the Perl SDK are a powerful combination. With a handful of helper scripts, you can administer a large number of hosts using the vCLI through vCenter.
Listing 14.6 is a Perl script that simply returns the hostnames in a cluster. This can be useful for configuring a cluster of ESXi hosts for a new datastore, a new vSwitch, or other items that you would want to match across all members of the cluster.
LISTING 14.6: Get all hosts in a cluster by using the Perl SDK
#!/usr/bin/perl
#
# Script Name: ~/bin/getClusterHosts.pl
# Usage: getClusterHosts.pl --server vCenter.your.domain clusterName
# Result: a newline delimited list of ESXihosts in the cluster
#
use strict;
use warnings;

# include the standard VMware perl SDK modules
use VMware::VIRuntime;

# some additional helper functions
use VMware::VIExt;
# define the options we need for our script
my %opts = (
   # we can use the special _default_ so that we do not have
   # to provide a command line switch when calling our script.
   # The last parameter is assumed to be the clustername
   '_default_' = > {
       # this parameter is a string
       type => "=s",

       # what is reported when the user passes the --help option
       help => "Name of the cluster to report hosts for",

       # boolean to determine if the option is mandatory
       required => 1
    }
 );

 # add the options to the standard VMware options
 Opts::add_options(%opts);

 # parse the options from the command line
 Opts::parse();

 # ensure valid input was passed
 Opts::validate();

 # the user should have passed, or been prompted for, a
 # username and password as two of the standard VMware
 # options. connect using them now…
 Util::connect();

 # search the connected host (should be vCenter) for our cluster
 my $clusterName = Opts::get_option('_default_'),
 my $clusterView = Vim::find_entity_view(
        view_type => 'ClusterComputeResource',
        filter => { name => qr/($clusterName)/i }
    );

 # ensure that we found something
 if (! $clusterView) {
     VIExt::fail("A cluster with name " . $clusterName . " was not found!");
 }

 # now we want to search for hosts inside the cluster we just
 # retrieved a reference to
 my $hostViews = Vim::find_entity_views(
view_type => 'HostSystem',
   begin_entity => $clusterView,
   # limit the properties returned for performance
   properties => [ 'name' ]
);

# print a simple newline delimited list of the found hosts
foreach my $host (@{$hostViews}) {
   print $host->name . "
";
}

# and destroy the session with the server
Util::disconnect();
Executing our script, you see the following results:
vi-admin@vma01:~> getClusterHosts.pl --server vCenter01 cluster01
Enter username: administrator
Enter password:
vSphere01.vSphere.local
vSphere02.vSphere.local
Notice that we were prompted for the username and password. This is a feature of using the VIRuntime library. VMware has simplified things for developers by providing default options. These are the same as for all of the vCLI scripts, so --username and --password apply regardless of whether you are using a vCLI script or one that you created. If you pass the username and password arguments to the script via the command line, it will not prompt for them. Alternatively, using fastpass will also eliminate the need for a username and password to be supplied.
You can now combine your Perl script with bash and fastpass to configure an entire cluster with a new portgroup quickly and efficiently.
vi-admin@vma01:~> vifptarget -s vCenter01
vi-admin@vma01:~[vCenter01.vSphere.local]> for server in
'getClusterHosts.pl cluster01'; do
> echo "$server is being configured…"
> vicfg-vswitch -h $server -A VLAN100 vSwitch0
> vicfg-vswitch -h $server -v 100 -p VLAN100 vSwitch0
> done
vSphere01.vSphere.local is being configured…
vSphere02.vSphere.local is being configured…
vi-admin@vma01:~[vCenter01.get-admin.com]> vifptarget -c
This example is just a tiny portion of what can be done with the Perl toolkit. The vCLI does not include functionality for managing virtual servers; however, you can leverage the Perl toolkit and the SDK to manage VMs just as you can PowerCLI. Using the SDK, you can accomplish any task that can be done through the VI Client or PowerCLI; the difference is the level of effort required to get the same results. Additional sample Perl scripts can be found on vMA at /usr/lib/vmware-vcli/apps/ and /usr/share/doc/vmware-vcli/samples/.
Automating with vCenter Orchestrator
vCenter Orchestrator (vCO) is VMware's process automation tool that comes bundled with vCenter Server. During vCenter Server installations, you may have noticed the inclusion of the vCenter Orchestrator service and installed files. While it is installed by default, it is still up to the administrator to configure vCO for use with vCenter Server. We'll go over that configuration later in this chapter. If you are able to use vCenter's Simple Install, the bulk of vCO configurations are done automatically.
Throughout its evolution vCenter Orchestrator has become an integral component of vCloud Director (vCD) and vCloud Automation Center (vCAC). Conversely though, independent adoption of this tool has been relatively light in comparison to PowerCLI or vMA. In our experience this in large part is due to a couple of factors:
- vSphere administrators are not yet adopting automation beyond small single-purpose scripts.
- vSphere administrators find the implementation of tasks and requirements difficult.
- vSphere administrators find the interface foreign and overwhelming.
No doubt you have seen or heard of vCenter Orchestrator but were probably unclear of how it fit into the vSphere ecosystem.
A few things are unique about vCenter Orchestrator:
- The ability of the workflow engine to manage many simultaneous processes. It's also able to track and manage pauses or interruptions in the workflow, such as approvals or service restart.
- Integration into the vSphere Web Client.
- Open for development of new plug-ins.
New Features in vCenter Orchestrator 5.5
VMware expanded the importance of vCenter Orchestrator as part of vCAC with the release of vSphere v5.1. In vSphere 5.5, its extends vCO by including the following features:
- Workflow Debugger. Provides a debug mode that workflow developers can use to rerun their workflows and better troubleshoot.
- vCO Cluster Mode. Provides dynamic scale-up and scale-down of orchestration when used with an external load balancer. This provides application high availability, allowing a workflow to be completed by a different vCO node in the event of a node outage.
- Security improvements.
- Improved integration with vSphere Web Client.
Make sure you read over the vCenter Orchestrator 5.5 release notes for the full listing of new features, especially if you're migrating from vCO 4.2.x to vCO 5.5.
Understanding vCenter Orchestrator Prerequisites
Because vCO is installed with vCenter Server, many of the prerequisites for vCO are the same as for vCenter Server. Like vCenter Server, vCO runs on any x64 Windows server. Also like vCenter Server, vCO requires a separate backend database. This backend database must be separate from the vCenter Server backend database.
vCO can leverage the following supported databases:
- Microsoft SQL Server Express for small deployments
- Microsoft SQL Server 2003 SP3 (Standard or Enterprise), 32-bit or 64-bit
- Microsoft SQL Server 2008 (SP1 or SP2, Standard or Enterprise), 32-bit or 64-bit
- Oracle 10g (Standard or Enterprise) Release 2 (10.2.0.3.0), 32-bit or 64-bit
- Oracle 11g (Standard or Enterprise) Release 1 (11.1.0.7), 32-bit or 64-bit
MySQL and PostgreSQL are also supported but only for testing and evaluation purposes.
USE A SEPARATE PHYSICAL SERVER FOR THE ORCHESTRATOR DATABASE
Because of CPU and memory usage, VMware recommends placing the vCO database on a separate machine from the vCO server. These machines should reside in the same datacenter for high-speed LAN connectivity.
If you are planning on using an Oracle database, you must download the Oracle drivers and copy them to the appropriate locations; the vCO installer does not do this for you. For more complete information on exactly how this is accomplished, refer to the vCO Installation and Configuration Guide available from VMware's website at
vCO also requires a working LDAP server in your environment. Supported LDAP servers include OpenLDAP, Novell eDirectory, Sun Java Directory Server, and Microsoft Active Directory.
If you want to set up vCO cluster mode, you'll need to ensure that the database can accept multiple connections so it can accept connections from each vCO server.
After you verify that you meet all these prerequisites, you are ready to get started configuring vCenter Orchestrator.
Configuring vCenter Orchestrator
vCenter Orchestrator (vCO) is arguably the most versatile and powerful of the automation technologies discussed in this chapter. To take advantage of that functionality, often considerable configurations must be applied. In the following sections, we'll go over the core configurations needed to make use of vCO in your environment. Do not be discouraged by the relatively long list of configuration needs. vCO has many touch points into your environment, and these changes are necessary for vCO to function properly.
STARTING THE VCENTER ORCHESTRATOR CONFIGURATION SERVICE
The first step in configuring vCO is starting the vCO Configuration service. This service allows you to configure settings such as network, database, and server certificate settings for the vCO engine. By default, this service is set to manual startup. It must be running in order to access the web-based configuration interface.
Perform the following steps to start the vCO Configuration service:
- Log in as an administrative user to the computer running vCenter Server, which will have vCenter Orchestrator also installed automatically.
- From the Start menu, choose Run.
- In the Run dialog box, type services.msc, and click OK.
- When the Services window opens, scroll through the list of services in the pane on the right until you see the VMware vCenter Orchestrator Configuration service.
- Right-click the VMware vCenter Orchestrator Configuration service and select Start.
- Verify that the service started correctly by ensuring that the Status column for the VMware vCenter Orchestrator Configuration service lists Started.
After the service starts, you can access the vCO Web Configuration interface.
- Open a web browser, and go to
https://<computer IP address or DNS name>:8283
- Log in with default credentials
User: vmware
Password: vmware
You will be prompted to change the default password. This is highly recommended. Make sure you save this password in your records in case you need to make future changes to the vCenter Orchestrator engine. This password must be complex, containing at least eight characters, including one digit, one uppercase letter, and one special character. You will be prompted if any of these conditions are not met.
- Enter the new password and click Apply Changes.
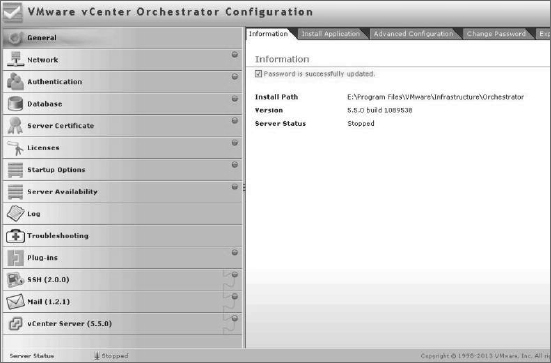
Once logged in you will see all of your options for configuring the vCenter Orchestrator instance. You'll notice in Figure 14.4 that the default settings have been applied for the vCenter Orchestrator instances that reside on the vCenter Server. This is a marked improvement to setup over previous versions.
FIGURE 14.4 The vCenter Orchestrator Configuration interface
CONFIGURING NETWORKING
Depending on how you choose to deploy vCenter Orchestrator, you may wish to designate a separate IP address for vCO to listen on. This is done easily through the vCenter Orchestrator Configuration page and should be the first thing you set up during your implementation. Follow these steps:
- Open a web browser, and go to
https://<computer IP address or DNS name>:8283
- Log in with your credentials:
User: vmware
Password: <your password>
- Click the Network tab on the left.
- In the IP Address drop-down, select the IPv4 or IPv6 IP address you wish vCenter Orchestrator to listen on. You'll notice that the DNS and port information populates.
- Click Apply.
CONFIGURING AUTHENTICATION
vCenter Orchestrator is capable of working with a variety of targets for user authentication. Authentication is critical to get the most out of vCenter Orchestrator while also protecting your vSphere environment from unapproved access. Let's go over the two most common authentication configurations: SSO and LDAP. Follow these steps:
- Open a web browser, and go to
https://<computer IP address or DNS name>:8283
- Log in with your credentials:
User: vmware
Password: <your password>
- Click the Authentication tab on the left.
Configure vCenter Single Sign-On
The default option for vCenter Orchestrator is using SSO. Before completing Single Sign-On authentication, you'll need to import the SSO SSL certificate:
- Go to the Network tab on the left.
- Select the SSL Trust Manager tab.
- Enter the SSO URL under Import From URL:
https://<SSO IP address or DNS name>:7444
- Click Import.
- Click the Authentication tab on the left.
- Enter the vCenter Server hostname with port info:
https://<computer IP address or DNS name>:7444
- Enter the SSO Admin username and password:
User: admin@vsphere-local
Password: <Your SSO Admin Password>
- Click the Register Orchestrator button.
Configuring for LDAP - Active Directory
In many cases, you will use Active Directory as your supported LDAP server because vCenter Server also integrates with Active Directory. As mentioned earlier, other LDAP servers are also supported.
Follow these steps to configure Active Directory as your LDAP server:
- Select your LDAP client. In this example, we use Active Directory.
- Enter your primary LDAP host and optionally the second LDAP host.
- Enter the root for your domain. (For example, the vtesseract. lab domain would be dc=vtesseract,dc=lab.)
- In the Username and Password text boxes, supply the username and password that vCenter Orchestrator will use to authenticate against Active Directory. Specify the username in DN format (cn=username,cn=Users,dc=domain,dc=com) or universal principal name (UPN) format ([email protected]).
- In the User Lookup Base text box, supply the base DN that vCenter Orchestrator should use when searching for user accounts. If you are unsure of what to use, specify the same value as the root DN.
- In the Group Lookup Base text box, supply the base DN that vCenter Orchestrator should use when searching for groups. If you are unsure of what to use, specify the same value as the root DN.
- In the vCO Admin Group text box, specify the DN of an Active Directory group that should receive vCenter Orchestrator administration rights. This should look something like cn=Administrators,cn=Builtin,dc=domain,dc=com.
- Click the Apply Changes button.
Once you have configured vCO for your preferred authentication method, you can test that connection with the Test Connection tab. If you need more advanced LDAP authentication instructions, reference the white paper “Installing and Configuring VMware vCenter Orchestrator.”
EXPORT/IMPORT CONFIGURATION
Having a disaster recovery plan for your vCenter and vCO databases is clearly a very good idea. It is also recommended to export your vCO configuration. You can do this, and protect it with a password if desired, through the vCenter Orchestrator Configuration General tab:
- Open a web browser, and go to
https://<computer IP address or DNS name>:8283
- Log in with your credentials:
User: vmware
Password: <your password>
- Click the General tab on the left.
- Select the Export Configuration tab.
- If you would like to password-protect your configuration (recommended), enter that in the Password field.
- Click Export.
Your configuration file will be stored on the server and the location is displayed on the screen. The file is saved with a .vmoconfig filename extension and the date and time is included in the filename. This file can be imported later if you need to restore your vCO configuration:
- Open a web browser, and go to
https://<computer IP address or DNS name>:8283
- Log in with your credentials:
User: vmware
Password: <your password>
- Click the General tab on the left.
- Select the Import Configuration tab.
- Enter the protection password in the Password field (if required).
- Browse to the saved configuration file.
- Select the check box if you wish to override the current internal certificate and networking with the new file.
- Click Import.
This will restore the configuration settings that you had exported into that file. The Export/Import capabilities can also make running cluster mode easier to configure.
STARTING VCENTER ORCHESTRATOR SERVICE
Once you have all the configurations you want updated and exported, it is time to start the actual vCenter Orchestrator engine. You can accomplish this two ways. You may wish to use the Windows services console if you'd like to set the service to start automatically. Keep in mind that starting the vCO Server service may take several minutes.
To start the service through the Windows services console, follow these steps:
- From the Start menu, choose Run.
- In the Run dialog box, type services.msc, and click OK.
- When the Services window opens, scroll through the list of services in the pane on the right until you see the VMware vCenter Orchestrator Server service.
- Right-click the VMware vCenter Orchestrator Server service and select Start. Wait patiently.
- Verify that the service started correctly by ensuring that the Status column for the VMware vCenter Orchestrator Server service lists Started.
- Set the service to start automatically by right-clicking the service name and choosing Properties.
- Change the startup type to Automatic.
To start the service through the vCenter Orchestrator Configuration page, follow these steps:
- Open a web browser, and go to
https://<computer IP address or DNS name>:8283
- Log in with your credentials:
User: vmware
Password: <your password>
- Click the Startup Options tab on the left.
- Click the link on the right that says Start Service. Wait patiently; it is important to give the service several minutes to start.
IMPORTING VCENTER SERVER SSL CERTIFICATE
To connect a standalone instance of vCenter Orchestrator to vCenter Server, you'll need to import the SSL certificate used for that server:
- Open a web browser, and go to
https://<computer IP address or DNS name>:8283
- Login with your credentials:
User: vmware
Password: <your password>
- Click the vCenter Server tab.
- Click the SSL Certificates link on the right.
- Under Import From URL, enter the vCenter Server instance's name or IP address and click Import.
- Review the vCenter certificate information and click Import.
IMPORTING THE VCENTER SERVER LICENSE
vCenter Orchestrator is included and licensed with vCenter Server. The vCenter Server license will be automatically imported when running on vCenter Server. However, most implementations will have vCO running on a different system. You'll need to import the vCenter Server license information. You can do this manually by entering the 25-digit serial number or by importing it from a vCenter Server instance:
- Open a web browser, and go to
https://<computer IP address or DNS name>:8283
- Log in with your credentials:
User: vmware
Password: <your password>
- Click the Licenses tab.
- Select the Use vCenter Server License radio button.
- Enter the vCenter Server host name or IP address and login credentials.
- Click Apply Changes.
Depending on the vCenter Server license that you own, vCenter Orchestrator will operate in one of two modes:
- For a vCenter Server Standard license, vCenter Orchestrator operates in Server mode. This provides full access to all Orchestrator elements and the ability to run and edit workflows.
- For a vCenter Server Foundation or vCenter Server Essentials license, vCenter Orchestrator runs in Player mode. You are granted read-only permission on Orchestrator elements, and you can run workflows, but you cannot edit them.
CONFIGURING THE PLUG-INS
vCenter Orchestrator uses a plug-in architecture to add functionality and connectivity to the base workflow engine. By default, vCenter Orchestrator comes with a default set of plug-ins, but you'll need to provide the username and password of an account with administrative permissions in vCenter Orchestrator to install them.
Perform the following steps to install the default set of plug-ins:
- In the vCenter Orchestrator Configuration interface, click the Plug-Ins tab.
- Specify the username and password of an account that is a member of the vCO Administration group. This is the group you specified previously when you configured the LDAP server.
- Click Apply Changes.
The Plug-Ins status indicator will change to a green circle, and assuming all the other status indicators are also green circles, the Startup Options status indicator will be as well. You can look for additional plug-ins from VMware's website at
vCenter Orchestrator Appliance
While vCO is provided by default with vCenter Server, VMware highly recommends keeping vCO installed separately and providing it with a separate database as well. You can accomplish this by installing vCO on a Windows server with the standalone installer, separate from the vCenter Server instance, or implementing the vCO appliance. In this section, we'll briefly discuss the steps required to implement the vCO appliance.
Before beginning the implementation of the vCO appliance, you may be asking yourself why you would choose the appliance versus installing vCO on a separate Windows server. You'll see shortly that the primary benefit is ease of implementation. Deploying the vCO appliance is extremely straightforward. The vCO appliance includes the following additional benefits:
- Reduced licensing cost
- Better scalability
- Isolating vCO entirely to minimize impacting other applications
The vCenter Orchestrator appliance comes with the following software installed:
- SUSE Linux Enterprise Server 11 Update 1 for VMware, 64-bit
- PostgreSQL (suitable for small to medium environments)
- OpenLDAP (suitable for experimental and testing purposes)
- vCenter Orchestrator 5.5
The vCenter Orchestrator appliance requires the following minimum hardware:
- 2 CPU
- 3 GB memory
- 7 GB hard disk
Implementing the vCenter Orchestrator Appliance
You'll begin implementing the vCO appliance by downloading it from your MyVMware portal where you'll find it listed with the vSphere downloads. Save it to a local directory that the vSphere Client, or vSphere Web Client, has access to since you'll need to deploy with one of vSphere clients. Then follow these steps:
- Log in to the vSphere Web Client with permissions to deploy OVF files.
- Select an inventory object that can contain a virtual machine such as a datacenter, folder, cluster, resource pool, or host.
- Select Actions
 All vCenter Actions Deploy OVF Template.
 - Enter path or URL to the OVF (.ovf) file and click Next.
- Review the OVF details and click Next.
- Review and accept the terms in the license agreement and click Next.
- Specify a name and location for the appliance and click Next.
- Select the desired destination and click Next.
- Select the desired disk format and datastore.
- Specify network settings. Static IP addresses are recommended but DHCP is fully supported. This setting can be changed later through the appliance web console.
- Review the properties and click Finish. You may also choose to have the virtual machine powered on after deployment.
- Verify that the appliance is online by browsing to http://<appliance address>.
CHANGING THE DEFAULT ROOT PASSWORD
Once you have established the availability of the vCenter Orchestrator appliance, you will want to change the root password. This can be done quickly:
- Open your supported browser to
https://<appliance address>:5480
- Enter the default login credentials:
User: root
Password: vmware
- Click the Admin tab.
- Enter the current root password, the new administrator password, and retype the new administrator password.
- Click Change Password.
You will want to log out and log back in with the new credentials.
Accessing vCenter Orchestrator
There are several ways to access vCenter Orchestrator. Previous versions of vCO required connectivity through the web operator or the vCO client. Beginning with the new vSphere Web Client in vSphere 5.1, vCenter Orchestrator provided access through vCenter Server itself. This is a tremendous advantage that was improved greatly in vSphere 5.5. More often than not those building workflows in vCO will find themselves working with the vCO client because it provides the greatest flexibility. If done correctly, it is entirely possible for your infrastructure consumers to take advantage of vCO without logging into any client by utilizing the vSphere Web Client integration.
vCenter Orchestrator and vCenter Server
We mentioned earlier that vCO has been widely integrated into the vSphere Web Client, allowing vSphere administrators the ability to make workflows available to a variety of Web Client users on most objects in vCenter Server. This means that a vCO server can be configured within the vSphere Web Client and then assign workflows to various object types. Role-based access control (RBAC) can then be leveraged to provide Web Client users more opportunity to utilize vCO workflows without leaving the web interface. This functionality has a huge advantage over the other automation options that we have discussed because these workflows are now extremely easy to share and are not limited to those with strong knowledge about the tool or environment. Here are some examples:
- Application owners have the ability to update virtual hardware on their VM (which would include checking that VMware Tools are up to date).
- System owners have the ability to upgrade the virtual hardware of a VM while also including limited options and optional approvals.
- System owners have the ability to launch a report that could provide health and change information about their system, or even the cluster on which the system is located.
KEYS TO VCO SUCCESS
Keep in mind that there are a few things that must be in good working order in your environment to take advantage of this feature. First, a vCenter Orchestrator instance needs to be fully configured and ready to begin work. Most of this work is done for you in Simple Install mode, and the steps required are mentioned previously in this chapter for other installs. Second, your authentication must be configured correctly. This is centrally related to Single Sign-On (SSO). If SSO is not working properly, you are going to have great difficulty configuring the integration between vCenter Server and vCO. Finally, you will have to continue with your server certificates. Issues with any of these items can make for challenging vCO-vCenter integration.
ASSIGN VCO INSTANCE TO MANAGE VCENTER
Assigning a vCO server to manage vCenter is actually pretty straightforward once you have validated the required trusts. You'll need to log in to the vSphere Web Client with an account that has administrator privileges, as follows:
- Verify that the vCenter Orchestrator service is running.
- Log in to vSphere Web Client.
- Click the vCenter Orchestrator tab.
- Click the Manage tab at the right.
- Select the row with the vCenter Server instance you want managed.
- Click Edit Configuration.
- Enter the vCenter Orchestrator name (Figure 14.5).
- Click Test Connection.
- Click OK.
FIGURE 14.5 Assigning a vCO instance
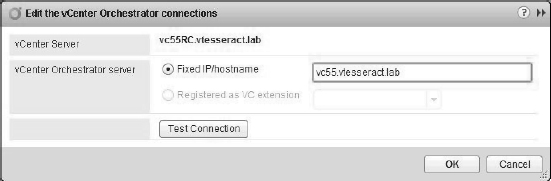
Using an Orchestrator Workflow
So far, you've only seen how to configure the vCenter Orchestrator server, but now that the server is up and running, you are ready to launch the client and actually run a workflow. The vCenter Orchestrator client is the application you will use to actually launch a workflow. You can launch the vCenter Orchestrator client from the Start menu and then log in with the Active Directory credentials of an account in the vCO Administrators group (this is the group configured earlier when you set up the LDAP server connection for vCenter Orchestrator).
vCenter Orchestrator comes with a library of preinstalled workflows. To view these workflows in the vCenter Orchestrator client, click the Workflows tab on the left side of the window, and then browse through the tree folder structure to see what workflows are already available for you to use. Figure 14.6 shows some of the preinstalled workflows in the vCenter Orchestrator client.
To run any of the workflows in the vCenter Orchestrator client, you just right-click the workflow and select Execute Workflow. Depending on the workflow, the vCenter Orchestrator client prompts you for the information it needs to complete the workflow, such as the name of a VM or the name of an ESXi host. The information that the vCenter Orchestrator client prompts you to supply will vary based on the workflow you have selected to run.
TODAY'S MIRACLES
You return from lunch on Friday to a frantic voicemail from one of the department heads in your company. An initiative has been underway to overhaul a major application that the department depends on. A consultant is coming in on Monday morning to deploy the application in an isolated development environment. There has been discussion about creating this environment but it has not been done yet. Naturally, you protest but agree to work through the weekend to prepare the new environment. That weekend can go dramatically different depending on the amount of automation implemented in your environment.
If you have automated the deployment of new virtual machines, implementation of new VLANs, addition of accounts, and access permissions, you may be able to accomplish the task within a few hours. If you do not have automation you will likely spend many hours implementing the solution manually and missing weekend activities. You are also likely to make mistakes or miss steps that can impact the confidence that the department head and your management have in you. In the end, you know you'll accomplish the task, but the amount of effort required will vary. Regardless of what it takes the department head sees the result and assumes that this is repeatable. As such, you will likely be put on the spot again in the future and doomed to repeat the effort. Today's miracles are tomorrow's expectations.
FIGURE 14.6 The vCenter folder contains all the workflows that automate actions in vCenter Server.
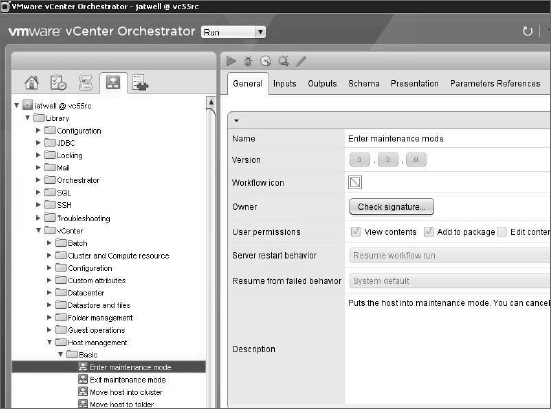
CREATING WORKFLOWS IS MOSTLY A DEVELOPER'S TASK
Unfortunately, creating custom workflows is probably beyond the reach of most vSphere administrators. Creating workflows and actions requires expertise and experience with web development languages like JavaScript. If this is something with which you have some knowledge, then download the vCenter Orchestrator Developer's Guide from VMware's website at www.vmware.com/support/pubs/orchestrator_pubs.html. This developer's guide provides more detailed information on how to create Orchestrator workflows.
vCenter Orchestrator is a powerful tool that is capable of creating some complex and highly interactive workflows. However, it doesn't give up its secrets easily, and creating workflows may be beyond the skills of many vSphere administrators. Fortunately there are more than enough built-in workflows to accomplish the majority of common tasks. With a little practice passing information between existing workflows, you will be able to do increasingly more complex tasks.
The Bottom Line
Identify tools available for automating vSphere. VMware offers a number of different solutions for automating your vSphere environment, including vCenter Orchestrator, PowerCLI, an SDK for Perl, an SDK for web service developers, and shell scripts in VMware ESXi. Each of these tools has its own advantages and disadvantages.
Master It VMware offers a number of different automation tools. What are some guidelines for choosing which automation tool to use?
Create a PowerCLI script for automation. VMware vSphere PowerCLI builds on the object-oriented PowerShell scripting language to provide administrators with a simple yet powerful way to automate tasks within the vSphere environment.
Master It If you are familiar with other scripting languages, what would be the biggest hurdle in learning to use PowerShell and PowerCLI, other than syntax?
Use vCLI to manage ESXi hosts from the command line. VMware's command-line interface, or vCLI, is the new way of managing an ESXi host using the familiar esxcfg-* command set. By combining the features of fastpass with vCLI, you can seamlessly manage multiple hosts using the same command set from a single login.
Master It Have you migrated management and configuration operations for which you currently use the ESXi command-line interface to vMA?
Use vCenter in combination with vMA to manage all your hosts. The new version of vMA can use vCenter as a target. This means that you can manage all of your hosts using vCLI without having to manually add each host to the fastpass target list.
Master It Use a combination of shell scripting with vCLI commands to execute commands against a number of hosts.
Employ the Perl toolkit and VMware SDK for virtual server operations from the command line. The vCLI is designed for host management and consequently lacks tools for manipulating virtual servers. With the Perl toolkit, leveraged against the VMware SDK, any task that can be accomplished in the Virtual Infrastructure client can be done from the command line.
Master It Browse the sample scripts and SDK documentation to discover the world of possibilities that are unlocked by using Perl, or any of the other supported languages, to accomplish management tasks.
Configure vCenter Orchestrator vCenter Orchestrator is designed to allow vSphere administrators to run workflows against the vSphere environment and much more. To orchestrate against things like Active Directory and UCS or to run PowerShell scripts, you need the appropriate plug-ins installed and configured.
Master It How can you tell which plug-ins are installed and available for your use?
Use a vCenter Orchestrator workflow After vCenter Orchestrator is configured and running, you can use the vCenter Orchestrator client to run a vCenter Orchestrator workflow. vCenter Orchestrator comes with a number of preinstalled workflows to help automate tasks.
Master It An administrator in your environment configured vCenter Orchestrator and has now asked you to run a couple of workflows. However, when you log into the vCenter Server instance where vCenter Orchestrator is also installed, you don't see the icons for vCenter Orchestrator. Why?