
Chapter 9
Creating and Managing Virtual Machines
The VMware ESXi hosts are installed, vCenter Server is running, the networks are blinking, the SAN is carved, and the VMFS volumes are formatted… let the virtualization begin! With the virtual infrastructure in place, you as the administrator must shift your attention to deploying the virtual machines.
In this chapter, you will learn to
- Create a virtual machine
- Install a guest operating system
- Install VMware Tools
- Manage virtual machines
- Modify virtual machines
Understanding Virtual Machines
It is common for IT professionals to refer to a Windows or Linux system running on an ESXi host as a virtual machine (VM). Strictly speaking, this term is not 100 percent accurate. Just as a physical machine is a physical machine before the installation of an operating system, a VM is a VM before the installation of a guest operating system (the term “guest operating system” is used to denote an operating system instance installed into a VM). From an everyday usage perspective, though, you can go on calling the Windows or Linux system a VM. Any references you see to “guest operating system” (or “guest OS”) are references to instances of Windows, Linux, or Solaris—or any other supported operating system—installed in a VM.
If a VM is not an instance of a guest OS running on a hypervisor, then what is a VM? The answer to that question depends on your perspective. Are you “inside” the VM, looking out? Or are you “outside” the VM, looking in?
Examining Virtual Machines from the Inside
From the perspective of software running inside a VM, a VM is really just a collection of virtual hardware pieces selected for the purpose of running a guest OS instance.
So, what kind of virtual hardware makes up a VM? By default, VMware ESXi presents the following fairly generic hardware to the VM:
- Phoenix BIOS
- Intel motherboard
- Intel PCI IDE controller
- IDE CD-ROM drive
- BusLogic parallel SCSI, LSI Logic parallel SCSI, or LSI Logic SAS controller
- AMD or Intel CPU, depending upon the physical hardware
- Intel E1000, Intel E1000e, or AMD PCnet NIC
- Standard VGA video adapter
VMware selected this generic hardware to provide the broadest level of compatibility across the entire supported guest OSes. As a result, it's possible to use commercial off-the-shelf drivers when installing a guest OS into a VM. Figure 9.1 shows a couple of examples of VMware vSphere providing virtual hardware that looks like standard physical hardware. Both the network adapter and the storage adapter—identified as an Intel(R) 82574L Gigabit Network Connection and an LSI SAS 3000 series adapter, respectively—have corresponding physical counterparts, and drivers for these devices are available in many modern guest OSes.
FIGURE 9.1 VMware ESXi provides both generic and virtualization-optimized hardware for VMs.
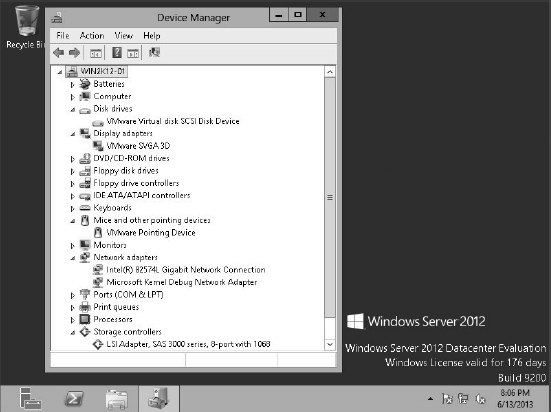
However, VMware vSphere may also present virtual hardware that is unique to the virtualized environment. Look back at the display adapter in Figure 9.1. There is no such physical card as a VMware SVGA 3D display adapter; this is a device that is unique to the virtualized environment. These virtualization-optimized devices, also known as paravirtualized devices, are designed to operate efficiently within the virtualized environment created by the vSphere hypervisor. Because these devices have no corresponding physical counterpart, guest OS—specific drivers have to be provided. VMware Tools, described later in this chapter in the section titled “Installing VMware Tools,” satisfies this function and provides virtualization-optimized drivers to run these devices.
A physical machine might have a certain amount of memory installed, a certain number of network adapters, or a particular number of disk devices, and the same goes for a VM. A VM can include the following types and numbers of virtual hardware devices:
- Processors: Between 1 and 64 processors with vSphere Virtual SMP (the number of processors depends on your vSphere licenses).
- Memory: Maximum of 1 TB of RAM.
- SCSI controller: Maximum of 4 SCSI controllers with 15 devices per controller for a total of 60 SCSI devices per VM; it's possible to boot only from 1 of the first 8.
- SATA controller: Maximum of 4 SATA controllers with 30 devices per controller for a total of 120 SATA devices per VM. Devices can include virtual hard drives or virtual CD/DVD drives.
- Network adapter: Maximum of 10 network adapters.
- Parallel port: Maximum of 3 parallel ports.
- Serial port: Maximum of 4 serial ports.
- Floppy drive: Maximum of 2 floppy disk drives on a single floppy disk controller.
- A single USB controller with up to 20 USB devices connected.
- Keyboard, video card, and mouse.
Hard drives are not included in the previous list because VM hard drives are generally added as SCSI devices. With up to 4 SCSI controllers and 15 SCSI devices per controller, it is possible to attach 60 hard drives to a VM. New in vSphere 5.5, virtual hard drives can now be added as SATA devices as well. Each VM can have a maximum of 4 SATA controllers with 30 devices per controller for a total of 120 possible virtual hard drives. If you are using IDE hard drives, then the VM is subject to the limit of 4 IDE devices per VM, as mentioned previously.
SIZE LIMITS FOR VIRTUAL HARD DRIVES
The maximum size for any virtual hard drive presented to a VM has been raised to 62 TB, up from just shy of 2 TB in previous versions. That's a lot of storage for just one VM and a welcome change for organizations looking to virtualize large-scale business-critical applications.
There's another perspective on VMs besides what the guest OS instance sees. There's also the external perspective—what does the hypervisor see?
Examining Virtual Machines from the Outside
To better understand what a VM is, you must consider more than just how a VM appears from the perspective of the guest OS instance (for example, from the “inside”), as we've just done. You must also consider how a VM appears from the “outside.” In other words, you must consider how the VM appears to the ESXi host running the VM.
From the perspective of an ESXi host, a VM consists of several types of files stored on a supported storage device. The two most common files that compose a VM are the configuration file and the virtual hard disk file. The configuration file—hereafter referred to as the VMX file—is a plain-text file identified by a .vmx filename extension, and it functions as the structural definition of the VM. The VMX file defines the virtual hardware that resides in the VM. The number of processors, the amount of RAM, the number of network adapters, the associated MAC addresses, the networks to which the network adapters connect, and the number, names, and locations of all virtual hard drives are stored in the configuration file.
Listing 9.1 shows a sample VMX file for a VM named win2k12-01.
LISTING 9.1: Example virtual machine configuration (VMX) file
.encoding = "UTF-8"
config.version = "8"
virtualHW.version = "10"
nvram = "Win2k12-01.nvram"
pciBridge0.present = "TRUE"
svga.present = "TRUE"
pciBridge4.present = "TRUE"
pciBridge4.virtualDev = "pcieRootPort"
pciBridge4.functions = "8"
pciBridge5.present = "TRUE"
pciBridge5.virtualDev = "pcieRootPort"
pciBridge5.functions = "8"
pciBridge6.present = "TRUE"
pciBridge6.virtualDev = "pcieRootPort"
pciBridge6.functions = "8"
pciBridge7.present = "TRUE"
pciBridge7.virtualDev = "pcieRootPort"
pciBridge7.functions = "8"
vmci0.present = "TRUE"
hpet0.present = "TRUE"
displayName = "Win2k12-01"
extendedConfigFile = "Win2k12-01.vmxf"
virtualHW.productCompatibility = "hosted"
scsi0.present = "TRUE"
disk.EnableUUID = "TRUE"
ide1:0.present = "TRUE"
ethernet0.present = "TRUE"
guestOS = "windows8srv-64"
memSize = "3072"
toolScripts.afterPowerOn = "TRUE"
toolScripts.afterResume = "TRUE"
toolScripts.beforeSuspend = "TRUE"
toolScripts.beforePowerOff = "TRUE"
uuid.bios = "42 0b c8 94 5e 80 53 23-93 c3 a1 83 e7 eb 3a 3c"
vc.uuid = "50 0b cd 35 8d 65 b5 e8-fa 91 9d 71 1e 4c 96 4b"
scsi0.virtualDev = "lsisas1068"
ide1:0.deviceType = "cdrom-image"
ide1:0.fileName = "/vmfs/volumes/51b386f8-2e41c1dd-cd3f-0050569d341f/9200.16384
.WIN8_RTM.120725-1247_X64FRE_SERVER_EVAL_EN-US-HRM_SSS_X64FREE_EN-US_DV5.ISO"
floppy0.startConnected = "FALSE"
floppy0.clientDevice = "TRUE"
floppy0.fileName = "vmware-null-remote-floppy"
ethernet0.virtualDev = "e1000e"
ethernet0.networkName = "VLAN-25"
ethernet0.addressType = "vpx"
ethernet0.generatedAddress = "00:50:56:8b:7f:44"
scsi0:0.present = "TRUE"
scsi0:0.deviceType = "scsi-hardDisk"
scsi0:0.fileName = "Win2k12-01.vmdk"
scsi0.pciSlotNumber = "160"
ethernet0.pciSlotNumber = "192"
vmci0.id = "-404014532"
vmci0.pciSlotNumber = "32"
uuid.location = "56 4d 63 d4 3c 1a 3b 36-b6 bf e6 a8 32 ce 3e 4e"
cleanShutdown = "FALSE"
replay.supported = "FALSE"
sched.swap.derivedName = "/vmfs/volumes/51b386f8-2e41c1dd-cd3f-0050569d341f/Win2
k12-01/Win2k12-01-9dff3075.vswp"
replay.filename = ""
scsi0:0.redo = ""
pciBridge0.pciSlotNumber = "17"
pciBridge4.pciSlotNumber = "21"
pciBridge5.pciSlotNumber = "22"
pciBridge6.pciSlotNumber = "23"
pciBridge7.pciSlotNumber = "24"
scsi0.sasWWID = "50 05 05 64 5e 80 53 20"
vm.genid = "4785438942692035628"
vm.genidX = "-5102819482874211651"
tools.remindInstall = "FALSE"
vmotion.checkpointFBSize = "4194304"
softPowerOff = "FALSE"
ide1:0.startConnected = "TRUE"
tools.syncTime = "FALSE"
unity.wasCapable = "TRUE"
toolsInstallManager.lastInstallError = "0"
toolsInstallManager.updateCounter = "1"
Reading through the win2k12-01.vmx file, you can determine the following facts about this VM:
- From the guestOS line, you can see that the VM is configured for a guest OS referred to as "windows8s rv-64"; this corresponds to Windows Server 2012 64-bit.
- Based on the memsize line, you know the VM is configured for 3 GB of RAM.
- The scsi0:0.fileName line tells you the VM's hard drive is located in the file Win2k12-01.vmdk.
- The VM has a floppy drive configured, based on the presence of the floppy0 lines, but it does not start connected (see floppy0.startConnected).
- The VM has a single network adapter configured to the VLAN-25 port group, based on the ethernet0 lines.
- Based on the ethernet0.generatedAddress line, the VM's single network adapter has an automatically generated MAC address of 00:50:56:8b:7f:44.
While the VMX file is important, it is only the structural definition of the virtual hardware that composes the VM. It does not store any actual data from the guest OS instance running inside the VM. A separate type of file, the virtual hard disk file, performs that role.
The virtual hard disk file, identified by a .vmdk filename extension and hereafter referred to as the VMDK file, holds the actual data stored by a VM. Each VMDK file represents a hard drive. For a VM running Windows, the first VMDK file would typically be the storage location for the C: drive. For a Linux system, it would typically be the storage location for the root, boot, and a few other partitions. Additional VMDK files can be added to provide additional storage locations for the VM, and each VMDK file would appear as a physical hard drive to the VM.
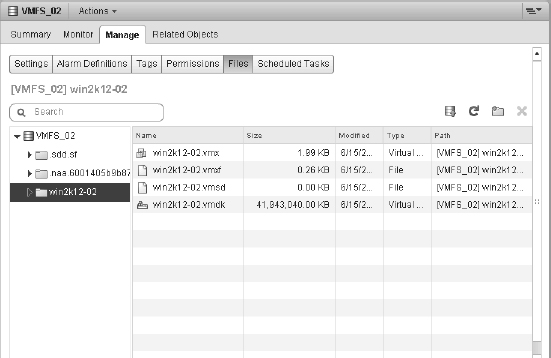
While we refer to a virtual hard disk file as “a VMDK file,” in reality there are two different files that compose a virtual hard disk. Both of them use the .vmdk filename extension, but each performs a very different role. One of these files is the VMDK header file, and the other is the VMDK flat file. There's a good reason why we—and others in the virtualization space—refer to a virtual hard disk file as “a VMDK file,” though, and Figure 9.2 helps illustrate why.
FIGURE 9.2 The file browser in the vSphere Web Client shows only a single VMDK file.
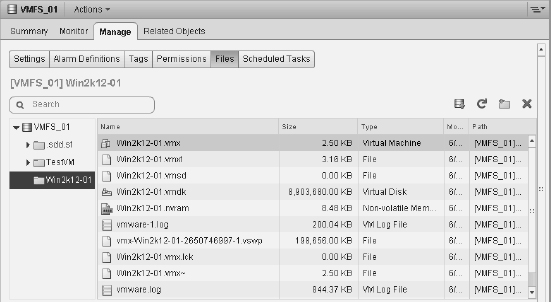
Looking closely at Figure 9.2, you'll see only a single VMDK file listed. In actuality, though, there are two files, but to see them you must go to a command-line interface. From there, as shown in Figure 9.3, you'll see the two different VMDK files: the VMDK header (the smaller of the two) and the VMDK flat file (the larger of the two and the one that has -flat in the filename).
FIGURE 9.3 There are actually two different VMDK files for every virtual hard disk in a VM, even though the vSphere Web Client shows only a single file.

Of these two files, the VMDK header file is a plain-text file and is human-readable; the VMDK flat file is a binary file and is not human-readable. The VMDK header file contains only configuration information and pointers to the flat file; the VMDK flat file contains the actual data for the virtual hard disk. Naturally, this means that the VMDK header file is typically very small, while the VMDK flat file could be as large as the configured virtual hard disk in the VMX. So, a 40 GB virtual hard disk could mean a 40 GB VMDK flat file, depending on other configuration settings you'll see later in this chapter.
Listing 9.2 shows the contents of a sample VMDK header file.
LISTING 9.2: Example VMDK header file
# Disk DescriptorFile
version=1
encoding="UTF-8"
CID=1c071021
parentCID=ffffffff
isNativeSnapshot="no"
createType="vmfs"

# Extent description
RW 83886080 VMFS "Win2k12-01-flat.vmdk"

# The Disk Data Base
#DDB
ddb.adapterType = "lsilogic"
ddb.geometry.cylinders = "5221"
ddb.geometry.heads = "255"
ddb.geometry.sectors = "63"
ddb.longContentID = "328b8afc206187816c4a76061c071021"
ddb.thinProvisioned = "1"
ddb.toolsVersion = "9314"
ddb.uuid = "60 00 C2 94 29 04 46 c9-4c 7f 86 94 c1 ea 41 60"
ddb.virtualHWVersion = "4"
There are several other types of files that make up a VM. For example, when the VM is running there will most likely be a VSWP file, which is a VMkernel swap file. You'll learn more about VMkernel swap files in Chapter 11, “Managing Resource Allocation.” There will also be an NVRAM file, which stores the VM's BIOS settings.
Now that you have a feel for what makes up a VM, let's get started creating some VMs.
Creating a Virtual Machine
Creating VMs is a core part of using VMware vSphere, and VMware has made the process as easy and straightforward as possible. Let's walk through the process, and we will explain the steps along the way.
VSPHERE WEB CLIENT VS. VSPHERE CLIENT
VMware has decided to move away from the full thick vSphere Client in favor of the multi-platform compatible vSphere Web Client. New features added into vSphere 5.1 and later, including vSphere 5.5, are available only in the vSphere Web Client. Although you can use the vSphere Client to create virtual machines, we recommend that you use the vSphere Web Client whenever possible.
Perform the following steps to create a VM:
- If it's not already running, launch the vSphere Web Client, and connect to a vCenter Server instance. If a vCenter Server instance is not available, launch the vSphere Client and connect directly to an ESXi host.
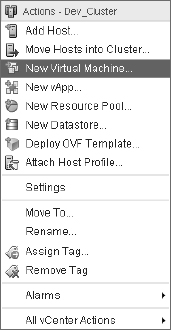
- In the inventory tree, right-click the name of a cluster, a resource pool, or an individual ESXi host, and select the New Virtual Machine option, as shown in Figure 9.4.
FIGURE 9.4 You can launch the New Virtual Machine Wizard from the context menu of an ESXi cluster or an individual ESXi host.
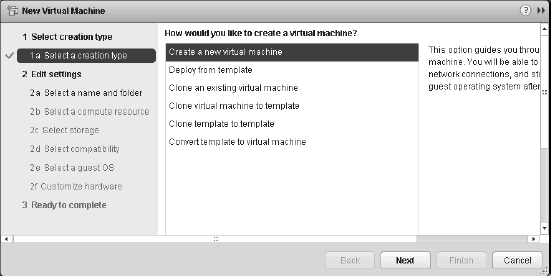
- When the New Virtual Machine Wizard opens, select Create A New Virtual Machine, shown in Figure 9.5, and then click Next.
FIGURE 9.5 Options for creating a new virtual machine when using the vSphere Web Client.
- Type a name for the VM, select a location in the inventory where the VM should reside, and click Next.
- If you selected a cluster without vSphere DRS enabled or you are running vSphere DRS in manual mode, you'll need to select a specific host within the cluster on which to create the VM, as shown in Figure 9.6. Select an ESXi host from the list and then click Next.
LOGICAL INVENTORY AND PHYSICAL INVENTORY
The inventory location you select when you create a new VM, as shown in Figure 9.6, is a logical location. This inventory location does not correspond to the server on which that VM will run or the datastore on which that VM will be stored. This logical inventory displays in the vSphere Web Client when you select VMs And Templates as the inventory view.
FIGURE 9.6 The logical folder structure selected here does not correspond to where the VM files (for example, VMX and VMDK) are located on the selected datastore.
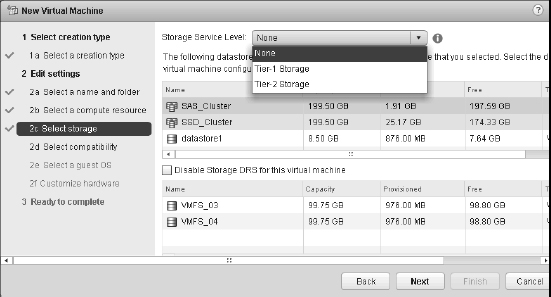
- Select a datastore where the VM files will be located.
As you can see in Figure 9.7, the vSphere Web Client shows a fair amount of information about the datastores (size, provisioned space, free space, type of datastore). However, the vSphere Web Client doesn't show information such as IOPS capacity or other performance statistics. In Chapter 6, “Creating and Configuring Storage Devices,” we discussed storage service levels, which allow you to create VM storage policies based on storage attributes provided to vCenter Server by the storage vendor (as well as user-defined storage attributes created and assigned by the vSphere administrator). In Figure 9.7, you can see the Storage Service Level drop-down list, which lists the currently defined storage service levels. If no service levels are defined or if storage service levels are not enabled, this drop-down list will be disabled.
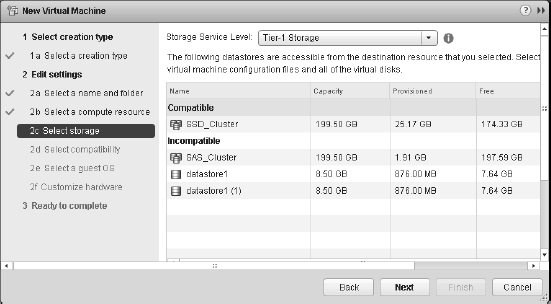
When you select a storage service level, the datastore listing will separate into two groups: compatible and incompatible. Compatible datastores are datastores whose attributes satisfy the storage service level; incompatible datastores are datastores whose attributes do not meet the criteria specified in the storage service level. Figure 9.8 shows a storage service level selected and a compatible datastore selected for this VM's storage.
FIGURE 9.7 You can use storage service levels to help automate VM storage placement decisions when you create a new VM.
FIGURE 9.8 When using VM storage policies, select a compatible datastore to ensure that the VM's storage needs are properly satisfied.
For more information on VM storage policies, refer to Chapter 6.
After you select a datastore, click Next.
- Select a VMware VM version. vSphere 5.5 introduces a new VM hardware version, version 10. As with earlier versions of vSphere, previous VM hardware versions are also supported. If the VM you are creating will be shared with ESXi hosts running both version 5.1 and version 5.5, then choose ESXi 5.1 and later (VM version 9). If the VM will be used only with vSphere 5.5, then choose ESXi 5.5 and later (VM version 10). Click Next.
RUNNING VMs FROM PREVIOUS VERSIONS OF ESXI
Unlike previous major versions of ESX/ESXi, version 5.5 allows you to run VMs created in earlier versions of ESXi without any sort of upgrade process. Some readers may recall that the upgrade from ESX 2.x to ESX 3.x, for example, required a “DMotion” upgrade process or significant downtime for the VMs.
This is not to say that there won't be any downtime for VMs when upgrading from earlier versions to vSphere 5.5, just that the downtime isn't required to occur during the upgrade of the hosts themselves. Instead, the tasks that do require VM downtime—upgrading VMware Tools and upgrading the virtual hardware from version 7 or version 8 to version 10—can be scheduled and performed at a later date.
vSphere supports a Default VM Compatibility level that can be configured at either the datacenter, cluster, or host level. With the Default VM Compatibility setting, you define a default value for the virtual machine version for newly created virtual machines. By setting Default VM Compatibility at a high level within your hierarchy, such as at the cluster level, you can be sure that newly deployed virtual machines will have the correct VM version.
Only the newest VM version, version 11, supports the latest features found in vSphere. If your environment is running only ESXi 5.5, you should consider setting Default VM Compatibility to ESXi 5.5 or later in order to take advantage of all of the new virtual machine features found in vSphere 5.5.
- Select the drop-down box that corresponds to the operating system vendor, select the correct operating system version, and then click Next. As you'll see shortly, this helps the vSphere Web Client provide recommendations for certain values later in the wizard.
- At this point, you are taken to the Customize Hardware screen where you can customize the virtual hardware that will be presented to your virtual machine. To start, we'll choose how many virtual CPUs will be presented to our virtual machine. Select the number of virtual CPUs by using the drop-down box next to CPU.
You can select between 1 and 64 virtual CPU sockets, depending on your vSphere license. Additionally, you can choose the number of cores per virtual CPU socket. The total number of cores supported per VM with VM hardware version 10 is 64. The number of cores available per virtual CPU socket will change based on the number of virtual CPU sockets selected. For specific information about how many virtual cores are available per virtual CPU socket, refer to the following location: www.vmware.com/support/pubs/.
Keep in mind that the operating system you will install into this VM must support the selected number of virtual CPUs. Also keep in mind that more virtual CPUs doesn't necessarily translate into better performance, and in some cases larger values may negatively impact performance.
When you finish configuring virtual CPUs, click Next to continue.
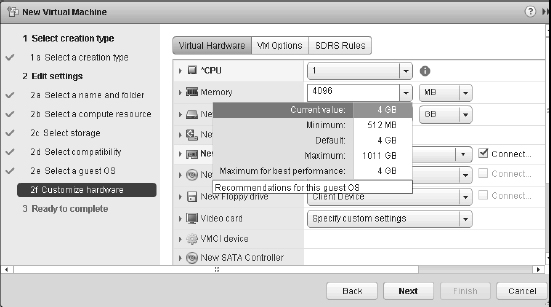
- Configure the VM with the determined amount of RAM by typing in the desired memory value, as shown in Figure 9.9. The default memory sizing is listed in megabytes (MB), so it may be easier to change it to gigabytes (GB) so that you do not need to know the precise number of megabytes.
FIGURE 9.9 Based on guest OS selection, the vSphere Web Client provides some basic guidelines on the amount of memory you should configure for the VM.
As shown in Figure 9.9, the vSphere Web Client displays recommendations about the minimum and recommended amounts of RAM based on the earlier selection of operating system and version. This is one of the reasons the selection of the correct guest OS is important when creating a VM.
The amount of RAM configured on this page is the amount of RAM the guest OS reflects in its system properties, and it is the maximum amount that a guest OS will ever be able to use. Think of it as the virtual equivalent of the amount of physical RAM installed in a system. Just as a physical machine cannot use more memory than is physically installed in it, a VM cannot access more memory than it is configured to use.
When you've selected the amount of RAM you want allocated to the VM, click Next.
DO YOU KNOW WHERE YOUR MEMORY IS?
The setting on the Customize Hardware page is not a guarantee that physical memory will be used to achieve the configured value. As we discuss in later chapters, memory for a VM might be physical RAM, VMkernel swap file space, or some combination of the two.
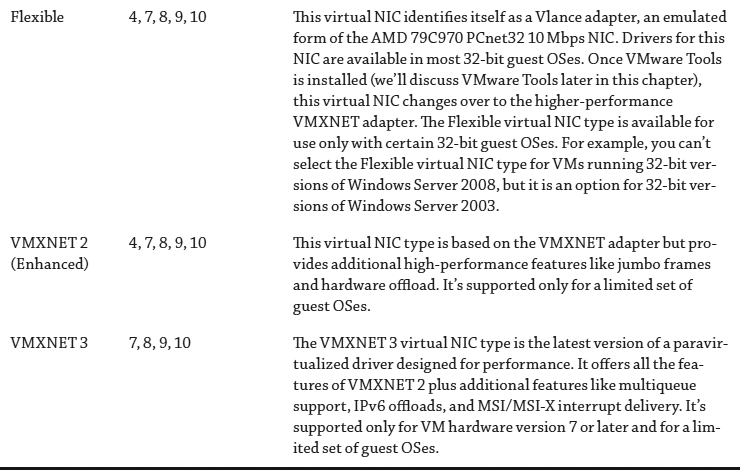
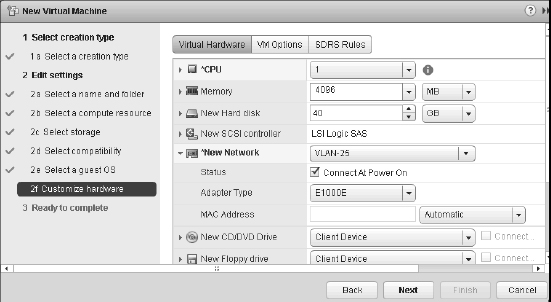
- Select the number of network adapters, the type of each network adapter, and the network to which each adapter will connect. Figure 9.10 shows a screen shot of configuring virtual NICs, and Table 9.1 provides additional information about the different types of virtual NICs.
FIGURE 9.10 You can configure a VM with up to four network adapters, of the same or different types, that reside on the same or different net-works as needed.
MORE INFORMATION ON VIRTUAL NIC ADAPTERS
VMware has detailed descriptions of the virtual NIC adapter types and the support requirements for each on its website at http://kb.vmware.com/kb/1001805.
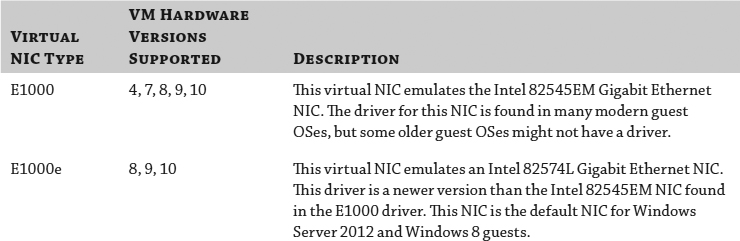
TABLE 9.1: Virtual NIC types in vSphere 5.5
- Select New SCSI Controller to expand the selection area, and then click the drop-down box to choose the appropriate SCSI adapter for the operating system selected on the Select A Guest OS page of the Create New Virtual Machine Wizard.
The correct default driver should already be selected based on the previously selected operating system. For example, the LSI Logic parallel adapter is selected automatically when Windows Server 2003 is selected as the guest OS, but the LSI Logic SAS adapter is selected when Windows Server 2008 is chosen as the guest OS. We provided some additional details on the different virtual SCSI adapters in Chapter 6.
VIRTUAL MACHINE SCSI CONTROLLERS
Windows 2000 has built-in support for the BusLogic parallel SCSI controller, while Windows Server 2003 and later operating systems have built-in support for the LSI Logic parallel SCSI controller. Additionally, Windows Server 2008 has support for the LSI Logic SAS controller. Windows XP doesn't have built-in support for any of these, requiring a driver disk during installation. Choosing the wrong controller will result in an error during the operating system installation. The error states that hard drives cannot be found. Choosing the wrong SCSI controller during a physical-to-virtual (P2V) operation will result in a “blue screen error” for a Windows guest OS inside the VM, and the Windows installation will fail to boot.
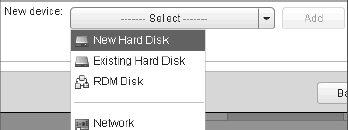
- A virtual hard disk is configured automatically when you create a new virtual machine. If you need to add a new virtual hard disk, select the New Device drop-down box at the bottom of the screen, as shown in Figure 9.11.
FIGURE 9.11 A virtual disk is configured automatically when you create a new virtual machine. You can also add additional virtual disks by using the New device option.
You are presented with the following options for adding a virtual disk to your VM.
- The New Hard Disk option allows the user to create a new virtual disk (a VMDK file) that will house the guest OS's files and data. Since a virtual hard disk is already added by default when a new virtual machine is created, using this option is useful if the virtual machine needs two disks (such as when an operating system drive and a data drive are required).
- The Existing Hard Disk option allows a VM to be created using a virtual disk that is already configured with a guest OS or other data and that resides in an available datastore.
- The RDM Disk option allows a VM to have raw SAN LUN access. Raw device mappings (RDMs) are discussed in a bit more detail in Chapter 6.
Since a virtual hard disk is already configured by default, we'll use it to install our guest OS and we won't need to add another virtual disk.
ADDING EXISTING DISKS
The existing virtual disk doesn't have to contain an instance of the guest OS; it can contain data that perhaps will serve as a secondary drive inside the VM. The ability to add existing disks with data makes virtual hard drives extremely portable, generally allowing users to move them from VM to VM without repercussions. You will obviously need to address any guest OS–specific issues such as partitions, file system type, or permissions.
- When either adding a new virtual hard disk or using the one provided by default, options are available for the creation of the new virtual disk. Select New Hard Disk to expand the selection area and access these options, as shown in Figure 9.12. First, configure the desired disk size for the VM hard drive. The maximum size will be determined by the format of the datastore on which the virtual disk is stored. Next, select the appropriate Disk Provisioning option:
FIGURE 9.12 vSphere 5.5 offers a number of different Disk Provisioning options when you're creating new virtual disks.
- To create a virtual disk with all space allocated at creation but not pre-zeroed, select Thick provision lazy zeroed. In this case, the VMDK flat file will be the same size as the specified virtual disk size. A 40 GB virtual disk means a 40 GB VMDK flat file.
- To create a virtual disk with all space allocated at creation and pre-zeroed, select Thick provision eager zeroed. This option is required in order to support vSphere Fault Tolerance. This option also means a “full-size” VMDK flat file that is the same size as the size of the virtual hard disk.
- To create a virtual disk with space allocated on demand, select the Thin provision option. In this case, the VMDK flat file will grow depending on the amount of data actually stored in it, up to the maximum size specified for the virtual hard disk.
Depending on your storage platform, storage type, and storage vendor's support for vSphere's storage integration technologies like VAAI or VASA, some of these options might be grayed out. For example, an NFS datastore that does not support the VAAIv2 extensions will have these options grayed out, as only thin provisioned VMDKs are supported. (VAAI and VASA are discussed in greater detail in Chapter 6.)
There are two options for the location of the new virtual disk. These options are available by selecting the drop-down box next to the Location field. Keep in mind that these options control physical location, not logical location; they will directly affect the datastore and/or directory where files are stored for use by the hypervisor.
- The option Store With The Virtual Machine will place the file in the same subdirectory as the configuration file and the rest of the VM files. This is the most commonly selected option and makes managing the VM files easier.
- The option Browse allows you to browse the available datastores and store the VM file separately from the rest of the files. You'd typically select this option when adding new virtual hard disks to a VM or when you need to separate the operating system virtual disk from a data virtual disk.
You can configure other options, such as shares, limits, or Virtual Flash sizing (discussed in greater detail in Chapter 6) for the virtual machine you are creating, if required.
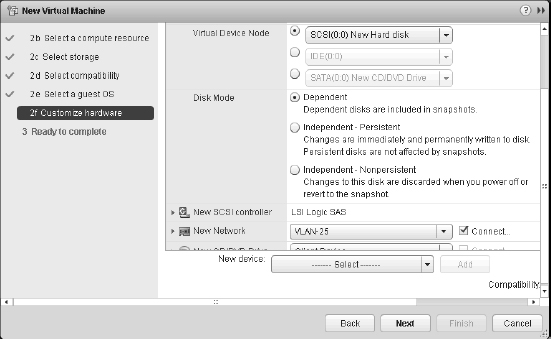
- The Virtual Device Node option lets you specify the SCSI node, IDE controller, or SATA controller to which the virtual disk is connected. The Disk Mode option allows you to configure a virtual disk in Independent mode, as shown in Figure 9.13. The disk mode is not normally altered, so you can typically accept the default values provided, as shown in Figure 9.13.
FIGURE 9.13 You can configure the virtual disk on a number of different SCSI adapters and SCSI IDs, and you can configure it as an independent disk.
- The Virtual Device Node drop-down box reflects the 15 different SCSI nodes available on each of the four SCSI adapters a VM supports. When you're using an IDE controller, this drop-down list shows the four different IDE nodes that are available. When you're using a SATA controller, this drop-down shows 30 different SATA nodes that are available.
- By not selecting the Independent mode option, you ensure that the virtual disk remains in the default state that allows VM snapshots to be created. If you select the Independent check box, you can configure the virtual disk as a persistent disk, in which changes are written immediately and permanently to the disk, or as a nonpersistent disk, which discards all changes when the VM is turned off.
When you are done adding or modifying the configuration of the virtual machine, select Next to continue.
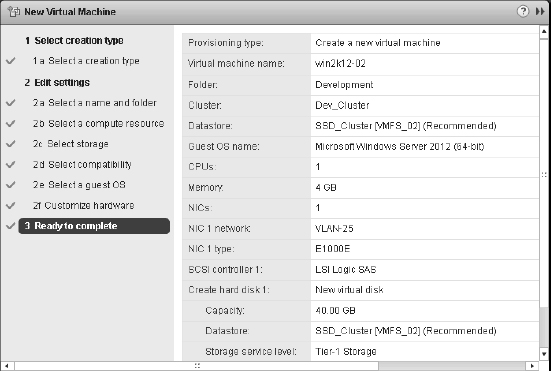
- Complete a final review of the VM configuration. If anything is incorrect, go back and make changes. As you can see in Figure 9.14, the steps on the left side of the wizard are links that allow you to jump directly to an earlier point in the wizard and make changes.
FIGURE 9.14 Reviewing the configuration of the New Virtual Machine Wizard ensures the correct settings for the VM and prevents mistakes that require deleting and re-creating the VM.
When everything is correct, click Finish.


As you can see, the process for creating a VM is pretty straightforward. What's not so straightforward, though, are some of the values that should be used when creating new VMs. What are the best values to use?
Choosing Values for Your New Virtual Machine
Choosing the right values to use for the number of virtual CPUs, the amount of memory, or the number or types of virtual NICs when creating your new VM can be difficult. Fortunately, there's lots of documentation out there on CPU and RAM sizing as well as networking for VMs, so our only recommendation there will be to right-size the VMs based on your needs (see the sidebar “Provisioning Virtual Machines Is Not the Same as Provisioning Physical Machines” later in this chapter).
VIRTUAL MACHINE SIZING CAN HAVE AN IMPACT
Determining the right size for your VMs is a crucial part of your overall vSphere design, and it can impact a number of different areas. For more information on how right-sizing VMs impacts other areas of your vSphere design, refer to VMware vSphere Design by Forbes Guthrie and Scott Lowe (Sybex, 2013).
For other areas besides these, the guidance isn't quite so clear. Out of all the options available during the creation of a new VM, four areas tend to consistently generate questions from both new and experienced users alike:
- How can I find out how to size my VMs?
- How should I handle naming my VMs?
- How big should I make the virtual disks?
- Does my virtual machine need high-end graphics?
Let's talk about each of these questions in a bit more detail.
SIZING VIRTUAL MACHINES
You might be hoping that we'll give you specific guidance here about how to size your virtual machines. We wish we could, but unfortunately virtual machine sizing differs greatly depending on the environment, the applications installed on the virtual machines, performance requirements, and many other factors. Instead, it's better to discuss a methodology you can use to understand the resource utilization requirements (CPU, memory, disk, and network) of your physical servers before re-deploying them as virtual machines.
Simply sizing your virtual machines to the same specifications used for physical servers can lead to oversizing (or undersizing) virtual machines unnecessarily. Both oversizing and under-sizing a virtual machine can lead to performance problems not only for that virtual machine but potentially other virtual machines on the same ESXi host.
Instead, you can use a process called capacity planning to help you understand how to size your virtual machines. Capacity planning is a process where you learn over time how your current physical servers are utilized and then use that information to size your virtual machines. A typical capacity planning exercise takes place over a two-to-four-week period and uses tools to automatically monitor and report on the performance of physical servers. By monitoring your servers over time, such as over a 30-day period, you can capture normal business cycles such as end of month processing that you might otherwise miss if you monitor for only a short time.
Two of the most common tools used for capacity planning are actually free, though as you'll see, one of them is not available to everyone. Perhaps the most well known is a product by VMware called Capacity Planner. The other product, called Microsoft Assessment and Planning Toolkit, may not be as well known but it's still a powerful tool.
FREE, BUT NOT FOR EVERYONE
VMware Capacity Planner is a free product, but it is not available for everyone to use. Capacity Planner is available only to VMware or VMware's certified partners. If you're an end user of VMware's products, you cannot access Capacity Planner yourself.
Not already working with VMware or a partner? Luckily, you can usually work with your VMware representative to get access to Capacity Planner for servers in your environment.
Microsoft Assessment and Planning Toolkit is a free download on Microsoft's website and is available to everyone. You can download it from the following location:
www.microsoft.com/en-us/download/details.aspx?id=7826
Both tools produce similar results, such as average and maximum utilization values for CPU, memory, disk, network, and other more specific performance counters. Capacity Planner is very customizable, allowing you to add custom performance counters to monitor beyond the standard Windows or application counters. Microsoft Assessment and Planning Toolkit is less customizable, but it includes advanced reporting for Microsoft applications (like SQL Server or SharePoint Server) that are useful if you're looking to virtualize these applications.
The process for using these tools is also similar for both. After running the capacity planning analysis over time, you review the results to understand the actual utilization of your servers. These tools also allow you to produce reports that tell you how many ESXi hosts (or in the case of Microsoft Assessment and Planning Toolkit, Hyper-V hosts, though the results are applicable to ESXi as well) you'll need to support the environment. For example, if you monitor 70 total physical servers, the tools may tell you that, based on the actual utilization of each server, you need only seven total ESXi hosts to support those servers as virtual machines. Your results will vary depending on the actual utilization in your environment.
Capacity planning is such a useful exercise because it tells you the true utilization of your servers before you convert them to virtual machines. Let's say you have a physical server with two CPUs, each with eight cores and 64 GB of RAM, and that server runs Microsoft SQL Server 2012. You might think that because SQL Server is typically an important application, the server must be fully utilized. In reality, many times after a capacity planning exercise you may find that the server really utilizes only two CPU cores and 8 GB of RAM. When you virtualize that server, you can reduce the resources down to what the server actually uses and save resources for other virtual machines.
Whether you're just starting out on your virtualization journey or you're moving on to virtualizing more critical applications, capacity planning will provide valuable information that you can use to properly size your virtual machines. Without performing a capacity planning exercise, you are mostly just guessing at how many ESXi hosts you'll need to support the environment or how to properly size your virtual machines.
NAMING VIRTUAL MACHINES
Choosing the display name for a VM might seem like a trivial assignment, but you must ensure that an appropriate naming strategy is in place. We recommend making the display names of VMs match the hostnames configured in the guest OS being installed. For example, if the intention is to use the name Server1 in the guest OS, then the VM display name should match Server1. If you use spaces in the virtual display name—which is allowed—then using command-line tools to manage VMs becomes a bit tricky because you must quote out the spaces on the command line. In addition, because DNS hostnames cannot include spaces, using spaces in the VM name would create a disparity between the VM name and the guest OS hostname. Ultimately, this means you should avoid using spaces and special characters that are not allowed in standard DNS naming strategies to ensure similar names both inside and outside the VM. Aside from whatever policies might be in place from your organization, this is usually a matter of personal preference.
The display name assigned to a VM also becomes the name of the folder in the VMFS volume where the VM files will live. At the file level, the associated configuration (VMX) and virtual hard drive (VMDK) files will assume the name supplied in the display name text box during VM creation. Refer to Figure 9.15, where you can see that the user-supplied name of win2k12-02 is reused for both the folder name and the filenames for the VM.
FIGURE 9.15 The display name assigned to a VM is used in a variety of places.
SIZING VIRTUAL MACHINE HARD DISKS
The answer to the third question—how big to make the hard disks in your VM—is a bit more complicated. There are many different approaches, but some best practices facilitate the management, scalability, and backup of VMs. First and foremost, you should create VMs with multiple virtual disk files to separate the operating system from the custom user/application data. Separating the system files and the user/application data will make it easier to increase the number of data drives in the future and allow a more practical backup strategy. A system drive of 25 GB to 30 GB, for example, usually provides ample room for installation and continued growth of the operating system. The data drives across different VMs will vary in size because of underlying storage system capacity and functionality, the installed applications, the function of the system, and the number of users who connect to the computer. However, because the extra hard drives are not operating system data, it will be easier to adjust those drives when needed.
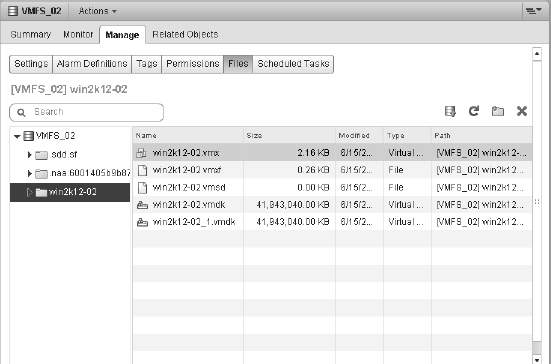
Keep in mind that additional virtual hard drives will pick up on the same naming scheme as the original virtual hard drive. For example, a VM named Server1 that has an original virtual hard disk file named win2k12-02.vmdk will name the new virtual hard disk file win2k12-02_1.vmdk. For each additional file, the last number will be incremented, making it easy to identify all virtual disk files related to a particular VM. Figure 9.16 shows a VM with two virtual hard disks so that you can see how vSphere handles the naming for additional virtual hard disks.
In the next chapter, “Using Templates and vApps,” you'll revisit the process of creating VMs to see how to use templates to implement and maintain an optimal VM configuration that separates the system data from the user/application data. At this point, though, now that you've created a VM, you're ready to install the guest OS into the VM.
FIGURE 9.16 vSphere automatically appends a number to the file-name for additional virtual hard disks.
![]() Real World Scenario
Real World Scenario
PROVISIONING VIRTUAL MACHINES IS NOT THE SAME AS PROVISIONING PHYSICAL MACHINES
You need to approach provisioning VMs differently from the way you provisioned physical machines in the past. After all, didn't underutilized and overprovisioned servers lead you to use visualization to consolidate your workloads?
In the physical world, you provision servers based on the maximum you think that server might ever need throughout its lifetime. Because the intended workload for a server might shift over that lifetime, you probably provision the physical server with more CPU resources and more RAM than it really needs.
In the virtual environment, though, VMs should be provisioned only with the resources they really need. Additional resources can be added later should the workload need them, sometimes with no downtime required.
In the event that you don't make this shift in thinking, you'll end up much like our client who had the same problem. During the early phases of the client's consolidation project, they provisioned VMs with the same level of resources given to physical machines. It wasn't until they ran out of resources in the virtual environment and had a far lower consolidation ratio than anticipated that we convinced them to change their provisioning practices. Once the provisioning practices were changed, the client was able to improve their consolidation ratio without negatively impacting the level of service they were able to provide. Right-sizing your VMs is a good thing!
VIRTUAL MACHINE GRAPHICS
Depending on what kind of virtual machines you're deploying in your environment, you may need to think about graphics performance. For backend systems, such as database systems or email platforms, the graphics performance of the virtual machine is not important and is not something you typically have to worry about. If you're deploying a virtual desktop infrastructure (VDI), however, the graphics performance and capabilities of the virtual machine are likely to be a key consideration.
For VDI solutions like VMware Horizon View, end users no longer run a full desktop or laptop but instead connect to their virtual desktop (running on vSphere) from a variety of end-point devices. These devices could be laptops, desktops, thin or zero clients, or even tablets and smart-phones. The virtual desktop often acts as a complete desktop replacement for end users, so the desktop needs to perform as well as (or better than) the physical hardware that is being replaced.
In order to provide high-end graphics capabilities to virtual machines, vSphere 5.5 supports vSGA, or Virtual Shared Graphics Acceleration. This technology allows you to install graphics cards into your ESXi host and then offload the processing of 3D rendering to the physical graphics cards instead of the host CPUs. This offloading helps to reduce overall CPU utilization by allowing hardware that is purpose-built for rendering graphics to perform the processing.
Though the 3D rendering settings are configured in the settings of a virtual machine, they are intended only for use with VMware Horizon View. If you are using a VDI solution other than Horizon View, speak to the vendor to understand if 3D rendering on vSphere is supported.
Installing a Guest Operating System
A new VM is analogous to a physical computer with an empty hard drive. All the components are there but without an operating system. After creating the VM, you're ready to install a supported guest OS. The following OSes are some of the more commonly installed guest OSes supported by ESXi (this is not a comprehensive list):
- Windows 8 (32-bit and 64-bit)
- Windows 7 (32-bit and 64-bit)
- Windows Vista (32-bit and 64-bit)
- Windows Server 2012 (64-bit)
- Windows Server 2008 R2 (64-bit)
- Windows Server 2008 (32-bit and 64-bit)
- Windows Server 2003 (32-bit and 64-bit)
- Windows Small Business Server 2003
- Windows XP Professional (32-bit and 64-bit)
- Red Hat Enterprise Linux 3/4/5/6 (32-bit and 64-bit)
- CentOS 4/5 (32-bit and 64-bit)
- SUSE Linux Enterprise Server 8/9/10/11 (32-bit and 64-bit)
- Ubuntu Linux (32-bit and 64-bit)
- NetWare 5.1/6.x
- Sun Solaris 10 (32-bit and 64-bit)
- FreeBSD (32-bit and 64-bit)
VIRTUAL MAC SERVERS?
VMware vSphere 5.0 added support for some new guest OSes. Notably, vSphere 5 added support for Apple Mac OS X Server 10.5 and 10.6. This allows you to run Mac OS X Server VMs on your VMware ESXi hosts. However, it's critically important to note that this is supported only when running ESXi on specific models of the Apple Xserve servers.
Installing any of these supported guest OSes follows the same common order of steps for installation on a physical server, but the nuances and information provided during the install of each guest OS might vary greatly. Because of the differences involved in installing different guest OSes or different versions of a guest OS, we won't go into any detail on the actual guest OS installation process. We'll leave that to the guest OS vendor. Instead, we'll focus on guest OS installation tasks that are specific to a virtualized environment.
Working with Installation Media
One beneficial task in a virtual environment that isn't typically required in a virtual environment concerns guest OS installation media. In the physical world, administrators typically put the OS installation media in the physical server's optical drive, install the OS, and then are done with it. Well, in a virtual world, the process is similar, but here's the issue—where do you put the CD when the server is virtual? There are a couple of different ways to handle it. One way is quick and easy, and the second way takes a bit longer but pays off later.
VMs have a few different ways to access data stored on optical disks. VMs can access optical disks in one of three different ways (Figure 9.17 shows the Datastore ISO File option selected):
Client Device This option allows an optical drive local to the computer running the vSphere Web Client to be mapped into the VM. For example, if you are using the vSphere Web Client on your corporate-issued HP laptop, you can simply insert a CD/DVD into your local optical drive and map that into the VM with this option. This is the quick-and-easy method that was referenced above.
Host Device This option maps the ESXi host's optical drive into the VM. VMware administrators would have to insert the CD/DVD into the server's optical drive in order for the VM to have access to the disk.
Datastore ISO File This last option maps an ISO image (see the sidebar “ISO Image Basics”) into the VM. Although using an ISO image typically requires an additional step—creating the ISO image from the physical disk—more and more software is being distributed as an ISO image that can be leveraged directly from within your vSphere environment.
ISO IMAGE BASICS
An ISO image is an archive file of an optical disk. The name is derived from the International Organization for Standardization (ISO) 9660 file system standard used with CD-ROM media, and the ISO format is widely supported by many different software vendors. A variety of software applications can work with ISO images. In fact, most CD-burning software applications for Windows, Linux, and Mac OS X can create ISO images from existing physical disks or burn ISO images to a physical disk.
FIGURE 9.17 VMs can access optical disks physically located on the vSphere Client system, located on the ESXi host, or stored as an ISO image.
ISO images are the recommended way to install a guest OS because they are faster than using an actual optical drive and can be quickly mounted or dismounted with very little effort.
Before you can use an ISO image to install the guest OS, though, you must first put it in a location that ESXi can access. Generally, this means uploading it into a datastore accessible to your ESXi hosts.
Perform these steps to upload an ISO image into a datastore:
- Use the vSphere Web Client to connect to a vCenter Server instance or launch the vSphere Client to connect to an individual ESXi host.
- From the vSphere Web Client menu bar, select Storage.
- Right-click the datastore to which you want to upload the ISO image and select Browse Files from the context menu.
- Select the destination folder in the datastore where you want to store the ISO image. Use the Create A New Folder button (it looks like a folder with a green plus symbol) if you need to create a new folder in which to store the ISO image.
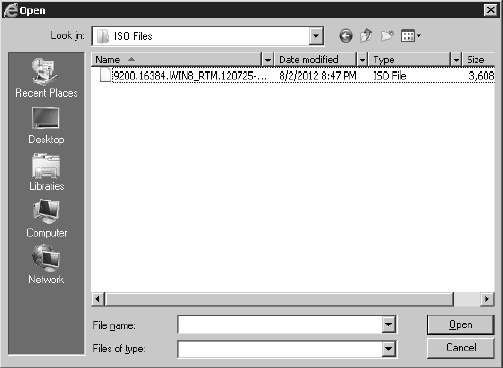
- From the toolbar in the Files screen, click the Upload button (it looks like a disk with a green arrow pointing into the disk). From the dialog box that appears, select the ISO image as shown in Figure 9.18 and click Open.
- The vSphere Web Client uploads the file into the selected folder in that datastore.
After the ISO image is uploaded to an available datastore, you're ready to actually install a guest OS using that ISO image.
FIGURE 9.18 Use the Upload button to upload ISO images for use when installing guest OSes.
Using the Installation Media
Once you have the installation media in place—by using the local CD-ROM drive on the computer where you are running the vSphere Web Client, by using the physical server's optical drive, or by creating and uploading an ISO image into a datastore—you're ready to actually use that installation media to install a guest OS into the VM.
Perform the following steps to install a guest OS using an ISO file on a shared datastore:
- Use the vSphere Web Client to connect to a vCenter Server instance or use the vSphere Client to connect to an individual ESXi host where a VM has been created.
- If you're not already in the Hosts And Clusters or VMs And Templates view, use the menu bar to select Home
 Hosts And Clusters or Home VMs And Templates.
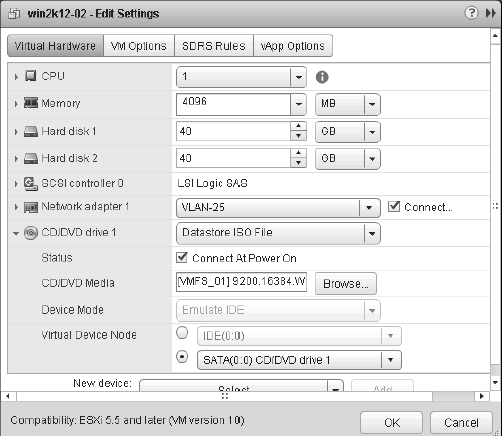
 - In the inventory tree, right-click the new VM, and select the Edit Settings menu option. The Virtual Machine Properties window opens.
- Expand the CD/DVD Drive 1 hardware option to expose the additional properties.
- Change the drop-down box to Datastore ISO File, and select the Connect At Power On check box. If you fail to select the Connect At Power On check box, the VM will not boot from the selected ISO image.
- Click the Browse button to browse a datastore for the ISO file of the guest OS.
- Navigate through the available datastores until you find the ISO file of the guest OS to be installed. After you select the ISO file, the properties page is configured similar to the screen shot shown previously in Figure 9.17.
- Right-click the virtual machine and select Power On from the menu. Alternatively, you can use the Actions drop-down option on the properties page of the virtual machine. The VM boots from the mounted ISO image and begins the installation of the guest OS.
- Right-click the VM, and select the Open Console option. Alternatively, you can use the Open Console option from the properties page of the virtual machine.
- Follow the on-screen instructions to complete the guest OS installation. These will vary depending on the specific guest OS you are installing; refer to the documentation for that guest OS for specific details regarding installation.
VIRTUAL MACHINE GUEST OSES
For a complete list of guest OSes and all respective information regarding installation notes and known issues, refer to the PDF available on the VMware website at www.vmware.com/pdf/GuestOS_guide.pdf (note that this URL is case sensitive).
Working in the Virtual Machine Console
Working within the VM console is like working at the console of a physical system. From here, you can do anything you need to do to the VM: you can access the VM's BIOS and modify settings, you can turn the power to the VM off (and back on again), and you can interact with the guest OS you are installing or have already installed into the VM. We'll describe most of these functions later in this chapter in the sections titled “Managing Virtual Machines” and “Modifying Virtual Machines,” but there is one thing that we want to point out now.
The vSphere Web Client must have a way to know if the keystrokes and mouse clicks you're generating go to the VM or if they should be processed by the vSphere Web Client itself. To do this, it uses the concept of focus. When you click within a VM console, that VM will have the focus: All of the keystrokes and the mouse clicks will be directed to that VM. Until you have VMware Tools installed—a process we'll describe in the very next section, you'll have to manually tell the vSphere Web Client when you want to shift focus out of the VM. To do this, you use the vSphere Web Client's special keystroke: Ctrl+Alt. When you press Ctrl+Alt, the VM relinquishes control of the mouse and keyboard and returns it to the vSphere Web Client. Keep that in mind when you are trying to use your mouse and it won't travel beyond the confines of the VM console window. Just press Ctrl+Alt, and the VM will release control.
Once you've installed the guest OS, you should then install and configure VMware Tools. I discuss VMware Tools installation and configuration in the next section.
![]() Real World Scenario
Real World Scenario
MICROSOFT LICENSING AND WINDOWS ACTIVATION FOR VIRTUAL MACHINES
As the virtualization market has matured, Microsoft has adjusted its licensing practices to reflect that market. In spite of those adjustments—or perhaps because of them—there is still confusion about the virtualization licensing available for the Windows Server operating system. Microsoft has simplified the licensing significantly in Windows Server 2012, reducing the number of versions of the operating system to license. The following list of licensing data is a combination of information from both Microsoft and VMware:
- Microsoft Windows Server licenses are attached to the physical machine, not to the VM. Specifically, the Windows Server 2012 license is attached to the CPUs of the physical server.
- A licensed copy of Windows Server 2012 Datacenter Edition entitles a user to install and run an unlimited number of virtual Windows instances on the physical server to which that license is assigned.
- A licensed copy of Windows Server 2012 Standard Edition grants the user the right to install and run up to two Windows instances per physical CPU on the physical server to which the license is assigned.
- Downgrade rights exist so that a physical server licensed with Windows Server 2012 Datacenter Edition can run unlimited VMs running either Datacenter Edition or Standard Edition. This also applies to running previous versions of Windows Server.
- vMotion, which moves a running VM to a new host, does not violate a Microsoft licensing agreement as long as the target ESXi host is licensed for the post-vMotion number of VMs and you maintain active Software Assurance on your Windows licenses. For example, if an ESXi host named ESXi01 with two physical CPUs has four running instances of Windows in VMs, a second ESXi host named ESXi02 with two physical CPUs has three running instances of Windows in VMs, and each of the physical systems has been assigned a Windows Server 2012 Standard Edition license, then it is within the licensing agreement to perform a vMotion move of one VM from ESXi01 to ESXi02. However, a vMotion move from ESXi02 to ESXi01 would violate the licensing agreement because ESXi01 is licensed to run only up to two virtual instances of Windows per CPU at a time.
Because Microsoft requires Windows Server licenses to be attached to physical hardware, many organizations are choosing to license their physical hardware with Windows Server 2012 Datacenter Edition. This gives the organization the ability to run an unlimited number of Windows Server instances on that hardware, and downgrade or previous version rights allow the organization to use the Standard, Enterprise, or Datacenter Edition of Windows Server 2008 or Standard or Datacenter Edition of Windows Server 2012.
Activation is another area requiring a bit of planning. If your licensing structure for a Windows Server guest OS does not fall under the umbrella of a volume licensing agreement, you will be required to activate the operating system with Microsoft within 60 days of installation. Activation can be done automatically over the Internet or by calling the provided regional phone number. With Windows Server operating systems specifically, the activation algorithm takes into account the hardware specifications of the server. In light of this, when enough hardware changes have been made to significantly change the operating system, Windows requires reactivation. To facilitate the activation process and especially to reduce the possibility of reactivation, you should make adjustments to memory and processors and install VMware Tools prior to performing the activation.
Installing VMware Tools
Although VMware Tools is not installed by default, the package is an important part of a VM. VMware Tools offers several great benefits without any detriments. Recall from the beginning of this chapter that VMware vSphere offers certain virtualization-optimized (or paravirtualized) devices to VMs in order to improve performance. In many cases, these paravirtualized devices do not have device drivers present in a standard installation of a guest OS. The device drivers for these devices are provided by VMware Tools, which is just one more reason why VMware Tools is an essential part of every VM and guest OS installation.
In other words, installing VMware Tools should be standard practice and not a debatable step in the deployment of a VM. The VMware Tools package provides the following benefits:
- Optimized NIC drivers.
- Optimized SCSI drivers.
- Enhanced video and mouse drivers.
- VM heartbeat.
- VSS support to enable guest quiescing for snapshots and backups. Many VMware and third-party applications and tools rely on the VMware Tools VSS integration.
- Enhanced memory management.
VMware Tools also helps streamline and automate the management of VM focus so that you are able to move into and out of VM consoles easily and seamlessly without having to constantly use the Ctrl+Alt keyboard command.
The VMware Tools package is available for Windows, Linux, NetWare, Solaris, and FreeBSD; however, the installation methods vary because of the differences in the guest OSes. In all cases, the installation of VMware Tools starts when you select the option to install VMware Tools from the vSphere Web Client. Do you recall our discussion earlier about ISO images and how ESXi uses them to present CDs/DVDs to VMs? That's exactly the functionality that is being leveraged in this case. When you select to install VMware Tools, vSphere will mount an ISO as a CD/DVD for the VM, and the guest OS will reflect a mounted CD-ROM that has the installation files for VMware Tools.
WHERE ARE THE VMWARE TOOLS ISOS FOUND?
In the event you're curious, you'll find the VMware Tools ISO images located in the /vmimages/tools-isoimages directory on an ESXi host. This directory is visible only if you enable the ESX Shell on your ESXi hosts and then open an SSH connection to the host; it is not visible from the vSphere Web Client. The ISO images are placed there automatically during installation; you do not have to download them or obtain them from the installation CD-ROM, and you do not need to do anything to manage or maintain them.
As we mentioned previously, the exact process for installing VMware Tools will depend upon the guest OS. Because Windows and Linux make up the largest portion of VMs deployed on VMware vSphere in most cases, those are the two examples we'll discuss. First, we'll walk you through installing VMware Tools into a Windows-based guest OS.
Installing VMware Tools in Windows
Perform these steps to install VMware Tools into Windows Server 2012 running as a guest OS in a VM (the steps for other versions of Windows are similar):
- Use the vSphere Web Client to connect to a vCenter Server instance or use the vSphere Client to connect to an individual ESXi host.
- If you aren't already in the Hosts And Clusters or VMs And Templates inventory view, use Home Hosts And Clusters or Home VMs And Templates to navigate to one of these views.
- Right-click the VM in the inventory tree and select Open Console. You can also use the Open Console option on the properties page of the virtual machine.
- If you aren't already logged into the guest OS in the VM, select Send Ctrl-Alt-Delete and log into the guest OS.
- Right-click the virtual machine and select All vCenter Actions Guest OS Install VMware Tools. A dialog box providing additional information appears. Click Mount to mount the VMware Tools ISO and dismiss the dialog box.
HOW DO I GET OUT OF HERE AGAIN?
Remember that before VMware Tools is installed into a guest OS, the ability to seamlessly move into and out of the guest OS in the console doesn't exist. Instead, you must click into the VM console in order to interact with the guest OS. When you are finished, you must press Ctrl+Alt to release the mouse and keyboard. After VMware Tools is installed, this happens automatically for you.
- An AutoPlay dialog box appears, prompting the user for action. Select the option Run Setup64.exe.
If the AutoPlay dialog box does not appear, open Windows Explorer and double-click the CD/DVD drive icon. The AutoPlay dialog box should then appear.
- Click Next on the Welcome To The Installation Wizard For VMware Tools page.
- Select the appropriate setup type for the VMware Tools installation, and click Next.
The Typical radio button will suffice for most situations. The Complete installation option installs all available features, while the Custom installation option allows for the greatest level of feature customization.
- Click Install.
During the installation, you may be prompted one or more times to confirm the installation of third-party device drivers; select Install for each of these prompts.
If the AutoRun dialog box appears again, simply close the dialog box and continue with the installation.
- After the installation is complete, click Finish.
- Click Yes to restart the VM immediately, or click No to manually restart the VM at a later time.
Newer versions of Windows, such as Windows Server 2008, use a different mechanism—a different video driver—to improve the graphical performance of a console session.
Perform the following steps to install this different video driver and improve the graphical console performance:
- From the Start menu, select Run. In the Run dialog box, type devmgmt.msc and click OK. This will launch the Device Manager console.
- Expand the Display Adapters entry.
- Right-click the Standard VGA Graphics Adapter or VMware SVGA II item, and select Update Driver Software.
- Click Browse My Computer For Driver Software.
- Using the Browse button, navigate to
C:Program FilesCommon FilesVMwareDriverswddm_video
and then click Next.
- After a moment, Windows will report that it has successfully installed the driver for the VMware SVGA 3D (Microsoft Corporation – WDDM) device. Click Close.
- Restart the VM when prompted.
After Windows restarts in the VM, you should notice improved performance when using the graphical console. Note that this procedure is no longer required in Windows Server 2012. The VMware SVGA 3D driver is automatically installed along with the VMware Tools installation.
For older versions of Windows, such as Windows Server 2003, you can improve the responsiveness of the VM console by configuring the hardware acceleration setting. It is, by default, set to None; setting this to Maximum provides a much smoother console session experience. The VMware Tools installation routine reminds you to set this value at the end of the installation, but if you choose not to set hardware acceleration at that time, it can easily be set later. This is highly recommended to optimize the graphical performance of the VM's console. (Note that Windows XP has this value set to Maximum by default.)
Perform the following steps to adjust the hardware acceleration in a VM running Windows Server 2003 (or Windows XP, in case the value has been changed from the default):
- Right-click an empty area of the Windows Desktop, and select the Properties option.
- Select the Settings tab, and click the Advanced button.
- Select the Troubleshooting tab.
- Move the Hardware Acceleration slider to the Full setting on the right, as shown in Figure 9.19.
Now that the VMware Tools installation is complete and the VM is rebooted, the system tray displays the VMware Tools icon, the letters VM in a small gray box (Windows Taskbar settings might hide the icon). The icon in the system tray indicates that VMware Tools is installed and operational.
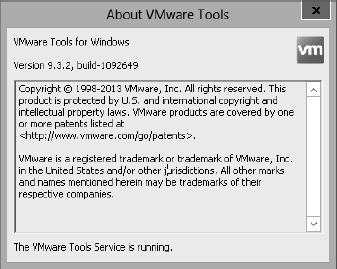
In previous versions of vSphere, double-clicking the VMware Tools icon in the system tray would bring up a set of configurable options. As of vSphere 5.1, that interface has been removed and replaced with the informational screen shown in Figure 9.20. Previously you could configure time synchronization, show or hide VMware Tools from the Taskbar, and select scripts to suspend, resume, shut down, or turn on a VM.
VMware now provides a command-line-based tool, called VMwareToolboxCmd.exe, that will allow you to configure these settings. You can access VMwareToolboxCmd.exe by launching a command prompt and browsing to the installation directory of VMware Tools.
As with previous versions of VMware Tools, time synchronization between the guest OS and the host is disabled by default. You'll want to use caution when enabling time synchronization between the guest OS and the ESXi host because Windows domain members rely on Kerberos for authentication and Kerberos is sensitive to time differences between computers. A Windows-based guest OS that belongs to an Active Directory domain is already configured with a native time synchronization process against the domain controller in its domain that holds the PDC Emulator operations master role. If the time on the ESXi host is different from the time on the PDC Emulator operations master domain controller, the guest OS could end up moving outside the 5-minute window allowed by Kerberos. When the 5-minute window is exceeded, Kerberos will experience errors with authentication and replication.
FIGURE 9.19 Changing the hardware acceleration feature of a Windows guest OS is a common and helpful adjustment for improving mouse performance.
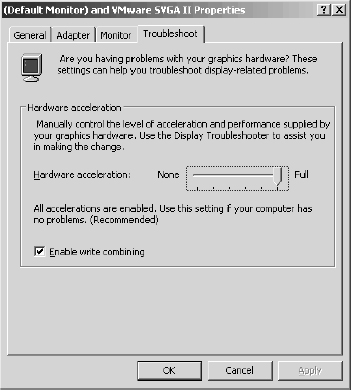
FIGURE 9.20 As of vSphere 5.1, you can no longer configure properties in VMware Tools by interacting with the icon in the system tray.
You can take a few different approaches to managing time synchronizations in a virtual environment. The first approach involves not using VMware Tools time synchronization and relying instead on the W32Time service and a PDC Emulator with a Registry edit that configures synchronization with an external time server. Another approach involves disabling the native time synchronization across the Windows domain and then relying on the VMware Tools feature. A third approach might be to synchronize the VMware ESXi hosts and the PDC Emulator operations master with the same external time server and then to enable the VMware Tools option for synchronization. In this case, both the native W32Time service and VMware Tools should be adjusting the time to the same value.
VMware has a couple of Knowledge Base articles that contain the latest recommendations for timekeeping. For Windows-based guest OS installations, refer to http://kb.vmware.com/kb/1318 or refer to the document “Timekeeping in Virtual Machines” at the following location:
www.vmware.com/files/pdf/Timekeeping-In-VirtualMachines.pdf
CONFIGURING NTP ON ESXI
If you do choose to synchronize the guest OS to the ESXi host using VMware Tools, be sure to synchronize the ESXi host to an authoritative time source using NTP. Refer to Chapter 2, “Planning and Installing VMware ESXi” for more information on how to configure ESXi to synchronize with an NTP-based time server.
We've shown you how to install VMware Tools into a Windows-based guest operation system, so now we'd like to walk through the process for a Linux-based guest OS.
Installing VMware Tools in Linux
There are a number of different versions (or distributions) of Linux available and supported by VMware vSphere, and while they are all called “Linux,” they do have subtle differences from one distribution to another that make it difficult to provide a single set of steps that would apply to all Linux distributions. In this section, we'll use Novell SuSE Linux Enterprise Server (SLES) version 11, a popular enterprise-focused distribution of Linux, as the basis for describing how to install VMware Tools in Linux.
Perform the following steps to install VMware Tools into a VM running the 64-bit version of SLES 11 as the guest OS:
- Use the vSphere Web Client to connect to a vCenter Server instance or use the vSphere Client to connect to an individual ESXi host.
- You will need access to the console of the VM onto which you're installing VMware Tools. Right-click the VM and select Open Console.
- Log into the Linux guest OS using an account with appropriate permissions. This will typically be the root account or an equivalent (some Linux distributions, including Ubuntu, disable the root account but provide an administrative account you can use).
- Right-click the virtual machine and choose All vCenter Actions Guest OS Install VMware Tools. Click Mount on the dialog box that pops up.
- Assuming that you have a graphical user environment running in the Linux VM, a file system browser window will open to display the contents of the VMware Tools ISO that was automatically mounted behind the scenes.
- Open a Linux terminal window. In many distributions, you can right-click a blank area of the file system browser window and select Open In Terminal.
- If you are not already in the same directory as the VMware Tools mount point, change directories to the location of the VMware Tools mount point using the following command (the exact path may vary from distribution to distribution and from version to version; this is the path for SLES 11):
cd /media/VMware Tools
- Extract the compressed TAR file (with the .tar.gz filename extension) to a temporary directory, and then change to that temporary directory using the following commands:
tar -zxf VMwareTools-9.3.2-1092649.tar.gz -C /tmp
cd /tmp/vmware-tools-distrib
- In the /tmp/vmware-tools-distrib directory, use the sudo command to run the vmware-i nstall.pl Perl script with the following command:
sudo ./vmware-install.pl
Enter the current account's password when prompted.
- The installer will provide a series of prompts for information such as where to place the binary files, where the init scripts are located, and where to place the library files. Default answers are provided in brackets; you can just press Enter unless you need to specify a different value that is appropriate for this Linux system.
- After the installation is complete, the VMware Tools ISO will be unmounted automatically. You can remove the temporary installation directory using these commands:
cd
rm -rf /tmp/vmware-tools-distrib
- Reboot the Linux VM for the installation of VMware Tools to take full effect.
The steps described here were performed on a VM running Novell SLES 11 64-bit. Because of variations within different distributions of Linux, the commands you may need to install VMware Tools within another distribution may not match what we've listed here. However, these steps do provide a general guideline of what the procedure looks like.
VMWARE TOOLS FOR LINUX
When installing VMware Tools to a Linux guest OS, the path to the TAR file and the numbers in the TAR filename will vary. Depending upon your Linux distribution, the VMware Tools installer may also provide instructions on replacing the Ethernet driver with an updated VMXNet driver. Typically, these instructions involve unloading the older drivers, scanning for new devices, loading the new VMXNet driver, and then bringing the network interfaces back up.
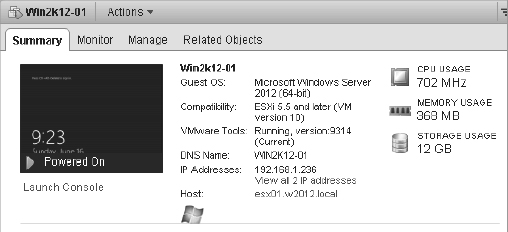
After VMware Tools is installed, the Summary tab of a VM object identifies the status of VMware Tools as well as other information such as operating system, CPU, memory, DNS (host)name, IP address, and current ESXi host. Figure 9.21 shows a screen shot of this information for the Windows Server 2012 VM into which we installed VMware Tools earlier.
FIGURE 9.21 You can view details about VMware Tools, DNS name, IP address, and so forth from the Summary tab of a VM object.
In the event you are upgrading to vSphere 5.5 from a previous version of VMware vSphere, you will have outdated versions of VMware Tools running in your guest OSes. You'll want to upgrade these in order to get the latest drivers. In Chapter 4, “vSphere Update Manager and the vCenter Support Tools,” we discuss the use of vSphere Update Manager to assist in this process, but you can also do it manually.
For Windows-based guest OSes, the process of upgrading VMware Tools is as simple as right-clicking a VM and selecting All vCenter Actions ![]() Guest OS
Guest OS ![]() Upgrade VMware Tools. Select the option labeled Automatic Tools Upgrade, and click OK. vCenter Server will install the updated VMware Tools and automatically reboot the VM, if necessary.
Upgrade VMware Tools. Select the option labeled Automatic Tools Upgrade, and click OK. vCenter Server will install the updated VMware Tools and automatically reboot the VM, if necessary.
For other guest OSes, upgrading VMware Tools typically means running through the install process again. You can refer to the instructions for installing VMware Tools on SLES previously in this chapter, for example, for information on upgrading VMware Tools in a Linux VM.
Creating VMs is just one aspect of managing VMs. In the next sections we look at some additional VM management tasks.
Managing Virtual Machines
In addition to creating VMs, there is a range of other tasks that vSphere administrators will need to perform. While most of these tasks are relatively easy to figure out, we include them here for completeness.
Adding or Registering Existing VMs
Creating VMs from scratch, as described previously, is only one way of getting VMs into the environment. It's entirely possible that you, as a vSphere administrator, might receive pre-created VMs from another source. Suppose you receive the files that compose a VM—notably, the VMX and VMDK files—from another administrator and you need to put that VM to use in your environment. You've already seen how to use the vSphere Web Client-based file browser to upload files into a datastore, but what needs to happen once it's in the datastore? In this case, you need to register the VM. The process of registering the VM adds it to the vCenter Server (or ESXi host) inventory and allows you to then manage the VM.
Perform the following steps to add (or register) an existing VM into the inventory:
- Use the vSphere Web Client to connect to a vCenter Server instance or use the vSphere Client to connect to an individual ESXi host.
- A VM can be registered from a number of different views within the vSphere Web Client. The Storage inventory view, though, is probably the most logical place to do it. Navigate to the Storage inventory view by using the menu bar or the navigation bar.
- Right-click the datastore containing the VM you want to register. From the context menu, select Register VM as shown in Figure 9.22.
- Use the file browser to navigate to the folder where the VMX file for the VM resides. Select the correct VMX file and click OK.
FIGURE 9.22 You invoke the Register Virtual Machine Wizard by right-clicking the datastore and selecting Register VM.
- The Register Virtual Machine Wizard prepopulates the name of the VM. It does this by reading the contents of the VMX file. Accept the name or type a new one; then select a logical location within the inventory and click Next.
- Choose the cluster on which you'd like to run this VM and click Next.
- If you selected a cluster for which VMware DRS is not enabled or is set to Manual, you must also select the specific host on which the VM will run. Choose a specific host and click Next.
- Review the settings. If everything is correct, click Finish; otherwise, use the hyperlinks on the left side of the wizard or the Back button to go back and make any necessary changes.

When the Register Virtual Machine Wizard is finished, the VM will be added to the vSphere Web Client inventory. From here, you're ready to manipulate the VM in whatever fashion you need, such as powering it on.
Changing VM Power States
There are six different commands involved in changing the power state of a VM. Figure 9.23 shows these six commands on the context menu displayed when you right-click a VM and select All vCenter Actions ![]() Power.
Power.
FIGURE 9.23 The Power submenu allows you to power on, power off, suspend, or reset a VM as well as interact with the guest OS if VMware Tools is installed.
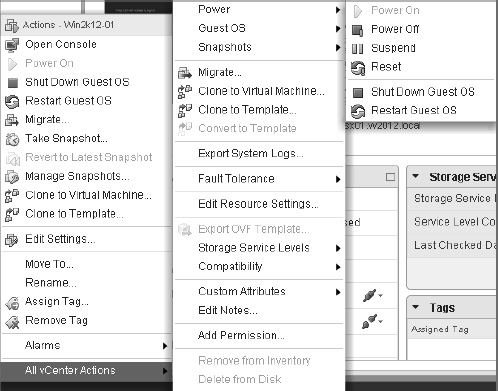
By and large, these commands are self-explanatory, but there are a few subtle differences in some of them:
Power On and Power Off These function exactly as their names suggest. They are equivalent to toggling the virtual power button on the VM without any interaction with the guest OS (if one is installed).
BE CAREFUL WITH POWER OFF
Although the behavior of the Power Off option can be configured in the Virtual Machine Properties dialog box—see the VM Options tab under the settings for each virtual machine—our testing showed that the default value of Power Off (which is Shut Down Guest) still did not behave in the same manner as the actual Shut Down Guest command. Instead, the Power Off command simply turned off power and did not invoke an orderly shutdown of the guest OS.
Suspend This command suspends the VM. When you resume the VM, it will start back right where it was when you suspended it.
Reset This command will reset the VM, which is not the same as rebooting the guest OS. This is the virtual equivalent of pressing the Reset button on the front of the computer.
Shut Down Guest OS This command works only if VMware Tools is installed, and it works through VMware Tools to invoke an orderly shutdown of the guest OS. To avoid file system or data corruption in the guest OS instance, you should use this command whenever possible.
Restart Guest OS Like the Shut Down Guest command, this command requires VMware Tools and initiates a reboot of the guest OS in an orderly fashion.
Removing VMs
If you have a VM that you need to keep but doesn't need to be listed in the VM inventory, you can remove the VM from the inventory. This keeps the VM files intact, and the VM can be re-added to inventory (i.e., registered) at any time later on using the procedure described earlier in the section titled “Adding or Registering Existing VMs.”
To remove a VM, simply right-click a powered-off VM and from the context menu, select All vCenter Actions ![]() Remove From Inventory. Select Yes in the Confirm Remove dialog box and the VM will be removed from the inventory. You can use the vSphere Web Client file browser to verify that the files for the VM are still intact in the same location on the datastore.
Remove From Inventory. Select Yes in the Confirm Remove dialog box and the VM will be removed from the inventory. You can use the vSphere Web Client file browser to verify that the files for the VM are still intact in the same location on the datastore.
Deleting VMs
In the event you have a VM that you no longer need at all—meaning you don't need it listed in the inventory and you don't need the files maintained on the datastore—you can completely remove the VM. Be careful, though; this is not something that you can undo!
To delete a VM entirely, you only need to right-click a powered-off VM and select All vCenter Actions ![]() Delete From Disk from the context menu. The vSphere Web Client will prompt you for confirmation, reminding you that you are deleting the VM and its associated base disks (VMDK files). Click Yes to continue removing the files from both inventory and the datastore. Once the process is done, you can once again use the vSphere Web Client file browser to verify that the VM's files are gone.
Delete From Disk from the context menu. The vSphere Web Client will prompt you for confirmation, reminding you that you are deleting the VM and its associated base disks (VMDK files). Click Yes to continue removing the files from both inventory and the datastore. Once the process is done, you can once again use the vSphere Web Client file browser to verify that the VM's files are gone.
Adding existing VMs, removing VMs from inventory, and deleting VMs are all relatively simple tasks. The task of modifying VMs, though, is significant enough to warrant its own section.
Modifying Virtual Machines
Just as physical machines require hardware upgrades or changes, a VM might require virtual hardware upgrades or changes to meet changing performance demands. Perhaps a new memory-intensive client-server application requires an increase in memory, or a new data-mining application requires a second processor or additional network adapters for bandwidth-heavy FTP traffic. In each of these cases, the VM requires a modification of the virtual hardware configured for the guest OS to use. Of course, this is only one task that an administrator charged with managing VMs could be responsible for completing. Other tasks might include leveraging vSphere's snapshot functionality to protect against a potential issue with the guest OS inside a VM. We describe both of these tasks in the following sections, starting with how to change the hardware of a VM.
Changing Virtual Machine Hardware
In most cases, modifying a VM requires that the VM be powered off. There are exceptions to this rule, as shown in Figure 9.24. You can hot-add a USB controller, a SATA controller, an Ethernet adapter, a hard disk, or a SCSI device. Later you'll see that some guest OSes also support the addition of virtual CPUs or RAM while they are powered on as well.
FIGURE 9.24 Users can add some types of hardware while the VM is powered on. If virtual hardware cannot be added while the VM is powered on, the operation will fail.
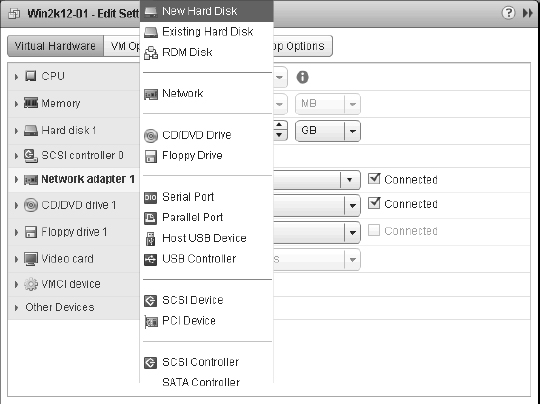
When you're adding new virtual hardware to a VM using the vSphere Web Client, the screens are similar to the screens used while creating a VM. For example, to add a new virtual hard disk to an existing VM, you would use the New Device drop-down box at the bottom of the Virtual Machine Edit Settings dialog box. You can see in Figure 9.24 that it is possible to add a virtual hard disk to a VM while it is powered on. From there, the vSphere Web Client uses the same steps shown in Figure 9.11, Figure 9.12, and Figure 9.13 earlier in this chapter. The only difference is that now you're adding a new virtual hard disk to an existing VM. As an example, we'll go through the steps to add an Ethernet adapter to a VM (the steps are the same regardless of whether the VM is actually running).
Perform the following steps to add an Ethernet adapter to a VM:
- Launch the vSphere Web Client, and connect to a vCenter Server instance or use the vSphere Client to connect to an individual ESXi host.
- If you aren't already in an inventory view that displays VMs, switch to the Hosts And Clusters or VMs And Templates view using the Home Inventories menu.
- Right-click the VM to which you want to add the Ethernet adapter, and select Edit Settings.
- Select the New Device drop-down box at the bottom of the screen and select Network. Click the Add button next to the New Device drop-down box to add the Ethernet adapter to the virtual machine.
- Expand the New Network option to gain access to additional properties.
- Select the network adapter type, the network to which it should be connected, and whether the network adapter should be connected at power on, as shown in Figure 9.25.
FIGURE 9.25 To add a new network adapter, you must select the adapter type, the network, and whether it should be connected at power on.
- Review the settings, and click OK.
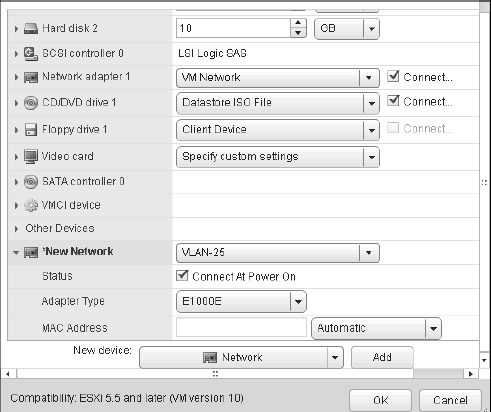
Besides adding new virtual hardware, users can make other changes while a VM is powered on. For example, you can mount and unmount CD/DVD drives, ISO images, and floppy disk images while a VM is turned on. We described the process for mounting an ISO image as a virtual CD/DVD drive earlier in this chapter in the section titled “Installing a Guest Operating System.” You can also assign and reassign adapters to virtual networks while a VM is running. All of these tasks are performed from the VM Properties dialog box, accessed by selecting Edit Settings from the Context menu for a VM.
DOES ANYONE STILL USE FLOPPY DRIVES?
New VMs created in a vSphere environment automatically come with a floppy drive, although in our experience it is rarely used. In fact, about the only time that it does get used is when a custom storage driver needs to be added during installation of a Windows-based guest OS. Unless you know you will need to use a floppy drive, it's generally safe to remove it from the hardware list.
If you are running Windows Server 2008, Windows Server 2008 R2, or Windows Server 2012 in the VM, then you also gain the ability to add virtual CPUs or RAM to a VM while it is running. To use this functionality, you'll have to first enable it. In a somewhat ironic twist, the VM for which you want to enable hot-add must be powered off.
To enable hot-add of virtual CPUs or RAM, perform these steps:
- Launch the vSphere Web Client if it is not already running, and connect to a vCenter Server instance or use the vSphere Client to connect to an individual ESXi host.
- Navigate to either the Hosts And Clusters or VMs And Templates inventory view.
- If the VM for which you want to enable hot-add is currently running, right-click the VM and select All vCenter Actions Power Shut Down Guest. The VM must be shut down in order to enable hot-add functionality.
REMEMBER THE DIFFERENCE BETWEEN POWERING OFF AND SHUTTING DOWN THE GUEST
Recall from earlier in this chapter that the context menu of a VM contains two items that appear to perform the same function.
The Power
 Power Off command does exactly that: It powers off the VM. It's like pulling out the power cord unexpectedly. The guest OS has no time to prepare for a shutdown.
The Power
Shut Down Guest OS command issues a shutdown command to the guest OS so that the guest OS can shut down in an orderly fashion. This command requires that VMware Tools be already installed, and it ensures that the guest OS won't be corrupted or damaged by an unexpected shutdown.In day-to-day operation, use the Shut Down Guest OS option. The Power Off option should be used only when it is absolutely necessary.
- Right-click the VM and select Edit Settings.
- In the Virtual Hardware tab, select CPU to expand the available options. Select the Enable CPU Hot Add check box in the CPU Hot Plug option.
- To enable memory hot-add, select Memory to expand the available options. Select the Enable check box in the Memory Hot Plug option to enable hot-plug memory.
- Click OK to save the changes to the VM.
Once this setting has been configured, you can add RAM or virtual CPUs to the VM when it is powered on. Figure 9.26 shows a powered-on VM that has memory hot-add enabled. Figure 9.27 shows a powered-on VM that has CPU hot-plug enabled; you can change the number of virtual CPU sockets, but you can't change the number of cores per virtual CPU socket.
Aside from the changes described so far, configuration changes to a VM can take place only when the VM is in a powered-off state. When a VM is powered off, all the various configuration options are available to change: RAM, virtual CPUs, or adding or removing other hardware components such as CD/DVD drives or floppy drives.
FIGURE 9.26 The range of memory you can add is restricted when using memory hot-add.
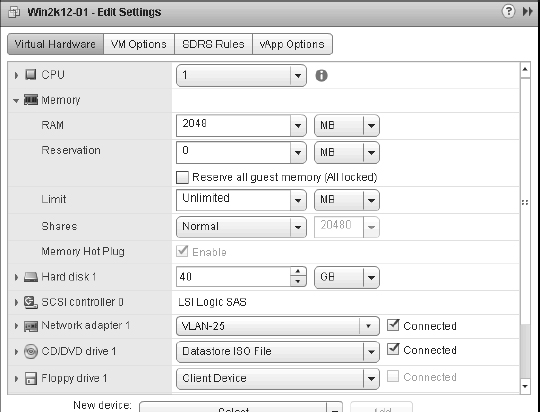
FIGURE 9.27 With CPU hot-plug enabled, more virtual CPU sockets can be configured, but the number of cores per CPU cannot be altered.
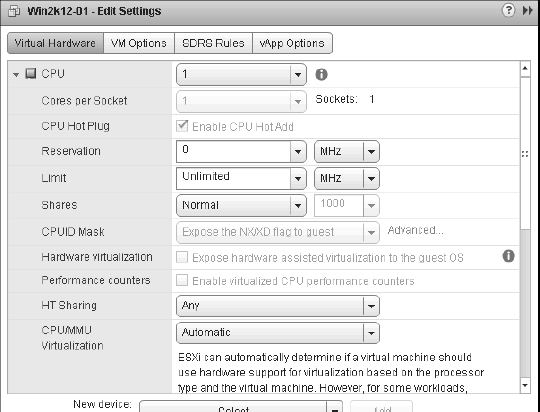
ALIGNING VIRTUAL MACHINE FILE SYSTEMS
In Chapter 6, we introduced the concept of aligning VMFS, and we suggested that the VM's file system should also be aligned. If you construct VMs with separate virtual hard drives for the operating system and data, then you are most concerned with the alignment of the file system for the data drive because the greatest amount of I/O occurs on that drive. For example, a VM with Disk 0 (that holds the operating system) and a blank disk called Disk 1 (that holds data that will incur significant I/O) should have Disk 1 aligned. The need to align the guest file system is applicable to almost all distributions of Linux and all but the most recent versions of Windows. For example, Windows 7 and Windows Server 2008 align themselves properly during installation, but earlier versions do not.
Perform the following steps to align Disk 1 of a VM running a version of Windows earlier than Windows Server 2008:
- Log into the VM using an account with administrative credentials.
- Open a command prompt, and type Diskpart.
- Type list disk, and press Enter.
- Type select disk 1, and press Enter.
- Type create partition primary align = 64, and press Enter.
- Type assign letter =X, where Xis an open letter that can be assigned.
- Type list part to verify the 64 KB offset for the new partition.
- Format the partition.
Perhaps you are thinking that this seems like a tedious task to perform for all your VMs. It is a tedious task; however, the benefit of doing this is realized most when there is a significant I/O requirement.
As you can see, running your operating system in a VM offers advantages when it comes time to reconfigure hardware, even enabling such innovative features as CPU hot-plug. There are other advantages to using VMs too; one of these advantages is a vSphere feature called snapshots.
Using Virtual Machine Snapshots
VM snapshots provide administrators with the ability to create point-in-time checkpoints of a VM. The snapshot captures the state of the VM at a specific point in time. VMware administrators can then revert to their pre-snapshot state in the event the changes made since the snapshot should be discarded. Or, if the changes should be preserved, the administrator can commit the changes and delete the snapshot.
This functionality can be used in a variety of ways. Suppose you'd like to install the latest vendor-supplied patch for the guest OS instance running in a VM but you want to be able to recover in case the patch installation runs amok. By taking a snapshot before installing the patch, you can revert to the snapshot in the event the patch installation doesn't go well. You've just created a safety net for yourself.
OTHER FEATURES LEVERAGE SNAPSHOTS TOO
Snapshots are leveraged by vSphere Update Manager and are also used by various VM backup frameworks.
Before starting to use snapshots, be aware that vSphere FT—discussed in Chapter 7, “Ensuring High Availability and Business Continuity”—does not support snapshots, so you can't take a snapshot of a VM that is protected with vSphere FT. Earlier versions of vSphere did not allow Storage vMotions to occur when a snapshot was present, but this limitation is removed in vSphere 5.
Perform the following steps to create a snapshot of a VM:
- Use the vSphere Web Client to connect to a vCenter Server instance or use the vSphere Client to connect to an individual ESXi host.
- Navigate to either the Hosts And Clusters or VMs And Templates inventory view.
- Right-click the VM in the inventory tree and select Take Snapshot.
- Provide a name and description for the snapshot, as shown in Figure 9.28, and then click OK.
FIGURE 9.28 Providing names and descriptions for snapshots is an easy way to manage multiple historical snapshots.
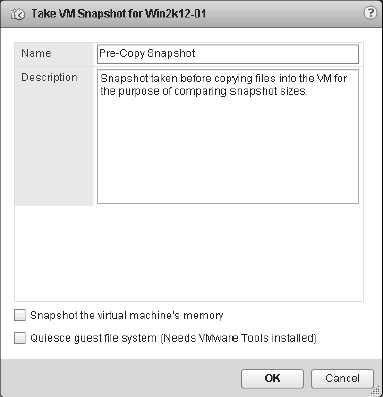
As shown in Figure 9.28, there are two options when taking snapshots:
- The option labeled Snapshot The Virtual Machine's Memory specifies whether the RAM of the VM should also be included in the snapshot. When this option is selected, the current contents of the VM's RAM are written to a file ending in a .vmsn filename extension.
- The option labeled Quiesce Guest File System (Needs VMware Tools Installed) controls whether the guest file system will be quiesced—or quieted—so that it is considered consistent. This can help ensure that the data within the guest file system is intact in the snapshot.
When a snapshot is taken, depending on the previous options, some additional files are created on the datastore, as shown in Figure 9.29.
FIGURE 9.29 When a snapshot is taken, some additional files are created on the VM's datastore.
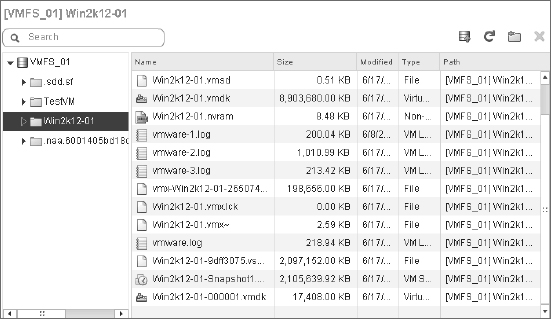
It is a common misconception for administrators to think of snapshots as full copies of VM files. As you can clearly see in Figure 9.29, a snapshot is not a full copy of a VM. VMware's snapshot technology consumes minimal space while still reverting to a previous snapshot by allocating only enough space to store the changes rather than making a full copy.
To demonstrate snapshot technology and illustrate its behavior (for practice only), we performed the following steps:
- We created a VM with a default installation of Windows Server 2012 with a single hard drive (recognized by the guest OS as drive C:). The virtual hard drive was thin provisioned on a VMFS volume with a maximum size of 40 GB.
- We took a snapshot named FirstSnap.
- We added approximately 3 GB of data to drive C:, represented as win2k12-01.vmdk.
- We took a second snapshot named SecondSnap.
- We once again added approximately 3 GB of data to drive C:, represented as win2k12-01.vmdk.
Review Table 9.2 for the results we recorded after each step. Note that these results were recorded as part of our example and may differ from your results if you perform a similar test.
TABLE 9.2: Snapshot demonstration results
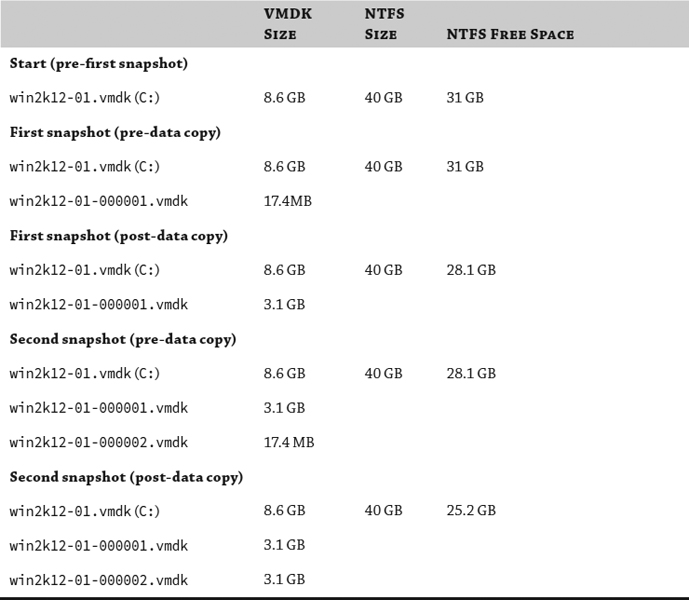
As you can see from Table 9.2, the VM is unaware of the presence of the snapshot and the extra VMDK files that are created. ESXi, however, knows to write changes to the VM's virtual disk to the snapshot VMDK, properly known as a delta disk (or a differencing disk). These delta disks start small and over time grow to accommodate the changes stored within them.
Despite the storage efficiency that snapshots attempt to maintain, over time they can eat up a considerable amount of disk space. Therefore, use them as needed, but be sure to remove older snapshots on a regular basis. Also be aware there are performance ramifications to using snapshots. Because disk space must be allocated to the delta disks on demand, ESXi hosts must update the metadata files (files with the .sf filename extension) every time the differencing disk grows. To update the metadata files, LUNs must be locked, and this might adversely affect the performance of other VMs and hosts using the same LUN.
To view or delete a snapshot or revert to an earlier snapshot, you use the Snapshot Manager.
Perform the following steps to access the Snapshot Manager:
- Use the vSphere Web Client to connect to a vCenter Server instance or use the vSphere Client to connect to an individual ESXi host.
- In the inventory tree, right-click the name of the VM, and from the context menu select Manage Snapshots.
- Select the appropriate snapshot to fall back to, as shown in Figure 9.30, and then click the Revert To button.
FIGURE 9.30 The Snapshot Manager can revert to a previous snap-shot, but all data written since that snapshot was taken and that hasn't been backed up elsewhere will be lost.
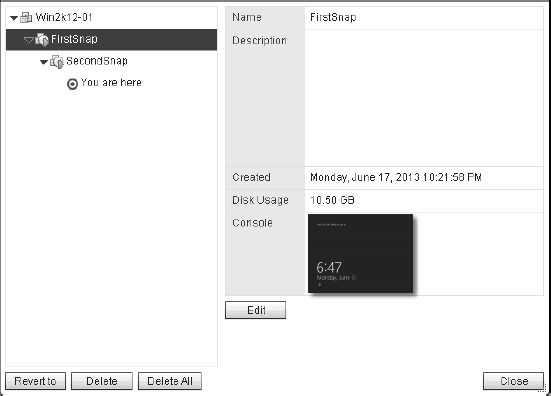
To further illustrate the nature of snapshots, see Figure 9.31 and Figure 9.32. Figure 9.31 shows the file system of a VM running Windows Server 2012 after data has been written into two new folders named temp1 and temp2. Figure 9.32 shows the same VM but after reverting to a snapshot taken before that data was written. As you can see, it's as if the new folders never even existed. (And yes, we can assure you we didn't just delete the folders for these screen shots. Test it yourself!)
FIGURE 9.31 This VM running Windows Server 2012 has had some data placed into two temporary folders.
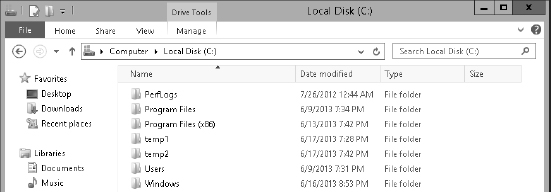
Reverting to a snapshot incurs a loss of data. Any data that was written since the snapshot has occurred will no longer be available, along with any applications that were installed since the snapshot was taken. Therefore, revert to snapshots only if you have determined that the loss of data is acceptable or if the data is backed up elsewhere.
FIGURE 9.32 The same VM, after reverting to a snapshot taken before the temporary folders were created, no longer has any record of the data.
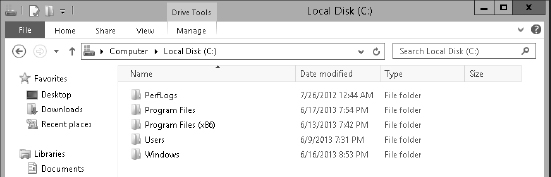
As you can see, snapshots are a great way to protect yourself from unwanted changes to the data stored in a VM. Snapshots aren't backups and should not be used in place of backups. However, they can protect you from misbehaving application installations or other processes that might result in data loss or corruption.
There are additional VM management tasks that we'll discuss in other chapters. For example, you might want to migrate a VM from one ESXi host to another ESXi host using vMotion; this is covered in Chapter 12. Changing a VM's resource allocation settings is covered in Chapter 11.
In the next chapter, we'll move from creating and managing VMs to streamlining the VM provisioning process with templates, OVF templates, and vApps. While VMware makes the VM provisioning process pretty easy, we'll show you how using templates can simplify server provisioning even more while bringing some consistency to your VM and guest OS deployments.
The Bottom Line
Create a virtual machine. A VM is a collection of virtual hardware pieces, like a physical system—one or more virtual CPUs, RAM, video card, SCSI devices, IDE devices, floppy drives, parallel and serial ports, and network adapters. This virtual hardware is virtualized and abstracted from the underlying physical hardware, providing portability to the VM.
Master It Create two VMs, one intended to run Windows Server 2012 and a second intended to run SLES 11 (64-bit). Make a list of the differences in the configuration that are suggested by the Create New Virtual Machine Wizard.
Install a guest operating system. Just as a physical machine needs an operating system, a VM also needs an operating system. vSphere supports a broad range of 32-bit and 64-bit operating systems, including all major versions of Windows Server, Windows 7, Windows XP, and Windows 2000 as well as various flavors of Linux, FreeBSD, Novell NetWare, and Solaris.
Master It What are the three ways in which a guest OS can access data on a CD/DVD, and what are the advantages of each approach?
Install VMware Tools. For maximum performance of the guest OS, it needs to have virtualization-optimized drivers that are specially written for and designed to work with the ESXi hypervisor. VMware Tools provides these optimized drivers as well as other utilities focused on better operation in virtual environments.
Master It A fellow administrator contacts you and is having a problem installing VMware Tools. This administrator has selected the Install/Upgrade VMware Tools command, but nothing seems to be happening inside the VM. What could be the cause of the problem?
Manage virtual machines. Once a VM has been created, the vSphere Web Client makes it easy to manage. Virtual floppy images and CD/DVD drives can be mounted or unmounted as necessary. vSphere provides support for initiating an orderly shutdown of the guest OS in a VM, although this requires that VMware Tools be installed. VM snapshots allow you to take a point-in-time “picture” of a VM so that administrators can roll back changes if needed.
Master It What are the three different ways an administrator can bring the contents of a CD/DVD into a VM?
Master It What is the difference between the Shut Down Guest command and the Power Off command?
Modify virtual machines. vSphere offers a number of features to make it easy to modify VMs after they have been created. Administrators can hot-add certain types of hardware, like virtual hard disks and network adapters, and some guest OSes also support hot-adding virtual CPUs or memory, although this feature must be enabled first.
Master It Which method is preferred for modifying the configuration of a VM: editing the VMX file or using the vSphere Web Client?
Master It Name the types of hardware that cannot be added while a VM is running.