
Chapter 10
Using Templates and vApps
Creating VMs manually and installing guest operating systems (guest OSes) into those VMs is fine on a small scale, but what if you need to deploy lots of VMs? What if you need to ensure that your VMs are consistent and standardized? Through vCenter Server, VMware vSphere offers a solution: VM cloning and templates. In this chapter, we'll show you how to use cloning, templates, and vApps to help streamline the deployment of VMs in your environment.
In this chapter, you will learn to
- Clone a VM
- Create a VM template
- Deploy new VMs from a template
- Deploy a VM from an Open Virtualization Format (OVF) template
- Export a VM as an OVF template
- Work with vApps
Cloning VMs
If you've ever wished there were a faster way to provision a new server into your environment, then you'll be glad to know that VMware vSphere fulfills that wish in a big way. When you are using vCenter Server in your environment, you have the ability to clone a VM; that is, you can make a copy of the VM, including the VM's virtual disks. How does this help provision new VMs faster? Think about it: What takes the most time when creating a new VM? It's not the creation of the VM itself, because that takes only minutes. It's the installation of the guest OS—whether it is Windows Server, Linux, or some other supported guest OS—that takes up the bulk of the time needed to create a new VM. Using vCenter Server to clone a VM—which means also cloning the VM's virtual disks—keeps you from having to install the guest OS into the cloned VM. By cloning VMs, you eliminate the need to perform a guest OS installation into every new VM.
THE FIRST GUEST OS INSTALLATION IS STILL NEEDED
We mentioned in the text that cloning a VM eliminates the need to perform a guest OS installation into every new VM. That's true—assuming you actually installed the guest OS into the VM that you're cloning. As you consider using VM cloning to help provision new VMs, recognize that you still need to install the guest OS into your source VM. Some things just can't be eliminated!
However, there's a potential problem here: If you are making a clone of a guest OS installation, that means you'll now have two VMs with the same IP address, same computer name, same MAC address, and so forth. Not to worry, though: VMware built the ability to customize the guest OS installation in the cloned VM so that you preserve the guest OS installation but create a new identity in the cloned VM. For Linux-based guest OSes, VMware leverages open-source tools to customize the installation; for Windows-based guest OSes, vCenter Server will leverage Microsoft's well-known Sysprep tool. However, depending on the version of Windows you're cloning, you may need to first install Sysprep on the vCenter Server computer.
Installing Sysprep on the vCenter Server
To customize Windows-based guest OS installations, vCenter Server leverages Microsoft's Sysprep tool. If you aren't familiar with Sysprep, the purpose of the tool is to allow a single Windows installation to be cloned many times over, each time with a unique identity. This ensures that you have to install Windows only once, but you can reuse that Windows installation over and over again, each time using Sysprep to create a new computer name, new IP address, and new security identifier (SID).
In order for vCenter Server to use Sysprep, an administrator must first extract Sysprep and its associated files to a directory created during the installation of vCenter Server. If these files are not extracted before you deploy a VM, the ability to customize the guest OS will be unavailable for all versions of Windows prior to Windows Server 2008. (Windows Server 2008 does not require Sysprep to be installed on the vCenter Server computer). Figure 10.1 shows the Guest Customization page of the Clone Existing Virtual Machine Wizard on a vCenter Server that has not had the Sysprep files extracted.
FIGURE 10.1 If the Sysprep files are not extracted and stored on the vCenter Server system, you might not be able to customize the guest OS when you clone a VM.
Perform these steps to allow guest OS customization of Windows Server 2003 x86 (32-bit) guest OS templates:
- Insert the Windows Server 2003 x86 CD into the disk drive of the vCenter Server computer.
- Navigate to the /support/tools/deploy.cab directory on the Windows Server 2003 CD.
- If the vCenter Server computer is running Windows Server 2003, copy the sysprep.exe and setupcl.exe files to this directory:
C:Documents and SettingsAll UsersApplication DataVMwareVMware
VirtualCentersysprepsvr2003
If the vCenter Server computer is running Windows Server 2008 or later, then this is the correct path to use:
C:ProgramDataVMwareVMware VirtualCenterSysprepsvr2003
Repeat these steps for other platforms (use the svr2003-64 folder for customizing 64-bit installations of Windows Server 2003 or the xp and xp-64 folders for customizing installations of Windows XP and Windows XP 64-bit, respectively). As mentioned previously, customizing installations of Windows Server 2008 and later does not require a version of Sysprep to be installed on the vCenter Server computer.
Once you've installed the Sysprep tools for the appropriate versions of Windows (where applicable), you're ready to start cloning and customizing VMs. Before you clone your first VM, though, we recommend that you take the time to create a customization specification, as described in the next section.
Creating a Customization Specification
vCenter Server's customization specification works hand in hand with the tools for customizing VM clones (Sysprep for VMs with a Windows-based guest OS, open-source tools for a VM with a Linux-based guest OS). As you'll see later in this chapter in the section “Cloning a Virtual Machine,” the administrator has to provide vCenter Server with the information necessary to give the cloned VM its own unique identity. This includes the IP address, passwords, computer name, and licensing information. With customization specification, an administrator provides all the information only once and then applies it as needed when cloning a VM.
You can create a customization specification in the following two ways:
- By creating it during the process of cloning a VM
- By using the Customization Specification Manager in vCenter Server
We'll show you how to create a customization specification while cloning a VM in the section “Cloning a Virtual Machine.” For now, we'll show you how to use the Customization Specification Manager.
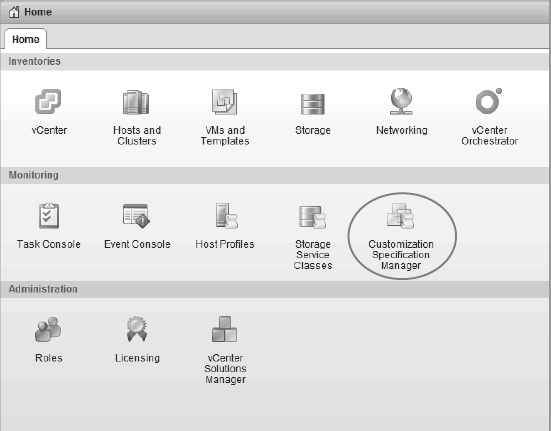
To access the Customization Specification Manager, within the vCenter Web Client select Home ![]() Customization Specification Manager, as you see in Figure 10.2.
Customization Specification Manager, as you see in Figure 10.2.
After you're in the Customization Specification Manager area of vCenter Server, you can create a new customization specification or edit an existing customization specification. The process is almost identical, and in both cases it involves the New VM Guest Customization Wizard.
Perform the following steps to create a new customization specification:
- If the vSphere Web Client isn't already running, launch it and connect to a vCenter Server instance. (This functionality is available only when connecting to vCenter Server, not a stand-alone ESXi host.)
- Navigate to the Customization Specification Manager by selecting Home
 Customization Specification Manager.
FIGURE 10.2 The Customization Specification Manager is readily accessible from the home page of the vSphere Web Client in the Management tab.
- Click the first icon to create a new customization specification. This opens the vSphere Web Client Guest Customization Wizard.
- From the Target Virtual Machine OS drop-down box, select either Windows or Linux. Windows is the default.
- Provide a name for the customization specification and, optionally, a description. Click Next to continue.
- Supply a value for both Name and Organization (you won't be able to proceed until you supply both). Click Next to proceed.
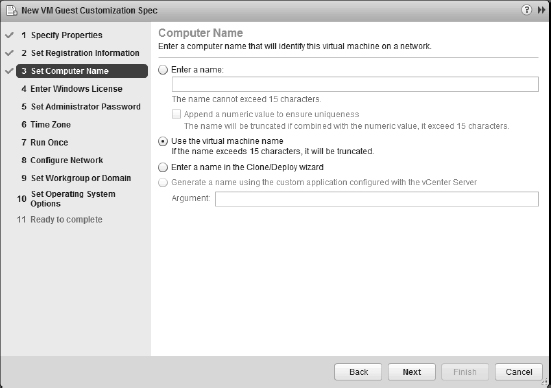
- Select an option for the computer name within the Windows guest OS installation.
There are four options from which to select:
- You can manually supply a name, but this option is useless without also selecting Append A Numeric Value To Ensure Uniqueness.
- Select Use The Virtual Machine Name to set the computer name within the guest OS installation to the same value as the name of the VM.
- Choose Enter A Name In The Clone/Deploy Wizard if you want to be prompted for a name when you use this customization specification.
- The fourth option uses a custom application configured with vCenter Server. Because there is no custom application configured with this instance of vCenter Server, it is currently disabled (grayed out).
We generally recommend selecting Use The Virtual Machine Name. This keeps the guest OS computer name matched up with the VM name, as we recommended when creating new VMs in Chapter 9, “Creating and Managing Virtual Machines.” Figure 10.3 shows the four options.
FIGURE 10.3 The Guest Customization Wizard offers several different options for naming a cloned VM.
After you select the option you want to use in this customization specification, click Next.
- Provide a Windows product key and select the appropriate server licensing mode (Per Seat or Per Server). Click Next.
- Enter the password for the Windows Administrator account and then confirm the password.
If you'd like to log on automatically as Administrator (perhaps to help with any automated configuration scripts), select Automatically Log On As The Administrator and specify how many times to log on automatically. Click Next to continue.
- Select the correct time zone and click Next.
- If you have any commands you want to run the first time a user logs on, supply those commands at the Run Once screen of the vSphere Web Client Windows Guest Customization Wizard. Click Next if you have no commands to run or when you are finished entering commands to run.
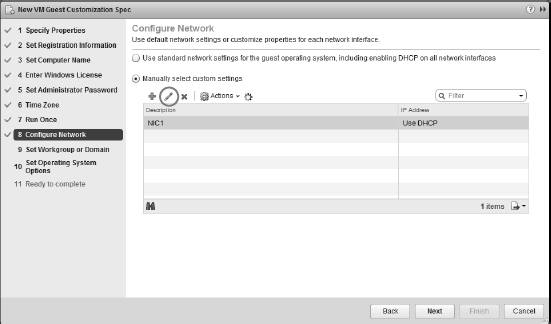
- Choose the settings you'd like to apply to the network configuration:
- If you want to use DHCP to assign an IP address to the VM's network interfaces, select Typical Settings.
- If you want to assign a static IP address to any of the network interfaces, you'll need to select Custom Settings, and the wizard will prompt you to input that information. Many administrators don't want to use DHCP but still want to ensure that each VM has a unique IP address. To see how this can be done in the customization specification, select Custom Settings and click Next.
- At the Configure Network screen, click the small pencil above the description field of the NIC1 line. In Figure 10.4 this button is circled for your reference. This will open the Edit Network dialog box shown in Figure 10.5.
FIGURE 10.4 This small button allows you to customize the network interface settings.
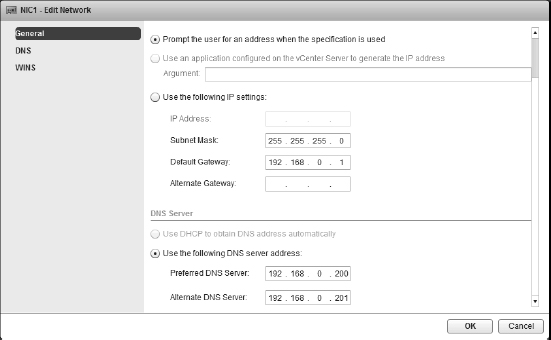
FIGURE 10.5 The Edit Network dialog box has an option to prompt the user for an address.
The key to assigning a static IP address to cloned VMs without having to modify the customization specification every time lies in the selection titled Prompt The User For An Address When The Specification Is Used. When you select this option, vCenter Server will prompt the user to supply a unique static IP address every time the specification is used when cloning a VM.
Select Prompt The User For An Address When The Specification Is Used. You must then supply a subnet mask, default gateway, and preferred and alternate DNS servers. Fill in these values, click OK, and then click Next.
- Select whether you want the Windows-based guest OS to join a workgroup or a domain.
If the guest OS should join a workgroup, supply the workgroup name. If the guest should join a domain, supply the domain name and credentials to join the domain. Click Next.
- Generally speaking, you will want to leave Generate New Security ID (SID) selected. Click Next.
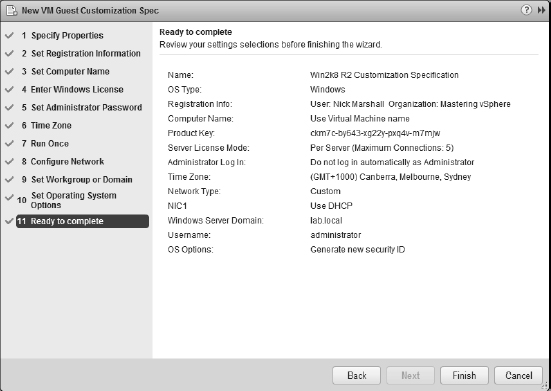
- Review the settings in the final screen of the vSphere Web Client Windows Guest Customization Wizard to ensure that you have the right values supplied.
If you need to change anything, use the hyperlinks on the left or the Back button to go back and change the values. Otherwise, click Finish to complete the creation of the customization specification.
Because a customization specification for Windows usually contains product keys, you'll probably need to create multiple specifications for different versions or editions of Windows. Repeat the previous steps to create additional specifications.
![]() Real World Scenario
Real World Scenario
IMPORTING, EXPORTING, AND CLONING SPECIFICATIONS
When we were helping a customer migrate to a new vSphere environment, they didn't wish to set up their large number of customization specifications from scratch. We used vSphere's ability to export, import, and clone to save all the additional effort.
Within the Customization Specification Manager, there are icons to import from a file, to export to a file, and to clone the selected specification. While you can transfer specifications between environments using these tools, you will lose some of the saved sensitive information such as product keys. You can simply add this information back to the specification after importing it.
Now that you have a customization specification in place and the Sysprep tools installed on the vCenter Server computer (if you are cloning a Windows version earlier than Windows Server 2008), all you need is a source VM with a guest OS installed and you're ready to clone and customize a VM.
CUSTOMIZATION SPECIFICATIONS AREN'T REQUIRED
You aren't required to create customization specifications. However, you will be required to supply the information found in a customization specification when you clone a VM. Because you have to enter the information anyway, why not do it only once by creating a customization specification?
Cloning a Virtual Machine
If you've performed all the steps in the previous two sections, then cloning a VM is actually simple.
Perform the following steps to clone a VM:
- If the vSphere Web Client isn't already running, launch it and connect to an instance of vCenter Server. Cloning isn't possible when connecting directly to an ESXi host.
- Navigate to either the Hosts And Clusters or VMs And Templates inventory view.
- Right-click a VM and select Clone to Virtual Machine. This opens the Clone Existing Virtual Machine Wizard.
- Supply a name for the VM and select a logical inventory location for the VM. Click Next.
- Select the host or cluster on which the VM will run. Click Next.
- If you selected a cluster for which DRS is not enabled or is configured in Manual mode, you must select the specific host on which to run the VM. Click Next.
- If prompted, select the resource pool in which the VM should be placed. Click Next.
- Select the desired virtual disk format and select a target datastore or datastore cluster. Use the Advanced button if you want or need to place the VM's configuration files in a different location than the virtual hard disks. Click Next to continue.
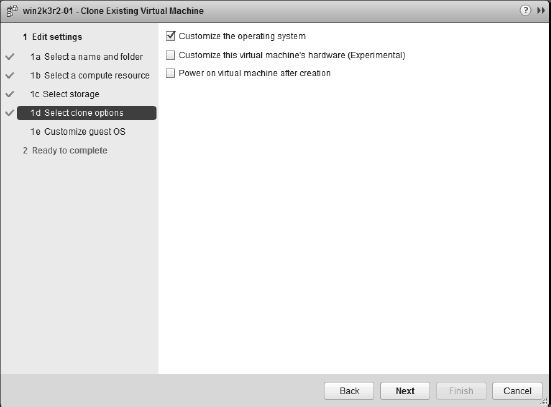
- At this point the Clone Existing Virtual Machine Wizard is prompting you for guest customization options, as shown in Figure 10.6.
If you want to use a customization specification that you already created, you would select Customize The Operating System. In this case, we want to show you how to create a specification while cloning the VM, so select Customize The Operating System and click Next.
- Click the Create a Specification icon and the Guest Customization Spec Wizard opens.
This is the same wizard you used to create the customization specification in the section “Creating a Customization Specification.” Refer back to that section for the specific details to use as you walk through the sections of this wizard.
- At the end of the Guest Customization Spec, as shown in Figure 10.7 the specification is saved for later use.
FIGURE 10.6 The Clone Virtual Machine Wizard offers several options for customizing the guest OS.
FIGURE 10.7 Your guest OS customizations as a specification are saved for later use, even if created in the middle of the VM cloning wizard.
You've now seen both ways to create a customization specification within the vSphere Web Client.
- Click Finish to complete the guest customization process and return to the Clone Existing Virtual Machine Wizard, select the newly created specification and then click Next.
- Review the settings for cloning the VM. If any of the settings are incorrect, use the Back button or the hyperlinks on the left to go back to the appropriate section and make any desired changes. Otherwise, click Finish to start the VM cloning process.
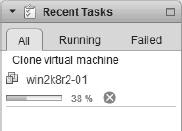
When the VM cloning process kicks off, the vSphere Web Client will show a new active task in the Recent Tasks area, as shown in Figure 10.8. From here, you can monitor the progress of the cloning operation.
FIGURE 10.8 The cloning task in the vSphere Web Client provides feedback on the current status of the VM cloning operation.
Once the cloning is complete, you can power on the VM. Note that the guest OS customization won't begin until you power on the VM. After you power on the VM and the guest OS loads, the vSphere Web Client will kick in and start the guest customization process. Depending on the guest OS, it may take at least one reboot before the customization process is complete.
CLONING RUNNING VMS
It's possible to clone even powered-on VMs! The context menu of a VM provides a Clone option that allows you to make a copy of the VM. The Clone To New Virtual Machine option from the Commands list on a VM summary page accomplishes the same task. These commands are available for VMs that are powered off as well as VMs that are powered on. Keep in mind that unless you customize the guest OS, an exact copy of the original VM will be made. This could be especially useful when you're looking to create a test environment that mirrors a live production environment.
As you can see, cloning VMs—which may take only a few minutes, depending upon the size of the VM and your infrastructure—is a much faster way of deploying new VMs than manually creating the VM and installing the guest OS.
Through VM cloning, administrators can create a library of “gold VM images,” master copies of VMs that have certain settings and a particular guest OS installed. The only problem with this approach is that these VMs, which are intended to serve as master copies and not be changed, can still be powered on and modified. This potential shortcoming is addressed through VM templates within vCenter Server. We'll show you how templates work in the next section.
Creating Templates and Deploying Virtual Machines
In a vSphere environment, what would traditionally take several hours to do is now reduced to a matter of minutes. In this chapter, you've already seen how you can quickly and easily spin up new VMs with VM cloning and customization specifications, complete with the guest OS already installed. The templates feature of vCenter Server builds on this functionality to help you roll out new VMs quickly and easily with limited administrative effort while protecting the master VMs from inadvertent changes.
YOU'LL NEED VCENTER SERVER FOR THIS FEATURE
Because templates leverage cloning to deploy new VMs, it's possible to use templates only when you are using vCenter Server to manage your ESXi hosts.
vCenter Server offers two different options for creating templates: Clone To Template and Convert To Template. In both cases, you'll start with a VM that already has an instance of a guest OS installed. As the name suggests, the Clone To Template feature copies this initial VM to a template format, leaving the original VM intact. Similarly, the Convert To Template feature takes the initial VM and changes it to template format, thereby removing the ability to perform power operations on the VM without converting back to VM format. Using either approach, once the VM is in template format, that template cannot be powered on or have its settings edited. It's now in a protected format that prevents administrators from inadvertently or unintentionally modifying the “gold image” from which other VMs are deployed.
When considering which VMs you should convert to templates, remember that the idea behind a template is to have a pristine system configuration that can be customized as needed for deployment to the target environment. Any information stored on a VM that becomes a template will become part of the new system that is deployed from that template. If you have VMs that are critical servers for production environments that have applications installed, those are not good candidates for becoming templates. The best VMs to use for templates are VMs that have a new, clean installation of the guest OS and any other base components.
In fact, we recommend creating a new VM specifically for use as a template or creating the template from a VM as soon after creation as possible. This ensures that the template is as pristine as possible and that all VMs cloned from that template will start out the same way.
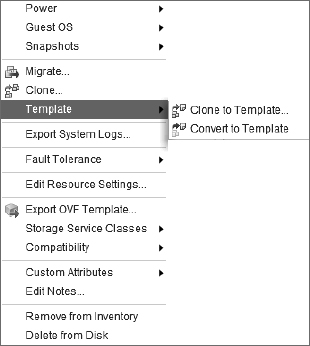
You can convert a VM to a template using the context menu of the VM or the Convert To Template link in the Commands list. Figure 10.9 shows two ways an existing VM can be changed into a template format. Because templates cannot be modified, to make changes or perform updates to a template you must first convert the template back to a VM, then update it, and finally convert it back to a template. Note that the Convert To Template command is grayed out if the VM is currently powered on. To use the Convert To Template command, the VM must be powered off.
FIGURE 10.9 Users can either convert a VM to a template or clone the VM to a template.
Cloning a Virtual Machine to a Template
The Clone To Template feature provides the same result as the conversion method in creating a template that can be deployed as a new VM, but it differs from the conversion method in that the original VM remains intact. By leaving the original VM in a format that can be turned on, the Clone To Template feature facilitates making updates to the template. This means you don't have to store the template object definition in the same datastore from which the VM was built.
Perform these steps to clone a VM into a template format:
- Use the vSphere Web Client to connect to a vCenter Server instance. Cloning and templates are not supported when using the vSphere Client to connect directly to an ESXi host.
- Navigate to the Hosts And Clusters or VMs And Templates inventory view.
Either view allows you to clone to a template, but you'll only be able to see the template in the VMs And Templates inventory view.
- Right-click the VM to be used as a template, and select All vCenter Actions Template Clone To Template.
- Type a name for the new template in the Template Name text box, select a logical location in the inventory to store the template, and then click Next.
- Select the host or cluster where the template should be hosted, and click Next.
- If you selected a cluster for which DRS is disabled or is configured for Manual operation, you must select a specific host in the cluster. Click Next.
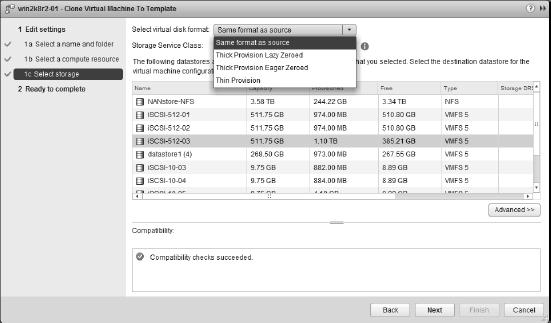
- At the top of the next screen, shown in Figure 10.10, select the disk format for the template.
FIGURE 10.10 vCenter Server offers four options for storing a template's virtual disks.
Four options are available for the template's disk format:
- The Same Format As Source option keeps the template's virtual disks in the same format as the VM that is being cloned.
- Thick Provision Lazy Zeroed means that the space is fully allocated when the virtual disk is created but the space is not zeroed out upon creation.
- Thick Provision Eager Zeroed also allocates all space on creation and also zeroes all the space out before it can be used. This format is required for use with vSphere FT.
- Thin Provision format commits space on demand, meaning that the virtual disks will occupy only as much space as is currently used by the guest OS.
- If you have defined any VM storage policies, choose the appropriate storage policy from the Storage Service Class drop-down list. If VM storage policies haven't been enabled or none are defined, this drop-down list is disabled (grayed out). Click Next to continue.
- Review the template configuration information, and click Finish.
YOU DON'T CUSTOMIZE TEMPLATES
You'll note that you didn't have an option to customize the template. The guest OS customization occurs when you deploy VMs from a template, not when you create the template itself. Remember that templates can't be powered on, and guest OS customization requires that the VM be powered on.
Templates have a different icon than the one used to identify a VM in the vCenter Server inventory. The template objects are available by clicking a datacenter object and then selecting the Virtual Machines tab or by adjusting the inventory view to the VMs And Templates view.
Deploying a Virtual Machine from a Template
After you have created a library of templates, provisioning a new VM is as simple as right-clicking the template you'd like to use as the base system image.
Perform these steps to deploy a VM from a template:
- Use the vSphere Web Client to connect to a vCenter Server instance. Cloning and templates are not supported when using the vSphere Client to connect directly to an ESXi host.
- Locate the template object to be used as the VM baseline. You will find the template object in the VMs And Templates inventory view.
- Right-click the template object and select Deploy Virtual Machine From This Template. This launches the Deploy From Template Wizard.
- Type a name for the new VM in the VM's Name text box, select a logical location in the inventory to store the VM, and then click Next.
- Select the cluster or host on which the VM should run, and then click Next.
- If you selected a cluster for which DRS is not enabled or is configured to operate in Manual mode, you must select the specific host on which to run the VM. Click Next.
- If prompted, select the resource pool in which the VM should be located and click Next.
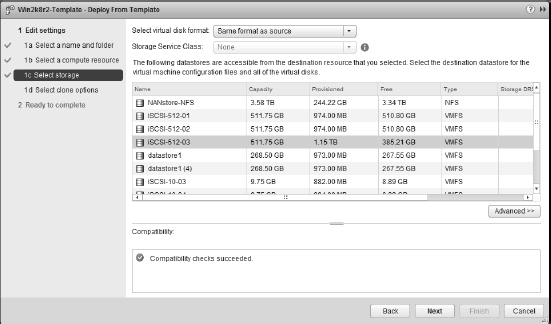
- Select the desired virtual disk format for the VM to be created from the template.
- If you have defined any VM storage policies, choose the appropriate storage policy from the VM Storage policy drop-down list, then select the destination datastore or datastore cluster. Use the Advanced button (shown in Figure 10.11 but not selected) if you need to place VM configuration files and virtual disks in separate locations.
FIGURE 10.11 Select a datastore for a new VM based on the vMotion, DRS, HA, and other constraints of your organization.
- Select how you want to customize the guest OS.
You can use an existing customization specification by selecting Customize Using An Existing Customization Specification, or you can select Customize Using The Customization Wizard to supply the customization information interactively. We've shown you both options already. In this case, let's use the specification you created earlier, so select Customize Using An Existing Customization Specification and select the specification you created earlier. Click Next.
DON'T SELECT DO NOT CUSTOMIZE
We do not recommend selecting Do Not Customize. This will result in a VM that has the same guest OS and network configuration as the original template. While this might not cause any problems the first time you deploy from this template, it will almost assuredly cause problems for future deployments.
The only instance in which selecting Do Not Customize is applicable is if you have already taken steps within the guest OS installation (such as running Sysprep in a VM with a Windows-based guest OS) before converting it to a template.
- Because the customization specification you created earlier was created with the option to prompt the user for the static IP address to be assigned to the guest OS, the Deploy From Template Wizard now prompts you for the IP address. Enter the IP address you want to assign to this VM and click Next. If the customization had been configured to use DHCP, the wizard would skip this step.
- Review the template deployment information.
If you need to make changes, use the hyperlinks or the Back button to go back. Otherwise, click Finish to start the VM deployment from the template.
vCenter Server will proceed to copy all the files that compose the template into a new location on the selected datastore. The first time the new VM is powered on, vCenter Server will kick in and perform the customization according to the values stored in the customization specification or the values you entered in the Guest Customization Wizard. Aside from those changes, the new VM will be an exact copy of the original template. By incorporating the latest patches and updates in your templates, you can thus be sure that your cloned VMs are up to date and consistent.
Templates are a great way to help standardize the configuration of your VMs while also speeding up the deployment of new VMs. Unfortunately, vCenter Server doesn't make it possible for you to transport a template between vCenter Server instances or between different installations of VMware vSphere. To help address that limitation, VMware helped develop a new industry standard: the Open Virtualization Format (OVF) standard.
Using OVF Templates
Open Virtualization Format (formerly called Open Virtual Machine Format) is a standard format for describing the configuration of a VM. While originally pioneered by VMware, other virtualization vendors now support OVF as well. VMware vSphere 5 provides OVF support in two different ways:
- Deploying new VMs from an OVF template (essentially, importing a VM in OVF format)
- Exporting a VM as an OVF template
Let's look first at deploying VMs from an OVF template.
Deploying a VM from an OVF Template
The first way to work with OVF templates is to deploy a VM from an OVF template by simply right-clicking a host, cluster, datacenter, or vCenter Server and selecting Deploy OVF Template. This initiates a wizard that walks you through deploying a new VM from the OVF template. Figure 10.12 shows that vCenter Server can deploy OVF templates stored locally as well as OVF templates that are stored remotely and are accessible with a URL.
FIGURE 10.12 vCenter Server uses a wizard to deploy templates from OVF.
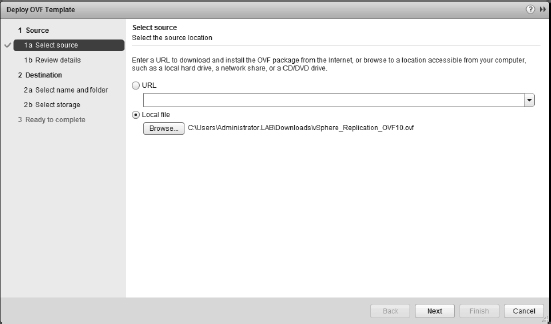
Aside from selecting the source location of the OVF template, the process of deploying a VM from an OVF template is the same regardless of whether you are importing from a local set of files or downloading it across the Internet.
Perform the following steps to deploy a VM from an OVF template:
- If it is not already running, launch the vSphere Web Client and connect to a vCenter Server instance or an ESXi host.
- From within the vSphere Web Client Hosts And Clusters view, right-click a host and select Deploy OVF Template.
- Select the source location of the OVF template—which must be provided in OVF or OVA format—and click Next.
OVF OR OVA?
Later in this chapter, in the section “Examining OVF Templates,” we'll provide more information on the difference between OVF and OVA.
- The OVF Template Details screen summarizes the information about the template. Click Next to continue.
- Click the Accept button to accept the end user license agreement, and click Next.
- Supply a name for the new VM you're deploying from the OVF template, and select a location within the vCenter Server inventory.
This is a logical location, not a physical location; you'll select the physical location (where the new VM will run and where the virtual hard disk files will be stored) in the next step.
- Select a cluster, an ESXi host, or a resource pool where the new VM will run, and then click Next.
- If you selected a cluster for which vSphere DRS is not enabled or is set to Manual, you must select a specific host on which to run the VM. Select an ESXi host and click Next.
- Choose the datastore or datastore cluster where you want to store the new VM.
If you are unsure of how much space the new VM requires, the OVF Template Details screen, described in step 4, shows how much space the VM requires. Click Next after you've selected the datastore you want to use.
- Select the virtual disk format you want to use for the new VM.
Click Next after selecting a disk format.
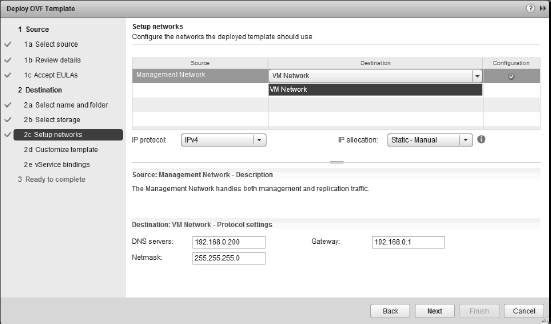
- Map each source network defined in the OVF template to a destination network in vCenter Server.
The destination networks are port groups or dvPort groups, as you can see in Figure 10.13. For more information about port groups, see Chapter 5, “Creating and Configuring Virtual Networks.”
FIGURE 10.13 Source networks defined in the OVF template are mapped to port groups and dvPort groups in vCenter Server.
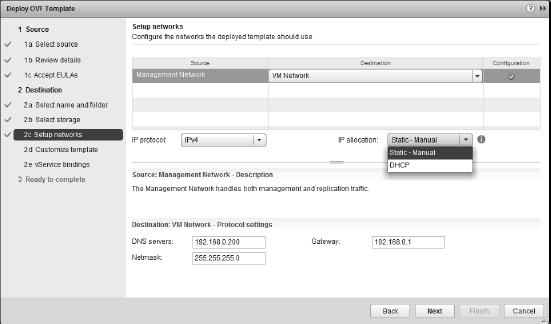
- Some OVF templates will ask you to confirm how IP addresses should be assigned to the new VM, as you can see in Figure 10.14. Select the option you prefer (Static - Manual or DHCP) and click Next.
FIGURE 10.14 vSphere administrators have different options for controlling how new VMs are deployed from OVF templates and assigned an IP address.
SELECTING THE CORRECT IP ALLOCATION POLICY
Generally, you will select either Static - Manual or DHCP from the IP allocation drop-down list. The Transient option requires specific configurations to be enabled within vCenter Server (IP pools created and configured) as well as support within the guest OS inside the OVF template. This support usually takes the form of a script or an executable application that sets the IP address.
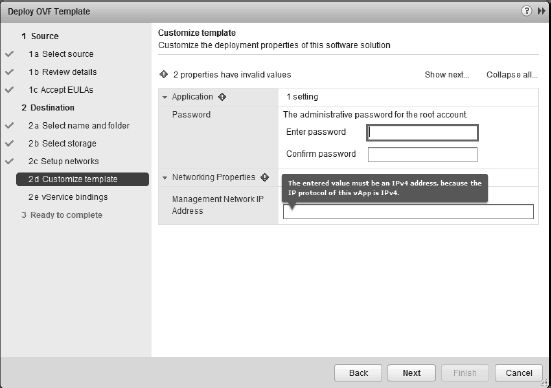
- Some OVF templates will now prompt the user to input certain properties that will be used by the new VM.
For example, if you selected Static - Manual as the IP address allocation mechanism in step 12, you would be prompted to assign an IP address in this step as illustrated in Figure 10.15. Supply the correct value, and then click Next to continue.
- The Ready To Complete screen summarizes the actions to be taken while deploying the new VM from the OVF template. If everything is correct, click Finish; if anything is incorrect, use the Back button to go back and make the correct selection.
Once the deployment of the new VM from the OVF template is complete, the new VM is treated like any other VM in the inventory. You can power it on, power it off, clone it, or snapshot it—refer to Chapter 9 for more details on these tasks.
The other way vCenter Server allows you to work with OVF is to export a VM as an OVF template.
FIGURE 10.15 The Deploy OVF Template Wizard provides a warning if properties have invalid values assigned.
Exporting a VM as an OVF Template
In addition to providing the ability to deploy new VMs from an OVF template, vCenter Server lets you export an existing VM as an OVF template. This functionality could be used in a number of different ways:
- Creating a template that could be transported between multiple vCenter Server instances
- Transporting a VM from one vSphere installation to another vSphere installation
- Transporting a VM to or from a different hypervisor that supports the OVF standard
- Allowing a software vendor to package its product as a VM and easily distribute it to customers
Whatever your reason for exporting a VM as an OVF template, the process is relatively straightforward.
Perform these steps to export a VM as an OVF template:
- If it is not already running, launch the vSphere Web Client and connect to a vCenter Server instance or an ESXi host.
- From within the vSphere Web Client, locate the VM you wish to export.
- Right-click the VM and select Export OVF Template. This opens the Export OVF Template dialog box.
- Supply a name for the OVF template, select a directory where the OVF template will be stored, and choose the format:
- The Folder Of Files (OVF) format puts the separate components of an OVF template—the manifest (MF) file, the structural definition (OVF) file, and the virtual hard disk (VMDK) file—as separate files in a folder.
- The Single File (OVA) format combines the separate components into a single file. You might find this format easier to transport or distribute.
- Supply a description for the OVF template.
- When you are ready to begin the export, click OK.
- The selected VM is exported to the chosen directory as an OVF template.
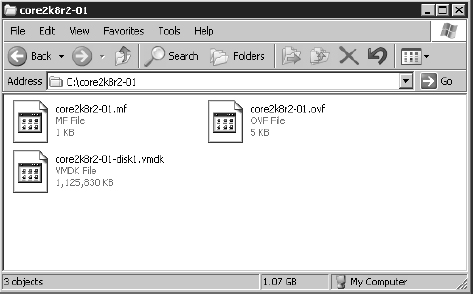
Figure 10.16 shows a VM that was exported as an OVF template in OVF (Folder of Files) format, so that you can see the different components.
FIGURE 10.16 This VM exported as an OVF template shows the different components of the template.
Once the VM has been successfully exported as an OVF template, you can use the steps in “Deploying a VM from an OVF Template” to import that VM back into a VMware vSphere implementation.
Before we move away from the topic of OVF templates, Let's take a quick look at the structure and components that make up an OVF template.
Examining OVF Templates
In Figure 10.16, we showed you the different files that make up an OVF template. In this example, three files make up the OVF template that you exported out of vCenter Server:
- The name of the manifest file ends in .mf and the file contains SHA-1 digests of the other two files. This allows vCenter Server (and other applications that support the OVF specification) to verify the integrity of the OVF template by computing the SHA-1 digests of the other files in the package and comparing them against the SHA-1 digests in the manifest file. If the digests match, then the contents of the OVF template have not been modified.
WHAT PROTECTS THE MANIFEST?
The manifest contains SHA-1 digests to help an application verify that the components of the OVF template have not been modified. But what protects the manifest? The OVF specification lets you use an optional X.509 digital certificate that can verify the integrity of the manifest file as well.
- The OVF descriptor is an XML document, with a filename ending in .ovf, that contains information about the OVF template such as product details, virtual hardware, requirements, licensing, a full list of file references, and a description of the contents of the OVF template. Listing 10.1 shows the partial contents of the OVF descriptor for the VM we exported from vCenter Server in the previous section. (We've added backslashes () where a line has been manually wrapped to help with the readability of the OVF descriptor.)
- The virtual hard disk file has a filename ending in .vmdk. The OVF specification supports multiple virtual hard disk formats, not just the VMDK files used by VMware vSphere, but obviously vCenter Server and VMware ESXi only natively support virtual hard disks in the VMDK format. Depending on the OVF template, it may contain multiple VMDK files, all of which would need to be referenced in the OVF descriptor file (refer to the <DiskSection> in the OVF descriptor file in Listing 10.1).
LISTING 10.1: Partial contents of a sample OVF descriptor file
<?xml version="1.0" encoding="UTF-8"?>
<!--Generated by VMware VirtualCenter Server, User: Administrator,
  UTC time: 2013-04-05T00:37:32.238463Z-->
<Envelope vmw:buildId="build-380461"
xmlns="http://schemas.dmtf.org/ovf/envelope/1"
xmlns:cim="http://schemas.dmtf.org/wbem/wscim/1/common"
xmlns:ovf="http://schemas.dmtf.org/ovf/envelope/1"
xmlns:rasd="http://schemas.dmtf.org/wbem/wscim/1/cim-schema
/2/CIM_ResourceAllocationSettingData"
xmlns:vmw="http://www.vmware.com/schema/ovf"
xmlns:vssd="http://schemas.dmtf.org/wbem/wscim/1/cim-schema
/2/CIM_VirtualSystemSettingData"
xmlns:xsi="http://www.w3.org/2001/XMLSchema-instance">
 <References>
   <File ovf:href="core2k8r2-01-disk1.vmdk" ovf:id="file1"
   ovf:size="1152849920" />
 </References>
 <DiskSection>
<Info>Virtual disk information</Info>
   <Disk ovf:capacity="30" ovf:capacityAllocationUnits="byte * 2^30"
   ovf:diskId="vmdisk1" ovf:fileRef="file1"
   ovf:format="http://www.vmware.com/interfaces/specifications/vmdk.html#
   streamOptimized" ovf:populatedSize="2744057856" />
 </DiskSection>
 <NetworkSection>
   <Info>The list of logical networks</Info>
   <Network ovf:name="VLAN19">
     <Description>The VLAN19 network</Description>
   </Network>
 </NetworkSection>
 <VirtualSystem ovf:id="core2k8r2-01">
   <Info>A virtual machine</Info>
   <Name>core2k8r2-01</Name>
   <OperatingSystemSection ovf:id="1"
   vmw:osType="windows7Server64Guest">
     <Info>The kind of installed guest operating system</Info>
     <Description>Microsoft Windows Server 2008 R2 (64-bit)
     </Description>
   </OperatingSystemSection>
   <VirtualHardwareSection>
     <Info>Virtual hardware requirements</Info>
     <System>
       <vssd:ElementName>Virtual Hardware Family</vssd:ElementName>
       <vssd:InstanceID>0</vssd:InstanceID>
       <vssd:VirtualSystemIdentifier>core2k8r2-01
       </vssd:VirtualSystemIdentifier>
       <vssd:VirtualSystemType>vmx-08</vssd:VirtualSystemType>
     </System>
   </VirtualHardwareSection>
 </VirtualSystem>
</Envelope>
The OVF specification allows two different formats for OVF templates, which we've discussed briefly. OVF templates can be distributed as a set of files, like the one we exported from vCenter Server in the previous section. In this case, it's easy to see the different components of the OVF template, but it's a bit more complicated to distribute unless you are distributing the OVF template as a set of files on a web server (keep in mind that vCenter Server and VMware ESXi can deploy VMs from an OVF template stored at a remote URL).
OVF templates can also be distributed as a single file. This single file has a name that ends in .ova and is in TAR format, and the OVF specification has strict requirements about the placement and order of components within the OVA archive. All the components that we've already described are still present, but because everything is stored in a single file, it's more difficult to view them independently of each other. However, using the OVA (single file) format does make it easier to move the OVF template between locations because you work with only a single file.
WANT EVEN MORE DETAIL?
The full OVF specification as approved by the Desktop Management Task Force (DMTF) is available from the DMTF website at www.dmtf.org/standards/ovf. At the time this book was written, the latest version of the specification was version 1.1.0, published in January 2010.
The OVF specification also gives OVF templates another interesting ability: the ability to encapsulate multiple VMs inside a single OVF template. The OVF descriptor contains elements that specify whether the OVF template contains a single VM (noted by the VirtualSystem element, which you can see in Listing 10.1) or multiple VMs (noted by the VirtualSystemCollection element). An OVF template that contains multiple VMs would allow a vSphere administrator to deploy an entire collection of VMs from a single OVF template.
In fact, vSphere leverages this ability of an OVF template to encapsulate multiple VMs in a key feature known as vApps.
Working with vApps
vApps are a way for vSphere administrators to combine multiple VMs into a single unit. Why is this functionality useful? Increasingly, enterprise applications are no longer constrained to a single VM. Instead, they may have components spread across multiple VMs. For example, a typical multitier application might have one or more frontend web servers, an application server, and a backend database server. Although each of these servers is a discrete VM and could be managed as such, they are also part of a larger application that is servicing the organization. Combining these different VMs into a vApp allows the vSphere administrator to manage the different VMs as a single unit.
In the following sections, we'll show you how to work with vApps, including creating vApps and editing vApps. Let's start with creating a vApp.
Creating a vApp
Creating a vApp is a two-step process. First, you create the vApp container and configure any settings. Second, you add one or more VMs to the vApp, by cloning existing VMs, deploying from a template, or creating a new VM from scratch in the vApp. You repeat the process of adding VMs until you have all the necessary VMs contained in the vApp.
Perform these steps to create a vApp:
- If it is not already running, launch the vSphere Web Client and connect to a vCenter Server instance or launch the traditional vSphere Client and connect to a stand-alone ESXi host.
- Ensure that you are in an inventory view that will allow you to create a vApp by selecting Hosts And Clusters or VMs And Templates.
- Right-click an existing host, resource pool, or cluster and select New vApp. This launches the New vApp Wizard.
LIMITATIONS ON CREATING NEW VAPPS
While you can create vApps inside other vApps, you can't create a vApp on a cluster that does not have vSphere DRS enabled.
- If using the Web Client, you will be asked if you wish to create a new vApp or clone an existing vApp. In this example, we are creating a new vApp, so choose that option and click Next to continue.
- Supply a name for the new vApp.
If you are connected to vCenter Server, you must also select a location in the folder hierarchy in which to store the vApp. (This is logical placement, not physical placement.)
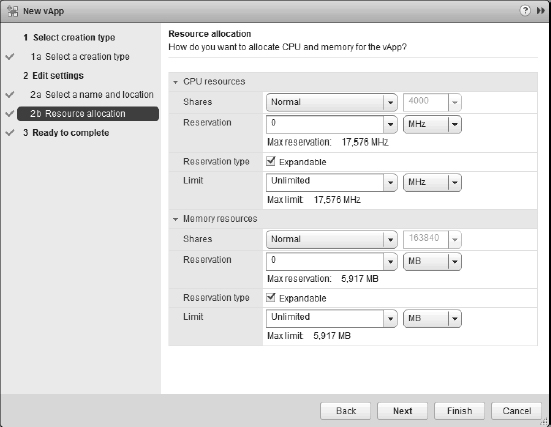
- Click Next. This advances the New vApp Wizard to the Resource Allocation step. If you need to adjust the resource allocation settings for the vApp, you may do so here.
By default, as shown in Figure 10.17, a new vApp is given normal priority, no reservation, and no limit on CPU or memory usage. It's important to note, however, that these default settings might not fit into your overall resource allocation strategy. Be sure to read Chapter 11, “Managing Resource Allocation,” for more information on the impact of these settings on your vApp.
- Click Next to proceed to the final step in the New vApp Wizard. From here, review the settings for the new vApp. If everything is correct, click Finish; otherwise, go back in the wizard to change what needs to be changed.
After the vApp is created, you can proceed with adding VMs to the vApp. There are a few different ways to add VMs to a vApp:
- You can clone an existing VM into a new VM inside the vApp. We described the process of cloning a VM earlier in this chapter in the section “Cloning a Virtual Machine”; that same procedure applies here.
- You can deploy a new VM from a vCenter Server template and put the new VM into the vApp.
- You can create an entirely new VM from scratch inside the vApp. Because you are creating a new VM from scratch, this means that you will have to install the guest OS into the VM; cloning an existing VM or deploying from a template typically eliminates this task.
- You can drag and drop an existing VM and add it to a vApp.
Once the vApp is created and you've added one or more VMs to it, you'll probably need to edit some of the vApp's settings.
FIGURE 10.17 You will want to ensure that these default resource allocation settings are appropriate for your specific environment.
Editing a vApp
Editing a vApp is a bit different because a vApp is a container, of sorts, and the vApp has properties and settings just as the VMs in that vApp have properties and settings. To help avoid confusion about where a setting should be set or edited, VMware has tried to make the vApp container as lean and simple as possible. There are really only a few settings that can be edited at the vApp level.
EDITING A VAPP'S RESOURCE ALLOCATION SETTINGS
To edit a vApp's resource allocation settings, right-click a vApp and select Edit Settings from the context menu. This will bring up the Edit vApp dialog box, shown in Figure 10.18.
FIGURE 10.18 The Edit vApp Settings dialog box is where you can make any changes that need to be made to a vApp's configuration.
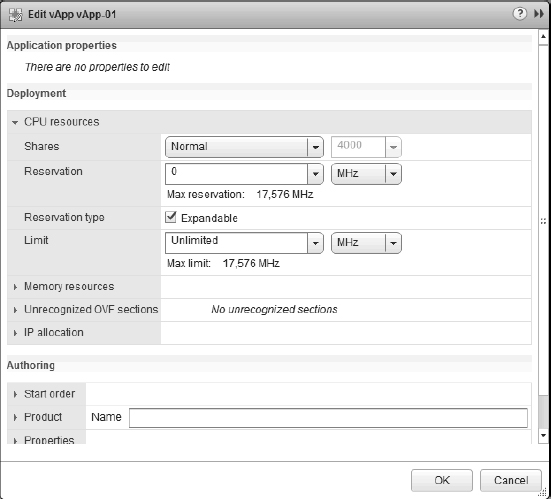
Selecting the Options tab and then the Resources option will expose the vApp's resource allocation settings. From here you can assign a higher or lower priority of access to resources, reserve resources for the vApp, or even limit the resources used by the vApp. If you don't understand what these settings mean or how they are used yet, don't worry; Chapter 11 provides complete details on using these settings in your VMware vSphere environment.
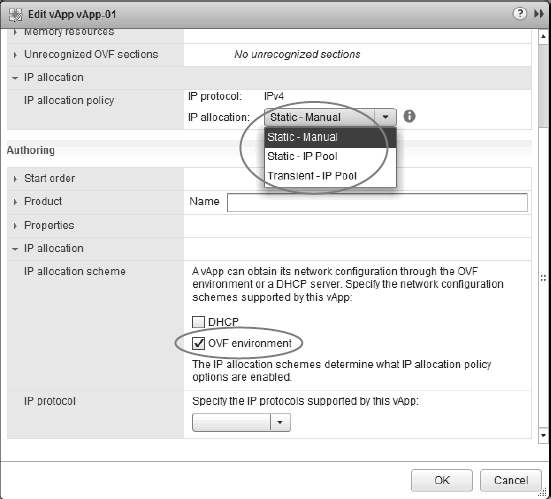
EDITING A VAPP'S IP ALLOCATION SCHEME
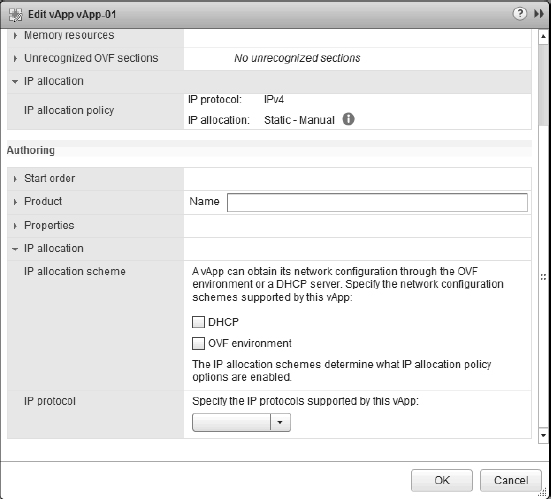
Within the Edit vApp Settings dialog box, the IP Allocation Policy option allows you to modify how IP addresses will be allocated to VMs contained within the vApp, as shown in Figure 10.19.
The three possible IP allocation settings are Static - Manual, Transient, and DHCP:
- When you use the Static-Manual option, the IP addresses must be manually set in the guest OS instance inside the VM.
- The Transient option leverages vCenter Server's ability to create and manage IP pools to assign IP addresses to the VMs inside a vApp. When the VMs are powered off, the IP addresses are automatically released.
- The DHCP option leverages an external DHCP server to assign IP addresses to the VMs in a vApp.
FIGURE 10.19 There are different options for assigning IP addresses to VMs inside a vApp.
IP POOLS AREN'T THE SAME AS DHCP
You might initially think that using Transient with IP pools means that vCenter Server uses a DHCP-like mechanism to assign IP addresses to VMs inside a vApp without any further interaction from the user. Unfortunately, this is not the case. Using Transient with IP pools requires the guest OSes in the VMs in the vApp to have some sort of support for this functionality. This support is typically in the form of a script, executable, or other mechanism whereby an IP address is obtained from the IP pool, and it is assigned to the guest OS inside the VM. It is not the same as DHCP and it does not replace or supplant DHCP on a network segment.
When you first create a vApp, you will find that the only IP allocation policy that you can select here is Static - Manual. You will need to enable the other two options before you can select them. You enable the other IP allocation options by selecting the OVF Environment check box in the IP Allocation area. This activates the Advanced IP Allocation dialog box shown in Figure 10.20.
FIGURE 10.20 If you want to use the Transient (also called OVF Environment) or DHCP options, you must enable them in this dialog box.
EDITING A VAPP'S AUTHORING SETTINGS
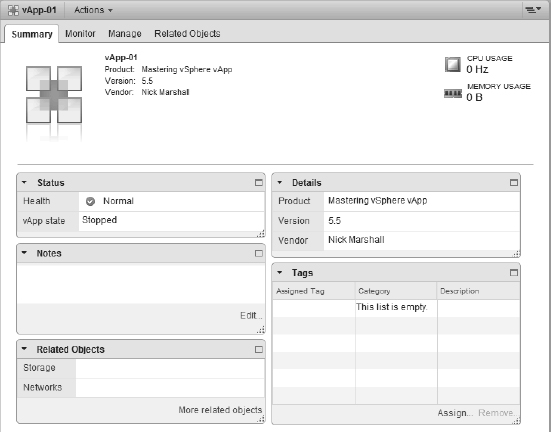
The Authoring area of the Edit vApp Settings dialog box is where you can supply some additional metadata about the vApp, such as product name, product version, vendor name, and vendor URL. The values supplied here might be prepopulated, if you have a vApp that you received from a vendor, or you might populate these values yourself. Either way, the values set here show up on the Details area of the Summary tab on the vApp. Figure 10.21 shows a vApp's metadata as it appears in the vSphere Web Client.
EDITING A VAPP'S POWER SETTINGS
One of the value propositions of a vApp is that you can power on or power off all the VMs in a vApp, in the correct order, in one step. We'll show you how that's done in just a moment—although you probably have already figured it out—but first we want to cover the vApp's power settings.
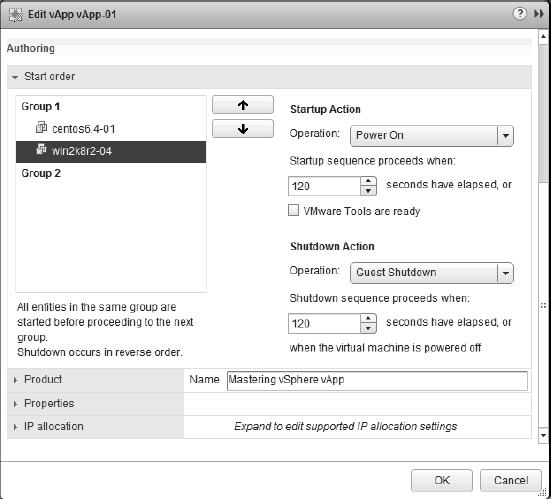
The Start Order section of the Edit vApp Settings dialog box is where you can set the startup order of the VMs and specify how much time will elapse between VMs booting up. Likewise, this is where you can set the shutdown action and timing.
For the most part, the only thing you'll really need to adjust here is the actual startup/shutdown order. Use the up/down arrows to move the order of the VMs so that the VMs boot up in the correct sequence. For example, you may want to ensure that the backend database VM comes up before the middle-tier application server, which should in turn come up before the frontend web server. You can control all this from the Start Order tab. Generally speaking, most of the defaults here are fine.
FIGURE 10.21 The vSphere Web Client displays the metadata in the Details area of the Summary tab of a vApp object.
Note that we said “most of the defaults.” There is one default setting that we would recommend you change. Shutdown Action is, by default, set to Power Off. We recommend you change this to Guest Shutdown (which will require VMware Tools to be installed in the guest OS instance). You can set this on a per-VM basis, so if you have a VM that doesn't have the tools installed—not a recommended situation, by the way—then you can leave Shutdown Action set to Power Off.
Figure 10.22 shows the Shutdown Action option for the VM named win2k8 r2-04 set to Guest Shutdown instead of Power Off.
Changing a vApp's Power State
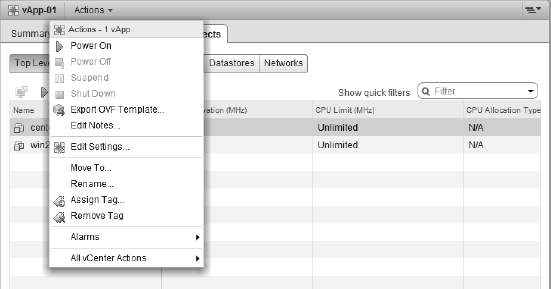
The process for powering on or powering off a vApp is the same as for a standard VM. You can select one of the following three methods to power on a vApp:
- The Power On command in the Actions button as shown in Figure 10.23
FIGURE 10.22 Using Guest Shutdown instead of Power Off will provide application and OS consistency and help avoid corruption in the guest OS instance.
FIGURE 10.23 The Actions button for a vApp offers options to change the power state for all VMs within the vApp.
- The Power On button on the vSphere Web Client toolbar from within the Related Objects tab
- The Power On command from the vApp's context menu, accessible by right-clicking a vApp
The Start Order tab in the vApp's properties controls what happens when the user tells vCenter Server to power on the vApp; you can see this in Figure 10.22. vCenter Server will power on all the VMs in a group, wait the specified period of time, then power on the VMs in the next group, wait the specified period of time, and so on. You can control the order in which VMs should be started as well as the waiting period between the groups by editing the settings shown in the Start Order tab.
Once the vApp is up and running, you can suspend the vApp or power down the vApp just as you would suspend or power down a stand-alone VM. Depending on the settings on the Start Order tab, the VMs within a vApp can be configured in different ways to respond to a Power Off request to the vApp itself. As we recommended in the previous section, it's probably best to set Guest Shutdown as the action to take in response to a request to power off the vApp. Shutdown occurs in the reverse order from startup of the vApp.
Cloning a vApp
In much the same manner as cloning individual VMs, you can also clone a vApp.
Perform the following steps to clone a vApp:
- If the vSphere Web Client is not already running, launch it and connect to a vCenter Server instance. You must connect to vCenter Server in order to clone a vApp.
- Navigate to either the Hosts And Clusters or VMs And Templates view; both of them show the vApp objects in the inventory.
- Right-click the vApp and select All vCenter Actions Clone.
- In the Clone vApp Wizard, select a host, cluster, or resource pool on which to run the new vApp. Because vApps require vSphere DRS, you cannot select a cluster on which vSphere DRS is not enabled. Click Next.
- Supply a name for the new vApp, and select a logical inventory location for the vApp. Click Next to continue.
- Select a target datastore or datastore cluster, and then click Next. Note that you do not have the option to select a VM storage policy. While member VMs can have VM storage policies assigned, you can't assign a VM storage policy to the vApp itself.
- Select the target virtual disk format. Click Next.
- If the vApp has specific properties defined, you will next have the option to edit those properties for the cloned vApp. Click Next when you are ready to continue.
- Review the settings for the new vApp, and use the Back button or the hyperlinks on the left to go back and make changes if needed. If everything is correct, click Finish.
vCenter Server will clone the vApp container object and all VMs within the vApp. vCenter Server will not, however, customize the guest OS installations inside the VMs in the vApp; the administrator assumes the burden of ensuring that the VMs in the cloned vApp are customized appropriately.
So far in this chapter, you've seen how to clone VMs, customize cloned VMs, create templates, work with OVF templates, and work with vApps. In the last section of this chapter, we'll take a quick look at importing VMs from other environments into your VMware vSphere environment.
Importing Machines from Other Environments
VMware offers a stand-alone free product called VMware Converter to help customers take OS installations on physical hardware and migrate them—using a process called a physical-to-virtual migration, or a P2V migration—into a virtualized environment running vSphere. Not only does VMware Converter provide P2V functionality, but it also provides virtual-to-virtual (V2V) functionality. The V2V functionality allows VMs created on other virtualization platforms to be imported into VMware vSphere. Administrators can also use VMware Converter's V2V functionality to export VMs out of VMware vSphere to other virtualization platforms. This V2V functionality is particularly helpful in moving VMs between VMware's enterprise-class virtualization platform, VMware vSphere, and VMware's hosted virtualization platforms, such as VMware Workstation for Windows or Linux or VMware Fusion for Mac OS X. Although VMware created all these products, slight differences in the architecture of the products require VMware Converter or a similar tool to move VMs between the products.
The Bottom Line
Clone a VM. The ability to clone a VM is a powerful feature that dramatically reduces the amount of time to get a fully functional VM with a guest OS installed and running. vCenter Server provides the ability to clone VMs and to customize VMs, ensuring that each VM is unique. You can save the information to customize a VM as a customization specification and then reuse that information over and over again. vCenter Server can even clone running VMs.
Master It Where and when can customization specifications be created in the vSphere Web Client?
Master It A fellow administrator comes to you and wants you to help streamline the process of deploying Solaris x86 VMs in your VMware vSphere environment. What do you tell him?
Create a VM template. vCenter Server's templates feature is an excellent complement to the cloning functionality. With options to clone or convert an existing VM to a template, vCenter Server makes it easy to create templates. By creating templates, you ensure that your VM master image doesn't get accidentally changed or modified. Then, once a template has been created, vCenter Server can clone VMs from that template, customizing them in the process to ensure that each one is unique.
Master It Of the following tasks, which are appropriate to be performed on a VM running Windows Server 2008 that will eventually be turned into a template?
- Align the guest OS's file system to a 64 KB boundary.
- Join the VM to Active Directory.
- Perform some application-specific configurations and tweaks.
- Install all patches from the operating system vendor.
Deploy new VMs from a template. By combining templates and cloning, VMware vSphere administrators have a powerful way to standardize the configuration of VMs being deployed, protect the master images from accidental change, and reduce the amount of time it takes to provision new guest OS instances.
Master It Another VMware vSphere administrator in your environment starts the wizard for deploying a new VM from a template. He has a customization specification he'd like to use, but there is one setting in the specification he wants to change. Does he have to create an all-new customization specification?
Deploy a VM from an OVF template. Open Virtualization Format (OVF, formerly Open Virtual Machine Format) templates provide a mechanism for moving templates or VMs between different instances of vCenter Server or even entirely different and separate installations of VMware vSphere. OVF templates combine the structural definition of a VM along with the data in the VM's virtual hard disk and can exist either as a folder of files or as a single file. Because OVF templates include the VM's virtual hard disk, OVF templates can contain an installation of a guest OS and are often used by software developers as a way of delivering their software preinstalled into a guest OS inside a VM.
Master It A vendor has given you a Zip file that contains a VM they are calling a virtual appliance. Upon looking inside the Zip file, you see several VMDK files and a VMX file. Will you be able to use vCenter Server's Deploy OVF Template functionality to import this VM? If not, how can you get this VM into your infrastructure?
Export a VM as an OVF template. To assist in the transport of VMs between VMware vSphere installations, you can use vCenter Server to export a VM as an OVF template. The OVF template will include the configuration of the VM as well as the data found in the VM.
Master It You are preparing to export a VM to an OVF template. You want to ensure that the OVF template is easy and simple to transport via a USB key or portable hard drive. Which format is most appropriate, OVF or OVA? Why?
Work with vApps. vSphere vApps leverage OVF as a way to combine multiple VMs into a single administrative unit. When the vApp is powered on, all VMs in it are powered on, in a sequence specified by the administrator. The same goes for shutting down a vApp. vApps also act a bit like resource pools for the VMs contained within them.
Master It Name two ways to add VMs to a vApp.