
Chapter 7
Connecting With and Endorsing Your Network
In This Chapter
![]() Organizing your LinkedIn contacts
Organizing your LinkedIn contacts
![]() Storing conversations and notes about your first-degree connections
Storing conversations and notes about your first-degree connections
![]() Understanding LinkedIn endorsements
Understanding LinkedIn endorsements
![]() Giving your network endorsements
Giving your network endorsements
![]() Approving and displaying others’ endorsements of you
Approving and displaying others’ endorsements of you
Let's look inward for a moment and think about the basic building block of your LinkedIn network — your relationship with each of your first-degree connections. Each of these relationships has a different identity, from the colleague you just met and added to your network, to a lifelong friend. LinkedIn wants to help you manage the qualities of that relationship, not just the fact that you know that person. This way, LinkedIn becomes more of your hub for managing your professional network and building your own brand and/or business.
In this chapter, I discuss how to properly use two of LinkedIn's newer functions, Contacts and Endorsements. I start by discussing how LinkedIn displays and organizes your contacts, and then I walk you through how you can use Contacts as your own personal “Customer Relationship Management” (CRM) system to store notes, tags, and information about how you relate to each contact. Then, I shift gears and focus on LinkedIn Endorsements, where you can give and receive endorsements of others’ skills, and how they differ from recommendations. You find out how to endorse your first-degree connections, review the endorsements they give you, and add those endorsements to your profile.
Interacting with Your Network with LinkedIn Contacts
The goal of LinkedIn Contacts is to give users “a smarter way to stay in touch.” LinkedIn Contacts lets you sync your address books, e-mails, and calendar entries with your LinkedIn contact information, so LinkedIn can organize your communication with your colleagues and professional friends. By knowing all the information you keep in these various systems (address book, calendar, e-mail, LinkedIn), it can sort that information, by the other person, and show you a comprehensive history starting with how you met or linked to each person, plus a history of your interactions with each person up until the last conversation, an inventory of mutual friends and colleagues, and updates of their career events and LinkedIn activities. Finally, LinkedIn gives you the power to add and store your own private notes for each contact and schedule follow-up or regular interactions with those contacts.
LinkedIn Contacts is a tool to help you manage your professional relationships en masse while still being personal. Here are some of the advantages of using this system:
- It stores your contact history. For each contact, LinkedIn shows you when you connected with that person, and logs each conversation with that person you did through LinkedIn. If you synced other systems (like your e-mail), LinkedIn Contacts shows you a chronological history of those conversations as well.
- It shows mutual connections. When you communicate with other colleagues, sometimes it's helpful to know at a glance which connections you share with that person. Perhaps you need a favor and must decide who among your network can help you make your case to the other person. LinkedIn Contacts displays, for each contact, who you and that person both have as first-degree connections, which is perfect for you to know who to enlist when it's time to ask for help or an opinion.
- It encourages new and ongoing communication. Since professionals use LinkedIn to record their career accomplishments, from new jobs and promotions to receiving awards and certifications, LinkedIn Contacts notifies you when someone in your network has a career “event” (for example, a promotion or work anniversary) and encourages you to reach out and communicate, whether it's to say “Congrats” or connect with a common friend who just joined LinkedIn. Contacts also allows you to set reminders so you can follow up with someone at a later date. By encouraging regular communication, LinkedIn helps reduce the awkwardness when you need to reach out to a contact.
- It's available at your fingertips. LinkedIn made sure that the Contacts feature is robust and available not just on its website, but also through mobile applications. You can download and install a LinkedIn Contacts app for your Apple or Android OS system and have the same information at your fingertips, in case you're not in front of your computer.
- You can add your own notes. After LinkedIn catalogs your past and current interactions, it allows you to record your own notes for each person, visible only to you. Your notes are stored on LinkedIn and available anytime. In addition, you can create tags for each contact, allowing you to create your own virtual “groups” of people that you can manage or change at any time.
Understanding how LinkedIn Contacts is structured
The good news is there is nothing to install or pay for in order to use LinkedIn Contacts. Any LinkedIn member, whether he has a free or paid account, sees the same LinkedIn Contacts screen and has access to all the LinkedIn Contacts functions. This capability is available from the moment you join LinkedIn and start adding connections, and it's free to sync any of your other accounts to LinkedIn to store additional information. As of this writing, LinkedIn is able to sync with major e-mail providers such as Gmail, Yahoo! Mail, and Outlook, along with address books like Google Contacts, Yahoo! Address Book, Outlook Address Book, and the iPhone Address Book. In addition, you can sync information with systems such as CardMunch, Evernote, and TripIt.
To get started, you can either hover your mouse over the Network link in the top navigation bar and then click Contacts, or go directly to contacts.linkedin.com. You should see the Contacts screen, as shown in Figure 7-1.
Along the top of the screen, LinkedIn displays a tiled bar of contacts who have either reported a new event or potential new contacts of someone in your network. Each element in that bar has a suggested action, such as “Say Congrats” or “Connect,” that you can click, which encourages some interaction with that person. You can also click the Skip link at the bottom right of each tile area to bring up another potential contact, or click the See More People to Contact link to bring up another row of contact tiles.
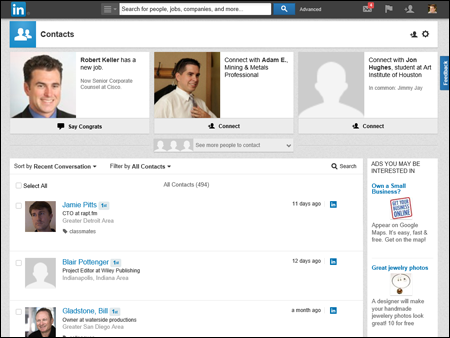
Figure 7-1: LinkedIn Contacts keeps you in touch with your network.
Below that bar is your list of contacts, sorted by Recent Conversation by default. This way, you see the LinkedIn contacts you've most recently talked to, and next to each name, LinkedIn shows the length of time that has passed since your last interaction.
You can click the drop-down arrow next to Sort By to change the sort order of your contacts. As of this writing, your choices for sorting are:
- Recent Conversation
- Alphabetical (based on each contact’s first or last name)
- New (starting with the newest connections to your network)
Next to the Sort By option is the Filter By option, which is useful if you want to see a certain subset of your contacts list. By default, it's set to All Contacts, but if you click the drop-down arrow, you can set a filter to see only the list of contacts from a certain Company, Location, Job Title, or self-created Tag, instead of the list of All Contacts.
To the right of the Filter By option is a Search link. When you click it, a text box appears that you can use to search your contact list. Simply type the desired keywords in the box and then press Enter to run the search.
Using LinkedIn Contacts
When you're ready to use all of LinkedIn Contact's capabilities, just follow these steps:
- From the LinkedIn Contacts screen, click the wheel icon on the top right of your screen, as shown in Figure 7-2.
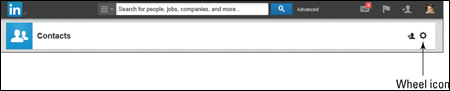
Figure 7-2: Click the wheel icon to set up Contacts.
You are taken to the Contacts Settings page, as shown in Figure 7-3.
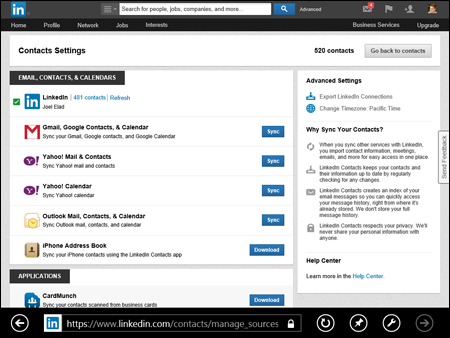
Figure 7-3: Sync your different accounts with LinkedIn Contacts.
- Click Sync next to the name of your e-mail system and/or address book to sync your e-mail messages with the LinkedIn Contacts system.
If you've got Gmail, Yahoo! Mail, or Outlook, click the appropriate blue Sync button to start the sync process. In this example, I sync my Gmail and Google accounts.
- Follow the prompts to sync your other accounts.
In this example, I am prompted to log into my Google account, as shown in Figure 7-4. After I do, I get a Permissions screen, as shown in Figure 7-5, where I click the blue Allow Access button to give LinkedIn the ability to sync with my Google account.
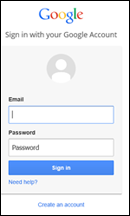
Figure 7-4: Log into your other accounts.
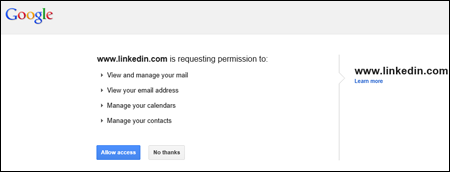
Figure 7-5: Allow access for LinkedIn Contacts to sync.
- Repeat Steps 2 and 3 for any other accounts you wish to sync with LinkedIn Contacts.
After each sync, you are returned to the LinkedIn Contacts Settings page, where you can pick another e-mail, contacts, calendar, or application provider. In addition, you can import your Outlook, Yahoo! Mail, or Mac Address Book contacts by importing a .CSV (comma-separated values) file created by those applications.
 LinkedIn Contacts stores more information than just your first-degree connections. You can also add someone who's not yet a LinkedIn member.
 - From the Contacts Settings page, click the gray Go Back to Contacts button and pick an individual contact by clicking her name from the Contacts screen.
To use the Contacts functions for any particular first-degree connection, you need to pull up the person's profile information by clicking his name on the Contacts screen. When you reach a contact's profile page, you should see a box with the Relationship and Contact Info tabs, as shown in Figure 7-6. LinkedIn has already populated this box with any LinkedIn messages you've sent to each other.
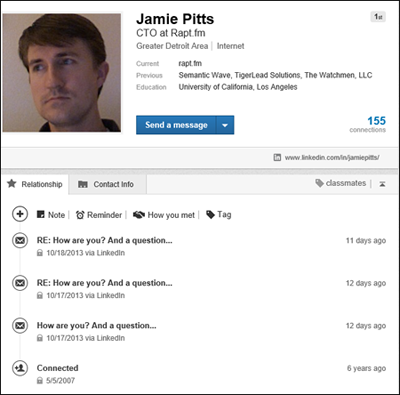
Figure 7-6: LinkedIn Contacts shows the Relationship elements.
- (Optional) Click the Note link to add a note to yourself pertaining to this contact.
Think of the Note function as a way for you to record any thoughts about this contact, remind yourself of information that was mentioned in past conversations, or jot down any questions you need to ask this person. When you click the Note link, a text box opens where you can type the note, as shown in Figure 7-7. When you're done, click the blue Save button and the note is added to the log of communications for that contact, as shown in Figure 7-8.
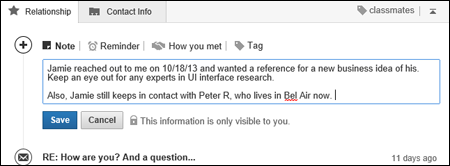
Figure 7-7: Add a note to yourself about this contact.
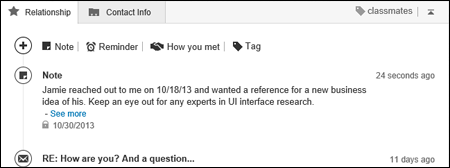
Figure 7-8: The note is recorded as part of your communication with that person.
- (Optional) Click the Reminder link to set up a reminder message from LinkedIn pertaining to this contact.
When you click the Reminder link, a text box opens where you can type the subject of the reminder message that LinkedIn will send you, as shown in Figure 7-9. Using the radio buttons below that text box, decide when you want the reminder message sent to you. Click the blue Save button to create the reminder, and in the designated time frame, LinkedIn sends you a reminder message with the subject line you just entered.
- (Optional) Click the How You Met link to record how you met this contact.
Clicking the How You Met link opens a text box where you can record the details of how you met this contact. When you click the blue Save button, LinkedIn creates an entry entitled “How you met” and puts it at the bottom of the Relationship box, as shown in Figure 7-10. This way, this information is always available to you.
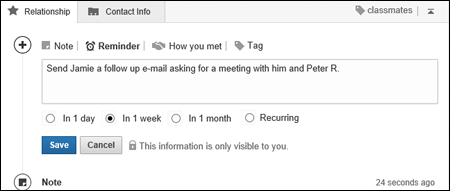
Figure 7-9: Use LinkedIn to remind you of upcoming actions you wish to take for a particular contact.
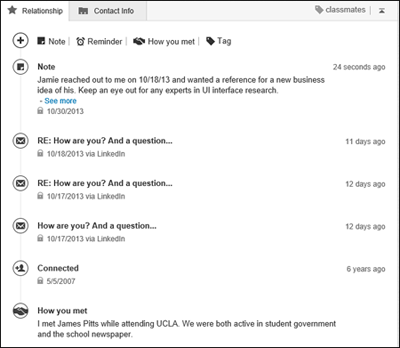
Figure 7-10: Record the details of how you met this contact.
The information you add with these functions is visible only to you and nobody else, so you can type these notes without the other person (or anybody else) seeing this information. - (Optional) Click the Tag link to identify this contact with your own “category” name.
Let's say that you want to tag your LinkedIn connections with whom you shared a certain group in college, in case you want to send messages to only this group regarding a reunion or something similar. Click the Tag link to generate a drop-down list of tags to choose from. You can select the check box next to a pre-determined tag, like colleague or classmate, or click the Add a Tag link to generate a text box to write your own tag, as shown in Figure 7-11.
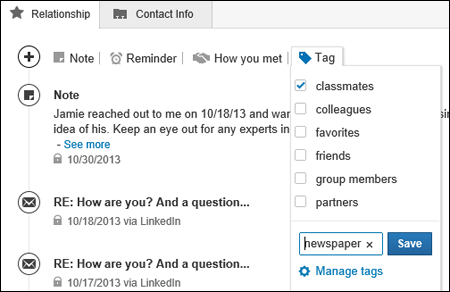
Figure 7-11: Create your own tags to identify the different contacts in your network.
 You can assign multiple tags to the same person — if the same person is involved in more than one category in your life, for example.
 - Repeat Steps 6 to 9 for any contacts where you want to record any of this information.
You can add this information whenever you want, it doesn't have to be done all at once. As you use LinkedIn, be aware that these options exist, especially when you're looking at someone's profile page. Make notes while they're still fresh in your mind, or after receiving an e-mail or notification from someone.
Giving and Receiving Endorsements on LinkedIn
Although many people believe “It's not what you know, it's who you know,” which is one of the main reasons why LinkedIn is so valuable, many folks (recruiters, hiring managers, CEOs, investors, and more) are very interested in what you know. Logically, the people who know you best are the people in your network, who have observed your work firsthand and can speak to the quality and degree of your skill set. LinkedIn came up with an easier way for users to identify what skills they think their contacts have, and this system is called LinkedIn Endorsements.
Initially, LinkedIn offered this ability through its Recommendations system (which I cover in the next chapter), but it wanted to offer a way for users to identify skills in their contacts that was easier to use and less comprehensive (and time-consuming) than its Recommendations system, which is how the Endorsements function was created. Endorsements had only been available a short time when, LinkedIn announced more than 2 billion endorsements had been given on its site, signaling a widespread adoption of this new functionality. So why is LinkedIn Endorsements important to understand and use? Here are a few reasons to consider:
- Endorsements are an easier way to recognize someone's skill set. While a recommendation can be a thorough and positive review of someone's job, endorsing a particular skill can show the community very quickly what skills someone possesses.
- Endorsements are a great way for you to highlight important skills. When you're looking for a job or thinking about your career, having your key skill set show up as endorsements on your profile signals to recruiters and hiring managers that not only do you have the skills to do that job, but other people believe in your skills enough to endorse you. Just like with recommendations, people are more likely to believe other people's testimony about your skills than your own assertions.
- Endorsements are independent of any specific position. When you write a recommendation for someone on LinkedIn, it is tied to one position. When you endorse someone's skill, it's tied to that person's entire profile, not just one job that was held any number of years ago.
- Endorsements are faster and more specific. It's much easier and more precise for your contacts to endorse your specific skills than to write an entire recommendation. Many of your contacts can only speak to certain skills anyway, and with LinkedIn Endorsements, they can “give kudos with just one click.”
 Because of the ease and speed of endorsing someone's skills, coupled with the fact that LinkedIn offers lots of prompts for you to endorse people's skills, there is a very real trap you need to avoid: blindly endorsing skills the other person may not possess (and others endorsing skills of yours they can't verify you possess). It's important that your endorsements are authentic, so put some thought into giving and managing your endorsements.
Each LinkedIn user can have up to 50 skills that can be endorsed by his network, and the top 10 endorsed skills appear on your profile page, under the Skills & Expertise section, as shown in Figure 7-12. The profile pictures of the people who endorsed those skills appear to the right of each skill. While many of the skills that appear on the Endorsements list come from what you entered as your skills and experience on your profile, your contacts can add skills you may not have identified yet. (For example, in Figure 7-12, someone endorsed me for Books and Cloud Computing, which were skills I had not yet defined in my profile.)
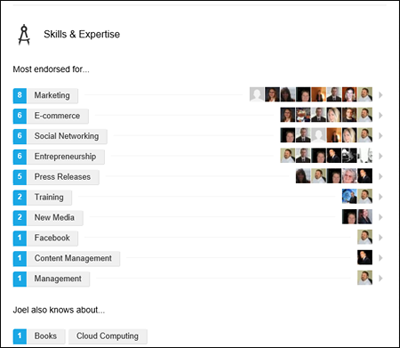
Figure 7-12: LinkedIn Endorsements show your network's beliefs in your skill set.
Endorsing someone on LinkedIn
As you use LinkedIn, you should notice that the system often prompts you to endorse your contacts for specific skills on their profile. LinkedIn built this into its system to make it as easy and automatic as possible to endorse your contacts without you looking for a particular screen or function.
You might see a screen where you are prompted with the option to endorse four different contacts for a particular skill (as shown in Figure 7-13). When you see that box, you have several options:
- If offered, you can click the Endorse All 4 button to endorse all four contacts at once. In some cases, you can click the View More button to see a new screen of four contacts with a skill to endorse for each one.
- You can click individual Endorse links (below each profile picture) to select which of the four endorsements you want to give. Each time you click Endorse, a new skill and contact pops up in that box for you to consider.
- You can click the X in the top right corner of each box to close that option. That box is repopulated with a new contact and a new skill to endorse for that contact.
- You can click the Close button (the X in the top right corner of the big blue box) to stop the process.
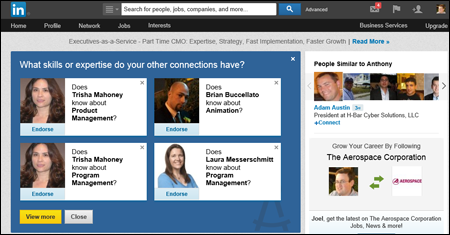
Figure 7-13: Endorse multiple contacts for the skills they possess.
When you are looking at any particular contact's profile, you may be presented with a blue box asking you to endorse multiple skills for that contact (as shown in Figure 7-14). You can also bring up this box by clicking the drop-down arrow next to the Send a Message button and selecting Endorse Skills & Expertise.
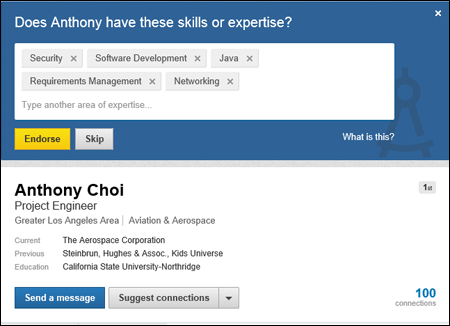
Figure 7-14: Endorse multiple skills for one contact.
When you see this box, you have several options:
- You can click the yellow Endorse button to endorse all the skills listed in the box.
- To remove an individual skill from the list before clicking Endorse, click the X next to the skill name.
- To add an individual skill to the list before clicking Endorse, simply start typing in the Type another area of expertise area. LinkedIn prompts you with possible skill names that you can click (as shown in Figure 7-15), or finish typing to add that skill to the list.
- You can click the Skip button (or the X in the top right corner of the blue box) to stop the process. The box disappears and you see the contact's profile page.
After you click Endorse or Skip, the process is concluded for that particular contact. When you visit another contact's profile page, the process begins again for that contact.
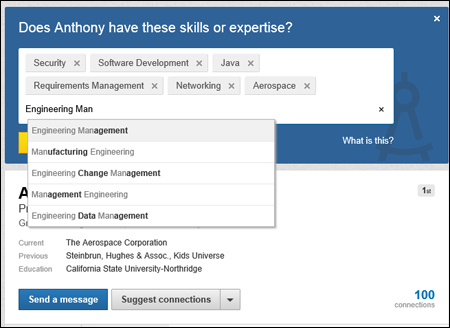
Figure 7-15: You can add skills to your endorsements list for this contact.
Think carefully about which skills you can honestly endorse for another person, as you should only endorse skills you truly believe the other person has or that you have witnessed in action. You may also want to consider what skills the other person wants highlighted on her profile, which can be evident from the most endorsed skills she has currently. You should never feel compelled to endorse someone's skill just because LinkedIn prompts you for one particular skill.
If you want to give endorsements for someone's skills without being prompted, simply go to her profile page and scroll down to her Skills & Expertise section, where you can see her identified skills. When you see an individual skill you want to endorse, hover your mouse over the + sign next to the skill name (as shown in Figure 7-16) and click the Endorse link that appears. You can repeat the process to endorse as many skills as you wish.
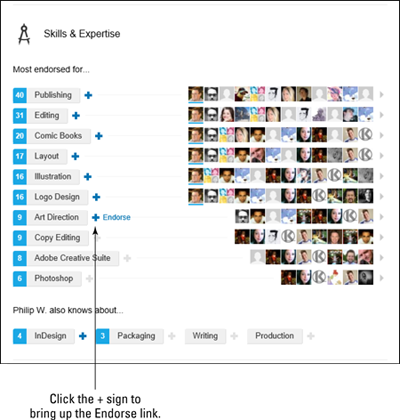
Figure 7-16: Select individual skills to endorse for a contact.
Any skills you have already endorsed appear with a blue filled in + sign next to the skill name, and your profile picture is underlined to the right of the skill name. If you want to remove a particular endorsement, hover your mouse over that blue + sign and click the Remove Endorsement link that appears.
You can always go back and add more skill endorsements at any time, even after you initially endorse someone's skills.
Accepting endorsements on LinkedIn
LinkedIn does not automatically add any incoming endorsements to your profile; you must accept those endorsements first.
When you receive an endorsement, it appears in your Notifications list at the top right corner of the LinkedIn screen (as shown in Figure 7-17), and you also receive an e-mail (depending on your e-mail settings) letting you know who endorsed you and for what skills.
The easiest way to accept (or reject) these endorsements is to edit your LinkedIn profile. Hover your mouse over the Profile link in the top navigation bar, and then click Edit Profile from the drop-down list that appears. You can also respond to the Notification message that LinkedIn sends you, which takes you to the Edit Profile screen, too. When your profile comes up for editing, you should see a blue box indicating that your connections have endorsed you for skills and expertise, as shown in Figure 7-18.
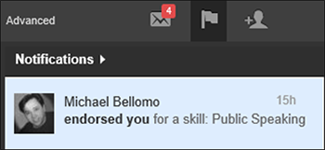
Figure 7-17: LinkedIn notifies you when someone endorses your skills!
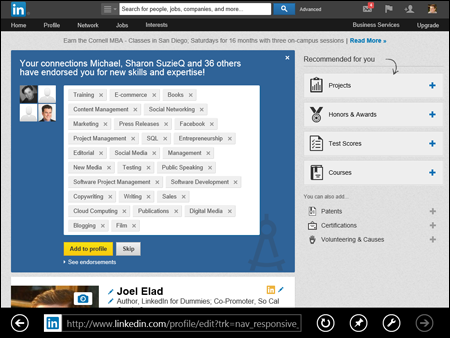
Figure 7-18: LinkedIn asks you to add new endorsements to your profile.
When you see this box, you have several options:
- Click the yellow Add to Profile button to add all the incoming endorsements to your profile. (You can manage your endorsements later, which I discuss in the next section.)
- Click the gray Skip button, or the X in the top right corner of the blue box, to ignore this and deal with it later.
- Click the See Endorsements link to see who endorsed which skills.
If you decide to add these endorsements to your profile, LinkedIn offers you the chance to give endorsements to people in your network, similar to Figure 7-13 from the previous section.
After you've accepted the endorsements, an optional step is to contact the person or people that endorsed you with a quick note to say thanks. Not only does it give you a valid reason to stay in touch, but it helps cultivate the relationship. You can also visit their profile page and decide to reciprocate by endorsing some of their skills, but staying in contact is a great networking chance that shouldn't be missed.
Managing your endorsements
Now that you've added endorsements to your profile, you may want to manage them and make sure you are happy with the ones you've received being displayed on your profile. Whenever you are ready to manage your endorsements, simply follow these steps:
- Hover your mouse over the Profile link in the top navigation bar and select Edit Profile from the drop-down list that appears.
This allows you to edit your LinkedIn profile, which is necessary when you want to manage your skills listings and endorsements.
- Scroll down to the Skills & Expertise section of your profile and click the Edit link (with the pencil icon) next to the Skills & Expertise header.
This opens up a new section below the Skills & Expertise header to help you manage your skills listings and endorsements of those skills, (as shown in Figure 7-19. There are two options: Add & Remove and Manage Endorsements. By default, you see the Add & Remove options first.
- If you want to add a skill to your list (so people can endorse it later) simply type in the name of the new skill and then click Add. When you're done, click the Save button to save your changes.
You must click the Save button before doing anything else, like managing your endorsements. Otherwise, any skills you add won't be saved to your profile.
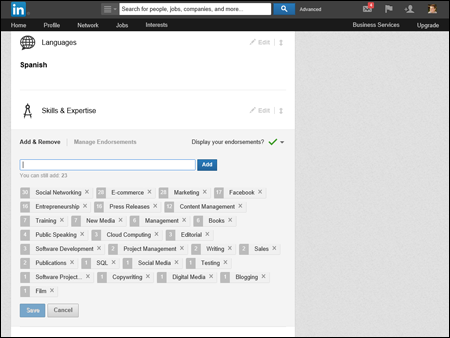
Figure 7-19: Add skills to be endorsed later.
As you start typing the name of your skill, LinkedIn automatically prompts you with possible skill names based on other users’ profiles, as shown in Figure 7-20. You can click the option that best matches what you want, or finish typing your own skill name.
You don't have to accept what LinkedIn prompts you for, especially if you are trying to ensure the right keywords come up for your skills profile when other people review it. - To manage your endorsements, click the Manage Endorsements link. Click the name of the skill that was endorsed and then click any person's name to deselect the check box, effectively hiding that person's endorsement from your profile.
On the Manage Endorsements screen that appears, your skills are sorted by the number of endorsements you've received for each skill, from highest to lowest, as shown in Figure 7-21. Click the arrows next to the number of endorsements to scroll up and down the list of skills, and use the scroll bar on the right side to scroll through the names of your connections that endorsed the highlighted skill.
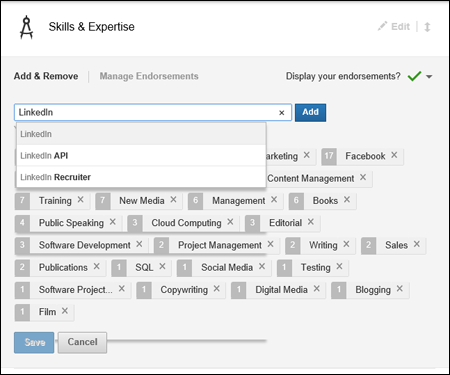
Figure 7-20: LinkedIn prompts you for new skill names.
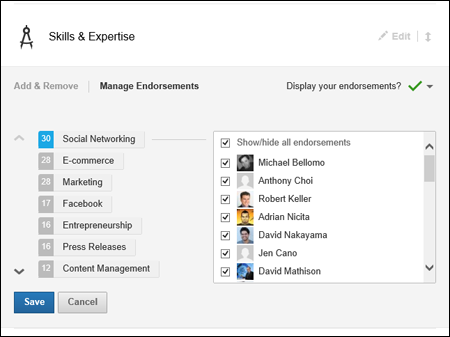
Figure 7-21: You can hide someone's skill endorsement from appearing on your profile.
If you want to remove all the endorsements for any given skill, simply deselect the Show/Hide All Endorsements check box. - Repeat Step 4 for any other endorsements you want to hide from your profile. When you're done, click the Save button to save your changes.
After you finish with your changes, you see the Skills list again and the number of endorsements for your skills is updated based on the changes you made.