Chapter 3
Building Your Channel from the Ground Up
In This Chapter
- Navigating your new channel
- Customizing your channel
- Making your channel viewer friendly
A YouTube channel is where the creator can track activity, maintain account settings, and — most importantly for a creator like you — upload videos. The ability to find your way around your channel and understand the different features that YouTube offers is essential to building your audience, and — drumroll, please — obtaining revenue.
Navigating Your Channel
A YouTube channel has two primary purposes. For most users, YouTube is for watching videos. When you log in to your YouTube account, you're met with a page offering a lot of videos for you to watch. You'll also see a large ad — no surprise there — as well as suggestions from YouTube for what you should watch. There are sections for some of the channels you subscribe to, and some guesses at stuff you might like. A lot of the logged-in experience is covered in Chapter 2, but it's time to dig a little deeper and look at what you can do with your channel.
 YouTube's initial page view defaults to the familiar What to Watch tab, but along the left side you'll find the keys to the castle, so to speak — links that lead to all the important channel controls.
The My Channel link
The value of making your channel look really good can't be overestimated. Though your videos are ultimately the most important tool you have for attracting viewers and subscribers, the look of your channel is a big deal, too. YouTube wants viewers to spend more time watching content. What better way to do this than by giving content creators like you the tools to make an awesome YouTube channel experience.
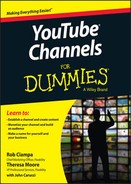
When you're logged in on YouTube, clicking the My Channel link in the top left-hand corner brings you straight to your channel in Edit mode, as shown in Figure 3-1. Note the following elements:
- The header bar: This element runs across the top of your My Channel page, and gives you access to some pretty important information.
- Subscribers: Since your channel may be new, you probably have zero subscribers — the link on the header that reads 0 subscribers is at the top to point that out. Hopefully, that number won't be 0 for long.
When you click the Subscribers link, you see a list of your subscribers, where you can see who is subscribed to your channel and review the information that they share publicly.
- Video Manager: Clicking the Video Manager link leads you — no surprise here — straight to the Video Manager, which is the most useful place to manage the settings for your individual video uploads. You can read more about the Video Manager in Chapter 9.
- Subscribers: Since your channel may be new, you probably have zero subscribers — the link on the header that reads 0 subscribers is at the top to point that out. Hopefully, that number won't be 0 for long.
- Channel art: The large, gray box with all the gray triangles as background is the default channel art for your channel. It has a picture of a computer, a TV, and a phone, and a large Add Channel Art button. Adding channel art is something you'll want to do as soon as you can. (Before you do though, check out the later section “Customizing and Branding Your Channel.”) You can also add links to websites, links to social networks, and an email contact button to this area, all of which you can do later in this chapter.
- Channel icon: Overlaying your channel art on the left side is the channelicon. The default channel icon is a light blue square with a nondescript dark blue icon in the middle. This element is an important one because it acts as your channel's identifying mark on YouTube and Google+; it appears next to your channel's name all over both sites; it shows up in subscription lists; and it appears next to every comment you make. If your channel art is the face of your My Channel page, this icon is your face everywhere else on YouTube. Channel icons are typically a brand logo or a picture of the channel's content creator.
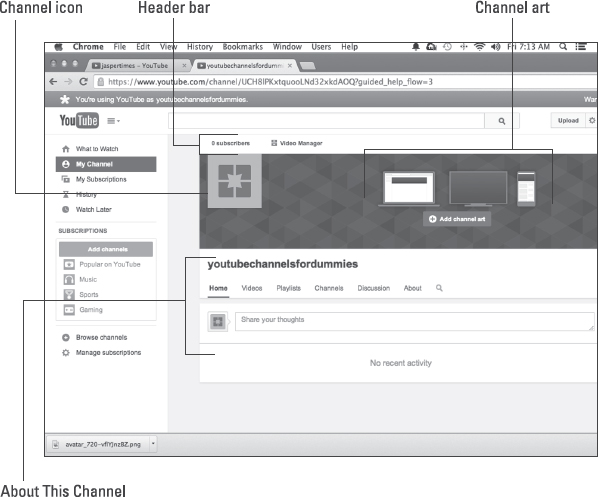
Figure 3-1: The My Channel page.
When you roll the mouse pointer over the different areas of the My Channel page, a small, gray box with a pencil icon in it appears. This is the Edit button. When you get around to customizing your channel later in this chapter, the Edit button is what you'll use to access the controls for each of these elements.
Figure 3-1 shows the basics of the My Channel page, but you can add more. Here's a list of the kinds of things that you can display there:
- Channel trailer: You can add a channel trailer for unsubscribed viewers. (Think “trailer” as in “movie trailer,” not “trailer” as in “trailer park.”) This is a perfect opportunity to show your audience what your channel is all about, what content you cover, what days you publish and anything else you think might help viewers subscribe to your channel and watch tons of your content.
- Sections: These are groups of videos that help viewers explore your content. Create sections to make it easy for your viewers to browse and find content that interests them. Think of them like bookshelves that gather content of similar types. Sections can contain a playlist, your most recent videos, your most popular videos or other collections of content that you want your viewers to see. The default section on a new channel is Uploads — that's just the list of your most recently published videos.
- Channel Tips: YouTube wants you to succeed; they even give you best practice tips based on your current channel status. Find these at the top of the right-hand section when logged in.
- Related Channels: This area will be blank until you add in channels that are related to your channel. This is optional, but also a very good opportunity to highlight any partnerships you may have formed with other YouTube creators. You can highlight your partners and your partners can highlight your channel to help share audience between related channels.
- Popular Channels on YouTube: YouTube recommends channels that are related to your channel for your viewers on your My Channel page. If you don't want YouTube showing other channels, you can disable this feature. Simply hover over this section and a Disable button will appear.
- View as Public: Whenever you've made some changes to your channel, you'll want to see how your channel is going to look to your viewers. In the top right-hand corner, note the small planet Earth labeled View as Public. Click this link to view your channel like a normal YouTube user would see it. To go back to Edit mode, click the Done button in the blue bar on top.
 Create sections with multiple playlists in addition to just shelves with individual videos. This will help your Playlist tab appear more organized, making it easier for viewers to find more content quickly. Be sure to have a strong thumbnail image for every video in a section and every playlist.
The Channel tabs
Just like a web browser, YouTube channels also have tabs. Tabs are helpful for viewers looking to navigate your channel quickly and efficiently. Each tab has a different functionality intended to help the viewing experience.
- Home: A viewer sees this tab by default when they click on your channel from a YouTube search or if they manually type in your channel address in their web browser. Your Channel Trailer and Sections all appear here on the Home tab.
- Videos: The Videos tab contains exactly what you'd expect — all public videos on the channel. The default view is Newest Videos First — the videos that were added to the channel most recently. The viewer can always sort by Oldest Videos First or Most Popular as well.
- Playlists: The Playlist tab is where all your channel's public playlists can be found. As a creator, you can fill up playlists with your own content. You can also curate content from other YouTube channels for your playlists.
Playlists also come up in YouTube search results, so be sure to always use descriptive thumbnails for your videos, as well as compelling playlist descriptions. Playlists are a great way to extend your viewers' session time on your channel. (Session time directly supports your channel ranking and discoverability on YouTube search.)
- Channels: If you have partnerships, this tab is the place to add all of those channels that you associate with. If you are a brand that owns many channels, you'll want to make sure all of your channels are listed here for easy discoverability and reference for the viewers. This is a quick way to get interested viewers to consume more related content.
- Discussion: Viewers are sure to comment on your channel and videos if you are creating engaging content. You can follow along with all the channel comments here on this tab. When logged in, you can remove inappropriate comments or report spam comments directly.
- About: This tab acts as your opportunity to tell your viewers all about yourself and/or your business. You can include an email address for viewers to contact you outside of YouTube. You can also include any relevant social network sites that you might be active on. Your viewers can come here to see some quick stats on your channel, such as your total view count, number of subscribers, and the date you created your YouTube channel.
The My Subscriptions link
The My Subscriptions link on the left of the My Channel page (refer to Figure 3-1) takes you to a new page displaying a list of channels you're subscribed to. If your channel is new, this is listing is probably empty. As you subscribe to channels that you like (which you will, even as a creator), this page becomes a bit more populated — and a bit more complex. After you've subscribed to some channels, you can look at the information in a couple of different views. You'll use the various links at the top of the My Subscriptions area (see Figure 3-2) to switch between views.
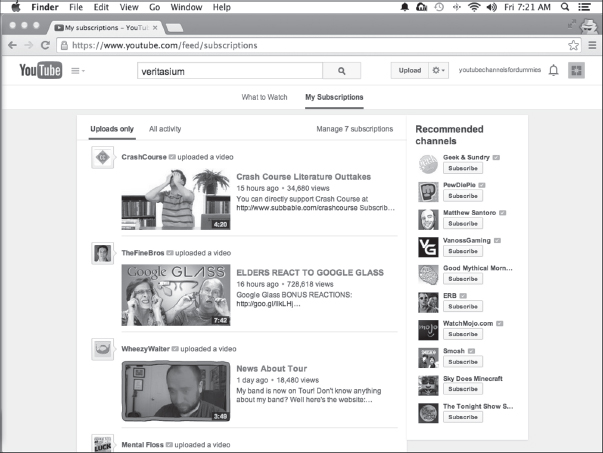
Figure 3-2: The My Subscriptions page.
Here are some brief descriptions of what each link does for you:
- Uploads Only: This link organizes the channels you are subscribed to in a list of videos. You'll see a list of uploaded videos, showing the most recent first. All your subscriptions are in one long list, so if you have a lot of subscriptions, this can be an overwhelming way to look at things.
- All Activity: This view of your subscription feed can be even more overwhelming. As its name implies, it shows all of the activity on the channels you follow — their uploads, their comments, their announcements, and changes to their playlists all show up here if you've chosen to see all that activity. (Note that you can control what you see from each channel you subscribe to using the Manage Subscriptions page — see the next bullet item.)
- Manage Subscriptions: This link leads to a page where you can do some detailed management of the channels you subscribe to and control what sort of content you see from that channel. This is also its own section in the main menu on the left, so we cover it in more detail later in this chapter.
The History link
Clicking the History link takes you to a new page listing every video you've ever watched. This page can be deeply embarrassing to visit, because it can reveal to you just how many makeup tutorials and Let's Play videos you've watched in the last week. But whereas this section can lead to feelings of shame and regret for time wasted, it can also be an interesting insight into your viewing habits. Luckily, it is only for you. As the section helpfully points out at its top, “Only you can see your history.” (Figure 3-3 shows a Watch History Listing example).
Your watch history is what YouTube's algorithms pay attention to when populating the suggested videos on the front page of your account.
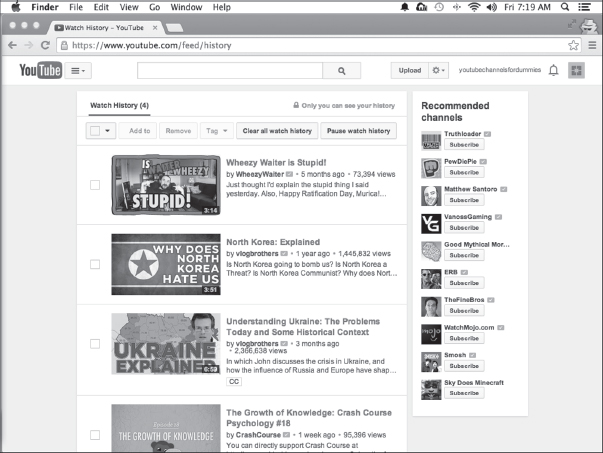
Figure 3-3: The Watch History listing.
Unlike with real-world history — the stuff recorded in encyclopedias and history books — you do have some control over this list. A few controls here let you “rewrite history,” as described in this list:
- Clear All Watch History: This is the nuclear option. If you're ready to undo everything you've ever watched and start over with a clean slate, this button does just what it says and deletes all the information from your watch history.
- Pause Watch History: This button puts your memory on hold, and allows you to watch videos without them being added either to your history or your video recommendations from YouTube. If you know that you're about to binge-watch a bunch of children's videos and you don't want to be recommended videos like these, this is the option to select. Of course, this strategy works only if you pause before you watch the videos. Otherwise, you'll be in there clearing your watch history before you know it.
- Search History: This allows you to review all the YouTube searches you have conducted. This is helpful when you forget to save a video and you want to reconstruct the search history. These are clickable links that allow you to be taken right back to the YouTube search results for that query.
The Watch Later link
The Watch Later link opens to a new page that allows you to collect videos in a private playlist to watch later. Your channel subscribers won't be able to see this playlist unless you make it public. After you have watched the content, you can quickly remove it from the list. If you use a streaming device attached to your TV, this can be your TV line-up for the evening. You can easily add videos to Watch Later link as described in the following list.
- Add Videos: Click this button to add the selected videos to the Watch Later playlist. You can add videos by YouTube Search, URL or by using Your YouTube Videos. Playlists are useful for organizing the videos you like or want to watch later. For example, you can collect all the One Direction videos you've watched into one pop powerhouse playlist.
- Remove Watched: This is where you can clean up the playlist quickly. If looking through your Watch Later playlist is becoming tedious because of the number of videos listed, you can weed things out by simply clicking the Remove Watched button.
- Play All: This allows you to play all the videos in the Watch Later playlist.
The Purchases link
The Purchases link allows you to view all of the purchases you have made through Google Play or YouTube. You can watch any movies you have purchased yet again at any time from this link.
The Playlist Section link
The Playlist section on the left side of your My Channel page is where you can see all the recent playlists you have either created on your channel or have recently watched. This section is more for your consumption of YouTube content; this is not one of the creator tools for Playlists. You can click on any one of your playlists from here to easily access the creator tools to modify the playlist.
The Subscriptions Sections link
This section on the left side of the My Channel page lists several of the channels you subscribe to; the number of new videos you have yet to view from this channel will be listed just after the channel icon and name. You have the option to sort these by relevance (the default setting — this highlights those channels from your subscriptions section you view frequently), by new activity, or in alphabetical order. This section is intended for you to utilize as a viewer of your own content collections, not a creator looking to manage your subscribers. You can learn more about your channel subscribers in Chapter 10.
The Browse Channels link
This option on the left side of your My Channel page takes you to a new page where YouTube suggests channels from the top 1 percent most popular channels on YouTube that week. Some of the recommendations are based on your recent viewing history.
The Manage Subscriptions link
This link has a clear and descriptive title — use it to go to a new page where you can manage the various YouTube channels you as a viewer have subscribed to. (Figure 3-4 shows an example of a Manage Subscriptions page.)
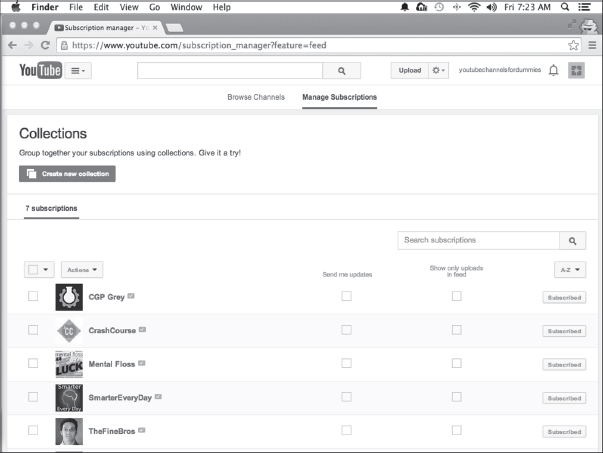
Figure 3-4: The Manage Subscriptions page.
To do all this managing, you'll make (frequent) use of this page's extensive set of links, as described in this list:
- Collections: You can organize your subscriptions into custom groups called collections. For example, if a creator you follow has more than one channel, you can organize those channels into a collection that allows you to keep up with everything that person is doing across a number of channels. The possibilities are nearly endless, allowing you to organize by genre or almost any criteria you can imagine.
- The check box: This button at the top of the subscription list allows you to select all or none of the videos in your list. This is handy when you want to take action on several of your channels at a time.
- Actions: Clicking the Actions button reveals a number of choices, each of which has a check box on the individual channel level of the list. This Actions button is mainly for performing actions on more than one channel at a time. You could, for example, check the Send Me Updates option, which will send you email notifications when a new video has been released; checking Unsubscribe lets you unsubscribe from multiple channels at the same time. These actions can be taken on the individual subscriptions as well.
- Individual Subscriptions: Each channel you subscribe to has a line in the subscription list. The most important options are in the check boxes on each subscription's line:
- Send Me Updates: Do you want to receive an email every time one of the channels you subscribe to uploads a video? Most subscribers don't, so you can leave this box unchecked. If you have a lot of subscriptions, this option can pretty quickly overwhelm your inbox, so use this option with caution. The upside is that you can set it for each channel, so if you have a few channels that you really care about, this feature can be useful.
- Show Only Uploads in Feed: When this check box is selected, you see only new video uploads from that creator in your subscription feed. By default you aren't notified in your subscription feed when this creator comments on videos, favorites videos, or takes any number of actions.
Keeping an eye on more than video uploads might be a good idea in some cases, especially as you're learning about building your audience. For example, seeing how often a channel you admire is commenting on videos and interacting with other creators can give you some insight into how successful creators behave on YouTube. You might learn something about how to interact with your own potential audience.
Customizing and Branding Your Channel
Clicking the My Channel link in the menu along the left side of the YouTube Channel screen takes you straight to the My Channel page, which is where you're going to do the bulk of the customization of your channel. This is a pretty important series of decisions you're about to make, so pay attention to what you're doing. Lots of viewers make decisions about the quality of a channel based on a glance at the My Channel page. If there's one stereotype that pretty much holds true for YouTube viewers, it's that they're highly distractible. A professional-looking front page that holds a viewer's interest indicates to potential viewers that you've put a lot of thought, time, and effort into creating your channel. So get to it!
Creating channel art
The channel art section is in the large gray box at the top of the My Channel page when viewing on a computer. (It will look differently on other devices like mobile phones and TVs, but a computer is the only device you can use to change your channel art, so start there.) By default, it has a few items in it, and you're going to change pretty much all those items. Before getting into the steps of creating your channel art, though, you should keep some important guidelines in mind. YouTube is available on a lot of different devices. Your audience may be watching on a TV, a computer, or a mobile device. Given that fact, YouTube has gone to a lot of effort to create a system that allows your channel to look good across all kinds of delivery platforms. It has come up with some guidelines for artwork that you would be wise to follow. If you pay attention to the size of the graphics needed, you should have no trouble with your channel looking good, no matter how your audience is looking at it.
Channel art is most effective when it is representative of the channel's content. For example, if your channel is about the hottest new shoes, your channel art should include images of shoes.
Before you get around to adding the channel art, you need to create your channel art. This process requires some kind of image creation software. We recommend software like Adobe Photoshop to create custom channel art, but it's an expensive option. If you're investing in the Adobe ecosystem for editing, Photoshop is probably a good option for you. If you're more interested in free tools, something like GIMP, an open source photo editor (available for download at www.gimp.org) might be more up your alley.
YouTube has created a template (see Figure 3-5) that makes the creation of channel art that works across platforms much simpler to create. The template calls for a 2560 × 1440 pixel image that is no larger than 2MB, and provides you with guidance on how to place text and logos to allow the image to work pretty much everywhere.
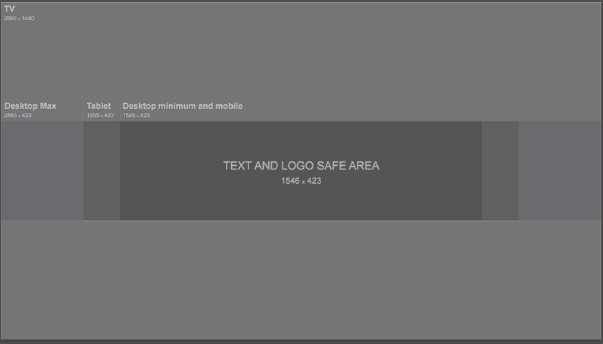
Figure 3-5: The YouTube Channel Art template.
When creating art destined for use in the YouTube channel art template, it is important to adhere to the advice it provides. You need to be sure that your text lands in the sections of the template that will not be covered up by your channel icon or channel links after you upload this image. If you edge too close to the top-left-hand corner, you'll have a hard time maintaining the continuity of the image across devices and operating systems. Your text and logos might be cut off or unreadable on some devices, and that will contribute to viewers dismissing your channel and moving on to something else. Channel art is an opportunity to make a first impression, and the cold truth is that bad channel art can drive away viewers. Be sure to check how your channel art looks on several different devices.
If you find all this talk of pixels and formats confusing, it might be a good idea to consult with someone who has some graphic design experience. Even tracking down a graphic design student to help you tailor an image to the YouTube specifications can be helpful. If you don't feel comfortable doing the art yourself, and finding help isn't possible, YouTube does provide some stock options, which aren't great, but are a far better choice than the placeholder pattern of gray diamonds. If you do ask someone for help with your channel art, it's important to remember that creative professionals like to be paid for their work. Just because your friend is a graphic designer, or your nephew is an art student doesn't mean they want to work for you for free. Even if you don't pay them the market rate, paying them something is the decent thing to do.
Managing channel art
After you've created the art for your channel (or received art from the nice person you convinced to help you), it's time to add that art to your channel. YouTube has made this a pretty straightforward process; here are the steps:
- Back in your My Channel page, click the Add Channel Art button.
You shouldn't have any trouble spotting this button. It's the blue button that says Add Channel Art in the center of the placeholder banner.
If you've already set your channel art and want to change it, the Add Channel Art button is no longer an option. In this case, roll the mouse pointer over the banner, and a small box with the familiar pencil icon appears. Click this icon to edit your channel art and open the Artwork dialog box. - In the dialog box that appears (see Figure 3-6), choose from one of the following options to add new channel art:
- Upload Photos: This is the default option for adding photos to your channel. If you've created your own artwork as spelled out in the previous section, more likely than not your artwork is somewhere on your computer. To upload that artwork, click the Select a Photo from Your Computer button, use the dialog box that appears to navigate to the file's location, and then select it. Alternatively, you can just drag and drop the file onto this window, and it should start the upload.
- Your Photos: Selecting this option allows you to choose a photo from your Google+ photo album. Since you've probably just created this account, it's unlikely that you'll have photos in any Google+ albums — the Your Photos option probably won't be the option you choose. You can safely ignore this.
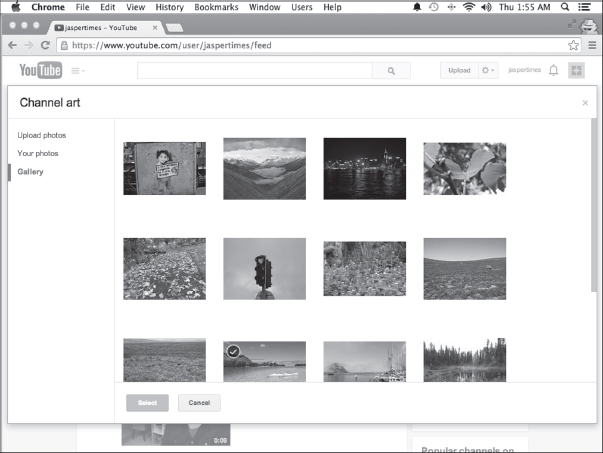
- Gallery: If you haven't created your own channel art, the gallery section shown in Figure 3-7 provides you with some stock images that YouTube furnishes for your free use. Though none of them is great-looking, and they're unlikely to be excellent branding choices for your channel, they're miles better than leaving the default placeholder image as your channels banner.
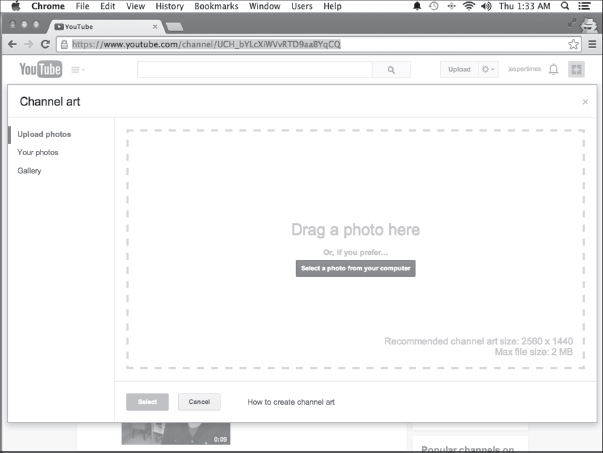
Figure 3-6: The Upload Photos dialog box.
Figure 3-7: The Channel Art gallery.
As you complete each step in the process of branding your channel, it's a good idea to click on the View As Public icon on the top right above your banner art. (The icon has the shape of a globe.) Clicking here lets you look at your channel as the public would see it, without all the controls you see as the owner of the channel. This is the best way to understand how the changes you're making will affect the look of your channel. - (Optional) Crop your photo.
After you select a photo, you'll see a preview with a cropping mask laid over it. If you decide that you want to crop your photo, you can move this cropping mask around to select the portion of the photo you want to use. (Note the Device Preview button that lets you preview what the image will look like on different devices.)
- After the size and placement of the image are to your satisfaction, click Select, and your channel art is in place!
Creating the channel icon
The channel icon is an important aspect of your overall channel art and branding strategy. Though your channel art is the most prominent face of your channel page, the channel icon will be the face of your channel everywhere else. It's also the icon associated with your Google+ account, which means that this icon will appear pretty much anytime your channel is listed on YouTube, and it will appear next to all of the comments you make on the site. So, creating an icon that works is important.
Creating a good icon can be tricky. You want something that is simple and easily recognizable — one that allows viewers to quickly recognize your content as your content, in other words. As usual, if you can't pull all that off, at least don't use an icon that will drive away viewers. Don't use an offensive or obscene image, and definitely avoid foul language. Not only will that stuff alienate potential subscribers, it will get you in trouble with the powers-that-be at YouTube. Keeping things simple is probably the best bet, and even a simple-colored background with the first letter or initials of your channel goes a long way toward adding a degree of professionalism. If you can add a little bit of themed art to that simple layout, all the better.
When creating an icon that's going to work with your channel, follow a couple of basic guidelines:
- Image size: Your icon will appear on the site at 98 × 98 pixels most of the time, but you should create your icon as an 800 × 800 pixel square and upload that size. Let the site scale the image down for you, because it results in the best possible image quality for your icon.
- File format: YouTube recommends that you upload your files as JPG, GIF (no animated GIFs are allowed), BMP, or PNG. All these formats should be available in your image editor, so choose the one that works best for you.
Uploading the channel icon
The default channel icon is the blue box overlaying the left side of your banner art. It's marginally okay, but nothing to write home about, so you'll definitely want to replace it. When you have your icon all designed and ready, follow these easy steps to add the icon to your channel:
- Roll the mouse pointer over the large icon placeholder at the top of your page to make the familiar Pencil icon appear.
Technically, the Pencil icon is referred to as the Edit Channel Icon button.
- Click the Edit Channel Icon button.
Doing so brings up a dialog box informing you that your channel icon is also the icon for your Google+ page and that you need to go to your Google+ account to make the change.
- Click the Edit on Google+ button.
This button brings you immediately to the Upload page on Google+.
- Select a photo using the Google+ dialog box that appears.
As with most things related to YouTube and Google, you have a number of options for selecting a photo. Those options (displayed as a set of links along the top of the dialog box, as shown in Figure 3-8) are described in this list:
- Upload: This option is the one you're most likely to use. In the best-case scenario, you've created an awesome custom icon that truly encapsulates and embodies the spirit of your channel. You can drag and drop a photo onto the dialog box or click the Select a Photo from Your Computer button and navigate to the location where the icon is stored on your computer.
- Albums: If you select this option, you see a list of your Google+ photo albums. If you don't have any, which is likely, you won't use this option.
- Photos of You: This area is also likely to be empty if your Google+ account is brand-new since this section will only be populated with photos that you tagged on Google+ as showing yourself.
- Web Camera: This option allows you to take a picture using your computer's built-in web camera (assuming it has one) and using that image as the icon.
We don't recommend using a casual selfie as your icon if you are just starting out. A nicely designed logo looks more professional than a selfie. An exception is if your channel is a personality-based vlog. - After making your selection, click the Set As Profile Photo button.
You'll be prompted to post this change as a status update on Google+.
- Skip the Status Update step, close the Google+ page, and return to your YouTube page.
Your new icon should be in place. If the icon isn't showing up yet, you may need to refresh the browser window. The icon update can take up to 24 hours in some cases.
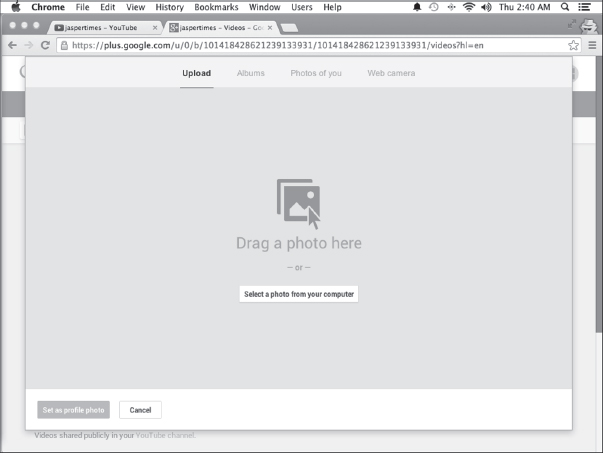
Figure 3-8: The Google+ dialog box for adding an icon to your channel.
Managing your links
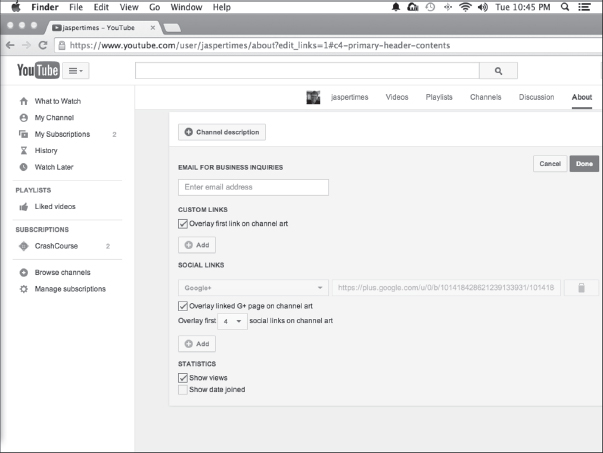
The last part of the channel art setup involves placing link overlays — the custom links pointing to your website or social media pages on your channel art. By default, your channel art has a link to your Google+ page in the bottom-right corner of the banner. You can add links to many social networks, merchandise providers, and even iTunes. You can also add a link to an email address or even your personal website. Adding links is, like many of the tasks in this chapter, accomplished in a few simple steps:
- Roll the mouse pointer over the channel art banner and click the Edit button (the Pencil icon) when it appears.
Doing so takes you to a dialog box for adding and/or editing your links, as shown in Figure 3-9.
- Enter an email address in the Email for Business Inquiries field.
Okay, the vast majority of email you'll receive in this context will be spam, but you never know. A legitimate offer may pop up. Stranger things have happened.
- In the Custom Links section, click the Add button to begin adding your custom links to your website and social media pages.
The dialog box that appears lets you overlay a link on your artwork. YouTube allows users to associate one external website with their channel, which means that you can send your viewers to an external site where they can get more information about you and your channel or maybe even buy merchandise.
- Use the drop-down menus in the Social Links section to add your social media links.
You can also overlay links to many other social media sites and some e-commerce sites, including Twitter, Tumblr, and Facebook, and even sites like iTunes, Google Play, and Café Press, where you can sell stuff to your audience.
- Specify your statistics preferences in the Statistics section.
Selecting the Show Views check box does just that — it displays the number of views your channel has logged. Neither is the Show Date Joined option much of a mystery. Selecting this check box reveals to the world when you started your channel. (Personally, we'd leave the Show Date Joined check box deselected, just because we think you'd prefer to keep the date you joined under wraps. There's no need to tip off the audience that you're new at this.) Any of these “show” options make the selected information public and allow your audience (as well as your competitors) access to this data.
Managing Uploads
Arguably, the most important part of building your channel is adding video content. That is, after all, why YouTube was created. We'll talk more about the nuts and bolts uploading a video in Chapter 9, but we wanted to close out this chapter by at least giving you the big picture.
Before you upload anything to YouTube, it's a good idea to familiarize yourself with the kinds of things that you can't upload to the site. There are several types of content that YouTube doesn't allow, and uploading content that violates these guidelines can get you in trouble. You can even lose your account. YouTube reserves the right to remove any video at any time, but these types of videos are explicitly banned and will get you in trouble with the YouTube authorities:
- Pornography: YouTube doesn't tolerate pornography or any sort of sexually explicit content. YouTube also points out that the company will report any videos of child exploitation to law enforcement if they are uploaded to the site.
- Illegal behavior: YouTube removes videos that show drug abuse, underage drinking or smoking, animal abuse, bomb making, and a host of other illegal behaviors that people might want to document and share.
- Gratuitous violence: Videos that show people being attacked, hurt, or humiliated are also banned from the site.
- Hate speech: Videos that demean a group based on race, ethnic origin, disability, gender, age, or sexual orientation will be removed if flagged by the community.
- Threats or harassment: YouTube is also not a place for stalking, harassing, or predatory behavior. Content of this type will be removed.
- Spam: Videos with misleading titles, descriptions, thumbnails, or other metadata will be removed. Misleading means that the title does not match the content of the video. A good example for a misleading title might be “Katy Perry at my house,” when the video is actually about a cat riding a skateboard. It is also unacceptable to post spam comments on videos — for example asking people to subscribe to your channel or to visit your website if it has nothing to do with the video you're commenting on. This will typically lead to the comment being flagged as spam, and this will make it invisible to other users.
- Copyrighted material: You should only upload content that you own or have the appropriate licensing rights to use. Though the other community guidelines are important to the smooth functioning of the YouTube community, the copyright restriction is hugely important to YouTube as a business. (See Chapter 16 for more information on copyright.)