Chapter 10
Building Your Audience
In This Chapter
- Developing an engaged community of channel subscribers and fans
- Understanding who your fans are and how best to communicate with them
- Setting up annotations to drive audience engagement and interaction
- Making comments work effectively for your channel and your audience
There's obviously more to being an excellent channel manager than simply uploading a few videos and arranging a playlist or two. To truly excel as a channel manager, you have to realize that the core of your YouTube channel activities centers on your audience and understanding and responding to their needs. Your audience, whether it consists of one person or ten million people, is coming to your channel and watching your videos for a reason, whether it's education, entertainment, production information, or what-have-you. Building an audience is about catering to the requirements of your viewers.
In the “good old days” of television, content was broadcast to a mass of viewers who were, for the most part, anonymous. It was never truly clear how many people were watching, so companies such as Nielsen provided estimates. The only feedback the audience delivered was either watching or not watching. As important as it was to retain regular viewers, the television networks knew they had to build an audience as well. They did this by putting together good shows and doing lots of advertising. There wasn't much else for the audience to do other than show up and watch shows when the networks decided.
Fast-forward to Generation YouTube, where a completely different set of audience expectations affect not just viewing patterns but also how viewers expect to interact with the stars of the show. In this sense, the YouTube world is a two-way street where the audience expects a back-and-forth exchange with the content providers. Audiences want an experience on their terms.
As a YouTube channel manager, you need to keep that engagement going. If you manage a YouTube celebrity, consider yourself the agent. Got a brand or business channel? You need to put on your Social Media and Press Relations hat. Either way, you need to treat your audience with the same care and attention that you do your own content.
Developing a Community
Your audience consists of the people who watch your videos. As you acquire bigger audiences, YouTube ranks your channel and content higher, greatly aiding discoverability — the process whereby potential viewers are led to view your content. It's that simple, and it's why audience development is vital to your channel strategy. You want that newly acquired audience to go to your channel page and experience more of your great content. It's a good pattern to establish.
Deciphering audience evolution
Unless you're already a Hollywood celebrity, you probably won't acquire an audience overnight. That's okay. You need to understand that it may take years to build the right audience. Also remember that your channel may be evolving as well. Where you start on YouTube may not be where you end up. Nonetheless, consider the evolution of your audience and how they engage with your content. That process should (you hope) play out with these characteristics:
- Interest: Viewers are interested in something, whether it's Bruno Mars, monster trucks, Indian cooking, radiant floor heating installation, or so much more. They search and come to YouTube to find out more about what they're interested in.
- Curiosity: Impressed by watching one of your videos, your viewers then visit your channel to look for more of your stuff. A nicely designed channel and well-organized playlist enhance their experience.
- Connection: Liking their experience with you and your channel, they now want to stay current and be informed of updates. They choose to subscribe.
- Engagement: Your audience wants even more, so they begin to click that handy Like button on some of your videos and start offering comments. They may engage with each other on the Comments section of your channel.
- Promotion: They then share your content via Facebook, Twitter, and other social media channels with others who share similar interests and also become part of your audience.
- Collaboration: In addition to giving you feedback, your most passionate fans may even work with you on content.
Determining what you want your audience to do
Though your final goal may be to become a YouTube celebrity and have your audience request autographed pictures of you, you have some other homework to do before the audience is eating out of your hand. Your audience requirements come down to two simple things you want them to do:
- Watch: You know the importance of watch time on discoverability. Your audience needs to view your content regularly — and you need to feed them good content regularly.
- Engage: Having viewers watching content is great, but having them actually do something is the frosting on the cake. Engagement is a broad topic that you can read about at length in this chapter. It includes actions such as liking, commenting, messaging, sharing, and clicking.
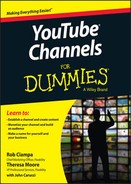
 Engagement is a two-way street. You need to engage back as well. Holly Casto (www.youtube.com/charmandgumption) is the owner and designer of Charm & Gumption, an online gift shop for bloggers and creative types. Aside from having an interesting YouTube channel that support her business, she does a fine job of communicating with her fans, as shown in Figure 10-1.
As you get more viewers, your watch time and engagement level increase. That's why building an audience for your channel can't be left to chance.
Appreciating the importance of community
Communities have developed around common interests for thousands of years. From medieval guilds to book groups to political causes, people have banded together into communities. As the Internet grew in both reach and popularity, virtual communities began to spring up. Suddenly, people could be part of large, diverse communities spread over continents and time zones.
Figure 10-1: Audience engagement through comments.
By bringing the video component to the Internet picture, YouTube made these communities more engaged — and more real. You could actually see your peers. As a result, YouTube communities quickly displayed characteristics important to both creators and companies: They supported and helped their members.
Your community could do much to drive the audience growth for your YouTube channel, but for that to happen you need to be a genuine and active member of the community.
Over time, many members of your community will take that extra step and subscribe to your channel. Subscribers are worth their weight in gold because they watch more and engage more. Clearly that's a good thing, but there's something else: YouTube offers additional features to channels that have a high subscriber count, including fan insights and additional monetization options. (Fan insights provide more detail about who is watching your content, while the additional monetization options enables more ways for you to make money off your channel and content.) As you acquire more subscribers, YouTube gives you more perks.
In the YouTube world, you also hear a lot about fans. Aren't all subscribers fans? Not exactly. Your fans will be that subset of your subscribers who exhibit considerably higher levels of engagement. Take care of your subscribers, but take special care of your fans.
Fans and Insights
If your channel has a large number of subscribers, YouTube provides two interesting options for analyzing your fans in order to learn a bit more about them and (hopefully) communicate with them more effectively. These features — the Fans feature and the Insights feature — are found in the Community section of Creator Studio. Here's how they work:
- Fans: This Fans feature shows your top fans based on their subscriber count and their engagement with your channel, including likes, comments, and subscriptions. This feature also highlights recent activity and provides options for communicating directly via Google+.
- Insights: With the Insights feature, you're able to put your top fans into a Google+ circle. With that in place, you can look at demographic data — where fans are from, for example — as well as information about their recent activity with your channel.
 With the Google+ integration, Insights is a great way to have a “private” discussion with only your fans. You can also share unlisted videos just for them, which is another effective way to engage or to provide a special offer if you're a business.
YouTube can be somewhat vague on how many subscribers you need to access specials feature. That number may also change over time, so be sure to check out https://support.google.com/youtube for the latest details. Often, you'll find out that you qualify when you see these new features show up on your channel. If your channel has enough subscribers to warrant access to the Fans and Insights features, you can do so using the following steps:
- From the YouTube home screen, click the blue Sign In button in the top-right corner to log in to your YouTube account.
If you don't see the blue button, you are likely still logged in. YouTube doesn't log you out when you leave the page.
- Click the Channel icon in the top right of the page and then click Creator Studio in the menu that appears.
- Click the Community section of Creator Studio in the menu on the left side of the screen.
- Select either the Fans or the Insights option from the menu that appears.
You probably should check out Fans first to get a sense of the community where the Insights are derived.
Fans and Insights are different from the Fan Finder feature, found under the Channel section of Creator Studio, which has more to do with advertising on YouTube. You can find out more about YouTube advertising in Chapter 13.
Understanding Subscribers and Their Value
YouTube allows viewers to connect more deeply with the channels they like by allowing them to become subscribers. To subscribe to a channel, all a viewer needs to do is go to a channel's home page and click either the red Subscribe button or a link to the Subscribe button. (The Subscribe button is shown in Figure 10-2.)
Each Subscribe button also shows the number of current subscriptions to the channel, which is a great way to see how much interest lies in a particular channel.
Understand that your subscribers have both YouTube value — in the sense that more subscribers lets YouTube know that your channel and content are important — and in some cases monetary value. If you make money from YouTube or are planning to, you'll look at audience data and advertising performance to determine what your subscribers are worth. You can read more about these topics in Chapters 11 and 14.
Figure 10-2: The YouTube button for new subscription requests.
Viewers must be logged in to subscribe to a channel. If they happen to click the Subscribe button when logged out, YouTube simply asks them to log in with their Google credentials.
If a viewer is logged in and visits a channel page that he has subscribed to or visits a video watch page that's part of one of his subscribed channels, he sees a gray Subscribed box with a check mark in it instead, as shown in Figure 10-3. Note that each Subscribed button has the gear icon next to it — click that button and a menu appears, listing options that allow subscribers to control how they receive channel updates.
Figure 10-3: YouTube button for existing subscribers.
Convincing viewers to subscribe
Channel managers have several options when it comes to getting viewers to subscribe:
- Below the channel art: On every page that has channel art (such as the home page, About page, Watch page, and channel pages) you'll find a Subscribe button, under the right side of the channel art. (Channel art is described in Chapter 2.)
- On the Watch page: Users can subscribe to a channel by viewing a video on the Watch page — the page where viewers watch a video. The Subscribe button is underneath the left side of the video — below the channel name and next to the channel icon. Chapter 2 describes the characteristics of the Watch page.
- Through custom links: Channel managers can create subscription custom links that will appear on the channel's About page and in the channel art. Start with the following line of code, and add the name of your channel to yourchannelname:
http://www.youtube.com/subscription_center?add_ user=yourchannelname - In the channel description: Subscriber links can be useful in the descriptions uploaded as part of your video metadata. Just use the subscriber link code shown in the preceding paragraph. Chapter 9 describes how to modify and optimize (for video SEO) a video description.
Subscriptions links can get long and unsightly. Don't be afraid to substitute a shortlink instead. You also get additional tracking to see which subscription links generate the most clicks. Chapter 9 introduces short-links and the software needed to track them.
- Through annotations: A video overlay is a great way to add a subscription link to your channel. YouTube provides all the tools necessary to place these overlays, known as annotations, to video without requiring any editing. You can read about annotations later in this chapter.
- Recommendations: Subscription buttons also show up under the Recommended Videos section of a channel page. The channel manager can hand-select specific channels that may be of interest to the viewer. (Note that, unlike other Subscribe buttons, which are red, these buttons are gray with no subscriber count.)
- With web URLs: It's easy to get people to subscribe from places not on YouTube; just include a Subscription link like the one shown earlier. Clicking the link brings them to a YouTube channel, so determine whether you want the link to open in another tab or window if you don't want the subscriber to exit your site.
Many channel managers put a link to the channel page as the target of the Subscribe link. If you want to bring them to your channel, please let them know that; otherwise, make the Subscribe button trigger a subscription request.
- The old-fashioned way: Have your video personality look straight into the camera and ask them to subscribe. They can say the name of the Subscribe link. There's no harm in asking! You can even combine an annotation link here to make it even easier.
There are many ways to ask your viewers to subscribe. Don't feel that you have to use only one method. YouTube allows a good deal of flexibility in generating subscription requests, so go ahead and experiment to see what works best for your audience.
Specifying how subscribers get updates
Being a subscriber to a channel is a lot like being a supporter of a local museum: You get notified about things first, and you get to see things before anyone else. Yes, being a subscriber has its benefits. Subscribers can be notified when you
- Upload a video
- Add a video to a public playlist
- Like a video or save a playlist
- Subscribe to a channel
Subscribers can choose between being notified of all your events or just your uploads. (They do this by clicking the gear icon next to the gray Subscribed button and making their choice from the options that appear.) As a channel manager, you choose how much information you want to share with your subscribers. This is done through the channel feed, which is discussed in some detail in the next section. Don't forget to manage the frequency of communication as well, which is triggered from all the activity discussed earlier.
 Your subscribers are your gold, so keeping them happy with your channel and the frequency of your notifications is important. If they receive too many from you, they may unsubscribe; too few and they may forget about you. Moderation is important.
You should understand how your subscribers receive your channel updates:
- Mobile device notification
- Accounts connected to social media
- Channel feed
Your channel feed is your richest source of updates. Subscribers receive updates from several areas of the platform:
- What to Watch: When viewers log in to YouTube, click the YouTube button in the top left corner of their browsers, or start the YouTube app on their mobile devices, they land on the What to Watch page.
This page is customized for each user because YouTube makes video suggestions based on a viewer's subscriptions and recommendations derived from her viewing history.
- My Channel: This is your channel, not the public view. You can edit your channel page directly here or go into the Video Manager to make individual video-playlist edits or manage your channel settings and analytics. (Details of your YouTube channel are covered in Chapters 2 and 3; additional information on Video manager is also in Chapter 9.)
- My Subscriptions: When viewers are logged in, they find their subscriptions on their home pages or in the guide. This is where all their subscriptions can be found and sorted by uploads or by all activity. Users can also manage subscriptions and create collections of channels in this section. (For more on subscriptions and guides, see Chapters 2 and 3.)
Setting the channel feed and privacy levels
You can control what your subscribers see by configuring your channel feed, as shown in Figure 10-4.
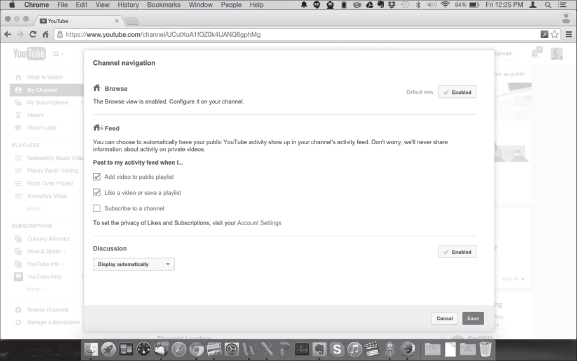
Figure 10-4: Setting your channel feed.
To configure your channel feed, do the following:
- Log in to your YouTube account.
- Click the guide icon next to the YouTube logo in the top left of the screen and select My Channel from the menu that appears.
The My Channel screen appears.
- Hover the mouse cursor over the channel name to bring up the Edit button.
The channel name sits just below the channel art; the Edit button should appear in the top left, below any links you may have configured.
- Click the Edit button and then select Edit Channel Navigation from the menu that appears.
Doing so brings up the screen shown earlier, in Figure 10-4.
- In the Feed settings section, select the check boxes of those activities you want to share with your subscribers.
Your subscribers can be notified when you:
- Add a video to a playlist
- Like a video or save a playlist
- Subscribe to a channel
- Click Save.
You can also set the privacy of your likes and subscriptions under your channel's account settings. To access your account settings, click the Account Settings link from the Edit Channel Navigation screen (refer to Figure 10-4) or by following these steps:
- Log in to your YouTube account.
- Click the Channel icon in the top right corner of the YouTube home page.
- Click the gear icon to the right of the Creator Studio button in the menu that appears.
- Select Privacy on the left side of the Account Settings navigation bar.
- Select the check box for the information you want to make private.
Your privacy options are:
- Keep your liked videos and saved playlists private
- Keep your subscriptions private
- Click Save.
You can also go directly to the privacy setting by using yet another method visiting www.youtube.com/account_privacy.
It's hard to use a product from Google, especially YouTube, without running into Google+, or G+, as it is sometimes known. Launched in 2011, Google+ is the company's fourth attempt to deliver a social media platform designed to counter Facebook.
What made Google+ unique is the concept of circles, which allows users to group their social media contacts into distinct groups. Different content could be easily shared with different circles. While on Google+, users could see updates from all their different circles on what was known as the stream.
Google+ concurrently evolved into an identity service for other Google properties such as Gmail, Google Maps, Google Play, YouTube, and others. In other words, Google+ made it easy to link many of your online efforts. But there's the rub: Google+ was starting to look like many different things, and the broader user community started to become perplexed.
Making matters worse was the integration of Google+ with YouTube comments in 2013, forcing users to comment with their Google+ profiles exposed and no anonymity. However noble the intent to tame the often-wild YouTube comment jungle, the YouTube nation bit back with a vengeance, including a less-than-flattering response from Jawed Karim, one of YouTube's cofounders. Since then, Google has softened the Google+ stance for many of its products, including YouTube.
Nonetheless, with so much Google+ integration in YouTube, channel managers need to gauge how important Google+ is to their communities. Don't be deceived: There are perks with Google+ integration with YouTube, especially around fan management. In the meantime, YouTube channel managers should stay current on Google+ moves. The YouTube official blog (http://youtube-global.blogspot.com) is a great place to start.
Your public channel uploads are automatically part of your feed and can't be set as part of the feed or privacy settings. Only the subscribers can specify whether they want to be notified about your new public videos.
Treating subscribers and nonsubscribers differently
To provide a more customized experience for viewers, YouTube allows you to treat subscribers and nonsubscribers differently when they visit your channel. (Subscribers don't necessarily want to see the same video when they show up at your channel, because they've likely already seen it, so it makes sense to treat them differently than nonsubscribers.)
Working with a channel trailer
The channel trailer is a prominent video that's shown whenever viewers first arrive at your channel. It's your chance to convert nonsubscribers, to inform them about what they can expect from your channel, get them excited about you and your content, and give them the details of your programming schedule.
You won't need to change out your channel trailer frequently, because a viewer who subscribes isn't shown this trailer again. Subscribers are greeted by a What to Watch Next page instead of a channel trailer.
Several factors affect what shows up on the What to Watch Next page. If you're live-streaming, that stream shows up first. If you're running a TrueView YouTube advertising campaign (see Chapter 13), your ads will show here. If none of these applies, your related video or most recent uploads will appear to subscribers.
Setting the Channel Browse view
To show a channel trailer, you need to set up Channel Browse view. To do so, do the following:
- Log in to your YouTube account.
- Click the guide icon next to the YouTube logo on the top left of the screen and select My Channel from the menu that appears.
The My Channel screen appears.
- Hover the mouse cursor over the channel name to bring up the Edit button.
The channel name sits just below the channel art; the Edit button should appear on the top left, below any links you may have configured.
- Hover the mouse cursor over the Edit button and then select Edit Channel Navigation from the menu that appears.
The Channel Navigation screen appears (refer to Figure 10-4).
- Click the Enable button in the Browse section if it doesn't already show a check mark.
- Click Save.
Managing Comments
Many people tend to forget that YouTube is also a social media platform. That's a bit odd because it's one of the most heavily trafficked websites on the planet. In fact, one reason YouTube is so effective for creators and companies is precisely because its platform provides a powerful connection not just between a viewer and your brand but also among your audience.
Seeing why comments matter
Your interaction with your viewers and channel visitors is an important signal to not just your current subscribers but also potential subscribers. It tells them that your brand and your channel and content are worth their time. Encouraging comments is a great way to grow an audience and feed your community.
Make a concerted effort to add your own follow-ups to comments posted when you upload a video. Channel programming is about regularly scheduling uploads. Channel manager programming is about always responding to comments in a timely manner.
Your options for managing any particular comment are listed here:
- Allow the comment.
- Allow and respond to the comment.
- Remove the comment.
- Report spam or abuse.
- Ban the commenter from the channel.
You'll typically allow and respond to comments. You'll learn the details of managing comments in the following sections.
Similarly to likes and dislikes on video, viewers can like and dislike comments as well. Pay attention to comments that receive both large numbers of likes and dislikes.
Viewers generally appreciate being recognized by creators and channel managers. You can add the name of a viewer in a comment by typing a plus sign (+) and then their name. YouTube helps by autocompleting the name, so you're assured that the person will be notified of your outreach.
You can respond to comments in one of two ways:
- On the Watch page: Both viewers and channel managers can add comments just below the channel description (refer to Figure 10-1). The Comment field is in the All Comments section; just type right where it says “Share your thoughts.”
Commenters must be logged in to make a comment. If they are not logged in, YouTube asks them to do so.
- Community Comments Section in Creator Studio: Only channel managers can respond here. The idea is to provide a convenient place for channel managers to respond to comments for all their videos.
Setting up your channel for comments
You may hear some people say not to allow comments on your channel. We're convinced that you'd give up much of the effectiveness of YouTube by following that advice. Much of the concern folks have about comments stems from the fact that some channel managers have done a less-than-stellar job around content moderation, which meant that some channels' Comments sections turned into toxic cesspools. That's a sign of a channel manager falling down on the job, not proof that comments can't work in a YouTube context. In the next section, you can find tips and techniques that you need to keep from falling down on the job.
Enabling channel-level comment controls
As a channel manager, you first have to enable comments for your entire channel; with that out of the way, you can then move on and decide your level of comment control as well.
You control whether comments are posted automatically or only with your approval. In the following steps, we explain how you can screen bad comments before they get posted.
- Log in to your YouTube account.
- Click the guide icon next to the YouTube logo on the top left of the screen and select My Channel from the menu that appears.
The My Channel screen appears.
- Hover the mouse cursor over the channel name to bring up the Edit button.
The channel name sits just below the channel art; the Edit button should appear on the top left, below any links you may have configured.
- Hover the mouse cursor over the Edit button, click it, and then select Edit Channel Navigation from the menu that appears.
The Channel Navigation screen appears (refer to Figure 10-4).
- Look at the Discussion section and confirm that the button to the right is selected and labeled Enabled.
If it says Enable with no check, simply click the button. Your channel is now enabled for comments.
- Determine how you want comments displayed by clicking the button under the Discussion label and choosing the appropriate option.
Your choices are
- Display Automatically posts appropriate comments without your approval.
- Don't Display Until Approved requires you to explicitly approve a comment before it is posted.
- Click Save.
In the meantime, you need to enable or confirm that your channel is set up for comments.
Enabling video-level comment controls
With your channel enabled for discussion, your videos can receive comments. You can also control comments on a video-by-video basis. You have three ways to enable comments on individual videos:
- Default: YouTube allows channel and video comments by default.
- Upload defaults: In the Creator Studio Channel section, you set the default comment controls for all future uploaded videos. This allows you to set a general policy so you don't have to configure each individual video.
- Advanced settings: In the Creator Studio Video Manager section, set the comments controls for an individual video and click Save Settings. (We show you how to do this one in a sec.)
For the last two options, you can go with one of these two settings:
- All will post appropriate comments for the video without your approval.
- Approved requires you to explicitly approve a comment on the video before it is posted.
To set up video commenting at the individual level, do the following:
- Log in to your YouTube account.
- Click the Channel icon in the top right of the page and then click Creator Studio in the menu that appears.
- On the left side of the screen, click the Video Manager heading in Creator Studio's navigation menu.
- Select Videos from the drop-down menu that appears.
- Scroll through your videos to find the one whose Comments feature you want to configure.
If you have quite a few videos, you can use the search bar on the Videos page to track down the one you want.
- Click the Edit button to the right of the video and then select Advanced Setting under the video.
- Under Comments, check the Allow Comments box to allow comments for this video. (To block comments, uncheck the check box.)
- Click the button to the right of All Comments to select whether you want all comments added automatically or whether they need to be approved first.
- Click the blue Save Changes box on the bottom right to save your changes.
Moderating comments
As your audience engages more and more with your videos and your channel becomes increasingly successful, comment moderation on a video-by-video basis can become rather tedious. Fortunately, YouTube allows you to moderate comments all in one place — in the Community Comments section of Creator Studio. To access these comments:
- Log in to your YouTube account.
- Click the Channel icon in the top right of the page and then click Creator Studio in the menu that appears.
- On the left side of the screen, click the Community heading in Creator Studio's navigation menu.
- Select Comments from the drop-down menu that appears.
Doing so brings up the Comments page, as shown in Figure 10-5. By default, clicking on Community should bring you automatically to the Comments section.

Figure 10-5: Managing YouTube comments.
Note the following three tabs:
- Published Comments: These are the comments currently posted on your channel. You can do all the standard things with these comments — allow the comment, allow and respond to the comment, remove the comment, report the comment as spam or abusive, or ban the commenter from the channel.
Whether you're on the Watch page or in the Comments section, you have icons and pull-downs to the right that allow you to remove a comment, block a commenter, or report spam. (You'll probably make much use of the Trash icon, which quickly vaporizes an inappropriate comment.)
- Held for Review: Comments are held here when you don't allow automatic posting or when comments are caught by blacklist filters you set in the community guidelines. (For more on blacklist filters, check out the “Configuring Community settings” section, later in this chapter.) If the comment is acceptable, click the Check button; otherwise, click its associated Trash icon to remove it. Review your held comments regularly so the appropriate ones get posted on your channel.
- Likely Spam: YouTube, in its efforts to root out spam, places comments here that it regards as likely spam. Ultimately, however, you are the judge of what's spam and what's not. You should make sure that YouTube hasn't jumped the gun and mischaracterized a comment as spam. If it's not spam, just click the check button to accept; otherwise, click the Trash icon to remove it.
Anything you can do to a single comment on the Comments page — accept, respond to, delete — can be done to multiple comments in one fell swoop. Simply check one or more of the comments you're moderating and take bulk action.
Reacting to inappropriate comments
As a channel manager, you need to draw the line as to what comments are appropriate to be shown on your channel. Just because someone disagrees with you doesn't mean you have to call out the military. Some channel managers and creators like a debate, but there are situations where comments are abusive and inappropriate, while providing no benefit to you, your viewers, or your community.
With comments, you have the following options:
- Remove. This will simply delete the comment.
- Report spam or abuse. Comments and those who comment are subject to the same community guidelines. (For more on community guidelines, see Chapter 9.) The Report Spam or Abuse flag is there to report a guideline violation, not a channel or video comment disagreement. See the next option if community guidelines are adhered to and yet you still need to address a situation.
- Ban from channel. Sometimes you just need to divorce yourself from certain viewers. This setting prevents them from posting comments. If circumstance change and you want them back, then you can remove them from the banned user list in your Community settings. (More about that later.)
To remove a comment, report spam or abuse, or ban a user from your channel, channel managers can:
- Use the pull-down to the right of the comment that appears on the Watch page. (See Figure 10-6.)
- Manage a comment from the Community Comments section in Creator Studio. (See Figure 10-7.)
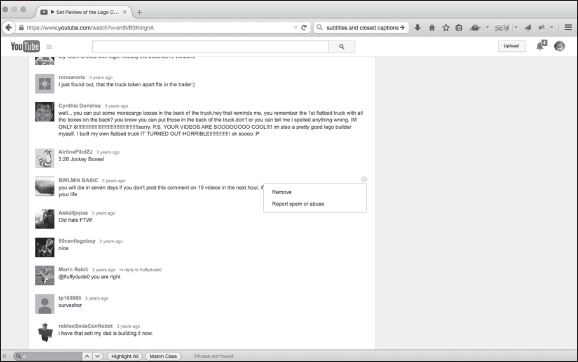
Figure 10-6: Removing comments from the Watch page.
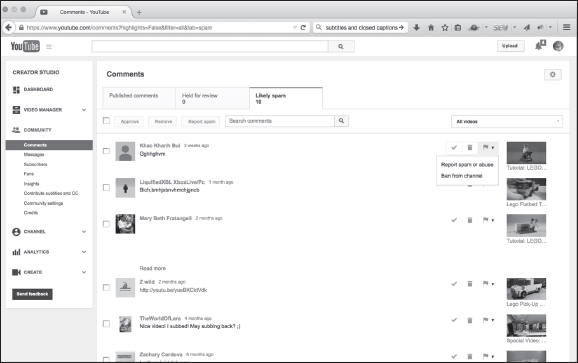
Figure 10-7: Managing comments from the Community section of Creator Studio.
User anonymity has been a blessing and a curse since the early days of the Internet. In some instances, it facilitated very honest discussion, and in other cases it provided a cover for bad behavior and malicious intent. This latter group is known as trolls. Popular websites, such as the Huffington Post, decided to forbid anonymous comments because their moderators were too busy filtering out trolls and spam rather than moving the discussion forward. Because YouTube is a social platform with a massive audience, it has attracted more than its fair share of trolls, much to the frustration of channel managers and viewers alike.
Making matters worse, YouTube's platform is decidedly videocentric, which can more easily trigger a response than, say, a three-page blog. YouTube's ease of adding comments didn't help either, because viewers (or malcontents) could add a comment easily, instantaneously, and anonymously. YouTube had a challenge on its hand.
Starting in late 2013, YouTube began putting controls in place to counter trolls as well as spam, because neither serves part of the discussion around a video. It started off by forcing a deeper integration with Google+ to “pierce the veil of anonymity.” Though this strategy was well-intentioned, many legitimate viewers cried foul over privacy concerns, with hundreds of thousands of users signing an online petition against what they saw as heavy-handed restrictions.
By 2014, YouTube backed off some of the requirements, but provided channel managers with more tools and controls, such as blacklisting and keyword flagging, to help preserve the integrity of their channels. It's gone a long way toward getting the problem under control, but it will remain an evolving situation for YouTube and many other social platforms.
Using Messaging
Sometimes your audience prefers not to have a discussion in a public forum, so YouTube came up with a messaging system. With it, your viewers can communicate directly with you.
If you've been using YouTube for a while, you may be familiar with the Inbox feature, which has been replaced by Messaging. Be sure to clear out your old Inbox and start using Messages in its place. New users don't have to worry about this.
Messages are an important way to build an audience, but as with comments, managing a large number of messages can be time consuming.
Managing messages follows the same pattern as moderating comments, except that you don't see links to your video content and you have different tabs. To access your messages, do the following:
- Log in to your YouTube account.
- Click the Channel icon in the top right of the page and then click Creator Studio in the menu that appears.
- On the left side of the screen, click the Community heading in Creator Studio's navigation menu.
- Select Messages from the drop-down menu that appears.
Doing so brings up the Messages page, as shown in Figure 10-8.
Note that the Messages page has four tabs — not the three you see with Comments:
- Approved messages: These are audience messages that have made their way to you. Feel free to respond to a message, remove it, block it, or report a message as spam.
Check your messages regularly and respond to important subscribers or audience members in a timely manner.
- Filtered Messages: These are messages caught by the filters you set in the Community Guidelines section. The settings are discussed in the Configuring Community Settings section, later in this chapter.

- Likely spam: As with comments, YouTube wants to do its part when it comes to filtering out spam hiding as messages, but ultimately you have the yea or nay here. Just double-check to make sure YouTube made the right decision when characterizing a message. If a message is not spam, just click the check button; otherwise, click the Trash icon to remove it once and for all.
- Sent messages: These are messages that you've sent.
- Approved messages: These are audience messages that have made their way to you. Feel free to respond to a message, remove it, block it, or report a message as spam.
As with comments, anything you can do to a single message on the Messages page can be done to multiple messages in one fell swoop. Simply check one or more of the messages you're moderating and take bulk action.
Configuring Community Settings
You've probably noticed some similarities between comments and messages. Both of these involve the management of users. YouTube makes it easy to manage users from a central location known as Community Settings. To access Community Settings, do the following:
- Log in to your YouTube account.
- Click the Channel icon in the top right of the page and then click Creator Studio in the menu that appears.
- On the left side of the screen, click the Community heading in Creator Studio's navigation menu.
- Select Community Settings from the drop-down menu that appears.
Doing so brings up the Community Settings page, as shown in Figure 10-9.
Community settings consist of three sections:
- Automated filters: There will be viewers who are constructive and viewers who are not. That's just the nature of YouTube. This is where you manage:
- Approved users: Enables automated posting of comments and messages from identified users.
- Banned users: Block comments and messages from identified users.
Both approved and banned users can be managed using their Google IDs, Google+ profiles, or Google+ circles.
- Blacklist: Comments and messages that match phrases or words in this list will be held for review. This also applies to live chats and the content will be blocked.
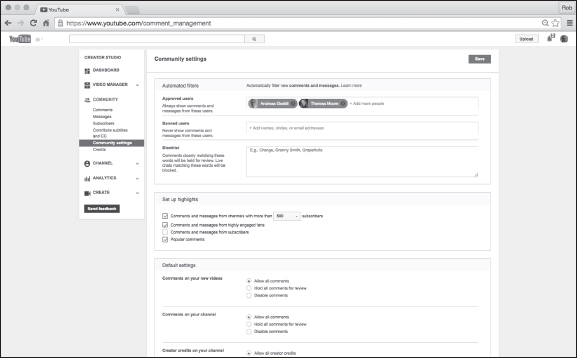
Figure 10-9: YouTube Community settings.
- Set up highlights: This helps you limit what comments you see in order to help you identify the most relevant ones. This is important because you may want to respond to specific community members. If you have tons of comments, this will prevent you from seeing all of them. Approved comments will still end up on your channel, but you may not see them all.
- Default settings: This is your overall comment management. You can:
- Allow all comments
- Hold all comments for review
- Disable comments
Think hard before disabling comments. It's tough to develop a community when you've taken away a key engagement component of YouTube.
Getting Viewers to Engage
After you have a solid channel and an active audience commenting, messaging, and sharing your content, you have to ask whether they're doing everything you expected. In Chapter 5, we talk about establishing the goals for your channel. Some of those goals may be YouTube related, such as getting more views and subscribers, or they could be more commerce-oriented, such as influencing a brand decision and driving a product purchase from a website. Either way, you need to get your audience to click on the video and take the next action.
It's all about the click, and YouTube has some tools to make that click happen.
Working with annotations
Annotations are overlay elements that you can add to your existing videos. They allow a viewer to do something when they click on the annotations, such as subscribe, get more information about you, or view more content. (An annotation also happens to be one of the best ways out there to get your audience to engage with your channel, just in case you were curious.)
For channel managers, annotations are editable fields that can be added to videos after they're uploaded. Annotations can be modified and updated at any time. In other words, you're not stuck with an annotation once you've created it; you can change it, delete it, move it, and so on. Annotations can just be plain text or links back to other content on YouTube, or off YouTube, such as specific social networks, nonprofits, fundraising, retails accounts, and other associated websites.
Use annotations to create what are called custom end-cards — a collection of one or more annotations at the end of a video that help instruct viewers in what to do when the video is completed. This can also include subscription requests. Custom end-cards are good for branding consistency, and they always helps your audience identify with your content. Figure 10-10 shows what an end-card could look like.
Exploring the annotation types
YouTube would seem to subscribe to the notion that variety is the spice of life, given the number of annotation options it offers. The following list gives you an overview:
- Speech bubble: This annotation is a lot like the clouds you see in newspaper comics. Use it whenever you want to visually express thoughts or spoken words.
- Note: This annotation is similar to a speech bubble, except that the text is enclosed in a box.
Figure 10-10: Use of an end-card.
- Title: An overlay name for your video, like one you might add during the editing process. Doing it as an annotation lets you be more flexible later on if you decide to change the title. Titles are non-clickable.
- Spotlight: Use this annotation to create custom end-cards or to highlight an element in the video. Spotlight annotations are different from other types of annotation because they only appear when the viewer moves the mouse over the section of the video that has the annotation. It minimizes viewers distraction while still provide a path for engagement.
- Label: When a viewer hovers the cursor over the annotation, your label appears. This is commonly used for videos featuring multiple products at a time on the screen. Viewers can choose what interests them most and interact with only that item. Labels prevent the video from getting cluttered and does not take away from the viewing experience.
Specifying an annotation target
Though coming up with a cool annotation design can be a lot of fun, never lose sight of your end goal. Annotations are meant to point your viewer to some new place on the Internet — another video, a playlist, an associated website, you name it. Above all, this new place — the target of your annotation — has to relate to the video that was viewed.
Viewers need be directed to targets that make sense based on the context of the video. If they feel misled or sent to a confusing target, chances are good that they won't click on another annotation. Even worse, they may unsubscribe from your channel.
Your site must be in good standing to use annotations. See Chapter 9 for more information to learn more about keeping your channel in good standing.
Setting up annotations
To create annotations, follow the same path you'd use when working with any video on your channel — in other words, you need to pay another visit to the Video Manager. To set up annotations, do the following:
- Log in to your YouTube account.
- Click the Channel icon in the top right of the page and then click Creator Studio in the menu that appears.
- On the left side of the screen, click the Video Manager heading in Creator Studio's navigation menu.
- Select Videos from the drop-down menu that appears.
- Scroll through your videos to find the one you want to annotate.
If you have quite a few videos, you can use the search bar on the Videos page to track down the one you want.
- Click the Edit button to the right of the video.
Doing so brings you to the Video Editing page; the Info & Settings tab is shown by default.
- Select the Annotations tab above the video.
The Annotations tab of the Videos page appears.
You can alternatively select the down arrow next to Edit, which provides a drop-down where you can select Annotations that will drive you to the Annotations section in the Video Editing page. The first way, you have to take two steps, the second way you only take one step to get to the Annotations tab. - Click the + Add Annotation button on the right side of the video.
- Choose an annotation type from the menu that appears.
Your choices are Speech Bubble, Note, Title, Spotlight, and Label.
- Choose when the annotation runs by either dragging the mouse cursor over the Play bar to the point where you want the annotation to show or manually entering the times in the Start and End boxes.
- Add text to the annotation text box and customize the font size, font color, and background color by using the editing toolbox that's provided
- To make your annotation a clickable link, select the Link check box.
- Paste the URL into the field under the Link check box.
- Click the Video button to the right of the Link check box and select the link type.
You must use YouTube-accepted links, which include the following targets:
- Another video
- A playlist
- Another channel
- A Google+ profile page
- A Subscribe prompt
- A fundraising project
- An associated website
- A merch (an approved retail site)
- If you've chosen a linked video, set the start time.
- Click the Open Link in a New Window button if you want the clicked link to open in a new window.
- On the Annotations tab, preview the newly annotated video, as shown in Figure 10-11, and be sure to play and pause the video when the annotation appears.
- Using the sizing handles, change the annotation size and location, if necessary.
Do not put annotations at the top of a video or in the lower third, because they can be obstructed by overlay ads.
- Click the Apply button to save your work.
Getting creative with annotations
Want to take annotations even further and provide an even more interactive experience for your audience? Use annotations to offer surveys your viewers can then use as an easy way to decide what they most want to view from you.
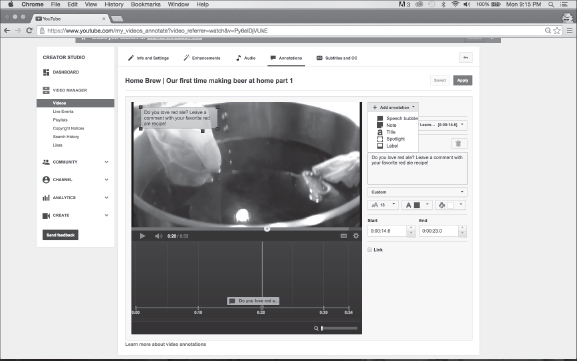
Figure 10-11: Setting up annotations.
In Figure 10-12, you can see how British Airways does a great job of helping its audience choose what adventure video to watch next. (To see this nice bit of annotation work in the context of YouTube, check out https://www.youtube.com/watch?v=d6VdAR3-O1U.)
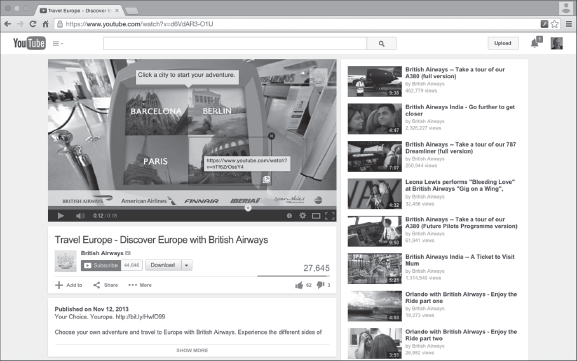
Figure 10-12: Using annotations to help viewers decide what to watch next.
Be sensible about annotations. They should complement, not detract from, the viewer's experience. Don't be shy, either. The end of a video is a wonderful place to use an ask a viewer to subscribe.
In Chapter 11, you find out how to assess how much your audience likes your channel. That assessment should be able to tell you how much they like your annotations as well.
Adding branding to the mix
Audiences engage with your channel, but they also come to recognize your brand — those unique elements that tell the world your content is yours rather than someone else's content. YouTube recognizes that branding is a big deal in our content-saturated world. That's why it goes out of its way to provide some additional capabilities to apply branding without forcing you to invest the additional time and effort that always comes with an additional video edit.
Branding was previously known by the more confusing name: InVideo programming.
When it comes to branding, YouTube allows channel managers to do the following:
- Add a brand watermark to the top left corner of each video on the channel.
- Automatically add a short video as a branded introduction to each of your channel's videos.
To set up branding for your channel, follow these steps:
- Log in to your YouTube account.
- Click the Channel icon in the top right of the page and then click Creator Studio in the menu that appears.
- On the left side of the screen, click the Channel heading in Creator Studio's navigation menu.
- Select Branding from the drop-down menu that appears.
The Branding page appears, as shown in Figure 10-13.
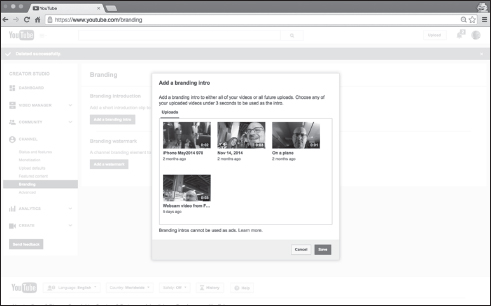
- To add a standard opening branded video to your content, click the blue Add a Branding Intro button. (See Figure 10-14.)
You can upload a video that's three seconds or less as your intro. This branding video must already be on your channel and you should set its privacy to unpublished. Refrain from making the introduction an advertisement per YouTube policy. You can subsequently change branded intros, but do so sparingly so you don't alienate your audience. You can also remove a branded intro by simply clicking the Remove button.
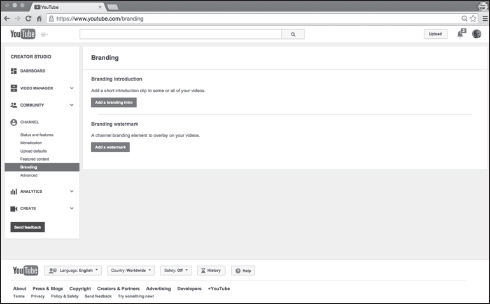
Figure 10-13: Video branding options.
- To add an overlay brand watermark, click the blue Add a Watermark button. (See Figure 10-15.)
Upload a PNG or GIF file less than 1MB in size. After you've saved the branded watermark, choose the duration for when you want it to show:
- For the entire video.
- At end of the video.
- At a custom time within the video.
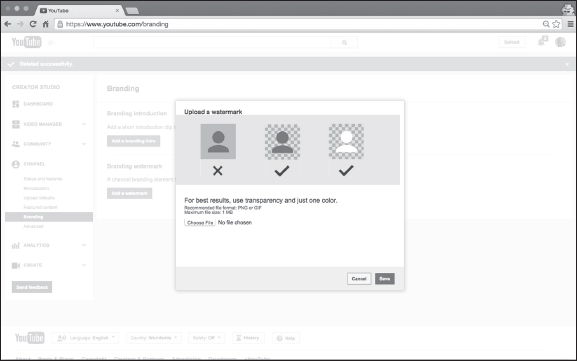
Figure 10-15: Adding a brand overlay watermark.
Like a branded video intro, you can subsequently remove a watermark by clicking the Remove button.
The full branding experience may not be fully integrated into all mobile devices.
Capturing the Captioning Opportunity
Language and sound should not be barriers to connecting with your audience. YouTube provides tools for subtitles and closed captions. Subtitles and closed captions allow viewers who don't speak your language to watch and understand your video. Even viewers with hearing disabilities can enjoy watching your content, too.
Adding subtitles and closed captions
Don't let the thought of dealing with closed captions and subtitles scare you. Working with these elements is similar to working with any other video element on your channel — in this, as in all things, Video Manager is your friend. Use the following steps to create subtitles and closed captions:
- Log in to your YouTube account.
- Click the Channel icon in the top right of the page and then click Creator Studio in the menu that appears.
- On the left side of the screen, click the Video Manager heading in Creator Studio's navigation menu.
- Select Videos from the drop-down menu that appears.
By default, clicking on Video Manager should bring you automatically to the Videos section.
- Scroll through your videos to find the one you want to work with.
If you have quite a few videos, you can use the search bar on the Videos page to track down the one you want.
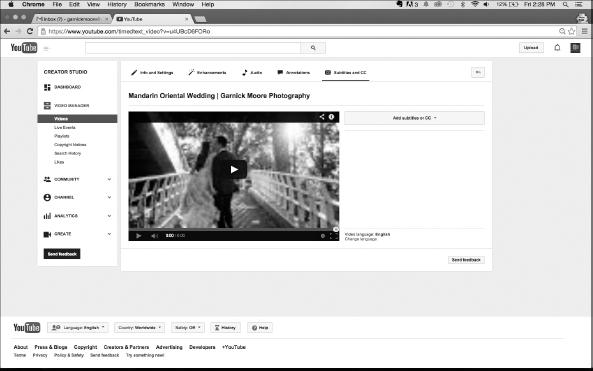
- Click the Edit button to the right of the video and select the Subtitles and CC tab from the menu that appears above the video.
Doing so brings up the Subtitles and CC tab of the Videos page, as shown in Figure 10-16.
You can also click the down arrow to the right of Edit button and select Subtitles and CC directly. - Click the Add subtitles and CC drop-down menu to the left of the video to view your language choices.
- Choose your language or search for it in the search box.
After your language is selected, you'll be prompted with how you'd like to add your subtitles or closed captions.
- Select your method:
- Upload a file. Add a text transcript or timed subtitles in the form of an uploadable file.
- Transcribe and set timing. Type or paste a transcript into the video transcript box that comes up on the right of the video. YouTube autoconfigures the timing.
- Create new subtitles or CC. Add captions as you watch the video either by uploading a transcript file or by entering the text directly into a transcript box. You can pause and play while doing this.
Having viewers contribute subtitles and closed captions
Some channels, known as participating channels, allow their own viewers to submit subtitles and closed captions. Expect this limited function to be more broadly available in the future, representing a great way to get your audience to help out.
For more information on subtitles, closed captions, and participating channels, see https://support.google.com/youtube.
Giving Credit Where It's Due
YouTube videos frequently represent the work of many people. Some of the more elaborate content on YouTube could easily rival a small Hollywood movie. Recognizing the people who work with you on YouTube productions has been a bit of a challenge. More creative channel managers have sometimes called out collaborators in the video description field.
YouTube has formalized the attribution of key contributors with a new functionality called creator credits.
Receiving credit
In the YouTube world, channels with higher subscriber counts gain certain benefits. Being able to assign credits is limited to channels with 10,000 or more subscribers. (Note that YouTube may lower thresholds over time.) However, you don't need that many subscribers to have someone else credit you.
If you're just dying to know where you've been credited, do the following:
- Log in to your YouTube account.
- Click the Channel icon in the top right of the page and then click Creator Studio in the menu that appears.
- On the left side of the screen, click the Community heading in Creator Studio's navigation menu.
- Select Credits from the menu that appears.
Doing so brings up the Credits page. Note the four tabs where your collaboration work could (potentially) be recognized: Pending, Published, Removed, or Spam.
- Approve or remove credits.
You have control over were you've been credited, so you can remove the attribution if you want.
People who receive credit always receive an email notification. Credit settings can also be configured in the community guidelines.
Assigning credit
When you reach 10,000 subscribers, you can assign credit to your production partners. Creator credits are shown on the Watch page, as shown in Figure 10-17. Viewers need to click Show More to reveal more.
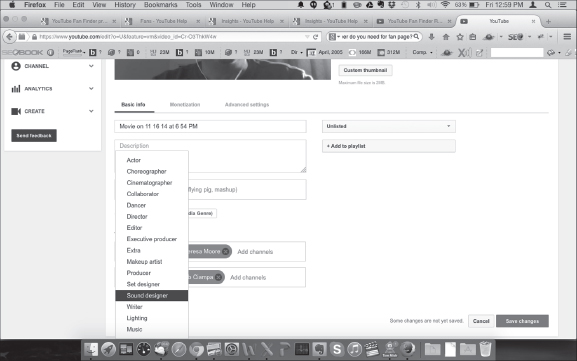
Figure 10-17: Creator credits.
To add creator credits to your video, do the following:
- Log in to your YouTube account.
- Click the Channel icon in the top right of the page and then click Creator Studio in the menu that appears.
- On the left side of the screen, click the Video Manager heading on Creator Studio's navigation menu.
By default, clicking on Video Manager should bring you automatically to the Videos section.
- Use the search bar on the video screen or scroll through your videos to find the one you want to work with.
- Click the Edit button next to the video thumbnail. It should come up in the Basic info setting be default. If not, select the Basic Info tab.
- Scroll down to the Video Credits section at the bottom.
- Click the + Add Role button to bring up a list of available roles.
- Hover over the appropriate role and click it. The role will be added.
- Type in their YouTube channel user name or channel URL until YouTube shows a match.
- Click the blue Save Changes button on the bottom right.
Producing Live Events
Putting together live events on YouTube is a great way to build an audience and drive engagement. You have several options for managing live content on YouTube:
- YouTube live events: Live-streaming with active management of the comments.
- Google+ Hangouts On Air: This is a great way to have a video-based discussion with your fans. Hangouts On Air allows you to stream live events or online discussions from either Google+ or YouTube.
- Off-platform events: Grab the opportunity to meet with your fans in real life. Many YouTube creators use physical community events such as VidCon (www.vidcon.com) to meet with their fans — and shoot some live content with them.
Repurpose your live event content for your channel. Your audience will love the attention.