Chapter 8
Fixing It in Post: The Edit
In This Chapter
- Choosing editing software
- Getting started
- Editing and polishing your video
- Adding music and sound effects
- Exporting the final version of the video
Even the simplest modern editing tools are powerful applications. If you want to edit your own videos, expect to spend some time learning how to use your tool of choice. If you've ever worked with Word or PowerPoint, for example (from the Microsoft Office suite), you may recall that you spent some time learning how to use that program. Let's be honest: Most people discover new features and new ways of doing things in these programs all the time.
To edit a video, you need to get familiar with the software and some foundational editing techniques. In this chapter, we describe both of these and how to turn your footage into a polished video.
Choosing Editing Software
Editing programs are sophisticated tools for content creation with a lot of powerful features. The best way to approach them is to first read about the basics, or you may take a class to get started. Then just dive in and complete a project. Most people become comfortable using their chosen editing tool during the first few days.
The first item to consider when choosing editing software is your existing operating system on your computer. In other words, if you use Windows, you need editing software for Windows; if you use a Mac, you need editing software for the Mac.
Mac tools
The selection of editing tools on the Mac is somewhat smaller than on the PC, but that isn't necessarily bad news, because of the high quality of Mac-based programs:
- Apple itself provides two industry-leading editing applications:
- iMovie: Entry level
- Final Cut Pro: Professional level
- Adobe, the market leader in creative software, offers a full line of tools for the Mac.
iMovie
If you have a Mac, you already have iMovie. This powerful little editing application comes preinstalled on every new Mac. We highly recommend this for your YouTube video editing because it is very easy to use.
 Upgrade to the latest version of iMovie, if you can. If your version is older, you can buy the current edition online at the Apple App Store. It's more than worth the price.
iMovie covers virtually everything you need for normal video editing, and it comes supplied with helpful templates for impressive titles and neat visual effects.
 The main drawback of iMovie compared to professional-grade applications is that it can deal with only a single video track and a single track of background sound. You can use background music and a voice-over narration track at the same time, but using more elements isn't possible. This restriction isn't a big deal for most videos, though it can be limiting on ambitious productions.
A good companion product for iMovie is Garage Band, which comes preinstalled on Macs as well. You can finish up your visual edits in iMovie and export right into Garage Band. It lets you put together soundtracks for your videos and provides some useful background music tracks that you can use immediately. Be sure to check on the copyright for any existing or canned background music tracks you pull from Garage band. Your video monetization may be affected when using tracks with existing copyrights.
Final Cut Pro
Final Cut Pro is the professional-grade editing application from Apple that covers most capabilities that an editor needs. It's used by many professionals, including such legendary editors as Walter Murch (The Godfather, Apocalypse Now).
Final Cut Pro is a major upgrade from iMovie. Its user interface is quite similar to iMovie, and old iMovie projects can be imported directly. It offers much more flexibility, such as unlimited video and audio tracks, many more visual effects, a feature-rich footage management system, and sophisticated audio editing.
If you're going with Apple editing programs, start with iMovie and then upgrade to Final Cut Pro X when you run into limitations.
Adobe Premiere
Apple's primary competitor on the Mac platform is Adobe and its Premiere editing programs — note the plural form here. You have a choice between two Premiere products:
- Premiere Elements: The entry-level Adobe editing program, Premiere Elements, an application designed for consumers and business users.
The advantages of using Premiere Elements over the free Apple iMovie program are that it:
- Supports multiple video and audio tracks
- The additional power is useful if you edit more complex projects, such as footage shot with multiple cameras simultaneously
- Offers a more sophisticated way to organize large collections of raw footage
- Provides more flexibility in dealing with photos and other images
- Premiere Pro: The Adobe program for professional video editors, Premiere Pro offers all the same professional features of Final Cut Pro. Some editors like it better because:
- Its user interface is optimized for a professional editor's typical workflow.
- It has broader support for the file formats that professional and consumer-level cameras produce. It allows you to work with files natively — no transcoding needed.
- It integrates the workflow as a one-stop — you can take a project entirely through the Adobe Creative Suite, including color correction, motion graphics, and audio finishing.
Windows tools
Dozens of editing programs of all sophistication levels are available on the Windows PC platform. The following five sections describe a few of the most popular.
Windows Movie Maker
Much like iMovie on the Mac, the free editing tool Windows Movie Maker covers basic video editing needs. It lets you quickly import footage and pictures, arrange and trim clips, add music, and apply basic visual effects and titles. If your Windows PC doesn't have Movie Maker installed, you can download Movie Maker for free at this Microsoft website: http://windows.microsoft.com.
Movie Maker is a helpful way to get your feet wet with video editing. Most people working on advanced video projects quickly run into its limitations, such as having only one background audio track, one video track, and limited visual effects. Furthermore, its particular way of handling the start and stop points of clips isn't ideal for precision editing.
Adobe Premiere
The people behind Photoshop also provide their video editing program, Premiere, for Windows PCs. The Premiere version you need depends on your goals.
Premiere can work with multiple video and audio tracks, which allows for the easy arrangement of footage and complex narrative structures. That's an important advantage over the free Windows Movie Maker.
Here are your Premiere choices:
- Premiere Elements: A strong editing application for consumers and business users, Premiere Elements improves upon Windows Movie Maker by packing in a ton of features that let you edit your videos in a much more sophisticated way. It organizes footage more intelligently, it can stabilize shaky footage, and it comes supplied with a huge selection of transitions and visual effects. It can even handle green-screen effects and animated graphics.
- Premiere Pro: We discuss Premiere Pro, Premiere Element's larger sibling, in the earlier Mac section “Premiere Pro.” The Windows version is largely identical, and it's a highly respected tool for professionals.
Sony Vegas Movie Studio
Sony's aggressively priced Vegas Movie Studio editing software is an interesting alternative to Adobe products, positioned between Premiere Elements and Premiere Pro. It offers features that are comparable to some of the best editing software on the market. If you're looking for the most bang for your buck, Vegas is worth a serious look.
Pinnacle Studio
This product is significantly more sophisticated than Premiere Elements. It boasts unlimited video and audio tracks, animated titles, broad format support, sophisticated audio editing, and a ton of professional-level special effects.
The price is reasonable, and the product even comes with a green-screen backdrop and software for Blue-ray disc authoring. Pinnacle Studio is a good choice for people who want to do frequent, sophisticated editing and are willing to endure a bit of a learning curve.
CyberLink PowerDirector
Another tool competing with Premiere Elements is CyberLink PowerDirector, priced similarly to Premiere Elements. The PowerDirector feature set is comparable to other products in this market segment, but its performance tends to be somewhat faster, and its user interface is nice and clean.
The drawback to using PowerDirector is its somewhat weaker media organization functionality, which can be a problem for people with a lot of footage. But thanks to its speed, it's one of the best programs on the market.
Where to Get Started with Editing
At first, the task of editing video may seem confusing and somewhat scary. The process has many technical expressions to understand, many software features to use, and many concepts to grasp. The best way to deal with this complexity is to simply dive in.
Attempting a test project
After some preparation, there's no better way to get up to speed in video editing than to simply try it. Select a topic for a test project, and try to put together a simple video about it. This gives you firsthand experience with the editing software before you try to create your first real video.
Reading books and watching videos
As a starting point for editing video, you may want to read a book about your editing software of choice. A book can help you understand the basic concepts that your editing application is built on, and it can provide a quick overview of all its features. In addition, good books have step-by-step guides for more advanced features.
Several books in the For Dummies series explain how to use some of the most popular editing programs, and we highly recommend them. Apple and Adobe products generally have the biggest selection of good instructional books available, though some of the less popular editing applications aren't covered as thoroughly. Before you decide on a particular editing program, look at what kind of information and support are available for it. Don't forget to check out YouTube for editing tutorials, there are many channels dedicated to this topic.
If you have some video footage from your last vacation or family event, that's a good place to start, because your family can then enjoy a watchable, well-edited video. Or if you want to dive right into marketing-oriented videos, shoot some quick footage about your business and use existing pictures.
Avoid overthinking your first project. Your goal isn't to produce a masterwork of cinematic storytelling — it's to explore the features of your editing tool and experience the basic process of editing.
Your first project should follow these guidelines because you find these elements in most serious video projects:
- Import, view, and organize multiple clips of raw video footage.
- Use pictures and graphical elements, such as a logo, in your video.
- Experiment with different title styles.
- Try variations of background music to see how music can influence the mood of a video.
- Explore basic visual effects, such as transitions between scenes.
- Record a voice-over narration track.
Make a short video first, maybe a couple of minutes long. Don't forget to share the video with a friend for feedback; you'll be surprised at what you notice when you're sharing a project.
Handling file formats, resolution, and conversion
Video used to be supplied on magnetic tape. Though it was available in several formats, such as VHS and Betacam, figuring out what you had was fairly simple. The digital world has brought about a dramatic cost reduction (video professionals no longer have to own a VCR for every cassette format), but it also brought about more complexity. Dozens of different digital video file formats are now used in the industry.
Fortunately, modern editing programs handle much of this mess for you. Almost all editing tools handle the most common dozen or so formats. But if you work with video footage shot by someone else, you still may occasionally encounter an exotic format. That's why you should understand the basic principles of using video file formats.
Sorting out the file formats
Digital video produces extremely large files. These files would be even larger if not for the heavy compression that's applied to the original video signal. Video compression uses some fancy calculations to squeeze high-quality moving pictures and sound into files that are as small as possible. To give you an idea, your video files would be between 5 and 50 times larger without compression.
The compression process is managed by a coder/decoder, or codec. This piece of software squeezes the video into a smaller digital format when it's recorded and decompresses it again when it's being watched. Because a codec typically isn't compatible with other codecs, you can't watch a video recorded via codec A on a device that supports only codec B.
Some of the most popular video codecs are
- Apple ProRes
- Digital Video (DV)
- H.264 (a more modern version of MPEG-4)
- MPEG-4
- Windows Media (WMV)
The data generated by these codecs is stored in a file that contains additional information, such as the title and description of the video, synchronization markers that sync audio and video, subtitles, and more.
You see these file formats, or container formats, on your PC or Mac. These container formats and their file endings are the most popular:
- Flash Video (.flv)
- MP4 (.mp4)
- MPEG (.mpg)
- QuickTime (.mov)
- Windows Media (.avi)
Don't let yourself become confused: Container files can contain several different codecs. For example, a QuickTime file can contain a video in Apple ProRes, DV, or H.264 format. Each format can be matched with a number of audio codec formats, such as AAC, AIFF, or MP3.
In other words, if someone asks you for the format of your video files and you respond “AVI” or “MOV,” the person doesn't know much more about the format than before he asked. Any container file type can contain any of dozens of different codecs.
The only way to determine what you have is to open the video file in a player application, such as QuickTime Player or Windows Media Player. Then use the menu command that shows you details about the file. In QuickTime, it's Window ![]() Show Movie Inspector. In Windows Media Player, it's File
Show Movie Inspector. In Windows Media Player, it's File ![]() Properties.
Properties.
Converting formats
Modern editing programs can work with most widely used video file formats. However, if you use footage in a more exotic format — material provided by someone else, for example — you may encounter roadblocks. Your editing application may not be able to work with unusual formats directly.
In this case, convert these files to a more standard format by using a video conversion program. Your editing program may even have one already.
You can find many free or inexpensive conversion programs. If you have to deal with an exotic video file format, the time savings are definitely worth the price. On Windows PCs, AVS Video Converter (www.avsmedia.com/AVS-Video-Converter.aspx) and Any Video Converter Pro (www.any-video-converter.com/products/for_video) are good choices. On the Mac, AVCWare Video Converter (www.avcware.com/) and Wondershare Mac Video Converter (www.wondershare.com/pro/video-converter-pro.html) are recommended products.
Editing Your Video
Editing is the art of telling a story using video footage, pictures, and sound. Editing is often called the invisible art because the best editing isn't noticed by the viewer.
A well-edited video brings the viewer into the story, none of the elements of the actual edit should be seen unless your goal is to show off a digital effect on the footage.
Even when you plan a video shoot meticulously, surprises and changes take place during editing. An idea that seems outstanding at first may not work in the final video. On the other hand, unexpected moments of excellence may show up in your footage to give your video an extra boost.
Editing can make or break your video. This section tells you how to approach this essential process. We use the Apple iMovie editing software in the examples, though other editing programs work similarly.
Recognizing videos that need no editing
Some types of video can stand on their own with no significant amount of editing. You can prepare the following types of videos for publishing with a minimal amount of trimming:
- Talking head: A talking-head video shows a person simply speaking into the camera to make an announcement or to explain a concept or an issue. This technique isn't terribly interesting visually, but it can be effective if the speaker has interesting material. If your talent can complete the statement in one take, you typically don't even need to edit.
- Speech and presentation: Sometimes, you can tape a representative of your company or an outside expert presenting a relevant topic at an event. You can typically use this footage without editing if the presentation is brief. But remember that presentations on video tend to be less interesting than the ones you see in person.
- Simple product demonstrations: A salesperson, or even a CEO, may be able to give a killer product demonstration in only one take. Sometimes, a charismatic salesperson can be more convincing than a slickly produced product video. A competent camera person can show details of the product by zooming in or moving the camera.
Logging your footage
After you return from a shooting location, follow these general steps to log your footage — the most important step in preparing for the editing process:
- Download the footage to your computer. Using a modern camera, this process can be completed quickly — just copy the digital video files from the camera. Shooting on tape is more time-consuming because you have to let the tape run so that your editing program can capture all footage digitally. Refer to your camera's instruction manual to find out how.
- Import the footage into your editing program. You may already have completed this step if you downloaded the footage using your editing software, but in other cases, you first have to import the footage manually.
- Organize your clips. After you have a bunch of clips that cover different parts of your project, start by organizing them to better see what you have. Group clips that are related to the same scene. Editing programs offer different methods to help, such as folders or “bins” in which you can store clips, labels and tags that you can assign to clips, or “events” that group related clips.
- Watch your footage. Review all your clips to determine what you have. If you have a lot of footage, there's no way to avoid this time-consuming step.
- Remove unwanted material. If you have clips that are clearly unusable, remove them immediately. Don't delete them — just store them in a folder labeled Unusable in your editing program or in your computer's file system. Sometimes a clip that looks unusable now can come in handy later.
- Take notes. The best way to find your footage quickly during editing is to take the time to take notes about every clip. Add a few simple words about the content of the clip and its level of quality. Notes can be taken in the editing software directly in line with the clip you are referencing in most programs.
- Mark the best clips. If you have multiple takes of a scene, mark the one you think is best. Many editing programs let you use a special Favorites functionality, or you can simply make a mark in your notes. Also mark B-roll footage that you think looks good, and make notes of the best sound bites in interview clips.
Logging your footage may seem like a tedious and time-consuming process, but investing time in it pays off later. During editing, you can waste a lot of time hunting for a particular clip that you somehow recall but didn't mark properly.
Trimming video clips
Clips often tend to be too long. If you want to use a one-take video, you can simply trim off unwanted pieces at the beginning and the end. Fortunately, trimming a clip on your computer is fairly easy. The best tool depends on the platform you use:
- On the Mac: Mac users already have QuickTime, a preinstalled media player that has basic editing features.
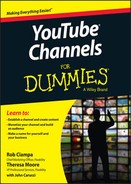
If you want to trim a clip, open the video file in QuickTime, and then choose the Edit
 Trim command. A timeline showing the entire clip appears. Drag the yellow handles to mark the start and end of the clip, and then click the Trim button. The resulting clip can be saved or exported for use on YouTube or on your website. Figure 8-1 shows how to use the trim function in QuickTime.
 - On the PC: PC users can select from a variety of video processing tools that provide the trimming function.
An easy way is to use Windows Movie Maker (described earlier in this chapter). This simple editing application is free, and it works well if you want to trim only a few clips.
 In some editing programs you will need to save the trimmed video as a new clip, or else you lose the rest of your footage.
Some simple video programs even let you assemble multiple clips into a longer clip. For example, QuickTime lets you add a clip to the end of the current clip by choosing the Edit![]() Add Clip to End command. On a PC, use Windows Movie Maker and simply drag and drop the clips to the storyboard. This method works for assembling two or three clips, but don't expect it to replace an editing program. As soon as you want to move beyond the simplest trimming level (and save time in the end), invest in quality editing software.
Add Clip to End command. On a PC, use Windows Movie Maker and simply drag and drop the clips to the storyboard. This method works for assembling two or three clips, but don't expect it to replace an editing program. As soon as you want to move beyond the simplest trimming level (and save time in the end), invest in quality editing software.
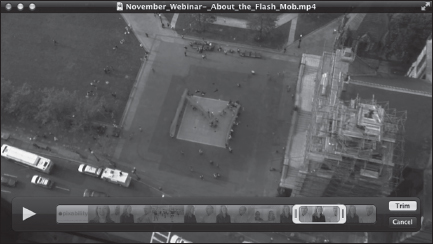
Figure 8-1: The trim function in QuickTime Player.
Making a rough cut
The first step in determining what your video will look like is to make a rough cut, in which you line up all the good footage to figure out what works. A rough cut is typically much longer than the final product, and it lacks many of the elements from the final video, such as titles and visual effects.
To make a rough cut, first log your footage, as explained earlier in this chapter, in the section “Logging your footage.” Then follow these steps:
- Review your storyline in sequence.
Tackle every scene separately.
- For every scene, find the best takes that you marked during logging.
- Mark in and out points for every clip to trim it to the part you want in the video.
In and out points are indicators you set on the individual clips that make up the scene. An in point is the frame in the clip where you would like to begin viewing, an out point is the frame you would like to end the clip with.
Don't worry much about the exact timing. It comes later. In and out points can easily be changed once your clip is in your timeline.
- Insert the clip in your editing program's timeline, in any order you want.
Figure 8-2 shows what a rough cut looks like in an editing program. It's just a sequence of clips with no further treatment.
- Repeat this process for all scenes to assemble a sequence of clips that tells your intended story.
When you watch your rough cut for the first time, it probably looks bumpy, overly long, and <ahem> rough. Your goal is simply to figure out how well your material works when it's assembled.
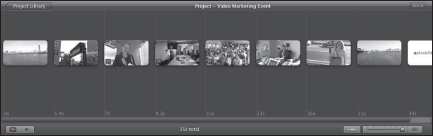
Figure 8-2: A timeline with a rough cut in an editing program.
If it's possible in your editing program, make a safety copy of your first rough cut, of either the timeline or the whole project. This copy may come in handy later in the editing process, when you don't see the forest for all the trees and you need a fresh perspective. Making a copy can also be a helpful way to find raw clips quickly if you have a lot of footage.
Switching it around
The great thing about modern editing software is that you can experiment by moving clips and entire sequences to find the best combination of clips and scenes. Be careful: You can easily get lost in the experimentation process. First consider why you would want to change something, and if you have a truly good reason, do it.
Try some of these suggestions:
- Use different versions of the same take. Sometimes, a take that you think is best when you watch it in isolation no longer works well with the rest of the material. If you're unhappy with a take, try using a different take of the same shot to see whether it improves the entire scene.
- Drop clips or entire scenes. Shorter is typically better in editing. If you feel that a particular clip or an entire scene doesn't add much value to the video, drop the clip entirely and watch the video without it. If you don't miss it much, your audience will likely never miss it.
- Change the order of scenes. Particularly in documentary-style and educational videos, scenes don't necessarily have a natural fixed order. You can also change the sequence completely for dramatic effect. For example, if you sell lawnmowers and you want to show how your latest model performs, you can grab your viewers' attention if you first show the pristine lawn that results from using your product and then demonstrate how your product was responsible.
Editing is storytelling, but stories don't always have to flow linearly. Early in your video, specify to your audience that you have something interesting to say. Learn from the pros: James Bond movies, for example, don't start with a boring explanation of the villain's latest evil plot, but rather with a high-octane action scene that grabs the audience's attention immediately.
Creating cuts
A rough cut is all about finding the right way to tell a story with your video. In a written document, the rough cut would be the equivalent of the outline and first draft. But there's more to editing: Just as you would refine a written text for style and powerful language, refine your video edit with better timing, transitions, additional material, and refined cuts.
Working on these elements is the style aspect of video editing, and it makes all the difference between a video that's barely watchable and one that excites viewers.
A cut in film editing connects two shots. One shot ends and the next one begins, and between them is a cut. The word cut comes from the act of physically cutting celluloid film in traditional movie editing. Today, in the age of digital editing, no cutting is taking place, though the name stuck.
Different types of cuts serve different purposes. Depending on the effect you want to achieve, use one of these cut types:
- Hard: This is the most basic (and by far the most frequently used) type of cut. One shot ends, and the next shot starts immediately. Both the picture track and the sound track are cut at the same time.
- Transition: One shot flows into the next with some kind of visual effect. The simplest form of transition is the fade, which softly transitions one picture to the next. You can use many different types of other transitions, some of which can look quite elaborate; use such transitions with caution, since the editing should be felt not seen. You don't want to take away from the viewing experience with star burst transitions every minute.
Use transitions to suggest a special relationship between two shots, such as a scene transition.
- Cross fade: This cut type can be used between shots as a softer replacement for hard cuts. If you want to edit to slow music and achieve a flowing pace, the fade is a useful technique.
Figure 8-3 shows what a cross fade between two shots looks like in the context of a video. On the left, you can see the timeline with the vertical bar that shows which part of the video is playing. On the right, the preview pane shows the two shots that the cross fade combines.
- Jump: Cut from one view of a person or an object to another one that's only slightly different. You should generally avoid using the jump cut, but it can be used occasionally for dramatic effect. It's also used in interviews or talking-head videos to shorten a statement or to add visual variety. For example, the person who's speaking can be shown in a medium shot while you cut to a slightly tighter shot for the next sentence.
Your rough cut probably uses plain hard cuts exclusively, but as you start refining your video, you may want to consider using these other types of cuts to help advance the story and make the viewing experience more sophisticated.
Figure 8-3: A cross fade transition.
Many beginners in video editing overuse fancy transitions. Modern editing programs are supplied with dozens of different transitions, and spicing up a video with all that eye candy is tempting. But don't forget that most viewers are more impressed by good storytelling than by overused special effects. A good rule of thumb is that 95 percent of your cuts should be plain hard cuts. If you use more than a handful of fades in your video, you're probably overdoing it.
Filling the gaps with B-roll
The term B-roll describes supplemental footage that can be used to provide additional context for the viewer or to fill gaps in the main storyline. We talk about how to shoot B-roll in Chapter 7. Having plenty of good B-roll is always a good idea because it makes an editor's life easier.
Use B-roll in your video in these common scenarios:
- Illustrate what a speaker or an interviewee is saying by showing the subject of the explanation.
- Add a bit of rhythm and visual polish to an otherwise long and visually boring scene.
- Separate scenes in a scripted video to give the viewer breathing room. Many TV series use a few pieces of B-roll between scenes — for example, in shots of the city where the story is taking place.
- Hide cuts in an interview or another continuous scene. If you have only one perspective of an interviewee, shortening the interview is difficult. Cutting directly looks jumpy and indicates that you've omitted material. If you cut instead to a piece of B-roll while the interviewee is still talking, you can easily mask the cut.
- Disguise small flaws in the footage. Did the camera suddenly shake in the middle of the interview, or did the subject move briefly out of focus? No problem — simply use a bit of B-roll to hide the mistake.
If you use B-roll only to disguise mistakes, your use of it may become too obvious. Use B-roll frequently to make your video more interesting and varied. But also avoid using B-roll that has nothing to do with the subject and doesn't add true value.
Polishing Your Video
After you refine your rough cut into a well-timed, well-trimmed video, it's time to apply the final layer of polish. A bit of further fine-tuning makes the difference between an acceptable video and one that looks truly professional.
Fine-tuning your edit
Videos can benefit from a number of relatively simple steps you can follow to improve certain aspects that viewers may not even consciously recognize:
- Tweak your cut timing. If a cut seems even a little bit off, spend some time fine-tuning it. Even placing a cut a frame or two earlier or later can make a difference.
- Add music. You may have already worked with some temporary music tracks during earlier editing steps, but now is the time to finalize all of your audio and background tracks.
- Clean up the audio track. Most audio tracks can use some additional work. Be sure that the levels are correct and consistent throughout the video. Viewers don't like viewing one scene that's too loud followed immediately by one that's barely audible. Some editing programs have the Normalize Audio function, which optimizes audio levels automatically. Also, hard audio cuts rarely sound good. You can add a dissolve transition to the audio track while still applying a hard cut to the picture track.
- Use color correction. Scenes in general should have a consistent look between shots; different video cameras can pick up different color influences. The color-correction feature in most editing programs will help fix color inconsistencies between shots and scenes. Color-correction also lets you give your video a unique and more interesting feeling. For instance, bluer light or colder light is used in many crime scenes, more yellow or warmer light is typically used in more romantic movies.
Adding bells and whistles
You can add a number of elements, as described in this list, to complete your video and make it look more interesting:
- Titles: A video should have a good title sequence, and editing programs offer a variety of different templates. Try a few different styles to see what works best. A general rule for any text on screen is viewers should be able to read it quickly twice. Be sure your title sequences are not too long, viewers on YouTube typically have less patience than viewers in the movie theater.
- Sound effects: A well-placed sound effect can make certain scenes much more interesting. We aren't talking about explosions, alien ray gun sounds, or Wilhelm Screams, but about basic background tracks or sounds that match the visible content on the screen. Sometimes, your original background sounds for a scene aren't good, and you can use canned sounds to replace them. Some editing programs come with small libraries of sound effects, and you can find more online.
- Visual effects: Most editing programs have effect filters that change the look of your footage completely. Though you should always use these effects sparingly, they may occasionally help make your video look more interesting.
You can experiment with bells and whistles in the earlier stages of the editing process, though you typically should wait until the end of your editing process before trying to use them fully. They're typically time consuming to apply, and if you change your edit afterward, you may have to do unnecessary work.
Adding Music to Your Video
You may wonder why music is even necessary in a video that isn't destined to sell a pop singer's latest album. Music determines a lot about the perception of your message because viewers make split-second, subconscious judgments about the content of your video depending on the type of music you choose.
In contrast to music videos, the music in your marketing video is meant to complement the message you're trying to convey. Music isn't the focus of a video — it's there simply to add color.
You must understand the difference between music you pay royalties to use and royalty-free music. Most of the music that you hear on the radio or buy online is copyrighted and can be used in videos only if you pay royalties to its record label — often an expensive strategy because you must pay for every use of a copyrighted music track. Record labels sometimes even charge more, depending on how many views your video attracts. And, “borrowing” music and hoping that you won't get caught is not an option. Videos containing copyrighted music can be banned automatically from sites such as YouTube.
The easiest way to save time and expense is to use only royalty-free music tracks — they're sold specifically for use in YouTube videos or presentations. After you pay a fixed price per song, you can usually use it however you want, as long as you stay within the boundaries specified by the music publisher contract. For example, some royalty-free tracks may be available for use in online videos but not in TV commercials. To choose music for your video, follow these steps:
- Determine which emotion you want to convey. For example, you may want viewers to feel happy, sad, or uplifted — or neutral.
- Watch a rough edit of your video several times. Or, if you're still in the planning stage, simply review the video's storyline in your mind. Do you need fast, aggressive cuts? Are your graphics clean and simple, or more elaborate and flowery? The music you choose must match the video's storyline, aesthetic value, and editing style.
- Choose an appropriate genre. You may want to use a rock-and-roll track or a country track, for example, or perhaps electronic music more closely suits your style.
- Set the mood. The mood of the music you choose has to match the emotion you want to convey. To judge, determine how the music makes you feel when you listen to it. If it matches the emotion you chose in Step 1, you're on the right track.
- Control the pace of the video by controlling its musical tempo. A song's tempo refers to its speed or pace. The pace of the video also has to fit the emotion you're trying to convey and the overall storyline. For example, should viewers be relaxed or breathless after watching your video? Choose a tempo between these two extremes that creates the impression you want.
- Search for a song. After you choose the genre, mood, and tempo of the music in your video, search for a song. (You'll find out more about music to purchase in the following sections. Or, if you're truly talented, compose one yourself.) You'll likely stick with royalty-free music.
- Drop in the music. After you finish creating the video, you can drop the music into your editing timeline and edit the piece to mirror the pacing of the footage.
Adding built-in music in video editing tools
Most of the video editing software programs we describe in this chapter contain royalty-free song tracks, such as in these two examples:
- Apple Final Cut Pro: Has over 1,000 royalty-free sound effects and music tracks
- Sony Vegas Movie Studio: Contains 400 royalty-free music soundtracks
Some of the songs you can use from video editing software are so popular and overused (because they're free) that you risk triggering unwanted reactions from your audience. For example, a friend once complained to us that his video reminded him of a late-night TV ad containing questionable content. When we watched it, we found that his video editor had used a free, built-in music track that's often chosen by these low-cost advertisers.
Incorporating stock music libraries
If you have only a small budget and you want to sound different from the standard music libraries that come with many editing programs, you can find a good selection of royalty-free stock music to download online. This list describes some options that we recommend:
- PremiumBeat (www.premiumbeat.com): Has a great selection of great audio tracks and sound effects. They work closely with composers from around the world. They are very selective so it is easier to search through libraries for what you need.
- Audiojungle (www.audiojungle.com): It's less expensive than Shockwave-Sound (www.shockwave-sound.com), the major player in the stock music and sound effects derby, but its selection isn't as large. Songs cost between $10 and $20 apiece.
- Footage Firm (www.footagefirm.com): This site sells inexpensive DVD song compilations. A disc usually has only a few good songs, but they're usually worth the price — approximately $10 per disc, including shipping.
If you want to use an iconic song such as Nirvana's “Smells Like Teen Spirit” and you have a limited budget or limited time to secure the rights, you can often find inexpensive but similar-sounding songs on stock music sites.
If you can't find a song that matches the length of your video, don't worry: Viewers don't focus on songs — songs simply enhance the pacing and mood. Therefore, a repetitive song, or looping a song to fit the length of the video, usually works well.
Putting music in your video
After you have selected your music, it's time to insert it in your video.
The mechanical aspect of this task is easy to complete. Follow these steps in your editing software:
- Gather into one folder on your computer all the music files you want to use.
Using one folder helps you find files easily and helps you back them up after editing. If you store your music on a CD, import the necessary tracks to your computer first by using a program such as iTunes.
- Import the music files into your video editing software.
Most editing programs can process MP3 files and most other commonly used music file formats.
- Add an additional audio track to your editing project.
Certain simpler programs, such as iMovie, have predetermined tracks for background music.
- Drag and drop your music piece to the new audio track. Then shift its position until it fits the timing you want.
- Watch the part of the video that now has background music in context. Fine-tune the timing of the music, if necessary.
If you aren't sure which piece of music will work best with your video, simply import into your editing program multiple music tracks that you're considering. Drop one after the other on the audio timeline, watching the video with every piece of music, to quickly find which track you like best.
Adding emotional impact
The main purpose of your music selection is to enhance the emotional impact of your video. Even the specific way in which you use music in your edit affects the video's emotional impact. Try these simple tricks to give your music more emotional impact:
- Work with the volume level. Music in a video shouldn't always play at the same volume level. It should be softer and drop into the background whenever it supports dialogue or a voice-over narration, and it should be fairly loud when it stands on its own and drives home an emotional point. Most editing programs let you change the volume of a particular track over time. Dramatically increasing the volume of the music track in a key video scene adds quite a powerful effect — Hollywood movies and TV shows do it all the time.
- Determine the proper timing. A music track doesn't have to start at its beginning when you insert it in your video. Match the music to the video's visual content. Most musical selections have hooks — particularly remarkable and recognizable parts. For example, the hook of Beethoven's Fifth Symphony is the famous “Ta-ta-ta-daaa.” Try to match musical hooks with important moments in the video.
Cutting your video to music
When you have a piece of music that matches well the emotional purpose of your video, fine-tune your edit to maximize the effect of the music. For example, you can extend a scene slightly to fit the most dramatic moment with a remarkable hook in the music.
Most editing programs let you lock your music tracks to avoid their being affected by other changes in your video. Follow these steps:
- Put your musical piece on its own audio track.
- Time the music so that the music begins exactly where you want.
- Lock the music track.
Most editing programs use a tiny padlock icon to indicate locking.
- Watch the video and determine how to adapt the timing to best fit the music.
For example, shorten or stretch certain shots slightly.
- Make your editing changes.
- Unlock the audio track.
Precisely matching cuts in a video with beats in the music can create quite a pleasing effect because the picture and music then seem to move in perfect harmony. Avoid overdoing it, though, because an exact match can quickly bore viewers. The best approach is to match a couple of cuts with the music and then purposely skip the next few cuts before matching again. Alternating makes the final product less predictable and maintains viewer interest.
Cutting your music to video
You may not want to alter an edit just to better fit the music. In this case, cut the music to match your video instead.
Another important reason to cut music is to omit parts that may not fit well with the visual side of your video. For example, the piece of music you selected may have a bridge section that has a slightly different mood from the rest of the track, which can be distracting in a video. Eliminate the unwanted section by cutting precisely at the end of the previous part and at the end of the bridge section.
Almost all video editing programs let you cut audio tracks also, which is good enough for completing the basic editing of your music tracks, such as cutting off unwanted intros or endings to the millisecond.
An alternative is to cut your music tracks in advance by using an audio program such as Garage Band or Pro Tools. They let you edit audio precisely, and they provide a wealth of audio effects to help you enhance your music tracks for video use.
Adding Voiceover and Sound Effects
Many videos used for marketing employ voiceover narration, using offscreen narrators to tell viewers about the company's products or services. Most video editing programs have a voice-over recording feature, which is useful if you're recording your own voice directly into your computer.
To record your own voiceover, invest in a mid-quality external microphone. You can buy good USB microphones well below $100 — a worthy investment because your voice-over tracks will sound much better.
As with voice-over narration, you can also add sound effects. Most noises you hear in a typical Hollywood movie aren't recorded live on the set, but are added later in the process. Recording sounds on location is tricky and often creates mediocre results.
So, sound effects are most often added during the editing process. This list describes the major kinds of sound effects you can use:
- Background or ambient: Continuous background noises that suggest where the video scene is taking place work well to establish location. For example, a busy city scene needs vehicle noises, lots of footsteps, and the occasional siren. A beach scene needs wind and water sounds. These background sounds are easy to apply.
If you can, record a few minutes of ambient sound on your video set to capture the audio character of the location.
- Hard: This type of sound effect accompanies visible events onscreen, such as slamming doors or passing vehicles. This type is a little more difficult to apply because they must be synced precisely to the picture, though most editing programs let you do it quite easily.
Most advanced video-editing programs are supplied with a small library of basic sound effects that you can easily use in your edits. Just add an audio track, drag in the sound recording you want, and shift the track around until it fits the scene.
You can find additional sound effects online from stock sound libraries such as Shockwave-Sound.com (www.shockwave-sound.com) and Soundsnap (www.soundsnap.com). Most of these sounds have specific descriptions, such as “Cars passing by at 25 mph on a somewhat busy street,” so you can likely find something suitable.
Exporting the Final Version
When you finally finish editing, you export the video from your editing program so that you can use it later.
Typically, you should export multiple versions of a video because you can use the final product in different ways:
- Export an archive master copy with the highest possible quality that your editing program offers. You can always decrease, but not increase, quality (and therefore file size). That's why you should store a high-quality copy, in case you want to create other versions later.
- Keep a copy just for YouTube purposes: YouTube export settings are always changing, so be sure to double check the current best practices for settings directly on your YouTube channel upload page. Typically the settings look like this:
- Container: mp4
- Audio Codec: AAC-LC
- Video Codec: H.264
- Acceptable and common frame rates: 24, 25, 30, 48, 50, 60 frames per second
- Aspect Ratio: YouTube players are all 16:9, a typical resolution is 720p: 1280×720
Most of the editing programs discussed in this book let you directly upload video to your YouTube channel. Uploading this way is convenient, but if you notice a mistake after uploading the video, you'll have to remove it, which can be a hassle. Normally, exporting video to your hard drive first is recommended for backing up and test purposes — watch it one last time, and then upload it manually to gain more control over every step.