Chapter 14
Amazing Tablet Feats
In This Chapter
![]() Waking up to your Android tablet
Waking up to your Android tablet
![]() Making tablet calculations
Making tablet calculations
![]() Keeping your appointments
Keeping your appointments
![]() Reading digital books
Reading digital books
![]() Playing games
Playing games
![]() Watching junk on YouTube
Watching junk on YouTube
![]() Buying or renting films and TV shows
Buying or renting films and TV shows
Even given the variety of things your Android tablet can do, you will find some limitations. For example, you cannot use an Android tablet as a yoga block. It makes a poor kitchen cutting board. And despite efforts by European physicists, the Android tablet simply cannot compete with the Large Hadron Collider. Still, for more everyday purposes, I believe you’ll find your tablet more than up to the task.
This chapter corrals many (but not all) of the things you can do on your Android tablet. Among the devices it replaces are your alarm clock, calculator, day planner, game machine, eBook reader, and even your TV set. That’s not even the full list, but rather everything I could legally cram into this chapter without violating the For Dummies chapter length regulations.
Clock
Your Android tablet keeps constant, accurate track of the time, which is displayed at the top of the Home screen as well as on the Lock screen. That’s handy, but it just isn’t enough, so the tablet ships with an app that tells the time and also may double as an alarm clock.
The app may be called Clock or Alarm. If it’s called Alarm, it’s probably nothing more than a basic alarm clock. The Clock app, on the other hand, is more of a chronometric app, featuring a timer, stopwatch, alarm, and world clock functions. Of these activities, setting an alarm is pretty useful: In that mode, your tablet becomes your nightstand companion.
Here’s how to set a wake-up alarm in the stock Android Clock app:
- Tap the Alarm icon or tab atop the Clock app’s screen.
Tap the Add icon.
 A card appears, which you use to set the alarm time, days, name, and so on.
Fill in details about the alarm.
Set the alarm’s time, decide whether it repeats daily or only on certain days, choose a ringtone, and complete any other settings as shown on the card. The alarm name appears when the alarm triggers.
Set the alarm.
 Alarms must be set to activate.
When the alarm triggers, tap the Dismiss icon to tell the tablet, “Okay! I’m up!” Or you can tap the Snooze icon to be annoyed again after a few minutes.
Your tablet keeps its clock accurate by accessing an Internet time server. You never have to set the time.
 Information about a set alarm appears on the Clock app’s screen and on the tablet’s Lock screen. An Alarm notification, similar to what’s shown in the margin, also appears in the status area. These are your clues that an alarm is set and ready to trigger.
- Unsetting an alarm doesn’t delete the alarm. To remove an alarm, tap the alarm and then tap the Delete (Trash) icon. In some incarnations of the Clock/Alarm app, you long-press an alarm and choose the Delete action.
- The alarm doesn’t work when you turn off the Android tablet. However, the alarm does go off when the tablet is locked.
Calculator
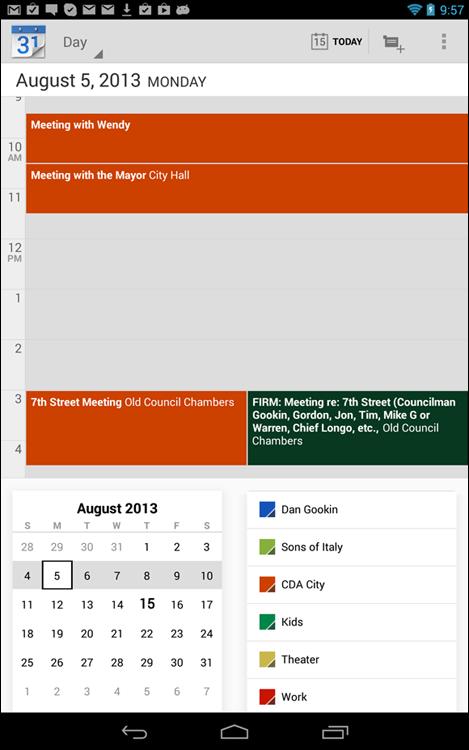
The next time you do math, don’t bother whipping out your brain. Instead, whip out your Android tablet and summon the Calculator app. The stock Android Calculator app appears in Figure 14-1. Most Android tablet manufacturers mess with this app, so what you see on your tablet might look subtly different, although the basic operation remains the same.
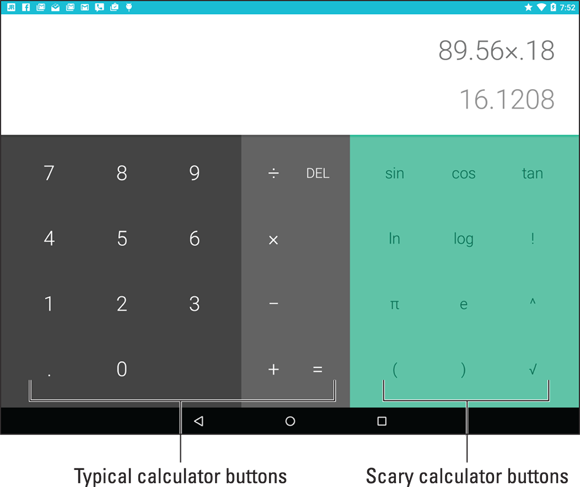
Figure 14-1: The Calculator app.
Type your equations by tapping the various buttons on the screen. Parentheses buttons can help you determine which part of a long equation gets calculated first. Use the DEL, CLR, or C key to clear input.
 Long-press the calculator’s text (or results) to cut or copy the results. This trick may not work in every Calculator app.
- I use the Calculator app most often to determine my tip at a restaurant. In Figure 14-1, a calculation is being made for an 18 percent tip on an $89.56 tab. The crab Rangoon was exceptionally fantastic.
Calendar
Your Android tablet is the 21st century version of the old ball-and-chain of the busy person’s world: the date book. Thanks to the Calendar app and the Google Calendar service on the Internet, you can toss out your date book.
- Google Calendar works with your Google account to keep track of your schedule and appointments. You can visit Google Calendar on the web at
www.google.com/calendar - For some weird reason, a few Samsung tablets refer to the Calendar app as the S-Planner. It’s the same thing.
- Before you throw away your date book, copy into the Calendar app any future appointments and recurring info, such as birthdays and anniversaries.
Browsing your schedule
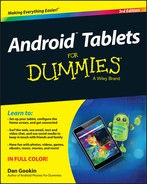
To see what’s happening next, to peruse upcoming important events, or simply to know which day of the month it is, summon the Calendar app. Figure 14-2 shows the Calendar app’s Month and Week views. Choose a view by tapping the Action Overflow icon, as illustrated in the figure.
Figure 14-2: The Calendar app.
The current day is highlighted in the Calendar app, as shown in Figure 14-2. For some views, the current time is shown as well. To return to the current day, tap the Show Current Day icon, illustrated in the figure.
- Calendar views not shown in Figure 14-2 include Day and Schedule.
- Schedule view might be called Agenda or List in some versions of the Calendar app.
- Some Calendar apps feature 4-day view as well.
- Use Month view to see an overview of what’s going on, and use Week view or Day view to see your appointments.
- I check Week view at the start of the week to remind me of what’s coming up.
- Swipe the screen left or right to change the view from month to month, week to week, or day to day.
- Different colors flag your events, as shown in Figure 14-2. The colors represent a calendar category to which events are assigned. See the later section “Creating an event” for information on calendar categories.
Reviewing appointments
To see more detail about an event, tap it. When you’re using Month view, tap the date with the event on it to see Week view. Then choose an event to see its details, similar to what’s shown in Figure 14-3.
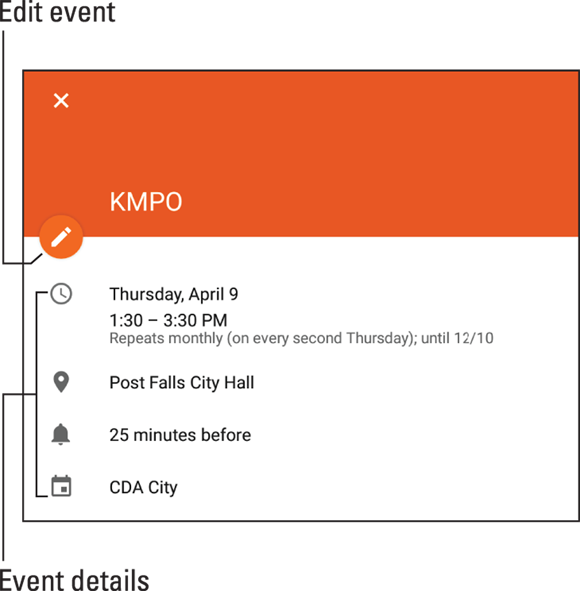
Figure 14-3: Event details.
The details you see depend on how much information was recorded when the event was created. Some events have only a minimum of information; others may have details, such as a location for the event, the time, and with whom you’re meeting.
 Tap the Close icon to dismiss the event’s details.
- Birthdays and a few other events on the calendar may be pulled in from the tablet’s address book or from social networking apps. That probably explains why some events can be listed twice — they’re pulled in from two sources.
- When the event’s location is listed, you can tap that location to open the Maps app. See where the event is being held and get directions, as covered in Chapter 10.
- The best way to review upcoming appointments is to choose the Schedule view from the Action Overflow.
- The Calendar widget also provides a great way to see upcoming events from right on the Home screen. See Chapter 18 for information on applying widgets to the tablet’s Home screen.
- The Google Now feature lists any immediate appointments or events. See the later section “Google Now.”
Creating an event
The key to making the calendar work is to add events: appointments, things to do, meetings, or full-day events such as birthdays or colonoscopies. To create an event, follow these steps in the Calendar app:
Select the day for the event.
Or, if you like, you can switch to Day view, where you can tap the starting time for the new event.
Touch the Add Event icon (refer to Figure 14-2).
The New Event card or Add Event card appears. Your job now is to fill in the blanks to create the new event.
Add information about the event.
The more information you supply, the more detailed the event, and the more you can do with it on your Android tablet and on Google Calendar on the Internet. Here are some of the many items you can set when creating an event:- Title: The name of the event, person you’re going to meet, or place you’re headed.
- Calendar Category: Choose a specific calendar to help organize and color-code your events.
- Time/Duration: If you followed Step 1 in this section, you don’t have to set a starting time. Otherwise, specify the time the meeting starts and stops, or choose to set an all-day event such as a birthday or your mother-in-law’s visit that was supposed to last for an hour.
- Location: Type the location just as though you’re searching for a location in the Maps app.
- Repeat: Tap the More Options button if you don’t see this item. Use the Repeat setting to configure events on a recurring schedule.
- Notification/Reminder: Set an email or Calendar notification to signal an upcoming event.
- Touch the Save or Done button to create the new event.
The new event appears on the calendar, reminding you that you need to do something on such-and-such a day with what’s-his-face.
- You can change an event at any time: Simply tap the event to bring up more information, and then tap the Edit icon to modify the event, similar to what’s shown in Figure 14-3.
- For events that repeat twice a week or twice a month, create two repeating events. For example, when you have meetings on the first and third Mondays, you need to create two separate events: one for the first Monday and another for the third. Then have each event repeat monthly.
- To remove an event, touch the event to bring up more information, and tap the Delete icon. Touch the OK button to confirm. For a repeating event, choose whether to delete only the current event or all future events.
- Setting an event’s time zone is necessary only when the event takes place in another time zone or spans time zones, such as an airline flight. In that case, the Calendar app automatically adjusts the starting and stopping times for events depending on where you are.
 If you forget to set the time zone and you end up hopping around the world, your events are set according to the time zone in which they were created, not the local time.
 Reminders are set to direct the tablet to alert you before an event takes place. The alert is either a notification (shown in the margin), or a Gmail message. I prefer notifications, which also display an alert on the tablet’s Lock screen.
eBook Reader
Printed books are O so 14th century. These days, reading material is presented electronically in the form of an eBook. The great Googly way to read eBooks is to employ the Play Books app. Still, if you’re a Kindle fan, you can also get the Amazon Kindle app from the Play Store (see Chapter 15). Why not use both?
![]() Begin your reading experience by opening the Play Books app. You’ll see any recent books you’ve read; otherwise, you can view your entire book library: Tap the Side Menu icon (shown in the margin) and choose the My Library command from the navigation drawer.
Begin your reading experience by opening the Play Books app. You’ll see any recent books you’ve read; otherwise, you can view your entire book library: Tap the Side Menu icon (shown in the margin) and choose the My Library command from the navigation drawer.
The library lists any titles you've obtained for your Google Books account, similar to what’s shown in Figure 14-4.
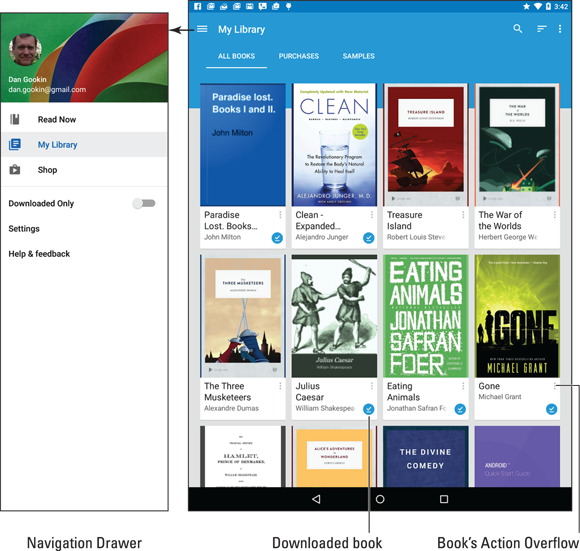
Figure 14-4: The Play Books library.
Scroll through your library by swiping the screen.
Tap a book’s cover to open it. If you've opened the book previously, you're returned to the page you last read. Otherwise, you see the book’s first page.
Figure 14-5 illustrates the basic book-reading operation in the Play Books app. You turn pages by swiping the screen right-to-left, assuming that you’re reading English or other languages that read in that direction.
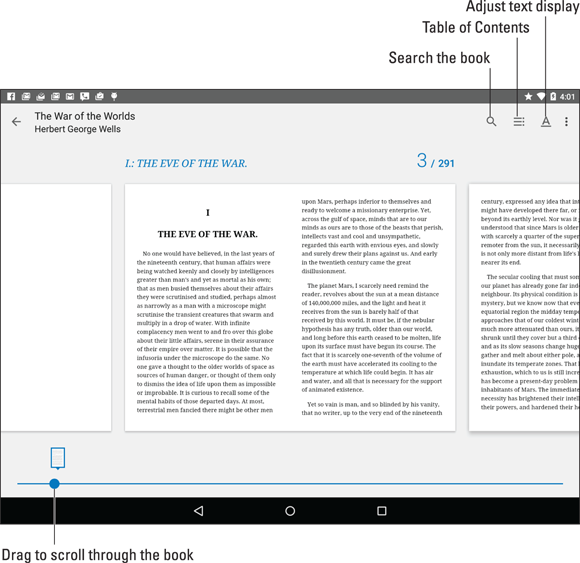
Figure 14-5: Reading an eBook in the Play Books app.
The Play Books app also works in both vertical and horizontal orientations. You can lock the screen by choosing the Settings command from the navigation drawer: Choose the Auto-Rotate Screen item and select how you want the screen locked or not.
- If you don't see a book in the library, tap the Action Overflow icon and choose Refresh.
- Books in your Play Books library are stored on the Internet and available to read only when an Internet connection is active. It’s possible to keep a book on your tablet by downloading it to the device. Refer to Chapter 15 for details on downloading books.
- To remove a book from the library, tap the Action Overflow icon on the book's cover and then choose the Delete from Library command.
- If the onscreen controls (refer to Figure 14-5) disappear, tap the screen to see them again.
Tap the A icon to display a menu of options for adjusting the text on the screen and the brightness.
 Unlike dead tree books, eBooks lack an index. That’s because text on digital pages can change based on the book’s presentation. Therefore, use the Search command (refer to Figure 14-5) to look for items in the text.
- Copies of all your Google Books are available on all your Android devices and on the
http://books.google.comwebsite. - Refer to Chapter 15 for information on obtaining books at the Google Play Store, as well as how to download books to your tablet.
Game Machine
Nothing justifies your expensive, high-tech investment in electronics like playing games. Don’t even sweat the thought that you have too much “business” or “work” or other important stuff you can do on an Android tablet. The more advanced the mind, the more the need for play, right? So indulge yourself.
It used to be that your tablet’s manufacturer would toss in a few sample games to whet your appetite. That’s no longer the case; however, you can obtain an abundance of games, free or not, from the Google Play Store. Look for the “lite” versions of games, which are free. If you like the game, you can fork over the 99 cents or whatever the full version costs.
See Chapter 15 for details on shopping at the Google Play Store.
Google Now
Don’t worry about your tablet controlling too much of your life: It harbors no insidious intelligence, and the Robot Uprising is still years away. Until then, you can use the tablet’s listening abilities to enjoy the feature called Google Now. It’s not quite like having your own personal Jeeves, but it’s on its way.
The preferred method to summon Google Now is to swipe your finger upward from the bottom center of the touchscreen. This technique is supposed to work on the Lock screen, the Home screen, or in any app, although your tablet may not support that technique. Otherwise, you can open the Google app in the Apps drawer.
The main Google Now screen looks similar to what’s shown in Figure 14-6. Below the Search text box, you’ll find cards. The variety and number of cards depend on how often you use Google Now. Though you can’t manually add cards, the more the app learns about you, the more cards appear.
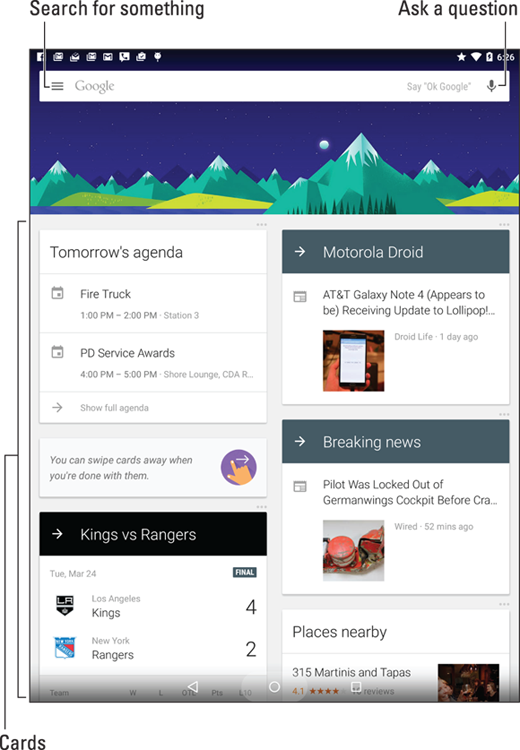
Figure 14-6: Google Now is ready for business. Or play.
You can use Google Now to search the Internet, just as you would use Google’s main web page. More interestingly than that, you can ask Google Now questions; see the nearby sidebar “Barking orders to Google Now.”
Google Now might also be found on the far left Home screen page: Keep swiping the Home screen left-to-right until it shows up — if your tablet supports this feature.
Video Entertainment
Someday, it may be possible to watch “real” TV on an Android tablet, but why bother? You’ll find plenty of video apps available on your tablet to sate your television-watching desires. Two of the most common are YouTube and Play Movies. So although you may not be able to pick up and enjoy the local Action News Team every day at 5 p.m., you’re not bereft of video enjoyment on your tablet.
Enjoying YouTube
YouTube is the Internet phenomenon that proves that real life is indeed too boring and random for television. Or is it the other way around? Regardless, you can view the latest YouTube videos by using the YouTube app on your Android tablet.
Search for videos by tapping the Search icon. Type the video’s name, a topic, or any search terms to locate videos. Zillions of videos are available.
The YouTube app displays suggestions for any channels you’re subscribed to, which allows you to follow favorite topics or YouTube content providers.
To view a video, touch its name or icon in the list.
- Because you have a Google account, you also have a YouTube account. I recommend that you log in to your YouTube account when using YouTube on your Android tablet: Tap the Action Overflow icon and choose the Sign In command. Log in if you haven’t already. Otherwise, you see your account information, your videos, and any video subscriptions.
- Refer to Chapter 12 for information on uploading a video you’ve recorded on your Android tablet to your account on YouTube.
- To view the video in a larger size, tilt the tablet to the horizontal orientation.
- Use the YouTube app to view YouTube videos, rather than use the tablet’s web browser app to visit the YouTube website.
- Not all YouTube videos are available for viewing on mobile devices.
Buying and renting movies
You can use the Play Movies & TV app to watch videos you’ve rented or purchased at the Google Play Store. Open the app and choose the video from the main screen. Items you’ve purchased show up in the app’s library.
The actual renting or purchasing is done at the Google Play Store. Check the Store often for freebies and discounts. More details for renting and purchasing movies and shows is found in Chapter 15.
- Movies and shows rented at the Play Store are available for viewing for up to 30 days after you pay the rental fee. After you start the movie, you can pause and watch it again and again during a 24-hour period.
- Not every film or TV show is available for purchase. Some are rentals only.