Chapter 19
Customize Your Android Tablet
In This Chapter
![]() Changing the background image
Changing the background image
![]() Working with Home screen pages
Working with Home screen pages
![]() Changing the screen brightness
Changing the screen brightness
![]() Putting shortcuts on the Lock screen
Putting shortcuts on the Lock screen
![]() Controlling Lock screen notifications
Controlling Lock screen notifications
![]() Activating keyboard features
Activating keyboard features
![]() Setting sound options
Setting sound options
It’s entirely possible to own an Android tablet for decades and never once customize it. It’s not that customization is impossible; it’s that most people just don’t bother. Maybe they don’t know how to customize it; maybe they don’t try; or maybe they’re deathly afraid that the tablet will seek revenge.
Poppycock!
It’s your tablet! Great potential exists to make the device truly your own. You can change the way it looks to the way it sounds. Revenge is not part of the equation.
Home Screen and Display Settings
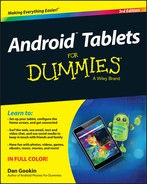
The Home screen is where the action happens on your Android tablet. To help hone the Home screen to meet your demands, several customization options are available. You can change the background image, control the automatic lock timeout, and even add or remove Home screen pages. This section uncovers the secrets.
Decorating the Home screen
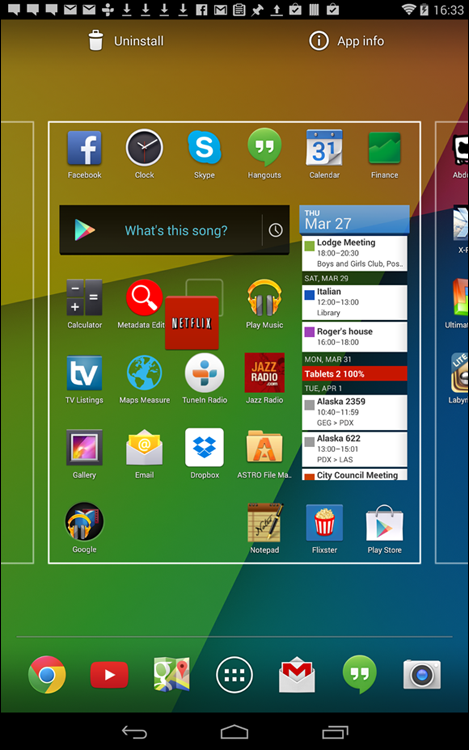
The key to Home screen decorating can be subtly different from tablet to tablet. Perhaps the most predictable method is to long-press a blank part of the Home screen; do not long-press a launcher icon or widget. Upon success, you may see Home screen management options, similar to those shown in Figure 19-1.
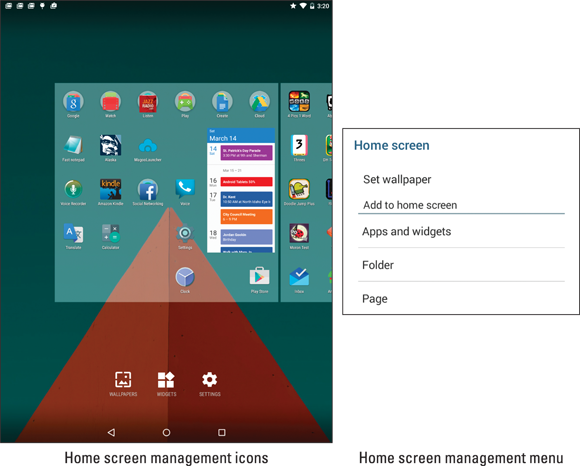
Figure 19-1: The Home screen menu.
The most popular method of showing the options is to present them as icons, shown on the left in Figure 19-1. Your tablet may instead present the options on a menu, shown on the right. These options include the following items:
- Wallpaper: Change the background image on the Home screen.
- Widgets: Add widgets to the Home screen. An Apps option might also be available, or combined as Apps and Widgets.
- Folder: Create folders for storing launcher icons on the Home screen.
- Page: Add, remove, or manage Home screen pages.
Later sections in this chapter describe how to use each command.
- You cannot long-press the Home screen when it’s full of launcher icons and widgets. Swipe to a screen that’s all or partially empty.
 Use folders to help organize apps on the Home screen, especially when the Home screen starts to overflow with launcher icons. See Chapter 18.
- Some older Android tablets featured a menu button below the touchscreen. Press that button to view the Home screen menu, which looks similar to the option on the right in Figure 19-1.
Hanging new wallpaper
The Home screen background can be draped with two types of wallpaper: traditional and live. Traditional wallpaper can be any image, such as a picture you’ve taken or an image provided by the tablet’s manufacturer. Live wallpaper is animated or interactive.
To set a new wallpaper for the Home screen, obey these steps:
- Long-press the Home screen and tap either the Wallpapers or Set Wallpaper command or icon.
Choose the Home screen option if prompted to set the Home screen or Lock screen wallpaper.
See the later section “Setting the Lock screen background” for information on changing the Lock screen’s wallpaper.
Tap a wallpaper to see a preview.
Swipe the list left or right to peruse your options. You see the previous wallpaper images plus those provided by the tablet manufacturer. On the far right, you’ll find the live wallpapers.
Tap the Set Wallpaper button to confirm your choice.
The new wallpaper takes over the Home screen.
If you prefer to use an image from the tablet’s photo library, tap the Pick Image or More Images button in Step 3. Choose an image. Crop the image by manipulating the cropping rectangle on the screen. Tap the Done button to set the wallpaper.
With some tablets, you must first choose the wallpaper type. You see three options:
- Wallpapers: Choose a preset wallpaper.
- Live Wallpapers: Select an animated Home screen background.
- Image app: Use the named app (Gallery, Photos, or whatever) to choose an image stored on the tablet.
When choosing your own image, you’ll be asked to crop. Tap the Set Wallpaper button to assign the image as the tablet’s Home screen background.
- Be careful how you crop the wallpaper image when you choose one of your own photos. Zoom out (pinch your fingers on the touchscreen) to ensure that the entire image is cropped properly for both the tablet’s horizontal and vertical orientations.
- Live wallpapers can be obtained from the Google Play Store. See Chapter 15.
- The Zedge app is an über-repository of wallpaper images, collected from Android users all over the world. Zedge is free at the Google Play Store.
- See Chapter 12 for more information on how to crop an image.
Managing Home screen pages
The number of pages on the Home screen isn’t fixed. You can add pages. You can remove pages. You can even rearrange pages. This feature might not be available to all Android tablets and, sadly, it’s not implemented in exactly the same way.
The stock Android method of adding a Home screen page is to drag an icon left or right, just as though you were positioning that icon on another Home screen page. When a page to the left or right doesn’t exist, the tablet automatically adds a new, blank page.
Other tablets may be more specific in how pages are added. For example, you can choose a Page command from the Home screen menu, shown earlier, in Figure 19-1.
Samsung tablets feature a Home screen page overview, shown in Figure 19-2. To edit Home screen pages, pinch the Home screen: Touch the screen with two fingers and drag them together. You can then manage Home screen pages as illustrated in the figure.
Figure 19-2: Manipulating Home screen pages.
Generally speaking, to rearrange the pages, long-press and drag it to a new spot. When you’re done, tap the Back or Home icon.
- The maximum number of Home screen pages may be three, five, seven, or nine, depending on your tablet. The minimum is one.
- On some tablets, the far left Home screen page is the Google Now app.
- Some tablets allow you to set the primary Home screen page, which doesn’t necessarily have to be the center Home screen page. I’ve seen different ways to accomplish this task. The most common one is to tap the Home icon in a thumbnail’s preview, which is what’s illustrated in Figure 19-2.
Setting the screen lock timeout
You can manually lock your tablet at any time by pressing the Power/Lock key. That’s probably why it’s called the Power/Lock key, although I have my doubts. When you don’t manually lock the tablet, it automatically locks after a given period of inactivity.
You have control over the automatic lock-timeout value, which can be set from just a few seconds to several minutes. Obey these steps:
- Open the Settings app.
Choose Display.
On some Samsung tablets, you need to first tap the Device tab before you can locate the Display item.
Choose the Screen Timeout item.
This option is titled Sleep on some tablets.
Select a timeout value from the list.
I prefer a value of 10 minutes.
The lock timer measures inactivity; when you don’t touch the screen, the timer starts ticking. About 5 seconds before the timeout kicks in, the touchscreen dims. Then the touchscreen turns off and the tablet locks. If you touch the screen before then, the timer is reset.
 The Lock screen has its own timeout. If you unlock the tablet but don’t work the screen lock, the tablet locks itself automatically after about tem seconds. This timeout value cannot be adjusted.
Adjusting display brightness
You can set the screen brightness to very dim or very bright, or you can let the tablet determine the setting by using the ambient light in the room.
To set brightness, follow these steps:
Open the Settings app and tap the Display item.
On Samsung tablets, look for the Display item on the Device tab.
- Tap the Brightness item.
- Use the slider to adjust the touchscreen’s intensity.
If you’d rather have the tablet adjust the brightness for you, locate the Adaptive Brightness item and slide its master control to the On position. Not every tablet may feature this option.
- The Adaptive Brightness setting might be called Automatic Brightness.
- You might also find a Brightness setting in the tablet’s Quick Settings area. See Chapter 3 for information on accessing the Quick Settings.
Lock Screen Settings
The Lock screen is different from the Home screen, although the two locations share similar traits. As with the Home screen, you can customize the Lock screen. You can change the background, add app launcher shortcuts, and perform all sorts of tricks.
- Lock screen features might not be available for all Android tablets.
- For information on setting screen locks, refer to Chapter 20.
Setting the Lock screen background
For most Android tablets, the Lock screen wallpaper is the same as the Home screen wallpaper. A few tablets, however, let you set separate Lock screen wallpaper.
To determine whether your tablet provides for separate Lock screen wallpaper, follow the same steps as outlined in the earlier section “Hanging new wallpaper.” If you see a prompt to set the Lock screen wallpaper, choose it. Then select a wallpaper for the Lock screen that’s different from the Home screen.
Adding Lock screen shortcuts
Some Android tablets feature the Camera icon in the lower right corner of the screen. Swipe that icon to unlock the tablet and run the Camera app. It’s a quick way to take a picture.
Samsung tablets allow for up to five launcher icons to appear on the Lock screen, but only when the Swipe screen lock is selected. You can use these Lock screen launchers to both unlock the tablet and immediately start the app: Simply swipe the app launcher icon on the Lock screen.
To configure Lock screen shortcuts on some Samsung tablets, heed these steps:
- Open the Settings app.
- Tap the Device tab, and then choose Lock Screen from the left side of the screen.
On the right side of the screen, locate the Shortcuts item and slide its master control to the On position.
If you don’t see this item, your tablet lacks this feature.
Tap the Shortcuts item.
You see the icons that will appear on the Lock screen.
You can add or remove Lock screen launchers: Tap the Add icon to choose another app. A maximum of five Lock screen shortcuts can be selected. Long-press an app icon and drag it to the Delete icon to remove it from the Lock screen launcher list.
Displaying Lock screen notifications
The Lock screen can list the tablet’s notifications, just as they appear on the notifications drawer. You can determine whether all notifications appear or just highlights (for added security), or you can deactivate the feature.
To control Lock screen notifications, follow these steps:
- Open the Settings app.
- Tap the Sound & Notification item.
- Choose When Device Is Locked.
Select a Lock screen notification level.
Three options are shown:
- Show All Notification content.
- Hide Sensitive Notification Content.
- Don’t Show Notifications at All.
- Choose a notification level.
The Hide Sensitive Notification Content item simply displays notices, not message previews. And, of course, the Don’t Show Notifications at All setting suppresses Lock screen notifications.
The Samsung Galaxy Tab S can also display Lock screen notifications in the form of information cards. To activate the Lock screen cards, follow these directions:
- Open the Settings app.
- Tap the Device tab, and choose Lock Screen from the left side of the window.
- Choose Lock Screen Card.
Place a green check mark by the cards you want to appear on the Lock screen.
To disable this feature, uncheck all the items.
You can simply admire the Lock screen notifications, or to use them, double-tap. The app that generated the notification (or card) is started, and you can see more details.
Keyboard Settings
Quite a few options are available for the Google Keyboard, some of which enable special features and others which supposedly make the onscreen typing experience more enjoyable. I’ll leave it up to you to determine whether that’s true.
Getting keyboard feedback
The onscreen keyboard can help with your typing by generating haptic feedback. This is either in the form of a pleasing click sound or by vibrating the tablet. To check these settings, follow these steps:
- Open the Settings app.
Choose Language & Input.
Samsung tablets keep the Language and Input item on either the General or Controls tab in the Settings app.
- Choose Google Keyboard.
Choose Preferences.
The two items that control haptic feedback are Vibrate on Keypress and Sound on Keypress.
- Use the master control to set vibration and sound options.
On Samsung tablets, tap the Settings icon by Samsung keyboard. You’ll then find check boxes for Sound and Vibration.
Not every tablet features vibration.
Ensuring that predictive text is active
Predictive text is on all the time when you use the Google Keyboard. Not every Android tablet uses that keyboard, so to ensure that the feature is active, follow these steps:
- Open the Settings app.
Choose Language & Input.
On Samsung tablets, you may have to first tap the General or Controls tab to locate the Language and Input item.
Tap the item Google Keyboard.
On Samsung tablets, tap the Settings icon by the Samsung Keyboard item.
Ensure that the item Predictive Text is active.
On some tablets, place a check mark by that item; on others, slide the master control to the On position.
If your tablet doesn’t show the Predictive Text item, it’s most likely on all the time and can’t be turned off. Do ensure that the Next-Word Suggestions item is active: On the Google Keyboard Settings screen, tap Text Correction and then confirm that the master control by the item Next-Word Suggestions is in the On position.
See Chapter 4 for more information on using the predictive text feature.
Activating keyboard gestures
Gesture typing allows you to create words by swiping your finger over the onscreen keyboard. Chapter 4 explains the details, although this feature may not be active on your tablet. To ensure that it is, follow these steps:
- Open the Settings app.
- Choose Language & Input.
- Choose Google Keyboard.
- Choose Gesture Typing.
Ensure that all the Master Control icons are set to the On position.
Only the Enable Gesture Typing item needs to be enabled, although activating the other items does enhance the experience.
For some Samsung tablets, the setting is called Keyboard Swipe. Activate it from the Samsung Keyboard Settings screen by following these steps:
- Open the Settings app.
Tap the General Tab.
On some Galaxy Tabs, tap the Controls tab if you can’t find Language and Input on the General tab.
- Choose Language and Input.
- Tap the Settings icon by Samsung Keyboard.
Choose Keyboard Swipe.
This item might be called SwiftKey Flow on older Samsung tablets. Also be aware that not every Galaxy Tab offers this feature.
- Tap the item Continuous Input.
Refer to Chapter 4 to learn more about gesture typing.
Turning on dictation
![]() Voice input should be active on all Android tablets, but that’s no guarantee. The secret is to find the Dictation (Microphone) icon on the keyboard. The icon looks similar to the one shown in the margin.
Voice input should be active on all Android tablets, but that’s no guarantee. The secret is to find the Dictation (Microphone) icon on the keyboard. The icon looks similar to the one shown in the margin.
On some Samsung keyboards, long-press the Multifunction key to locate the Dictation icon.
When you can find the Dictation key, and before you defenestrate the tablet in frustration, follow these steps to ensure that this feature is active:
- Open the Settings app.
Choose Language & Input.
Samsung tablets title this item Language and Input, and it’s found on the Controls tab or on the General tab.
Ensure that Google Voice Typing is listed; if a check box is available, ensure that a check mark is in the box.
If not, tap the box to place a check mark there.
The Microphone key now appears on the onscreen keyboard. Using that key is covered in Chapter 4.
Audio Adjustments
The Sound & Notification screen in the Settings app is where you control the various ways your Android tablet can make noise. It’s capable of more than beeping, and the volume can be set as well as the vibration options.
To witness the Sound screen for yourself, open the Settings app and tap the Sound & Notification item. On some tablets, the item is called Sound. On Samsung tablets, the Sound item is found on the Device tab in the Settings app.
Worthy options on the Sound screen include the following, although the specific names used on your tablet may be slightly different from what’s shown here:
Default Notification Ringtone: Choose which sound you want to hear for a notification alert. Choose a sound or choose None or Silent (at the top of the list) for no sound.
Vibration: Choose the Vibration item to set whether the tablet vibrates during a notification and, potentially, how vigorously it vibrates. If you don’t see this option, your Android tablet either doesn’t let you control vibration or it lacks the vibration feature.
Volumes: Though you can set the Android tablet volume using the Volume buttons on the side of the gizmo, the Volumes command on the Sound screen lets you set the volume for different types of sound events, such as music, games, and notifications.
Other items might also be available, controlling features specific to the tablet.