Chapter 3
How Android Tablets Work
In This Chapter
![]() Working the touchscreen
Working the touchscreen
![]() Changing the volume
Changing the volume
![]() Getting around the Home screen
Getting around the Home screen
![]() Checking notifications
Checking notifications
![]() Using Quick Settings
Using Quick Settings
![]() Running apps
Running apps
![]() Accessing recently used apps
Accessing recently used apps
![]() Exploring common icons
Exploring common icons
It used to be that you could judge how advanced something was by how many buttons it had. Starting with the dress shirt and progressing to the first computer, more buttons meant fancier technology. Your Android tablet tosses that rule right out the window. Beyond the Power/Lock key and the volume key, the device is shamefully bereft of buttons.
My point is that in order to use your tablet, you have to understand how a touchscreen works. That touchscreen is the tablet’s main input device — the gizmo you use to do all sorts of wondrous and useful things. Using a touchscreen may be a new experience for you, so this chapter provides a general orientation to the touchscreen and how an Android tablet works.
Basic Operations
Your Android tablet’s ability to frustrate you is only as powerful as your fear of the touchscreen and how it works. After you clear that hurdle, as well as understand some other basic operations, you’ll be on your way toward mobile device contentment.
Touching the touchscreen
Minus any buttons and knobs, the way you control an Android tablet is to manipulate things on the touchscreen with one or two fingers. It doesn’t matter which fingers you use, and you should feel free to experiment with other body parts as well, although I find fingers to be handy.
Here are some of the common ways to manipulate the touchscreen:
- Tap: The basic touchscreen technique is to touch it. You tap an object, an icon, a control, a menu item, a doodad, and so on. The tap operation is similar to a mouse click on a computer. It may also be referred to as a touch or a press.
- Double-tap: Tap the screen twice in the same location. Double-tapping can be used to zoom in on an image or a map, but it can also zoom out. Because of the double-tap’s dual nature, I recommend using the pinch or spread operation to zoom.
- Long-press: Tap part of the screen and keep your finger down. Depending on what you’re doing, a pop-up menu may appear, or the item you’re long-pressing may get “picked up” so that you can drag (move) it around. Long-press might also be referred to as touch and hold.
- Swipe: To swipe, you tap your finger on one spot and then move your finger to another spot. Swipes can go up, down, left, or right; the touchscreen content moves in the direction in which you swipe your finger. A swipe can be fast or slow. It’s also called a flick or slide.
- Drag: A combination of long-press and then swipe, the drag operation moves items on the screen.
- Pinch: A pinch involves two fingers, which start out separated and then are brought together. The effect is used to zoom out, to reduce the size of an image or to see more of a map.
- Spread: The opposite of pinch is spread. You start out with your fingers together and then spread them. The spread is used to zoom in, to enlarge an image or see more detail on a map.
- Rotate: A few apps let you rotate an image on the screen by touching with two fingers and twisting them around a center point. If you have trouble with this operation, pretend that you’re turning the dial on a safe.
Using the navigation icons
Below the touchscreen dwell three icons. They can appear as part of the touchscreen itself; or, on some tablets, they may be part of the bezel or may even be physical buttons. These are the navigation icons, and they serve specific functions.
Traditionally, you find three navigation icons: Back, Home, and Recent. The appearance of these icons can vary, with the most common variations shown in Table 3-1. The Lollipop version of the navigation icons are used in this book’s margins.
Table 3-1 Navigation Icon Varieties
Icon |
Lollipop |
KitKat and Earlier |
Home |
|
|
Back |
|
|
Recent |
|
|
 Back: The Back icon serves several purposes, all of which fit neatly under the concept of “back.” Tap the icon once to return to a previous page, dismiss an onscreen menu, close a window, or hide the onscreen keyboard, for example.
 Home: No matter what you’re doing on the tablet, tapping this icon displays the Home screen. When you’re already viewing the Home screen, tapping the Home icon returns you to the main, or center, Home screen.
 Recent: Tapping the Recent icon displays the Overview, a list of recently opened or currently running apps. The list scrolls up and down, so when it’s too tall for the screen, just swipe it with your finger to view all the apps. Choose an app from the list to switch to that app. To dismiss the Overview, tap the Back icon. See the later section “Switching between running apps” for more info.
 On Android tablets without the Recent icon, long-press the Home icon to see the Overview.
- Older Android tablets may sport the Menu icon or button instead of the Recent icon. Tap the Menu icon to display a pop-up menu from which you can choose commands.
The three navigation icons may hide themselves when certain apps run. In most cases, the icons are still there — just invisible. Tap the screen to summon them. For some full-screen apps and games, swipe the screen from top to bottom to see the icons.
 The Back icon changes its orientation, shown in the margin. Tap this icon to hide the onscreen keyboard, dismiss dictation, or perform other actions similar to the Back navigation icon.
Setting the volume
There are times when the sound level is too loud. There are times when it’s too soft. And, there are those rare times when it’s just right. Finding that just-right level is the job of the volume key that clings to the side of your Android tablet.
When the volume key is on the tablet’s side, press the top part of the key to make the volume louder; press the bottom of the key to make the volume softer. When the volume key is on the top edge of the tablet, press the left part to increase volume and the right part to decrease volume.
As you press the volume key, a graphic appears on the touchscreen to illustrate the relative volume level, similar to the one shown in Figure 3-1. You can continue pressing the volume key, or use your finger to adjust the onscreen slider and set the volume.
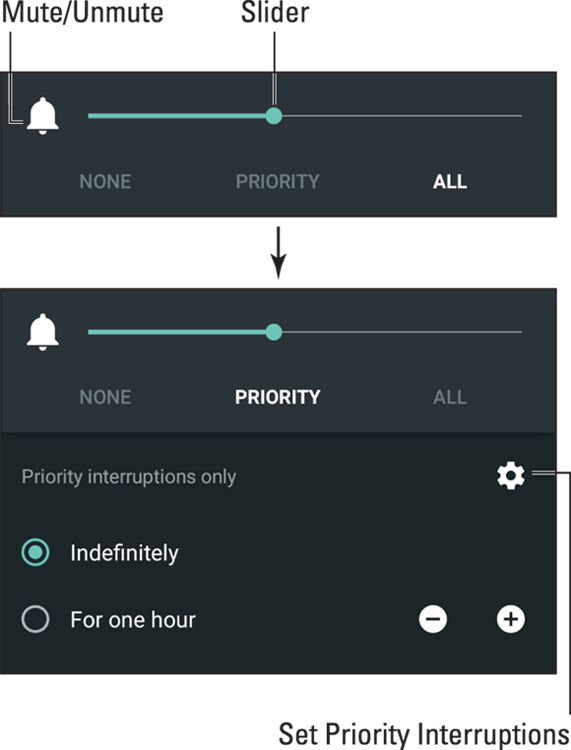
Figure 3-1: Setting the volume.
Some tablets may display specific controls for certain noise-making activities, such as media (movies, music), games, system sounds, and notifications.
The onscreen volume control disappears after a few moments.
- When the volume is set all the way down, the tablet is silenced. In Figure 3-1, tapping the Bell icon mutes the tablet.
- Silencing the tablet by sliding down the volume level may place it into Vibration mode. Not every tablet features Vibration mode.
 The volume key works even when the tablet is locked. That means you don’t need to unlock the tablet if you’re playing music and you only need to adjust the volume.
- Refer to Chapter 19 for more details on setting the tablet’s volume and Vibration mode.
Changing the orientation
Your Android tablet features a gizmo called an accelerometer. It determines in which direction the tablet is pointed or whether you’ve reoriented the device from an upright position to a horizontal one (or vice versa) or even upside down. That way, the information displayed on the tablet’s screen always appears upright, no matter how you hold it.
To demonstrate how the tablet orients itself, rotate the tablet to the left or right. Most apps change their orientation to match however you’ve oriented the tablet, such as the Home screen, shown in Figure 3-2.
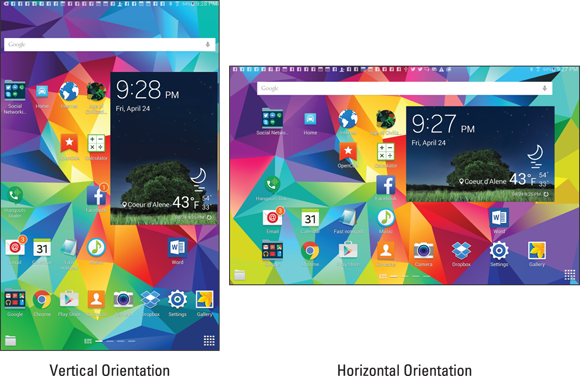
Figure 3-2: Android tablet orientation.
The rotation feature may not work for all apps, and it may not even work for the Home screen. In that case, open the web browser app to experiment with rotation.
- Most games present themselves in one orientation only.
- The onscreen keyboard is more usable when the tablet is in its horizontal orientation. Chapter 4 covers using the onscreen keyboard.
 You can lock the orientation if the rotating screen bothers you. See the section “Making Quick Settings,” later in this chapter.
- A great application for demonstrating the Android tablet accelerometer is the game Labyrinth. You can purchase it at the Google Play Store or download the free version, Labyrinth Lite. See Chapter 15 for more information about the Google Play Store.
There’s No Place Like Home Screen
The main base from which you begin domination of your Android tablet is the Home screen. It’s the first thing you see after unlocking the tablet, and it’s the place you go to whenever you leave an app.
 To view the Home screen at any time, tap the Home icon found at the bottom of the touchscreen. Some tablets feature a physical Home button or key, which performs the same duties as the Home icon.
Touring the Home screen
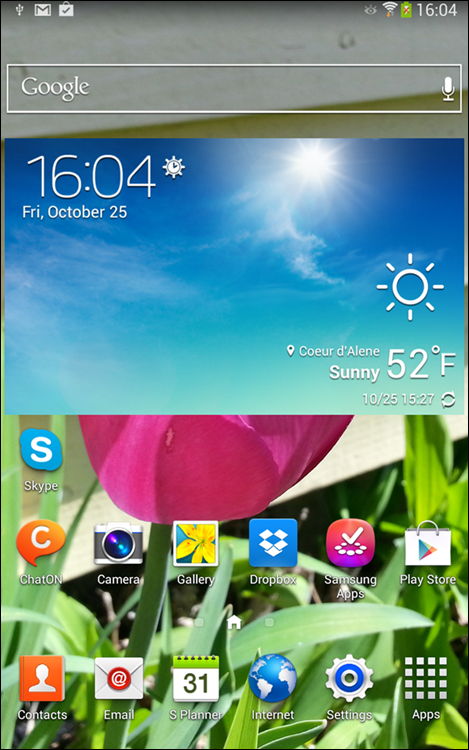
The typical Android tablet Home screen is illustrated in Figure 3-3. Several fun and interesting things appear on the Home screen. Find these items on your own tablet’s Home screen:
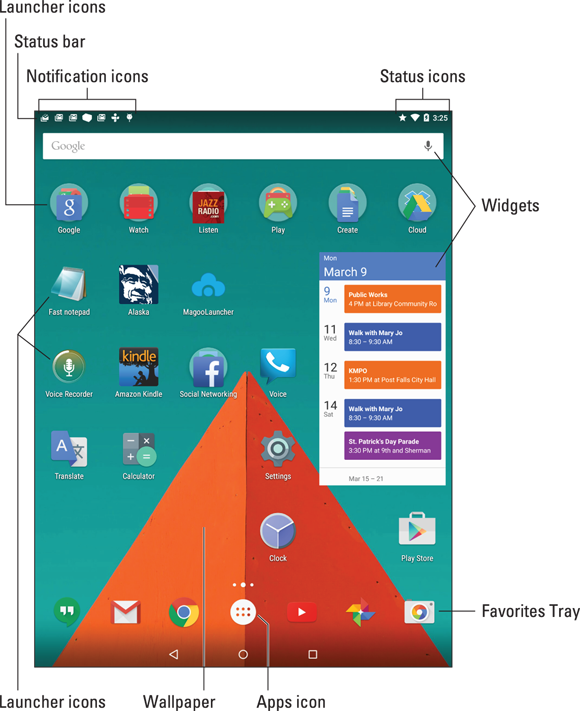
Figure 3-3: The Home screen.
- Status bar: This area at the top of the screen shows notification icons and status icons. The status bar may disappear, in which case a quick swipe of the screen from the top downward will redisplay it.
- Notification icons: These icons come and go, depending on what happens in your digital life. For example, new icons appear whenever you receive a new email message or have a pending appointment. The section “Reviewing notifications,” later in this chapter, describes how to deal with notifications.
- Status icons: These icons represent the tablet’s current condition, such as the type of network to which it’s connected, signal strength, and battery status, as well as whether the tablet is connected to a Wi-Fi network or is using Bluetooth, for example.
- App launcher icons: The meat of the meal on the Home screen plate, app (application) launcher icons are where the action takes place. Tapping a launcher icon opens an app.
- Widgets: A widget is a window through which you view information, control the tablet, access features, or do something purely amusing. A special widget is the Google Search widget, which lets you search the Internet or use the powerful Google Now feature.
- Folders: Multiple apps can be stored in a folder. Tap the folder to see a pop-up window listing all the apps. Tap an app icon to start. See Chapter 18 for more information on folders.
- Wallpaper: The background image you see on the Home screen is the wallpaper.
- Favorites Tray: The lineup of icons near the bottom of the screen contains slots for popular launcher icons. The favorites tray shows the same icons at the bottom of every Home screen page.
- Apps icon: Tap this icon to view the collection of apps and widgets available on your tablet. See the later section “Finding an app in the Apps drawer.”
- The Home screen is entirely customizable. You can add and remove icons from the Home screen, add widgets and shortcuts, and even change wallpaper (background) images. See Chapter 19 for more information.
Touching a part of the Home screen that doesn’t feature an icon or a control does nothing. That is, unless you’re using the live wallpaper feature. In that case, touching the screen changes the wallpaper in some way, depending on the wallpaper that’s selected. You can read more about live wallpaper in Chapter 19.
 You may see numbers affixed to certain Home screen icons. Those numbers indicate pending actions, such as unread email messages, indicated by the icon shown in the margin.
Accessing multiple Home screens
The Home screen is more than what you see. It’s actually an entire street of Home screens, with only one Home screen panel displayed at a time.
To switch from one panel to another, swipe the Home screen left or right. There are pages to the left of the main Home screen page, and pages to the right. The number of panels depends on the tablet. Many tablets let you add or remove panels; see Chapter 19 for details.
Figure 3-4 illustrates the Home screen index, used on some tablets to help you determine which Home screen is displayed. You can swipe the index or tap one of the dots to zoom to a specific Home screen panel.
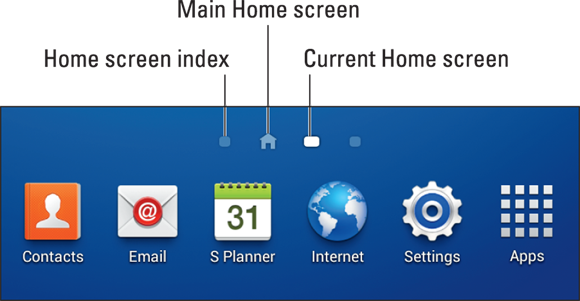
Figure 3-4: The Home screen panel index.
 When you tap the Home navigation icon, you return to the last Home screen page you viewed. To return to the main Home screen panel, tap the Home icon a second time.
- Some tablets reserve the far left Home screen panel for the Google Now app. See Chapter 14 for information on Google Now.
- The main Home screen is often the center Home screen panel, though some Android tablets let you choose any page as the main one.
Reviewing notifications
Notifications appear as icons at the top of the Home screen, as illustrated earlier, in Figure 3-3. To review them, you pull down the notifications drawer by dragging your finger from the top of the screen downward. The notifications drawer is illustrated in Figure 3-5.
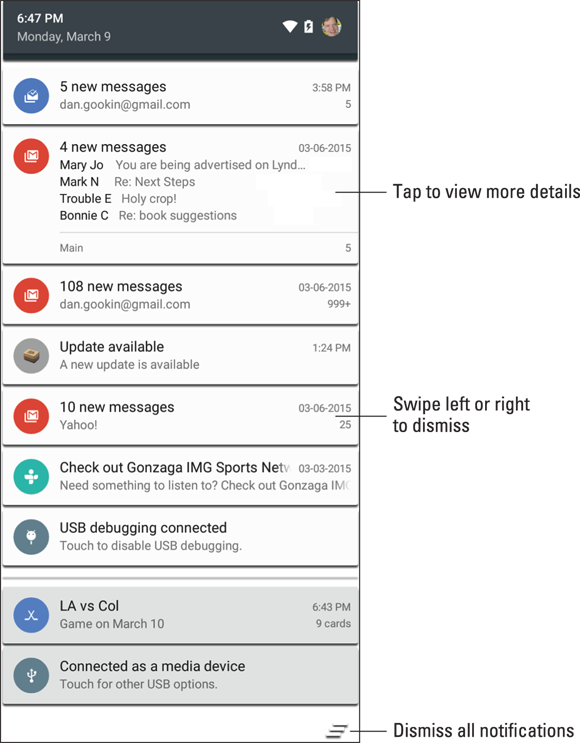
Figure 3-5: The notifications drawer.
Scroll through the list of notifications by swiping the drawer up and down. To peruse a specific notification, tap it. Choosing a notification displays more information, and it may also dismiss the notification.
![]() You can dismiss a notification by sliding it left or right. To dismiss all notifications, tap the Clear Notifications icon, shown in the margin. You may need to slide the notification drawer up or down to locate the Clear button.
You can dismiss a notification by sliding it left or right. To dismiss all notifications, tap the Clear Notifications icon, shown in the margin. You may need to slide the notification drawer up or down to locate the Clear button.
 To hide the notifications drawer, tap the Back icon, swipe the screen upward, or tap anywhere else on the Home screen.
Some tablets require you to swipe the screen from the top-left edge to see the notifications drawer. When you swipe down from the top-right edge, you see the Quick Settings shade. See the next section.
 When more notifications are present than can be shown on the status bar, you see the More Notifications icon displayed, similar to the one shown in the margin.
- Dismissing some notifications doesn’t prevent them from appearing again in the future. For example, notifications to update your apps continue to appear, as do calendar reminders.
- Ongoing notifications cannot be dismissed. They include items such as USB (refer to Figure 3-5), Bluetooth, and Wi-Fi connections.
- Some apps, such as Facebook and Twitter, don’t display notifications unless you’re logged in. See Chapter 9.
- Your Android tablet plays a notification ringtone whenever a new notification floats in. You can choose which sound plays; see Chapter 19 for more information.
Making Quick Settings
Many common settings for Android tablet features are found in the Quick Settings drawer, which sits atop the notifications drawer. The Quick Settings appear as large buttons, which either access popular features or turn settings on or off, such as Bluetooth, Wi-Fi, Airplane Mode, Auto Rotate, and more.
The stock Android method for accessing the Quick Settings depends on the Android operating system version. For Lollipop, swipe the screen from top to bottom twice; once to see the navigation drawer and again to view the Quick Settings, shown in Figure 3-6. For Android KitKat, swipe the screen from top to bottom but starting from the right side of the status bar.

Figure 3-6: The Quick Settings drawer.
Samsung tablets always show the Quick Settings atop the navigation drawer. Figure 3-7 illustrates how the icons may look. You can swipe them left or right to view more or tap the View All icon to see all available Quick Settings.
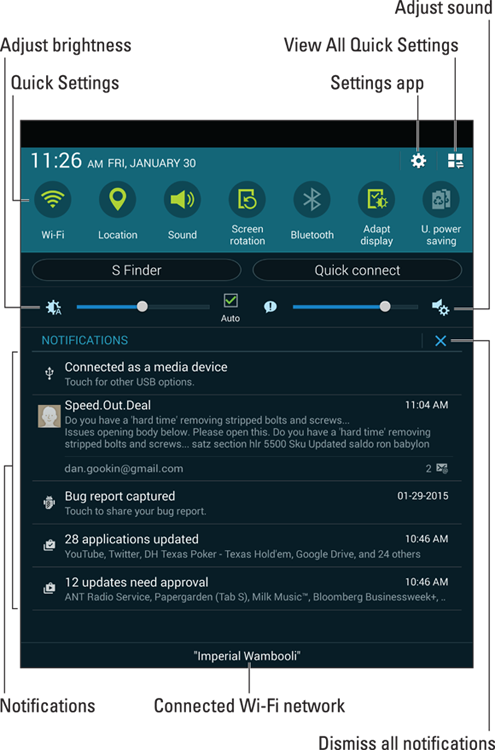
Figure 3-7: A Samsung tablet’s Quick Settings.
Dismiss the Quick Settings drawer by tapping either the Back or Home icons.
The World of Apps
You probably didn’t purchase a tablet so that you could enjoy the thrill-a-minute punch that’s packed by the Android operating system. No, an Android tablet’s success lies with the apps you obtain. Knowing how to deal with apps is vital to being a successful, happy Android tablet user.
Starting an app
To start an app, tap its icon. The app starts.
Apps can be started from the Home screen: Tap a launcher icon to start the associated app. Apps can be started also from the Apps drawer, as described in the section “Finding an app in the Apps drawer.”
You can also start an app found in a Home screen folder: Tap to open the folder, and then tap an icon to start that app.
Quitting an app
Unlike on a computer, you don’t need to quit apps on your Android tablet. To leave an app, tap the Home icon to return to the Home screen. You can keep tapping the Back icon to back out of an app. Or you can tap the Recent icon to switch to another running app.
- Some apps feature a Quit command or an Exit command, but for the most part you don’t quit an app on your tablet — not like you quit an app on a computer.
 If necessary, the Android operating system shuts down apps you haven’t used in a while. You can directly stop apps run amok, which is described in Chapter 18.
Finding an app in the Apps drawer
The launcher icons you see on the Home screen don't represent all the apps in your tablet. To view all installed apps, you must visit the Apps screen: Tap the Apps icon on the Home screen. This icon has a different look to it, depending on your tablet. Figure 3-8 illustrates various looks to the Apps icon, though more varieties may exist.

Figure 3-8: Apps icon varieties.
After you tap the Apps icon, you see the Apps drawer. Swipe through the icons left and right across the touchscreen.
To run an app, tap its icon. The app starts, taking over the screen and doing whatever magical thing that app does.
- As you add new apps to your tablet, they appear in the Apps drawer. See Chapter 15 for information on adding new apps.
- Some tablets allow you to create folders in the Apps drawer. These folders contain multiple apps, which helps keep things organized. To access apps in the folder, tap the folder icon.
- The Apps drawer displays apps alphabetically. On some tablets, you can switch to a non-alphabetical viewing grid. With that feature active, it’s possible to rearrange the app icons in any order you like.
 For apps you use all the time, consider creating launcher icons on the Home screen. Chapter 18 describes how.
Switching between running apps
 The apps you run on your tablet don’t quit when you dismiss them from the screen. For the most part, they stay running. To switch between running apps, or to any app you’ve recently opened, tap the Recent icon. You see the Overview, similar to what’s shown in Figure 3-9.
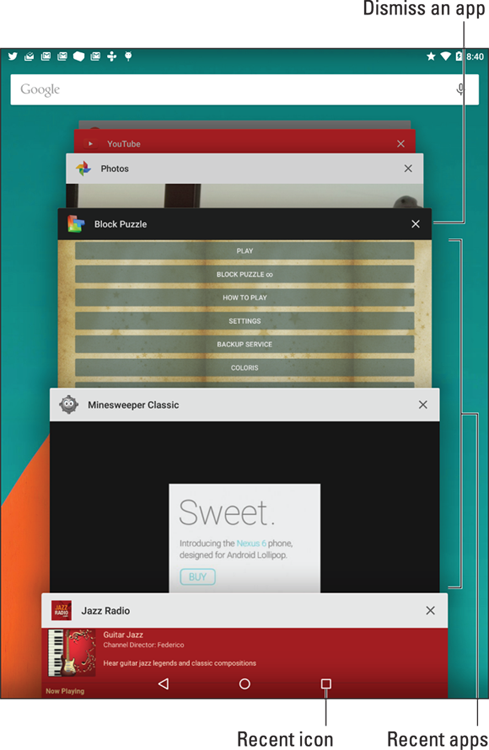
Figure 3-9: The Overview shows recently used apps.
To switch to an app, choose it from the list.
- You can remove an app from the Overview by swiping it off the list, left or right, or up or down, depending on the tablet’s orientation. Removing an app from the Overview is pretty much the same thing as quitting an app.
- For tablets that lack the Recent icon, long-press the Home icon to see the Overview.
 The Android operating system may shut down apps that haven’t received attention for a while. Don’t be surprised if you see an app missing from the Overview. If so, just start it up again as you normally would.
Common Android Icons
In addition to the navigation icons, various other icons appear while you use your Android tablet. These icons serve common functions in apps as well as in the Android operating system. Table 3-2 lists the most common icons and their functions.
Table 3-2 Common Icons
Icon |
Name |
What It Does |
|
Action Bar |
Displays a pop-up menu. This teensy icon appears in the lower-right corner of a button or an image, indicating that actions (commands) are attached. |
|
Add |
Adds or creates a new item. The plus symbol (+) may be used in combination with other symbols, depending on the app. |
|
Close |
Closes a window or clears text from an input field. |
|
Delete |
Removes one or more items from a list or deletes a message. |
|
Dictation |
Lets you use your voice to dictate text. |
|
Done |
Dismisses an action bar, such as the text-editing action bar. |
|
Edit |
Lets you edit an item, add text, or fill in fields. |
|
Favorite |
Flags a favorite item, such as a contact or a web page. |
|
Overflow |
Displays a menu or list of commands. |
|
Refresh |
Fetches new information or reloads. |
|
Search |
Searches the tablet or the Internet for a tidbit of information. |
|
Settings |
Adjusts options for an app. |
|
Share |
Shares information stored on the tablet via email, social networking, or other Internet services. |
Various sections throughout this book give examples of using the icons. Their images appear in the book’s margins where relevant.
Other common symbols are used on icons in various apps. For example, the standard Play and Pause icons are used as well.
 Older tablets may use the Menu icon to display onscreen menus. This icon serves the same function as the Overflow icon, shown in Table 3-2. The icon is found as a button on the device.
Some Samsung tablets use a MORE button in place of the Overflow icon.
 Another variation on the Settings icon is shown in the margin. It serves the same purpose as the Gear icon, shown in Table 3-2, although this older Settings icon is being phased out.
