
CHAPTER 11
Securing OS X

Threats to your computing-related security and privacy often come from the Internet and from someone simply using your Mac while you are not around. To protect yourself and your family, you need to understand these threats and know what you can do to thwart them.
Change Your Password
You can make OS X more secure by changing your password. For example, if you turn on file sharing, as described in Chapter 15, you can configure each shared folder so that only someone who knows your password can get full access to that folder. Similarly, you should change your password if other network users know your current password and you no longer want them to have access to your shared folders. Finally, you should also change your password if you feel that your current password is too easy to guess. See the Tip to learn how to create a secure password.
Change Your Password

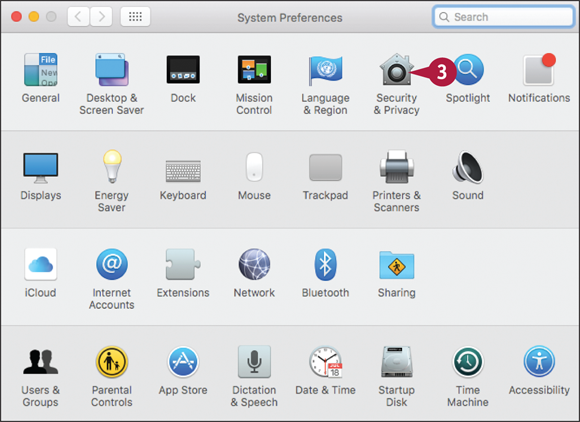
![]() Click System Preferences (
Click System Preferences (![]() ).
).
The System Preferences appear.
![]() Click Users & Groups.
Click Users & Groups.

The Users & Groups preferences appear.
![]() Your user account is selected automatically.
Your user account is selected automatically.
![]() If you want to work with a different user account, you must click the lock icon (
If you want to work with a different user account, you must click the lock icon (![]() ), type your administrator password (
), type your administrator password (![]() changes to
changes to ![]() ), and then click the account.
), and then click the account.
![]() Click Change Password.
Click Change Password.
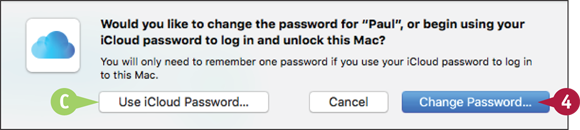
System Preferences asks whether you want to use your iCloud password.
![]() Click Change Password.
Click Change Password.
![]() If you prefer to log in to OS X with your iCloud password, click Use iCloud Password.
If you prefer to log in to OS X with your iCloud password, click Use iCloud Password.

The Change Password dialog appears.
![]() Type your current password.
Type your current password.
![]() Type your new password.
Type your new password.
![]() Retype the new password.
Retype the new password.
![]() Type a hint that OS X will display if you forget the password.
Type a hint that OS X will display if you forget the password.
Note: Construct the hint in such a way that it makes the password easy for you to recall, but hard for a potential snoop to guess.
![]() Click Change Password.
Click Change Password.
OS X changes your password.
Require a Password on Waking
You can enhance your Mac’s security by configuring OS X to ask for your user account password when the system wakes up from either the screen saver or sleep mode. Protecting your account with a password prevents someone from logging on to your account, but what happens when you leave your Mac unattended? If you remain logged on to the system, any person who sits down at your computer can use it to view and change files.
To prevent this, activate the screen saver or sleep mode before you leave your Mac unattended, and configure OS X to require a password on waking.
Require a Password on Waking

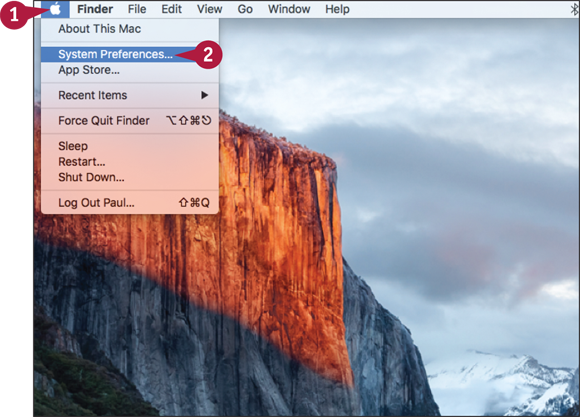
![]() Click Apple (
Click Apple (![]() ).
).
![]() Click System Preferences.
Click System Preferences.
You can also click System Preferences (![]() ) in the Dock.
) in the Dock.

The System Preferences appear.
![]() Click Security & Privacy.
Click Security & Privacy.
The Security & Privacy preferences appear.
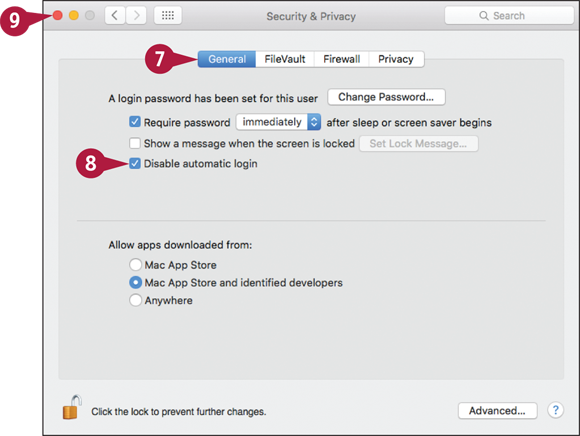
![]() Click the General tab.
Click the General tab.

![]() Click the Require password check box (
Click the Require password check box (![]() changes to
changes to ![]() ).
).
![]() Click Close (
Click Close (![]() ).
).
OS X puts the new setting into effect.
Disable Automatic Logins
You can enhance your Mac’s security by preventing OS X from logging in to your user account automatically. If you are the only person who uses your Mac, you can configure OS X to automatically log in to your account. This saves time at startup by avoiding the login screen, but it opens a security hole. If a snoop or other malicious user has access to your Mac, that person can start the computer and gain access to your documents, settings, web browsing history, and network. To prevent this, configure OS X to disable the automatic login.
Disable Automatic Logins
![]() Click Apple (
Click Apple (![]() ).
).
![]() Click System Preferences.
Click System Preferences.
You can also click System Preferences (![]() ) in the Dock.
) in the Dock.

The System Preferences appear.
![]() Click Security & Privacy.
Click Security & Privacy.

The Security & Privacy preferences appear.
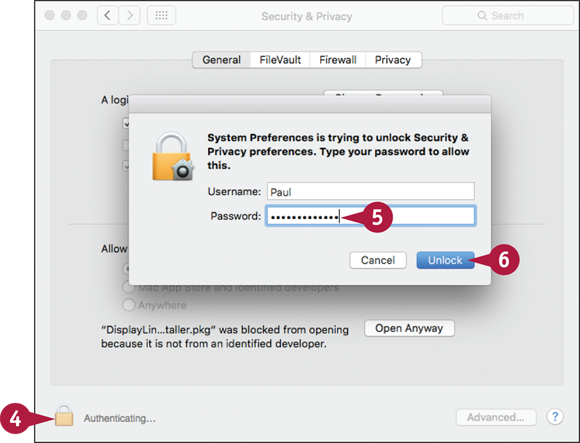
![]() Click the lock icon (
Click the lock icon (![]() ).
).
OS X prompts you for your administrator password.
![]() Type the administrator password.
Type the administrator password.
![]() Click Unlock.
Click Unlock.
OS X unlocks the preferences (![]() changes to
changes to ![]() ).
).
![]() Click the General tab.
Click the General tab.
![]() Click the Disable automatic login check box (
Click the Disable automatic login check box (![]() changes to
changes to ![]() ).
).
![]() Click Close (
Click Close (![]() ).
).
OS X puts the new setting into effect.
Configure App Downloads
You can ensure that malware cannot be installed on your Mac by configuring the system to allow only app downloads from the Mac App Store. By default, OS X allows downloads from the App Store and from so-called identified developers. The reason for this heightened security is that malware developers are starting to target Macs now that they have become so popular. The extra security is a response to that and is designed to prevent users from accidentally installing malware. However, you can configure this feature to be even more secure, which is useful if you are setting up a user account for a child.
Configure App Downloads

![]() Click Apple (
Click Apple (![]() ).
).
![]() Click System Preferences.
Click System Preferences.
You can also click System Preferences (![]() ) in the Dock.
) in the Dock.

The System Preferences appear.
![]() Click Security & Privacy.
Click Security & Privacy.

The Security & Privacy preferences appear.
![]() Click the lock icon (
Click the lock icon (![]() ).
).
OS X prompts you for your administrator password.
![]() Type the administrator password.
Type the administrator password.
![]() Click Unlock.
Click Unlock.

OS X unlocks the preferences (![]() changes to
changes to ![]() ).
).
![]() Click the General tab.
Click the General tab.
![]() Click the Mac App Store option (
Click the Mac App Store option (![]() changes to
changes to ![]() ).
).
![]() Click Close (
Click Close (![]() ).
).
OS X puts the new setting into effect.
Turn On the Firewall
You can make your Mac’s Internet connection much more secure by turning on the OS X firewall. A firewall is a tool designed to prevent malicious users from accessing a computer connected to the Internet. Chances are your network router already implements a hardware firewall, but you can add an extra layer of protection by also activating the OS X software firewall. This will not affect your normal Internet activities, such as web browsing, emailing, and instant messaging.
Turn On the Firewall

![]() Click Apple (
Click Apple (![]() ).
).
![]() Click System Preferences.
Click System Preferences.
You can also click System Preferences (![]() ) in the Dock.
) in the Dock.
The System Preferences appear.
![]() Click Security & Privacy.
Click Security & Privacy.
The Security & Privacy preferences appear.
![]() Click the lock icon (
Click the lock icon (![]() ).
).
OS X prompts you for your administrator password.
![]() Type the administrator password.
Type the administrator password.
![]() Click Unlock.
Click Unlock.

OS X unlocks the preferences (![]() changes to
changes to ![]() ).
).
![]() Click the Firewall tab.
Click the Firewall tab.
![]() Click Turn On Firewall.
Click Turn On Firewall.
![]() Click Close (
Click Close (![]() ).
).
OS X puts the new setting into effect.
Configure Location Services
Location services refers to the features and technologies that provide apps and system tools with access to location data, particularly the current location of your Mac. This is a handy and useful thing, but it is also something that you need to keep under your control because your location data, especially your current location, is fundamentally private and should not be given to applications thoughtlessly. Fortunately, OS X comes with a few tools for controlling and configuring location services.
Configure Location Services

![]() Click Apple (
Click Apple (![]() ).
).
![]() Click System Preferences.
Click System Preferences.
You can also click System Preferences (![]() ) in the Dock.
) in the Dock.

The System Preferences appear.
![]() Click Security & Privacy.
Click Security & Privacy.

The Security & Privacy preferences appear.
![]() Click the lock icon (
Click the lock icon (![]() ).
).
OS X prompts you for your administrator password.
![]() Type the administrator password.
Type the administrator password.
![]() Click Unlock.
Click Unlock.

OS X unlocks the preferences (![]() changes to
changes to ![]() ).
).
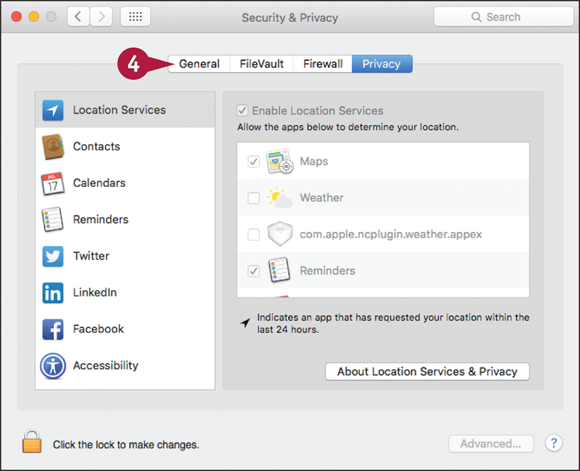
![]() Click the Privacy tab.
Click the Privacy tab.
![]() Click Location Services.
Click Location Services.
![]() Click the check box beside each app that you do not want to determine your location (
Click the check box beside each app that you do not want to determine your location (![]() changes to
changes to ![]() ).
).
Note: This list will be empty if none of your apps have requested to use location services.
![]() Click Close (
Click Close (![]() ).
).
OS X puts the new setting into effect.
Encrypt Your Data
By encrypting data, you can ensure that a malicious user who has physical access to your Mac cannot read the files in your user account. This means that your data appears as gibberish until it is decrypted by entering your user account password. Your password protects your user account from unauthorized access, but a sophisticated user can still access your data by using special tools. If you have sensitive, secret, or private files in your user account, you can protect that data from such access by encrypting it.
Encrypt Your Data

![]() Follow steps 1 to 6 in the previous section, “Configure Location Services,” to display and unlock the Security & Privacy preferences.
Follow steps 1 to 6 in the previous section, “Configure Location Services,” to display and unlock the Security & Privacy preferences.
![]() Click the FileVault tab.
Click the FileVault tab.
![]() Click Turn On FileVault.
Click Turn On FileVault.

System Preferences asks whether you want to use your iCloud to unlock your disk if you forget your encryption password.
![]() Click the Allow my iCloud account to unlock my disk option (
Click the Allow my iCloud account to unlock my disk option (![]() changes to
changes to ![]() ).
).
![]() Click Continue.
Click Continue.

If you have multiple users, OS X prompts you to enable FileVault for the other accounts.
![]() If you want to enable FileVault for a user, click Enable User, type the account password, and then click OK.
If you want to enable FileVault for a user, click Enable User, type the account password, and then click OK.
![]() Click Continue.
Click Continue.

OS X prompts you to restart the computer.
![]() Click Restart.
Click Restart.
OS X restarts and begins encrypting your user account data.