CHAPTER 12
Customizing OS X
OS X comes with a number of features that enable you to customize your Mac. For example, you might not like the default desktop background or the layout of the Dock. Not only can you change the appearance of OS X to suit your taste, but you can also change the way OS X works to make it easier and more efficient for you to use.
Change the Display Resolution and Brightness
Create an App Folder in Launchpad
Add a Widget to the Notification Center
Display System Preferences
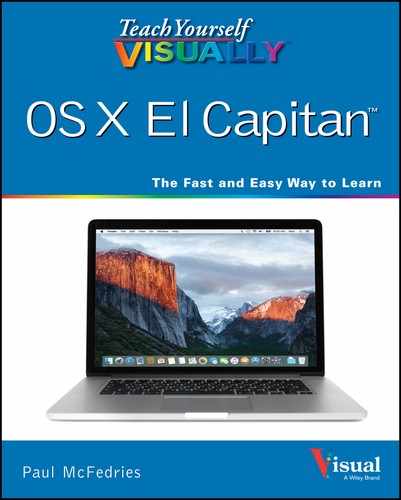
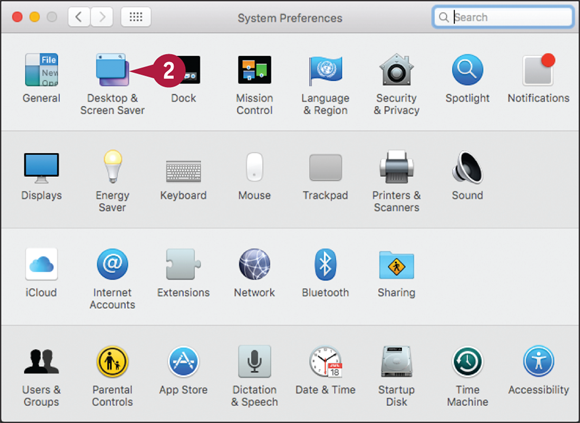
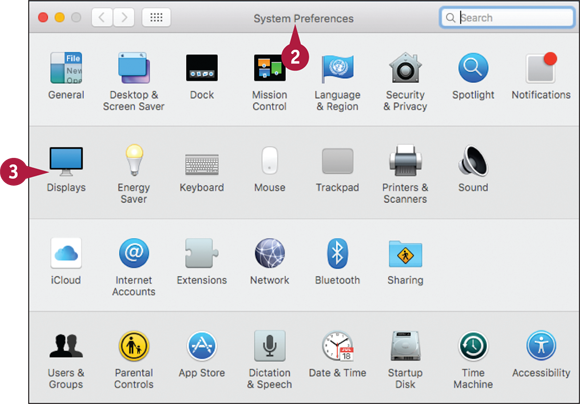
You can find many of the OS X customization features in System Preferences, a collection of settings and options that control the overall look and operation of OS X. You can use System Preferences to change the desktop background, specify a screen saver, set your Mac’s sleep options, add user accounts, and customize the Dock, to name some of the tasks that you learn about in this chapter. To use these settings, you must know how to display the System Preferences window.
Display System Preferences

Open System Preferences
![]() In the Dock, click System Preferences (
In the Dock, click System Preferences (![]() ).
).
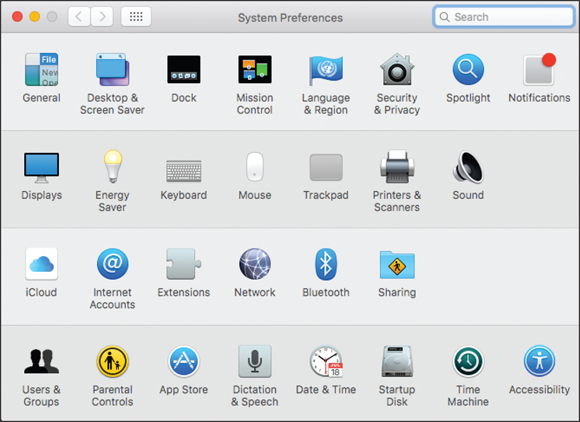
The System Preferences appear.
Close System Preferences
![]() Click System Preferences.
Click System Preferences.

![]() Click Quit System Preferences.
Click Quit System Preferences.
Change the Desktop Background
To give OS X a different look, you can change the default desktop background. OS X offers a wide variety of desktop background options. For example, OS X comes with several dozen images you can use, from abstract patterns to photos of plants and other natural images. You can also choose a solid color as the desktop background, or you can use one of your own photos. You can change the desktop background to show either a fixed image or a series of images that change periodically.
Change the Desktop Background
Set a Fixed Background Image
![]() In the Dock, click System Preferences (
In the Dock, click System Preferences (![]() ) (not shown).
) (not shown).
![]() In the System Preferences, click Desktop & Screen Saver.
In the System Preferences, click Desktop & Screen Saver.
Note: You can also right-click (or ![]() -click) the desktop and then click Change Desktop Background.
-click) the desktop and then click Change Desktop Background.

The Desktop & Screen Saver preferences appear.
![]() Click Desktop.
Click Desktop.
![]() Click the image category you want to use.
Click the image category you want to use.
![]() To add a folder, click Add (
To add a folder, click Add (![]() ), open the folder, and then click Choose.
), open the folder, and then click Choose.

![]() Click the image you want to use as the desktop background.
Click the image you want to use as the desktop background.
Your Mac changes the desktop background.
![]() If you chose a photo in step 5, click
If you chose a photo in step 5, click ![]() and then click an option to determine how your Mac displays the photo.
and then click an option to determine how your Mac displays the photo.
Note: Another way to set a fixed background image is to select a photo in the Photos app, click Share (![]() ), and then click Set Desktop.
), and then click Set Desktop.

Set a Changing Background Image
![]() Click the Change picture check box (
Click the Change picture check box (![]() changes to
changes to ![]() ).
).
![]() Click
Click ![]() and then click how often you want the background image to change.
and then click how often you want the background image to change.
![]() If you want your Mac to choose the periodic image randomly, click the Random order check box (
If you want your Mac to choose the periodic image randomly, click the Random order check box (![]() changes to
changes to ![]() ).
).
Your Mac changes the desktop background periodically based on your chosen interval.
Set Your Mac’s Sleep Options
You can make OS X more energy-efficient by configuring parts of your Mac to go into sleep mode automatically when you are not using them. Sleep mode means that your display or your Mac is in a temporary low-power mode. This saves energy on all Macs, and saves battery power on a notebook Mac. For example, you can set up OS X to put the display to sleep automatically after a period of inactivity. Similarly, you can configure OS X to put your entire Mac to sleep after you have not used it for a specified amount of time.
Set Your Mac’s Sleep Options

Open the Energy Saver Preferences
![]() In the Dock, click System Preferences (
In the Dock, click System Preferences (![]() ) (not shown).
) (not shown).
![]() In the System Preferences, click Energy Saver.
In the System Preferences, click Energy Saver.
The Energy Saver preferences appear.

Set Sleep Options for a Desktop Mac
![]() Click and drag the slider to set the display sleep timer.
Click and drag the slider to set the display sleep timer.
This specifies the period of inactivity after which your display goes to sleep.

Set Sleep Options for a Notebook Mac
![]() Click Battery.
Click Battery.
![]() Click and drag the slider to set the computer sleep timer for when your Mac is on battery power.
Click and drag the slider to set the computer sleep timer for when your Mac is on battery power.
![]() Click and drag the slider to set the display sleep timer for when your Mac is on battery power.
Click and drag the slider to set the display sleep timer for when your Mac is on battery power.
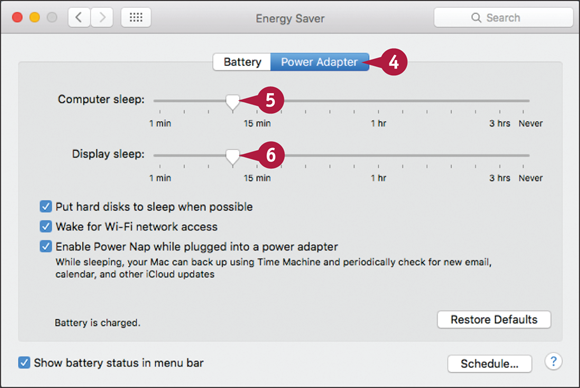
![]() Click Power Adapter.
Click Power Adapter.
![]() Click and drag the slider to set the computer sleep timer for when your Mac is plugged in.
Click and drag the slider to set the computer sleep timer for when your Mac is plugged in.
![]() Click and drag the slider to set the display sleep timer for when your Mac is plugged in.
Click and drag the slider to set the display sleep timer for when your Mac is plugged in.
Change the Display Resolution and Brightness
You can change the resolution and the brightness of the OS X display. This enables you to adjust the display for best viewing or for maximum compatibility with whatever application you are using.
Increasing the display resolution is an easy way to create more space on the screen for applications and windows, because the objects on the screen appear smaller. Conversely, if you have trouble reading text on the screen, decreasing the display resolution can help because the screen objects appear larger. If you find that your display is too dark or too bright, you can adjust the brightness for best viewing.
Change the Display Resolution and Brightness

![]() In the Dock, click System Preferences (
In the Dock, click System Preferences (![]() ) (not shown).
) (not shown).
![]() In the System Preferences, click Displays.
In the System Preferences, click Displays.

The Displays preferences appear.
![]() Click Display.
Click Display.
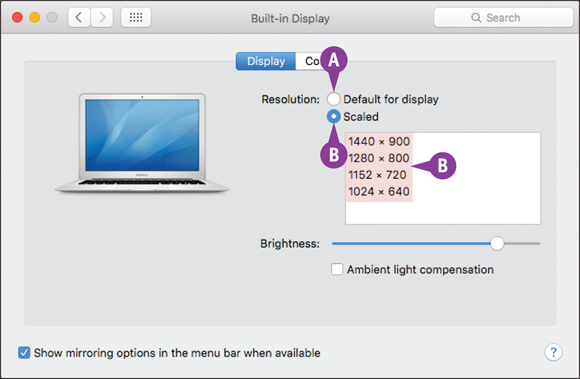
![]() Select the resolution:
Select the resolution:
![]() To have OS X set the resolution based on your display, click the Default for display option (
To have OS X set the resolution based on your display, click the Default for display option (![]() changes to
changes to ![]() ).
).
![]() To set the resolution yourself, click the Scaled option (
To set the resolution yourself, click the Scaled option (![]() changes to
changes to ![]() ) and then click the resolution you want to use.
) and then click the resolution you want to use.
OS X adjusts the screen to the new resolution.

![]() For some screens, you can click and drag the Brightness slider to set the display brightness.
For some screens, you can click and drag the Brightness slider to set the display brightness.
OS X adjusts the screen to the new brightness.
![]() If you do not want OS X to adjust the notebook screen brightness based on the ambient light, click the Ambient light compensation check box (
If you do not want OS X to adjust the notebook screen brightness based on the ambient light, click the Ambient light compensation check box (![]() changes to
changes to ![]() ).
).
Create an App Folder in Launchpad
You can make Launchpad easier to use by combining multiple icons into a single storage area called an app folder. Normally, Launchpad displays icons in up to five rows per screen, with at least seven icons in each row, so you can have at least 35 icons in each screen. Also, if you have configured your Mac with a relatively low display resolution, you might see only partial app names in Launchpad.
All this can make it difficult to locate your apps. However, app folders can help you organize similar apps and reduce the clutter on the Launchpad screens.
Create an App Folder in Launchpad

![]() Click Launchpad (
Click Launchpad (![]() ).
).
![]() Launchpad displays icons for each installed application.
Launchpad displays icons for each installed application.
![]() Click the dot for the Launchpad screen you want to work with.
Click the dot for the Launchpad screen you want to work with.

![]() Click and drag an icon that you want to include in the folder, and drop it on another icon that you want to include in the same folder.
Click and drag an icon that you want to include in the folder, and drop it on another icon that you want to include in the same folder.
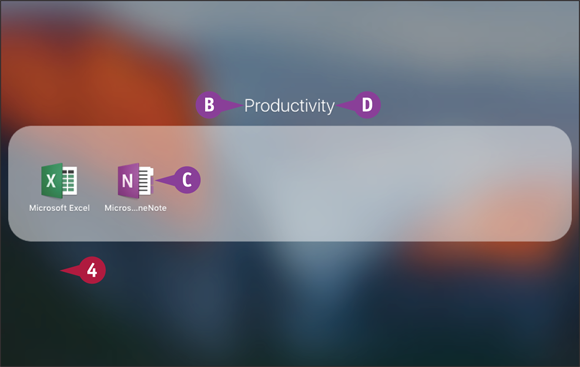
Launchpad creates the app folder.
![]() Launchpad applies a name to the folder based on the type of applications in the folder.
Launchpad applies a name to the folder based on the type of applications in the folder.
![]() Launchpad adds the icons to the app folder.
Launchpad adds the icons to the app folder.
![]() To specify a different name, you can click the name and then type the one you prefer.
To specify a different name, you can click the name and then type the one you prefer.
![]() Click the Launchpad screen, outside of the app folder.
Click the Launchpad screen, outside of the app folder.

![]() Launchpad displays the app folder.
Launchpad displays the app folder.
![]() To add more icons to the new app folder, click and drag each icon and drop it on the folder.
To add more icons to the new app folder, click and drag each icon and drop it on the folder.
Note: To launch a program from an app folder, click Launchpad (![]() ), click the app folder to open it, and then click the program’s icon.
), click the app folder to open it, and then click the program’s icon.
Add a User Account
You can share your Mac with another person by creating a user account for that person. This enables the person to log in to OS X and use the system. The new user account is completely separate from your own account. This means that the other person can change settings, create documents, and perform other OS X tasks without interfering with your own settings or data. For maximum privacy for all users, you should set up each user account with a password.
Add a User Account

![]() In the Dock, click System Preferences (
In the Dock, click System Preferences (![]() ) (not shown).
) (not shown).
![]() In the System Preferences, click Users & Groups.
In the System Preferences, click Users & Groups.
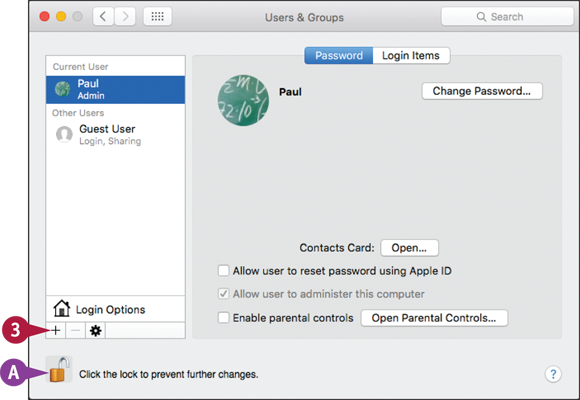
![]() In most OS X systems, to modify accounts you must click the lock icon (
In most OS X systems, to modify accounts you must click the lock icon (![]() ) and then type your administrator password (
) and then type your administrator password (![]() changes to
changes to ![]() ).
).
![]() Click Add (
Click Add (![]() ).
).
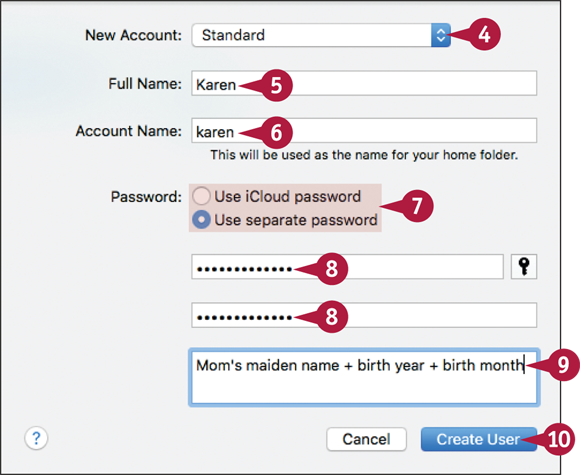
The New Account dialog appears.
![]() Click the New Account
Click the New Account ![]() and then click an account type.
and then click an account type.
![]() Type the user’s name.
Type the user’s name.
![]() Edit the short username that OS X creates.
Edit the short username that OS X creates.
![]() If the user has an iCloud account, click Use iCloud password; otherwise, click the Use separate password option (
If the user has an iCloud account, click Use iCloud password; otherwise, click the Use separate password option (![]() changes to
changes to ![]() ).
).
![]() Type and retype the user’s password.
Type and retype the user’s password.
![]() Type a hint that OS X will display if the user forgets the password.
Type a hint that OS X will display if the user forgets the password.
![]() Click Create User.
Click Create User.

![]() OS X adds the user account to the Users & Groups preferences.
OS X adds the user account to the Users & Groups preferences.
Customize the Dock
You can customize various aspects of the Dock by using System Preferences to modify a few Dock options. For example, you can make the Dock take up less room on the screen by adjusting the size of the Dock. You can also make the Dock a bit easier to use by turning on the Magnification feature, which enlarges Dock icons when you position the mouse (![]() ) over them. You can also make the Dock easier to access and use by moving it to either side of the screen.
) over them. You can also make the Dock easier to access and use by moving it to either side of the screen.
Customize the Dock

![]() In the Dock, click System Preferences (
In the Dock, click System Preferences (![]() ).
).
![]() In the System Preferences, click Dock.
In the System Preferences, click Dock.
Note: You can also open the Dock preferences by clicking Apple (![]() ), clicking Dock, and then clicking Dock Preferences.
), clicking Dock, and then clicking Dock Preferences.
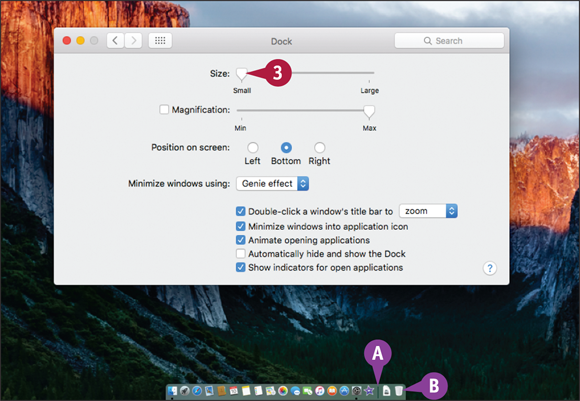
The Dock preferences appear.
![]() Click and drag the Size slider to make the Dock smaller or larger.
Click and drag the Size slider to make the Dock smaller or larger.
![]() You can also click and drag the Dock divider: Drag up to increase the Dock size, and drag down to decrease the Dock size.
You can also click and drag the Dock divider: Drag up to increase the Dock size, and drag down to decrease the Dock size.
![]() System Preferences adjusts the size of the Dock.
System Preferences adjusts the size of the Dock.
Note: If your Dock is already as wide as the screen, dragging the Size slider to the right (toward the Large value) has no effect.
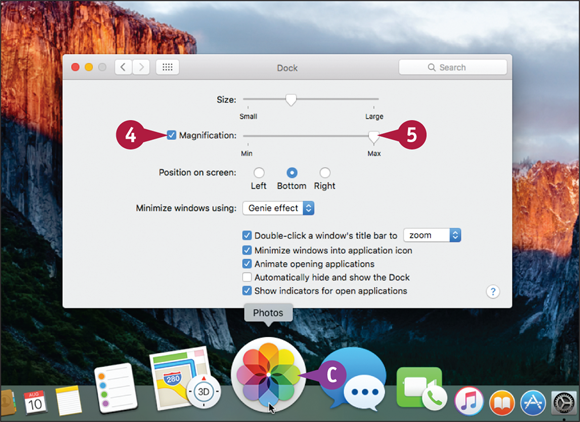
![]() Click the Magnification check box (
Click the Magnification check box (![]() changes to
changes to ![]() ).
).
![]() Click and drag the Magnification slider to set the magnification level.
Click and drag the Magnification slider to set the magnification level.
![]() When you position the mouse (
When you position the mouse (![]() ) over a Dock icon, your Mac magnifies the icon.
) over a Dock icon, your Mac magnifies the icon.
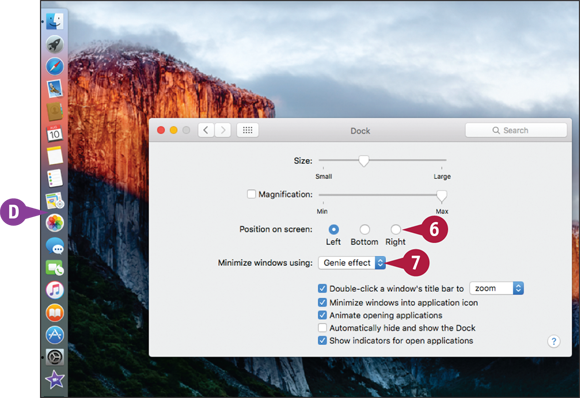
![]() Use the Position on screen options to click where you want the Dock to appear, such as the Left side of the screen (
Use the Position on screen options to click where you want the Dock to appear, such as the Left side of the screen (![]() changes to
changes to ![]() ).
).
![]() Your Mac moves the Dock to the new position.
Your Mac moves the Dock to the new position.
![]() Click the Minimize windows using
Click the Minimize windows using ![]() and then click the effect you want your Mac to use when you minimize a window by clicking
and then click the effect you want your Mac to use when you minimize a window by clicking ![]() : Genie effect or Scale effect.
: Genie effect or Scale effect.
Add an Icon to the Dock
The icons on the Dock are convenient because you can open them with just a single click. You can enhance the convenience of the Dock by adding an icon for an application you use frequently.
The icon remains in the Dock even when the application is closed, so you can always open the application with a single click. You can add an icon to the Dock even if the program is not currently running.
Add an Icon to the Dock

Add an Icon for a Nonrunning Application
![]() Click Finder (
Click Finder (![]() ).
).
![]() Click Applications.
Click Applications.
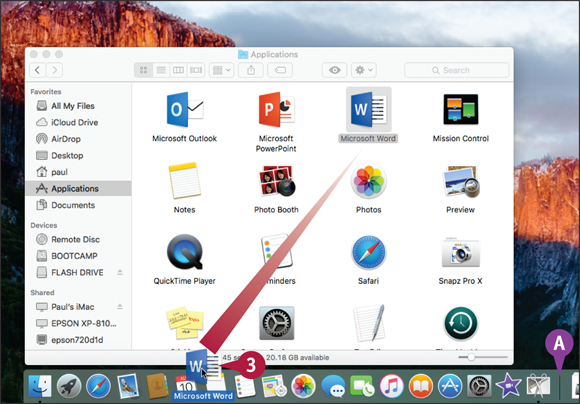
![]() Click and drag the application icon, and then drop it inside the Dock.
Click and drag the application icon, and then drop it inside the Dock.
![]() Be sure to drop the icon anywhere to the left of the Dock divider.
Be sure to drop the icon anywhere to the left of the Dock divider.

![]() OS X adds the application’s icon to the Dock.
OS X adds the application’s icon to the Dock.

Add an Icon for a Running Application
![]() Right-click (or
Right-click (or ![]() -click) the application icon in the Dock.
-click) the application icon in the Dock.
![]() Click Options.
Click Options.
![]() Click Keep in Dock.
Click Keep in Dock.
The application’s icon remains in the Dock even after you close the program.
Hide the Dock
When you are working in an application, you might find that you need to maximize the amount of vertical space the application window takes up on-screen. This might come up, for example, when you are reading or editing a long document or viewing a large photo. In such cases, you can size the window to maximum height, but OS X will not let you go past the Dock. You can work around this by hiding the Dock. When the Dock is hidden, it is still easily accessible whenever you need to use it.
Hide the Dock

Turn On Dock Hiding
![]() Right-click (or
Right-click (or ![]() -click) the Dock divider.
-click) the Dock divider.
![]() Click Turn Hiding On.
Click Turn Hiding On.
![]() OS X removes the Dock from the desktop.
OS X removes the Dock from the desktop.

Display the Dock Temporarily
![]() Move the mouse (
Move the mouse (![]() ) to the bottom of the screen.
) to the bottom of the screen.
![]() OS X temporarily displays the Dock.
OS X temporarily displays the Dock.
Note: To hide the Dock again, move the mouse (![]() ) away from the bottom of the screen.
) away from the bottom of the screen.
Add a Widget to the Notification Center
The Notification Center is an OS X application that you use not only to view your latest notifications, but also to display widgets. A widget is a mini-application, particularly one designed to perform a single task, such as displaying the weather, showing stock data, or working with reminders. You can customize the Notification Center to include any widgets that you find useful or informative. OS X comes with several widgets, and there are also many widgets available via the App Store.
Add a Widget to the Notification Center

![]() Click Notification Center (
Click Notification Center (![]() ).
).
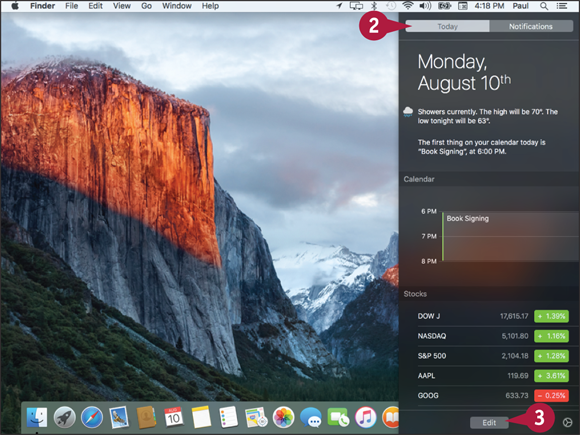
![]() Click Today.
Click Today.
OS X displays the Notification Center and its current set of widgets.
![]() Click Edit.
Click Edit.
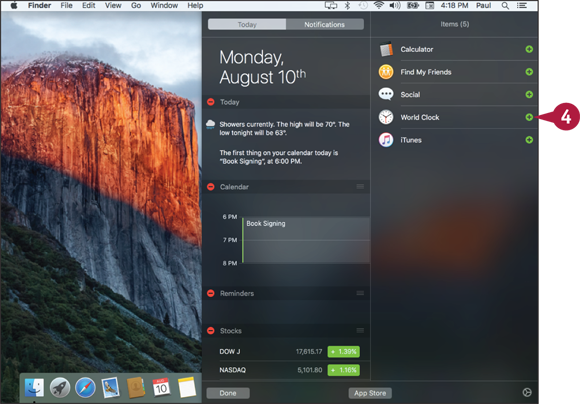
OS X displays its collection of widgets.
![]() Click Add (
Click Add (![]() ) beside the widget you want to add.
) beside the widget you want to add.
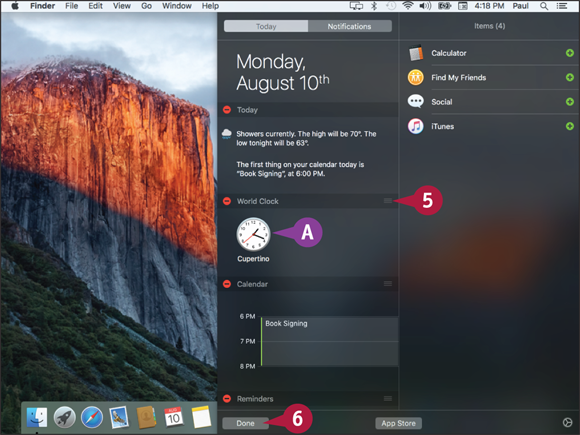
![]() OS X adds the widget to the Notification Center.
OS X adds the widget to the Notification Center.
![]() Click and drag the widget to the position you prefer.
Click and drag the widget to the position you prefer.
![]() Click Done.
Click Done.
OS X updates the Notification Center.
Extend the Desktop Across Multiple Displays
You can improve your productivity and efficiency by connecting a second monitor to your Mac. To work with an extra display, your Mac must have a video output port — such as a Thunderbolt port or Mini DisplayPort — that matches a corresponding port on the second display. If you do not have such a port, check with Apple or the display manufacturer to see if an adapter is available that enables your Mac to connect with the second display. After you connect your Mac to the display, you can extend the OS X desktop across both monitors.
Extend the Desktop Across Multiple Displays
![]() Connect the second monitor to your Mac.
Connect the second monitor to your Mac.
![]() Open System Preferences.
Open System Preferences.
Note: See the section “Display System Preferences,” earlier in this chapter.
![]() Click Displays.
Click Displays.

The Displays preferences appear.
![]() Click Arrangement.
Click Arrangement.
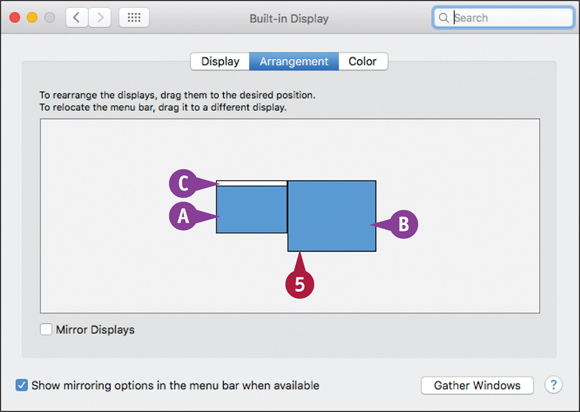
![]() This window represents your Mac’s main display.
This window represents your Mac’s main display.
![]() This window represents the second display.
This window represents the second display.
![]() This white strip represents the OS X menu bar.
This white strip represents the OS X menu bar.
![]() Click and drag the windows to set the relative arrangement of the two displays.
Click and drag the windows to set the relative arrangement of the two displays.

![]() To move the menu bar and Dock to the second display, click and drag the menu bar and drop it on the second display.
To move the menu bar and Dock to the second display, click and drag the menu bar and drop it on the second display.
Customize the Share Menu
The Share menu appears in many OS X applications, including Finder, Safari, Preview, Maps, and Notes. You use the Share menu’s extensions to perform actions on the application’s content. For example, in Safari you can use the Sharing menu to create a bookmark, send the page URL via email, text message, or AirDrop, or share the page on Twitter, Facebook, or LinkedIn. If you find that extensions are on the Share menu that you never use, you can reduce clutter on the menu by removing those items. You can also reorder the menu to put the items you use most often near the top.
Customize the Share Menu

Display the Share Menu Extensions
![]() In the Dock, click System Preferences (
In the Dock, click System Preferences (![]() ).
).
![]() In the System Preferences, click Extensions.
In the System Preferences, click Extensions.

The Extensions preferences appear.
![]() Click Share Menu.
Click Share Menu.
![]() OS X displays the extensions available for the Share menu.
OS X displays the extensions available for the Share menu.
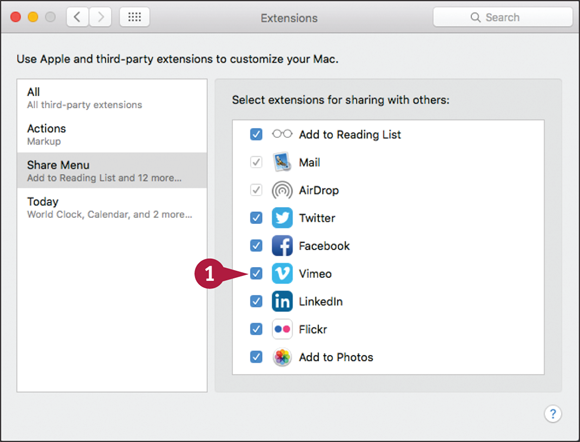
Remove a Share Menu Extension
![]() To temporarily remove an extension from the Share menu, click its check box (
To temporarily remove an extension from the Share menu, click its check box (![]() changes to
changes to ![]() ).
).
The next time you open the Share menu, you will no longer see the extension.
Note: OS X moves the disabled extension to the bottom of the list. To enable the extension later on, scroll to the bottom of the list and click the extension’s check box (![]() changes to
changes to ![]() ).
).
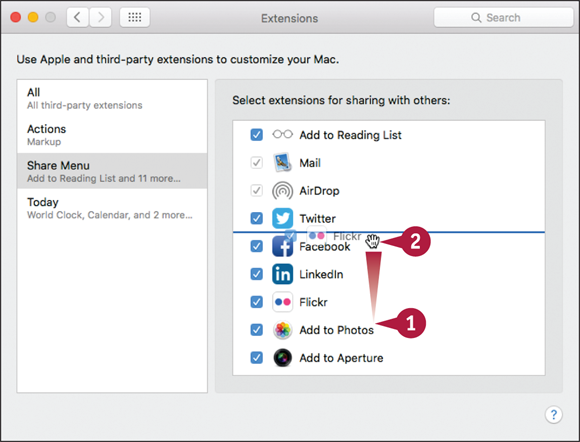
Move a Share Menu Extension
![]() Position the mouse (
Position the mouse (![]() ) over the name of the icon of the extension you want to move (
) over the name of the icon of the extension you want to move (![]() changes to
changes to ![]() ).
).
![]() Click and drag the extension up or down to the new menu position and then release the extension.
Click and drag the extension up or down to the new menu position and then release the extension.
The next time you open the Share menu, you will see the extension in its new position.