
Chapter 6
Manipulating Focus and Color
IN THIS CHAPTER
Solving focus problems
Exploring autofocus features
Focusing manually
Playing with depth of field
Understanding digital color
Using white balance and other tools to adjust photo colors
Today’s digital cameras offer an abundance of focus and color features. But if you don't understand how they work, you may get unexpected (and unacceptable) results. You may want to photograph a particularly stunning rose bloom in your garden, for example. If that rose is surrounded by other plants, the camera's focusing system may lock onto one of them instead, which can cause the rose to appear blurry in the photo. Or you may discover that at the current color settings, the camera renders the rose petals as a solid blob of orange instead of accurately capturing the subtle shades of yellow and coral that actually make the flower a stunner.
To help you avoid such miscues, this chapter explains common focusing and color-related options. The early sections detail the most important aspects of focus, covering such topics as getting the best results from your camera’s autofocusing system and achieving different creative goals by manipulating depth of field (the distance over which sharp focus is maintained). The second part of the chapter dives into the color pool, explaining how to deal with off-kilter colors and offering tips about subtle color adjustments you can use to enhance different subjects. To wrap things up, I explain a feature that affects both color and subject sharpness.
Diagnosing Focus Problems
Several factors affect focus, so to find the solution to a focusing concern, you first have to identify the cause. Here’s a quick symptoms list that will point you in the right direction:
-
The entire picture is blurry. This problem, illustrated in the first photo in Figure 6-1, is the result of camera shake — camera movement during the exposure. Camera shake is a possibility any time you handhold the camera, and the slower the shutter speed, the greater the risk. To remedy the situation, put the camera on a tripod or find another surface on which to place the camera so that you can get a steady shot.
 If you must handhold the camera, find out whether your camera or lens offers image stabilization. That feature, when enabled, can compensate for small amounts of camera shake.
 - My subject is blurry, but the rest of the picture is sharp. This problem can be caused by a couple of errors:
-
The subject moved, and the shutter speed wasn't fast enough to freeze the action. To catch a tack-sharp picture of a moving subject, you need a fast shutter speed. How fast depends on your subject's speed. In the first photo in Figure 6-2, for example, the duck on the left was moving his head too fast to be captured cleanly at a shutter speed of 1/60 second. Bumping the shutter speed up to 1/250 second froze the action successfully, as shown in the photo on the right.
 In order to maintain the proper exposure when you raise the shutter speed, which reduces exposure time, you must choose a lower f-stop setting (to allow more light into the camera) or raise the ISO setting (to make the camera more sensitive to light). In Figure 6-2, I adjusted ISO. Chapter 5 talks more about exposure; for more tips on shooting a moving target, check out Chapter 7.
 -
The subject is outside the focusing zone. By default, most cameras base focus either on the object closest to the lens or the object at the center of the frame. To make things even more complex, the designated focus point may change depending on your exposure mode — the camera may use a different point in Auto mode, for example, than it does in Close-up mode.
Obviously, it's critical to know the spot your camera targets when setting focus so that you can be sure that your subject is within that focusing area. Depending on your camera, you may be able to designate a specific focusing point or area other than the one used by default; see the section “Getting good autofocusing results,” later in this chapter, for a bit more explanation.
-
- Too much (or too little) of the scene is in focus. When you focus the camera, you establish the point of sharpest focus. Whether objects in front of or behind the focus target are also in focus depends on the depth of field. Your camera's focus controls don't affect this aspect of your photos; instead, you manipulate depth of field by adjusting aperture (f-stop), focal length, and camera-to-subject distance. See “Playing with Depth of Field,” later in this chapter, for details.
-
The camera won't focus. Assuming that your camera isn’t broken, you may simply be too close to your subject. Again, every lens has a close-focusing limit, which you should be able to determine with a look at your camera or lens manual.
If you're using autofocusing, another possible cause is the subject itself. Even the best autofocusing systems have trouble with certain subjects, such as reflective surfaces and objects under water or behind a fence. Dim lighting is also problematic for autofocusing systems, as are scenes in which little contrast exists between your desired focus point and the surrounding area. The easiest fix is to focus manually, if your camera permits it. Another option is to look for an easy-to-focus object that's the same distance from the camera as your subject, lock focus on that object, and then reframe to your desired composition and take the picture. Again, check out “Getting good autofocusing results” for specifics on that technique.
- The scene in the viewfinder looks blurry even when the camera indicates that focus is set. Go ahead and take the picture, and then determine whether the image is in fact correctly focused. If it is, you may simply need to adjust the viewfinder to your eyesight. You do this by using a diopter adjustment control, a little dial or switch located near the viewfinder. (Chapter 3 has details.) On the other hand, if your test shot is as blurry as the viewfinder indicates and none of the preceding solutions solves the problem, your camera or lens may need repair.
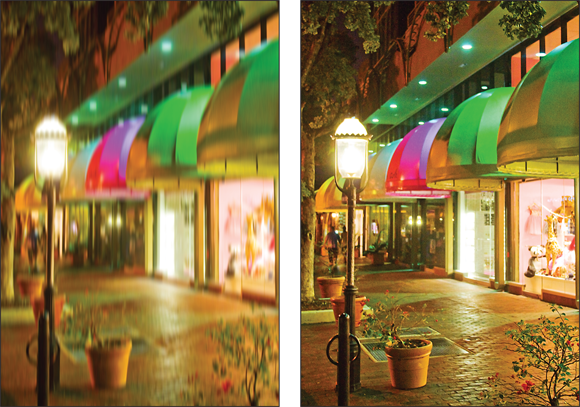
FIGURE 6-1: Camera shake causes allover blur (left); use a tripod to ensure sharp shots (right).
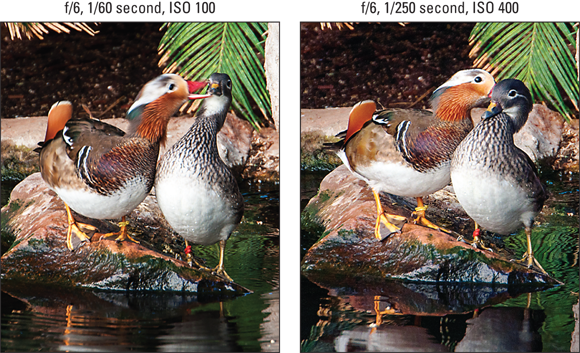
FIGURE 6-2: If moving objects are blurry, try using a faster shutter speed.
Dirt or dust on your lens can also cause focusing miscues, so keep your lens-cleaning supplies handy. If you have a filter attached to the lens (such as a neutral density filter), remove it to make sure that no debris is trapped between it and the lens. Then clean both the lens and the filter.
Understanding Focusing Systems
Focusing features on digital cameras range from very basic to extremely complex. On touchscreen-enabled cameras, you may be able to simply tap the monitor screen to focus. On advanced cameras, you can choose from manual focusing or autofocusing, and most high-end models offer a seemingly endless list of ways to modify the camera's focusing behavior.
Knowing how your camera’s focusing system works is critical to getting sharp shots. The following sections describe the most common focusing schemes and how you can make the most of them.
Getting good autofocusing results
Because the steps you take to autofocus vary widely depending on the type of camera you use, I can't provide step-by-step instructions for autofocusing. But Chapter 3 provides a basic recipe for autofocusing using the typical default camera settings, and the following list provides additional information that may help you sort things out on your camera.
- On cameras that offer both autofocusing and manual focusing, you may need to enable autofocusing. On an interchangeable-lens camera, you may find a control on the lens or camera body (or both) that switches the system from manual to autofocus. For example, Figure 6-3 shows the switch as it appears on a Canon dSLR and lens combo. Other cameras require you to switch the focusing method to auto via a menu option.
-
Determine the location of autofocusing points within the frame. The camera can focus only on objects that fall under the focus points, so it's critical that you take this step.
Most cameras display marks in the viewfinder or monitor to indicate the autofocus points. The left screen in Figure 6-4 shows one example of how autofocus points are represented in the viewfinder on some Canon dSLRs. You may not always see individual points; sometimes the camera simply displays a border around the frame area that contains the focus points. If your camera doesn't have a viewfinder or you use Live View (you compose the scene using the monitor instead of the viewfinder), you may instead see a rectangular focus frame like the one shown on the right in the figure.
Which focus points are active and which one the camera checks first to establish focusing distance may vary depending on the exposure mode or certain autofocusing settings. In some cases, the markings in the displays change depending on those settings. (See the next bullet point for more on this topic.)Also, some cameras display additional marks that aren't related to focusing. The center circle in the viewfinder shown on the left in Figure 6-4, for example, indicates the spot-metering zone, an exposure feature offered on some Canon cameras. And when the scene displayed in the viewfinder differs significantly from the area that the camera will actually photograph, framing marks are usually provided to let you know where the edges of the picture will be.
-
If your camera has a shutter button, remember to use the two-stage button-pressing technique. To set focus, press the button halfway down and hold it there. Don't simply press the button all the way down to take the picture in one motion; if you do, the camera doesn't have adequate time to set focus and exposure.
 When you're ready to take the shot, gently (but firmly) press the shutter button the rest of the way, being careful not to move the camera in the process. Remember, any camera movement while the shutter is open can blur the image.
 -
Find out whether your camera offers single-point focusing, multiple-point focusing, or both. Here's how these options work:
- Single-point autofocusing: The camera bases focus on the object that falls under a specific focus point. Usually, the default focus spot is in the center of the frame. But you may be able to select a different focus point by either using a control on the camera or, on touchscreen-enabled devices, tapping the screen.
- Multiple-point autofocusing: With this setup, also known as multispot autofocusing, the camera considers all focusing points. It then sets focus on the object nearest the lens or, in some cases, the object occupying the largest portion of the frame (such as a large building).
To control this part of the autofocusing system, look for a setting that has a name such as AF mode, AF-area mode, and the like. (The AF stands for autofocus.) You may need to shoot in an advanced-exposure mode to access this setting, though; in Auto and scene shooting modes, the camera may make this decision for you.
Some cameras enable you to choose which option you want to use. You may even find additional focusing schemes; for example, you may be able to base focus on a small cluster of focus points in a particular area of the frame. This option is usually referred to as zone autofocusing. Or you may be able to reduce the number of available focus points to make it easier to select a point when you use single-point autofocus. (Scrolling the point-selection cursor to get to your desired point takes less time when the camera is set to display only 11 points, for example, instead of 39 points.) Look for this kind of option on your camera's advanced setup menu(s). -
For stationary subjects, use single-servo autofocusing; for moving subjects, use continuous-servo autofocusing. Don't get freaked out by the techie-sounding names — these two options are actually easy to understand:
-
Single-servo autofocusing: In this mode, focus is locked at the moment the camera achieves focus. Once and done, if you like (thus, single servo). This option is usually best for portraits, landscapes, and any nonmoving subject.
Single-servo autofocus enables you to use the “focus and reframe technique” when you want your subject to appear somewhere other than under the selected focus point. Compose the picture initially so that the subject is under that point and then press the shutter button halfway to set focus. Keep the button pressed down halfway, reframe as desired, and then press the shutter button the rest of the way to take the picture. Figure 6-5 illustrates this technique. On touchscreen devices, you may be able to lock focus by tapping the screen instead.
When you reframe, after locking focus, be careful not to change the distance between the camera and your subject, or else focus will be off. In photography lingo, keep the camera on the same focal plane. - Continuous-servo autofocusing: This mode is designed for photographing moving subjects. The camera sets the initial focusing distance just as it does in single-servo mode, but then adjusts focus continuously as needed up to the time you take the shot. So if you set focus on a subject that's 20 feet in front of you but don't take the picture until the subject is 10 feet away, it should still be in focus.
Not all cameras offer this degree of autofocusing flexibility, however. Some models don't offer continuous autofocusing, and others decide for you whether to use single- or continuous-servo autofocusing. If the camera senses motion in front of the lens, it uses continuous-servo autofocusing; if not, it sticks with single-servo.
Even on cameras that do enable you to make the call, the default mode is usually the automatic (camera's choice) setting. To access the other options, you may need to switch to an advanced exposure mode, such as aperture-priority autoexposure or manual exposure.
Also note that these settings go by different names, depending on the manufacturer. For example, most Canon cameras use the terms One Shot for single-servo autofocus; AI Servo for continuous autofocus (AI stands for artificial intelligence); and AI Focus for the automatic mode that lets the camera decide whether focus is locked. Nikon, on the other hand, uses the terms AF-S for single-servo; AF-C or AF-F for continuous-servo (C for continuous and F for full-time autofocusing); and AF-A to represent the Auto setting.
-
-
When focus is set, the camera may emit a beep or display a focusing symbol in the displays. Usually, a little light in the viewfinder turns green, the camera emits a beep, or both. With cameras that use a focusing frame like the one shown in Figure 6-4, the frame turns green. If your camera has a viewfinder, the focusing points that the camera used to set focus may also light briefly.
With continuous autofocusing, most cameras send the focus-achieved signal only when the initial focusing distance is set. Some don't provide that signal at all in continuous-autofocus mode.
-
Your camera may offer special focusing modes that choose the closest or farthest possible focusing distance. Point-and-shoot cameras sometimes provide one or both of these specialty focus modes:
- Macro focusing mode allows you to focus at a closer distance than you normally could. It’s designed for shooting close-ups, in other words. On some cameras, selecting the Close-up exposure mode automatically enables this focus option.
- Infinity mode does the opposite. It sets focus at the farthest point possible and is designed for shooting subjects at a long distance. Your camera may select this focus setting automatically when you shoot in certain automatic exposure modes, such as the Landscape and Fireworks scene modes. (See Chapter 3 for more information about automatic scene modes.)
For each of these focus settings, check your camera’s manual to find out the proper camera-to-subject distance.
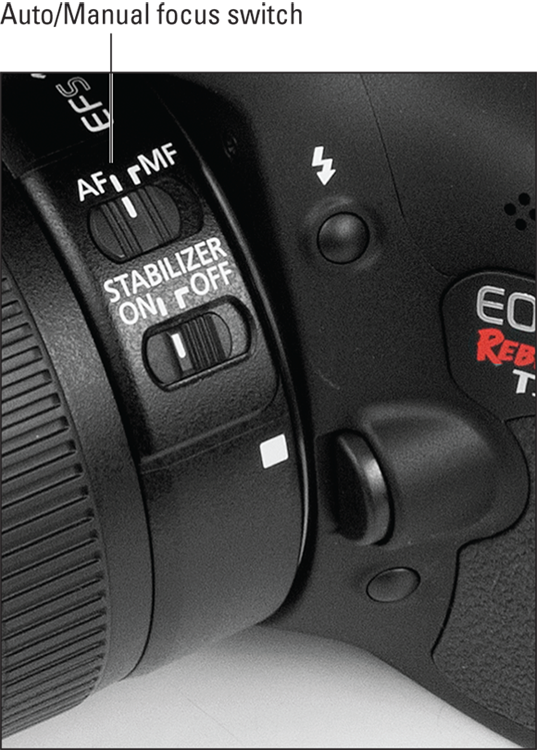
FIGURE 6-3: Some dSLR lenses have a switch that sets the camera to autofocus mode.
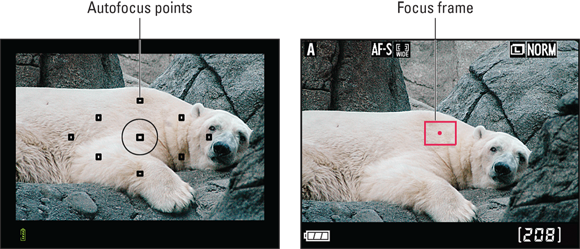
FIGURE 6-4: The autofocus areas may be indicated by little squares in the viewfinder (left) or by a single focus frame (right).
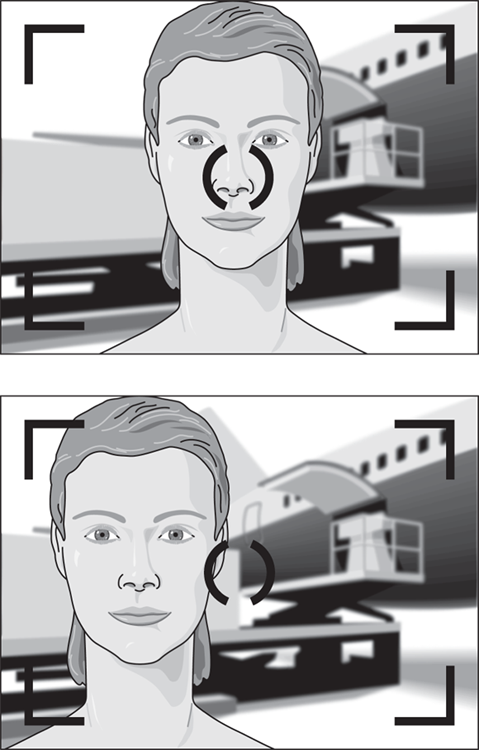
FIGURE 6-5: After locking focus on your subject, you can reframe the shot, if you want.
Finally, remember that even the most capable autofocus system may have trouble doing its job in dim lighting. Certain types of subjects also confuse autofocus mechanisms: Objects behind vertical bars (such as a lion at the zoo), low-contrast scenes (think gray boat sailing in foggy weather), and highly reflective objects are among the biggest troublemakers.
If your camera offers manual focusing, the easiest solution is to switch to that mode and do the focus work yourself. But you can also use the focus-and-reframe focusing technique mentioned earlier: Lock focus on something else that’s the same distance away from the lens as your subject, and then reframe the shot as needed.
Focusing manually
On some cameras, you can opt out of autofocus and instead rotate a focusing ring on the lens to focus manually. You first may need to set a switch on the lens or camera body to manual-focus mode, select manual focusing from a camera menu, or both. The steps you use and the placement of the focusing ring vary, so check out those camera and lens manuals for details.
If your lens doesn't offer a focusing ring, you may be able to set focus manually. Some cameras enable you to set focus by using a switch or lever on the camera or by entering a specific focusing distance via a menu option.
Even when you focus manually, some cameras offer tools to assist you in achieving focus. Here are some of these features:
- Standard “focus achieved” signals: Your camera may send the same signals as it does when you use autofocusing. For example, the focus indicator lamp may light, the camera may beep at you, or both.
- Focus peaking: Some cameras can display highlights on the monitor to indicate which areas are in focus. You can usually choose the colors for the highlights. If your camera has an electronic viewfinder, you may be able to see the highlights in the viewfinder as well as on the monitor. With a camera that has an optical viewfinder, the focus-peaking display appears only if you set the camera to Live View mode (the setting that disables the viewfinder so that you can compose the scene using the monitor).
- Display magnification: You may be able to magnify the screen display so that you can verify that focus is set precisely on your subject. Again, on cameras with an optical viewfinder, you must be in Live View mode to use this feature.
- Rangefinder: You also may be able to swap out the exposure meter for a focusing aid called a rangefinder. Figure 6-6 gives you a look at the rangefinder design used on some Nikon cameras, for example. The bars under the rangefinder meter indicate whether focus is set behind, in front of, or on your subject. Just keep in mind that because the rangefinder is based on the same focusing system that the autofocus system employs, subjects that confuse the autofocus system also render the rangefinder unable to find a focusing target.

FIGURE 6-6: A rangefinder is a focusing aid that provides feedback when you focus manually.
Playing with Depth of Field
One way to become a more artful photographer is to learn how to control depth of field, which refers to the distance over which sharp focus is maintained.
Chapter 2 introduces you to this concept and offers several examples of how to put depth of field to creative use, but here's a quick recap:
-
Shallow depth of field: The subject is sharp, but objects at a distance are blurred, as in the left image in Figure 6-7. This treatment is perfect for portraits because it prevents the background from drawing attention from the subject. You can also use shallow depth of field to help a subject stand apart from a similarly colored background (see Figure 6-9, later in this section.)
One often overlooked point on this treatment: For the background to appear blurry, some distance must exist between it and the subject. The farther the background is from the subject, the blurrier it appears. Ditto for objects in front of the subject. -
Large depth of field: A large depth of field extends the sharp-focus zone over a greater distance. Landscapes and architectural shots like the one on the right in Figure 6-7 typically benefit from a large depth of field. Focus in this image was set on the foreground figure, but the ones in the distance look nearly as sharp.
A long depth of field is also helpful when you're photographing a subject that's moving quickly toward or away from you. The larger the depth of field, the greater your chances of capturing a moment when the subject is within the sharp-focus zone.

FIGURE 6-7: Shallow depth of field is ideal for portraits (left); landscapes benefit from a longer zone of sharp focus (right).
With the “whys” of manipulating depth of field out of the way, here are the three ways you can modify this aspect of your picture:
-
Adjust the aperture (f-stop). Chapter 5 introduces you to the aperture setting, or f-stop, which is an exposure control that also affects depth of field. The higher the f-stop number, the greater the depth of field. The water lily images in Figure 6-8 show an example: At f/6.3, the leaf and the watery background are much blurrier than in the f/20 example.
It's important to understand that the f-stops I used in the sample photos may not produce similar results on your camera. I mention this technical caveat in Chapter 1, but it bears repeating: The depth of field produced by any f-stop depends on the size of the image sensor and how close that sensor is to the camera lens. Experiment to get a feel for what to expect when you adjust aperture on your camera.
A few other reminders about using aperture to manipulate depth of field:
- As you change the f-stop, either the shutter speed or ISO must also change to maintain the same exposure. As you raise the f-stop, which reduces the size of the aperture, you must use a slower shutter speed or higher ISO to compensate for the reduced light that results from the smaller aperture opening.
- Try using aperture-priority autoexposure mode when you want to control depth of field. In this mode, (normally identified by Av or A on your camera’s mode dial), you set the f-stop, and the camera selects a shutter speed that will deliver a good exposure.
- Some scene modes also are designed to deliver a short or long depth of field. For example, Portrait mode typically selects a wide aperture setting to produce a shallow depth of field, and Landscape mode typically selects a narrow aperture to produce a greater depth of field. The extent to which these automatic modes can adjust aperture depends on the light and the aperture settings available on your lens, though, so they won’t always produce the desired depth of field.
- A traditional (optical) viewfinder doesn't show the depth of field that your f-stop setting will produce. That preview isn't possible because the aperture doesn't actually adjust to the selected f-stop setting until you press the shutter button. However, some cameras often provide a depth-of-field preview button. When you press the button, the camera adjusts the aperture to the chosen f-stop, and you can then preview aperture-related depth of field in the viewfinder. If you're using a small aperture, the scene may appear very dark because not much light is coming through the lens.
-
Change the lens focal length. Focal length, measured in millimeters, determines the camera’s angle of view, how large objects appear in the frame, and — the important point for this discussion — depth of field. A long focal length, such as the one you get from a telephoto lens, produces a shallow depth of field. A wide-angle lens, on the other hand, has a short focal length and produces a large depth of field.
Figure 6-9 offers an example. Both photos were taken at an aperture of f/5.6; however, the top image was taken at a shorter focal length (wider angle), so more of the scene remains in the sharp-focus zone. Also understand that the original 174mm-version contained a great deal more background area (because of the wider angle of view). I cropped the image so that the subject filled about the same amount of the frame as the 270mm version.
If your camera has an optical zoom, you can change focal length by simply zooming in and out. (Your camera manual should spell out the range of focal lengths for the lens.) Or if you own an interchangeable-lens camera, you can buy lenses of various focal lengths or even a couple of zoom lenses that each offer a different focal-length range. If your camera doesn’t have an optical zoom, though, you’re stuck with a single focal length. And digital zoom, a feature found on some cameras, does not produce a shift in depth of field; digital zoom simply results in cropping and enlarging the existing image.
- Change the distance between camera and subject. As you move closer to your subject, you decrease depth of field; as you move away, you extend depth of field.
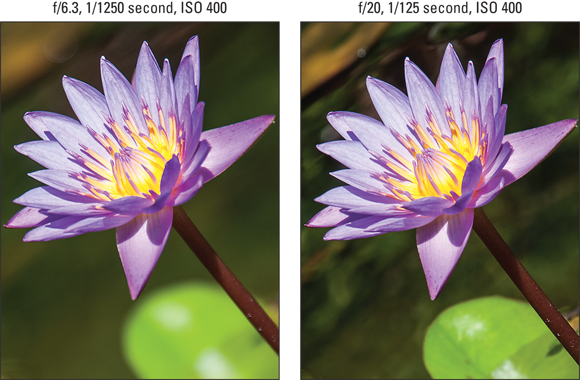
FIGURE 6-8: Changing the aperture is one way to adjust depth of field.
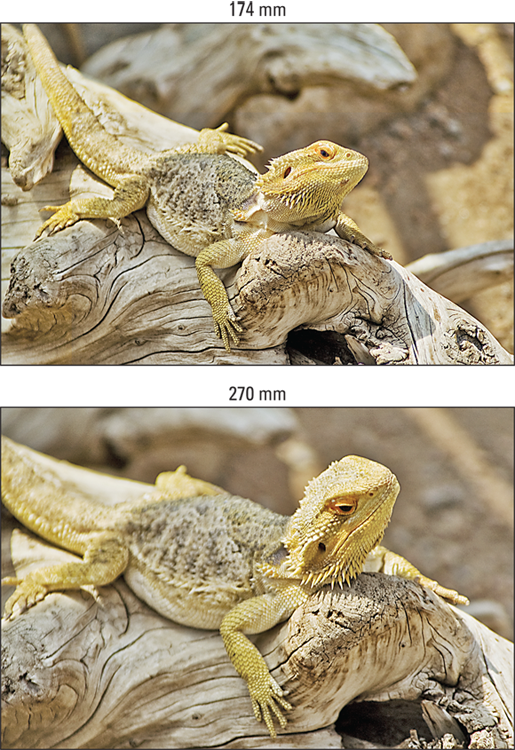
FIGURE 6-9: Zooming to a longer focal length also decreases depth of field.
To put it all together, then, decide how much depth of field best suits your subject, and then combine aperture, focal length, and camera-to-subject distance to create the look you want. Remember the following formulas, illustrated in Figure 6-10:
- For minimum depth of field (subject sharp, distant objects blurry): Use a wide aperture (low f-stop number) and a long focal length (telephoto lens), and move as close as possible to your subject. Be sure not to exceed the minimum close-focusing distance of your lens, though.
- For maximum depth of field (subject and distant objects sharp): Use a small aperture (high f-stop number) and a short focal length (wide-angle lens), and move back from your subject as much as possible.
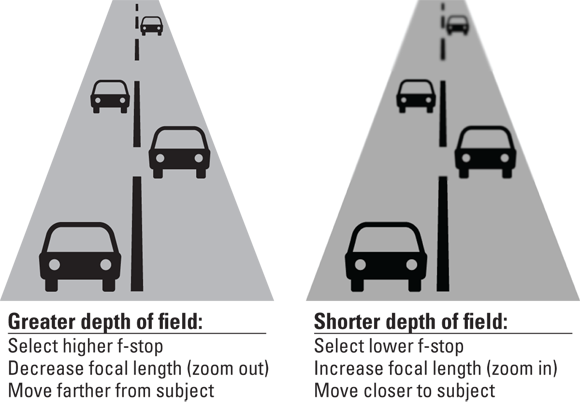
FIGURE 6-10: Combining all three techniques enables you to achieve the minimum or maximum depth of field.
Controlling Color
In the film photography world, photographers manipulate color by using different films and lens filters. If you want landscapes that feature bold blues and vivid greens, for example, you choose a film known to emphasize those hues. If you’re shooting portraits, on the other hand, you might add an amber-tinted filter onto your lens to infuse the scene with a warm, golden glow that flatters skin tones.
Things work differently in the digital world, but you still have several options for manipulating color — in fact, more so than in the film world, and without having to lug around a bag of different films and filters, too. The rest of this chapter explains the standard digital-camera color features and also helps you solve some common color problems.
Exploring the world of digital color
Like film cameras, digital cameras create images by reading and recording the light reflected from a scene. But how does the camera translate that brightness information into the colors you see in the final photograph?
The next three sections explain this mystery and decode some of the color-related techie-terms you may encounter when you browse digital photography magazines, websites, and other forums.
RGB: A new way of thinking about color
Digital images are known as RGB images because they are created by mixing red, green, and blue light. Monitors, scanners, and digital projectors also use this light-based color technology. In fact, so does the human eye.
To understand the process, you need to know that light can be broken into three color ranges: reds, greens, and blues. Inside your eye, three receptors correspond to those color ranges. Each receptor measures the brightness of the light for its particular range. Your brain then combines the information from the three receptors into one multicolored image in your head.
Just like your eyes, a digital camera analyzes the intensity — sometimes referred to as the brightness value — of the red, green, and blue light in a scene. Then the camera’s computer brain mixes the brightness values to create the full-color image.
Digging through color channels
 After your camera analyzes the amount of red, green, and blue light in a scene, it stores the brightness values for each color in separate portions of the image file. Digital-imaging professionals refer to these collections of brightness information as color channels.
Some cameras enable you to view separate histograms for the red, green, and blue image channels during picture playback. (A histogram is a chart that plots out the brightness values in a photo.) Chapter 8 talks more about this feature and how to interpret the results, if you're interested.
In addition, Photoshop and certain other high-level photo editing programs enable you to manipulate the red, green, and blue color channels independently in order to tweak color and exposure. You also may encounter the word channel when reading camera reviews. A writer may note, for example, that a camera produces more image noise — that's the defect that looks like grains of sand — in one channel than in the others. Should you care about that? Not unless you're an imaging wonk who is used to tackling noise in a photo editor using channel-by-channel adjustments. A noisy image is a noisy image, no matter which channel is responsible. But at least now when you encounter the term, you can nod knowingly and sound impressive when you explain it to photographers who didn't take the time to read this section.
Choosing a color space (sRGB and Adobe RGB)
By default, your camera captures images using the sRGB color space, which refers to an industry-standard spectrum of colors. (The s is for standard, and the RGB is for red, green, blue, which, again, are the primary colors in the digital color world.) This color space was created to help ensure color consistency as an image moves from camera (or scanner) to monitor and printer; the idea was to create a spectrum of colors that all devices can reproduce.
Because sRGB excludes some colors that can be reproduced in print and onscreen, at least by certain devices, some cameras enable you to shoot in the Adobe RGB color space, which contains a larger spectrum of colors. Figure 6-11 compares the two color spaces and how they fit into the larger gamut (range) of colors that the human eye can perceive.
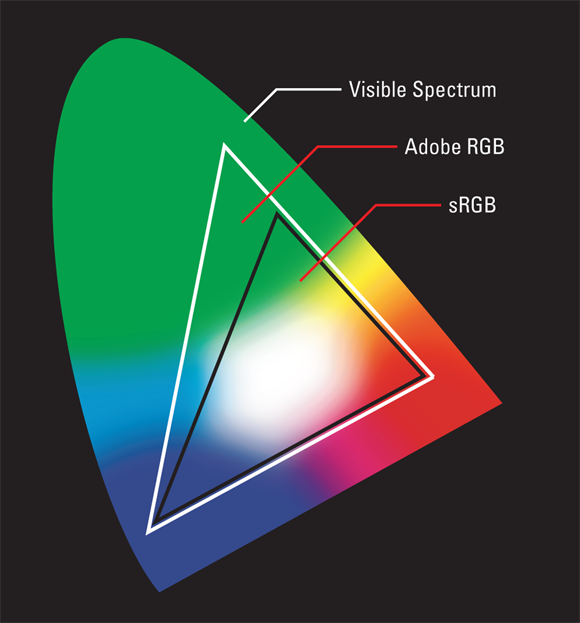
FIGURE 6-11: Although Adobe RGB can capture more colors than sRGB, using the larger color space isn't a good idea for most people.
Although capturing a larger color spectrum sounds like a no-brainer, choosing Adobe RGB isn't necessarily the right choice. Consider these factors when making your decision:
- Some colors in the Adobe RGB spectrum can’t be reproduced in print; the printer substitutes the closest printable color, if necessary.
- Home photo printers and retail photo labs are geared toward sRGB files. If you send an Adobe RGB file to the printer, its printed colors may be off because the printer may not correctly translate the Adobe RGB colors to the sRGB color space.
- Computer monitors, tablet displays, and even digital projectors are also set up around the sRGB spectrum. Again, feeding the display an Adobe RGB image can lead to color confusion unless the monitor is specifically tuned to render colors in the Adobe RGB space.
- If you want to retain the original Adobe RGB colors when you edit images in a photo-editing program, the program must support that color space. For that kind of support, you usually need to invest in a professional editing solution such as Adobe Photoshop or Adobe Lightroom. You also must be willing to study the topic of digital color because you need to use specific software and printing settings to avoid mucking up the color works.
Long story short: Stick with sRGB unless you're schooled enough in this topic to set up a color-managed viewing, editing, and printing system (workflow, in photography lingo).
Using white balance to adjust color
If the colors in your picture are out of whack — skin tones are green or pink, for example — you no doubt have an issue related to the camera's white-balance setting. This feature is designed to compensate for the fact that different light sources have varying color temperatures, which is a fancy way of saying that they contain different amounts of red, green, and blue light and thus cast their own color bias on a scene.
Color temperature is measured on the Kelvin scale, illustrated in Figure 6-12. The midday sun has a color temperature of about 5500 Kelvin, which is sometimes abbreviated as 5500K — not to be confused with 5500 kilobytes, also abbreviated as 5500K. When two worlds as full of technical lingo as photography and computers collide, havoc ensues. If you’re ever unsure which K is being discussed, just nod your head thoughtfully and say, “Yes, I see your point.”

FIGURE 6-12: Each light source emits its own color cast.
At any rate, the human eye manages the perception of color temperature naturally, and no matter if you’re in an office with fluorescent light, under a bright sun, or in a living room with house lamps, when you see red, it looks red (assuming no difficulties with color blindness, of course). However, cameras aren’t as sophisticated as your brain at accommodating various lighting conditions and the colors being illuminated by them.
Film photographers use special films or lens filters designed to compensate for different light sources. But digital cameras, like video cameras, get around the color-temperature problem by using a process known as white balancing. White balancing simply tells the camera what combination of red, green, and blue light it should perceive as pure white, given the current lighting conditions. With that information as a baseline, the camera can then accurately reproduce the other colors in the scene.
On some digital cameras, white balancing is handled automatically, but most models give you the option to set the white balance manually to match the light source. That feature comes in handy when your subject is lit by two light sources that have different color temperatures. Figure 6-13 shows one such example. For this shot, my subject was lit primarily by tungsten studio lights, which have a yellow color cast (refer to Figure 6-12). But an adjacent window allowed some daylight into the room, and because it was a cloudy day, the light had a slight blue tint. The mixture of the two light sources confused the automatic white-balance system, resulting in the yellowish cast shown in the first shot. After I set the White Balance option to Tungsten, my whites were once again white.
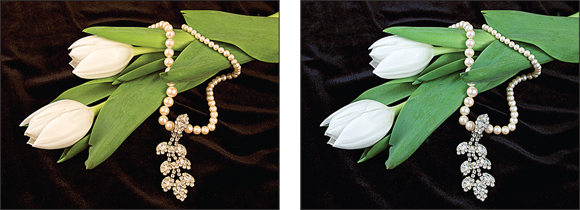
FIGURE 6-13: Using two different light sources confused the automatic white balance system (left); modifying the White Balance setting corrected the problem (right).
When you take the White Balance reins, choose the option that most closely matches your most prominent light source. Table 6-1 shows some common manual settings. These settings are usually represented by graphical icons; the ones in the table are generic, but most cameras use similar symbols to represent the white-balance settings.
TABLE 6-1 Manual White-Balance Settings
Icon |
Setting |
Use |
|
Daylight or Sunny |
Shooting outdoors in bright light |
|
Cloudy |
Shooting outdoors in overcast skies |
|
Fluorescent |
Taking pictures in areas with fluorescent lights |
|
Incandescent |
Shooting under incandescent lights (standard household lights) |
|
Flash |
Shooting with the flash |
|
Kelvin |
Select a specific Kelvin temperature |
That’s the short story on white balance: Turn to this control any time your colors look out of whack. But also investigate the tactics explored in the next few sections, which present additional white-balance features and uses.
Get in the habit of resetting the White Balance option back to AWB (automatic white balance) after you’re done using a manual setting. Otherwise, if you shoot another photo in different light, the color is likely to appear wrong in that photo.
White-balance shift
Some cameras offer a way to refine white balance beyond what you can do with the six or seven usual manual settings. Suppose that you’re using incandescent lamps but the Incandescent setting on your camera doesn’t quite produce neutral colors. You may be able to nudge the white-balance adjustment in small increments to eliminate the problem. For example, on some Canon cameras, you can tweak the white-balance adjustment by moving a little marker inside a color grid, shifting hues along both a blue/amber axis and a green/magenta axis, as shown in Figure 6-14. The setting in the figure shifts the white balance three steps toward amber and one toward magenta.
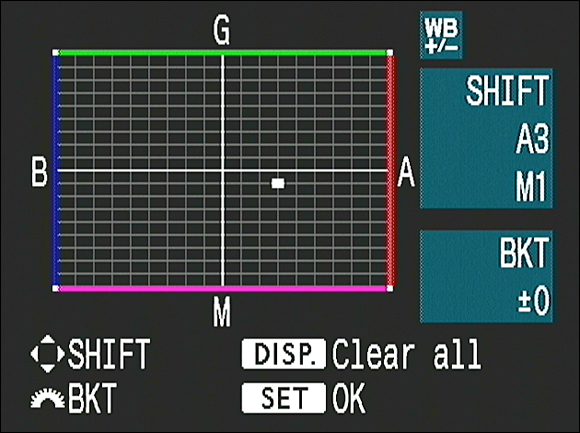
FIGURE 6-14: On some cameras, you use this type of control to adjust white balance in small increments.
This feature sometimes goes by the name white-balance shift; on other models, it may go by the name white-balance fine-tune or a similar term. But regardless of the label, this feature offers precise control over white balance.
Typically, the shift increments are geared toward a measure called a mired (“my-redd”), which indicates the degree of color correction applied by a traditional colored-lens filter. Each white-balance adjustment increment equals so many mireds (usually, five). If you’re hip to the whole mired issue, check the fine print in your camera manual for details on how your model handles the situation.
Custom white balancing based on a gray card
Some cameras allow you to shoot a reference photo that the camera analyzes to determine the right amount of white balancing needed to completely remove any color casts. This feature is usually the most reliable and efficient way to ensure accurate color.
Here’s how it works: You take a picture of a neutral gray card, illuminating the card with the same lighting that you plan to use for your shot. (You can buy cards made just for this purpose at your local camera store for under $20.) The camera then determines what white-balance adjustment is needed to get that image to a neutral color state. The adjustment information is stored as a custom setting, and any time you shoot in that same light, you select that custom setting as the white-balance option, and the camera applies the same correction to ensure color accuracy.
In a pinch, you can also use a piece of white paper or card stock as the source of your custom white-balance setting. Just make sure that the paper or card is really and truly neutral in color.
White-balance bracketing
If you’re unsure about the light illuminating your subject, you may want to try white-balance bracketing, which means taking a picture of the same item several times with different white-balance settings. Then you have a variety of color renditions from which to choose.
Some cameras offer automatic white-balance bracketing that handles the changes between exposures for you. You first select a white-balance setting: Auto, Sunny, Cloudy — whatever. Then you tell the camera to take one shot at that setting, take a second shot at a setting that shifts colors in one direction, and a third that shifts colors in another direction.
Using white balance for effect
Colors are often described as being either “cool” or “warm.” Cool colors fall into the blue/green range of the color spectrum; warm colors, the red/yellow/orange spectrum. Light, too, is often said to be cool or warm: Candlelight, for example, is a very warm light, whereas flash is a very cool light.
Talking about colors as being cool and warm can get confusing if you’re also pondering the Kelvin scale. Colors that give off the bluish light have a higher Kelvin temperature than those that give off a warmer light, and most of us are used to thinking of a higher temperature as warmer. Don’t think too much about it — it’s more important that you’re aware of the colors of different light sources than their Kelvin temperatures.
Back to the discussion at hand: Film photographers often apply tinted filters to the ends of their lenses to purposefully add a warm or cool cast to their subjects. With digital, however, you may be able to do the same thing simply by using your camera’s white-balance controls.
Assuming that your camera offers manual white-balance settings, you can simply experiment with different settings to see which ones provide the warming and cooling effects you want. The trick is to choose a white-balance setting that’s actually designed for a light source that has a different color temperature than your actual light source, as follows:
- For warmer colors: Choose a white-balance setting designed for the bluish light sources that fall at the top of the Kelvin scale, such as flash or clouds. The camera, thinking that the light is very blue, shifts colors to the warmer side of the scale. And if you’re shooting in light that’s actually not cool, the resulting colors wind up being shoved slightly past neutral to warm.
- For cooler colors: Choose a white-balance setting designed for the warm-colored light sources at the bottom of the Kelvin scale, such as Incandescent. Again, the camera applies what it thinks is the right amount of cooling needed to make your whites white, but the adjustment again takes your colors past neutral, this time to the cooler side of the color range.
As an example, take a look at Figure 6-15. The actual light in this scene was from strong, bright daylight coming in through the overhead windows. At the Daylight white-balance setting, the colors were neutral — or to put it another way, rendered without a color cast from the light. Shooting the scene using the Cloudy setting produced the result you see in the right figure. The camera applied an overly strong warming effect, thinking that it needed to compensate for the bluish tint of cloudy skies. The change is most evident in the green ironwork at the top of the scene and in the walls, which appear almost tan in the original but golden in the Cloudy version.
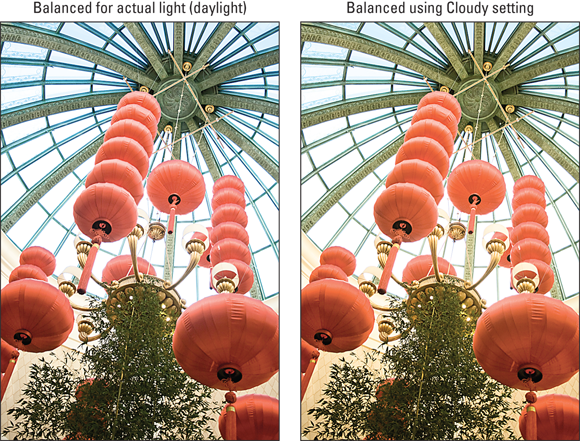
FIGURE 6-15: You can trick the white-balance control into serving as a digital warming filter.
Of course, this trick works only to a certain degree. If you select Cloudy, for example, hoping to make colors warmer, you won't see any effect if you're actually shooting in cloudy conditions. Instead, the setting just neutralizes the cloudy light. The degree of color change that occurs when you select a different white-balance setting depends on how far the actual light source is from that setting.
If your camera offers white-balance shift, you may be able to tell the camera that you always want to push colors slightly to the warm or cool side any time you select a certain white-balance setting. If you find that your camera consistently produces colors that are too cool for your liking at the Cloudy setting, for example, you can dial in a correction that increases warming in cloudy light.
Investigating JPEG Picture Presets
When you shoot in the JPEG file format, the camera applies certain color adjustments as it creates the image. At the same time, it may tweak contrast and apply some sharpening, which is a process that boosts contrast in a way that creates the illusion of slightly sharper focus. (Note slightly sharper — sharpening isn't a fix for images that are extremely soft.)
The adjustments that are made depend on a setting that goes by various names, including Picture Style, Picture Control, or Optimize Image. The available settings vary depending on your camera, but you typically get a choice of the settings described in the following list (again, the specific names vary; I used some of the common monikers here):
- Standard or Normal: This option captures the image using characteristics that the manufacturer considers suitable for the majority of subjects.
- Neutral or Flat: At this setting, the camera doesn’t enhance color, contrast, and sharpening as much as in the other modes. The setting is designed for people who want to precisely manipulate these picture characteristics in a photo editor. By not overworking colors, sharpening, and so on when producing your original file, the camera delivers an original that gives you more latitude in the digital darkroom.
- Vivid or Intense: In this mode, the camera amps up color saturation, contrast, and sharpening.
- Portrait: This mode tweaks colors and reduces sharpness in a way that is designed to produce soft skin texture and pleasing skin tones.
- Landscape: This mode emphasizes blues and greens and increases contrast and sharpening.
- Monochrome: This setting produces black-and-white photos.
With the exception of Monochrome, the extent to which the selected preset affects an image depends on the subject and the camera — though Figure 6-16 offers a look at the same scene as produced by four typical presets. As you can see, there's not a lot of difference, although the blues in the Landscape version are decidedly more intense than in the other versions and the Neutral version is clearly undersaturated and lacks contrast. This scene also points up another hiccup related to JPEG presets: What option do you choose if your scene contains both people — suitable for the Portrait option — and a landscape, as here?
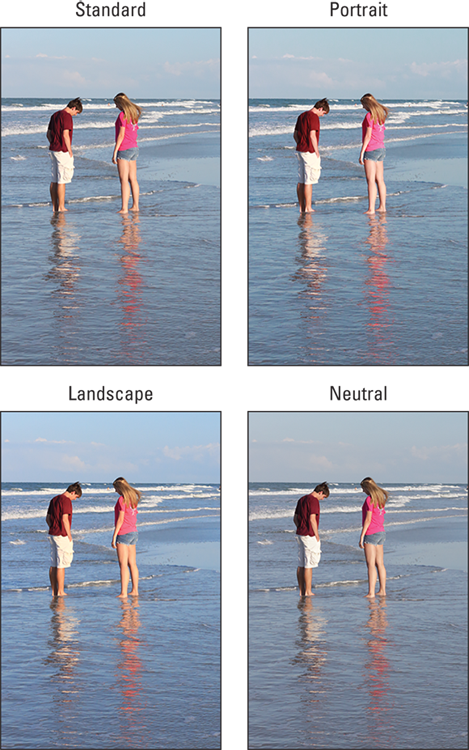
FIGURE 6-16: You may be able to choose from several picture-rendering presets, each of which tweaks color, contrast, and sharpness slightly differently.
In my experience, the default setting truly does work best for most shots, and on some cameras, you don't even notice as much difference between the various preset styles as shown in the figure. I stick with the default. Your mileage may vary, though, so take test shots at each of your camera's settings.
Keep in mind these additional points:
- You may not be able to choose which preset is applied when you shoot in Auto mode, scene modes, or other automatic exposure modes. Most cameras don't give you control over this feature unless you shoot in an advanced mode (programmed autoexposure, manual, aperture-priority autoexposure, or shutter-priority autoexposure).
- Don't confuse these Portrait and Landscape settings with the Portrait and Landscape exposure modes. I know — like this stuff isn't confusing enough, you have to deal with two settings bearing the same option names? But the deal is this: Assuming that you shoot in an exposure mode that gives you control over these presets, you can select any one you like — you can snap a photo of a mountain landscape using the Portrait setting, if that's the look you want. If, on the other hand, you shoot in Landscape scene mode, the camera automatically selects the Landscape setting. And in the Portrait scene mode, the file is processed according to the Portrait preset color/sharpness/contrast recipe.
-
Using black-and-white mode isn't the best route to a black-and-white photo. When you take a photo in black-and-white mode, the camera captures a full-color image and then just desaturates (removes all color from) the photo. Depending on the original colors in the scene, this can lead to a fairly “blah” black-and-white image. A better choice is to capture the image in full color and then do the conversion to black-and-white in a photo-editing program. Assuming that you own a capable program, you’ll have much more control over how the colors in the image are translated to grayscale. As an example, Figure 6-17 shows the simple, in-camera monochrome version of a color original and one that I created using my photo editor. For my custom conversion, I darkened pixels that were green in the original, helping to set the subject apart from the background a little more.
Some cameras offer a built-in editing tool that creates a copy of a color photo and converts the copy to a black-and-white image. That's an okay option if you need a grayscale version of the photo right away, but again, you don't get any control over the conversion (the results are the same as shooting in black-and-white mode).
At the very least, take one shot of the subject in color and one in black-and-white mode. You can always go from color to grayscale after the fact, but you can’t do the opposite.
-
You may be able to modify presets or create your own presets. For example, some cameras enable you to adjust the amount of sharpening, contrast, color saturation, and other parameters that are made by a particular preset. Even better, you can sometimes create and store your own, custom preset in addition to the prefab ones.
If you want to get big-time into presets, you can even go online and download presets that other photographers have created. You might find a preset designed to capture a particular landmark at sunset, for example. Check your camera manual to find out whether this option exists, and if so, how to install the presets in your camera.
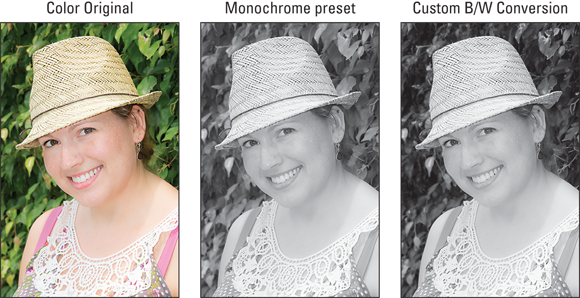
FIGURE 6-17: Monochrome mode usually results in a flat, low-contrast, black-and-white photo; converting a color original in a photo program gives you more control over how each color is translated to grayscale.
Shooting Raw for Maximum Control
In the Raw file-capture format, the camera doesn't apply white balancing or any of the other color, sharpness, or contrast adjustments that are made by the JPEG presets discussed in the preceding section. Instead, you specify these image attributes (and more) when you convert the Raw file to a standard format (such as TIFF) on your computer.
Although Raw capture involves more time behind the computer and has a few other complications you can explore in Chapter 4, shooting in this format gives you a much finer degree of control over these picture characteristics than you get in JPEG, even if you play with all available capture settings.
Take a look at the screen shown in Figure 6-18, which shows one of multiple panels of options found in the Adobe Camera Raw converter tool, which is provided with several Adobe photo programs, including Photoshop and Lightroom. This particular panel is one of my favorites because it enables you to adjust the hue (basic color), saturation (intensity of color), and luminance (brightness) of individual color ranges. For this image, I was able to tweak sky and sea colors separately from skin tones and from the clothing colors.
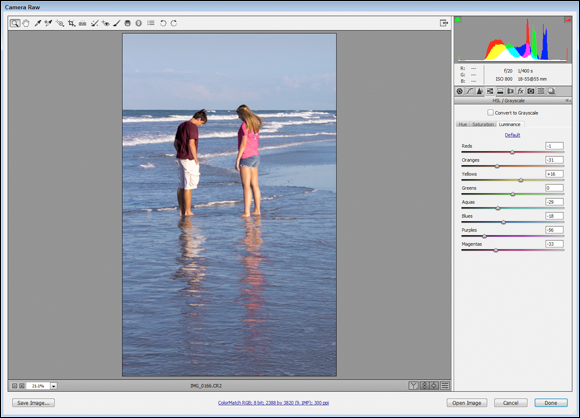
FIGURE 6-18: Here's a look at the Adobe Camera Raw file-conversion tool; on this panel, you can manipulate the brightness of individual color ranges separately.
I find Raw especially helpful when I'm shooting in mixed lighting sources and can't find just the right white-balance setting or another adjustment to produce neutral colors. If you shoot JPEG and your photos have a color cast, it's sometimes difficult to make things right even using a powerful photo-editing program. But with Raw, the color isn’t locked in when the file is created, so you always get a second chance. Additionally, because the Raw format can retain a slightly greater range of brightness values than the JPEG format, it gives you a bit more latitude if you need to adjust exposure after the shot.
That’s not to say that you should completely ignore white balance and the other settings explained in this chapter when you shoot in the Raw format, however. For one thing, the picture you see during playback on the camera monitor is a JPEG preview of the image as it will appear if you stick with the current white-balance setting. So, if the color is way off, judging the overall result of the picture is a little difficult. It’s hard to tell whether a red flower is properly exposed, for example, if the entire image has a blue color cast. And when you open the picture file in a Raw converter, the software initially translates the picture data according to the recorded white-balance setting. Getting as close as possible from the get-go can thus save you some time tweaking colors during the conversion stage.