Chapter 12
Presenting Your Movie
IN THIS CHAPTER
![]() Converting files for export
Converting files for export
![]() Exporting your movie
Exporting your movie
![]() Sharing the movie
Sharing the movie
![]() Choosing long-term storage
Choosing long-term storage
Whether your movie consists of a few clips from the GoPro you mounted on a lawn mower, an elaborate edit of your backyard-pool Olympics, or a short movie of your dramatic friends, it’s time to kick it out of GoPro Studio Edit and get it out into the world.
Will you upload it to a video-sharing website? Send it out as a live stream? Go old-school and burn it to a Blu-ray DVD? You have many possibilities to consider.
Maybe you’re not even looking to make an exclusively GoPro movie; instead, you want to incorporate some GoPro footage into a bigger movie project. That’s no problem, because the process of using the program, and ultimately exporting your edit, remains the same.
After that, it’s a matter of showing it to the world.
Converting Your Movie Files for Export
Although GoPro Studio Edit (see Chapter 11) provides some options for exporting your movie, it offers limited choices. Although many may work for your needs, you can export your movie from GoPro Studio Edit and use a conversion program to create a file that meets your specific needs.
Conversion programs do more than make video files viewable in another file format: They also allow you to customize resolution, quality settings, audio settings, bit rate, and other settings. Convert your uncompressed file to an MP4 file, for example, or transform an AVI file to an FLV file for embedding in a web page. Whatever you choose to do, the software does the work.
MPEG Streamclip
If you’re looking to convert your movie to another format with lots of options and don’t feel like spending a lot of money, check out MPEG Streamclip. It’s powerful, it’s free, and it handles multiple formats and sizes. It also is available for both Macintosh and Windows.
Because it’s designed exclusively for exporting and encoding files in a variety of formats, MPEG Streamclip gets the job done quickly. It supports the following formats:
AC3 AVI AVR AIFF DAT DV M1A M1V M2P M2T M2V MMV MOD MOV MP2 MP4 MPA MPEG MPV PS REC TS VID VOB VRO
You can download it at www.squared5.com.
Other conversion programs
If you need a little more horsepower for converting your files, here are a couple of reasonably priced programs.
- AVS Video Converter (Windows only): This program handles an extensive list of video file types (including Blu-ray) and provides a wide array of tools and effects. At this writing, a subscription to the software ranges from $39 to $59. You can download a trial version at
www.avs4you.com. - Xilisoft Video Converter Ultimate (Windows and Macintosh): This conversion program handles most file types and supports a variety of mobile devices, music players, and gaming platforms. The program costs around $50. You can download a trial version at
www.xilisoft.com.
Getting That Movie Out There
When you’ve put your movie together, applied every possible effect that GoPro Studio Edit has to offer, performed any necessary conversions (see the preceding section), and saved it, you’re ready to export it.
 After you export a movie, you no longer need editing software to play it, because the file becomes self-playing. You can watch it on any computer, mobile device, and even your big screen television.
Choosing export options
Sometimes, you have a definitive plan for the movie, so it’s simple to pick the export settings you need for it. At other times, the process is a little more complicated. You may have used a low-quality setting, only to find out that what looks good on a smartphone looks bad on a video-sharing website and atrocious on a big-screen television set. To make the right choices about everything from resolution to playback bit rate, you need to have informed opinions.
You have two ways to export and share: You can export your movie, either by clicking the tab of the Export work area, or by using the pull-down menu. On a Mac, go to Share ⇒ Export Movie. You’ll see the choices for sharing, as shown in Figure 12-1. On a PC, go to File ⇒ Export movie.
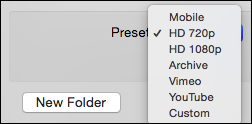
FIGURE 12-1: The Export dialog with the pull-down menu on a Mac.
GoPro Studio Edit provides many ways to export your files. Following are the program’s export options:
- Mobile: Sizes your video appropriately for viewing on smartphones and other mobile devices.
- HD 720p: Exports a high-definition (HD) movie file.
- HD 1080p: Exports a full HD movie.
- Archive: Exports the file with the CineForm codec.
- Vimeo: Exports the file in full HD for sharing on the Vimeo website.
- YouTube: Exports the file in resolutions up to full HD for sharing on YouTube.
- Custom: Lets you create your own versions of some of the preceding options.
The following sections take a deeper look at GoPro Studio Edit’s export options to help you find the one that’s right for you.
Mobile
This option is the perfect choice for exporting a movie that you want to play smoothly on a mobile phone — the kind of thing you want to send via email or show as a work in progress. You never want this version of a file to be the only export of a movie unless you don’t really care about it. Here are the settings:
- Resolution: No matter what resolution you used to shoot the movie, this setting changes it to 640x360p (pixels).
- Compression: This setting applies the H.264 compression format.
- Bit Rate: This setting is 1.5MB per second — a very low rate, so both video and audio quality will suffer. But because the file is intended to be viewed only on a mobile phone, the quality will suffice.
- Exported Frame Rate: The file will have a maximum frame rate of 29.97 frames per second (fps).
HD 720p
This option creates a smaller HD file that provides the perfect compromise between quality and file size. Think of it as HD light — something that plays online with excellent quality. Here are the settings:
- Resolution: No matter what resolution you used to shoot the movie, this setting changes it to 1280x720p.
- Compression: This setting applies the H.264 compression format.
- Bit Rate: This setting varies with the frame rate at which you captured the footage. Footage captured at a frame rate higher than 29.97 fps gets a healthy bit rate of 15MB per second; anything with a lower frame rate has a bit rate of 7MB per second.
- Exported Frame Rate: This setting varies based on native resolution but goes no higher than 59.94 fps.
HD 1080p
This option is the default for export and provides the greatest quality. It’s perfect for playing your movie on a big screen or burning it to DVD. If you want to upload your movie to a video-sharing site or send it to a friend to watch on a smartphone, however, it’s a bit much. Here are the settings:
- Resolution: No matter what resolution you used to shoot the movie, this setting changes it to 1920x1080p.
- Resolution: No matter what resolution you used to shoot the movie, this setting changes it to 1920x1080p. Be careful if your original GoPro capture setting is lower; otherwise the result is a net loss of resolution.
- Compression: This setting applies the H.264 compression format.
- Bit Rate: This setting produces an optimum-quality bit rate of 15MB per second, which creates a great experience for the viewer as well as an enormous file. YouTube has a handy “grid” of settings for bit and frame rates at
https://support.google.com/youtube/answer/1722171?hl=en.
Where to Go from Here
Now you’re ready for action. Give the pages a quick flip and scan a section or two that you know you’ll need later. Please remember, this is your book — your weapon against the computer nerds who’ve inflicted this whole complicated computer concept on you. Please circle any paragraphs you find useful, highlight key concepts, add your own sticky notes, and doodle in the margins next to the complicated stuff.
The more you mark up your book, the easier it will be for you to find all the good stuff again.
Archive
This export option retains the program’s original codec by creating a CineForm file with a user-selectable quality level. This option is your best choice if you want to export a high-quality master file for broadcast or archival purposes. Here are the settings:
- Resolution: This setting preserves the resolution at which you shot the movie.
- Compression: This setting applies the CineForm codec. On a Windows PC, you can choose a CineForm AVI or MOV format.
- Bit Rate: This setting doesn’t apply a numerical bit rate; it allows you to choose Low, Medium, or High.
- Exported Frame Rate: This setting applies the native frame rate of each clip.
Vimeo
Choose this option for movies that you want to export to the Vimeo video-sharing site. Here are the settings:
- Resolution: This setting applies native resolution up to 1080p. Files with resolution higher than 1080p are center-cropped and scaled to 1080p.
- Compression: This setting applies the H.264 compression format.
- Bit Rate: This setting varies with resolution, applying a bit rate of 15MB per second to files with resolution of 1080p or higher. For clips with resolution below 1080p, the setting applies a lower bit rate of 7MB per second.
- Exported Frame Rate: This setting is native to the frame rate of each clip but never higher than 29.97 fps.
YouTube
Choose this option for movies that you want to export to the YouTube video-sharing site. Here are the settings:
- Resolution: This setting applies native resolution up to 1080p. Files with resolution higher than 1080p are center-cropped and scaled to 1080p.
- Compression: This setting applies the H.264 compression format.
- Bit Rate: This setting varies with resolution, applying a bit rate of 8MB per second for files with resolution of 1080p files or higher. For clips with resolution below 1080p, the setting applies a lower bit rate of 5MB per second.
- Exported Frame Rate: This setting applies the native frame rate of each clip and supports rates of up to 59.94 fps.
Custom
If you don’t find the other export settings to be to your liking, you can build your own, choosing the format, frame size, frame rate, and quality settings. The Custom dialog (see Figure 12-2) allows you to customize your movie for export as follows:
- Resolution: You can select a resolution up to 1920x1080p.
- Compression: Choose H.264 or CineForm compression.
- Bit Rate: Use a slider to set a bit rate of 1MB to 50MB per second. CineForm uses a slider between low and high.
- Exported Frame Rate: This setting applies the native frame rate of each clip and supports rates of up to 59.94 fps.
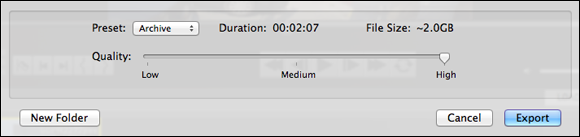
FIGURE 12-2: Custom dialog options.
Exporting your movie on a Mac
The Export pane of the player window is where you export your movie in the desired format and with the desired settings.
Exporting is quite simple. Follow these steps:
Choose Share ⇒ Export Movie or click the Export pane.
The dialog shown in Figure 12-3 appears.
- Type a name for your file in the Export As text box.
- Choose a preset from the Presets drop-down menu.
Click Export.
Within a few moments, a self-playing movie is ready.
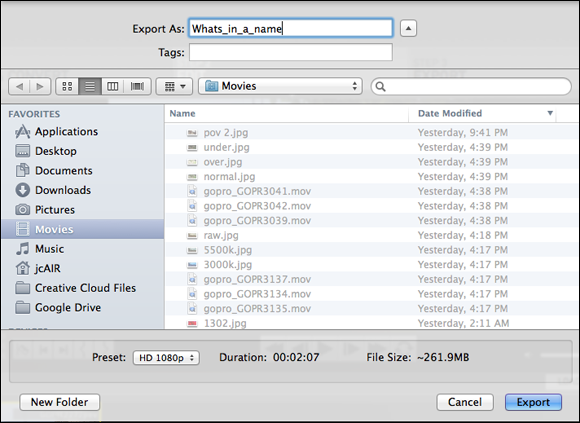
FIGURE 12-3: The Export dialog.
Exporting your movie in Windows
Because the Mac and Windows version of GoPro Studio Edit differ somewhat, the process is slightly different when exporting your movie.
- Click Export or choose File ⇒ Export.
- Type a name for your file in the Export As text box.
Choose your preset.
On the lower right of the dialog, you find the Presets drop-down menu.
Click Export.
Within a few moments (or many, depending on the file size), a self-playing movie is ready.
After you export your movie file, be sure to watch it for quality control. Make sure that the file format and size you applied look as good as possible. If you don’t like it, trash it and export another copy that meets your approval.
Sharing and Sharing Alike
Sharing movie files in the era of the hit television series Mad Men was very different than we do it today. Back then, would-be moviemakers made copies of their silent 8mm film reels to send to family, friends, and film competitions. That spirit remains alive today, except instead of a physical movie, you’re sending a virtual one. It’s also not going to just one person, but many — maybe even millions.
Here are some of the ways you can share your movie:
- Upload it to video-sharing sites.
- Share it on social media.
- Share it on mobile devices.
- Send it via email.
Movie files are big, and HD makes them bigger, so it’s important to strike the right blend between file size and quality. Ideally, you compressed yours enough to upload on the Internet. Although each video-sharing site has different specifications, it’s possible to upload a HD movie that’s properly encoded.
Sharing your movie on Facebook
The world’s largest social media site, with around 1 billion active users, provides a great forum for your video. How many people see your video, of course, depends in part on the size of your Friends list and how many of your friends can get other people to check out the movie. Facebook allows you to upload a video directly from your computer, or you can post a link to YouTube if your video is posted there.
Be sure that you’re using a recent web browser and have Adobe Flash loaded. Adobe Flash is necessary for the movie to play. If you don’t have it, chances are you will be prompted to download it. If you already have it, then expect to be asked to update Flash periodically. Your movie should meet the following requirements:
- The video is no larger than 1,024MB.
- The video’s length doesn’t exceed 20 minutes.
- The video is an MP4 movie file using H.264 compression and the AAC audio format.
- You made the video yourself or have permission to share it.
Uploading a video to Facebook is relatively easy. Follow these steps:
Navigate to the Facebook home page (
www.facebook.com).Make sure you have a Facebook account. If not, create one.
- Click the Add Photos/Video link at the top of the page (see Figure 12-4).
- Click the Add Video pane (see Figure 12-5), click Choose File, and navigate to the desired file.
- Add a description of the movie, if you want (see Figure 12-6).
- Click Post, and grab a cup of coffee.
Share the movie.
Determine who gets to see it. You can share your movie with anyone on Facebook who can find it, your friends, or a group of your friends. Or just yourself.

FIGURE 12-4: The Add Photos/Video link.
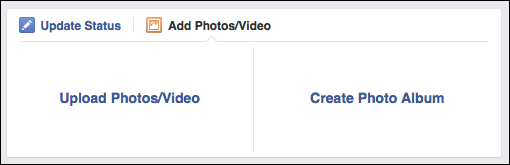
FIGURE 12-5: The Add Video pane.
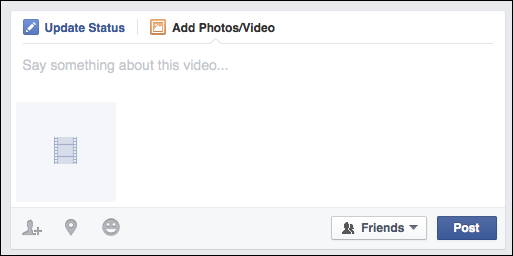
FIGURE 12-6: What you type here is what viewers will see.
Sharing your movie on YouTube
YouTube records more than 4 billion video views per day, so your movie has the potential to be viewed by a lot of people — if they know it’s available. If you’re a little shy about reaching an audience, you can make your movies private and send would-be viewers an invitation to see it. The website supports a variety of file formats and allows some videos to be uploaded in full HD.
Here are a couple of YouTube requirements:
- Video length can’t exceed 15 minutes unless you verify your account.
- You made the video yourself or have permission to share it.
Uploading a video to YouTube is relatively easy. Follow these steps:
- Navigate to the YouTube home page (
www.youtube.com). Sign in.
Enter your username and password, or your Google login, as shown in Figure 12-7.
Click Upload at the top of the page.
After the upload screen, search for the video you want to share.
- Select the video you want to upload.
Add details about the video while it’s uploading.
Depending on file size, uploading can take an hour or more. Use this time to name the movie and provide the proper information (see Figure 12-8).
View your movie.
Also, keep an eye on the page views (see Figure 12-9) to see whether you’ll have a viral favorite on your hands.
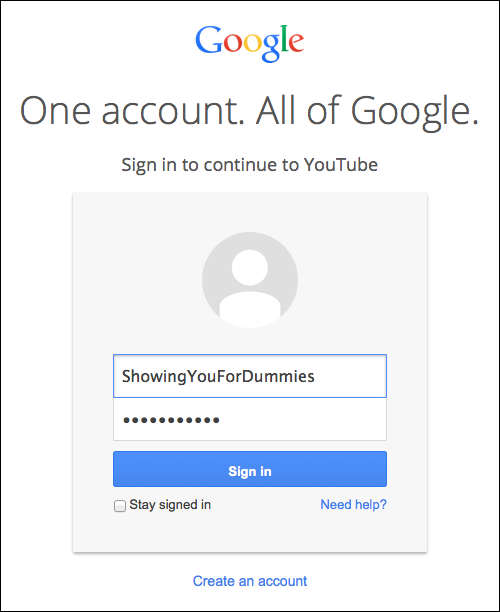
FIGURE 12-7: When you attempt to upload a video, you will be prompted to sign in.
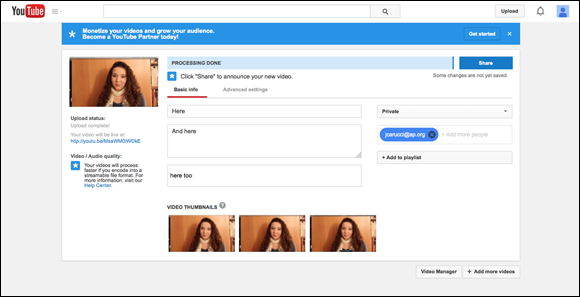
FIGURE 12-8: The more information you add here, the easier it is for your movie to find an audience.
FIGURE 12-9: You can see how many people have viewed your video every time you look at it.
Sharing your movie on Vimeo
Vimeo (an anagram for movie) is an alternative to YouTube. Because it supports higher quality, it’s a popular place for independent filmmakers to upload, share, and view movies. Another notable difference from YouTube is that all uploaded content must be original and noncommercial.
Vimeo is a much smaller community than YouTube: The site has 35 million registered users and attracts around 170 million unique visitors per month.
Vimeo provides several levels of access: While free to upload video, users are limited to 500MB. An inexpensive Vimeo Plus account allows users a greater weekly upload amount, as well the capability to limit advertisements before the video, unlimited HD videos, and unlimited creation of channels, groups, and albums. Vimeo PRO provides the highest level of service and offers large storage, third-party video player support, and advanced analytics.
Uploading a video to Vimeo is simple. Follow these steps:
- Navigate to the Vimeo login page (
https://vimeo.com). - Log in, using your Vimeo or Facebook login details.
Click the Upload a Video button.
The Upload dialog appears (see Figure 12-10). You can click it to navigate to the selected video file, or drag and drop it.
Select the video you want to upload, and click the Upload Selected Videos button.
Depending on file size, uploading can take an hour or more.
- Name the movie and provide the proper description.
View your work.
You’ll notice the sleeker presentation, as seen in Figure 12-11.

FIGURE 12-10: The upload dialog.
FIGURE 12-11: The Vimeo player occupies a fair amount of screen real estate.
Finding the Best Archiving Solution
There’s a great deal of uncertainty about the best way to save digital media files. Technology changes rapidly and is unstable at times. The problem of finding a stable solution is further compounded by imperfections in most of the storage methods at your disposal. This section presents some of the options.
Choosing a file format
The first step in saving your beloved files is choosing the right file format. Here are a few options:
- MOV: Apple created this file format for use in its QuickTime program. It’s a versatile format that allows you to save files in both compressed and uncompressed form. Use it when you want a self-playing file that you can also edit in another program without a loss of quality. It’s ideal for broadcast.
- MP4: Also created by Apple, this format lets you compress files securely and (depending on the level of compression) with little loss in quality. This format uses the H.264 codec. These files can play back on iOS devices. This format is a perfect blend of quality and size, and can be delivered via email and FTP for broadcast playback.
- AVI: Microsoft’s AVI (Audio Video Interweave) format saves files with a variety of compression formats and in several sizes. It doesn’t retain aspect-ratio information, however.
- CineForm: CineForm is GoPro’s proprietary codec and the one used when you save an archive copy in GoPro Studio Edit. It supports 3D and has been used for many feature films.
Archiving on an external hard drive
External hard drives get faster and cheaper all the time, so they continue to be viable options for backing up your GoPro movies. With HD files occupying about five times the space of standard-definition (SD) files, however, the 2GB drive that you thought could never fill begins gasping for air. HD costs more to save, because the minutes of video per dollar ratio (breaking down capacity with file size) hasn’t quite caught up with hard drive capacity. Of course, after you fill it you can move on to the next one.
Also, external hard drives have been known to fail from time to time, and they sometimes corrupt data, stop spinning, or burn out. You should always save important files on various drives and keep your fingers crossed.
Backing up to tape
You can back your files up to tape if you have a camcorder or HD recording deck that uses tape. Professional production houses also back up to tape.
The upside of tape is that your footage can be played back on a television set or computer. You can digitize it by playing it into the program while it’s recording.
The downside of tape is that tape is being phased out. Fewer decks for playback will be available over time, so finding someone to digitize your tapes may be difficult.
Using media cards
Using media cards to store files, at least temporarily, has some merit. The prices of the cards are plunging, their capacity is rising, and their access time is increasing. That means you can play back an HD movie with no glitches.
Here are a few tips on using media cards:
- Save as storage. The intention is not necessarily to play video directly from the card, just to save the video file. You load the card, drag the files on it, and then safely eject.
- Use a fast card. If you plan to play video directly from the card, be sure to use a fast-enough card. If you’re not sure which speed will work for you, see Chapter 3.
- Stick with common formats. These days, common formats are Compact Flash (CF), Secure Digital (SD), and Memory Stick.
- Be ready to transfer. Because technology changes so rapidly, consider saving your files on newer media from time to time to ward off the evils of dust interfering with transfer or problems with the firmware of the drive or reader.
- Keep the cards safe. If media cards get wet, dusty, or stepped on, their content is lost.
Storing in the Cloud
You no longer have to worry about local media storage when you save in the Cloud. Media files are uploaded to large servers in a techno netherland.
Most Cloud sites offer free basic plans and use secure servers. Not all free plans are easy to use, however, making it hard to upload or find your files. Also, if your files are too big or you need to add space, you’re either out of luck or have to pay a subscription fee to upgrade.
Longevity is also a concern. Although some Cloud services are full-fledged online businesses, others aren’t as successful. Stay current on site activity, and be prepared to move your files at the first sign that the service is closing.
Following are a couple of credible Cloud services:
- Dropbox: This file-hosting service makes it easy to send files from one computer and access them on another by using a common folder on the Desktop. You drop files or folders into the Dropbox folder and send invitations to people, allowing them to access your material via an email link. Dropbox offers 2GB of storage space for free.
- Hightail: This reliable FTP service (formerly known as YouSendit) allows you to save and share large files. The free version provides 2GB of storage. A professional plan that costs $12.00 per month provides unlimited storage.