Chapter 3
Getting through GoPro Boot Camp
IN THIS CHAPTER
![]() Understanding the lens
Understanding the lens
![]() Taking advantage of Protune
Taking advantage of Protune
![]() Shooting time-lapse video
Shooting time-lapse video
![]() Playing with other effects
Playing with other effects
If you buy a GoPro camera and expect to use it the way you do a video camcorder or a point-and-shoot camera, you quickly find out that this camera doesn’t respond well to convention. It’s like a beat poet speaking at a 19th-century French literature seminar: Much will get lost in translation. Yet footage captured on a GoPro has been used in all sorts of conventional capacities, from feature films and television shows to sports and news coverage. You just have to understand that it behaves differently from the cameras you’re used to using. Sometimes, success begins with putting everything you know on the back burner.
Before you can shoot successfully with your GoPro, however, you have to know how it works. In this chapter, I show you the fundamentals of working with a GoPro.
Viewing the Lens
If you were playing the “obvious game,” the first thing you might say about the GoPro is that the lens is wide (see Figure 3-1). Really wide. A lens this wide is a luxury, and when you realize that it’s connected to an affordable camera, it seems more like a luxurious gift.
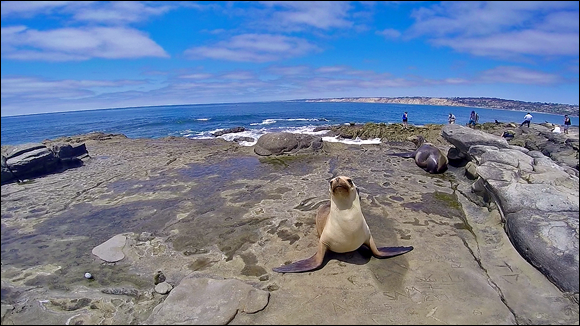
FIGURE 3-1: While only a few feet away from this seal, this ultra-wide-angle-lens captures the entire scene.
Yes, this camera offers you boundless creative choices, especially when you’re playing with perspective. Still, it’s possible to get into trouble with a camera that lacks a viewfinder. Shooting without monitoring the shot isn’t much different than drawing in the dark. Both will produce an image, but rarely the way you intended.
Like everything else, the GoPro’s lens has pros and cons. Here are the pros:
- Fits in tight spaces: With such a wide angle of view, you can include everything in the shot.
- Has great depth of field: The wider the lens, the more of the scene that appears in focus. Because GoPro is really wide, so is the amount of focus in the scene.
- Gets really close to the subject: You can use this camera in the tightest of places.
And here are the cons:
- Records a pretty wide view: Sometimes it’s possible to “under” lens the scene by having too expansive of a view. Even with different settings, the view is still very wide if you’re not close enough.
- Can’t control focus: The camera has no focus control.
- No viewfinder: That means you cannot monitor the scene on the camera and therefore judge the view of the lens.
- Produces geometric warping (better known as distortion).
Getting up close and very personal
The GoPro is meant to work in close quarters, so it’s most comfortable mere inches from the subject. Thanks to that wide lens, the camera is great for tight, confined areas. Because the field of view is so wide, the sense of depth expands, and objects in the distance appear to be much smaller and farther away. You can position your GoPro inches from the subject and still get a full view. Whether you’re capturing a bizarre perspective of a street scene or looking to uniquely show the person in his or her environment, getting close to your subject with this camera provides a fresh look at the world.
Here are some situations that are great for your GoPro:
- Shooting in tight spaces: You can capture almost everything that’s in front of the camera, such as a small room, the interior of a stock car, or the inside of one of those red British phone booths.
- Shooting people: The GoPro is great for scenes showing the subject in his environment. Of course, you’ll need to be careful with distortion or he can end up looking like a bobble head, and not always the good kind.
- Capturing street scenes: The camera matches your periphery of view, so you can capture scenes with both an expansive and personal feel.
- Showing relationships: Shows relationships in size and distance between objects in the foreground and background.
- Providing an uncommon view of common objects: Subjects can include geometric shapes, billowy clouds in the sky, and very unusual angles (see Figure 3-2).
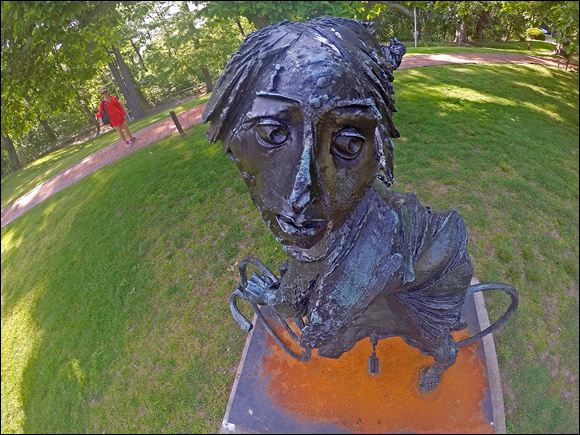
FIGURE 3-2: Shooting from a high angle not much more than one foot away creates a unique perspective for the sculpture.
Taking advantage of SuperView
Here’s an irony: The GoPro, known for capturing high-definition (HD) and 4K video, uses a 4:3 image sensor — a square-ish one that resembles the ratio used by old television sets. It’s not uncommon for a widescreen camera to use a 4:3 sensor, but it’s rare to take advantage of all that space on the sensor.
The GoPro takes advantage of the sensor through its SuperView mode. This new feature combines the best of both worlds by recording the scene with the full sensor vertical resolution of 1440 pixels (p) and then squishing it down to 1080p.
This feature is designed for situations in which you want more vertical resolution than horizontal, such as using the GoPro as a follow or point-of-view camera. The resulting image plays back at a 16:9 ratio but shows more of the scene. The image is slightly unrealistic, as shown in Figure 3-3, mainly because parts of the scene appear to be squished.
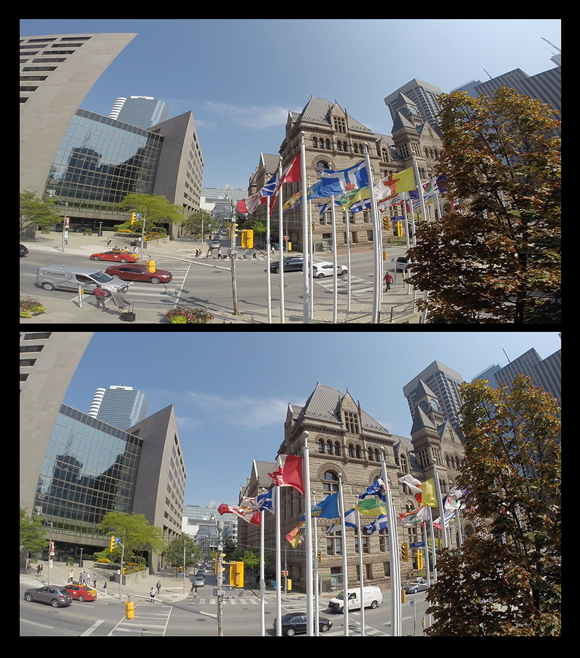
FIGURE 3-3: The same scene was captured in standard 1080p mode (bottom) and in SuperView mode (top).
Here’s what you can expect:
- Immersive wide-angle perspective: Shows a more inclusive view.
- Distorts shapes: Makes a round object appear slightly oblong and tall objects slightly shorter.
- Produces more distortion: Compared with normal 1080p 16:9 video, shows more distortion at the top and bottom of the screen.
Keeping the lens clean in messy situations
A camera that you can use anywhere — even submerged in water or mud — lets you do a lot of awesome stuff, as Figure 3-4 shows. But although the camera case is waterproof, the lens cover on the waterproof housing isn’t self-cleaning like your oven. You have to wipe it constantly; otherwise, many of your cool shots will be taken with goop on the lens.
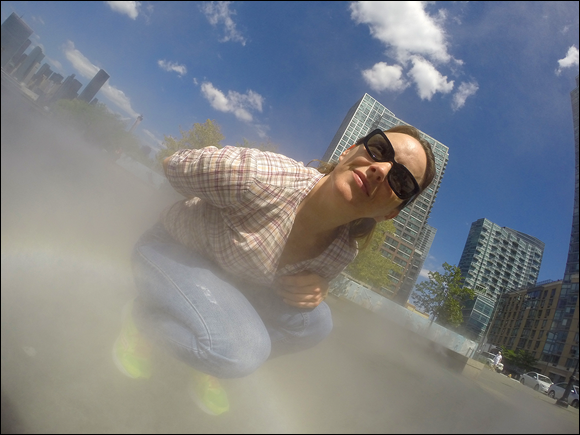
FIGURE 3-4: While capturing this portrait, I had to keep wiping water off the lens housing.
 Here are a few pointers for keeping the lens clean:
- Clean the case, not the lens. It’s much safer and easier to clean the glass on the case than to clean the actual lens. Just use a microfiber cloth and rub gently.
- Don’t scrub. All it takes to scratch the lens is one scrubbed-in speck of dirt. So never scrub the case, let alone the camera lens.
- Wipe the lens housing before you shoot. Nothing is worse than capturing the greatest footage of your life, only to find that you had dirt on the lens.
- Use a blower brush on the actual lens. Use a blower brush to clean the camera lens. It’s just not worth scratching the lens with a cloth, especially because that scratch will appear in all your movies and images later.
Mastering Protune
Although a GoPro camera can do amazing stuff, it still behaves like a point-and-shoot camera. You have little power when it comes to focus and exposure, so you need to live with the footage that the camera captures. Most of the time, the camera renders the scene accurately, but if you’re an advanced user looking for a little more control, consider using Protune mode.
Here are some of the benefits of turning it on:
- High-quality image capture: When you turn on Protune, the high data increases, so you capture images with less compression, and ultimately better quality.
- Neutral color: More accurately, it’s flatter to provide flexibility during post-production color correction. It also captures more detail in shadows and highlights.
- Film/TV frame-rate standard: Offers more choices for image capture, including the cinema-quality 24 frames per second (fps) setting.
- Compatibility with other effects: Activating Protune provides more control over camera settings such as resolution and frame rate, which can affect field of view. You can also simultaneously capture video and still images.
- Control over still photography: Protune also provides more control over your photographs.
Seeing how it works
 Protune puts a little more power in your hands. For one thing, image quality improves because it increases the data rate by more than double. That reduces image compression, thus reducing or eliminating imperfections in the video, such as artifacting. Examples of artifacting include jagged edges, showing blocks of pixels, and posterization.
Protune also offers advanced controls. You have a little more control of your footage when you can alter settings such as white balance, exposure, field of view, and color.
In addition, Protune lets you shoot at a more cinema-friendly 24 frames per second (fps). It’s not that big a deal for most video shooters, but when you intend to match GoPro footage with other footage captured at 24 fps, such as for a movie, the function is invaluable.
Enabling Protune on your GoPro
Casual users probably won’t want to or need to reap the benefits of Protune. But if you’re looking for more quality and better control, you may want to turn it on.
To do so, follow these steps:
With your GoPro powered up, navigate to the Settings menu.
Press the Power/Mode button to cycle through menus until you reach the Settings menu, the one with the wrench icon.
- Press the Shutter/Select button to select it.
- Press the Power/Mode button to cycle through settings until you reach Protune.
Select Protune by pressing the Shutter/Select button.
Make sure that the Protune slider is in the on position on the app.
Setting Protune controls
You can select Protune by going to the Settings menu (the wrench icon) either through the camera or the Capture app. Protune consists of a group of features that let you fine-tune GoPro capture. Adjusting your Protune settings won’t affect non-Protune video modes. You can reset your Protune settings to their default states.
Following are some of the powerful settings you can adjust with Protune.
White balance
You can access this setting through the Protune menu. The icon resembles two triangles looking to catch a small rectangle. White balance adjusts the color temperature between the actual color of the scene and the way your camera records it. By default, white balance on your GoPro is set to Auto, which works well in most situations. If you want to control the color temperature, however, you can set the white balance manually with several presets (see Figure 3-5):
- 3000K: Comes close to the color temperature of indoor lighting.
- 5500K: Matches the color of daylight.
- 6500K: Matches the tone of an overcast day.
- Camera Raw: Doesn’t apply any white-balance setting, so it’s pretty much native out of the camera.
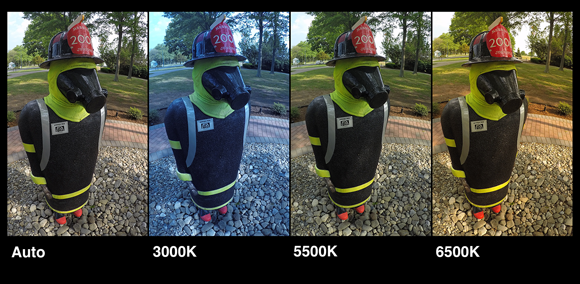
FIGURE 3-5: This image sequence was shot late in the afternoon and shows the following white balance settings: Auto, 3000K, 5500K, and 6500K.
ISO settings
This setting alters the sensitivity of the sensor. For shooting outdoors, you should set the camera to ISO 400, which allows you to adequately capture outdoor scenes with enough light. This setting also captures the scene with the least amount of noise.
When you choose to shoot at dawn or dusk, however, or maybe indoors, you may not have enough light to render the scene properly. To capture a brighter image, you need to bump it up a little bit by increasing the sensitivity of the sensor, which you do by raising the ISO setting. The good news is that you can capture the scene with better exposure. The bad news is that the improved exposure comes at the expense of quality: You’ll have noise and grain in the image.
It’s a good idea to keep the camera set at the default ISO 400 and make adjustments when you need more light. That way, you can consistently produce clean video.
Here are the ISO settings for video capture:
- 400: The default setting provides the best image quality in normal light conditions, such as on a bright sunny day. When you use it in lower light levels, your video will be darker than normal.
- 800: When there is a little less light, such as in shady areas or brightly lit indoor illumination, this setting provides the best combination between acceptable exposure and low image noise.
- 1600: Ideal for situations where the light levels are not very bright, or for action scenes where you want the camera to choose a higher shutter speed to freeze the action, this setting produces slightly more image noise but is still within acceptable range. Make sure that you set it back to 400 when shooting in bright light.
- 3200: Scenes that consist of very low light levels, such as dusk, a dimly lit room — or for times when you want the camera to catch a higher shutter speed to capture crisp action — benefit from this setting. Of course, it comes at the expense of increased image noise.
- 6400: Use this setting when light levels are very low, such as darker areas at dusk or a sparsely-lit interior (but with increased image noise).
Protune ISO settings for still images
In Protune, you can also set ISO settings for still photography. The default setting is at ISO 800, but you can set lower ISO settings with less image noise in 400, 200, and 100.
Sharpness
Like most digital cameras, the GoPro adds digital sharpness after capturing footage to give it the appearance of being sharper. By default, it applies high sharpness to the image, but you can change that setting in Protune to medium or low. The footage will appear softer. You can always enhance it in postproduction, reminiscent of the Camera Raw setting on your DSLR (digital single lens reflex camera). Having control of the footage plays a big part in the look of your movie. You can adjust all these settings on the camera or in the Capture app on your smartphone (see Figure 3-6).
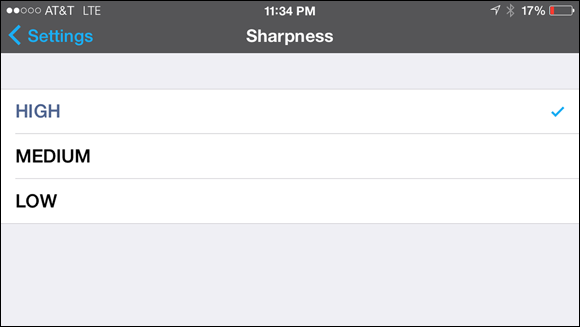
Photo courtesy of GoPro, Inc.
FIGURE 3-6: Protune lets you control image sharpness and can be accessed through the Capture app on a smartphone.
You can choose one of three settings:
- High: The default setting applies a great deal of sharpness to the scene. Sometimes it looks fake. That’s because sharpness is added (along with other settings) while the image is being processed after you capture it.
- Medium: This setting is still sharp but provides a bit more realistic appearance to some situations.
- Low: This setting captures video with the least amount of sharpness but provides the most flexibility in postproduction.
Color
By default, your camera is set to GoPro Color, which is vibrant and saturated, and makes the video look great. When you’re trying to match what you shot on your GoPro with footage captured with another camera, it’s harder to match the color.
If you change the setting to Flatter Color, you can do more in postproduction, especially when you’re looking to match footage. If not, the GoPro Color setting works well.
Exposure compensation
Exposure compensation provides a little more control by telling the camera to adjust exposure above or below the normal automatic exposure setting. Figures 3-7, 3-8, and 3-9 show variations in exposure compensation. You can see how greatly they differ. You can adjust brightness only within the existing ISO limit. If brightness has already reached the ISO limit in a low-light environment, increasing it won’t have any effect. Exposure adjustments over a two-stop range in half-stop increments can be used to under or overexpose the scene.
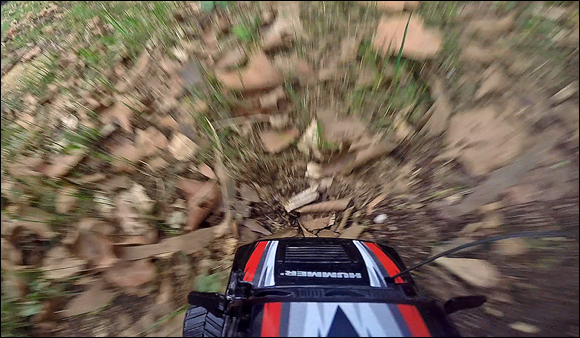
FIGURE 3-7: GoPro mounted to a radio-controlled car captured with normal exposure.
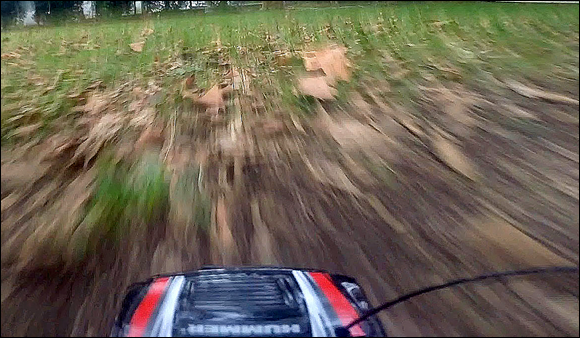
FIGURE 3-8: Captured with the +2.0-exposure compensation setting, the scene appears to be very bright (in photography terms, overexposed).
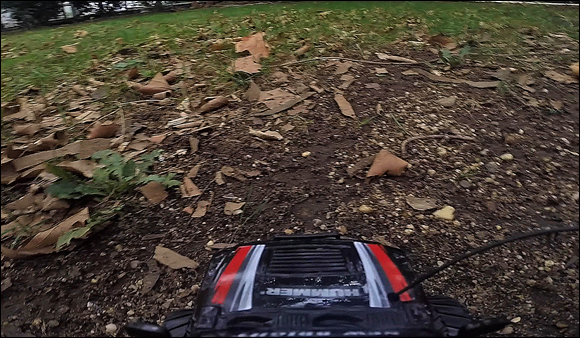
FIGURE 3-9: Captured with the –2.0 exposure compensation setting, the scene is darker than normal (underexposed).
Resolution
Protune gives you access to more resolutions and frame rates. While the HERO5 Black provides the most variations (see Table 3-1), other models offer a wide range of choices.
TABLE 3-1 Non-Protune Resolutions
Resolution | Frame Rate (fps) | Field of View |
4K / 4K (17:9) | 30, 25, 24 | Ultra Wide |
4K (SuperView) | 24 | Ultra Wide |
2.7K, 2.7K (17:9) | 60, 50, 48, 30, 25, 24 | Ultra Wide, Medium, Linear FOV |
2.75 (SuperView) | 30,25 | Ultra Wide |
1440p | 80, 60, 50, 48, 30, 25, 24 | Ultra Wide |
1080p | 120, 90, 60, 50, 48, 30, 25, 24 | Ultra Wide, Medium, Narrow |
1080p (SuperView) | 80, 60, 50, 48, 30, 25, 24 | Ultra Wide |
960p | 120, 60, 50 | Ultra Wide |
720p | 240, 120, 60, 50, 25 | Ultra Wide, Medium, Narrow |
720p (SuperView) | 120, 60, 50 | Ultra Wide |
WVGA | 240 | Ultra Wide |
Non-Protune capture settings
Non-Protune settings include the following:
- Camera Orientation: This setting lets you shoot the scene upside down, eliminating the need to rotate the video in postproduction. That means you are free to mount the camera and not have to worry about orientation.
- Spot Meter: This setting allows the camera’s automatic exposure to base exposure on a much smaller portion of the scene. Use Spot Meter when you’re capturing scenes in dark spaces with bright lighting, which can otherwise confuse the automatic exposure setting (see Figure 3-10).
Simultaneous Video and Photo: This setting lets you simultaneously capture video and still photographs. You can set the camera to take a still image every 5 to 60 seconds while recording video.
 Not all video resolutions support this setting, and you can’t use it while Protune is on.
- Looping Video: Like a security camera, this setting continuously records the scene. When space on the memory card runs out, the camera overwrites previously recorded content. You can alter the setting to rerecord after a certain duration (5 to 120 minutes). Like Simultaneous Video and Photo, this feature doesn’t work when Protune is turned on.

FIGURE 3-10: Spot metering allows you to capture accurate exposure in scenes with wide light disparities, such as this replica of the transporter from Star Trek.
Using Advanced Features
Delving deeper into your GoPro’s feature set can be as thrilling as finding spare change in your couch cushions. But unlike grabbing a few quarters that fell out of your pocket months ago, these functions help you find something else: cool stuff for capturing amazing imagery. And now there are new ones that make it even easier to capture time-lapse, night photography, and both together. For those times you wish to get right to the good parts to edit, the Hi-Light Tag lets you highlight your memorable moviemaking, literally. That’s the Hi-Light Tag, and it lets you mark important parts of the movie, while you’re shooting it, so that you can find it easily later.
Hi-Light Tag your best moments
This new feature provides the antidote for quickly finding key portions of your video, which comes in handy when shooting a lot of video. The relatively new function found on the HERO4 series as well as the Session models is easy to use, and incredibly efficient when it comes time to edit. This is important as media cards continue to get bigger and hold more content. The Hi-Light Tag simplifies the search by allowing you to add a marker to the footage making it easier to find and share it.
Like many other GoPro features, there’s more than one way to access and use the Hi-Light Tag function. You can access it from
- The camera: It’s the most basic way to use it, and simple too. Just start recording and press the Settings/Tag button on the side of the camera. While simple, it can also introduce vibration into the equation each time you touch the camera.
- The Capture app: When you pair it with your smartphone you can control all the camera’s functions and monitor the scene without touching it. Just tap the yellow button in the Capture app to tag each scene (see Figure 3-11).
- The GoPro remote: The remote allows you to tag important scenes by clicking the settings button — that’s the one that looks like a wrench — every time you want to highlight an important section.
FIGURE 3-11: Click the yellow button to tag each part of the scene.
Seeing the Hi-Light Tag in action
After importing the footage into GoPro Studio, every section you tagged is labeled with an orange marker, as shown in Figure 3-12. Just double-click on it, and it will open in a play window when editing in GoPro Studio. The yellow lines on the timeline make it easier to set in and out points for just what you need.
FIGURE 3-12: Highlighted clips show an orange marker.
Trying the Night Photo mode
The HERO4 and Session models provide expanded control over capturing night and low-light subjects with your GoPro (see Figure 3-13). This feature works for movies, still images, and time-lapse sequences. Basically, it allows you to select a longer shutter speed ranging from 2–30 seconds. Like many features on your GoPro, the Night Photo mode is accessible through the camera, remote, Capture app, and the touch screen display.
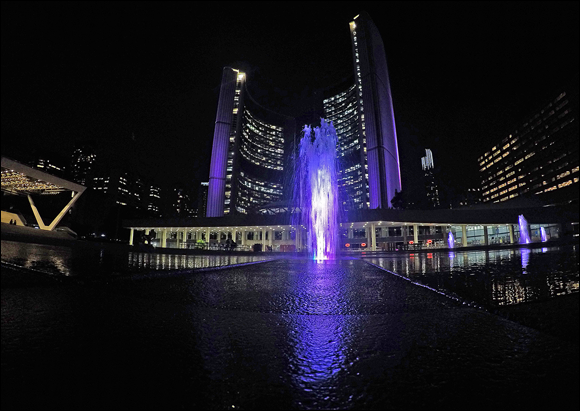
FIGURE 3-13: Night Photo mode allows you to take long exposure photos after dark.
Here are some useful tips when using the Night Photo mode.
- Keep the camera stable: Shoot in Night Photo mode just as you shoot in any other long exposure situation, and firmly mount the camera. Whether you’re using a traditional tripod, mounting adhesives, or a specialty mount, a steady camera is necessary for sharp, non-blurry imagery.
- Use in conjunction with Protune: Not only does shooting with Protune subject the video capture to less compression, thereby creating better imagery, it also lets you alter a variety of functions, including White Balance, ISO setting, and Exposure Compensation. Use these features to your advantage.
- Shoot a test exposure: Take advantage of your ability of the immediate gratification of viewing your footage after you shoot it. There’s no sense in investing all that time if you’re not going to make sure exposure, color, and composition are just right.
Accessing Night Photo mode by using the Capture app
You can access Night Photo mode on the camera, but sometimes using the Capture app is easier. It’s especially helpful when the camera is already mounted and you don’t want to touch it. You can also switch modes and make changes directly on your smartphone (see Figure 3-14).
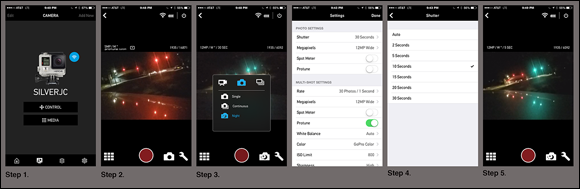
FIGURE 3-14: Using the Capture app to shoot a night photo.
To access Night Photo mode by using the Capture app, follow these steps:
Open the app.
After firing up the Capture app, and tapping Connect to Camera, tap the Control button on the Home screen.
Set the app to Night Photo.
At the bottom of the preview screen, tap the icon to the right of the record button. It reflects the last mode used, so it may look like a camera.
Select Night from the popup.
This mode will allow the shutter to record longer exposure times conducive for night photography.
Set the shutter speed.
Click on the wrench icon on the bottom right to change settings. Navigate to the Photo Settings and click Shutter. You can select a range for 2 to 30 seconds. If you’re not sure, select Auto, and the camera will decide the proper setting.
Now you’re ready to shoot.
Notice that the Night Photo mode is represented by a moon and stars over the camera icon.
Controlling the Night Photo mode from the camera
If you’re not using the Capture app, you can set the Night Photo mode on the camera by the doing the following:
- Press the Mode button and navigate until you get to the Photo mode.
Press the Settings/Tag button (that’s the one on the side of the camera).
Here you can access the mode of your choice for taking photos.
Press the Shutter button to change the mode to Night.
The default setting is single exposure.
- Press the Mode/Power button to select Shutter Speed.
Press the Shutter button to select the desired shutter speed.
You can select a shutter speed from 2–30 seconds. If you don’t, the camera will select a shutter speed automatically.
Shooting a time-lapse at night
Another cool feature on newer GoPro models is the Night-Lapse mode. This variation of the Time-Lapse mode lets you shoot time-lapse sequences at night or under extremely low light conditions. So how does it work? Basically, it’s the same function as a run-of-the-mill time-lapse, with one major difference: The shutter stays open longer. In the Auto mode, each frame is up to 2 seconds (depending on exposure) while in the Fixed mode, you can capture exposure durations between 2 and 30 seconds. In addition, it can capture single frame at intervals of up to one hour.
The photo shown in Figure 3-15 was captured by placing the camera on the hood of a car using the Suction Cup mount. The interval was set to one second, while the car moved at an average speed of 10 miles per hour, creating the illusion in the time-lapse of travelling more than 300 miles per hour.
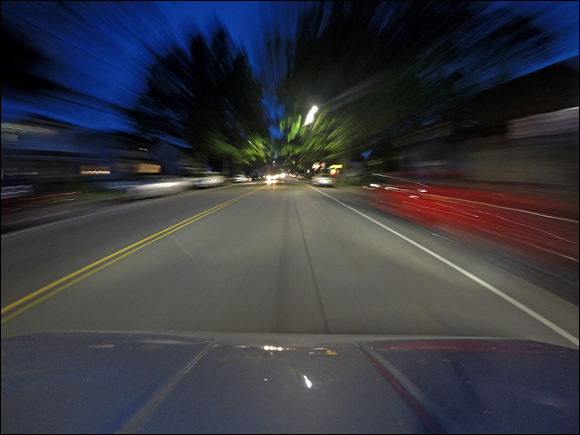
FIGURE 3-15: Using the Suction Cup mount on the hood of a car.
Access Night-Lapse mode through the Capture app, the touch screen display, or on the camera itself.
Here’s how to use it:
Open the app.
After firing up the Capture app, and tapping Connect to Camera, tap the Control button on the Home screen.
Set the app to Night Lapse.
At the bottom of the preview screen, tap the icon to the right of the Record button. It reflects the last mode used, so it may look like a camera or a stack of papers. Tap it, and then tap Multi-shot (the icon looks like a stack of papers).
Change the time interval.
Click on the wrench icon on the bottom right. It will bring up the settings menu. Navigate to Multi-Shot Settings and click Shutter. You can select a range from 2–30 seconds. If you’re not sure, select Auto, and the camera automatically selects the proper setting.
Make sure the shot is set up to your liking.
Now you’re ready to shoot. If you have questions on intervals and how long you need to shoot the time-lapse, see Chapter 5.
Start recording.
Press the Shutter/Select button to stop recording. The red status light flashes three times, and the camera emits three beeps to indicate that Time-Lapse mode has ended.
Controlling the Night-Lapse mode from the camera
If you’re not using the Capture app, and using at least a HERO4, you can set the Night-Lapse mode on the camera by the doing the following:
- Press Mode/Power and select Multi-Shot.
- Press Settings/Tag button (Multi).
- Press Shutter to change mode to Night Lapse.
- Press Mode/Power to find interval.
- Press Shutter to select the interval.