Chapter 13
Ten Fun Ways to Use Your GoPro
IN THIS CHAPTER
![]() Finding cool places to put your GoPro
Finding cool places to put your GoPro
![]() Making the most of your shoot
Making the most of your shoot
![]() Turning the GoPro on yourself
Turning the GoPro on yourself
The GoPro brings out your fun side faster than a New York Jets jersey gets your green eyes to pop, if you have green eyes. Anyway, this little wonder lets you take a fresh perspective on the world. You can put it anywhere your heart desires and get some pretty cool stuff. This petite wonder has changed sports and adventure video, because it lets you capture scenes in places where cameras weren’t always welcome.
In this chapter, you discover a fresh perspective for creating content, including putting the camera in places that were never “camera-friendly,” like in the water or up in the air. You can even attach it to your dog, or goat if you want, and see the world from his point of view. The sky is the limit when finding fun places for your GoPro.
Attach It to Your Bike
Ambitious riders have long been mounting cameras on their handlebars to record compelling video sequences. The GoPro can do the job too, with more options and from a unique perspective. And don’t worry about taking your hands off the handlebars to start and stop the camera, when you can speak verbal commands into the optional Remo voice-activated remote control.
Consider the following possibilities:
Helmet mount: This mount allows you to attach the GoPro on your bicycle helmet. Wear the camera as you zip down bike paths or mountain trails, giving the viewer a truly authentic rider’s-eye view.
 On the downside, the GoPro will capture motion from both the bike and the rider.
- Pro Handlebar / Seatpost / Pole Mount: This mount lowers the perspective and keeps the camera steady while providing the bike’s point of view. You can swivel this versatile mount 360-degrees for unique perspectives. So, turn it around to get the rider’s point of view, as shown in Figure 13-1. Its quick clip makes it easy to attach and remove. And don’t worry about the bar size, as it supports different diameters.
- Time-Lapse video at night: Point the camera at yourself and ride through a well-lit area, such as a busy downtown area at twilight. Keep the footage stable with an optional handheld gimbal or mounting on your Seeker backpack for super smooth footage.
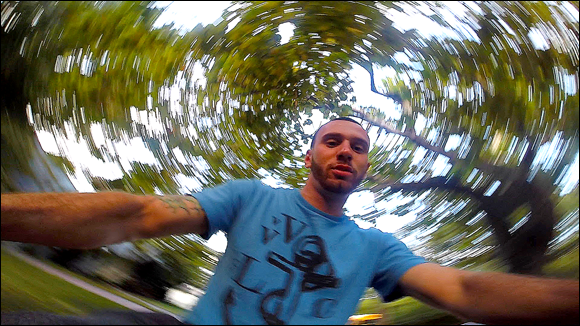
FIGURE 13-1: GoPro on a roll bar mount.
Take GoPro in the Snow
The GoPro enables a new generation of family documentarians, extreme-sports aficionados, and ambitious filmmakers to cover winter sports and activities with relative ease and little worry about the equipment.
Here are some of the cool ways you can use your GoPro in the cold:
- Ice skating: Mount the camera to yourself, using one of the body mounts (headband, helmet, Chesty, and so on), and get a fresh view of a day at the rink.
- Sledding: Attach the GoPro to yourself or your sled to capture the sensation of flying down a snowy hill.
- Snowboarding: You wear your GoPro with the helmet mount or on your back with the Seeker backpack. It provides three mounting options while carrying your stuff at the same time.
- Skiing: Mount the camera on yourself or use the 3-way pole to produce your own exciting ski video. Other options include mounting your GoPro on the Seeker backpack or attaching it on your ski pole with the Pro Handlebar / Seatpost / Pole Mount.
- Snow tubing: The helmet or headband mounts work great for this purpose, letting you capture the rush of going down the mountain. Shoot the scenery, or turn the camera around to record your buddy’s expression.
- Put it on a RVC: Some radio-controlled vehicles are powerful enough to trudge through the snow. For Figure 13-2, one of the adhesive mounts was attached to the vehicle, then the camera was slid into the mount. For stabilized footage, use the Karma Grip gimbal to create amazing footage.
- Snowman time-lapse: Mount the GoPro nearby and get to work on Frosty. You can mount the camera to a tree or use the tripod mount. Later, over hot chocolate, watch your hour-long effort in 45 seconds. You can also mount the GoPro on a warm day to capture the hours-long melting process in less than a minute. Use a portable power pack for longer durations.
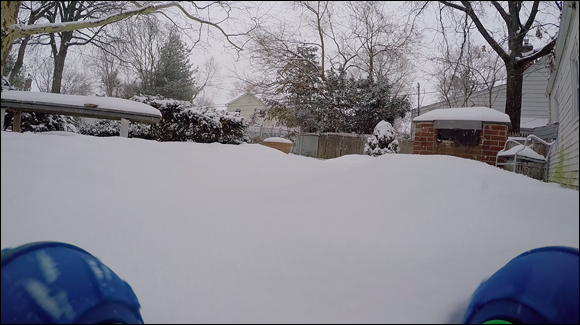
FIGURE 13-2: This snow scene was captured at ground level.
Explore Underwater
Maybe you’re not an accomplished oceanographer, but you still desire to be the Jacques Cousteau of your local swimming hole. If so, the GoPro is ready, willing, and able to capture your views of the underwater world.
Here are some cool ways to take underwater photos and videos:
- Swim with it. Take the GoPro underwater, and mount it to your body with the Chesty body harness or hold it as you navigate the deep. You can use it while snorkeling, scuba diving, or simply taking a dip in a pool (see Figure 13-3).
- Use an extension pole underwater. By attaching the camera to a pole like 3-way or the Handler and submerging it, you can get great underwater footage at a beach, pool, or lake.
Mount it underwater. Use an existing mount, or jerry-rig your own; then put it in a pool or a shallow lake.
 Just be careful that the GoPro doesn’t get swept away and become a hazard to others. That’s why it’s a good idea to use the Floaty Backdoor so the camera can float if it breaks free.
- Shoot at the surface. Catch a rider on a boogie board, your mom on her raft, or the players in a water-polo match. Attach GoPro to your arm or hand with the Strap to capture with ease.
- Monitor it with your smartphone. Because most GoPro cameras don’t include a viewfinder, and you don’t want to get your smartphone wet, you can monitor the footage from the sidelines (in other words, away from the water).
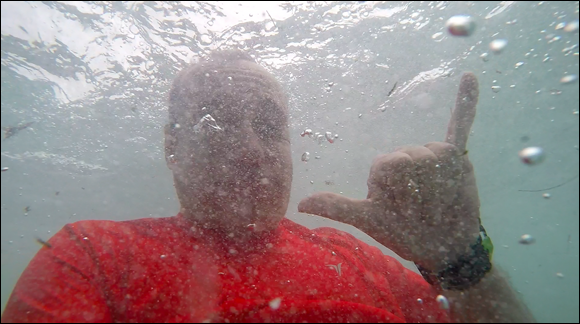
FIGURE 13-3: Capturing a selfie under a big wave at La Jolla.
Make the Coolest Selfie
The selfie is quickly becoming one of the most prominent ways to take a portrait. Thanks to the wide-angle view of your GoPro, the camera lets you create some interesting moving or still selfies.
Here are a few pointers for getting the best results:
- Make the shot flattering. More appropriately, keep it from becoming unflattering. The GoPro’s wide-angle lens can distort your appearance, and holding it too low and close to your face can make your nose look like a weapon. Instead, hold it at just above eye level, perpendicular to the ground.
- Know yourself. What’s your good side? If you know it, make sure that you shoot it.
- Make sure that the light works. Opt for soft directional light, as shown in Figure 13-4. Also, make sure that the background is not busy or too bright.
- Mount the camera on an extension pole. You can make a fun shot by extending the camera at an angle above you or your group with the GoPro 3-way or the Handler.
- Shoot on Burst. Press the shutter once and get a bunch of shots. This works especially well with group selfies and can improve the chances that everyone has a flattering expression.
- Use your smartphone as a monitor. Here’s something a little different: Hold the GoPro and keep your smartphone in view so that you have some idea how the shot will turn out.

FIGURE 13-4: A GoPro selfie taken on a red carpet.
Walk through a Crowded Space
Capturing video of walking through a crowd isn’t easy with a conventional camera. GoPro changes that situation, thanks to its small dimensions and wide view. You have lots of ways to move through a crowd with a GoPro attached to a headband or chest mount.
Here’s how to use these mounts effectively:
Head Strap plus Clip: The GoPro is almost small enough that you can walk through a crowd with it unnoticed.
 Try mounting the camera on your headband and looking behind you. This technique can provide some funny, compelling footage, especially when people get too close to you. You can monitor the scene by watching it on your smartphone.
- Chesty (chest harness): Also known as the Chesty, this mount holds your GoPro at chest height, providing a slightly different perspective. (See Figure 13-5.)
- Wristband or Strap: Both mounts let you grab shots to the side and shoot from the hip by holding the camera low and directly in your path. This technique helps you create some unique GoPro imagery.

FIGURE 13-5: Walking onto the field for the big game provides an interesting perspective.
Take It Out on an ATV
If offroading is your thing, the GoPro can help you capture some great footage from your All Terrain Vehicle. Don’t worry about the mud, sweat, and tears; the camera thrives under these conditions and handles them all with dignity.
Check out the following options for using your GoPro on an all-terrain vehicle (ATV):
- Mount it on a roll bar. GoPro makes a mount specifically for this point of view, the Large Tube mount. Mount to handlebar with the Pro Handlebar / Seatpost / Pole mount or use the 360-degree swivel QR base to rotate the camera for new perspectives.
- Put it on the bumper. This vantage point provides a rugged almost-ground-level view of the terrain, allowing the viewer to experience the excitement. You can also mount the Karma Grip gimbal to your vehicle for super smooth footage. See copy deck.
- Place it on a road course. If you’re traveling a specific road course, put a GoPro at a strategic location to get a unique perspective. (Just be careful that you don’t run over it.) Use a tripod or mount to a tree with Large Tube mount.
- Use multiple cameras. Mount a camera inside the vehicle to show the driver; then mount other cameras on the roll bar, bumper, and even on the course to capture multiple points of view. Control them all at the same time with Smart remote.
Wipe the lens after each take. There’s nothing worse than having a great capture and finding goop on the lens.
Shoot the View from the Sky
If you like flying remote-control planes as much as you like making cool videos, you’ll love flying your GoPro on a quadcopter. See section about the Karma drone.
Here are a few cool ways to capture airborne video:
- Fly it near fireworks. If you fly the quadcopter in safe areas (not over a large crowd or near a helicopter, for example), you can take an exciting new approach to filming a firework display.
- Get an overhead shot of the beach. Flying the GoPro over a beach can create interesting views of the sun and surf.
- Capture your town from above. It’s cool to look at a place you know well from an uncommon view. Capture everything from Main Street to your street for a fun and exciting video.
Abide by the rules. Always keep your quadcopter in your sight. Never fly it around another airborne vehicle or near an airport. And respect other people’s privacy.
Get a Dog’s-Eye View
If you have a big-enough dog (20–120 lbs.), you can mount the camera on him to get the canine version of a bird’s-eye view (see Figure 13-6). You have a few ways to mount the camera, with the best using the GoPro Fetch mount, which is designed specifically for your four-legged pal. Of course, fitting a small chest harness to the dog seems to work well too. It may take a few adjustments to get the harness to fit snugly (and for the dog to get used to it, but that’s nothing a few treats can’t fix).
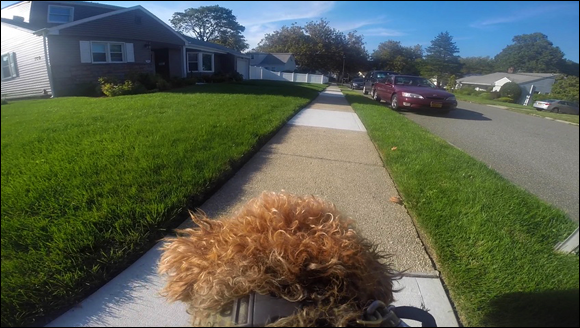
FIGURE 13-6: Dog’s-eye view — well, sort of!
When the camera is mounted and on, just let your dog do his thing. The camera is lightweight, and if you mount it properly, it shouldn’t cause the dog any discomfort. Also, mount your GoPro to a toy or stick with the handlebar mount for a new perspective of your dog playing or performing tricks.
 Try to shoot at a frame rate of 60 frames per second (fps) to compensate for the constant motion. Control the camera with Remo or Smart remote seeing as though you can’t press the shutter on a moving dog.
Here are some ideas:
- Get a dog’s view of the dog park. Watching your dog interact with his canine buddies puts you right in the middle of the action.
- Play fetch. The time-honored game takes on new, exciting meaning when you see exactly what the dog sees.
- Take your dog for a swim. If your dog likes the water, the GoPro is ready for the challenge, providing some interesting footage.
When you’re done with the shoot, have a treat ready!
Make a Time-Lapse Movie
It’s cool to shoot a bunch of still images to create a time-lapse movie. GoPro makes the process easy, with a special mode dedicated to time-lapse capture. You can speed up the world at the interval of your choosing for fun, or study changing scene over time. Shoot a sequence that shows a parade of commuters walking into the subway or fans filling a stadium, or record an expedited version of your child’s Little League game. (Sometimes it’s wishful thinking for a game to be that short.)
To make a time-lapse video, you need the following:
- Proper settings: Make sure that your GoPro is turned to Time-Lapse mode and set to the desired interval.
- Sturdy mount: Whichever mount you choose, make sure that it’s sturdy and located away from excessive vibration.
- Freshly charged battery: The GoPro’s battery doesn’t last long, so when you’re running the camera for an hour or so, you’re at risk of a battery failure. Also, consider using the Portable Power Pack to charge your GoPro during an extended time-lapse.
- Something to help pass the time: Although time-lapse recording produces an exciting effect, creating that recording isn’t too exciting. Depending on how long you plan to capture frames, bring along a book and maybe a chair. Come to think of it, bring a beverage and a snack, too.
Capture Your Own Band from the Stage
The GoPro provides an all-access pass to the center of any stage performance. Give the audience a perspective that only the band gets to see by using the removable instrument mount to capture footage right onstage.
Here are some of the places that a GoPro can go during a performance:
- Guitar: Mount the camera on the headstock with the Arm, and position it to show the guitarist’s fingers working the frets (see Figure 13-7). Put it on the guitar’s body with a gooseneck mount to show the player picking. Turn the GoPro around to capture the rest of the band with your “guitar cam.”
- Drums: If the drummer has enough space to drum, you can put the removable instrument mount anyplace. Use the gooseneck or jaws mount, depending on what you’re trying to show.
- Keyboards: Put the camera above the keys to show a close-up and nicely distorted view of the keyboard player’s hands.
- Microphone stand: Put the audience right in the middle of the action with a view from the microphone.
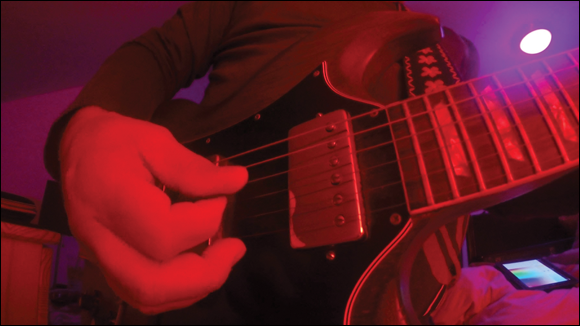
FIGURE 13-7: View of the frets from the neck down.