Chapter 2
Accessorize Me
IN THIS CHAPTER
![]() Choosing the right media card
Choosing the right media card
![]() Taking your GoPro underwater
Taking your GoPro underwater
![]() Mounting your GoPro
Mounting your GoPro
![]() Making your GoPro wearable
Making your GoPro wearable
![]() Ensuring a good charge
Ensuring a good charge
Think about the potato for a second. The tuberous nightshade vegetable lacks the flavor that it has when it’s cooked and spiced. Well-prepared potatoes are a much-loved food source that sometimes we love too much (thank you very much, French fries) and at other times just enough (boiled potatoes, you know who you are).
In a strange way, GoPro alone has much in common with a potato. Just as you can eat a raw starchy potato by itself, you can use a GoPro without any accessories. You can still make great movies and pictures with it, but mounts and accessories enhance the experience for sure. This is especially true when it comes to putting the camera in unusual places as well as creating unique perspectives.
GoPro seems like quite the accessory hound, but it already includes the vital accessory: the waterproof housing. That’s just the tip of the iceberg. Dozens of other accessories allow you to blaze new trails and do either the wildest or most practical things you can imagine.
Playing the Media Card
It’s important to make sure you can capture the action by using the right media card. Just as your grandmother used the very best grated cheese for her lasagna, you should use a microSD card that’s optimized for video capture.
 Not just any media card will do. Forget about capturing a continuous movie in high definition (HD) if you’re not using the right type, and if you have your heart set on capturing 4K video, the plot thickens. Capacity plays a big part (as you see in this section), but speed matters most.
Observing the speed limit
Because media cards have so many uses, the capacity of a card and the speed at which it transfers data will vary. Regardless of which kind of card you’re using, here’s a breakdown of the Speed Class Rating system, a system created by a consortium of manufacturers. You can find more information at www.sdcard.org.
- Class 10: 10MB per second
- Ultra High Speed, Class 1: 10MB per second
- Ultra High Speed, Class 3: 30MB per second
- Video Speed Class: From 6–90MB per second
Checking card capacity
HD movie files are large, and the 4K ones are even bigger. That’s why it’s important to have a large-capacity card so it doesn’t fill up sooner rather than later. Today, microSD cards continue to increase in capacity while going down in price. But sometimes the difference in price between using the right card and a slower one isn’t that much different. That’s why you should purchase the card based on its speed and storage, and not because of its cost.
Not all UHS cards are created equal. They represent the minimum speed requirement, so even cards from the same manufacturer differ in speed.
Here are transfer speeds for a few popular cards that you can use with your GoPro:
- Lexar 633x UHS I: This card comes in several sizes ranging from 32GB to 200GB and offers a maximum transfer speed of 95MB per second.
- Samsung Pro Plus: This media card has capacity up to 128GB and transfer speed up to 95MB per second.
- SanDisk Extreme Pro: SanDisk’s Extreme Pro comes in two sizes: 64GB and 128GB. This card is incredibly fast, with a write speed up to 100MB per second, and read speed up to 275MB per second.
GoPro can capture 4K video, with four times as much detail as HD. With great quality, however, comes great size. Capturing 4K video requires a fast, high-capacity card, because 4K takes up far more space than HD does. How much depends on the frame-rate setting. Regardless, 4K video is going to take up more than half of the capacity of the card, so a 32GB card with 4K video on it will hold less than a 16GB card would for the same amount of video capture.
Choosing the right card
The best type of card for you depends on what you’re trying to do and on your budget. Still-image capture requires less transfer speed than video does, so if you don’t have the fastest card, you can still get by. When you’re shooting HD movies, though, you need a card with a write speed that can keep up with movie capture. Using a low-speed card is like having slow workers on a factory assembly line; it makes the operation less efficient.
 GoPro recommends SDHC cards with a minimum Class 10 rating. Slower cards, if you happen to come across them, will work, but they process moving images less efficiently. Also, there’s always a risk that a slower card will lag and stop recording. Worse, you could lose data with a slow card. If you’re doing 4K, consider UHS Speed Class 3 cards for seamless capture. They’re the most expensive cards but are designed for the fastest transfer rates.
Managing media cards
Unlike calling a bald guy “Curly,” or a large person “Tiny,” there’s nothing ironic about a microSD card. They live up to their name as being a small media card. Not just small, but the kind of small that’ s easy to misplace in plain sight. Yet, it’s amazing how much data these little memory devices can hold. But it’s also possible to easily lose and misplace them because of this size, as shown in Figure 2-1.
Here are some suggestions to keep track of your cards.
- Always have a card in the camera: There are a few reasons for taking the card out of the camera, including to connect to a card reader or switch for a different size card. If you remove the card from the camera, be sure to put it back.
- Keep extra cards in their case: I cannot overemphasize that these cards are small and can easily get lost. And when you consider the cost of some of the bigger, faster ones, you have a lot to lose if you’re not careful.
- Delete after downloading: After you securely save the content of your card, purge the card. There’s nothing worse than being on an important shoot and running out of space because you have last summer’s water balloon fight still on the card.
- Format the card regularly: Think of it as “super” erasing the data on the card. Merely deleting files still leaves extraneous traces of data on the card, while formatting removes everything, allowing you to capture on a fresh data-free card. You don’t need to do it every time, but before each important shoot.
- Organize your cards: Don’t forget that “micro” in a microSD card means it’s small. That’s why it’s a great idea to store and organize it in a card caddy. If you don’t what to be so formal, a small box or a Ziploc bag can work for you.

FIGURE 2-1: The microSD card is as small as a dime.
Letting the GoPro Get Wet
One of the main reasons to buy a GoPro is to be able to take it into the sloppiest of conditions with little worry. You didn’t have that choice with other cameras. Taking a conventional camcorder through a swamp or shooting upward during a torrential rainstorm isn’t in that device’s best interest. Chances are that you’d burn it out. Most conventional cameras and especially the electronic ones don’t like the wet stuff.
Being able to go underwater makes the GoPro as refreshing as a cold glass of water or a swim on a hot summer day, and you can adequately capture each of those locations from the inside out. Isn’t it nice to have a camera that has the same tolerance for wet conditions as your diver’s wristwatch? Feel free to get it wet. One more thing; if you’re not using the HERO5 or Session, don’t take it in your bathtub without the waterproof housing, and make sure you don’t have the Skeleton backdoor on. That one’s not waterproof.
The HERO5 Black comes with an LCD screen that lets you view the scene on the camera under wet conditions. If you’re using an older model, you can attach the optional Touch BacPac.
Using underwater accessories
If you’re looking to record underwater seascapes or artful pool pictures, GoPro lets you easily capture submerged scenes. Whether you’re using the new HERO5 models, or a previous generation model, you can capture underwater scenes with relative ease and little worry.
The HERO5 Black comes with a built-in LCD screen making it possible to monitor and frame the scene right out of the box. Previous versions are a little more challenging, when it comes to viewing the scene. Normally, you would monitor the scene with your smartphone (see Chapter 1), but that’s not feasible for underwater recording because of the whole water-is-wet thing. So, there’s a little more guessing involved. Of course, you could also attach the optional Touch BacPac (see the next section) on most HERO models, Session excluded. The Touch BacPac allows you to monitor the scene from the back of the camera, but it’s submersible only to shallow depths, and the touch panel won’t work underwater.
Here are some accessories to consider for underwater recording:
- Antifog inserts: These inserts drop into the camera’s housing to prevent fogging in cold and humid environments. You can reuse them several times by drying them out in a 300°F oven for 5 minutes.
- A big media card: You can’t change the card underwater (or anywhere that’s even slightly moist, for that matter), so it’s a good idea to use the biggest one you can afford.
- Color-correction filters: Underwater scenes are beautiful, but they have blue or green casts. An optional color-correction filter in red or magenta can reduce or eliminate the cast.
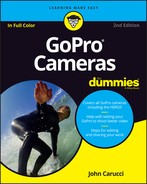
- Floaty Backdoor: This accessory attaches to the back of the camera and keeps it afloat in case you accidentally let go of it while taking an underwater selfie (see Figure 2-2). Any time you play in the water, there’s a risk that the camera will take more of a plunge than you’d like. Thanks to this bright-orange back, however, you’ll have no problem spotting it in the water.
- Dive Housing: The waterproof housing that comes with the camera works well for most underwater situations, but if you want to take the camera deeper, consider this housing. It’s more durable than the standard model and is waterproof to 197 feet (60m). The kit includes Standard, Skeleton, and BacPac backdoors. Its increased durability makes it perfect for more serious diving encounters. And its glass lens delivers optimal sharpness in and out of the water. While the HERO5 Black is already waterproof to 33 feet, to go deeper requires the optional Dive Housing.
- The Handler: The handgrip provides stability when holding the camera. It’s great for use in and out of the water, and will float if you accidentally drop the camera.
- Scuba mask: The GoMask is a cool third-party accessory that lets you wear the camera on your face while snorkeling or scuba diving so you can see what you’re capturing.
- Video lights: You can get a complete light system that mounts on a rack with your GoPro and provides up to 900 lumens of illumination for densely lit underwater scenes.
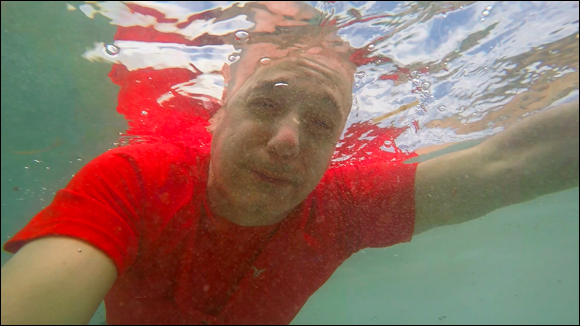
FIGURE 2-2: Having the Floaty Backdoor is a smart idea when taking your GoPro in the water for an underwater selfie.
Going deep
GoPro plays equally well in and out of the water, with the HERO5 Black and HERO5 Session no longer requiring a waterproof housing. Previous models come with a waterproof housing that can withstand depths of up to 131 feet (40 m). For these models, you can leave the housing on the camera when you’re using it for non-water-based fun. (You need it for some mounting options, because they attach to the housing. But I’m talking about waterproof situations in this section.)
Two backdoors come with your GoPro (except for the HERO5): The Skeleton, which provides good sound quality, and Standard, which is waterproof.
 Make sure that you have the Standard backdoor on when you use your GoPro underwater, because much like the name implies, the Skeleton isn’t waterproof.
Here are the maximum depths your GoPro can reach with a couple of other accessories:
- HERO5 Black and HERO5 Session: Both waterproof on their own to depths up to 33 feet (10 m). The optional Dive Housing lets you go deeper.
- Dive Housing: This accessory increases the GoPro’s depth rating to 197 feet (60 m) for HERO5 Black.
- Touch BacPac Backdoor: Although it lets you monitor the scene from the camera back, you can’t use it deeper than 10 feet (3 m).
Checking your camera before getting it wet
Anytime you plan to take your GoPro in or near the water you need to be sure everything is correctly set before you place the camera near water. (See Figure 2-3). So, before taking it for a dip consider the following:
- Have enough room on the microSD card: Remember, if you run out of storage, you can’t change cards in the water.
- Make sure it’s clean: Not only do they say it’s next to godliness, but keeping the glass in front of the lens clean will assure you capture clear and sharp images. The Anti-Fog inserts can help here.
- A test case: This applies to older models that require a waterproof housing. Yeah, it makes the camera waterproof, but isn’t it nice to be reassured? So, without the GoPro inside, close it up and submerge in water, as seen in Figure 2-3. After a brief soak, dry the outside completely before opening and see if it’s wet inside. Also, make sure the camera is fully sealed: Push the housing backdoor all the way in before securing the black latch on the top of the case.
- Rinse off salt water: If you’re going to take it to the beach, on a dive, or any situation involving salt water, it’s always a good idea to rinse the camera and accessories with fresh cool water. The salt can get caught in the case and around the lens, causing rust on the metal parts and a salty coating over the lens.

FIGURE 2-3: When using a HERO4 or older model, it’s important to make sure the housing is water-tight.
Remo (waterproof voice-activated remote)
Not only can you command your GoPro HERO5 with your own words, but you can do it from a distance using the optional Remo voice-activated remote. Don’t worry if you’re in or near the water, since the remote is waterproof, just like your GoPro. And if you don’t feel like talking, it acts as a one-button remote.
Here’s the lowdown on what it can do:
- Works from a distance: You can be up to 32-feet (10m) away from the camera and command it to capture the scene.
- Wear it: Much like a brooch, you can talk to Remo from your lapel (or any place else on your clothing) or a wristwatch, and wear Remo with the included clip and wrist housing.
- Easy commands: Understands 13 commands that allow you to shoot video, take still photos, and change settings.
- Enhances camera use: Even when GoPro is close to you, Remo helps enhance the voice control when the conditions are noisy or windy.
- Waterproof: Not only can you use it in the water while swimming, surfing, or doing whatever you like to do in the water, the HERO5 is also waterproof up to 16 feet.
- Multi-lingual: Can understand 10 languages, including English, Italian, Japanese, Chinese, and German.
Keeping the Shot Steady
The ability to place your GoPro almost anywhere makes it a pretty remarkable camera. But to capture all that action and those cool perspectives with little worry, you need to keep the camera steady. The GoPro isn’t like any other camera; it’s tiny and, except for two models (the HERO5 Black and HERO4 Silver), it doesn’t have a viewfinder. Holding it in your hand to take a picture or make a movie is the textbook definition of haphazard, because you can’t see what you’re shooting or hold the camera comfortably.
You can mount a GoPro on a tripod or on any of the dozens of mounts designed for the GoPro. In this section, I give you an abridged tour of some exotic and basic mounts.
Mounting your GoPro out of the box
When you take the camera out of the box, you’ll notice that it comes with some hardware:
- The Frame: Also includes Mounting Buckle & Long Thumb Screw.
- Flat adhesive mount: Makes it easy to connect your GoPro to any clean, flat surface. When the camera is attached to the quick-release buckle, it slides right into the mount.
- Curved adhesive mount: Looks a little like the flat mount but is designed for curved surfaces.
Using a tripod (with an adapter)
For a good part of the camera’s 200-year history, the tripod has been the photographer’s best friend when it comes to keeping the camera steady and composing the scene. For almost as long, cameras have had a standard socket for attaching to a tripod. Yep, the three-legged amigo has made all the difference between crisply shot movies and a shaky mess.
One problem with the GoPro is that it doesn’t have a tripod socket on its bottom, so there’s no built-in way to secure the camera to a tripod. No worries. You can still mount it with a special accessory that attaches to your GoPro and provides a standard tripod socket. This accessory also has a quick-release mount that allows you to move the camera conveniently between shots and locations. The GoPro looks comfortable when mounted on a flexible GorillaPod, for example (see Figure 2-4).
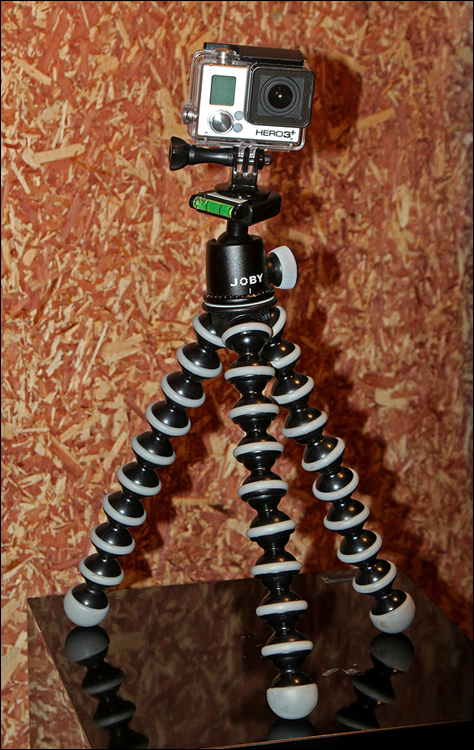
FIGURE 2-4: Tripod adapter connects a GoPro to your three-legged friend.
Getting Framed
When using an older model GoPro, you can leave the camera in its waterproof housing for most situations, but sometimes you may want to shoot outside of the case. The Frame comes standard with the HERO5 models, as well as being a cool accessory for older models. It allows you to place the camera in a frame, as the name implies. The open design delivers optimal audio capture, providing it’s not an activity that puts the camera too close to the noise. The integrated latch makes removing your GoPro from the Frame quick and easy. You also have open access to the camera’s microSD, Micro HDMI, and USB ports for easy data offload, live-feed video, and charging.
Here are some reasons for using it:
- Not bulky: Because it fits around the camera, it doesn’t add size to the camera like the waterproof housing.
- Better audio capture: Because the microphone is not obscured by the case, you get the clearest sound reproduction.
- No waterproof housing needed: Provides immediate access to camera ports for downloading data and live-feed video.
- Protective glass lens: Prevents the camera lens from getting dirty or scratched.
- Extendable support arm: Lets you easily attach accessories like the LCD Touch BacPac or Battery BacPac.
Choosing your mounts wisely
There’s a mount specific to whatever you’re looking to do with your GoPro, from surfing, skateboarding, playing music, or wearing it like a fashion accessory.
Using suction cups
When you think of mounting your camera with suction cups, secure placement isn’t the first thing that comes to mind. The first thing is “I hope it stays on,” as you worry that the cup will lose suction and the camera will fall off.
Not gonna happen. The industrial-strength suction cup mounts attach the camera to almost any flat, clean surface and even the hood of a moving car, as seen in Figure 2-5. How reliable are they? These mounts have been engineered to withstand a broad range of motion at speeds more than 150 mph. It’s a good idea for your GoPro to be in its waterproof housing to provide extra protection.
FIGURE 2-5: It’s easy to securely mount the suction cup to an automobile hood.
Using the Jaws Flex Clamp
“Jaws Flex Clamp” sounds like a sequel to the shark thriller, but this accessory lets you attach your GoPro to anything it can bite … er, clip. The mighty little clamp lets you attach the camera to a variety of objects up to 2 inches thick. You can mount the camera directly on the clamp, or attach it to the optional gooseneck to accommodate a wider range of camera angles.
2-Way
You can use this mount, shown in Figure 2-6, in three ways: as an extension arm, camera grip (when detached from the arm), and tripod. This cool mount expands to 20 inches and collapses to 7.5 inches, and it’s waterproof, making it perfect for traveling, hiking, or for selfies and group shots. You can even use it in and under the water.
Handlebar/Seat Post/Pole Mount
It’s basically a bar mount. No, not the kind for capturing a movie at your favorite watering hole, though it’s entirely possible to put one of these mounts around a beer tap or stool leg. This mount allows you to attach your GoPro to just about any kind of tube with a diameter of 22.2mm to 35mm (.9 to 1.4 inches) and bicycle handlebars and seat posts are the more popular choices. So you can get views both coming and going. But that’s not all, as you can use it on any other tube it fits. And did I mention that it also rotates 360° for unlimited capture options? Well it does.
Put the camera on the handlebars on your bike or motorcycle, or a windsurfer or ski pole. Mount it on any pole that it will fit.
Pro Seat Rail Mount
Let’s you hang the camera on back of your bicycle seat to capture a rear-facing camera perspective. (See Figure 2-6.)
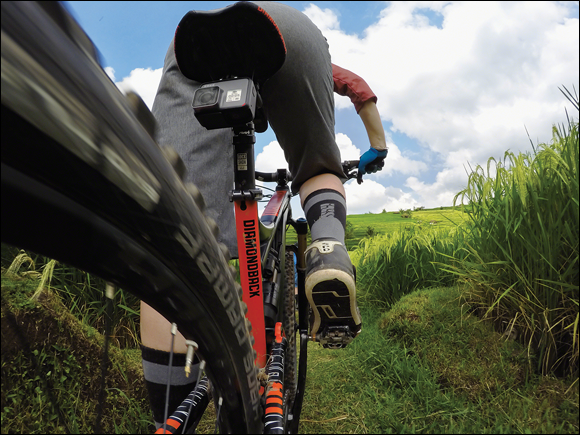
Photo courtesy of GoPro, Inc.
FIGURE 2-6: The Pro Seat Rail Mount lets you hang your GoPro for a rear view.
Large Tube Mount
This hinged mount is perfect for thicker bars – you know, those from 1.4 to 2.5 inches in diameter. This covers vehicle frames, like on go-karts, as well as cars with roll bars. But it attaches to so much more, like a soccer goal, kayak oar, bicycle frames, and any other tube it fits. With a push of a button, its integrated base allows you to rotate to 16 locked positions for 360° versatility.
Swivel Mount
The GoPro version of the ball-head mount provides a great deal of flexibility when it comes to orienting the camera. Instead of using the articulation arms that come with the camera, this mount uses a ball and socket that freely moves and can be locked into any position you decide.
Gun/Rod/Bow Mount
Easily attach your GoPro to sporting equipment such as a fishing rod, hunting rifle, bow or just about anything with a diameter of 0.4 to 0.9 inch. This multipurpose mount has a matte black finish to eliminate glare, and it’s compatible with most rifles, paintball guns, and revolvers. It also fits your fishing rod and bow components. You can also mount a second camera to capture both front-facing and rear-facing perspectives.
Musical mounts
Almost since the beginning of photography, musical performances have been captured from the outside, and the resulting footage often has a two-dimensional appearance. Musicians don’t want a clunky camera intruding in their performance space. But the GoPro can go where other cameras can’t, thanks to a few mounts specifically designed for music:
- Microphone-stand mount: This dandy little device transforms a microphone stand into a tripod of sorts. It’s compatible with standard microphone stands when you use the included adapter. It comes with a quick-release base that allows you to move the camera between mounts and locations.
- Instrument mount: If you’re looking to get a little closer to the action, opt for a removable instrument mount, which allows you to attach your GoPro to a guitar, bass, drums, or keyboard. You can even mount it on a turntable, if spinning vinyl is your jam. These temporary mounts have non-damaging adhesive that’s safe for most instrument surfaces. The kit includes three mounts (reusable) and two single-use adhesive strips.
- The Arm: Allows you to mount your GoPro to almost anything, including this guitar, as seen in Figure 2-7. It can be used on guitar headstocks, keyboards, horns, or any other instrument you can clamp it on.

FIGURE 2-7: The Jam showing the action from the neck down.
Wearing Your GoPro
First, the fashion was skinny jeans; then it was iridescent shoe soles; now it’s wearing the GoPro like a fashion accessory. Perhaps the only fashionable aspect of wearing a GoPro is the ability to capture great video with an interesting perspective. Regardless of the trends of the day, great video is always in vogue.
GoPro offers a bunch of wearable mounting options that may not improve your attire but can certainly make your movies look better by showing a truly POV perspective (see Figure 2-8). POV stands for point of view, and it’s yours that the viewer will see.
Why wear your GoPro? Because you can. More important, it’s more feasible to mount the camera than to try to hold it. For one thing, your hands are a little too big for it. That makes taking pictures or shooting movies not much different from going to your 5-year-old niece’s tea party with her dolls and drinking out of those tiny cups.
Another dilemma in holding the camera is that the angle of view is so wide, it’s easy to get your hands, nose, or other parts of your body in the shot and because most models lack a viewfinder, you won’t know until it’s too late. That problem is exacerbated when you try to use your smartphone to view and realize that you’re a hand short. For those times when handholding is necessary, consider using the Touch Display (if your GoPro has it) or the optional LCD Touch BacPac; both allow you to monitor the scene on the camera.
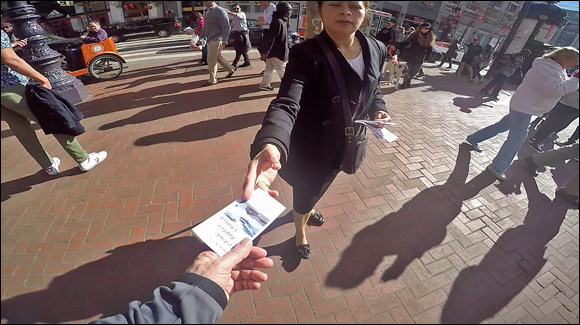
FIGURE 2-8: A POV shot taken while walking down the street.
The following sections cover a few accessories that can help you use your GoPro hands-free.
Headband mount
If you want to capture video from the perspective of what you’re seeing and want to look something like a coal miner too, this mount is for you. The fully adjustable strap allows you to attach the camera to your head or a helmet to capture footage from a headlamp-like perspective. Thanks to its design, you can also put it on a baseball cap.
Helmet mounts
Helmet mounts come in several configurations. If you’re going to use this mount while riding a bicycle or motocross bike, always select a helmet that meets the applicable safety standard when you use it with a GoPro helmet mount.
GoPro offers several helmet mounts, including these:
Helmet mount: Whether you take your GoPro on a motorcycle ride down a country road or zip down a windy trail on your mountain bike, this mount allows you to record the view from atop your head, as shown in Figure 2-9. The camera sits on the helmet like a headlamp, letting you capture forward-facing footage. You can adjust the extendable arm so that the camera faces you for self-portrait videos and photos.
This mount uses a special adhesive that can be removed only by heat from a hair dryer.- Vented-helmet mount: Instead of using adhesive to hold the camera in place, this mount uses straps to attach the camera to any vented sports helmet. The adjustable strap makes mounting the camera quick and easy.
- Helmet front and side mount: You can do more than just attach your GoPro to the side of a helmet with this mount. It also works well on vehicles and other moving objects. Three-way adjustability makes aiming the camera easy.
- Night-vision mount: This mount allows you to attach your GoPro to a helmet that includes a mounting plate for Night Vision Goggles.
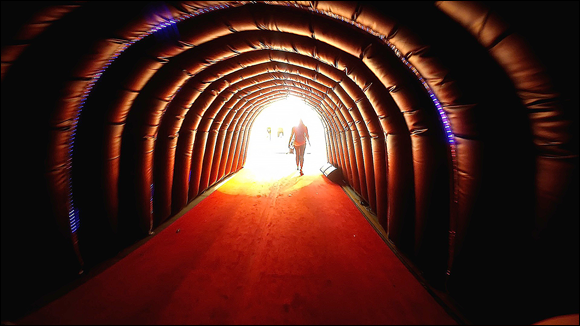
FIGURE 2-9: A helmet mount lets you capture forward-facing footage.
Chest harnesses, or the Chesty!
Sometimes when you’re in the middle of the action, it’s nice to hold the GoPro near and dear to your heart, literally. The Chesty lets you wear the camera on your chest. Basically, it looks like suspenders with a camera in the middle.
This harness comes in two sizes:
- Chesty M-XXL: This harness makes it easy to capture immersive video and photos, as shown in Figure 2-10. One benefit of using this type of mount is that you can include more of your body in the frame. It’s perfect for immersing yourself in your favorite activities, such as mountain biking, motocross, skiing, or paddle sports. You’ll capture more of your arms, knees, and maybe face (when you lean in). It’s fully adjustable to fit a wide range of adult sizes.
- Chesty XS-S: This smaller version of the Chesty is perfect for smaller humans. It lets them have fun with the GoPro when they’re playing on slides and swings, or skateboarding or bicycling.
FIGURE 2-10: Getting a chest-level view walking through the scene.
Fetch (dog harness)
For too many years, our fine-feathered friends have gotten credit for the shot that looks down on the situation. Well, move over bird’s-eye view and make way for the dog’s life view. Think of the Fetch as the canine version of the Chesty, allowing you to record the world as seen from the back of your dog. You can use it on any dog between 20 and 120 pounds. Just make sure the dog is never left alone, and not just because she will claim credit for the footage.
The Strap
The Strap lets you wear the camera on more than your wrist to capture hands-free footage from your arm or wrist. It allows you to capture 360° for unique POV footage or some of the coolest selfies. Ideal for numerous activities and fully adjustable to fit whatever limb works for you, the Strap is one of our most versatile mounts for your GoPro. (See Figure 2-11)

FIGURE 2-11: Wearing the camera on your wrist lets you swoop down on the subject to capture an effective angle.
Putting Your GoPro on a Drone
Flying your camera above some scenic area to make movies or take photographs was once as much of a fantasy as having a pet unicorn or owning a time machine. But alas, it’s true. The drone, or quadcopter as it’s sometimes called, has been on the scene for a few years now, and many have even supported GoPro as a worthy passenger. But GoPro has taken it further, entering the fray with Karma, a drone specifically designed for putting your GoPro high in the sky.
It’s all about Karma
GoPro has simplified the idea of flying your HERO from above. More than a drone, this vessel centers around the Karma Stabilizer, which is a stabilization device that attaches to the drone itself, as well as allowing you to hold it by hand, much like a steady cam does in movie production. That means you can capture incredibly steady footage from the air or when held in your hand, despite how much motion is going on around the camera. The Karma works with current GoPro models, including the HERO4 and HERO5 models.
Here’s what comes in the box:
- Karma Drone: Sleeker than other drones on the market, this one is made specifically for GoPro.
- Karma Controller: More than a remote, this video-game style device allows you to control and view the flight of your drone. Want more? The GoPro Passenger App lets you share flight monitoring with friends while you’re flying.
- Karma Grip: Helps you get smooth video whether it’s on the drone or you take it off and hold it by hand and use it as stabilization system on the ground.
- Karma Stabilizer and Harness: The harness holds your GoPro and the stabilizer attaches to the Karma to keep it steady to produce smooth shake-free video.
- Battery and Charger: All-in-one charger provides up to 20 minutes of flight on a one-hour charge.
- Propellers: Sometimes they’re the first victims in an altercation. No worries, six replacements come in the box. And they’re color-coded for easy installation.
- Mounting Ring: Use it to attach Karma Grip to GoPro mounts.
- Case: A durable weather-resistant case that’s perfect for carrying your Karma and all the necessary accessories. You can also fit the Karma drone in Seeker, the GoPro backpack.
Adding Some Other Cool Accessories
Not every accessory is for mounting your GoPro. Some accessories also enhance the camera’s operation. Whether it’s housing the camera with a more appropriate solution, making sure you have enough battery power to capture an event, or needing to see what you’re doing from the camera’s perspective, these accessories can help accomplish that task.
Keeping your GoPro charged
Your GoPro HERO camera offers amazing results while it’s powered up, but unfortunately, the power doesn’t last forever. Battery life is less than two hours, which can pose a problem when you’re out in the field. That’s why it’s a good idea to have an extra battery or a portable charger with you.
Here are a few other accessories that can keep your GoPro powered longer:
- Dual-battery charger: This device lets you charge two batteries at the same time and is USB-compatible. LED indicator lights display the charging status of both batteries.
- Super charger (Wall charger): The wall charger lets you connect your camera via USB directly to an AC outlet for fast charging. You can record while charging, essentially plugging the camera into a continuous power source.
- Portable Power Pack:
- Battery BacPac: For situations that require longer continuous service from the camera, you should consider using the Battery BacPac. This helpful accessory attaches to the back of the camera to extend battery life. Charge it through your computer or a wall charger. The LCD window displays battery level and charging status.
- Auto charger: This device allows you to charge up to two cameras in your car.