Chapter 4
Understanding Effective Camera Techniques
IN THIS CHAPTER
![]() Focusing on the camera’s fundamentals
Focusing on the camera’s fundamentals
![]() Shooting effectively
Shooting effectively
![]() Capturing time-lapse
Capturing time-lapse
![]() Using Continuous and Photo Burst modes
Using Continuous and Photo Burst modes
Its size is the first thing that lets you know making a movie with a GoPro is very different from using any other camera. After all, not many serious cameras resemble an accessory for your niece’s favorite American Girl doll. But don’t judge a book by its cover or a camera by its proportions. This formidable camera holds its own despite its diminutive appearance.
Regardless of your expertise in making movies or taking photographs, getting the most out of your GoPro requires a fresh approach, because GoPro shooting is a novel experience. You have limited control of exposure, focus, and focal length, for example, which makes it important to find the best places to mount the camera and compose the scene effectively.
In this chapter, I show you how to devote your time and energy to making a great GoPro movie.
Nailing GoPro Fundamentals
Proper planning is the key to success with a GoPro. It takes a few extra moments to make sure that the composition, color, and light are all right for the shot, but staying aware of how you capture each scene strengthens the final appearance of the movie. That’s how the pros do things.
Understanding the camera’s limitations
Unlike the camcorder or DSLR (digital single lens reflex camera) you may be comfortable using, the GoPro offers far fewer controls. It handles most of the technical settings automatically, and the focal length is limited to some pretty wide views. Earlier models offered a single, albeit very wide, view. But newer models offer some variations by also providing a narrow and medium angle of view. Basically, it shoots the scene at a higher resolution setting and crops it to fit the frame, so there is no loss of quality. The 2.7K mode provides enough resolution for the medium view; the 4K mode allows you to capture a narrower section.
So, when you’re on a lonely, desolate stretch of highway, a single-pump gas station has all that you need. A GoPro isn’t much different. The camera is simple to operate, leaving the creative stuff up to you. That “creative stuff” includes setting up the camera properly, arranging each shot effectively, and solving each problem that pops up. Every time something changes in the scene or you move the camera, it’s important to make adjustments.
In many ways, not having to focus or set exposure is one of the camera’s greatest assets. Still, you’ll need to find ways to work around (or work with) the following limitations of the GoPro:
- No adjustable aperture setting: The aperture setting determines the amount of light that goes into the lens. GoPro sets it automatically. With another camera, you might adjust the aperture setting to increase or decrease depth of the focus in a scene, but you don’t have that option when you’re working with an ultra-wide-angle lens.
- No adjustable shutter speed: Depending on the subject, lighting, and level of action, adjusting the shutter speed offers a little more control. Slow speeds produce blurred images; higher ones can capture crisp action. Except for the Night Photo mode, GoPro doesn’t allow you to change the shutter speed. But it does offer a wide range of frame rates, which you can adjust to achieve the same effects.
- No manual focus: You don’t have much to focus with a lens that covers a wide angle view up to 170 degrees. Just about anything in the scene is in focus as long as it’s more than a few inches away (see Figure 4-1).
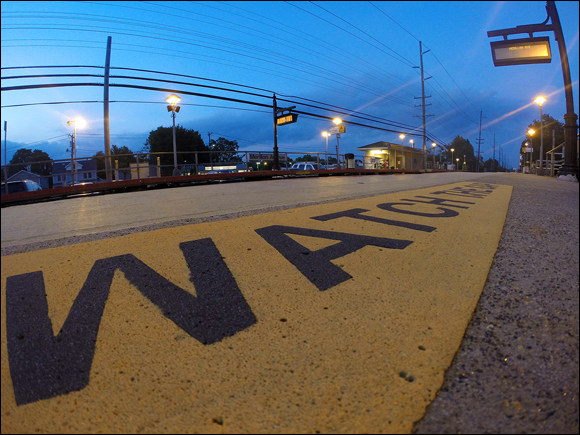
FIGURE 4-1: Though the GoPro is only a few inches from this reflective warning on a train platform, the entire picture is in focus.
Checking your setup
“Measure twice, cut once” works well for carpenters, so why wouldn’t it for moviemakers too. Taking a little extra time to make sure that everything is set right goes a long way. Making sure that a shot is technically perfect means double-checking the monitor, ensuring that the mount is secure, and verifying that the camera is set properly.
Getting exposure just right
It’s a tall order when you need to figure out how to fine-tune exposure with a camera that offers no manual settings, but GoPro moviemaking requires a different way of thinking. You can still control image quality, but the process is different from changing the aperture or lowering the shutter speed.
Here are some pointers:
- Monitor the scene with the Capture app. Because most of the time you will be nowhere near your GoPro, it’s necessary to monitor the scene so you can compose it properly and check the exposure. You probably already spend a lot of time checking your smartphone, so why not use it to check each shot on your GoPro, too? (I cover the app in detail in Chapter 5.)
- Use exposure compensation. Exposure compensation is the next-best thing to setting exposure manually. This feature (activated when you turn on Protune; see Chapter 3) lets you increase or decrease the automatic exposure setting a few steps.
- Set your ISO manually. Depending on the situation, you can alter the camera’s ISO setting to capture bright or dimly lit scenes properly. A bright daylight scene does well when you set the camera at ISO 400, for example; for a low-light situation such as a night scene or a dark club, try using ISO 6400 to increase sensor sensitivity. As with exposure compensation, you must enable Protune to change ISO settings manually.
Maintaining accurate color (with Protune)
The GoPro normally reproduces a scene with punchy, saturated color. That setting works well for many situations, but on some occasions, you want to fine-tune color or take a more stylized approach. Maybe you want to use color temperature to convey a feeling in the scene. A warmly lit scene may evoke coziness, whereas a cool blue rendering evokes distance and isolation or tells the viewer, “Hey, it’s pretty cold here.”
When Protune is turned on, you can navigate through the Capture app to the Color setting to adjust the color profile of your video footage. Here are the settings:
- GoPro Color: The default color setting, providing user with the color profile they know and love.
- Flat: Provides a neutral color profile that captures more shadows and highlights. Uncorrected, this setting doesn’t look very appealing, as seen in Figure 4-2, but it provides the most flexibility when it comes to postproduction. Figure 4-3 shows corrected color.
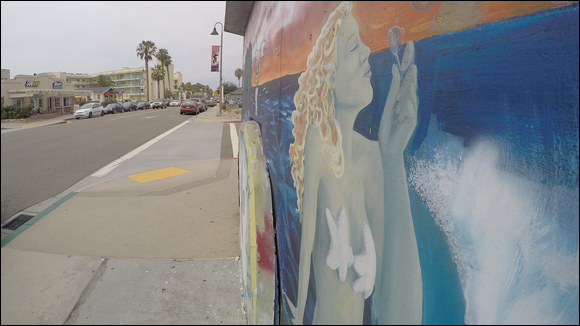
FIGURE 4-2: The color of this mural is dull.
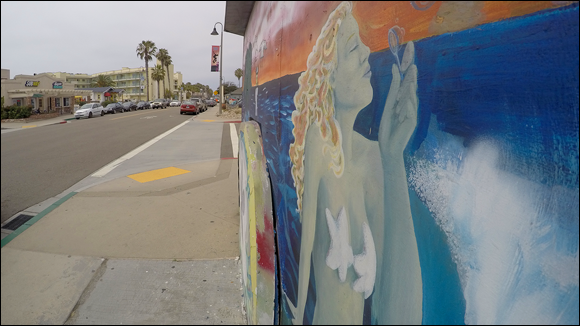
FIGURE 4-3: After a tweak, this image looks much better.
Keeping the camera steady
Although technical settings contribute to the success of each shot, none of them matters much if you can’t keep the camera steady. Camera stability is an important part of the equation, like following your grandmother’s recipe for reindeer cookies.
Make sure that the camera remains steady throughout your shots. GoPro offers more mounting accessories than an equestrian boutique (see Chapter 2), so choose the right mount for the job to make sure that the camera is secure. Also, check that everything is tightened properly. If you mount a GoPro on your skateboard, and the thumbscrew on the mount is loose, the resulting footage will show the camera slipping.
 At one point or another, you may consider holding the camera in one hand and your smartphone (running the Capture app) in the other. Don’t even think about hitting the wet stuff with your GoPro with smartphone in tow. It’s like going out with Superman and finding that bullets don’t bounce off your chest.
Shooting Your Movie
The success of your movie depends heavily on how effectively you capture each scene, and part of that process involves shooting enough variations of each scene. Having several angles and perspectives to choose among helps you alter the movie’s visual rhythm and give it a nice flow (see Figure 4-4).

FIGURE 4-4: Unique angles help make your movie more interesting.
Deviations within shots make for powerful editing and help you pace the movie. It’s not unusual for a movie to have a 20:1 ratio (or greater) of shots captured to shots used.
But not being stingy about shooting variations of each shot doesn’t give you license to overshoot. If you do, you’ll spend too much time going through the footage and second-guessing what you included in the edit and what you put on the storyboard.
Finding the best position for the camera
There’s a certain swagger to GoPro movies that makes them stand out from their more conventional counterparts. Whether it’s a segment of breathtaking action sequences, unique perspectives, or a little of both, there’s something truly distinctive about movies made with this camera. But they’re not impervious to the fundamentals of the best places to put the camera.
That’s because great moviemaking revolves around assembling an array of shots that come together like a visual symphony. If you think of each shot as a note of music, you will realize that sometimes it doesn’t matter how beautiful that note sounds on its own, because it needs other notes for it to sound complete. The same thing happens when you apply a nice mix of shots to your movie.
So, variety isn’t just the spice of life; it also adds flavor to your movie. That means altering the camera-to-subject distance or mixing in different angles keeps the viewer more interested in your movie than, say, using a bunch of eye-level shots. Don’t get me wrong — they’re necessary, but if that’s all you got, your audience will suffer from terminal yawning.
It also means putting the camera in unusual places to show a unique view, such as using a roll bar mount to attach the camera on a shovel, as seen in Figure 4-5.
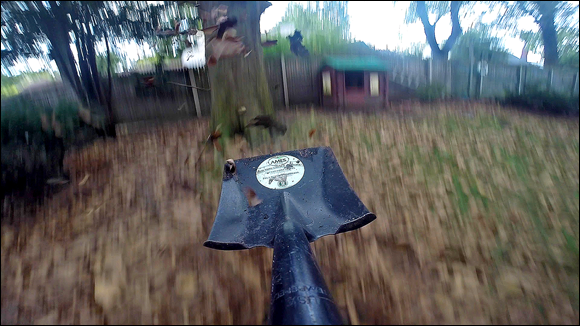
FIGURE 4-5: Attaching the camera to a shovel handle during fall leaf cleanup shows an interesting perspective.
Shooting to edit
Rather than shoot everything that happens in front of the camera, it’s more effective to shoot to edit. Shooting to edit means having an idea about the structure of the movie — or the number of scenes you want to include — and then creating each scene with three or more variations. The simplest form of shooting to edit means getting a wide-angle, normal, and close-up view of each subject.
Shooting to edit is a little more complicated with the GoPro, however, because its fixed lens covers a very wide angle of view, making normal view hard and zoom impossible.
Here are some options for varying your shots:
- Shoot variations of each shot in the scene. At the very least, include variations to subject size and angle. This makes it easier to choose shots in the editing process.
- Change the Field of View. Altering the size of the subject in the frame provides de facto versions of wide, close-up, and normal views.
- Shoot at different angles. Besides shooting at eye level, place the camera high and shoot down on the subject, or mount the camera low and shoot up at the subject.
- Alter the composition. You have a lot of frame to play with, so use it to your advantage by incorporating various compositional devices such as the rule of thirds, subject placement, and framing (see Figure 4-6). For a more thorough list of compositional choices, look at Chapter 6.
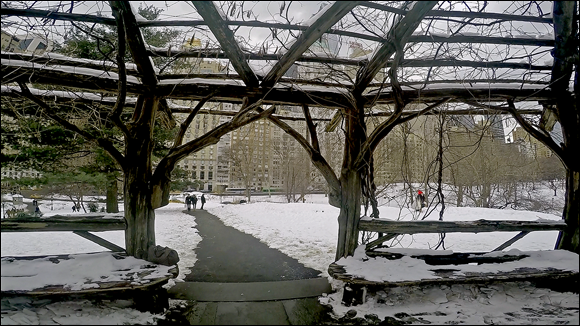
FIGURE 4-6: Framing the subject provides a nice option for your edit.
Alternating shots, GoPro style
GoPro uses a pretty wide focal length to make movies, but that’s not so unusual. Often, feature films are shot with a single lens. Changing the camera-to-subject distance and perspective varies shots. You can also select a less wide setting. (See Chapter 1.) But the big difference is that cinema cameras generally use a lens with a normal perspective. In the 35mm world, that would be the 50mm normal lens. Its perspective lies between being slightly wide and slightly telephoto.
GoPro makes alternating shots a little more challenging because it’s just wide. It’s still possible to get a good variation of shots with your GoPro; you just need to get a bit creative.
Maintaining continuity between shots
Most films are shot out of sequence and put together in postproduction like a giant puzzle. Sometimes when the movie is being assembled, though, a scene may be compromised because something changed from shot to shot. Maybe that can of soda that was on the edge of the counter in one shot is on the other side in another shot. Or maybe the actor’s shirt was buttoned differently in a couple of shots. Isolating all the details makes for logistical nightmares. Many mistakes are so minor that audiences wouldn’t even notice them. But that doesn’t mean you shouldn’t be as careful as possible.
 These pointers can prevent problems in your movie:
- Keep a detailed record of each scene. The proof is in the picture. The better your recollection of a scene, the better your chances of ordering other shots properly.
- Keep the action plausible. Successful editing thrives on the rhythm between shots, so it’s necessary they remain plausible. Don’t show a sequence of someone getting into a car, and then showing it moving in the opposite direction because the light was better.
- Watch the subject’s primary movements. Sometimes it’s hard with this camera, especially when shooting action. Regardless, be sure the subject’s actions remain consistent (See Figure 4-7). For example, if the subject has his right hand raised slightly in the wide shot, then make sure it’s not lowered in the medium shot. These minor breeches can still break the suspension of disbelief in your movie, so be aware of them.
- Try not to break the 180-degree rule. This establishes the screen direction of the action. It’s the same premise as a stage production, where everything happens in front of the audience, or within their peripheral view. Think of it as an imaginary line that the camera must stay behind to maintain continuity. Easier said than done with a GoPro, but many continuity problems occur when the succeeding shot does not maintain the periphery of human vision.
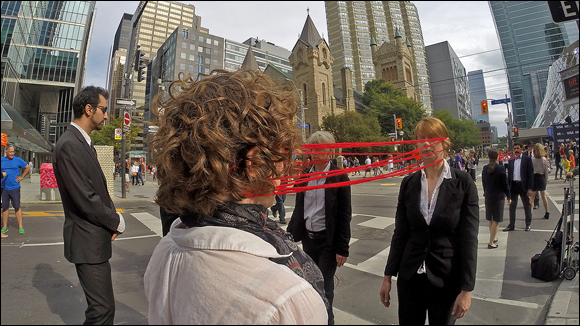
FIGURE 4-7: Video from these street performers was captured from the start of the performance.
When to stop and start the camera
When to stop and start the camera is a practical question. You can’t peek through a viewfinder on most models and press the shutter at the right moment. Nor can you fully trust the Capture app on your smartphone because it has a 2-second delay. So, here’s some advice on when to stop and start:
- Use the Capture app on your smartphone: Whenever possible, this provides the best way to record each scene, even with the 2-second delay. Not only can you look at the shot, but also you don’t have to touch the camera, possibly overturning it. You can control up to 50 cameras. You can also use the GoPro remote.
- Start early: No matter what kind of camera you’re using, it’s always best to pre-roll so that the action begins after you started recording. The same applies for stopping the record. Let it breathe a bit before ending the record.
- Use the Photo Burst mode for stills: You can alter its setting to how many frames it captures as well as the duration. For moving scenes that you don’t want to miss, set the camera on burst and press the Shutter/Select button. You can always discard the outtakes.
Tooling with Time-Lapse Mode
GoPro is an equal-opportunity camera because it allows you to capture still images that are every bit as impressive as its video. The wide-angle lens provides a crisp, sharp image for pictures that move and the ones that stay perfectly still. The only thing more impressive would be finding a way to mix them. Well, you don’t have to look; the time-lapse mode on your GoPro provides the best of both worlds.
Getting started with time-lapse
A time-lapse sequence consists of a bunch of still images that are captured at a constant rate. It’s like animation with photographs instead of computer-drawn pictures. By default, time-lapse mode on a GoPro shoots a frame every 0.5 second, but you can capture the scene at intervals as high as 1 frame every 60 seconds. In Figure 4-8, for example, the GoPro is mounted on car hood, and the duration was set at a 1/2 frame per second. The car was moving at 20 miles per hour, creating the illusion of moving at 300 miles per hour.

FIGURE 4-8: A time-lapse sequence is like animation with photographs instead of computer-drawn pictures.
After you capture the sequence, the numerous images are processed in a video editing program (such as GoPro Studio Edit; see Chapter 11) and brought together in order. Sometimes, a time-lapse sequence consists of thousands of images, so you need an application to put them all together.
Shooting time-lapse footage
After you power up your GoPro, here’s how to record time-lapse footage:
- Press the Power/Mode button to cycle through the available modes.
When you reach Time-Lapse, press the Shutter/Select button to select it.
The icon for Time-Lapse mode is a clock next to a camera.
Change the time interval.
Go to the Settings menu on the Capture app and click Time Lapse to find the desired interval.
The default setting is 0.5 second, but you can capture a frame every 1, 2, 5, 10, 30, or 60 seconds. (For more information, see the nearby sidebar “Calculating duration.”)
Press the Shutter/Select button to start time-lapse capture.
The camera initiates countdown, and the red status light on front of the camera flashes each time a frame is captured.
Press the Shutter/Select button to stop recording.
The red status light flashes three times, and the camera emits three beeps to indicate that time-lapse mode has ended.
Making time-lapse easier
Making time-lapse movies beats a lot of other cool ways to tell a story, but it can be nerve-wracking, too. For one thing, it’s a huge time investment. Also, if a glitch occurs, you lose the sequence but gain a few thousand images — not really an equal trade. For that reason, it’s important not only to set up the camera properly for time-lapse recording, but to also take a sensible approach to it.
Here are a few pointers:
- Mount it securely. Whether you opt for a GoPro mount or decide to use a tripod (with the GoPro adapter), be sure that you mount the camera securely. You don’t want to introduce motion where it shouldn’t exist.
- Take your time. Plan the shot, and make sure that the subject is properly framed (see Chapter 6). Be on the lookout for elements that can detract from the sequence, such as a bright light or an extraneous object.
- Understand that a time-lapse sequence is a sequence. Time-lapse recording depends on activity in the frame. Sometimes, that activity is going to be fantastic. At other times, you’ll have unpredictable motion in the scene or pedestrians getting too close to the camera, and maybe you’ll even catch yourself checking the camera. These moments pose little threat, if any, because they’re fleeting and won’t be noticed or can be deleted in postproduction (see Part 3).
- Use a large, fast memory card. The card you select should be like an NFL wide receiver: big, strong, and fast. Because time-lapse sequences have the potential to capture a lot of frames at a high resolution, you want a card that has enough capacity to hold them all and enough speed to perform smoothly. Few things are worse than missing key action because you filled the card or the card wasn’t fast enough to keep up. A 32MB Class 10 card is ideal (see Chapter 2).
- Have a fully charged battery. GoPro batteries are notoriously short-lived — battery life is around 2 hours — so it’s entirely possible for your camera’s battery to drain before the time-lapse sequence ends. Always use a freshly charged battery, and check on the camera often.
- Hurry up and wait. The name of this process alone — time-lapse — should tip you off that it’s quite lengthy. You won’t have to do much except wait. You can get some other things done and even walk away from the scene for a while if you’ll be nearby.
Using Other Photo Modes
Besides banging out the occasional still frame and capturing a time-lapse sequence, your GoPro offers more options for capturing still images. You’ll notice them when you’re scrolling capture modes.
Here are a couple of other photo modes that you may want to check out:
- Continuous: This mode allows the GoPro to work like a motor drive on a DSLR by capturing 3, 5, or 10 fps for as long as you hold down the Shutter/Select button. Continuous mode is great for capturing action scenes.
Photo Burst: This mode acts something like Continuous mode, but it shoots a burst of frames that you set ahead of time. It’s great when you want to have a choice of frames in an action sequence. Figure 4-9 shows a few of the frames that were in the capture using Photo Burst mode; Figure 4-10 shows the perfect one. In the Photo Burst mode, the burst was set to capture 30 frames in 3 seconds; Figure 4-9 shows five frames.
You can use one of the following settings:
- 3 photos in 1 second
- 5 photos in 1 second
- 10 photos in 1 second
- 10 photos in 2 seconds
- 30 photos in 1 second
- 30 photos in 2 seconds
- 30 photos in 3 seconds

FIGURE 4-9: Photo Burst mode.
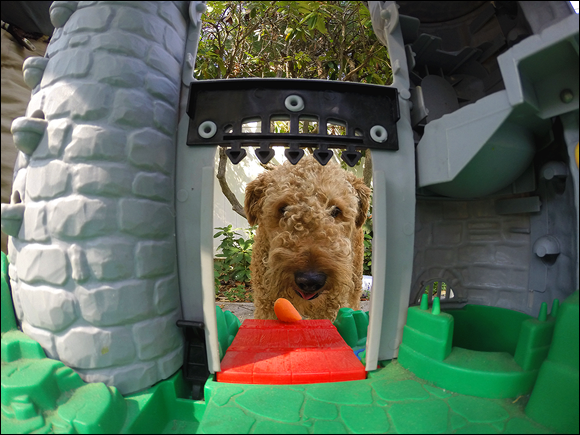
FIGURE 4-10: There’s a monster at the castle door! This frame shows the furry kid noticing the carrot before devouring it.