
Chapter 8
Recording Electric Guitars and Other Electronic Instruments
IN THIS CHAPTER
![]() Direct recording with virtual amplifiers
Direct recording with virtual amplifiers
![]() Recording with a microphone and amplifier
Recording with a microphone and amplifier
![]() Customizing your guitar tracks’ sound
Customizing your guitar tracks’ sound
In Chapters 6 and 7, I explain how to record software instruments and vocal and acoustic instrument tracks. In this chapter, I explain how to record another type of instrument: an amplified instrument, most notably an electric guitar.
 Throughout this chapter, I use the electric guitar as an example because that’s the instrument I happen to own and play. However, the electric guitar is just one of many electronic or amplified instruments you might record directly. So, if you play another electronic instrument, such as an electric piano, synthesizer, violin, bass, or whatever, merely substitute the name of your instrument wherever you see the word guitar.
For the most part, electric instrument tracks are the same as vocal and acoustic instrument tracks (discussed in Chapter 7). The big difference is that you can record electronic instruments without a mic by plugging the instrument directly into your Mac (or audio interface) instead of placing a microphone in front of the instrument’s amplifier.
For those who prefer recording the old-school way, I also cover recording guitars and other electronic instruments with a mic in front of their amplifiers.
Finally, I show you how to customize the sound of your electronic instrument track to make it sound even better.
Overview from the Top: Direct or Live Recording
Recording an electronic instrument with GarageBand is easier than with some other recording software because, once again, Apple did the heavy lifting for you. This time Apple has included built-in guitar amplifier and stomp box emulations with presets designed by professional guitarists and recording engineers. By merely choosing a different preset, you can give your guitar a vintage British Invasion sound, the overdriven distortion of Chord Burner, the dulcet tones of Cool Jazz Combo, and other guitar and bass presets too numerous to mention. Just pick a preset and record your masterpiece.
Recording electronic instruments with GarageBand is easy also because GarageBand doesn’t require you use an amplifier. Instead, you plug the instrument into your Mac (or into an audio interface connected to your Mac), and GarageBand emulates the sound of the amplifier and stomp box effects. The result sounds like an amp and stomp boxes. It’s slick.
 Even if you’re not a guitarist, if you have a guitar available — even if it’s a crummy one that sounds like garbage through an amplifier — try some of GarageBand’s guitar presets. I think you’ll be pleasantly surprised.
In the recording industry, plugging an electric guitar (or other electronic instrument) directly into your computer is called direct recording. I recommend direct recording if possible. Unless you have a lot of time to experiment with amplifier and microphone placement, you’ll almost always get better results this way — and it’s faster.
However, I realize that some purists, pros, recording engineers, and producers prefer to capture the unique interplay of guitar and amplifier by recording the guitar and amplifier live, using a microphone or microphones. If you want to record your guitar live, I cover most of what you need to know about setting up and recording with microphones in Chapter 7. Amplifiers are notoriously difficult to record well, so I have a few tips and hints for those of you who insist on recording with an amp and microphone(s).
When I worked in recording studios in the 1970s, the technology wasn’t good enough to record directly. The only way to record electric guitar and bass tracks was with a mic and an amp. Today, amp-modeling and sound-shaping software is so spectacular sounding that many popular artists play through modeled amps on stage and in recording. A few years ago, I played two sets with the Macworld All-Star Band sans amplifier, using GarageBand for all amp and effects sounds, with my Mac connected directly into the house sound system! It sounded great and, as a pleasant side effect, the sound level onstage was lower than usual, which meant we could hear ourselves playing and singing better.
I show you how to use GarageBand to play live without an amplifier in Chapter 20.
My Marshall amp died a few years ago and I didn’t bother to replace it. These days, if I want to play, I just open GarageBand and use one of its fine guitar presets (without recording) instead of an amp and stomp boxes.
Direct Recording with GarageBand’s Virtual Amplifiers
When you record directly, you bypass amplification and plug your instrument directly into your Mac. When you play, the sound comes out of your Mac speakers (or selected monitoring source). You can change your instrument sounds by selecting a different instrument or preset.
Setting up to record
Before you begin, you need two things: your instrument and the appropriate cable or cables to connect it to your Mac or audio interface. (See Chapter 2 if you’re wondering what an audio interface is.)
You can buy an adapter (see Chapter 2) that lets you plug your guitar into the audio in port on your Mac (if it has one) for under $20. It’s worth having an adapter even if you have an audio interface; that way, if you have a problem with the audio interface, you can just plug your guitar into your Mac instead. An adapter is also great for recording your guitar on the road without having to carry additional devices or boxes or cables or power supplies.
With your instrument plugged into your Mac, follow these steps to record your guitar (or other instrument) directly:
 Open GarageBand Preferences by choosing GarageBand ⇒ Preferences or pressing ⌘ + (⌘ +comma). Click the audio/MIDI icon, and then click the Input Device drop-down menu.
-
Click the input that your guitar is plugged into.
In Figure 8-1, I’m choosing my Focusrite Scarlett Solo audio interface (connected to my Mac via USB).
 If your Mac has a built-in microphone, as most Macs do these days, make sure Built-in Microphone is not selected before you proceed. Select either Line In (if your Mac has a Line In port) or your audio interface (if your instrument is plugged into an audio interface). Should you not heed this warning, you'll hear the awful high-pitched howling known as feedback as soon as you monitor any real instrument track.
Now you need to establish whether GarageBand “hears” your instrument.
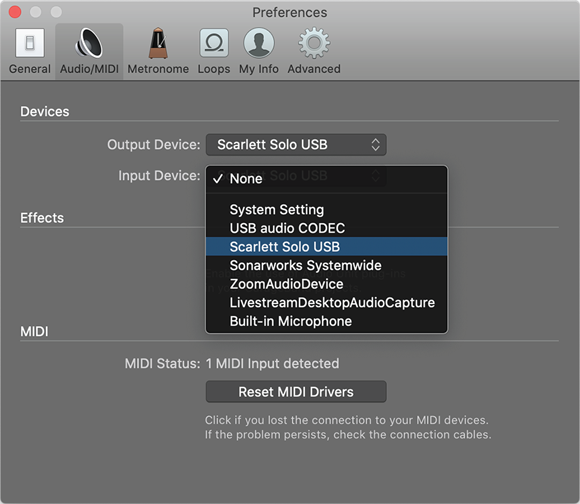
FIGURE 8-1: Choose the input your guitar is plugged into (Scarlett Solo USB here); don’t choose Built-in Microphone or your ears will get a nasty surprise.
- Open a GarageBand project by double-clicking it in Finder. Or create a project by choosing File ⇒ New or pressing ⌘ +N.
- When the Choose a Track Type dialog appears, click the connect a guitar icon and then click Create.
-
Select the new track (if it’s not already selected) and choose an instrument category in the first column of the library, and a subcategory in the second column (if necessary).
If you’re playing a guitar or bass, choose the Electric Guitar and Bass category. If you’re playing an acoustic guitar, choose the Acoustic Guitar category. If you’re playing another type of electronic instrument, choose a category that sounds appropriate.
If you see a category called Legacy, you should definitely explore it because it features presets from earlier versions of GarageBand that are no longer bundled with it but can still be used. -
In the right column, choose a preset for the category.
You just want to ensure that GarageBand can hear what you play, so you can choose any preset for now. Chapter 7 unravels how these categories and presets work.
- Set the input to the channel to which your instrument is connected.
 Click the monitoring button to enable monitoring (so you can hear what you play).
-
Strike a chord or play a riff (or do whatever it is you like to do with your instrument).
Did you hear what you played from your output source (usually your computer speakers)? And did you see activity in the track’s level meter and the master level meters?
If you heard your instrument loud and clear and answered both questions with a resounding “yes,” you’re good to go. Feel free to skip ahead to the “Setting levels” section. If you answered “no” to either question, see the next section, “Troubleshooting your setup.”
Troubleshooting your setup
If you followed the steps in the preceding section and the setup didn’t work quite right, here are some quick fixes (in no particular order):
- Make sure all your cables are connected firmly.
- Make sure the correct devices are selected for input and output in GarageBand’s Preferences. Open GarageBand Preferences, click the audio/MIDI icon, and choose the appropriate input and output devices from the Audio Input and Output menus. See Chapter 3 for more details about preferences.
- Make sure the proper track is selected in the main GarageBand window.
- Make sure the mute icon for the track you’re recording isn’t illuminated. If you mute the track you’re recording, you won’t hear yourself play.
- Make sure the solo icon for another track is not illuminated. If you solo any track but the one you’re recording, you won’t hear yourself play.
- Make sure the volume slider for the track isn’t all the way to the left.
- Make sure the volume control on your guitar is turned up.
- Make sure the audio inputs in System Preferences or on your audio interface cards are turned up.
- Make sure your Mac speakers aren’t muted (if that’s the output you’re using). Choose
 ⇒ System Preferences, click the Sound icon, and choose the Output tab. If the Mute check box contains a check mark, clear it to unmute your Mac.
 - Make sure you can hear other sounds through the selected output device.
- If none of this works, try switching to a different input. If you have an audio interface available, use it. If it’s an audio interface that’s giving you trouble, try using your Mac’s line in port instead.
Making a too soft instrument louder
If you get a signal from the guitar — you can hear it and see activity in its volume meter — but it’s not loud enough, even with the volume slider slid all the way to the right, you can do a few different things.
First, make sure the volume knob on your guitar is cranked up all the way. Temporarily use the same cable to plug into an amp or a headphone amp to check. I know I just mentioned this earlier, in the list of things to check, but I want you to double-check before I suggest spending money to resolve the problem.
If checking the volume didn't do the trick, an audio interface can make your instrument louder without adding noise (hissing, buzzing, crackling, and the like). If your guitar still doesn’t put out a loud enough signal and you’ve turned up the input levels everyplace you can, you need an audio interface with preamps.
My Scarlett Solo USB audio interface (shown in Figure 8-2), for example, has two inputs with preamps and suits my needs perfectly at a reasonable price (around $150).
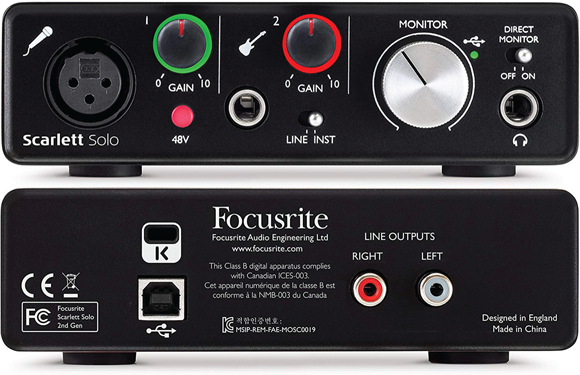
FIGURE 8-2: Scarlett Solo USB (front and back) is an audio interface and preamp, which makes instruments and microphones louder without adding unwanted noise.
In addition to a pair of ¼-inch guitar inputs, the Scarlett Solo also offers an XLR port, which can supply phantom power to microphones. The interface is super quiet (it doesn’t add noise) and boosts the level of my guitars and microphones quite nicely for GarageBand.
An audio interface with preamps can be used with almost any instrument or microphone you use to record — electric guitars and basses, acoustic guitars, microphones with XLR connectors, or other electronic instruments that require additional amplification to provide a sufficient signal to GarageBand.
Most audio interfaces include at least one input with a preamp. Many also offer one or more XLR inputs with phantom power. Read the specifications carefully to make sure your choice has the features you need before you buy, and buy this kind of stuff from a trusted vendor with a reasonable return policy.
I mention a few of my go-to online audio gear vendors in Chapter 26.
Setting levels
Because you’re recording on a real instrument and not a software instrument, you won’t be able to change the recording level after a track is laid down. So if you record the track too hot or too cool, meaning with too much or too little level, that’s the track you’re stuck with.
To ensure that you’re making a useable track, remember to check your levels before you begin recording. You do this by playing a bit of the song you want to record and watching the LEDs next to the track.
What should you look for? Take a gander at Figure 8-4 for the answer. You want to see as much green as possible without much or any yellow or red. An occasional spike near the red, as shown in the third picture in Figure 8-4, is fine as long as there aren’t too many and they don’t last too long.
If both red LEDs light up at once, as shown in the bottom picture in Figure 8-4, your recording will almost certainly be distorted and is likely to be unusable.
For more on checking and adjusting levels before you record, see Chapter 4.
By the way, if Figure 8-3 looks familiar, that’s because it's also in Chapter 7. But it’s so important that I felt obliged to include it here, too, for your convenience.

FIGURE 8-3: The top picture is too cool, the two middle pictures are in the just-right range, and the bottom picture is too hot.
That’s pretty much it. Just remember this mantra when you record guitars (or anything else, for that matter): Lots of green and it’s sweet and clean. Too much red and your track is dead.
Recording the track
There’s really not much to recording a track after GarageBand hears your guitar and you’ve set the levels. Because you’ve already created the track, all that’s left to do now is to turn on the metronome and count-in features if you want them, and then record. (See Chapter 7 for the specific steps.)
Even if you checked the levels before recording, you still need to pay careful attention to the levels while you record, too.
If only one or two brief passages were recorded too hot or cool (as opposed to a track that’s too hot or cool from start to finish), you can try lowering or raising the level of the hotter or cooler passages using the track volume control. (See Chapter 7 for details.) If there’s not too much distortion in the recording (from being too hot) and you have other tracks playing simultaneously, you can often make it good enough to get by. Still, it’s better to record at a proper level in the first place.
Let your ears be your guide. If it sounds good, it’s a keeper. If it doesn’t sound good, re-record it.
Recording Live with an Amplifier and Microphones
As I mention earlier in the chapter, recording an electric guitar (or other electronic instrument) live means that you hook your guitar up to a traditional guitar amp and record the amp (and room sound) with a mic, rather than plugging your guitar directly into your Mac and using GarageBand’s amp simulators.
The key to a good amplified electric guitar recording is patience. You need to experiment with mic positions, amp positions, microphones, rooms, and surfaces before you begin to understand how to achieve just the sound you want. If you think you’re just going to simply plug in a mic, hang it near an amplifier, and get a great guitar sound, you’ve got another think coming ’cause it ain’t that easy. But if you’re not averse to a bit of work, the results can be outstanding, just like (well, almost like) Jimmy Page, Eric Clapton, or Gary Clark Jr.
All the details in Chapter 7 apply to recording an amplified electric guitar with a microphone. Here are additional tricks and tips to help you capture the sound you desire as it leaves the amplifier:
-
Mic placement is key. You need to experiment and find the best location for the mic you’re using. No single right way exists; you have to find the sweet spot for your combination of microphone, guitar, and amp. Start with the mic about an inch from one of the amp’s speaker cones. Move it off-axis, to the left and right. Swivel it at different angles. Move it away from the speaker cabinet in small increments. If your amp has an open back design, try micing the back of the cabinet instead of the front. Move the mic around as before.
Microphone stands are a must in situations like this where precise positioning of the mic is necessary. - Loud isn’t always good. If you’re trying to get an overdriven or distorted guitar sound, set the levels of your amp and guitar as low as you can and still achieve the effect you desire. Playing louder will just muddy the recording (make it sound distorted and buzzy). This effect may be the one you’re looking for, but you’ll usually get a better recording if you play at the lowest level you can.
- A small practice amp is often better than a big old Marshall double stack for home recording. If you have both, try your little amp — you’ll be surprised at how nice it sounds when recorded.
-
Consider room acoustics. If you’re going for that reverb/echo/distortion sound, a lively room with many hard surfaces will add natural echo and reverb. For a more jazz-like passage, you might prefer that the room add as little color as possible, with soft surfaces to absorb reflected sound waves before they leak back into the mic.
If you play too loudly, you’ll end up with echo-and-reverb-laden mud instead of a sweet rock-and-roll guitar sound.
Try this experiment: Record something three times with the amp set to three different levels — quieter than usual, normal, and louder than heck. You’ll find that the louder-than-heck version rarely sounds as good as either of the others. Many engineers like to record guitar amps in the bathroom. All you need is a long mic cord and guitar cable. The effect is interesting, to say the least.If you try the bathroom trick, remember to experiment with mic position. It’s a time-consuming chore but worth it if you want the best sound. I’ve heard more than one recording engineer say that setting up guitar mics (or drum mics) properly often takes longer than the recording session itself.
Conversely, if you’re getting too much room sound in the track, try using pillows or blankets in front of the amp to reduce reflected sound. Move the amp around the room, too, and point it in different directions if you think that will help.
Finally, if you’re trying to record an acoustic guitar, you may have more luck with an electrified acoustic guitar, such as the J.R. Beck 9861EQ acoustic/ electric guitar shown in Figure 8-4. It’s a standard acoustic guitar with three additions: a pickup inside (think little baby microphone), a hole to plug a guitar cable into, and a 4-band equalizer and volume controller. It plays and sounds like an acoustic guitar, but you can plug it into an amplifier, an audio interface, or a Mac and record it without a microphone.
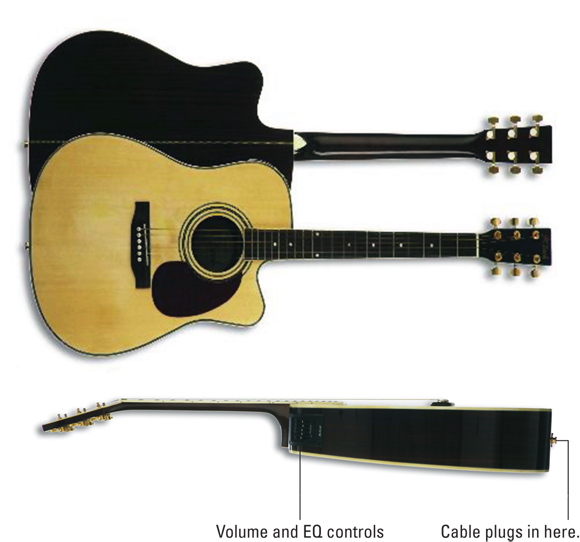
Photo courtesy of JR Beck Guitars (www.JRBeck.com)
FIGURE 8-4: This acoustic guitar can be recorded as though it were an electric guitar!
I can’t tell you how much easier it is to record my 9861 than it is to record my older Yamaha acoustic with a microphone. Also, the sound is much better, with less unwanted noise and other crud. If you plan to record a lot of acoustic guitar tracks, an electric/acoustic will save you hours of setup and microphone placement and adjustment. It will also almost certainly sound better.
J.R. Beck was a small guitar manufacturer that used the Dell model to offer great guitars at amazingly low prices on the web. The 9861 in Figure 8-4, for example, cost me around $200 but plays and sounds better than other electric/acoustics costing much more. Sadly, J.R. Beck went out of business.
Customizing the Sound of Your Guitar Tracks
Now that your guitar track is in the can, you can do many things to it to make it sound different if not better.
Changing presets and amp simulators
The first and easiest task is to choose a different amp model.
Open the library (View ⇒ Show/Hide Library, click the library icon in the toolbar, or press the Y key on your QWERTY keyboard) and select a different preset in the right column.
I changed the amp simulation effect by choosing a preset from one of the seven Electric Guitar and Bass subcategories, as shown in Figure 8-5. I heard an entirely different guitar sound than before.

FIGURE 8-5: Choose one of these seven subcategories and then choose a preset to achieve a new sound on your track.
If you’re looking for an unusual sound, try some of the bass, vocal, drum, or even band instrument presets, which may (or may not) sound great laid on your guitar track. Don’t be afraid to try different presets; you can always undo (⌘ +Z) if you don’t like it.
Editing presets
If you still haven’t found the sound you want among the amp and instrument presets, find the one that’s the closest to the sound you desire and edit it to your specifications. Here’s how:
-
If the Smart controls for your guitar track aren’t displayed, choose View ⇒ Show Smart Controls; click the Smart controls icon in the toolbar; or press the B key on your QWERTY keyboard.
GarageBand has a wide variety of amplifiers, stomp boxes, and plug-in effects. The Smart controls and plug-ins you see will differ for each preset, as shown in Figure 8-6.
Note that each of the three different amps has a unique set of Smart controls. And although the plug-ins look almost the same for all three presets, if you were to open them up, you’d find they have different settings for each preset.
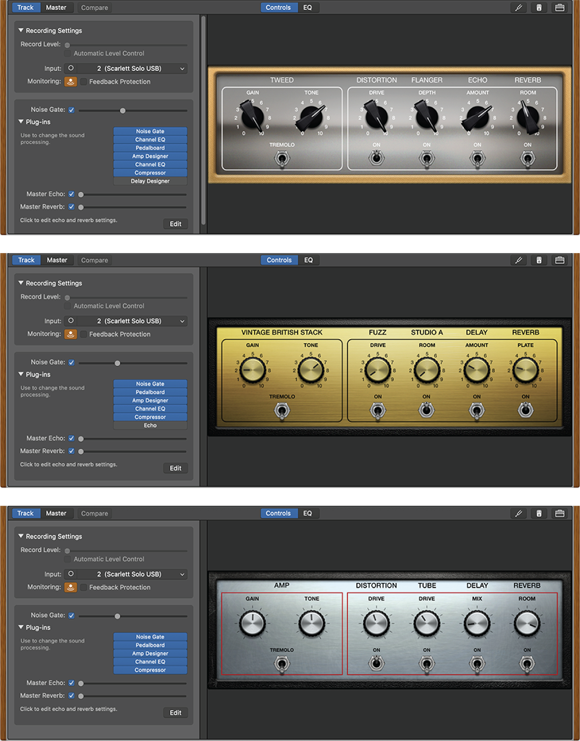
FIGURE 8-6: Smart controls and plug-ins for the Burnin’ Tweed (top), Clean Studio Stack (middle), and Indie Scorcher (bottom) guitar presets.
-
Adjust the Smart control knobs until you like what you hear.
You can play (or record) while you’re adjusting these controls. That way, you can try a bunch of settings before settling on the ones you want to record. -
If you’re still not satisfied with what you hear, click a plug-in and tweak its settings. Repeat (if necessary) for the other plug-ins.
Don’t forget that occasionally turning off a plug-in is more effective (and faster) than trying to tweak it. -
If you like the sound enough to want to reuse it someday, click the Save button at the bottom of the library and save it with a descriptive name.
When you’re asked to name a preset or instrument, choose a name other than the instrument or preset’s original name. If you use the original name when you save, you run the risk of confusing your preset with the Apple-configured version, which is never a good thing.
Making other changes
When you’re satisfied with the sound of your guitar track, here are some more tricks to try:
- Double tracking: Double tracking is an age-old technique to fatten up the sound of a guitar (or voice or other instrument). See Chapter 10 for details.
- Finding additional amp models: Many third-party amp modeling plug-ins are available, but my favorite is AmpliTube (see Figure 8-7). Its assortment of amps, speakers, preamps, stomp box effects, and presets is virtually endless. Even a mediocre guitar sounds better when you play it through an AmpliTube preset.
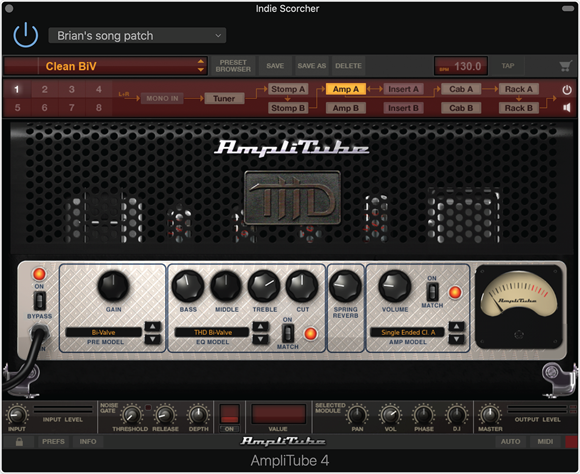
FIGURE 8-7: AmpliTube offers dozens of realistic amp models, plus stomp boxes and myriad presets.