Chapter 5
Using Loops to Make Music
IN THIS CHAPTER
![]() Understanding loop basics
Understanding loop basics
![]() Finding the right loops
Finding the right loops
![]() Knowing what the loop browser can do for you
Knowing what the loop browser can do for you
![]() Adding loops to your song
Adding loops to your song
![]() Tinkering with loops
Tinkering with loops
Even if you can’t play or sing a note, you can have lots of fun using GarageBand’s loops, which are prerecorded bits of music that require absolutely no talent on your part to sound great. In many cases, the fastest and easiest way to get a song started is to use one of the thousands of loops included with GarageBand.
We’re starting our Mac recording journey with loops for a reason. I have no idea whether you’re a talented musician or someone who can’t play a note on any instrument. With loops it doesn’t matter.
In this chapter, you create a song using only the prerecorded loops that come with GarageBand. (You’re free to add an audio track and sing your masterpiece if you like, but that’s optional.)
What Is a Loop, Anyway?
A loop, in its simplest form, is a piece of music that can repeat (loop) seamlessly. Loops are designed this way; a good one can be repeated without missing a beat. When you repeat a loop, it’s called looping. To use a loop, you drag it onto a track (or onto the workspace, where a track is created for it automatically). But I’m getting ahead of myself.
Anyway, the thousands of little pieces of sound that come with GarageBand are called loops. If you repeat a loop seamlessly, the loop is looped. The act of doing so is called looping.
 The term loop, which indicates a repeating segment of music, stemmed from the fact that the first artists doing this (Eno and Fripp come to mind) would cut the magnetic recording tape and paste it back together in a loop that played continuously. The process required multiple tape players and must have been awkward, but that’s how looping got its start.
GarageBand has two kinds of loops:
- Software instrument loops: These are recorded using a MIDI keyboard, drum machine, or another MIDI controller.
- Real instrument loops: These are recorded from an analog (real) source, that is, electric guitars, basses, horns, wind instruments, and of course, vocals.
Where to find more loops
Many loops are samples of music created by other artists. Other loops, including the loops that come with GarageBand, are original work.
You don’t have to confine yourself to the loops that Apple provides with GarageBand. First, you can download additional sounds and loops for free by choosing GarageBand ⇒ Sound Library ⇒ Download All Available Sounds, and then clicking Get in the resulting dialog.
GarageBand includes a passable selection of software instrument sounds and loops by default, but if you download all additional sounds and loops, you’ll have over 2 more gigabytes of sounds and loops!
 I encourage you do that right now — unless your SSD or hard disk is almost full. Even then, I encourage you to archive some files from the almost-full disk to another disk to free up space for the free additional sounds and loops. If you’re going to use GarageBand, you might as well stock it with everything you can that’s free — you never know what’s going to come in handy in a recording session.
Bottom line: GarageBand is great by default, but it’s even greater when you add thousands of additional high-quality sounds and loops without paying a penny.
You can also find thousands of free GarageBand-compatible loops on the Internet. Just search for “GarageBand Free Loops” (include the quotation marks to avoid a lot of unwanted hits) and you’ll find dozens of sites offering free content.
The format for the loops used by GarageBand is known as Apple loops. Other programs, including Apple’s Logic Pro ($199.99) and MainStage ($29.99), also use the Apple loop format. You can find Apple Loops in your Library/Audio folder; they have the .caf (core audio file) file extension.
Spicing up your songs with loops
Entire music genres — dance, electronica, house music, rap, and many others — have made an art form out of using loops. But don’t let these genres limit your perception of how loops are used. In GarageBand, loops don’t have to be looped. In fact, many GarageBand loops sound better as a one-shot accent than in repeated in a loop.
Here are just a few ways you can use loops:
- As a background groove or as the central, driving theme of a song: You can use a drum loop to provide the backbeat to your song or maybe just to keep the beat while you build other tracks with loops, instruments, and vocals.
- As musical punctuation marks: You can make a horn part lurk in the chorus, or a funky guitar riff chug along in the verse. For better or verse (groan), a loop can be the perfect tool for your song, regardless of the sound that you seek (or think you’re seeking).
- To spice up a single chorus, bridge, or verse and make it just a little bit different than the other ones. You might add a shaker or other percussion loop in the last verse and find that the addition was exactly what was missing in the song. Alternately, perhaps you need a bridge to break up a song. With a few loops, you can make a bass line, drum fill, and horn riff that punch up your song to the next level.
That's enough background on loops. Now let’s dig in and start playing with them!
Finding the Right Loop with the Loop Browser
The loop browser is GarageBand’s tool for managing the thousand(s) of loops in your loop library. It’s where you find GarageBand’s built-in loops, downloaded All Available Sounds loops (GarageBand ⇒ Sound Library ⇒ Download All Available Sounds), and loops you’ve picked up from other sources. You use the loop browser to find, preview, and select loops from your collection so you can add them to tracks.
You can make the loop browser appear on the right side of the main window in several ways:
 Click the loop browser icon (shown in the margin) near the upper-right corner of the GarageBand window. Click it again to hide the loop browser.
- Choose View ⇒ Show Loop Browser. Choose View ⇒ Hide Loop to (you guessed it) hide the loop browser.
- Press the 0 key. Press it again to hide the loop browser.
Regardless of which way you make the loop browser appear, when it does, the right side of the GarageBand window transforms into the loop browser.
Viewing loops in button or column view
The loop browser offers two convenient views so that you can always find the right loop without working too hard:
- Button view: This view provides three tabs — Instruments (shown in Figure 5-1), Genres, and Descriptors — each of which displays buttons for filtering your loops.
- Column view: If you’re not the button type, GarageBand also offers column view. In column view, you can browse your loops by genre, instruments, moods, or favorites. Select a category in the leftmost column, a subcategory in the middle column, and (if you want), a sub-sub category in the third column, as shown in Figure 5-2.
In either view, the list below displays only loops that match your choices. So, if you don’t see the loop you want, try selecting different buttons or categories and subcategories.
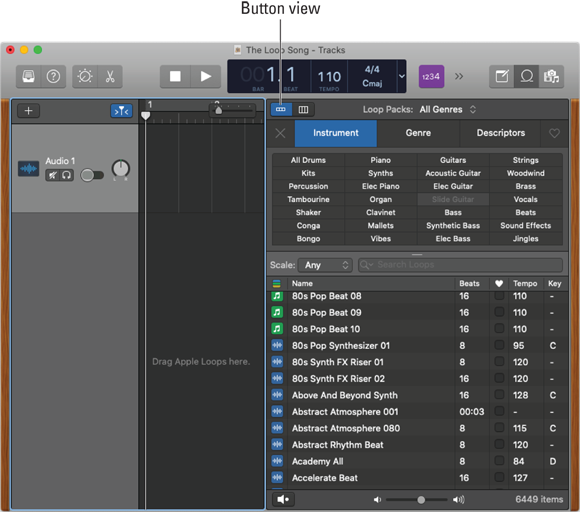
FIGURE 5-1: The loop browser in button view.

FIGURE 5-2: The loop browser in column view.
 To toggle between the two views, click the button view or column view icon in the upper-left corner of the loop browser (labeled in Figures 5-1 and 5-2).
Seeing more instruments
When you open the loop browser in button view, as shown in Figure 5-1, the Instrument tab may display only six or seven rows of buttons, about half the instrument buttons in GarageBand. The other half are inexplicably hidden.
To see more rows of buttons in your loop browser’s Instruments tab, follow these steps:
- Open the loop browser.
- Click the Instrument tab.
-
Hover the cursor over the dividing line between the buttons and the list until you see the resizer cursor.
 When you’re in the correct spot, your cursor will turn into a resizer cursor, as in Figure 5-3 (and in the margin).
FIGURE 5-3: Click the dividing line and drag downward to reveal more instrument buttons.
-
Click and drag downward to see more rows of buttons or upward to see fewer.
In Figure 5-3 I’ve dragged downward to reveal 13 rows of buttons (versus the 7 rows in Figure 5-1).
You can't scroll the top (button) area in the loop browser, so using the resizer is the only way to see all buttons in the Instrument tab.
All buttons on the Genre and Descriptors tabs are displayed, so using the resizer trick on these tabs is kinda pointless.
Searching for a loop you love
Finding the right loop is the hard part, especially when you have thousands to wade through. But, as you’ve just seen, GarageBand has two views to help you. These views conveniently divide GarageBand loops into instruments, genres, and descriptors, as shown in the previous figures.
In other words, Apple has done the heavy lifting for you. All you have to do to find the right loop is click a button or buttons, or an item or items in columns to filter your loops. GarageBand, marvel that it is, does the rest, filtering out loops that won’t sound right in your song, based on the key and tempo that you chose when you started the project and your choices in the loop browser.
Although you probably don’t know the names of loops you like best just yet, over time you’ll come to know some loops by name. When you do, you can bypass the buttons and columns and type your query in the Search Loops field, as I describe shortly.
Until then, here’s how you use GarageBand’s button and column views to find just the right loop for your song.
Searching in button view
The following steps walk you through a loop search in button view:
-
Start out in button view by click the button view icon at the top of the loop browser.
The button view icon is labeled in Figure 5-1.
-
Click the Loop Packs drop-down menu at the top of the loop browser and choose All Genres to ensure that you’re working with all the loops.
Use the resizer cursor as described in the previous section to make sure you are seeing all the buttons.
-
Click a button.
I clicked Beats. Figure 5-4 shows the 1,796 loops in that category.
That’s cool but here’s something even cooler: GarageBand has eliminated choices that don’t fit your selection. I have 6,449 items in my loop collection, so GarageBand is hiding 4,653 loops (6,449 minus 1,796 is 4,653). You have to love that.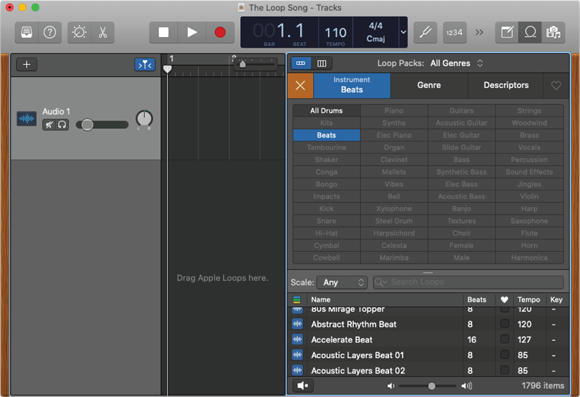
FIGURE 5-4: The loop browser button view, with only the Beats category selected.
-
Now that GarageBand has narrowed your choices to only loops that can work in this context, click another button (or buttons) to narrow your search further.
Clicking the Beats button alone yielded 1,796 loops. Clicking the Urban button in the Genre tab alone yielded 124 loops. But clicking both the Beats and Urban buttons narrowed the field to a more manageable 12 loops, as shown in the lower-right corner of Figure 5-5.

FIGURE 5-5: In this image, I’ve narrowed the selection to only loops that are in both the Beats and Urban categories.
-
If you want to refine your choices, use the Scale pop-up menu below the buttons in the loop browser.
The Scale menu options are Any, Minor, Major, Neither, Good for Both.
- When you’ve narrowed your search enough to be manageable, listen to some of the loops, as described in “Previewing loops,” later in this chapter.
- When you find the appropriate loop or loops, drag them to the location on the workspace labeled Drag Apple Loops Here.
To clear your button selections and start over, click the big X below the button and column view icons to the left of the Instrument tab.
Searching in column view
Moving on to the loop browser’s other view, the column view is a lot like the Finder’s column view, so you should feel right at home using it.
The following steps explain how a search in column view works:
-
Start out in column view by click the column view icon at the top of the loop browser.
The column view icon is labeled in Figure 5-2.
-
In the leftmost column, choose All (to see all loops), Favorites, Genres, Instruments, or Moods.
The appropriate choices become available in the adjacent column to the right.
-
Choose from the choices that appear in the second column.
More choices become available in the third column.
-
Choose one of the items in the third column.
Loops that match that criteria appear in the rightmost column. For example, in Figure 5-6, I chose Genres, Electronic, and then Vinyl and found nine DJ vinyl record scratches.
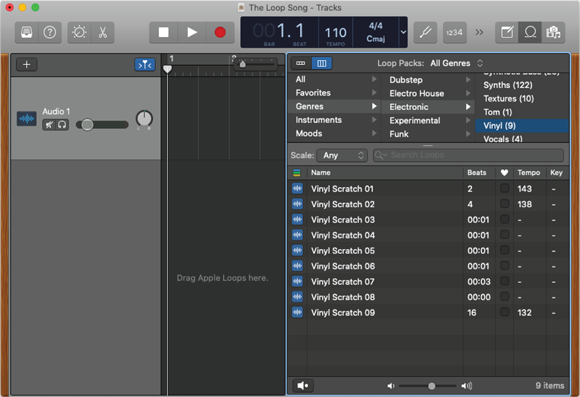
FIGURE 5-6: It won’t make you an honorary Beastie Boy, but this scratch might hit the spot.
Using the search field
Another tool you can use to find loops is the search box. If you type a generic term such as Blues in the Search Loops field at the bottom of the loop browser, you see a list of every loop Apple designated as blues-like.
To see your recent searches, click the magnifying glass icon on the left side of the Search Loops field.
I don’t use the search tool much because I find it unpredictable. Filtering my loop collection with the button or column view works well for me, so they’re my tools of choice when I need to find just the right loop for a project.
Filtering by loop type
Another way to limit your search results is by the type of Apple loop. Click the loop types icon and the choices shown in Figure 5-7 appear. Select the check box or boxes for the types you want. Your choices are All Loops, Audio, MIDI, and Drummer.

FIGURE 5-7: Click the loop types icon to limit your search results by the type of loop.
Previewing loops
After you find a loop that you think may fit the bill, you want to hear it, of course. So, when you click a loop in the list in the loop browser, a speaker icon appears before its name to indicate that the loop is currently playing. (Refer to Figure 5-7 to see the speaker icon.)
Click the speaker icon again to stop playing the loop.
Alternately, you can click the little green speaker icon at the bottom of the loop list to start or stop playing the selected loop.
Either way, you can quickly hear a loop without dragging it into your song, listening to it there, and deleting it if you don’t like it.
To audition many loops quickly, use the up and down arrow keys to navigate the list while a loop is playing. You don’t even have to wait for the current loop to finish; just press the up or down arrow key and the next (or previous) loop will start almost immediately. Use this wonderful technique when you find a loop with a promising name — and too many similarly named variations.
Keeping your favorite loops at the ready
Most people have particular loops that they really like or ones they want to be able to find quickly while they're working on a song. GarageBand has a favorites list built into the loop browser, and it couldn’t be easier to use:
-
Add a loop to your favorites. When you find a loop that you like, simply select the Fav check box at the far right of the loop browser. The loop is added to your favorites list, which you can access through the button or column view in the loop browser.
If you don’t see a Fav column in the loop browser, use the scroll bar below the list of loops or click the green gumdrop at the upper-left corner to fully expand the GarageBand window. -
Remove a loop from your favorites list. Just find the loop and deselect the Fav check box.
To find the loop you want to delete, looking in your Favorites category is usually fastest. However, you can also find the loop by the other search method (buttons, columns, search box).
The favorites list is particularly handy when you find a loop that you like a lot, but the loop isn’t quite right for the current project. Adding it to your favorites list makes that loop easy to find when you’re working on another project where it will work perfectly.
Adding third-party loops to the loop browser
As I mention in the section, “Where to find more loops,” earlier in this chapter, you can find tons of free GarageBand loops on the Internet and in third-party packages. The question is, how do you make those loops appear in the loop browser?
But because GarageBand offers no Import command, you may be at a loss as to how you add Apple loops to your loop library. The process is easy. Simply drag the loop into the loop browser and drop it there, as shown in Figure 5-8. The loop is automatically placed in the appropriate folder (Library/Audio/Apple Loops folder). If the loop is a properly made Apple loop, it will be categorized automatically; if it’s not, it won’t.

FIGURE 5-8: Drag the loop file from the Finder (the gray desktop below the GarageBand window here) and drop it onto the loop browser to add it to your personal loop library.
You can drag multiple files, a folder, or even a disk full of loops into the loop browser. All loops in all subfolders will be added.
Setting a Loop’s Tempo
Each loop is created with its own tempo, which you can see in the Tempo column of the loop browser. (If you don't see the Tempo column, select the Display Original Tempo and Key in Loop Browser check box in the Loops tab of GarageBand's Preferences. See Chapter 4 for details.)
If you can’t see all contents in the Name, Beats, Favorites, Tempo, or Key column, you can resize the column. Just hover the mouse pointer over a column divider (between column names). The resizer cursor appears when you’re hovering in the proper spot. When you see the resizer, click and drag to resize the column.
GarageBand changes the tempo of any loop that you add to your song so that it matches the song’s tempo. Even more intuitively, when you preview a loop in the loop browser, GarageBand plays the loop at the tempo of your song. Those crazy folks at Apple think of (almost) everything!
You can get an entirely different feel from a loop just by changing the tempo or, rather, by using that loop at a different tempo than what you see in the Tempo column. A slow, dirge-like drum loop may turn into something Latin-tinged or jazzy when you double its tempo. Think of the default tempos in the Tempo column as guidelines, and don’t be afraid to experiment!
To change the tempo of your project, click the tempo indicator in the toolbar and drag upward to increase the tempo or downward to decrease it (see Figure 5-9). The number in the tempo indicator updates in real time; drag up or down until you hit the tempo you desire.

FIGURE 5-9: Click the tempo indicator and drag up or down to change the project’s tempo.
Adding Loops to Tracks
You add a loop to your song by dragging it from the loop browser to the workspace. For example, Figure 5-10 shows the very tasty Blue Jazz Organ Riff 01 after I dragged it from the loop browser onto its own track on the workspace.

FIGURE 5-10: Drop a loop into a blank spot on the workspace and GarageBand creates a track to hold it automatically.
I recommend laying down software instrument loops and tracks first, before you begin recording real instrument tracks. That way, if you decide the tempo is too slow or fast, or the pitch is too high or low, you can change software instrument tracks without re-recording them. But if you record real instrument tracks first, and then decide a song is too slow, fast, high, or low, you’ll have to re-record all those real instrument tracks.
Some loops are short and others are long, but most are 4, 8, or 16 beats. Don’t worry much about length now because, as I explain the following sections, loops can be looped (repeated indefinitely).
Dragging and dropping loops
You can drag and drop a loop in a few different ways:
- Place a loop on its own track: Drag the loop into any empty spot on the workspace, where a track of the appropriate type (real or software) is created for the loop automatically.
- Insert a loop into an existing track: Drag the loop onto that track, and GarageBand leaves it wherever you dropped it on the track.
-
Move a loop within or between tracks: Drag the loop to its new destination and release it.
The only restriction is that you can’t drag a blue (audio) loop onto a green (software instrument) track. If you try, GarageBand gently scolds you in words and with the “not allowed” cursor, as shown in Figure 5-11.
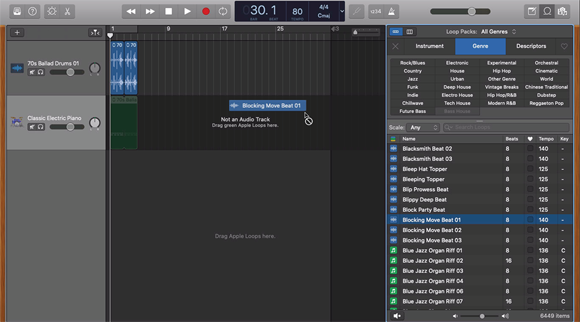
FIGURE 5-11: Drag a blue (audio) loop onto a green (software instrument) track and GarageBand provides a gentle reminder that you can’t do that.
You can drag a green (software instrument) loop onto a blue (audio) track, but when you do, the loop changes from an editable MIDI instrument loop (green) to a not-editable real audio loop (blue).
You discover how to edit software instrument regions and loops in Chapter 9. For now, just tuck that little tidbit away in the back of your mind.
No correct or better way to add loops to your songs exists. If you have a track of the proper type already created, you may want to drag the loop onto it to keep your track count down. If you’re just starting a song, you may want each loop to create a new track. If the loop is being used as punctuation, you may want to drag it onto existing audio and replace that audio with the loop. It just depends what you’re doing and the effect you’re trying to achieve.
 If something is on the track when you drop it, you will replace all or part of that something.
You can drag as many loops onto one track as you like, but only one loop at a time can play in any single track. If you want multiple loops to play at the same time, you must put each loop on its own track.
You can construct an entire song using nothing but loops. For those following along at home, drag a few loops onto the workspace and then click the play icon (or slap the spacebar) to hear your all-loop song.
Undoing and redoing a loop
If you drop a loop onto a track that has been recorded previously or has other loops in it, the loop segment that you’re dragging replaces what you drop it on. In other words, if you drag a loop that’s 4 beats long into the middle of a screaming guitar solo that you finally nailed after 56 attempts, the loop replaces 4 beats of your solo.
That’s why GarageBand has an undo feature — choose Edit ⇒ Undo or press ⌘ +Z. I’m not sure how many actions you can undo GarageBand, but it’s more than a handful, though I hesitate to call it unlimited. And did you notice the Redo command up there on the Edit menu? Choose Edit ⇒ Redo or press ⌘ +Shift+Z to redo something you’ve undone.
You can step forward or backward by repeating either command, which is useful for listening to something the way it sounded before you did whatever you just did, and then the way it sounds after you did it.
As with any Mac program, the Undo and Redo commands are linear, so pay attention lest you undo something you didn’t want to undo.
Extending, shortening, and repeating loops
Not every loop works perfectly as is. When you drag a loop into your song, it’s short — a lot shorter than your song unless you write extremely short songs. And, as you’ve heard several times, loops are designed to repeat (all together now) seamlessly. So, the next thing you need to know is how to loop a loop in a track. I start with that and then look at how you can make a loop longer (or shorter) without affecting that seamlessness. I also explain how to extend and shorten loops.
Before trying this exercise, it will be easier if you zoom in a little or a lot by sliding the zoom controller (labeled in Figure 5-12) to the right. It’s harder to locate the correct area to click in when you’re zoomed out (with the slider to the left).
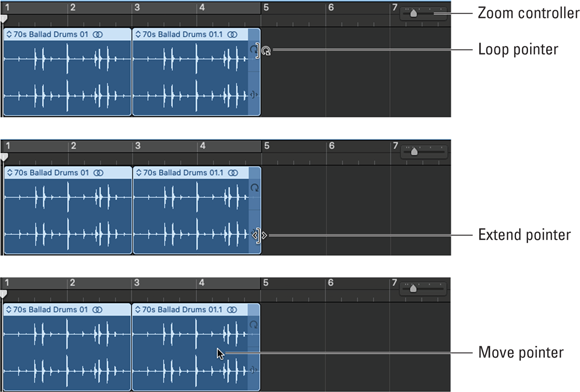
FIGURE 5-12: The loop pointer (top), extend pointer (middle), and move pointer (bottom).
Depending on where you click in a region, you see one of three pointers, or cursors, as shown in Figure 5-12.
When you click any part of the region (either type — software or real) except the right edge, you see a move pointer. The move pointer is the one that you want when you’re moving regions around within a track or moving them to other tracks.
When the pointer is over the right edge of a loop region, it changes into one of two pointers, as follows:
- If you click in the top half of the right edge of a loop region, the loop pointer appears.
- If you click in the bottom half of the left or right edge of a loop region, the extend pointer appears.
As you probably guessed, the loop pointer (the circled arrow) is the control for repeating (looping) a loop; the extend pointer (the straight arrow) is used for extending or shortening the length of a loop.
When you see the appropriate pointer, just click and drag. You’ll know that you are repeating your loops if the outline of the track repeats and you see notches in the region denoting the repetitions (as shown in all three images in Figure 5-12).
If your region is smooth and notch-free (not shown), it means you are extending (or shortening) your loop.
Be careful when you extend, shorten, or repeat loops. Some loops can’t be extended, but all loops can be shortened. Other loops can be extended but may include only empty space when you extend them. It’s also easy to extend, shorten, or repeat your loop to the wrong beat — or even slightly off beat. Use the guide marks in the ruler and the Snap to Grid feature (Edit ⇒ Snap to Grid or ⌘ +G) to help you keep everything lined up and in time. Finally, listen to the results before you do additional work on the project.
You can also edit loops in the same way you edit tracks. To find out more, see Chapter 9.
Editing loops: A preview
You can perform simple edits on any loop by
- Splitting loops into different parts
- Deleting part of a loop
- Moving sections of a loop
- Rearranging the notes in a software instrument loop
But you should also know that you can get creative with loops by using all the techniques you might use on non-loop tracks.
I describe all these techniques in Chapter 9.
Reusing an edited loop in a different song
Sadly, you can’t save edits to a loop in the loop browser, but you can reuse your lovingly edited loop by following these steps:
- Open the song that contains the edited loop you want to reuse.
-
Copy the edited loop region to the clipboard.
Click the loop region and choose Edit ⇒ Copy or press ⌘ +C.
- Open a different (or new) song and create the appropriate type of track for the loop (software or real instrument).
-
Paste the copied loop region onto that track.
Choose Edit ⇒ Paste or press ⌘ +V.
The process is cumbersome but makes sense with GarageBand’s consumer-friendly approach to recording music all in one window. And it also means you’ll never screw up one of the loops that came with the program (because you can’t).
Onward!