Chapter 23
CD Recording, Reproduction, and Distribution
IN THIS CHAPTER
![]() Exporting your GarageBand songs to iTunes
Exporting your GarageBand songs to iTunes
![]() Creating the final CD
Creating the final CD
![]() Distributing your CDs
Distributing your CDs
I’m going to go out on a limb here and assume you’d like to share your marvelous music with other people. Although sending a file via email or iMessage is easy, sometimes it’s more professional to send something physical, such as an audio CD.
When you burn a CD, you don’t have to even think about file formats, compatibility, or compression, because the songs on your audio CD are uncompressed by default. Plus, an audio CD is likely to work in almost any CD player — car, home, or pocket.
By the way, though it might be possible in theory to burn a CD from your iDevice, it’s not a supported feature and isn’t covered in this chapter. If you want to burn a song you created on an iDevice to a CD, share the file to your Mac and burn it there.
The Benefits of Burning CDs
If you haven’t already burned CDs on your Mac, you really should become familiar with the process because it’s useful for more than just GarageBand. But for the purposes of this chapter, I’m assuming that you want your friends to hear these great tunes you're making with GarageBand.
Of course, CDs aren’t the only way to share your songs. You can put songs on the web or send a song file with the Mail or Messages app or AirDrop (see Chapter 22 for details). But because not everyone has a broadband Internet connection to download your music, and not everyone has a player compatible with every file format you might send electronically, handing out CDs to your friends and family can be a good thing indeed.
 One of the things I like to do when I'm getting close to finishing a song is to take it for a ride in my car. In addition to the benefit of having no distractions — such as other people in the house, incoming instant messages and emails, or those bills I have to pay — listening to a song in the car has another benefit, too. We all grew up listening to music in the car, which is effectively a lifetime of training. Put that training to use in listening to your music, too. The advantage is that you’re listening to an uncompressed version of the song, which in theory should sound better than any compressed version.
If you have an iDevice and can play it through your car stereo, listening to songs that way is even better and quicker than burning a disc. Save an uncompressed version if you prefer. Either way, listening to your newly created masterpiece in your car helps you determine if it needs additional mixing or mastering (or sweetening) before you unleash it on the world.
Relax. CD burning on your Mac is a piece of pie. (I don’t like cake.)
Getting Ready to Burn Songs on CDs
Burning a CD of your GarageBand song is fairly straightforward, but it requires a few steps. First, you need to make sure that you have all the hardware. Then, you need to check the cycle area and export your song to the Music app (or iTunes).
Gathering what you need to burn CDs
To start, here’s a list of what you need:
- Completed song
- Music app or iTunes
- Blank CD-R disc (the R stands for recordable)
- Compatible CD burner or Apple SuperDrive
 If you’re making an audio CD, you must burn it to a CD-R disc. You can use any type of burner: CD-R, CD-RW, or SuperDrive, but the disc you burn must be a CD-R disc, and not a CD-RW (rewritable) or DVD-R or DVD-RW disc.
Put another way, if you burn anything other than a CD-R disc, it is unlikely to work properly in an audio CD player.
If your Mac doesn’t have a burner or SuperDrive, you can buy Apple 's external USB SuperDrive for $79. It’s what I’m using and a good value if you like to burn CDs or DVDs.
And that’s all you need — a Mac with a CD burner, a blank CD-R disc, and the Music (or iTunes) app.
Setting the cycle area
Although you generally use the cycle area to loop a song during recording or rehearsal, it serves a different purpose during exporting. When you export, the cycle area defines the portion of the song to be exported. To export the entire song, stretch the cycle area to include all of the song’s regions or disable the cycle area. Either way, the entire song will be exported.
So, before you go near the Share menu, make sure that the cycle area in your GarageBand project is turned off, covers the entire song, or covers the part of the song that you want to export and burn to disc.
If you’ve left the cycle area turned on and it’s shorter than the full length of the song, only that short portion is exported, which may not be what you want (but sometimes it is, as I explain in this section).
When the cycle area is on, it appears in yellow, just below the tempo ruler at the top of the timeline, as shown in Figure 23-1. (Because you can’t see the yellow in a grayscale figure, the yellow area is marked in the figure.)
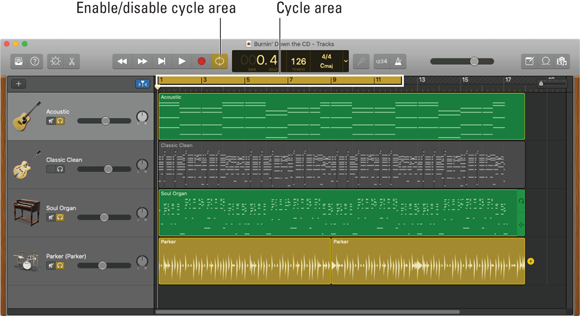
FIGURE 23-1: The cycle area is enabled and covering the first two-thirds of this song.
Using the cycle area is a great way to control how much of your song is exported. Just set the cycle area for the portion of the song that you want, and then export normally. GarageBand exports only the portion of the song that’s defined by the cycle area. The length of the song, number of tracks, and speed of your Mac’s processor determine how long an export will take, so if you’re in a hurry and just need part of a song, the cycle area can help you do the job faster.
Here’s how to tweak the cycle area so that you get the song (or portion of the song) that you want:
 To toggle the cycle area on or off: Click the circular arrow icon to the right of the record icon (and shown in the margin), or press C.
- To move the whole cycle area to the left or right: Click in the middle of the cycle area and drag it left or right.
- To extend or shorten the cycle area: Click the right or left edge of the cycle area, and then drag to extend or shorten it.
After you have the cycle area set up the way that you want, export the song as I describe in the next section.
Burning Songs to CDs
If you merely need to burn one song or part of one song to a CD-R disc, all you need is GarageBand, as I show you in the next section.
However, if you want to burn multiple songs to a disc (with control over the order in which the songs appear), you’ll need to share the songs to the Music app (or iTunes) first, create a playlist, and then burn a disc from that playlist.
You explore burning a single song from GarageBand in the next section, then burning multiple songs in the section after next.
Burning a song to a CD with GarageBand
Burning a song or part of a song to a CD from GarageBand is as easy as pie. (Remember, I don’t like cake.)
After setting up the cycle area (or not), as described earlier in the chapter, choose Share ⇒ Burn Song to CD. The Please Insert Blank Media dialog appears; insert your blank CD-R disc and click OK.
After a few minutes of clicking and whirring, your song will be magically transferred to the disc, which will work in most CD players.
It would behoove you to test the disc in your favorite CD player before bestowing it upon anyone. Although the technology is mature and usually works, sometimes it doesn’t. It’s better to find that out now than to have the producer you sent the disc to inform you it doesn’t work.
You may think testing the disc on your Mac is good enough, but discs you burn will occasionally work on your Mac but not in third-party CD players. Conversely, discs you burn can sometimes work on third-party CD players but won’t play on your Mac. For what it's worth, one of my test discs for this chapter worked in my car and my wife's car but not in my Mac. That’s strange considering the disc was burned on the same SuperDrive that no longer recognizes the disc.
My point is that burning CDs on a Mac usually works properly but can fail occasionally.
One last thing: If two or more discs in a row fail, I suggest trying a different brand of blank CD-R. In my experience, when you buy a spindle of blank CD-R discs (25 or 50) and more than a couple of them fail, the rest of the discs are likely to have a high failure rate. Return them if you can, and try a different brand. I have no direct evidence, but my gut feeling is that the cheapest blank discs — usually a store brand or a brand you’ve never heard of — seem to fail more frequently than those from national brands. Even so, I’ve had spindles of CD-R discs with high failure rates from most (if not all) manufacturers over the years.
Burning songs to a CD with the Music app or iTunes
To burn a CD with more than a single song, you need to first share your song from GarageBand to the Music app (or iTunes).
Step-by-step instructions appear next, but in a nutshell you export the songs from GarageBand to the Music app (or iTunes) as uncompressed files, create a playlist and put your songs in the order you want them to appear on the disc, and then burn the playlist to a CD-R disc.
Now, without further ado, here’s how to create a multi-song CD.
Part I: In GarageBand
Here’s the procedure for creating multi-song CDs in GarageBand, followed by the procedure for doing the same in the Music app (or iTunes):
- If you want to export only part of a song from GarageBand, enable the cycle area and define the part as described earlier in the chapter, and then select the Export Cycle Area Only check box.
-
Choose Share ⇒ Song to Music (or iTunes).
The Share to Music dialog appears, as shown in Figure 23-2.

FIGURE 23-2: The Share to Music dialog ready to share my song to the Music app.
- (Optional) Edit the title, artist, composer, and album and specify a playlist for the burned song.
- In the Quality drop-down menu, select Uncompressed.
-
Click Share.
GarageBand creates a stereo mix of the song, generates an AIFF file from that mix, exports that AIFF file to the Music app (or iTunes), and then opens the Music app (or iTunes) — all without you lifting a finger (after choosing Share ⇒ Song to Music, of course).
And that’s the end of the GarageBand part.
Part II: In the Music app (or iTunes)
If the Music app (or iTunes) didn’t open automatically when you shared the song (which it’s supposed to but occasionally doesn’t), open the Music app (or iTunes) now.
In the Music app (or iTunes), here are the steps to burn multiple songs to a CD-R disc:
- Find the playlist you specified in the Share to Music dialog. If you didn’t specify a playlist, create a playlist (File ⇒ New Playlist or ⌘ +N).
-
(Optional) Right-click the playlist and choose Open in New Window.
You don’t have to perform this step, but it makes it easier to work with the playlist, especially if you have songs in your library you want to include on this playlist.
- If you specified the playlist in the Share to Music dialog, all the songs you want to burn will be in it already. If you didn’t specify a playlist or all the songs don’t appear, locate the other songs in your library and drag them to the playlist, as shown in Figure 23-3.
- Drag the songs up or down in the list to put them in the order you want them to play on the CD.
-
Choose File ⇒ Burn Playlist to Disc.
The Burn Settings dialog appears, as shown in Figure 23-4.
- In the Preferred Speed pop-up menu, choose Maximum Possible.
-
In the Gap Between Songs pop-up menu, choose how much silence you want between songs.
I like a two-second gap but you can choose zero to five seconds here. -
Insert a blank CD-R disc and then click Burn.
iTunes will try to burn the entire playlist. If the content of your playlist exceeds 700MB or 80 minutes of playtime, the Music app (or iTunes) will burn as many of the playlist’s songs as can fit on the disc.

FIGURE 23-3: Drag songs from your library to the playlist if necessary.
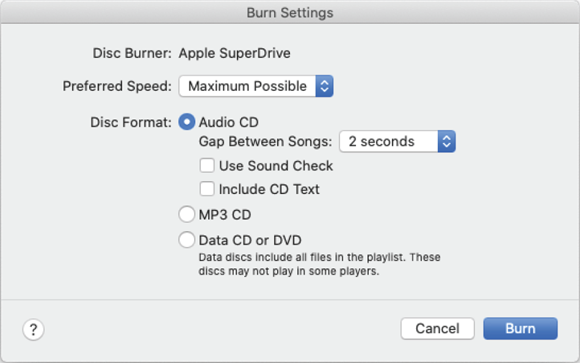
FIGURE 23-4: Configure the burn settings and then click Burn.
The number of tracks, total playing time of the tracks, and total size of the tracks appear at the bottom of the playlist window. As you can at the bottom of the playlist window (Production Demo for Sir Giles Martin) in Figure 23-3, those numbers are 6 songs, 11 minutes, and 224.6 MB.That’s it. After you click that Burn button, you can stick a fork in your CD — it’s as good as done.
Wasn’t that easy?
Making multiple copies of the same CD
At some point, you will want to make multiple copies of the same CD. You can do it two ways. Each method has advantages and disadvantages, depending on your needs.
Burn ’em yourself with a CD duplicator
iTunes allows you to burn the playlist onto as many CDs as you like. Repeat the preceding instructions as many times as necessary.
Obviously, this method works best if you only need a few copies. A diligent person could burn a gross of CDs one at a time (a gross is 12 dozen — 144 discs). If you need larger quantities, consider buying a CD duplicator that connects to your Mac or buying a stand-alone CD duplicator that can burn discs in batches of 25, 100, or more.
These devices automatically produce multiple CDs, one after another. Some print and affix a label to the CD at the same time; others print the label directly onto the CD. Some need to be connected to a Mac to be used; others are stand-alone devices that don’t require a computer.
CD-duplicating equipment used to cost tens or even hundreds of thousands of dollars. Today, CD duplicators can be found for less than $150, an amazing reduction in the barrier to entry for do-it-yourself CD production.
Using one of these devices is far beyond the scope of this book; suffice it to say that many brands and models of CD duplicators are on the market.
I haven’t tested any duplicators, so do your research before you buy. Many reviews are available on the Internet, so the information shouldn’t be too hard to find.
Have someone else do it for you
Consider one other option: If you need a lot of CDs — 100 or more — consider having the work done by a company that specializes in duplicating media. This option will cost more than burning them yourself, but it has the following big benefits:
- The CD will be a real pressed CD as opposed to a burned CD-R. People in the know will be more impressed with the former than the latter. Having a pressed CD can add enormous perceived value to your CD. Think about it: When was the last time you cared about a burned CD, even if it came with a label? CD-R discs have become so common that people tend to treat them with disdain. A pressed CD, on the other hand, is something you buy from a store, and people will treat it accordingly.
- If you send your CDs out to be pressed, you save a ton of time compared to burning them yourself. The question is, how much is your time worth?
As with CD-duplicating equipment, the details of CD manufacturers fall beyond the purview of this book.
Lovely labels for your CDs
If you're trying to make a good impression, make a label for your CD. A variety of label-making kits, including some that work with your printer, and dedicated label makers are available.
For a quick and easy label with a list of tracks, select your playlist in the Music app (or iTunes) and choose File ⇒ Print (or press ⌘ +P) and select CD Jewel Case Insert.
Your playlist will be printed as a jewel case insert like the one shown in Figure 23-5.

FIGURE 23-5: You can print a jewel case insert like this from the Music app (or iTunes).
If you plan to make a lot of copies, you may prefer to buy one of the dedicated CD duplicators mentioned earlier in this chapter. These units can burn and label 25, 50, or more copies of a CD without human intervention.
 If you have someone duplicate your discs, chances are the price you pay per disc includes labeling and jewel cases.
Distributing Your Music
As Steve Jobs is famous for saying, “There is one last thing,” and that one thing is distribution for your CD.
Now if all you care to do is to send one CD to Aunt Edna, distribution isn’t an issue. But if you want the whole world to hear your music, you’re going to want some type of distribution for your music.
Two popular companies that provide distribution services are CD Baby and TuneCore. Read on to take a quick look at both.
CD Baby and TuneCore
CD Baby (https://cdbaby.com) and TuneCore (www.tunecore.com) are a couple of popular independent music distributors. You can have CDs manufactured and shipped for you; you can sell your music online through the Apple, Amazon, and Google stores; you can offer your music to streaming services; you can have your song pressed on vinyl; and much more. Check out both for myriad ways to get your song out to more people.
More distribution ideas
I want to mention one last thing about distribution: You may want to look around your hometown for local record shops that can sell your CD. If you can find one, it’ll probably offer you a consignment deal. So if the record shop doesn’t sell any copies of your CD, you won’t make any money.
Most of the record stores that make such deals are independently owned and operated — not the big names like Best Buy or Fry’s. But don’t let that stop you from pitching your CD to any local store. One never knows, do one? (Apologies to Archie McNally for stealing his phrase.)
Be careful if you do get your CD in a local record store. You may experience a rapid rise in heartbeat the first time you see your CD between The Beastie Boys and The Beatles or between Emerson, Lake, and Palmer and Eminem.