
Chapter 21
Jamming with Others over Wi-Fi
IN THIS CHAPTER
![]() Becoming the leader of a jam
Becoming the leader of a jam
![]() Becoming a member of a jam
Becoming a member of a jam
![]() Playing in a jam session
Playing in a jam session
Did you know you can jam with other GarageBand users over Wi-Fi? Playback and recording is synchronized among all connected devices, which means you can play and record together as a duo or even a whole band. In this chapter, you discover how to set up a jam session, how to control playback and recording of your session, and anything else you might need to know in order to jam with friends.
You should know three things before you get too excited. The first is that the Mac version of GarageBand isn’t invited to this jam session — only iOS and iPadOS users can play. The second is that jam sessions work only with touch instruments and tracks view. In other words, the live loops grid is off-limits for jam sessions (although that would be a hoot). Finally, a jam session can have no more than eight tracks. I talk about this again later in the chapter, but for now, that’s all you need to know.
Let’s dive right in.
Becoming the Bandleader
A jam session’s creator is called the bandleader. I’m going to assume that’s you for the rest of this chapter to avoid confusion.
After the bandleader creates a jam session, other members can join as long as they’re on iDevices connected to the same Wi-Fi network.
To demonstrate, I used my iPad Pro as the bandleader and my iPhone X as the member, as shown in Figure 21-1.
As members join, the song settings you created as bandleader for this project are copied to their devices. These settings include tempo, key, time signature, sections, master effects, custom chords, fade-outs, and count-in.
The bandleader is the only one who can change these settings unless he or she disables the Bandleader Control switch in Jam Session Settings.
To create a jam session as bandleader, open the Jam Session controls by tapping the settings icon in the control bar and then tapping Create Session, which then changes to Stop Session, as shown in Figure 21-1.
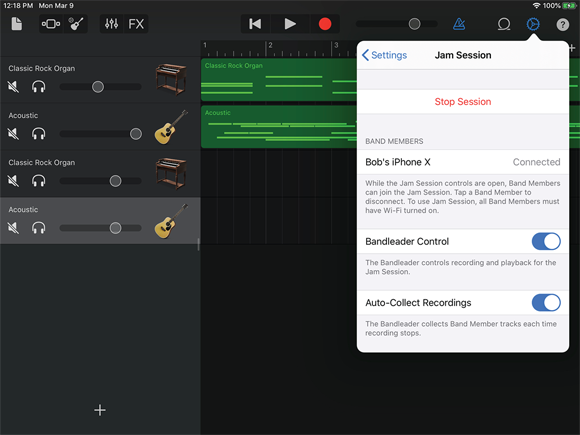
FIGURE 21-1: My iPad Pro is the bandleader and created this jam session.
As the bandleader, you’re responsible for settings such as tempo, key, time signature, and the others mentioned previously, so make any of those changes first.
And if you want to choose custom chords for your jam — which I almost always do — switch to the smart instrument view, tap the settings icon in the control bar, and tap Edit Chords. Then assign the chords you want as described in Chapter 14.
Your session is now ready for members to join.
To start recording a take, the bandleader taps the record icon and the count-in appears on everyone’s screen simultaneously (assuming the bandleader has count-in enabled) before recording begins.
When you (bandleader) tap the stop icon, all takes from members are automatically collected on your device unless Auto-Collect Recordings or Bandleader Control is enabled.
 The Auto-Collect Recordings switch in Jam Session Settings is enabled by default for a reason. If you disable it, members’ recordings will not be automatically copied to your device after each take.
You might want to disable this switch when you simply want to jam with friends. When Auto-Collect Recordings is enabled, all members (and the bandleader) have to wait after each take for the recording to be collected on the bandleader’s device. This process can take anywhere from a few seconds to a few minutes, depending on the length of the take and the number of players. If you don’t care about preserving a recording of every (or any) take, disable Auto-Collect Recordings and save some time after each take.
If you disabled Auto-Collect Recordings and wish you hadn’t, you can still collect members’ recordings. Open Jam Session Settings and tap Collect Recordings. Note that you won’t see Collect Recordings when either the Auto-Collect Recordings or Bandleader Control switch is disabled. Put another way, if both switches are blue, you won’t see a Collect Recordings button.
Finally, you can end a jam session in two ways. Either tap the settings icon in the control bar, tap Jam Session, and then tap Stop Session, or tap the my songs icon in the control bar.
Becoming a Member
To join the session a bandleader has created, members tap the settings icon, tap Jam Session, and then tap the name of the session they want to join (iPad Pro in Figure 21-2).
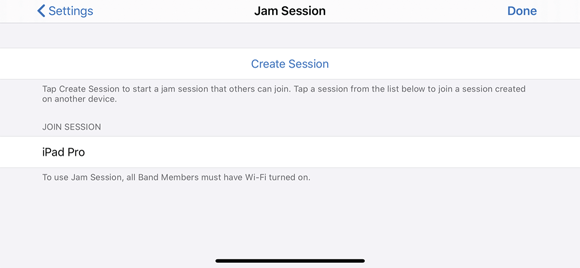
FIGURE 21-2: My iPhone X (member) joining my iPad Pro (bandleader) jam session.
When the bandleader taps the record icon on his or her iPad Pro to start the jam session, the count-in appears on both devices and then the recording begins.
When the bandleader ends the take by tapping the stop icon, member recordings are automatically collected on the bandleader’s device. When the collection process is complete, the bandleader can tap the record icon again to lay down additional tracks (until the bandleader reaches the limit of eight tracks for jam sessions, as discussed in the next section).
A member can leave a jam session voluntarily by tapping the settings icon in the control bar, tapping Jam Session, and then tapping Leave Session, or by tapping the my songs icon in the control bar.
A member can also leave a jam session involuntarily due to network issues.
If you’re disconnected from a jam session involuntarily, you should be able to rejoin the jam session the same way you joined it before.
All remaining jammers receive a message when a member leaves, but as long as two or more remain, they can continue the jam session.
Working with Jam Sessions
As mentioned, you’re limited to eight tracks in a jam session. When a jam session grows to eight tracks (on the bandleader’s device) you can’t collect or auto-collect additional tracks. If this happens, a bandleader has several choices:
- Delete a track or tracks from the jam session on his or her device.
- Ask members to delete a track or tracks from the jam session on their devices.
- Ask members to mute a track or tracks (muted tracks are never collected).
After reducing the track count one of these ways, tap Collect Recordings again.
I discovered a way to increase the number of tracks in a jam session based on an old-time technique used when recording to tape: bouncing tracks. In the old days, if you were in danger of running out of tracks, you would bounce (move) two or more existing tracks onto the last remaining empty track. Then you could erase the two or more tracks you just bounced and reuse them.
So, when you have eight tracks in your jam session, tell the other players to take a break while you do the following:
- Save the song by tapping the my songs icon.
-
On the My Songs screen, press the song and share it with your Mac as a project.
For details on sharing a song as a project, see Chapter 19.
-
Open the project on your Mac.
Your song will have eight tracks, as shown in Figure 21-3. GarageBand asks you to save it and suggests the same name with a numeral after it.
-
Save the song using the name GarageBand suggests.
I shared a jam named My Jam and GarageBand suggested I save it as My Jam1.
 You may feel like renaming the file, but don’t. Keep the name GarageBand suggests or you’ll break the connection that makes the magic in the next step happen.
 -
Share the project with iOS and open it on your iDevice (as detailed in Chapter 19).
When you open the project on your iDevice, you’ll find that GarageBand (for Mac) has magically mixed (bounced) the eight tracks on the Mac into a single track on iOS, as shown in Figure 21-4.
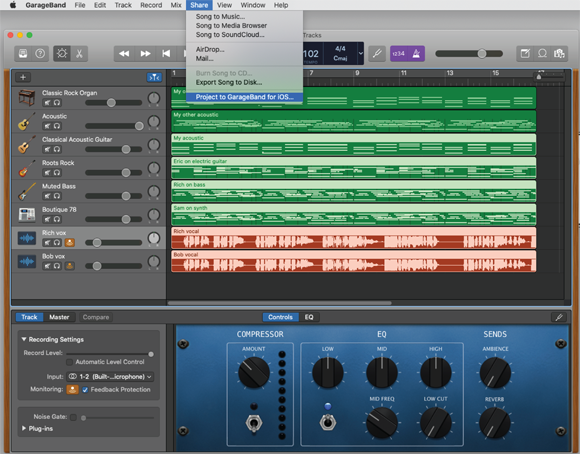
FIGURE 21-3: Sharing my eight-track song with iOS.
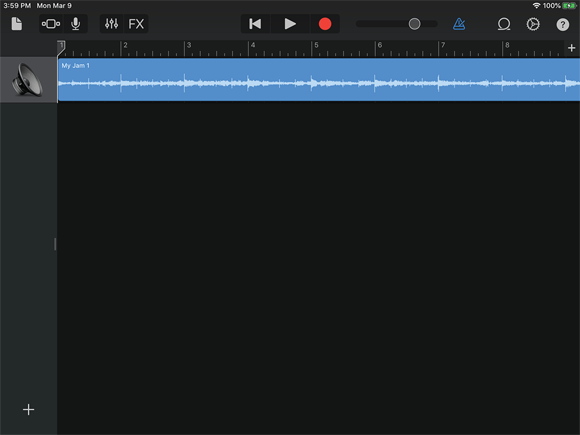
FIGURE 21-4: The shared eight-track song becomes a one-track song when shared to iOS.
This single track contains a mix of the eight tracks from your jam session. You’ll hear all eight of the old tracks (playing from the first track) as you record the next seven tracks!
When you’ve finished recording those seven tracks, follow the same steps as before.
When you reach Step 3, you’ll be surprised to see that the file has 15 tracks: 7 new ones plus 8 original tracks.
If you’re wondering where the 16th track went, GarageBand (Mac) created it from the first 8 tracks before sharing it to the iPad. GarageBand was then smart enough to delete it when the file was reshared to the Mac.
Now, when you share this 15-track song back to your iDevice, its 15 tracks will be mixed down onto 1 track so you can add 7 more tracks before doing the share dance again.
Finally, and this is very important: If your goal to end up with a GarageBand file that contains more than eight tracks, do not rename the file on either device after you’ve shared it to your Mac the first time.
And that’s pretty much all there is to jamming with your friends using iDevices.
Have fun!