
Chapter 15
Recording Vocals and Acoustic Instruments with a Mic
IN THIS CHAPTER
![]() Choosing a microphone
Choosing a microphone
![]() Recording with microphones
Recording with microphones
![]() Improving the sound of recordings
Improving the sound of recordings
This chapter cuts to the heart of audio recording — using a microphone or microphones to record vocals and instruments. As usual, Apple has done much of the heavy lifting already by including several dozen presets that you can use to change the sound of your recorded vocals and acoustic instruments. You, as the recording engineer, don’t have to worry as much about what type of microphone you should use to record which instrument or how much echo to apply to a grand piano, for example. The presets do it for you — and quite nicely I might add.
You’ll be surprised at how good your recordings sound even if you use only your iDevice’s built-in microphone. However, for better-quality recordings, almost any external microphone you happen to have handy will sound better than the built-in mic. Note, too that some mics work better for vocals and instruments than others. You can find details about choosing a mic in Chapter 2. In this chapter, you find out how to set up and position microphones for recording, as well as advice, tips, and hints for making better recordings with said microphones.
The only thing I’ll add here is that if you want to use a third-party microphone with your iDevice, get a microphone that specifically supports iOS/iPadOS. See Chapter 25 for recommendations on where to shop for recording gear.
If you already have a USB microphone, you can probably use an adapter like the Lightning-to-USB camera adapter (see Chapter 14) to connect it to your iDevice. I say “probably” because I tried four USB mics (and two different adapters) and only two worked reliably. I suspect the other two needed more power than an iDevice can provide through its Lightning port, so I ordered a HENKUR USB Camera Adapter with Charging Port for $17 (see Figure 15-1). It has a second Lightning port to connect a power source, and worked properly with all four USB mics.
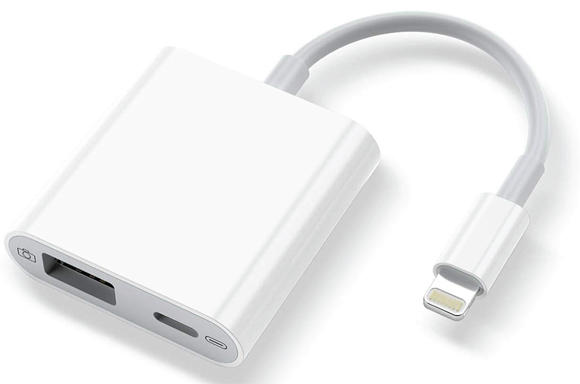
FIGURE 15-1: The HENKUR USB Camera Adapter with Charging Port worked with all four of my USB microphones.
Because your device’s single Lightning port is the only way to connect wired headphones to your iDevice — and you must use headphones while you record — you need a microphone with a headphone jack that supports monitoring so you can hear other tracks (or the metronome) as you sing or play. Without headphones, you’ll encounter dreaded feedback and the sound from the speakers will muddy your recording. If you use the built-in mic, connect headphones to the Lightning port before you record. If you use an external mic, make sure it has a headphone jack so you can hear other tracks or the metronome as you record.
One last thing: It’s possible to use multiple microphones to record to separate tracks on your iDevice, but you need a multichannel audio interface for iOS/iPadOS, such as the Focusrite iTrack Solo — Lightning (two microphones or guitars; around $130) or the RME Babyface Pro FS (up to 12 mics; around $900).
Before you start throwing money at the problem, though, remember that recording with microphones is an art, a science, and a skill and you won’t master everything at once. Many, many things can affect the sound you record, and understanding how these things interact and alter your recordings will take time. So try the gear you already have before spending any money.
You have a lot to cover, so let’s rock.
Getting Ready to Record
I’m going to assume that you are using either the built-in microphone or a third-party mic, are using headphones, and are ready to commence recording. But before you record a single note, you need to attend to a few things if you want to end up with great-sounding tracks.
The two things that you need to master first are microphone placement and level setting. If you nail these two, you’ll always get better results.
At this point, I wouldn’t recommend spending a lot of time trying to deaden the room (see Chapter 2 for details). Rather, I suggest that you place the microphone and record a test track. Now decide whether you have too much room sound coloring the track and adjust accordingly.
I guarantee that you’ll record better-sounding real audio tracks after reading this chapter.
Preparing to record
When your room setup is as good as it’s going to get, it’s time to set up your mic or mics. Perhaps the most important factor in what ends up being recorded is the position of the microphone during recording. Your job is to position the microphone where it sounds the best to your ear. But to do that, you need to make the microphone live so that you can hear the effect of repositioning it.
To set up your mic so that it’s live and then create the track to record on, follow these steps:
-
Connect headphones to your iDevice. Or if you’re using an external mic or audio interface, connect it to your iDevice and then connect your headphones to the audio interface.
An alert appears asking you to turn on monitoring (as shown in Figure 15-2).
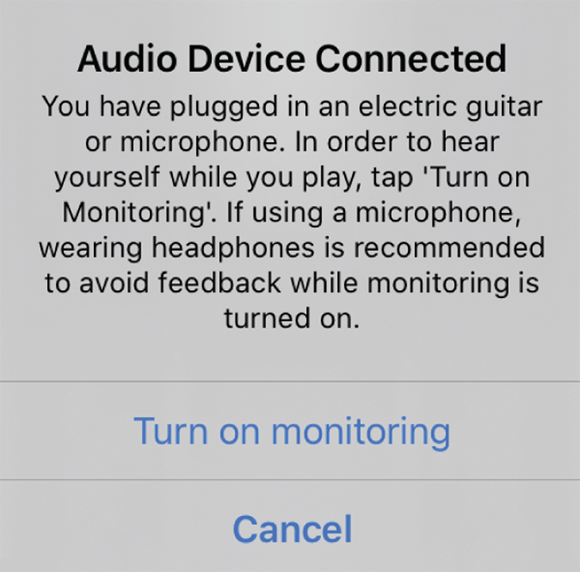
FIGURE 15-2: Turn on monitoring to avoid feedback and hear yourself play.
-
Tap Turn on Monitoring to hear sound from the microphone (and the metronome or other tracks) through your headphones.
If you don’t see the alert when you plug in your external mic, your iDevice didn’t recognize the mic. Disconnect and then reconnect it. If you’re using a USB-to-Lightning adapter, disconnect that and reconnect it.
If your mic (or audio interface) is still not recognized, try a different cable or adapter if you have one.
-
After your mic or audio interface is recognized by your iDevice, test your setup by putting your headphones on and speaking into the mic.
If you hear yourself in the cans, you’re golden. If you don’t hear yourself (and the track’s level-meter LEDs don’t light up), consider the following (in no particular order).
Make sure that
- All your cables are firmly connected.
- The proper track is selected (you can’t record a track unless it’s selected).
- The track you’re recording doesn’t have its mute icon illuminated.
- No other track has its solo icon illuminated.
- The track’s volume slider isn’t all the way to the left.
- The mic is turned on (not all mics have on/off switches).
- The iDevice’s sound is not muted or set too low to hear.
- If your mic or headphones let you adjust the volume, make sure it’s not set too low to hear.
If none of these solve the problem, try a different mic, cable, or adapter.
-
Test your headphone connection by tapping the play icon with the metronome enabled.
If you hear the metronome through anything but your headphones, check your connections and try again. When the only sound you can hear comes out of the headphones, you’re good to go.
 Should you not follow Steps 1 through 4, you will hear awful high-pitched howling, known as feedback, if your speaker and mic are in close proximity.
 -
Tap the my songs icon in the control bar and open an existing GarageBand project or create a new one.
See Chapter 4 for details on opening and creating projects.
-
Do one of the following:
- If you opened an existing project: Tap + at the bottom of the track headers to create a new track, and swipe left or right to find and select Audio Recorder.
- If you created a new project: Swipe left or right to find and select Audio Recorder.
The audio recorder appears on the screen, as shown in Figure 15-3.
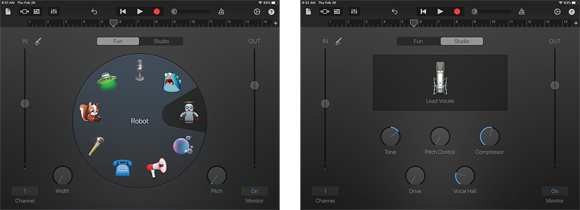
FIGURE 15-3: The audio recorder’s Fun tab (left) and Studio tab (right).
-
Tap the Fun tab and explore the nine icons that represent its presets.
Clockwise from 12 o’clock, the icons are Clean, Monster, Robot, Dreamy, Bullhorn, Telephone, Extreme Tuning, Chipmunk, and Alien. Tap a preset to select it and then sing or talk into the mic to hear its effects.
Although the Fun tab is fun, it probably won’t provide the sound you seek unless you're recording a novelty song. For serious recording, you are better served by the Studio tab.
- Tap the Studio tab so you can look at its presets and controls.
- Tap the current preset (Lead Vocals in Figure 15-3, right) to open the preset picker, as shown in Figure 15-4.
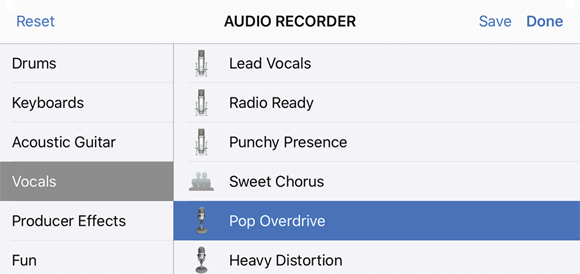
FIGURE 15-4: Choose the appropriate category and preset for the track.
-
Tap a category in the first column.
You want to choose the category that best describes the instrument or vocal part you’re recording. The categories are self-explanatory: Choose Vocal to record vocals; choose Acoustic Guitar to record acoustic guitars; choose Keyboards to record keyboards (with a mic); or choose Drums to record drums.
Two additional categories — Producer Effects and Fun — contain presets that you can use with most instruments and vocals.
-
Tap a preset in the second column.
When you select a category, its presets appear in the second column. Tap the preset that best describes the instrument or vocal sound you desire. In Figure 15-4, I selected the Vocals category and the Pop Overdrive preset.
 To audition presets, play (and pause) your song while you sing or play the instrument you’re recording.
When you’re satisfied with your preset choice, tap Done.
- Tap the tracks icon in the control bar to return to tracks view.
-
Tap the go to beginning icon, make sure the track you want to record is selected, and then click the play icon.
You should hear your project — the tracks recorded previously — and your mic should be live with the selected track ready for recording.
Although you may be tempted to tap the record icon now, there are still a few more things to consider.
Positioning the microphone
Assuming that you can hear the input from the microphone in your headphones (as described in Steps 1 and 2 in the preceding list), it’s time to adjust the mic’s position for optimal recording. Most vocals are recorded using a classic close mic technique, where the microphone is 6 inches or less from the vocalist’s lips. For other sound sources, the optimal distance from the sound to the mic can range from 6 inches to 2 feet or more.
Many mics pick up sound in a cardioid pattern (see Chapter 2), which is the preferred pattern for vocals and most single-instrument recordings. The closer you move a cardioid pattern mic to the sound source, the more bass response you hear, which is known as the proximity effect. You can really hear this effect in your cans (headphones) as you move the sound source and microphone closer together or farther apart.
Because cardioid-pattern mics pick up sound directly in front of them better than from the back or sides, changing the orientation of the mic can dramatically change what you hear. So don’t just move it closer or farther away — change the angle or direction in which the mic is pointed, too.
And by the way, the 6 inches to 2 feet guideline isn’t etched in stone. If your oboe sounds fantastic when the mic is exactly 3.75 feet away, fantastic! You can find the sweet spot for a mic only by experimenting with its placement.
After you’re happy with your mic’s placement, you’re ready to set the levels. See the next section for details about how to do this.
Setting levels
When the mic is positioned and sounds its best to you, fine-tune your recording level for the track. Because you’re recording real audio (and not a software instrument), you can’t change the recording level later. If you record the track too hot (too much level) or too cool (too little level), the track will be distorted or too quiet no matter what you do afterwards.
If you spike into the red zone once or several times during a performance, don’t lose hope. You may be able to use the track volume rubber band to lower the volume during those hot passages. If you don’t have too much distortion in the recording (from being too hot) and with other tracks blended in, your track may be fine.
 It’s always better to record at the right level, though. If you record a track too hot or too cool, you risk losing a great performance or, at best, having to work extra hard in post-production to salvage it.
So pay close attention to track volume levels (and master levels) while you record and also while you mix and master.
To set the levels before you record a take, play or sing a bit of the song that you want to record and watch the levels on the LED display, which you find in the Mixer column for that track. What should you look for to get a proper recording level? Check out Figure 15-5 to find your answers. The top LED meter shows levels that are too cool (quiet/indistinct); the middle pair of meters represent a good range of recording levels; the bottom meter is too hot (loud/distorted).

FIGURE 15-5: The range of good and bad levels.
You want the recording level as green as possible, without much (or any) yellow and little or no red. An occasional spike near the red, as shown in the second image in Figure 15-5, won’t hurt, but don’t let it stay that hot for long. If both red LEDs are lit, like they are in the bottom picture in Figure 15-5, your recording will almost certainly be distorted and may be unusable.
If your tracks are too cool or too hot, first try adding a bit of compression, which I discuss in more detail in the next section. Then play a bit of your song again to see whether that puts it in the green. If that doesn’t work, try adjusting the level by sliding the level fader to the left. Keep tweaking compression and levels until you find the right amount of level that gives you a useable track. If you’re using an audio interface, try increasing its gain (level). You can find more details about adjusting levels in Chapter 4.
Finally, memorize my late, great Uncle Yogi’s mantra for recording levels, and things will be fine:
Lots of green, it’s sweet and clean;
Too much red, your track is dead.
Adding effects
One way of making a track sound different or better is to add effects to it.
 In the past, the rule was to use as few effects as possible during recording. The object was to keep what was on tape as pristine as possible. If you recorded a track with echo and reverb, for example, and later decided that you didn’t want echo and reverb or wanted less of it, you were stuck. The track on tape had the echo and reverb in its DNA. Sometimes it was necessary to add some compression or equalization to a track during recording, but most other effects were added later, giving you the option of using them or not.
With GarageBand, you have no such limitation because it uses nondestructive effects — meaning that you hear the effects in real-time, but they’re not applied to your tracks until you export the project. And that, my friends, is a really good thing.
The upshot is that you no longer have to worry about spoiling a take by adding an effect. If you don’t like the effect, you can remove it without affecting your track. No harm, no foul.
If you’re a veteran of analog recording, this feature probably seems like a miracle. In the old days, effects were usually outboard hardware devices that were filled with strange DSP chips capable of such real-time shenanigans. Today, our Intel processors are more than powerful enough to add effects such as these on the fly.
It’s nice to know that you can add effects at any time. So add ’em or not as you like — you won’t hurt anything. Knock yourself out choosing different presets and adjusting the EQ, reverb, and echo — whatever rocks your boat.
That said, with most effects, you don’t gain a great advantage adding them before recording. But compression is a special case. Even in the old days, sometimes it was best to add a bit of compression to an instrument or voice before committing it to tape. And the same holds true for GarageBand.
When you have a track with a few (but not too many) hot spots, you may be able to bring the loudest and softest parts closer together by adding a bit of compression. I almost always add some compression to my vocals, guitar, bass, and drum tracks. There’s not much I don’t compress at least a small amount. So before you lower the level of the entire track or enable automation and use the track volume control, try adding a small amount of compression, as I describe in a moment.
The small amount is key. Although a little compression can make a track that’s too hot in some parts and too cool in others sound better, too much compression can make it sound artificial and even robotic.
To add just the right amount of compression for a vocal or acoustic instrument track, follow these steps:
- In tracks view, begin playing your song by tapping the play icon.
- Select the track you want to compress by tapping its header.
 Tap the track controls icon in the control bar.
The track controls appear to the left of the track headers.
-
In the Plug-ins & EQ section, move the Compressor slider right or left to increase or decrease, respectively, the amount of compression.
If the slider isn’t providing the results you’re looking for, try fine-tuning the compressor settings as follows.
- Tap the Plug-ins & EQ header to see the effects applied to this track, and then tap the compressor to see its controls, as shown in Figure 15-6.
-
Tap the go to beginning icon and then tap the play icon.
You may want to click the solo icon for the track so you can hear it more clearly.
- Slide the Compression Threshold slider until you like what you hear.
- Repeat with the remaining four sliders until you like what you hear.

FIGURE 15-6: The Compressor’s five sliders help you fine-tune its settings to perfection.
- Tap the Compressor’s power button to disable/enable the compressor, and listen to the track with and without compression.
-
Check your levels again.
For details, see the “Setting levels” section, earlier in this chapter.
You should see less yellow and red in the LED level displays, and you should be able to hear softer passages better than before. A bit of compression can free you from having to “ride the faders” (or “diddle the track volume rubber band controls,” in GarageBand parlance) to compensate for loud and soft portions.
You may have to slide the track’s level slider to the left or right by a small amount to achieve the best level for the track after you’ve added compression or changed your compression settings.
Tweaking the pan to hear vocals better
The pan settings control where a sound is coming from in the stereo field — that is, from the left or right. Although it’s more effective to wait and fine-tune pan settings for each track when you mix and master, a simple tweak to the pan settings may help you hear vocals better in your headphones.
Here’s how it works: Pan a track or more than one track all the way to the left or right and then pan the track that you’re recording all the way to the opposite side. This way, you hear the previously recorded instrument or voice tracks in one ear and the track that you’re currently recording in the other ear. Some musicians and singers find this less confusing than hearing everything in both ears. Try it and see if it works for you. I find it particularly helpful for recording harmony vocals.
One last thing before we leave track settings: If you want to record multiple takes, tap Track Settings at the top of the pane and enable Multi-Take Recording. Note that multi-take recording is an all-or-nothing proposition — if you enable it, it is enabled for all tracks in your project.
Checking for unwanted noise
I always do one last thing before I start recording: I listen carefully one more time for extraneous noise. Is the air conditioner or refrigerator running? (Better catch it before it runs away.) If you live in the South, listen for ceiling fans; if you’re a Northerner, listen for steam pipes or oil heaters clanging; no matter where you live, listen for jet planes flying overhead and semitrailers driving by.
If you hear anything in addition to your voice or instrument in the headphones, your take could be spoiled.
If you’re recording vocals, listen carefully and make sure that no sound from your headphones leaks into the mic when you sing. If it does, reduce the headphone output (the better choice) or back away from the mic a little (which may hurt your recording quality and is less likely to work).
See Chapter 2 for a checklist that can help you prevent background noise from showing up on your tracks.
Multitrack Recording
Recording one track at a time with one microphone can be a drag. If you need to record a band live, record several performers simultaneously, or record live drums, you’ll want to use a separate microphone and track for each player, instrument, or drum.
I'll use drums as an example of multitrack recording, but the techniques described here work just as well for recording an entire band live, three acoustic guitarists and a singer, or almost any recording scenario you can think of with more than one audio source.
Alas, I am not a drummer and don’t even play one on TV, so I asked my friend and colleague Dave Hamilton to help me out. Dave is the drummer for the greatest garage band you never heard, the Macworld All-Star Band; he's also the CEO of BackBeat Media and President of the Mac Observer. He's played and toured with members of the Dave Matthews Band, played in the horn section for Phish, and played in David Letterman’s CBS Late Night Orchestra. He’s the real deal.
Dave is also an underrated writer whose work has appeared in MacAddict and the Mac Observer as well as other Mac publications (but not often enough, if you ask me).
Now, without further ado, here’s Dave’s take (pun intended) on recording drums with GarageBand.
Dave Hamilton on multitrack drum recording
The one place where GarageBand falls short is in recording live drums. GarageBand’s limitation of recording one track at a time (without an expensive multichannel audio interface and enough microphones) leaves many would-be home engineers scratching their respective (drum)heads. Recording drums properly requires a minimum of three microphones (although you can use more if you want), and GarageBand is not built to accept that many mics unless you buy a bunch of additional gear. Don’t fret — I have two solutions, depending on your needs.
One track at a time
One option is to let GarageBand dictate the way you record — that being one track at a time. Because you'll be recording one instrument at a time, make sure you have your song mapped out (either in your head or on paper) from start to finish. Choose your first instrument — the hi-hat, for example — and place your microphone accordingly. Then get your song set up in GarageBand, set your tempo (you’ll want to record using GarageBand’s metronome as a guide), put on a pair of headphones, and fire away. When you have that track the way you want it, move on to the next instrument. Get your bass drum miced the way you want it, put the headphones back on, and go for it. Then do the snare, and so on.
This process is tedious, but the result will be clean and pristine tracks. These tracks can be individually equalized and effected in GarageBand, giving you complete control over the mix. The trade-off is that you may lose some of the feel of having a live drummer playing all the parts at once.
Don’t want to make that trade-off, you say? Well, you have two other choices: Use a mixer to record multiple mics to a single track, essentially recording as above, or use a multichannel audio interface to record multiple tracks at once.
Multiple tracks at once
To record multiple tracks at once, you must purchase a iOS-compatible audio interface with enough XLR inputs to match the number of microphones you want to record simultaneously. The Focusrite Scarlett 18i20 allows eight microphones to be connected and is available for less than $500.
After you've procured your audio interface and connected it to your iDevice, you’re ready to start. Follow these steps to record with a mixer:
-
Position your microphones.
I prefer a minimum of three mics (one on the bass drum and then two overheads to get a stereo image of the sound) for decent results. You can, of course, move on past that and mic the snare (top and bottom!), toms, and individual cymbals if you’re so inclined. Make sure to get a cowbell mic, too.
- Connect the microphones to the microphone inputs on the mixer, and head into GarageBand.
-
Tap the settings icon in the control bar, tap Advanced, and enable Multitrack Recording.
This is the trick that will allow GarageBand to record multiple tracks simultaneously.
-
Add one audio track for each microphone you've plugged in, and select the input to match.
If the bass drum mic is plugged into the first input, choose Input 1 for that track. Then choose Track ⇒ New Track and create the next track, choosing the next input to match.
- Tap the newly added record enable icon (red circle) in each drum track (but not your other tracks). Only flashing tracks will be recorded.
-
Tap the record icon and bash away, playing the drum track naturally!
You may find that you need to adjust the gain levels on the audio interface if one drum is recording too loudly or softly. This process, by its nature, is one of trial and error, so don’t record your masterpiece first. Just test it, adjust, and test again until you have a setup that captures your sounds the way you like.
Whichever option you choose, you end up with a decent drum sound that you can tweak to your heart’s content with GarageBand’s effects.
Happy recording!
To which I say, “Thanks, Dave!”
For what it's worth, Dave sent me an MP3 file of some drumming that he recorded using the three-microphones-and-a-mixer setup described in this section. It sounded just like drums (which is just what it should sound like).
Recording with a MIDI drum controller
You have one more option for recording drums: Use a MIDI drum controller such as the Korg nanoPAD2 Slim-Line USB MIDI Pads to tap out your drum part on 16 velocity-sensitive pads, as shown in Figure 15-7.
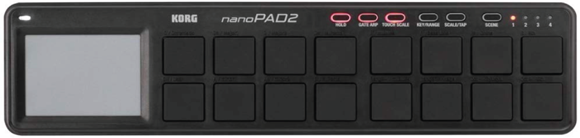
FIGURE 15-7: Korg nanoPAD2 Slim-Line USB MIDI Pads sends touch-sensitive MIDI information to your Mac.
Remember the MIDI keyboards I’ve been talking about throughout the book? Think of the Korg nanoPAD2 as serving the same purpose with a twist: Instead of sending MIDI information when you press a key, the nanoPAD2 sends MIDI information when you tap one of the 16 touch-sensitive pads with your finger.
Any drummer will tell you how hard it is to play drums using a piano-style MIDI keyboard. Although I’m not a drummer, I’ve used nanoPAD2 for many tracks and those tracks sound significantly more realistic than ones I create on a piano-style keyboard.
Priced at around $50, nanoPAD2 is an outstanding value if you need to record drums that sound reasonably realistic on a tight budget.
You can spend more on MIDI drums that look and play like a real drum set, such as the Alesis Drums Nitro Mesh Kit (under $400), shown in Figure 15-8.

FIGURE 15-8: Alesis Drums Nitro Mesh Kit looks and feels like drums, but it’s relatively quiet as it sends its MIDI instructions to your Mac.
Recording the Track
Okay then, now that you have everything ready to record, all that’s left is to actually record. No worries — it’s a snap.
Here’s how:
-
Move the playhead to the point in your song where you want to begin recording, or tap the go to beginning icon to move the playhead to the start of the song.
GarageBand has two features to help you record — a metronome and a count-in.
 If you want to use the metronome, tap the metronome icon in the control bar.
The metronome is a toggle; it’s on when the icon lights up (turns blue), and off when the icon is gray. See Chapter 12 for details on the metronome.
-
If you want to use count-in, tap Settings, tap Metronome and Count-in, and enable Count-in and Visual Count-in.
When count-in is turned on, you get an additional measure counted out before GarageBand starts recording.
-
Tap the record icon (red dot) and the recording begins.
Remember to watch your levels while you record.
-
When you’ve finished recording, tap the play/pause icon or press the spacebar to end the recording.
Wasn’t that simple?
Improving the Sound of Recordings
If you’ve been paying attention and haven’t killed the tracks that you’ve recorded (remember Uncle Yogi’s mantra: Too much red, your track is dead), you can tinker with the sound to your heart’s content.
Remember the nondestructive feature, described earlier in the chapter? You can add and subtract effects without affecting the quality of your original track — until you export it, that is.
So listen to what you’ve recorded now, and pay particular attention to both the sound of the instrument or voice and the performance itself. Now add some effects or change some presets, and then listen some more.
Are some parts too loud or too soft? Add a bit of compression, or use the track volume control to reduce the level. As shown in Figure 15-9, I played a chord too loud for this part of the song. The track volume control let me reduce the level smoothly before the loud chord and increase it smoothly after. See Chapter 17 for details on using the track volume control.

FIGURE 15-9: Changing the level (riding the fader) with the track volume control.
If you hear other problems on a recording, don’t worry yet — small problems can be fixed in several ways without redoing the entire track:
- If you hit a wrong note — or even three or four — read the section in Chapter 17 about fixing flubs. You can find several techniques for editing out mistakes and replacing mistakes with better performances.
- To fatten up the sound of almost any instrument or vocal track, try double-tracking, which is an age-old production technique. GarageBand gives you two ways to do this; each has pros and cons:
-
Way 1: Duplicate the original guitar track (tap the track header and then tap it again and tap Duplicate). Or copy and paste the original guitar region onto a new track. Either way is fast and easy, but unless you’re careful, it will sound mechanical because both tracks will be exactly the same.
One way to soften the effect is to change one of the tracks by adding effects; try a bit of Chorus and the doubled track sound sounds ethereal. Or choose a preset with lots of distortion for one track and choose a cleaner-sounding preset for the other.
- Way 2: Create a new track and record the part a second time, playing or singing along with the original track. You want to repeat your performance as precisely as you can, but because you’re only human, the second recording will have small differences from the original track. Although this technique can take you more time, the differences between the two takes can make this sound better than copying and pasting the same performance.
-